Friday, May 31, 2024

Apricot Tart + Bakewell Tart = Amazing Deliciousness


 Way back when I was a Daring Baker, I made a Bakewell Tart, which has a shortbread crust, jam over that, then a frangipane...an almond filling sort of like a sponge cake. It was delicious.

A couple of times in the last 10 years I've also posted about an apricot tart that I love making. I use either a sweet cookie type dough or a ready made pie crust, either canned or fresh and peeled apricots, and a frangipane that's just a little denser than the Bakewell Tart.

This week I made a tart that was a combination of those two. It had a pie crust shaped into a tart pan and blind baked, a jam layer over that for flavor and to keep the tart bottom from getting soggy (the Bakewell part, along with the frangipane), fresh peeled and pitted apricots from our local farmstand...soo fragrant!...plus the denser frangipane. Except for having too much filling, (which went over the top of the shell and baked on, making it impossible to remove the tart pan sides and making it difficult to serve) it was an amazing combination and will be repeated.

I'm sure that you can make this with canned apricots, and you can use any flavor of jam that you like. If you have almond flour or meal you are half way to a wonderful filling! If you don't have almond flour or meal, use the same weight of almonds and grind them to a fine powder in your food processor, using some of the sugar to buffer the grinding so that you don't end up with a paste of almonds. Be sure to use the rest of the sugar in the filling...it's easy to forget.

This really is a great way to bake with apricots. I enjoy fresh apricots as is, but I think that cooking them really allows their awesome flavor to really shine. Because you get big pieces of the apricot in this tart, the tartness and robust flavor are fully experienced, enhanced by the sweet jam (mixed berry in this case) and the moist but not too sweet almond filling. Sweetie really liked the crust, too. It added just the perfect extra texture to the tart. A winner!


Bakewell Style Apricot Tart
Serves 8

1 pre-made pie crust like Pillsbury ReadyCrust or your favorite sweet tart dough for 1 crust

Unroll the pie crust  disc and place in a 9-inch tart pan with removable bottom. Fold t he excess dough in on itself at the sides, then press the double thickness of dough into the tart pan ridges. Press firmly until the dough reaches the top of the pan sides. If a little goes higher than the sides, remove it and save to patch any holes after initial baking. Keep the excess dough in the fridge.
Prick all over and freeze for at least 30 minutes, but longer is O.K.

Preheat the oven to 375 degrees F. Put the rack in the center of the oven.

Remove tart shell from freezer. Spray a sheet of foil with cooking spray/oil and put, oil side down on the tart, pressing down to mold the foil to the tart shape.

Bake for 25 minutes. Remove the foil carefully and use the back of a spoon to gently press down any puffed crust. If necessary, use the extra dough from the fridge to patch any holes, then bake another few minutes. Let crust cool.

Prepare the frangipane filling, jam and apricots:

3 tablespoons soft butter or margarine
1/4 teaspoon salt
2/3 cup sugar
1 tablespoon + 2 teaspoons all-purpose flour
1/4 teaspoon almond extract
2 large eggs
3/4 cup almond flour or mixed nut flour (about 85 grams)

about 1/2 cup jam, preferably a berry or mixed berry jam

10 apricot halves, peeled and patted dry


Directions:
Preheat the oven to 350°F.

To make the filling:  Beat together the butter, salt, sugar, flour, and almond extract.
Beat in the eggs, then add the almond flour, stirring just to combine.

To assemble the tart: Spread the jam evenly over the cooled crust. Spread about half the frangipane filling over the jam, using an offset spatula to even the top, if necessary.

Place the apricot halves in a pattern on top of the filling, pressing them down gently so the bottom of the fruit is covered. There may not be room for all of the halves...save any left for another use. Add as much of the rest of the filling as will fit in the tart without going over the sides. Place the tart on a pizza pan or other large baking sheet to catch any drips.

Bake the tart in the preheated 350 degree F oven for 45 to 40 minutes, until the top is lightly browned. Filling will puff up around the apricots.  Cool slightly or completely before serving. 

Thursday, May 23, 2024

A Classic Party Cookie


 Have posted this recipe before, but sometimes it's good to remember recipes that have become classics. I first tried this one back in the 1970s. My mother-in-law gave me a subscription to Sunset Magazine for Christmas when I first moved to California. It really helped me get acclimated to the differences between here and the East Coast where I came from. One of the recipes that appealed to me was this one for super-sized cookies that get broken or cut apart for party food. Kids love them, so they became a favorite substitute for a birthday cake...you still have colorful toppings and some confectioners sugar icing...and they are far easier to make than a regular birthday cake or a bunch of cupcakes.

Today I brought one of the two that I baked yesterday to a gathering of women friends and they enjoyed it, too. One of the nice things is that you can break off a small piece or a larger one, depending on how much sweet treat you want, or you can go back for another piece, or both.

This is an easy recipe to make. It's basically a chocolate chip cookie recipe with the addition of some oatmeal.

The typical cookie is two cups of the batter, baked on a foil lined pizza pan - the foil needs to be sprayed with baking spray so that you can easily remove it once baked and cooled.

I shaped my dough into a heart shape for each cookie, sprinkled on mini-M&Ms, baked the cookies, cooled them, than decorated them with confectioner's sugar icing and both colorful sprinkles and yellow-gold sanding sugar. A neighboring family got the other one as a thank you for helping us out.

Sweetie loves raw cookie dough, so he helped out by eating some that didn't get baked.


Big Heart Party Cookies


Preheat oven to 375 degrees F

2 ½ cups all-purpose flour
1 tsp. baking soda
1 tsp. salt
1 cup (2 sticks) butter or margarine, softened
¾ cup granulated sugar
¾ cup brown sugar, light or dark, packed
1 tsp. vanilla extract
2 large eggs
½ cup quick rolled oats
2 cups (12-oz. package) semi-sweet chocolate chips
½ cup chopped nuts (I used pecans)
½ cup dried fruit (I used dark cherries)

For circle or heart shaped cookie:
1 cup M & M candies in appropriate colors (optional but fun)
1 cup confectioners sugar
2 tablespoons hot milk
Assorted cake decorations such as dragees, colored sugar, colored small shapes, chopped nuts, sprinkles

Combine flour, salt and baking soda in a small bowl. Beat butter, granulated sugar, brown sugar and vanilla extract in a large mixing bowl and beat until creamy. Add eggs, one at a time, beating well after each addition. Scrape bowl and beaters. Gradually beat in flour and beat until mixed. Beat in oatmeal. Mixture will be stiff. Stir in chocolate chips and nuts.

Line a 12” pizza pan  or baking sheet with foil. Spray with cooking spray. For a big circle cookie if using the pizza pan, put 2 cups of the dough on the foil. Using floured fingers, shape dough into desired shape, either circle or heart. Smaller hearts on baking sheets use 1 cup dough each. Exaggerate the shape since cookie will spread. You can fit two smaller hearts per pan. Sprinkle M&Ms over dough shape and pat lightly into dough, if using.

Bake one sheet at a time in middle of oven for 10 - 18 minutes (depending on the size of the cookie) until golden brown. Let sit on sheet for 10 minutes, then slide shape on foil onto a cooling rack. Continue to bake the rest of the dough. You can make regular drop cookies with the remainder of the batter if desired.

Once the cookie has cooled, if you like you can decorate for a party! Mix the confectioners sugar and milk and drizzle over the cookie in a random pattern. If you like you can color the icing. While it is still wet, sprinkle cake decorations over as desired. 

Put decorated cookies on party platter and serve. Pieces can be broken off or you can cut it into portions.

Sunday, May 19, 2024

A Spectacular Spring Pie


A dear friend of mine grows rhubarb. I probably should grow it myself since I really enjoy the tart deliciousness of it and it grows well here in Sonoma County. Since I don't, I was OK with asking her yesterday if I could have a stalk of it so that I could make Sweetie a pie. She actually had some already prepped in her freezer and insisted that I take that...so I did.

This morning the rhubarb had thawed, the pastry disc was softened from sitting on the counter overnight, and I prepped all the other ingredients. Morning pie is a rare and wonderful thing around here. While Sweetie enjoyed reading the Sunday Press Democrat paper, I first blind baked the pie crust. While that was in the oven I mixed together the filling. The wonderful part of that is that I was making up the filling as I went along! I started with 8 oz. of ricotta cheese, then added two eggs and some vanilla, 1/2 teaspoon of vanilla and a couple of tablespoons of flour. After whisking that together until smooth, I added 1/4 cup of 1/2 and 1/2 and whisked that in. I now had a cheese based custard, so I folded in the rhubarb and berries. It looked perfect.

Once the blind baked crust cooled a bit and I removed the pie weights (which in my case are lentils that I keep just for blind baking purposes), I added the filling, smoothed it out, then sprinkled sanding sugar around the edges and about 2 inches into the middle of the pie, just for fun and a bit of texture. Amazingly, the filling filled the pie perfectly! I guess years of baking paid off.


Once baked the pie still had to cool a while so that I could slice it. Hot custard tends to slump and I wanted nice slices. The photo at the top is one of the first ones I cut...looks great, doesn't it?

The pie was truly wonderful...not too sweet, soft and tender filling with the nice mixture of fruit in every bite, enhanced by the crisp pastry crust. I hope you make this during the spring when the berries and rhubarb are fresh and at their peak. You can make this with all rhubarb if you like, using 4 cups, but if you do, I would increase the sugar by 1/4 cup. You can also make it with only rhubarb and strawberries, using 2 cups of each. I wouldn't recommend making it with only strawberries because they need the tartness of the rhubarb to really shine, but if all you have is strawberries, add up to 1 tablespoon of lemon zest to the sugar before adding the sugar to the custard. Rub the zest into the sugar until it looks like moist beach sand. That way the oils in the lemons zest will be distributed throughout the filling and that zing will complement the strawberries.


Spring Strawberry-Rhubarb-Raspberry Custard Pie
My own recipe - Serves 6-8

For the pie shell:
1 disc pie dough - I use Pillsbury ReadyCrust, but a 1 crust pie dough rolled into a 12-inch circle from your favorite pie dough recipe is even better
parchment paper
pie weights
9-inch pie pan

For the filling:
8 oz. ricotta cheese - I used Kite Hill non-dairy ricotta, but use what you like. If the ricotta has a lot of extra moisture, drain it for at least 1/2 hour in a colander or fine mesh strainer before using
2 large eggs
2 tablespoons all-purpose flour
1/2 teaspoon vanilla extract
1/4 cup granulated sugar
1/4 cup 1/2 and 1/2 or non-dairy creamer (not milk)
2 cups rhubarb, washed & dried and sliced into 1/2-inch slices
1 1/2 cups fresh strawberries, green tops removed and sliced, or, if large, diced
1/2 cup fresh raspberries, washed & dried
about 2-3 tablespoons sanding sugar (optional)

Prepare the pie dough by lining the pie pan with it, rolling out first if non 12-inches in diameter. Roll under excess dough at the edges and then flute to secure to the edge of the pie plate. Line with parchment and add pie weights. Bake in a preheated 400 degree F oven for 10-12 minutes, until very light golden brown. Cool on a wire rack. Remove parchment and pie weights.

For the filling, while the pie shell bakes, whisk in a large bowl the ricotta, eggs, flour, vanilla and sugar until smooth. Add the 1/2 & 1/2 or creamer and whisk to combine well. Fold in the prepared berries.

When the pie shell has cooled and the oven is preheated to 350 degrees F., place the filling in the pie shell, smooth with a spatula, and, if desired, sprinkle the sanding sugar in a band on top of the filling near the outer edge of the pie.

Bake in the preheated 350 degree F oven for about 45 minutes. Finished pie will have dark golden brown crust and filling will be firm and slightly puffed at the outer edges.

Let cool completely (or cool in the fridge) before cutting. Serve at room temperature or chilled.


Saturday, May 18, 2024

Jedi


When you purposefully set your wedding date for May the 4th...you certainly will get those who reference Star Wars and May the Force Be With You. When your whole immediate family are big fans of the Star Wars universe, there will likely be some references on the Big Day.

Just after dinner, the chef set up a station for making instant ice cream drops using a metal bowl and some sort of coolant that made steam. As the bride and groom stood together waiting for the ice cream mixture, someone brought them light sabers...a red and a green. They had a little fun with them before the ice cream drops were made...and here they are, bride and groom Jedi! 

I really will return to the usual posts, but couldn't resist this one.

Friday, May 17, 2024

Some More About the Wedding


I promised you some stories about the unexpected things that happened on May the 4th, and I have told you about the mix up on the bouquets and about the snow forcing a move inside for the ceremony, but that's not all...


Turns out that the amazing chef for the wedding dinner lives somewhere like Fresno. He had to make his way through all the crazy traffic and delays caused by the spring snow storm...which ended up bringing two feet of snow we were told...so he was well over an hour late. Fortunately the group had meshed by then and the consumption of the signature cocktail I mentioned in an earlier post, plus other adult libations as desired, led to a pretty mellow group. Once the chef arrived he quickly set up a beautiful cheese board and the fun began. Pretty soon there were bacon wrapped dates and pulled pork with a 12 hour mole sauce, sizzling shrimp, and much more...and these were just the appetizers!

Of course the late dinner meant that the whole evening ran late. It was well after 9 pm before the cake was cut. The bride (with a little help by yours truly on baking the cake layers) made her own wedding cake and it was delicious as well as lovely. The flower decorations were done by one of her talented LA friends. (see photo at top of post) The groom claims that he had one bite and the bride may not have actually eaten any of the cake! They did do the traditional cake cutting and, later, the first dance was late enough that the bride had changed into pjs. Good thing that almost all the guests were staying at the lodge. Sweetie and I sort of sledded down to lake level before the cake cutting, to where we were staying, and were glad to get there safely.


Because there were guests, including the groom, who really prefer pie to cake, and because the bride wanted everyone happy, a local bakery was chosen as the place to pick up an assortment of tarts and small pies. Due to a glitch, when Sweetie and I went to pick them up on the morning of the wedding, they had no record of the order! Fortunately, they were very accommodating and filled the whole orderexcept for the chocolate dipped strawberries once we found out what the order should have been. They were really delicious pastries and the bakery was not at fault in any way about the glitch. I highly recommend the Sugar Pine Bakery in South Lake Tahoe if you are in the neighborhood and want high quality and tasty baked goods, plus excellent customer service.

Sugar Pine Bakery, 3564 Lake Tahoe Blvd. G, South Lake Tahoe 96150    530 503-0560


You would think that we had reached our limit of things that could go wrong, wouldn't you? But, no, there was one more. Sunday morning some of the guests headed to the kitchen for some breakfast and found a large bear in the sink. The bear had eaten all the breakfast croissants and was probably thirsty! A quick thinking guest made himself large by waving his hands and shooed the bear out a side door! Guess that was a very memorable final glitch.

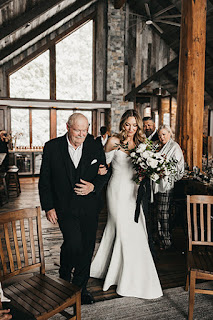
If you have gotten this far in the post you deserve some photos of the bride and groom. I think you'll like this one, and the ones following.


Sweetie looks pretty good escorting his daughter up to her groom, doesn't he?

Thursday, May 09, 2024

Quick Dinner


Sometimes you need or want to fix dinner quickly. I was lucky this evening to have some leftover rotisserie chicken, some ricotta tortellini, some pesto sauce, some pine nuts from the freezer, and a few veggies on hand. Put together they made a delicious meal in a very short time. Sweetie was a very happy guy and said I can make this any time.

The first thing to do is to put a big pot of water on to boil to cook the tortellini. While that's coming to a boil, toast the pine nuts in a large skillet. It only takes a minute or two. Set those aside and chop some onion - I used green onion, but yellow or white works, too. Spray the same skillet you used to cook the pine nuts with a little olive oil, then add the onions and sauté, stirring often. While those are cooking, chop some tomato...I used about a half dozen grape tomatoes. Add those to the onions, stir, and let them begin to sauté, too. Cube into bite size pieces the cooked chicken. (You could also use cooked turkey, cooked Italian sausages.) 

By now the water should be really boiling. Add some salt, if desired, and then the tortellini. Stir them every few minutes to cook the pasta part evenly, but be gentle so the fillings stays inside.

Add the cubed chicken to the onion-tomato mixture and stir to combine. Turn the heat to the lowest setting, cover and let it all heat up.

Get ready to drain the pasta when it is cooked al dente and cook about a cup of frozen peas in the microwave. Check the pasta and when it is ready, drain and put into a large bowl. Add a big scoop of pesto sauce and stir to combine with the pasta. Add the chicken-onion-tomato mixture and the pine nuts and stir gently to combine.

Serve at once with the hot peas on the side.

I know that there are no actual measurements for this recipe. If you feel you need them, make a comment asking for that and I'll try to figure out the amounts I used, O.K?

Monday, May 06, 2024

Signature Cocktail for the Wedding


On May the 4th (yes, the Star Wars day) our daughter K married the love of her life. The wedding took place in South Lake Tahoe and it was memorable for a number of reasons, including that it took place during a late season snow storm...one that was just supposed to be a few snow showers. It was beautiful and the bride and groom not only went with it, moving the ceremony inside instead of on the deck overlooking Lake Tahoe (which couldn't be seen due to the snow but was sort of visible during dinner, see photo below), but going outside into the snow after the ceremony and creating some very beautiful and memorable photos there like the one above. 


As with all events, there were various glitches but overall everything went very well, the guests and family enjoyed their time together, we had an amazing dinner created by a private chef who was delayed by the snow but still made delicious and flavorful food with a bit of showmanship thrown in. I'll update this post later when I have his contact information.


It seems that having a special cocktail to serve to your guests is fairly expected these days, so I wasn't surprised that K& A not only planned one, but put the mixture together themselves. To make the mixer extra special, they added edible glitter. The liquid shimmered and shone with a greenish glow...very pretty. Unfortunately I was suffering from altitude sickness and the cocktails were served downstairs. I was avoiding stairs as much as possible, so no photo...sorry. I do have the sign that allowed guests to serve themselves:


In case you would also like a refreshing cocktail for warmer weather, you can make this pear and elderflower one yourself. It starts with pear flavored vodka and includes elderflower liqueur. They provided coupe glasses and a way to rim the coupe with sugar. Then you add 3 oz. of the mix and top with sparkly wine...prosecco works well but you could also use champagne or cava.

Here's to the happy bride and groom!


As long as we are talking about adult beverages, I want to give kudos to Dickinson Glass of Sebastopol. They have a location in the Barlow, a shopping area just off Hwy. 12 on the east side of the town.

Dickinson Glass not only creates beautiful, heirloom quality hand blown glass pieces, but they give lessons, too. I commissioned a pair of toasting flutes for the happy couple and Michael Dickinson, the artist and craftsman who owns Dickinson Glass, produced awesome glasses that are so lovely they brought tears to my eyes...and stunned our daughter when we presented them to K & A before the wedding. Each is just a tiny bit different in the swirl of glass near where the stem joins the base of the bowl, so you know they are hand made. I highly recommend this company. The packaging was outstanding, too. They will soon be giving classes about 15 minutes north in a remodeled barn, so be sure to check and see if the shop in the Barlow is open before coming. 


Dickinson Glass Studio and Showroom
6770 McKinley St #120,
The Barlow
Sebastopol, CA 95472
707-690-4136