Tuesday, August 23, 2022

Grandad's Apple Cake


My Irish grandfather really loved this apple cake. My Mom would make it anytime that he was coming to visit. Since it uses applesauce it can be made any time of year, but this special version uses freshly made applesauce using the Gravenstein apples growing in our orchard, plus peeled, diced fresh apples...something that isn't in the favorite recipe, but I think grandad would have loved this variation.

This cake is a somewhat rustic tea cake and is moist and flavorful from the apples. I used white whole wheat flour from King Arthur for some additional fiber and goodness. I used golden raisins and walnuts, too, plus cinnamon, cloves and nutmeg. If you are yearning for just a bit of fall flavors as we begin to leave summer, this recipe is perfect for you!

If you are making this with homemade applesauce as I did, don't worry if yours is slightly thicker (as mine was) or thinner than the commercial kind...it will be fine after the cake bakes. I used half the sugar since I prefer my tea cake a bit less sweet and the applesauce adds natural sugars, but I'm leaving the recipe as written and you can adjust the amount of sugar to your own preferences.

I baked this up in four small loaves, plus one six-inch round pan. That way I can enjoy one small loaf with Sweetie, have another for the fire folks last night and still have some for the freezer, ready for tea time with friends after a brief thaw. The recipe has you bake it in a Bundt pan. I've done it that way and it works really well, too.

You can use any kind of apple for this but one with good apple flavor will be the best. I didn't peel the apples in the applesauce, but I did peel the fresh diced ones, but you can peel or not and it will still be a delicious cake.


Applesauce Cake

Makes 1 10" Bundt cake

3 cups flour

1 ½ teaspoon soda

½ teaspoon salt

1 teaspoon cinnamon

½ teaspoon cloves

¼ teaspoon nutmeg

¾ cup shortening

2 cups sugar

3 eggs, beaten lightly

1 ½ cup applesauce

1 cup raisins

1 cup nuts - chopped (walnuts are good)

2 medium apples, peeled, cored, and diced into 1" pieces (optional)


Instructions:
Preheat oven to 350 degrees F.

Sift flour with soda, salt and spices. Set aside.

Cream shortening and add sugar gradually; cream until light. Add beaten eggs and beat to combine.

Add flour mixture alternately with the applesauce, beginning and ending with the flour mixture.

Fold in the raisins and nuts (and diced fresh apples if using). Turn batter into a greased and floured Bundt pan.

Bake in Bundt pan in preheated 350 degree F oven for one hour or until done. Toothpick inserted will come out clean or with only a few crumbs stuck to it.

Cool on a rack 10 minutes, then turn out on a wire rack to cool.


Tuesday, August 16, 2022

Twist Again...with the BBBs


It's the 16th of the month, the traditional posting day for the Bread Baking Babes. This month our Kitchen of the Month is Aparna's My Diverse Kitchen. She has asked us to make twisted coconut buns. We've baked twisted breads before, but these are special. Sweetie was quite taken with them, scarfing down two, one right after the other, as soon as they were cool enough to eat.

The filling brings the coconut flavor forward. I added some freeze-dried raspberry powder that I bought in London in May...first time I've used it...but the coconut flavor outpaced the raspberry flavor quite a bit. It was still a delicious bun.

This dough is delicious and easy to work with. I do have to say that my life lately has not been simple, so the dough sat in the fridge a couple of days before I could bake with it and that may have added some nice flavor. It was easy to work with and I could make strudel with it...very easy to stretch very thin. As a matter of fact, I found it easier to stretch it than roll it with a pin. It is a bit sticky, but that helps keep it stretched out on the work surface. I did make a few changes, including using soy creamer instead of coconut or regular milk, dried potato flakes instead of dried milk, non-dairy margarine instead of butter since I can't do dairy. Not sure if that made it a better dough or not, but it really is a great dough.

I divided my  buns into 8 pieces because the buns made when dividing the dough into six seemed to me to be too large. These were a nice size; about the same as you would find in most bakeries for sweet yeast buns. The weight of each piece of dough was right around 89 grams.

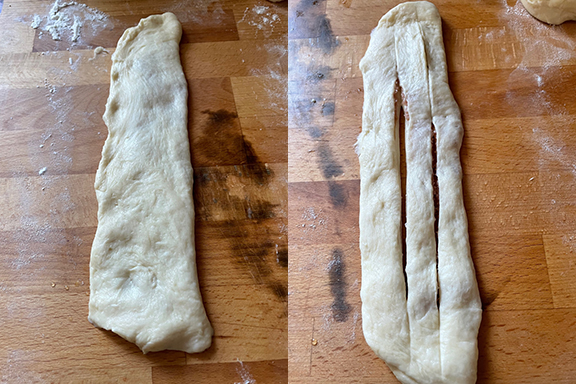
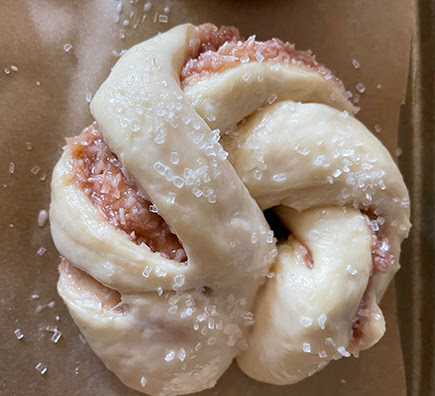
I found that a pizza cutter did a great job of cutting the long, thin cuts needed to make this shaping work. The knots are pretty with the filling showing here and there, the "inside-out" part. I used a soy milk wash but added some sparkling (sanding) sugar to make them even prettier.

Do try these lovely sweet buns, then send an email with a photo and a short description of your bake to Aparna so that she can send you a Buddy badge. It's always a delight to have Bread Baking Babes Buddies! She will do a round-up at the end of the month. Check our her post for all the deets.


Also, be sure to check out the other Babes and see what marvelous things they have done with twisted coconut buns!


INSIDE OUT COCONUT BUNS

Ingredients :

For the Dough :

175 ml coconut milk (I used soy creamer) , 3/4 cup

30 gm sugar, 3 tablespoons

3 gm active dry or instant yeast, 1 teaspoon

360 gm bread flour, 3 cups measured with spoon and sweep method (see note 1)

dried potato flakes, 2 tablespoon

2 gm salt, 1/2 teaspoon

50 gm unsalted butter, melted (I used non-dairy margarine)

1 large egg

For the Coconut Filling :

50 gm unsweetened shredded/ desiccated coconut, 1/2 cup

45 gm sugar, 3 tablespoons plus 1 teaspoon

1 teaspoon powdered freeze-dried raspberries

45 gm unsalted butter, soft at room temperature 3 tablespoons, melted (I used non-dairy margarine)

1 egg yolk, from a large egg

1 tsp vanilla extract

For Brushing :

Egg Wash or milk (I used soy creamer)

Method:

To Make the Dough :

Combine the milk, a little sugar and yeast in a small bowl. Set aside for 5 to 10 minutes till foamy.

Put this and all other ingredients for the dough in a large bowl or bowl of your dough kneading machine. Knead until you have a soft, smooth and elastic dough. Adjust liquid and flour, in small increments, as required to each this consistency. Scrape the dough out of the bowl onto a surface and knead a few times. Ideally, your dough should pass the “window pane” test.

Shape the dough into a ball and place in a well-oiled bowl.  Cover the bowl with a damp towel (or a silicone lid) and let it rise for about 1 hour, until the dough doubles in size.

To Make the Filling :

Using a spoon, mix together in a bowl all the ingredients for the filling, till combined.

Cover and refrigerate the filling for about 20 to 30 minutes to chill. The filling should still be of a spreading consistency when you take it out. Do not let it harden.

To Shape the Buns :

Gently knead the risen dough to degas it. Divide the dough into 6 equal pieces. Work with one portion at a time keeping the others covered. Shape the dough into an oval. Cover 5 pieces of dough with a towel while you shape the first bun.

Take the chilled filling out of the refrigerator and divide it into 6 pieces as well. Each portion should be equal to about 1 ½ tablespoons of filling worth. The directions below are to shape twisted round buns.


Roll out one piece of dough until you get a rectangle of about 10 x 4 inches long. You don’t need to flour your work surface. Take one portion of the filling and spread it over half of the rectangle, along its length. Fold the other side over the filling and press lightly to seal the edges. You should now have a long and thin rectangle.


Using a sharp knife, make 2 or 3 cuts along the length inside the rectangle, leaving about 1/4 to 1/2 inch at the short edges intact. Holding the short edges with your hands, pull very gently to stretch the dough, then twist the dough a few times. Fold into a knot. Tuck both ends under. The filling should show up in layers on the shaped dough. 


Place the shaped buns on a lightly greased or parchment lined tray. Transfer the knotted dough onto the lined baking sheet. Cover them loosely and allow them to rise till almost in size.


Cover the knotted buns with plastic wrap and let the buns rise for an hour, until they double in size. When ready. Brush the tops with egg wash or milk.

Bake them in a pre-heated oven at 180C (350F) for about 25 minutes till they’re done and a beautiful golden brown in color. Let them cool on the baking sheet for 5 minutes before transferring them to a cooling rack. These buns are best consumed while they’re still a little warm.

They will keep for 2 or 3 days, but it is best to refrigerate them if you live in warmer climates. Warm them up before eating.


Saturday, August 13, 2022

Thoughts


Saw something like this and it says things that I believe. Just wanted to share. There is a lot in the world these days that could keep us grim but I choose to focus on the opposite. Keep smiling!

Thursday, August 11, 2022

Lamb Breast


It isn't a cut you see often in the stores, but a neighbor raises lambs and gave us a couple packets of lamb breast riblets...a kind of lamb spare ribs. The recipes I looked at online seemed to indicate that they did best cooked long and slow. I found one recipe that has a glaze that you apply after they have cooked for a while without it. The glaze has honey, garlic, and fresh rosemary. I tried it and it was delicious, although both Sweetie and I found it to be too sweet. Next time I might try maple syrup instead, with some balsamic vinegar, too. 

The method of cooking the riblets long and slow in the oven in a baking sheet with parchment paper on both the bottom and top of the meat, followed by a tightly fitting foil over it all, worked well. The glaze added some flavor, moisture and a bit of chewiness where it had cooked where the meat met the bottom of the pan. The final coating with the glaze and then time under the broiler made it even chewier but added some crisp bits to the fatty parts. The riblets were tender and the meat practically fell off the bones. Do allow for a fair number of riblets per person since there are a lot of bones and little meat.

All in all, this recipe is a keeper. The only problem is that I didn't take any photos at all! I'll include one from the site, CraftBeering , where the recipe is. Please do yourself a favor and visit the site where you will find lots of photos, great tips, and illustrations of how to prepare the riblets for the recipe.

There are also instructions for grilling them. I made the honey-garlic-rosemary glaze, but there is also an Asian inspired one, or you can use your favorite BBQ sauce.


You need to prepare the lamb spare ribs for the slow cooking part of the recipe. We strongly recommend that you follow the steps illustrated on the CraftBeering site in order to achieve fall-off-the-bone tender meat.

·         First pat dry each rack with a paper towel and turn it over so the meatier side faces down. You will notice a translucent membrane that helps hold the ribs. To remove it, use the tip of a knife to lift it and then peel it off entirely.

·         Next, place the rack(s) onto a parchment paper lined baking sheet. Season with kosher salt and black pepper only, on both sides, and position with the meaty side up.

·         Finally cover with another parchment paper sheet and tightly wrap with aluminum foil, just as shown in the image grid.

·          

This style of wrapping the ribs for slow cooking in their own juices has several advantages:

·         the ribs do not dry out

·         clean up is easier

·         because the ribs are in between two layers of parchment paper there is no danger of aluminum seeping into the meat. If aluminum comes into direct contact with the seasonings on the meat, it can penetrate into it.  The parchment paper creates a barrier which prevents that and ensures food safety.

There are two stages for the cooking:


·         Stage 1 – Slow cook. Once you have prepared the spare ribs in the manner shown on the CraftBeering site, cook them in the oven for about 1 hour and 45 minutes at 275 to 300 degrees F, depending on how strong your oven is. Check on them at the end of that time and if satisfied with the tenderness, brush them on both sides with the glaze. (If not, cover them back up and cook for a few more minutes and check again - I had to give them another 10 minutes).

·         Stage 2 – Glaze and finish (broil if you can). Place them back in the oven and cook for 20-25 minutes. The fat and glaze will sizzle and the ribs will begin to darken and form a crisp exterior. To make them really appetizing consider broiling them for 5 minutes or so at the end of the 20-25 minutes. Stand by the oven and watch them closely!

 TENDER LAMB RIBS 
CraftBeering,
April 12, 2022 | Updated June 23, 2022 By 

Serves 4
Prep time is 10 minutes or so
Cook time is 2 hours 30 minutes


INGREDIENTS

·     LAMB RIBS
2 racks lamb spare ribs, Denver style, about 1.25 lb each

·     salt and pepper, to taste


STICKY HONEY GARLIC SAUCE

·     1/2 tbsp olive oil

·     3 cloves garlic, minced

·     3/4 cup honey

·     1 tbsp fresh rosemary leaves, very finely chopped

·     2 tsp lemon juice, freshly squeezed

HOISIN BARBECUE SAUCE

·     3/4 cup hoisin sauce

·     2 tbsp dark soy sauce

·     2 tbsp shaoxing wine or sake

·     2 tbsp honey

·     1 tsp rice vinegar

·     1 tbsp sesame oil

·     2 tsp fresh ginger, finely grated

·     2 tbsp green onion, finely chopped

INSTRUCTIONS

LAMB RIBS IN OVEN

1.  Preheat oven to 275-300 F.*

  1. Pat dry the lamb racks and remove the membrane holding the ribs together by gently lifting on one side with the tip of a knife and peeling it off.
  2. Line a baking sheet large enough to fit both racks with parchment paper. Place the racks on top and season generously with salt and pepper on both sides. Position ribs with the meaty side up and cover with another sheet of parchment paper. Wrap the so prepared ribs with aluminium foil, tightly.**
  3. Slow cook for 1 hour and 45 minutes and then unwrap to check for tenderness. If satisfied, leave uncovered and brush with your choice of sauce on both sides. (If it appears that the meat can use a little longer in the oven, go for another 20 mins and check again).
  4. Place the uncovered ribs back in the oven for 20-25 minutes. They will form a nice crust as the sauce bubbles. You can turn on the broiler for the last 5 minutes - stand by the oven and watch closely because the sugars in the sauce can burn.
  5. Transfer the cooked lamb ribs to a platter or cutting board, brush with sauce one more time and allow a 5 minute rest before you cut them for serving.

STICKY HONEY GARLIC SAUCE

1.  In a small sauce pan saute the minced garlic in the olive oil, over medium heat, just until garlic is fragrant and turns soft.

2.  Lower the heat to low, add honey and chopped rosemary. Let reach a slight bubbly simmer, then remove from heat. Add the lemon juice, stir and allow to steep. Keep warm. Use to brush over lamb ribs.

HOISIN BARBECUE SAUCE

1.  In a small sauce pan combine all the ingredients. Bring to simmer over low heat. After 7-10 minutes as the sauce thickens, remove from the heat. Use to brush over lamb ribs and as a dipping sauce.

NOTES

This recipe assumes lamb ribs are harvested from American lamb, such as Colorado, which is bigger than New Zealand or Australian lamb. If working with racks that weigh less than 1.25 lbs you may want to shorten the slow cooking time as they will cook faster.

*Depending on how strong your oven is.

April 12, 2022 | Updated June 23, 2022 By 


Sunday, August 07, 2022

The Project Turned Out Well


Sweetie approaches building projects as his creative outlet and this time he created something really nice. Although the original idea was to build a place to store our garbage and recycle and green waste/compost containers, as the creativity took hold and the true state of the barn was revealed, it became a barn buttress, too. It's very sturdy and because it's faced with redwood, it will last and look weathered in time. The horizontal boards bring it into the twenty-first century and the large swinging doors make it easy to use. 


It even has shelves on one side to hold things like the plant fertilizer and clips for the irrigation system and things like that. The part I like best is the swing arm that holds the left door closed or lets it be opened. Easy to use and simple but elegant in design. 


Once we get some rain to loosen up the weeds, I'll clear out the area between it and the rest of the garden and plant some of the things that are resistant to gophers but currently in pots like iris and lavender plants. I'll leave some space, covered in wood chips, for a few pots of sun lovers in season, since the area gets plenty of sun.  Check back next spring for photos on how the garden looks with those changes!

On the cooking and baking front I tried a new recipe today and will post about it in the next day or two. It involved long cooking and gets finished tomorrow under the broiler. Care to guess what it is?

Monday, August 01, 2022

Fresh Tomato Vegan Tart


The farm stand on Hwy. 12 had some nice looking tomatoes this week, but I found that there were more in the bag than I had thought, so today I not only had some with my lunch, but I decided to make a pie or tart with some of them. They aren't heirloom, but they are a nice size and juicy and tasty, so why not?

After looking at recipes for both tomato pie and tomato tart, I decided to create my own recipe because they all seemed to depend on a lot of cheese to make the pies and tarts work...and I don't do cheese made from dairy. Fortunately Kite Hill makes an acceptable ricotta 'cheese', so I used that as part of the base for my tart. A tart seemed better than a pie because it cooks faster and only needs one layer of tomatoes. That meant that I would have a layer of pie dough, a layer of ricotta-based filling, a layer of tomatoes and, I decided, a layer of bread crumbs/pine nuts for crunch and additional nutrition.


If you are vegan, this makes a nice meal with, perhaps, grilled zucchini, and a green salad or maybe some corn on the cob. Very summery!  If you aren't vegan, it makes a substantial side with something simple, perhaps grilled chicken thighs or fish. Either way, it is delicious eaten warm or at room temperature. It's a good idea to let it cool about 20 minutes to let the filling firm up a bit before serving.

I used my favorite food processor pie dough recipe, using non-dairy 'butter' instead of real butter.  Start this one early since both the butter or 'butter' and the finished dough require chilling time.

The tomatoes need to be started early, too. You slice them 1/2-inch thick and then drain them on paper towels. A sprinkle of garlic salt both seasons and encourages the tomatoes to give up their excess juice. A too-juicy tomato can make for a soggy tart.


The filling is pretty easy. You can used the work bowl you used to make the pie dough. Just wipe it out first. A vegan egg substitute needs a few minutes to thicken or you can use an egg if not doing vegan. I have a lovely basil plant on my front steps. It doesn't take a lot to fill a 1/4 cup measure, plus it's nice to save a few small leaves for garnish. Once mixed into the filling, the basil flavor is fairly mild, but it goes so nicely with the tomato slices!

The topping is simple: dry bread crumbs mixed with olive oil. You sprinkle that liberally over the finished tart, then sprinkle on a tablespoon or two of pine nuts for added flavor and protein.

If you'd like to serve this as an appetizer, shape the tart in a rectangular tart pan. The filling will be slightly thinner, but you can then cut squares of the tart to pass on a platter.


Fresh Tomato Vegan Tart
An original Elle Baker recipe

1/2 recipe Food Processor Pie Dough - (reserve the other dough disk for another use)
see below for recipe

2 large tomatoes, sliced 1/2-inch thick
garlic salt and pepper to taste

4 oz. Kite Hill ricotta (or used regular ricotta if not making a vegan tart)
1/4 cup chiffonade (thin strips) fresh basil, packed, plus a few small basil leaves for garnish
1/4 teaspoon salt
1 egg worth vegan egg substitute, reconstitute if needed (...or one egg if not making a vegan tart)

1/4 cup dry bread crumbs
1 tablespoon olive oil
1-2 tablespoons pine nuts

Preheat the oven to 375 degrees F. Place oven rack in bottom third of oven

Roll out chilled pie dough disk to a 11-inch diameter circle. Transfer to tart pan. Fold down any excess dough along the sides of the tart pan. Press dough into sides. Trim any dough at the top by running a rolling pin over the top edge. Chill until ready to fill.

Place the thinly sliced tomato slices in a single layer on a few sheets of paper towel. Sprinkle with garlic salt and freshly ground pepper, to taste. Let the tomatoes sit and exude juice while you make the filling.

Wipe out the work bowl that you used for the pie dough (or just use a clean work bowl) for your food processor. Add the steel knife and the ricotta, basil chiffonade, salt, and egg substitute (or egg). Cover with top and pulse until fully combines and the texture of mayonnaise. Set aside.

In a small bowl mix the dry bread crumbs and the olive oil.

Remove the tart shell from the refrigerator. Spread the ricotta/basil filling in the bottom of the tart shell and smooth to make it even. Place the seasoned tomato slices on top of the filling, overlapping slightly. You may have extra slices to use for another purpose.

Liberally sprinkle (I used clean hands) the bread crumb mixture over the tomato slices. Sprinkle the pine nuts evenly over the tart. Set the tart on a baking sheet.

Bake in the preheated oven for 25-35 minutes or until tart shell is golden brown and filling is set. Check after 20 minutes and cover the tart with foil tent if the bread crumbs or nuts are over-browning.

When baked, let cool for at least 15 minutes on a wire rack. Remove tart sides and serve warm or at room temperature. If desired, garnish with small basil leaves or some basil chiffonade.


Food Processor Pie Crust from Martha Stewart Test Kitchen

makes 2 disks

2 sticks unsalted butter, chilled and cut into small pieces, divided
2 1/2 cups all-purpose flour
1 teaspoon salt
1 teaspoon sugar
1/2 cup ice water

Freeze 3/4 of the butter pieces in a single layer on a parchment-lined baking sheet until hard, at least 30 minutes. Refrigerate the other 1/4 of the pieces. The frozen pieces stay chunky after being pulsed, creating steam pockets when baked (the key to flakiness) and the refrigerated bits get worked into the pastry, giving it a tender texture.

Combine flour, salt, and sugar in a food processor work bowl. Add refrigerated butter (the smaller amount of the butter bits). Pulse to combine, about 10 times. Add frozen butter and pulse until mixture resembles coarse meal, with some blueberry-sized clumps.

With the processor off, add the ice water. Immediately pulse until water is just incorporated, about 10 times. Squeeze a small amount of dough to make sure it holds together. Pulse a few times more if needed. When you squeeze the dough it should remain crumbly, but come together. Don't pulse it so long that it forms a ball. Adding water while the processor is running  and over-pulsing are bad ideas... could lead to tough dough.
Lay out 2 pieces of plastic wrap. Empty half the dough onto each piece. Bring edges of wrap together to gather dough and form a round mass. Press the dough this way to form a rough round mass, and press on top of the wrap to form a disk. The processed dough should resemble uneven crumbs. When you empty the mixture from the processor bowl out onto the plastic wrap, some pieces will be tiny, others will be in clumps. That is perfect! The gathered plastic wrap method of forming the disk simultaneously has you gathering the crumbs into a cohesive dough and shaping it.

Roll out disks, still wrapped in plastic, to 1/2 inch thick rounds, about 8 inches in diameter. Rounds this size will chill more quickly that hockey-puck sized ones and will soften more uniformly when removed from the refrigerator.

Refrigerate at least 45 minutes and up to 2 days. Dough can be frozen up to 1 month. (Note: I froze half of the dough for a week and a half. By the time it had thawed, it was a bit gray, but it baked up golden, flaky and gorgeous.)

Tuesday, July 26, 2022

Zucchini Bread For Chocolate Lovers


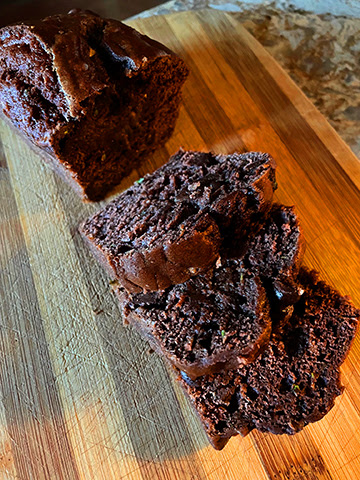
We have reached the point in the summer where the zucchini are showing up in the garden every day. With the warm weather a small one only takes a few days to become a baseball bat size squash...so regular harvests, daily or every other day, are essential to have useable veg. My two four-inch growers pots ended up have three plants in each, so I have six plants. The yellow ones were more prolific at first, but now I'm getting green ones every day. It helps to have some recipes that use a squash or two and one of my favorites is this Chocolate Zucchini Bread...a sweet tea loaf that stays moist from the zucchini. Zucchini, especially small, young zucchini, really don't have much flavor, so often the recipients of my mini-loaves have no idea that part of the loaf is grated zucchini! Every once in a while you can see a bit of the green from the outer skin, but that's about it. This is a quick tea bread. If your overfill your pan as I did, you might get an uneven top (as in photo above) but it will still taste great.


I've made some changes to the original recipe, which is standard for me. I've added espresso powder to deepen the chocolate flavor. I sometimes use melted margarine instead of plain vegetable oil, for a slightly more buttery taste. The biggest change is that I have cut the sugar by 1/3. This bread has chocolate chips in it!...it doesn't need a big dose of sugar. Of course, I like semi-sweet chocolate, so a super sweet chocolate flavor isn't what I yearn for. If you like your chocolate sweeter, by all mean increase the sugar to 1 1/2 cups.


Another change is minor...When it's time to add the moist mixture to the dry mixture, I don't mix the zucchini into the moist mixture...I just dump it right into the dry mixture in the big bowl, pour the wet mixture on top, then use my Kitchen Aid mixer to combine them...mixing just until combined, no longer, then I add the chocolate chips and mix with the Kitchen Aid for only a few seconds to distribute them.

The original recipe also added 1/2 cup chopped nuts and 1/2 cup dried cherries. You can add either or both at the same time as the chocolate chips and enhance the loaf. Dried cranberries work well in place of the dried cherries. I've used both walnuts and pecans successfully but I suspect that hazelnuts or macadamia nuts would work well, too. I think almonds might be too crunchy, but you could try them, well chopped.

This recipe only uses 2 cups of shredded zucchini, so you may need to make it multiple times while those plants are producing zucchini like mad!

I'm fortunate to have found a four-pan mini-loaf baking pan at a thrift store, but disposable mini-pans are sold at many grocery stores and can be ordered online. The nice thing about mini-pans is that the breads bake more quickly and the small loaf makes a great gift for a neighbor, friend, or your local librarian.  If you use the mini-muffin pans, you can arrange them to make letters or numbers, frost with buttercream, and you have a unique 'cake' to celebrate a friend, a birthday or anniversary, or just to celebrate summer if you arrange them to spell sun!


CHOCOLATE  ZUCCHINI BREAD or MINI-CAKES with Chocolate Chips

based on a recipe by Tanita Davis & Robin Brande & Jama Rattigan

3 cups flour
1/4 cup unsweetened cocoa powder
1 tsp baking soda
1/2 tsp baking powder
1 tsp salt
1 ½ cups sugar
3 eggs or equivalent egg substitute
1/3 cup vegetable oil
½ cup plus 2 tablespoons plain yogurt
1 tsp vanilla
2 cups shredded zucchini (about 2-3 medium zucchini)
½ cup chocolate chips
½ cup chopped nuts  if using
½ cup chopped dried fruit  if using

Preheat oven to 350 degrees. Lightly grease two 9x5" loaf pans with canola spray. Alternatively, lightly grease 24 mini-muffin pans or 4 mini-loaf pans.

In a large bowl, combine flour, cocoa, soda, baking powder, and salt. Mix well. In a separate bowl, beat eggs (or egg substitute and water) with the sugar until well combined. Add oil, yogurt and vanilla. Beat to combine, then stir in zucchini. Add wet bowl to dry bowl and stir until just moistened. Stir in chocolate chips (and nuts and/or dried fruit if using).

Spoon evenly into pans. Bake 55-60 minutes or until toothpick comes out clean if baking in loaf pans. If baking in mini-muffin pans, bake 15.  If baking in mini loaf pans, bake 25-30.Cool 10 minutes in pans, then turn onto racks. This bread is yummy when eaten still warm...the chips are melty and the fragrance is full chocolate!

Wednesday, July 20, 2022

Early Tomatoes


The baby tomatoes on the tomato plant in my garden are still pretty small; about golf ball size. It's going to be weeks before we enjoy any of them.


Fortunately the farm stand near town had some lovely, large, ripe tomatoes this week. They had good flavor, even if they were a bit pale towards the center, and so we could enjoy them the way we like tomatoes best. Slices of tomatoes are arranged on a plate, sprinkled with garlic salt and pepper, drizzled with olive oil and balsamic vinegar, and showered with thin slices of fresh basil. 

I served them with fresh corn from the same farm stand, and with some grilled zucchini which were from our garden. Nice and summery and so delicious!

Sunday, July 17, 2022

Bread Baking Babes Create Croissants


This month I had some help with baking the challenge. Raine was interested in laminated dough, so he helped me make the dough, then later roll out the dough and spread the butter and make the first folds, then later roll out the dough and do more folds. I finished things up but it was sure nice to have his company for the first part of the baking. Too bad I missed the usual posting day, but a day late is OK.


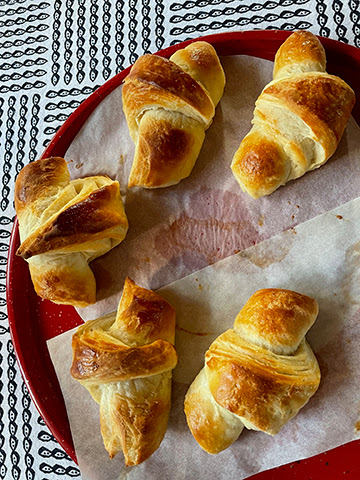
Kelly of A Messy Kitchen has challenged the Babes this month to make easier crescent rolls using a recipe from Half Baked Harvest. If you like croissants but are not so sure you can make the classic recipe, give this one a try. It has lovely layers when baked and some shards of crisp-baked dough on the outside...perfect when you take a bite. It isn't as layered as the classic, nor as delicate, but it is certainly easier, faster (but not fast), and the croissants are delicious ! Use the best butter that you can find because this has a simple flavor profile, with the butter being the stand-out flavor. We used Mykonos plant-based cultured 'butter' and it was tasty, but I'm sure that a high-quality real butter would have had more flavor. If you don't eat them all in one sitting, you can refresh the crescents by baking them on a baking sheet briefly (1-5 minutes) in a hot oven right before serving them again.

Remember that laminated dough takes time...and cold. Make room in your freezer in advance for a baking sheet with your dough block on it. You may need to adjust the amount of time it sits in the freezer, or even have it in the fridge towards the end...it depends on if your butter is escaping or not.

If you follow this recipe you should be successful. I recommend using a scale to weigh your ingredients. You will likely get better results. Happy baking!

To be a Buddy, bake the croissants and then send Kelly an email with your URL and a photo of your bake by July 29th to be included in the round-up. She will send you a Badge. You can also post on our Facebook page so we can all congratulate you for joining us.

Also, be sure to visit the other Bread Baking Babes to see their take on this classic baked treat.


Easier Flaky Crescent Rolls

¼ cup warm water ~105-110ºF [60 grams]
2 ¼ tsp active dry yeast one packet [7 grams]
2 tsp sugar [8 grams]
¾ cup warm milk (not boiling) [183 grams]
1 egg
1 tbsp unsalted butter, melted or softened [14 grams]
1 tsp salt [6 grams]
3 cups all-purpose flour plus more for rolling [375 grams + more for rolling]
8 tbsp (1 stick/½ cup) salted butter, softened [113 grams]
1 egg beaten and or melted butter, for brushing

Instructions

In a large glass bowl or stand mixer, combine the warm water, yeast and sugar to dissolve the sugar and yeast.  Let the mixture sit for about five minutes until it is puffed up and foamy.

Add the warm milk, egg, 1 tbsp butter, salt and flour. Using the dough hook, a dough whisk, or your hands, knead the dough until it is smooth and elastic.  The dough will seem sticky at first, but it will eventually become smooth and springy.

Turn out the dough onto a floured work surface.  Lightly knead into a smooth ball.  Put the dough back in the bowl, cover and place in the fridge for 30 minutes.

After 30 minutes, turn out the dough onto a lightly floured surface.  Roll out a large rectangle that is about ¼-inch thick. Gently spread the 8 tbsp softened butter all over dough, leaving about an inch around the sides of the rectangle.

Fold the dough in thirds by folding one side of the rectangle towards the center and folding the other side over as well on top of the first layer so that there are three dough layers.  Carefully move the dough to a baking sheet, cover with plastic wrap and place in freezer for 7-10 minutes.  (If you find the butter getting too hard, chill for less time, especially on subsequent roll outs, and allow to warm up until butter is pliable.)

Roll the dough again into a long rectangle (being careful of the butter - if it is breaking, let it warm up for a while longer) and fold dough again into thirds like a book. Place back in freezer for 5-7 more minutes. Repeat this process two more times for a total of three folds (and 30 minutes in the freezer.)  (I ended up just going to the refrigerator for my last chill, the butter was hardening too fast.)

After the three folds, you can either go ahead and shape for baking or you can wrap your dough tightly with plastic wrap and place in the fridge overnight or up to three days.

To shape, roll the dough out on a lightly floured surface into a rectangle about ¼-inch thick. Using a pizza cutter or sharp knife, cut the dough in half lengthwise, cut the strips into triangles. Roll each crescent up using both hands.  Place on a lined baking sheet about 2-3 inches apart.  Cover with a tea towel and set in a room temperature place to rise for 30 minutes to 1 hour.  (Not too warm or the butter will melt and there will be fewer layers.)

While the rolls rise, position a rack in the middle of the oven and preheat to 400ºF.  Before baking, brush each crescent with the beaten egg wash. Bake rolls for 10-14 minutes or until lightly golden brown.  If desired brush with melted butter.  Serve warm with butter and honey or jam.