Thursday, April 21, 2022

The Flowers That Bloom In The Spring Ta-La!


 An apricot iris is joined by quite a few deep purple iris. Just today a pale yellow iris with medium purple, pointed fuzzy part (I should know the iris parts, but can't remember what it's called. It's bright orange and fuzzy in the photo above). No photo of the pale yellow one because it was too rainy.


These wisteria are growing outside my dentist's office and they drip down almost tot he sidewalk.


This is an unusual cultivar...a lemon leafed St. John's Wort with white flowers. Usually St. John's Wort have green leaves and bright yellow flowers.


This rose bush, which I think is called Altissimo, is prolific and loves its location by the barn.


This pink geranium has been on our front steps through the winter, so some of the leaves are tinged with orange at the edges from the cold. It gives a cheerful greeting as you come up the walk.


I didn't grow this tulip...it came in a bunch I picked up at Costco...but I just love the color.


Last flower for today is this orchid. I usually kill houseplants, so I'm very happy that this plant not only lived but bloomed again. The last time it bloomed was last spring. Sweetie gave it to me for my birthday, but the blooms last for months. Then it has to be sparingly watered while it's dormant. I love the combination of cream and magenta!

That's it for now. All of these photos have been taken in the last couple of weeks. Soon there will be a Mr. Lincoln rose blooming, plus more iris...maybe some that are blooming or the first time this year!

Monday, April 18, 2022

Hot Cross Buns With Lots Of Orange


It's the time of year for hot cross buns. I haven't made them for a few years, but decided to make them this year with the idea of putting some in the freezer and sharing a few more with a friend.

Usually I soak the currants and/or raisins in rum or bourbon, but this time I soaked them in orange liqueur. Then I upped the orange factor by adding the zest from a whole, large orange. Finally I used fresh orange juice in the dough and in the icing for making the cross on top...lots of orange in this version. I also used both golden raisins and currants, but no candied fruit this time. Still used the warm spices of nutmeg, cinnamon and cloves, and I used bread flour.

It might seem like a big deal to make these if you don't often make your own rolls or buns, but the great thing is that you make 16 of them! They freeze well. I haven't had any of the frozen ones yet, but I bet there will the fine fragrance of orange in your kitchen if your rewarm them slightly in your oven or the microwave.  


We had ours yesterday morning with scrambled eggs and a mixed fruit salad. It made a wonderful Easter feast for the start of a great day.


Hot Cross Buns
Makes 16 buns

1/4 cup golden raisins, soaked in a few tablespoons Grand Marnier or other orange liquor
3/4 cup warm (100° to 110°) whole milk (I used soy)
4 1/2 teaspoons (2 packages) active dry yeast
1/4 cup fresh orange juice
1/4 cup brown sugar
finely grated zest from 1 large orange
1 large egg
1/4 cup butter, melted and cooled
3/4 teaspoon salt
1/2 teaspoon nutmeg, preferably freshly grated
1/2 teaspoon cinnamon
1/4 teaspoon cloves
About 31/2 cups flour (mostly wheat with some other grains is fine) - I used 3 cups bread flour, but you might need a bit more
1/4 cup dried currants, plumped with a little boiling water if dry, then drained well

2 teaspoons (about) fresh orange juice
1 cup powdered sugar, put through a fine strainer if lumpy

1. Drain the soaked raisins through a strainer, reserving the liquid. Set aside the raisins.
In a bowl of a stand mixer, combine milk and yeast; let stand until yeast softens, 5 to 10 minutes, then add the reserved liquid and fresh orange juice. In another bowl, blend with your fingers the brown sugar and orange zest until consistency of wet sand.  Whisk in the whole egg, cooled melted butter, salt, nutmeg, cinnamon, cloves. Add to the milk/yeast mixture and beat on medium speed with dough hook until blended.

2. Blend most of the  flour into the batter, a half cup at a time. Beat on medium speed until dough is smooth and stretchy, 10 to 12 minutes, using dough hook. Add just enough additional flour, a tablespoon at a time, (about 1/4 cup) so dough is only slightly tacky.

3. Turn dough out onto lightly floured clean surface and shape into a ball. Coat bowl with spray oil (I used butter flavored spray oil). Return dough to bowl, turn to coat with oil, cover, and let rise in a warm place until doubled, about 1 1/4 hours.

4. Punch down dough. Add currants and raisins to the dough, pick up dough, and mix with your hands to distribute fruit.(I turned the dough out onto a lightly floured board and kneaded the dough in...that way I was sure that I had the fruit well distributed.) Using a bench scraper, divide the dough into 16 pieces, about the same size. (You can use a scale if you have one...set to grams works best.) With floured hands, shape into 16 smooth rounds. (With all the fruit added it might be difficult to have a smooth top...just do the best you can.) Evenly space rounds in two buttered 8- or 9-in. square or round pans.

5. Cover loosely and let rise in a warm place until doubled and puffy, about 40 minutes. Meanwhile, preheat oven to 400°. Brush buns with beaten egg (egg wash is optional). Bake until deep golden, 13 to 15 minutes, up to 25 minutes. Let cool in pans at least 30 minutes.

6. In a small bowl, stir together juice and powdered sugar until smooth. Spoon into a small, heavy-gauge plastic bag, snip a hole in a corner, and squeeze icing onto buns to form large Xs on cooled buns. Let icing harden, then serve.

Sunday, April 17, 2022

Saturday, April 16, 2022

Mlyntsi (Blini) for Ukraine


The horrifying death and destruction of Ukraine by Russia continues, with high likelihood that war crimes against humanity are being committed by the Russians, including deliberate targeting of civilians.

To stand with Ukraine, if even in a very small way, the Bread Baking Babes are making Mlyntsi, Ukranian Blini, small buckwheat pancakes. A key element is melted butter on the cooked mlyntsi. This recipe is brought to you by Elizabeth of Blog from OUR Kitchen.

I used the commercial yeast recipe, mostly, although I had some nice sourdough starter on hand, so I added 1/4 cup of that for extra flavor. I adjusted the flour so that the mixture was the right thickness. Not only did these delicious morsels taste divine, but they smelled wonderful, too. The toasted buckwheat fragrance was lovely. Sweetie enjoyed his so much that he made some more after I sat down.

There is a bit of a story to go with these. Sweetie fell over and hit his head early in the morning March 30. It was unclear if he had passed out or had had a heart attack or some other medical emergency, so I called 911 and the paramedics took his vitals, found that he didn't remember falling, that he had been unconscious at least 10 minutes, but that he showed no sign of having a stroke or being in a dire situation medically when they arrived. At the hospital in the ER they did the usual labs, plus a sonogram, then admitted him and over the next few days did more lab work, more tests and finally decided that he had fainted, probably due to dehydration combined with low blood pressure from medication he no longer needed.

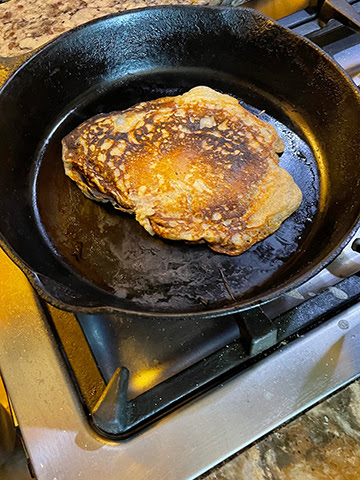
The reason that any of that goes with this recipe is that he had an appointment at 5 pm the day I made the batter, April 8th, with his GP for follow up and I forgot completely. I was ready to make these as appetizers with smoked salmon and sour cream at 5:30...but we had to leave before that and didn't get home until a bit after 6 pm. The batter was very much frothy and risen, although it sank a bit when I added the whipped egg whites. No way was this going to hold until tomorrow morning! So, I cooked some up, slathered it with melted plant-based 'butter' and served them for dinner with our cold shrimp and green salad. Totally delicious! Thank you Elizabeth for a great challenge. The next morning I added a bit of yeast, let the batter sit to revive, then made some more, which were even better. Sweetie made the final one...very big!...with the rest of the batter. Photo below.


Do consider becoming a Buddy dear reader. this is an easy recipe, no kneading required, and you'll get some really wonderful pancakes by making it. If you do, send the URL of your post, plus a photo and short description of your 'bake' to Elizabeth by April 29th for the round up and to get your Buddy Badge.


Be sure to also visit the sites of the other Bread Baking Babes to see what delights they have made. Below are both a recipe using commercial yeast and one using wild yeast (sourdough starter).


Mlyntsi (Blini)

commercial yeast | wild yeast
adapted from Darra Goldstein's recipe for Blini and Emilie Raffa's (The Clever Carrot) recipe for Fluffy Sourdough Pancakes

3 grams active dry yeast
2 Tbsp (30 grams) water at body temperature
1+1/4 cups (304 grams) milk [OR 70 grams instant milk powder + 300 grams water]
1/2 teaspoon (2 grams) sugar
6 Tbsp (23 grams) buckwheat flour
1.5 Tbsp (21 grams) butter
1 egg, separated
2 Tbsp (30 grams) plain 3% yoghurt
1/2 teaspoon (3 grams) salt
3/4 cups (94 grams) all-purpose flour
pinch baking soda

1.             In a small bowl, whisk yeast into body temperature water until it is the consistency of cream. Set aside briefly.

2.             In a medium size bowl, whisk together sugar, all but 1/4 cup of milk (or milk powder and water), buckwheat flour. Make sure the mixture is smooth; ie: no lumps. Whisk in the yeast mixture. Cover with a plate and allow to rise in a warm place for 1 hour. (In our cool kitchen, we use the oven with only the light turned on.)

3.             Melt butter and allow to cool a little before whisking it with the egg yolk and yoghurt. Stir this mixture into the buckwheat mixture, along with the remaining milk, the salt, and all-purpose flour. Again, make sure there are no lumps; you want this mixture to be smooth smooth smooth. Cover the bowl with a plate and allow to rise in a warm place for 2 hours.

4.             Whisk the egg white until stiff but not dry, then fold the fluffy egg white into the batter. Allow the batter to rest for 30 minutes more. If the batter seems thick, carefully add warm milk a very little at a time. Emilie Raffa says that "The texture should be thick, bubbly, and pourable".

5.             Heat a cast-iron pan. Run your fingers under cold water and flick the pan. If the water beads, the pan is at the right temperature. (If it lies there, the pan is too cool; if it disappears immediately in a puff of steam, the pan is too hot.)Brush the pan with butter. Use about 2 tablespoons of the batter for each blin. Darra Goldstein adds: "taking it from the top of the batter each time so that the rest doesn't fall". Swirl the pan to make a pancake that is about 5 inches in diameter.

"Cook the blin for just a few minutes, until bubbles appear on the surface, then turn and cook the other side until faintly browned. The blini are best served hot from the pan, but if they must be held, pile them in a deep dish, brushing each one with butter, and cover the top of the dish with a linen towel."
 - Darra Goldstein

...........................
When baking soda merges with the natural acids in the sourdough starter it tenderizes the texture (like buttermilk pancakes). So now you have light, fluffy and tender. 
[...] [T]he batter should be thick, bubbly and pourable. [...] You can actually "hear" it when you drag a spoon through the batter. It should drip down in slow, stretchy ribbons and not just plop into the pan.
- Emilie Raffa
.......................................

Wild Mlyntsi

[makes 10 6-inch pancakes]

ingredients based on Emilie Raffa's recipe:
LEAVENER
120 grams whole wheat flour
120 grams water
2 dessert spoons (about 30 grams) Jane Mason starter

Dough
DRY INGREDIENTS
125 grams unbleached all purpose flour
60 grams buckwheat flour
12 grams sugar
3 grams sea salt
5 grams baking soda
WET INGREDIENTS
all of the leavener from above (100% hydration and bubbly)
2 large eggs, separated
240 ml milk, plus more as needed
42 grams (3 Tbsp) melted unsalted butter, plus more to coat the skillet


1.             About 12 hours before mixing the batter, mix whole wheat flour, water, and starter from the fridge. Cover with a plate and leave at room temperature.

2.             Combine all the wet - except for the egg whites - and all the dry ingredients. Whisk well, cover with a plate and allow to rest a few moments.

3.             Beat the egg whites until stiff but not dry. Fold them gently into the batter. Cover with a plate and allow to rest for about 30 minutes before cooking the pancakes. Emilie Raffa writes, "The texture should be thick, bubbly, and pourable. Add extra milk, 1 tbsp at a time, to thin out the texture if needed. Let the batter sit for at least 5 minutes to aerate; it should be nice and bubbly before using.

4.             Heat a cast-iron pan. Run your fingers under cold water and flick the pan. If the water beads, the pan is at the right temperature. (If it lies there, the pan is too cool; if it disappears immediately in a puff of steam, the pan is too hot.)Brush the pan with butter. Use about 2 tablespoons of the batter for each blin. Darra Goldstein adds: "taking it from the top of the batter each time so that the rest doesn't fall". Swirl the pan to make a pancake that is about 5 inches in diameter.

"Cook the blin for just a few minutes, until bubbles appear on the surface, then turn and cook the other side until faintly browned. The blini are best served hot from the pan, but if they must be held, pile them in a deep dish, brushing each one with butter, and cover the top of the dish with a linen towel." 
- Darra Goldstein

Sources:
Darra Goldstein, Russian Pancakes (Blini), A Taste of Russia, p.102 https://darragoldstein.com/russian-pancakes-blini/

Emilie Raffa, The Clever Carrot, How to Make Fluffy Sourdough Pancakes https://www.theclevercarrot.com/2020/05/homemade-fluffy-sourdough-pancakes/

Some variations in blini include:
 
• Adding ingredients to the blini batter, including apple, raisins, or even grated potato. Such types of blini are more common in Eastern Europe than in Russia,
• Blini served with butter, sour cream, fruit preserve (varenie), jam, honey, or caviar,
• Blini folded or rolled into a tube, then filled with different fillings like jam, fruit, minced meat, chicken, salmon, boiled eggs, or mushrooms,
• Blini made by frying chopped vegetables and pouring the batter over them.

- Chefin Dictionary | Blini, https://chefin.com.au/dictionary/blini/


·                     Information and Tools
» Darra Goldstein: Russian Pancakes (Blini)
» The Clever Carrot: How to Make Fluffy Sourdough Pancakes
» Food to Glow: Brilliant Blinis with Sweet and Savoury Toppings
» SAVEUR: Darra Goldstein's Blini, adapted from her recipe in "Beyond the North Wind: Russia in Recipes and Lore", and made with an equal mix of buckwheat and all-purpose flours
»Tasting Table: Flour Guide - Everything you need to know about types of flour
» Gourmet Sleuth: Cooking Conversions Calculator
» Red Cross (International): Humanitarian crisis in Ukraine
» UNHCR: Ukraine Emergency


Wednesday, April 13, 2022

Asparagus Time


Not sure if it's true where you live, but here asparagus are in season. The spears coming into the markets are just the right size...not too thin and not to fat, with nice tight buds and beautiful green color.

One of my favorite ways to enjoy asparagus is to just steam them and eat them plain, but occasionally I like to do a fancier rendition. This pasta and asparagus dish is my go-to for those times. The only down side is I use three pots before I'm finished, but the final dish is so good, with tender pasta, garlic infused bite sized pieces of asparagus, and a delicious cheese sauce with the added zing of lemon zest. A large portion would make a fine vegetarian (or vegan the way I do it) meal by itself, or you can pair it with simple grilled fish or chicken as we did. Sweetie makes the best grilled salmon and steelhead.

You start by putting some water on to boil. Then you prepare the asparagus by snapping the ends off , then cutting them into bite sized pieces. They go into a small pot with minced garlic and some olive oil and then cook over low heat which allows the asparagus to become infused with the garlic while still retaining firmness and their green color. Don't forget to stir them occasionally so that all the pieces become soaked in the garlic oil.

While the asparagus are stewing you add  pasta to the boiling water. The pasta cooks while the veg and garlic do their magic. (If you use fresh pasta, you'll need to do this when the asparagus are almost finished cooking and after you've made the cheese sauce so that the pasta doesn't overcook. The asparagus take about 15 minutes.)

The cheese sauce is made in the third pot, using ricotta cheese, hot pasta water, salt, pepper, a dash of nutmeg, and the zest of one lemon. Over low heat the water is stirred into the cheese to make a creamy sauce. With most ricotta it will still be a little bit grainy, but that's fine. If you are going for vegetarian, you can add a few tablespoons of grated Parmesan, too. For my vegan version I skipped the parmesan and used an almond milk based 'ricotta'. My favorite brand is Kite Hill.

Now you have all of the parts. Once the asparagus are tender and the pasta is al dente tender, you drain the pasta, immediately mix it with the cheese sauce, and plate the sauced pasta, then top it with the garlicy asparagus pieces. For those using Parmesan, you can sprinkle another tablespoon of parmesan on top and serve it up!


Pasta with Ricotta  and Asparagus


a variation of a recipe in the Mediterranean Diet Cookbook
serves 4 - 6

3/4 lb tender young asparagus ( or 1/2 lb asparagus and 1/4 lb broccoli crown)
2 cloves garlic, finely chopped
3 tablespoons olive oil
2 tablespoons fresh mint, minced - optional
1 lb pasta of your choice - I used fusilli  (For vegan version use pasta made without animal products)
6 quarts water
1/2 lb fresh creamy ricotta (For a vegan version, I used Kite Hill almond milk ricotta)
salt and freshly ground black pepper, to taste 
dash nutmeg
zest of 1 lemon
1/2 cup freshly grated Parmesan cheese (Omit for vegan version)


Bring a large pot of water to a rolling boil and add 2 teaspoons salt.

Trim tough ends off asparagus after rinsing them. Cut tender parts into 2-inch lengths. Cut broccoli crown into small florets, if using.

In a sauté pan, over low heat and covered, gently stew the garlic, asparagus (and broccoli) in the oil until the vegetables are tender but not brown, about 15 minutes, stirring occasionally. Stir in mint if using. Set aside.

Meanwhile, cook pasta in boiling water until tender. While pasta cooks, extract 1/2 - 3/4 cup of the cooking liquid and mix it in a small saucepan with the ricotta. Set saucepan over low heat and gently cream the ricotta and cooking water. When the ricotta is warm, taste and add salt and pepper to taste. Add the nutmeg, lemon zest, and 1 tablespoon of the Parmesan cheese, if using, and stir to combine.

Drain the cooked pasta and combine immediately with the cheese sauce, tossing to mix well. Arrange over a warm platter and pour asparagus mixture over the top, being sure to scrape all of the cooked garlic onto the pasta and veggies. Sprinkle with the rest of the grated cheese (optional) and serve at once.

Monday, April 04, 2022

Taking A Header


I had hoped to be posting something food related by now, but life throws you curve balls sometimes, so instead of being in the bake center, I've been in the ER waiting room and beyond.

Sweetie woke up one morning last week, sat or stood up, grabbed his water bottle to take a drink, and promptly passed out...and landed on his poor forehead...a header indeed. He landed so hard that you could see the rug marks, plus he split the skin. See below for how it looked. 

Once 911 had been called they came and asked all sorts of questions and weren't sure if he had had a heart attack or had a brain problem, or had fainted for some other reason, so off to the ER in the ambulance. The Gold Ridge Fire personnel who responded gave him excellent service...thank you, thank you!...including carrying him down our stairs which wind to the left at the bottom, just to make it more difficult.

He spent most of the day in the ER waiting for a room to open up in the cardiac unit but while he was waiting the hospital (Memorial in Santa Rosa, which also did a great job),  did a whole bunch of blood work and tests, including a CT scan of his brain and later a sonogram of his heart. He also had an MRI of his brain and the following morning a stress test. Looks like it was possibly a mild heart attack but mostly dehydration and low blood pressure. He has been losing weight slowly over 2.5 years or so and it looks like he no longer needs blood pressure meds. Hard way to find out!


A few days after he got home I visited our neighbors across the street and got to play with their baby goat. She is a cutie! Her photo is at the top. Her name is Illy, after the coffee because her color is like a dark brown coffee bean.

These neighbors and some others down our road were amazing and so supportive...taking care of Pi and getting me to the hospital and more. We are very fortunate in our friends!

So, hope to have something food related the next time I post but right now we are keeping it simple...grilled chicken and green salad and plain rice...that kind of thing.

Saturday, March 26, 2022

Foggy Morning Along the Laguna


It was really foggy this morning but Sweetie and I both woke up right around 6 am, so by 7:30 or so we were ready to head out and walk the dog. Our favorite place to walk Pi is at Community Park in Sebastopol, right next to the narrow waterway called the Laguna. Where we ramble used to be the sewage treatment ponds (about 50 or more years ago). That use was replaced by walking paths once the joint area sanitation district was establish and a modern treatment facility set up five or so miles south of town.

One of the nice things about this park, besides being right next to the Laguna, is that is is underpopulated. This morning we didn't pass anyone on our walk until the final few minutes when another dog walker headed our way. There are fenced baseball fields and a children's play area and picnic areas but the trails are in fairly rustic areas of the park with lots of ferns and shrubs and trees and some wildflowers, too.

Above and below are two photos I took showing the fog, water, and some live oak trees. So peaceful!


Monday, March 21, 2022

Lamb Meatball Feast


There was something about this meal that made it seem like a feast. Maybe it was the delicious lamb meatballs, still faintly pink in the center but crusty on the outside and tender, too. I seasoned them with more than salt and pepper...Penzey's Greek seasoning to begin with, then some dried thyme, fresh minced parsley, and garlic powder because I love garlic with lamb. An egg provided binding and a cup of bread crumbs to a pound of ground lamb helped, too, plus gave the basis for the delicious browned crust.

With the meatballs, I served a yogurt-cucumber sauce, with about a 1/2 teaspoon of lemon zest worked in. It gave a tangy complement to the rich meat. It also was really good with the pine nut couscous (from a box) cooked with chicken broth. Last, but certainly not least, were steamed broccoli florets, for some green and another texture. 

I stirred all of the meatball ingredients together and them put the mixture in the fridge for a couple of hours so the flavors blended. When it was time to cook them, I used a disher to make fairly uniform lumps of the mixture, then used wet hands to form them into balls. Sweetie browned them in a cast iron skillet, using olive oil spray to keep them from sticking. Then they went onto a foil-lined sheet pan and baked in a 375 degree F oven for 12 minutes. Then I just kept checking the internal temperature. Once it was over 180 degrees, I served them with the couscous, broccoli and yogurt-cucumber sauce.

I know that there are no measurements here, but I didn't really do measurements. The Greek seasonings was about a teaspoon, the thyme about 1/2 teaspoon, the garlic about a half teaspoon and the parsley about a tablespoon and a half or two tablespoons, with salt and pepper to taste...really all of it to taste. For the sauce it was about a cup of yogurt and 1/4 cup finely chopped peeled cucumber, plus the 1/2 teaspoon lemon zest.

My computer has been giving me trouble, so not sure when I'll next be able to post. Stay safe and healthy dear reader.

Thursday, March 17, 2022

Glass Bread for March


Each month the Bread Baking Babes are challenged by our Kitchen of the Month to bake a new bread. This month Kelly gave us a true challenge...to bake Glass Bread. Why is it such a challenge...because it is a very slack dough, meaning that it is closer to soup than bread dough when you start out...and it doesn't get too much more dough like, even with stretching sessions every 20 minutes (I used the Sourdough measurements, but the regular directions). So why do this? Well, because it's fun to meet a challenge, but also because you finish with a delicious bread that has a truly artisan look to it.

I'm a pretty low maintenance person and I tend to avoid high maintenance people and situations if I can, so I probably won't make this again. It is very high maintenance in the world of breads, and also the messiest bread I've ever made. My work area in the bake center ended up with flour on the floor, flour all over the counter, wet flour in the sink from rinsing my hands after doing the multiple stretches and folds, and once the breads began to be baked, flour in the main kitchen from those. I also rolled up my sleeves, but still got dough on one of them, wet dough on the apron, wet dough on the shirt I was wearing before I realized that an apron was essential equipment...you get the idea.

I did enjoy learning how to do coil folding and it was fascinating to watch the dough try to join together again when I cut it into pieces with the bench scraper towards the end. I thwarted that by a liberal sprinkle of flour in the area of the cut, between the two 'pieces'.


I think that I also put too much flour under the dough when I turned it out to cut it up, so that resulted in excess flour being incorporated in the bottom part of the bread in sort of chunks of raw flour that baked up into white masses of cooked flour. If you make it, I think a light coating of flour would work, or even a light coating of flour on parchment, pour the dough onto that and then cut it up, then cut up the parchment instead of cutting and then moving to the parchment.


See...high maintenance, with all the stretching, folding, flouring, cutting parchment, etc. I had to bake them individually, too because I was using a smaller oven, which took a while.

It was full of larger holes at the top and smaller ones below and was like an airy ciabatta bread. Still glad I met the challenge...because it's delicious! I used my sourdough starter, which might have added flavor. Thank you Kelly for setting this bread for the March challenge. I may have sworn at the oobleck like dough, but never at you.

If you would like to be a Buddy (and I do hope I haven't scared you off!), bake and email Kelly by March 29th with a photo and short description of your bake and your URL. She'll send you a Buddy Badge created by our talented Elizabeth and she'll include you in the round-up.


Also, be sure to visit the other Bread Baking Babes to see how their experience was baking this Glass Bread...I suspect that they were less messy than I was.


Glass Bread or Pan de Cristal

From King Arthur Baking website

Ingredients

    500g water
    500g King Arthur Unbleached Bread Flour
    2.5g (3/4 teaspoon) instant yeast
    10g salt
    15g olive oil, for the pan

THIS IS DIRECTLY FROM THE WEBSITE

    To make the dough: Weigh your flour; or measure it by gently spooning it into a cup, then sweeping off any excess. (To measure by volume, see "tips," below.)

    In a medium bowl, mix the water, flour, yeast, and salt until thoroughly combined and homogenous. Note: The dough starts off very slack and wet. That’s OK; it will transform itself through time and folds.

    Oil a two-quart rectangular baking dish (10” x 7”) with the olive oil. If you don’t have a 2-quart dish, an 8” or 9” square pan will work. Don’t worry about any pan you use being oven-safe; you won’t be baking the bread in it.

    Pour the dough into the pan. Check the dough’s temperature by inserting a digital thermometer into the center. If it's less than 72°F, move the pan to a warmer spot, e.g., your oven with the light turned on.

    Cover the pan and allow the dough to rest for 20 minutes.

    Start with a bowl fold: Use your wet hands to grab a section of dough from one side, lift it up, then press it down into the middle. Repeat this eight to 12 times.

    Cover the dish and allow the dough to rest for 20 minutes.

    Then do a coil fold: With wet hands, reach under the dough and stretch the middle upward until the dough releases from the dish. Roll it forward off your hands, allowing it to fold over (or “coil”) on itself. This is called a coil fold. Rotate the dish 90 degrees (a quarter turn) and repeat. Continue performing this folding action until the dough feels like it won’t stretch and elongate easily, usually four to five times initially. Note: You’ll be doing this three more times, each time building strength and developing the dough. See "tips," below, for more details,

    Cover the pan and allow the dough to rest for 20 minutes.

    Repeat the coil fold. Cover the bowl and allow the dough to rest for 20 minutes.

    At this point, the dough should be easier to handle and feel tighter. Repeat the coil fold using only two or three folds this time. Cover the bowl and allow the dough to rest for 20 minutes.

    Repeat the coil fold one last time, using only one or two folds if the dough is relatively strong. Cover the bowl and allow the dough to rest for about 80 minutes.

    To divide the dough: As gently as possible, turn the dough out onto a heavily floured surface, maintaining the rectangle or square shape – be careful not to deflate the delicate dough. Sprinkle a generous amount of flour on top of the dough, leaving no exposed sticky spots. Then, working as gently as possible, use a bench knife or other sharp knife to divide it into four pieces. Gently place two pieces on a piece of parchment, leaving space between them. Repeat with the remaining two pieces of dough, placing them on another piece of parchment.

    Allow the loaves to rest at room temperature for 2 hours, uncovered. While the loaves are resting, preheat the oven to 475°F with a baking stone or steel on a lower rack. (If you don't have a stone or steel, see "tips," below.) Allow the oven to preheat for 1 hour to ensure it’s thoroughly heated. The loaves are ready for the oven when there are a few large bubbles on the surface of each loaf and they feel light and airy.

    To bake the bread: Carefully slide the two loaves (still resting on the parchment) into the oven onto the preheated stone or steel. If space is tight and the full sheet of parchment won’t fit on the stone or steel, cut the parchment between the two loaves and arrange them as best you can. Allow the other two loaves to continue to rest.

    Bake the loaves for 15 minutes, then transfer them, from the stone or steel, directly onto a rack in the upper third of the oven for an additional 13 to 15 minutes. (Leave the stone in place.) Moving them to the rack allows the baking stone or steel to become hot again in preparation for the next two loaves. After a total of 27 to 30 minutes of baking, remove the loaves from the oven and allow them to cool on a rack.

    Repeat the process with the two remaining loaves. Cool the bread fully before slicing.

    Storage information: Wrap the bread loosely and store it at room temperature for up to several days; freeze for longer storage.


SOURDOUGH VERSION

Formula for four:
400g strong flour
420g water (350+70)*
10g olive oil
11g salt
100g starter (100% hydration)

Total hydration: 106%

Method:
Mix 400g flour & 350 water.
Autolyse 45min 
Add 100g starter, fold/work,
60 min rest

Combine 70g reserve COLD water & 11g salt,
add half and fold/mix.
10min rest

Add remaining water/salt & mix,
add EVO & mix,
15 min rest

Folds: Oil glass pan,
add dough and do a few large (coil) folds.
45 min rest

Folds: Large (coil) folds in thirds, then rotate 90 and fold in thirds,
rest 45 min
Folds: Repeat folds,
rest 45 min 
Folds:
Repeat folds,
rest 45 min 
Folds:
Repeat folds,
Overnight in fridge for cold bulk

Room temp rest 60 min

Heavily flour table and pour the dough out,
divide into 4 & place on parchment.
60 min rest

Bake on steel at 500ºF for 8min with steam,
drop to 410 and bake for 20 min

*Note that the 70g is mixed with the salt and kept aside to incorporate after initial autolyse.

Wednesday, March 16, 2022

Glass Bread Coming

Have baked the delicious bread for March for the Bread Baking Babes, but it won't get posted until later tonight or tomorrow. Check out the other Babes sites for their takes on this very slack dough bread! 

Wednesday, March 09, 2022

Blueberry Waffles

We have been having chilly mornings with frost on the grass some days, so I decided to make waffles. I've been feeding the sourdough starter that my daughter gave me and decided to feed some of the toss off as a base for them. That was probably the reason they were so crisp on the outside and fluffy and soft on the inside...good starter.

As far as the blueberries go, I made the mistake of not coating them with batter as I usually do. The result was that they stuck to the waffle iron upper plate...not fun to clean up after the iron cooled and some of them scorched a bit...see the really dark spots in the photo. Thank you Sweetie for doing that. So if you decide to go with any berry cooked inside the waffle, mix them into the batter first. You'll be glad you did because they really add to the flavor of the waffle, but you really don't need that clean up issue.

This recipe is for the Amazing Overnight Waffles that work so well with either sourdough starter or active dry yeast. I made a half batch and replaced 1/4 cup of the flour with Irish Whole Meal Flour from King Arthur Baking Company which adds a nice, nutty flavor and some flecks of whole wheat and bran, too. Delicious!

My waffle iron is one that I bought at a yard sale in Berkeley over 40 years ago. It takes a little longer to heat up than it did all those years ago, but I like my waffles crispy on the outside and it does that. Use what ever waffle iron you have and be sure to let it cook until the steaming stops...you'll probably have nice crispy waffles, too.


If you keep up with what's going on here in Northern CA, we now have three lambs. Two were born a couple of weeks ago and the last lamb was born over the weekend. It's big for a newborn lamb, all black except for a cute white tail that waves madly when it nurses.


Amazing Overnight Blueberry Waffles

Sponge:
1 cup sourdough starter
½ cup all-purpose flour
1 tablespoon sugar
½ cup water
Whisk together and let sit, uncovered, at room temperature for 2 hours

Batter:
1 1/2 cups unbleached all-purpose flour
1/2 cup Irish wholemeal wheat flour
all of the sponge
1/8 teaspoon instant yeast
1 tablespoon sugar
½ teaspoon salt
2 cups milk
6 tablespoons unsalted butter, melted
2 large eggs
1 cup fresh blueberries, washed and drained


Nonstick spray
Butter (and bread) for the waffle iron
Whipped cream if you are feeling decadent or maple syrup if you prefer


Combine the flour, yeast, sugar, and salt in a medium bowl. Add the sponge that has sat for 2 hours waiting for this moment, and whisk to combine. Add the milk and whisk until blended. Cover the bowl tightly with plastic wrap and let stand overnight at room temperature (or put in the fridge if room temp. is over 70 degrees F.)

The next morning, preheat the waffle iron. Melt the 6 tablespoons butter and let cool a bit. Beat the egg is a small bowl (unnecessary if using egg substitute) then beat it into the batter along with the melted butter. 

Lightly spray the hot waffle iron with non stick spray, top and bottom plates, and then butter a piece of bread and use that to rub some butter on top and bottom plates.

Add the blueberries to the batter and stir gently just to coat the blueberries with the batter. Add just enough batter to cover the cooking surface…this varies by waffle iron…about 2/3 cup. Lower the top and cook until golden brown…it’s OK to check now and then. It takes about 2-3 minutes and it's usually when the steam is almost gone. You want it golden brown.

Serve hot, right away, with whipped cream or maple syrup, or toppings of your choice.

Note; If you have too many waffles for the number of people you are feeding, bake the leftover batter a little less than the ones you are eating, let cool on a baking rack, then freeze and store in the freezer tightly wrapped. Re-heat in the toaster.

Thursday, March 03, 2022

Scones with Currants


Dried currants are a favorite of mine. Each tiny one of them holds a big burst of flavor, so when you have lots of them baked into your favorite scone, you have a delicious treat.

Scones are a really simple quick bread...no yeast involved. The key to the best scones is to handle the ingredients gently and to just barely mix the liquids into the dry ingredients...a few dry crumbs that can be swept up into the dough mass as you form a ball is just right.

This scone has soy milk soured with lemon juice, some lemon zest, and lots of currants. I made these with all-purpose flour, but they are delicious with a mixture of all-purpose and most whole grain flours, like whole wheat, spelt, etc. I like to use King Arthur Baking's Irish Wholemeal flour for about 1/4 of the flour. It adds nutty flavor and a bit of chew. 

Once they are baked, do try to eat your first one while it is still warm from the oven to get the best experience. Those Sweetie and I didn't eat at once were allowed to cool to room temperature, then I put them into a gallon ziploc bag and then into the refrigerator. They kept well for a couple of days and were still delicious when re-heated on low power in the microwave.

Try them with butter or a smear of lemon curd and you will never want to be without a currant scone handy in the freezer. They do freeze beautifully. 


Dried Currant and Citrus Scones
Adapted from a Ladies Home Journal recipe March ‘97

Heat oven to 425 degrees F. Grease a cookie sheet.

3 cups all-purpose flour
½ cup sugar
2 ½ teaspoons baking powder
1 teaspoon salt
½ teaspoon baking soda
¾ cup unsalted butter, at room temperature (I used non-dairy margarine)
¾ cup currants
1 cup buttermilk (I used soy creamer soured with 2 tablespoons fresh lemon juice)
1 tablespoon grated lemon peel

Glaze:(optional) 2 tablespoons heavy cream
2 tablespoons sugar or sanding sugar

Combine flour, sugar, baking powder, salt, and baking soda in a large bowl. With pastry blender or two knives, cut in butter until mixture resembles coarse crumbs. Add diced dried fruit and pecans. Combine buttermilk and orange peel in a bowl or measuring cup. Pour over crumb mixture. Stir together with fork just until mixture comes together. Gather dough gently into a ball; knead 4 or 5 times.

Cut dough in half and transfer pieces to prepared cookie sheets. Shape each piece into a 6 inch x 1/4 inch thick circles, 2 inches apart. Using floured knife, cut each circle into 8 wedges. You will have two circles, cut into 16 scones.

For glaze, if using, brush tops with cream and sprinkle with sugar.

Bake 20 – 25 minutes until toothpick inserted in the center comes out clean. Serve warm or at room temperature.
Makes 16 scones.

Tuesday, March 01, 2022

Golden Beet Salad


As we come to March we enter the time between seasons, still enjoying winter's sturdy and hearty foods while beginning to want the lighter food of spring, along with their zing. This salad fits that transition with the delicious golden beets of winter and the mixed greens and citrus dressing for the whispy part. Walnuts add crunch and remind me of fall while the orange segments lean towards spring. Most of all it's delicious!

We start by roasting the beets, then letting them cool before peeling them and cutting them into wedges. While the oven is hot, it's easy to toast the walnuts which brings out their flavor. Next comes the citrus and walnut oil dressing. Some mustard and finely chopped Italian parsley add savory elements that provide counterpoint to the sweetness of the roasted beets and the oranges. 

If you like, this salad would also be good with the addition of some salty feta cheese or some pungent blue cheese.

Once you dress the greens, I doubt that this salad would keep well, but we didn't find out...Sweetie had a second helping and finished it off!

This is my own recipe, but you can probably find similar ones on the internet. For the dressing I used Penzey's Spices dried orange and lemon peel, but it would probably be even better with fresh zest of oranges and lemons. Do use fresh lemon juice for the dressing. I have some Meyer lemons from my lemon bush and they were great, but lemons from the market work well, too. If you don't have walnut oil, a good olive oil will work well, too. Fresh orange segments instead of canned would be even better, but canned was what I had on hand and they were fine.


Golden Beet Salad with Toasted Walnuts

3-4 golden beets (1 bunch), tops removed for another use
spray olive oil
1/3 cup walnuts...pieces are OK
1 small shallot, finely minced
1/2 teaspoon each lemon and orange zest (I used equivalent dried peel)
1/2 teaspoon Dijon mustard
salt or garlic salt and pepper to taste...I used about 1/4 teaspoon pepper and 1 teaspoon garlic salt
1 tablespoon finely chopped leaves of Italian parsley; discard stems
3 tablespoons freshly squeezed lemon juice, seeds removed
1/3 cup walnut oil
1/2 cup mandarin orange segments, fresh or canned/drained
6-8 cups fresh, washed and dried, spring mix lettuce or arugula

Wash the beets to remove any soil, then cut in half (or quarters if large) and place on foil lined baking sheet that has been sprayed with olive oil. Roast in preheated 425 degree F oven for 25-45 minutes, until a skewer easily goes into center of pieces. Remove from oven and let cool. Remove skin and discard. Slice the beets into wedges. Set aside.

While the oven is still hot, toast the walnuts for 5-10 minutes, stirring every few minutes, until toasted. You will smell walnuts when toasted. Remove from oven, cool, chop roughly and set aside.

While beets are cooling, make the dressing. Combine the shallot, citrus zests, mustard, salt or garlic salt and pepper, Italian parsley, lemon juice, and walnut oil in a jar. Close lid tightly and shake until all ingredients are well blended and dressing thickens slightly. Set aside to allow flavors to meld. Right before dressing the greens, shake again and taste. Adjust by adding zest, salt, pepper and/or lemon juice as needed. It should be tangy.

When ready to serve the salad, place the spring mix in a large bowl. Add about 2/3 of the dressing; reserve any left for another salad or another use. Toss with salad fork and spoon or tongs to completely but lightly coat the leaves of the greens. If needed add more dressing, but less is best. Pile the dressed greens on a serving platter.

Add the beet wedges to the bowl that held the greens. Toss to coat with the dressing in the bowl. This is just to add a bit of shine to the beets...they don't need to be coated with dressing. Scatter the beets over the greens, then scatter over the mandarin orange segments. Top everything with the toasted chopped walnuts and serve at once.