Showing posts with label blueberries. Show all posts

Saturday, August 09, 2025

Must Be Time For Berry Pie


We are enjoying the time with Raine and he seems to be enjoying the conversations, being on our 'farm' and the cooking and baking I'm doing with him, plus the woodworking that Sweetie is doing with him.

Yesterday he picked some more blackberries so that we could make a pie for dinner using the Food Processor Pie Crust dough we made the day before. To those blackberries we added some frozen raspberries and a few blueberries for a three berry delight.


Raine and I have baked freeform pies like galettes before, but this was our first pie in a pie pan together. He easily rolled out the dough for the pie bottom, seeming to know instinctively to keep the thickness even across the circle. He used a small knife to even out the overhang after I showed him how to fold the circle into quarters and then unfold that in the pie pan. Then, forgetting that we were planning to do a two crust pie, I showed him how to form the edge by folding the excess under, sort of rolling it, then fixing it to the edge and making it decorative with his fingers. By that time I remembered the two crust notion, so we changed course and decided to top it with streusel instead. Fortunately the book we're using for the pie recipe also has one for streusel.

The pie turned out pretty well. Because the frozen raspberries had a lot of juice, the filling was a bit loose, even with both flour and cornstarch added before baking, but it was still delicious and the pastry was excellent. I liked the streusel crunch as an contrast to the soft filling. We all agreed that the filling was nicely tart, even with the sweet streusel.


Triple Berry Pie with Streusel Top Crust

based on recipe from Art of the Pie by Kate McDermott

1 recipe Food Processor Pie Dough (see below), using half the recipe - reserve the other half for another use

6 cups (680-900 grams), about one and a half pounds, equal parts blackberries, blueberries, raspberries, fresh picked or unthawed-frozen (We used about 3 3/4 cups frozen raspberries,1/4 cup fresh blueberries and 2 cups fresh blackberries)

3/4 cup (150 grams) sugar

Small grating fresh nutmeg (OK to use a pinch of ground nutmeg instead)

1 teaspoon (5 grams) fresh lemon juice and a few gratings of lemon zest

1/4 teaspoon salt

1/2 cup (73 grams) all-purpose flour

1 tablespoon cornstarch 

1 recipe Streusel topping for pie (see below)

Preheat the oven to 425 degrees F (220 degrees C).

Roll out the half recipe of pie dough, fit it in the pie pan (9-inch, deep dish), fold under excess dough to create a raised edge, then flute. Place pie pan in the freezer while you make the filling.

Put the berries, sugar, nutmeg, lemon juice, zest, salt, flour and cornstarch into a bowl and mix just to combine. If there are few juices, mash slightly with a wooden spoon to create a small amount of juices.

If not already done, make the Streusel to top the pie with.

Pour the filling into the chilled pie dough lined pan. Gently smooth with the back of the wooden spoon to make level. Filling should come up to about 1/2 inch BELOW the edge of the pie.

Top the filling evenly with the Streusel (Crumble Topping).

Bake in the preheated oven for 15 minutes, then reduce heat to 350 degrees F (175 degrees C) and bake for another 25-35 minutes. Check after 15 minutes and cover streusel with aluminum foil, loosely, if topping is looking too brown. Pie is done when the filling at the edges of the streusel is bubbling and the pie crust is golden brown.

Set the pie on a cooling rack and cool to room temperature before serving so that the fruit filling can set up.

Food Processor Pie Crust from Martha Stewart Test Kitchen

makes 2 disks

2 sticks unsalted butter, chilled and cut into small pieces, divided
2 1/2 cups all-purpose flour
1 teaspoon salt
1 teaspoon sugar
1/2 cup ice water

Freeze 3/4 of the butter pieces in a single layer on a parchment-lined baking sheet until hard, at least 30 minutes. Refrigerate the other 1/4 of the pieces. The frozen pieces stay chunky after being pulsed, creating steam pockets when baked (the key to flakiness) and the refrigerated bits get worked into the pastry, giving it a tender texture.

Combine flour, salt, and sugar in a food processor work bowl. Add refrigerated butter (the smaller amount of the butter bits). Pulse to combine, about 10 times. Add frozen butter and pulse until mixture resembles coarse meal, with some blueberry-sized clumps.

With the processor off, add the ice water. Immediately pulse until water is just incorporated, about 10 times. Squeeze a small amount of dough to make sure it holds together. Pulse a few times more if needed. When you squeeze the dough it should remain crumbly, but come together. Don't pulse it so long that it forms a ball. Adding water while the processor is running  and over-pulsing are bad ideas... could lead to tough dough.
Lay out 2 pieces of plastic wrap. Empty half the dough onto each piece. Bring edges of wrap together to gather dough and form a round mass. Press the dough this way to form a rough round mass, and press on top of the wrap to form a disk. The processed dough should resemble uneven crumbs. When you empty the mixture from the processor bowl out onto the plastic wrap, some pieces will be tiny, others will be in clumps. That is perfect! The gathered plastic wrap method of forming the disk simultaneously has you gathering the crumbs into a cohesive dough and shaping it.

Roll out disks, still wrapped in plastic, to 1/2 inch thick rounds, about 8 inches in diameter. Rounds this size will chill more quickly that hockey-puck sized ones and will soften more uniformly when removed from the refrigerator.

Refrigerate at least 45 minutes and up to 2 days. Dough can be frozen up to 1 month. 

Streusel (Crumble Topping)

1/2 cup (110 grams) brown sugar, packed

1/4 teaspoon salt (a pinch)

1/2 cup (73 grams) all-purpose flour

1 1/2 cups (144 grams) whole oats, rolled

8 tablespoons (112 grams) unsalted butter

1/2 cup (60 grams) chopped nuts, optional - We used walnuts, but pecans are great, too

Put the brown sugar, salt, flour, and oats in a bowl and stir to mix.

Dice the chilled butter into small dice and scatter in the bowl. Cut the butter in with a pastry tool or two crossed knives, or use you fingers to smear the butter into the dry ingredients.  When you are done, the mixture should look crumbly. Take about a 1/4 cup in a clean hand and squeeze - it should stick together. If that works, add the nuts and mix in. If it doesn't stick together when squeezed, add another tablespoon or so of butter and work that in, then add the nuts.

Pour the mixture into a bowl or plastic bag and chill in the freezer while you make the filling.


Sunday, September 01, 2024

Peach Season Coffee Cake


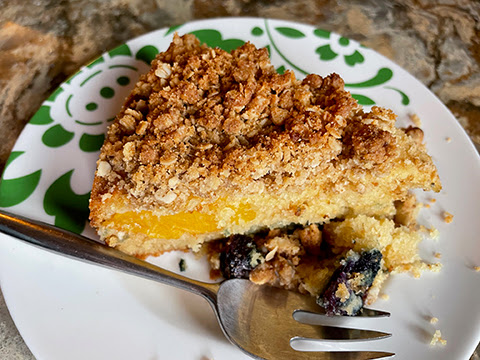
 I love peaches! There is something about the juicy, tangy fruit and just says 'summer' to me. Right now we are getting some lovely peaches at the farm stand that also sells strawberries. I decided to make a coffee cake using some, plus some blueberries. I looked at a number of recipes online but couldn't find what I wanted...a single layer cake made with self-rising flour and moistened with buttermilk. I decided to make my own recipe and hope that I got the proportions right.

It turned our really well, with a tender, moist cake that had a slight buttermilk tang, soft and sweet peaches and blueberries, and an oatmeal based streusel flavored with a bit of nutmeg that brought it together as a coffee cake. Hope you enjoy my recipe.  Give it a try and you'll see that it's fairly simple and very delicious.


Elle's Peach Blueberry Coffee Cake with Streusel

For the cake:

1/2 cup butter, at room temperature
1/2 cup brown sugar
2 eggs, at room temperature
1/4 teaspoon vanilla
1/4 teaspoon almond extract
1 3/4 cups self-rising flour
1 teaspoon baking soda
pinch of salt
1 cup buttermilk, at room temperature
1 very large or two smaller peaches, peeled, pitted, and sliced into  16 or 18 slices
1 cup fresh blueberries, rinsed and dried with paper towels

Prepare a 9-inch cake pan with at least 2" tall sides, or a 9-inch springform pan by spraying with baking spray. Put a 9-inch round of parchment paper in the bottom and spray the bottom. Set aside. Preheat the oven to 350 degrees F. after centering a rack in the oven

In a large bowl, beat the butter until fluffy, about 1 minute. Add the brown sugar and beat another minute. Add the eggs, one at a time, beating until incorporated, being sure the scrape bowl and beaters after each is incorporated. Add the vanilla and almond extract and beat another few seconds to incorporate.

Add the flour, baking soda and the pinch of salt and beat on low speed for about 20 seconds, just to get some of the flour incorporated, but there will still be lots of flour not mixed in. With mixer running on low, slowly add the buttermilk and then beat 2 minutes until batter is fully mixed and thick. Scrape bowl and beaters, then mix a few more seconds just to fully mix.

Scrape half the batter into the prepared pan and use a spatula to make the batter as even as you can. Evenly sprinkle the blueberries over the batter. Scrape the rest of the batter into the pan and spread it over the blueberries. Take the peaches and place them around the cake, pressing the sharper edge into the batter. The center probably won't have any peaches. Bake for 15 minutes. The peaches will sink a bit into the batter, but that's OK.

While the cake is beginning to bake, prepare the Streusel:

For the streusel:

3/4 cup oatmeal
1/2 cup brown sugar
3/4 cup all-purpose flour
1/8 teaspoon ground nutmeg
pinch of salt
1/2 cup cold butter (I used right out of the fridge)

In a medium bowl combine the first 5 (five) ingredients. Cut the butter into small pieces and add to the bowl. Use your clean fingers to rub the butter into the dry ingredients. When you are done the mixture will be fairly cohesive with some dry bits.

After the cake has baked for 15 minutes, removed from the oven. Place on a baking sheet and, using your clean hands, sprinkle the streusel mixture evenly over the top of the cake. Return the cake on the baking sheet to the oven and bake another 20 -25 minutes. Test for doneness by pressing lightly in the middle of the cake. If it feels at all soft or jiggly, bake longer. If it springs back against your pressure, it's done. Top should be golden brown. Cake might be pulling slightly away from the sides of the pan when baked.

Take the cake off the baking sheet and put the cake pan on a wire rack. Cool for 10 minutes. Run a knife around the sides of the pan, then invert the cake onto a plate. Remove the pan and parchment circle from the bottom of the cake. Put your serving plate, good side down, over the cake and grasp the serving plate and the wire rack. Turn the cake right side up onto the serving plate. Remove the wire rack and extra plate.  Let cake cool completely before serving.


Wednesday, May 17, 2023

Mother's Day Breakfast Super Pancake


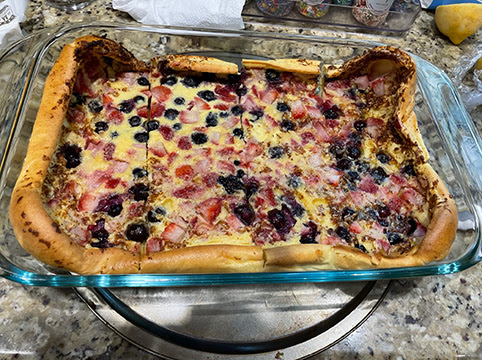
Being away from my kitchen on Mother's Day seemed strange, but fortunately my daughter's family was fine with me making a super sized Dutch Baby with berries for breakfast, so I still got to bake. BTG-guy made bacon and Raine manned the powder sugar sieve. It was delicious and easy. If you just do it with blueberries, it's even easier...we used blueberries and cubed strawberries.


I've now made this dish using four different ovens and I have to say that knowing your oven makes it easier to bake this. You want to know how quickly your oven gets to the heat needed for the recipe. If it takes a long time, don't put the pan with butter into the oven at the start. Wait until the oven is at least half way heated. If it heats up quickly, put the pan in at the beginning. Keep an eye on the butter. It's OK (delicious even) if the butter browns a bit, but you don't want to burn the milk solids...yet you still want the baking pan sizzling hot.

I had to remove the pan because the oven heated slowly and the butter browned before the oven was hot enough. As a result, the pan cooled a bit, so the pancake was a bit less puffy, although still delicious.

For toppings, more berries are great. Maple syrup is good. Traditional takes on this include just powdered sugar sifted on top and both sifted powdered sugar and lemon juice on top. Could be great with whipped cream, too. For dessert, a scoop of vanilla ice cream would be divine.


Dutch Baby with Strawberries and Blueberries

Serves 5-6

5 tablespoons butter (or non-dairy margarine or 'butter')
6 large eggs
1 cup milk (or nut milk)
1 cup all-purpose flour
dash salt
1 teaspoon vanilla extract
a few drops lemon oil (optional)

1/2 cup fresh strawberries, washed and drained and cubed to about the size of the blueberries
1/2 cup fresh blueberries, washed and drained and picked over for stems or over-ripe berries
1 tablespoon granulated sugar (optional)

More berries for on top (optional)

Preheat oven to 425 degrees F.

As oven preheats, put the butter in an ungreased 9x13-inch baking pan and place in the oven, just until the butter is melted. (Mine started to brown slightly at the edges)

Place the eggs, milk, flour, salt and vanilla, (and lemon oil, if using) in a blender and process until smooth. Scrape down the sides, if needed, and process again for a few seconds.

Pour the batter into the hot baking pan, over the melted butter. Sprinkle with the strawberries, blueberries and with the sugar (if using).

Bake, for 20-27 minutes or until edges are golden brown. Pancake will puff up, but will sink down again as it cools once removed from the oven.

Serve at once. Can sprinkle with powdered sugar, with lemon juice, or serve with maple syrup and/or more berries.

Note: you can make this without berries, too, and it will still puff up gloriously and taste wonderful.

Wednesday, October 12, 2022

A Single Serving


Sometimes you just need one serving. One day in the last few weeks...I should know when but things have been busy, with very little baking and only a bit more cooking...Sweetie wasn't here for breakfast...I think he was volunteering with the group in Petaluma that fixes up old train cars...so I made a single serving of the Dutch Baby with blueberries. Sooo good.

You keep the same proportions for this mini-baby as you do for the large one, you just make it in a smaller pan. I was lucky enough to recently find a small Pyrex baking dish just the right size...the size of a small loaf pan, but about an inch wider. Be sure to use a dish or pan that is meant to be used with high heat and you will be fine. If it's even wider, the mixture might not puff up as much in the middle, but it will still rise at the sides and you will have a delicious single-person treat.

I ate mine with just a small drizzle of maple syrup, but you can use syrup, whipped cream, yogurt or any other topping that you like.


Dutch Baby for One with Blueberries

Serves 1-2

1 tablespoons butter (or non-dairy margarine or 'butter')
1 large eggs
1/4 cup milk (or nut milk)
1/2 cup all-purpose flour
dash salt
1/4 teaspoon vanilla extract
1/4 cup fresh blueberries, washed and drained and picked over for stems or over-ripe berries
1/4 tablespoon granulated sugar (optional)

Preheat oven to 425 degrees F.

As oven preheats, put the butter in an ungreased 3x5-inch baking pan and place in the oven, just until the butter is melted. (Mine started to brown slightly at the edges)

Place the eggs, milk, flour, salt and vanilla, (and lemon oil, if using) in a blender and process until smooth. Scrape down the sides, if needed, and process again for a few seconds.

Pour the batter into the hot baking pan, over the melted butter, using a spatula to scrape out as much batter as possible. Sprinkle with the blueberries and with the sugar (if using).

Bake, for 15-20 minutes or until edges are golden brown. Pancake will puff up, but will sink down again as it cools once removed from the oven.

Serve at once. Can sprinkle with powdered sugar, with lemon juice, or serve with maple syrup and/or more berries.

Note: you can make this without berries, too, and it will still puff up gloriously and taste wonderful.


Wednesday, March 09, 2022

Blueberry Waffles

We have been having chilly mornings with frost on the grass some days, so I decided to make waffles. I've been feeding the sourdough starter that my daughter gave me and decided to feed some of the toss off as a base for them. That was probably the reason they were so crisp on the outside and fluffy and soft on the inside...good starter.

As far as the blueberries go, I made the mistake of not coating them with batter as I usually do. The result was that they stuck to the waffle iron upper plate...not fun to clean up after the iron cooled and some of them scorched a bit...see the really dark spots in the photo. Thank you Sweetie for doing that. So if you decide to go with any berry cooked inside the waffle, mix them into the batter first. You'll be glad you did because they really add to the flavor of the waffle, but you really don't need that clean up issue.

This recipe is for the Amazing Overnight Waffles that work so well with either sourdough starter or active dry yeast. I made a half batch and replaced 1/4 cup of the flour with Irish Whole Meal Flour from King Arthur Baking Company which adds a nice, nutty flavor and some flecks of whole wheat and bran, too. Delicious!

My waffle iron is one that I bought at a yard sale in Berkeley over 40 years ago. It takes a little longer to heat up than it did all those years ago, but I like my waffles crispy on the outside and it does that. Use what ever waffle iron you have and be sure to let it cook until the steaming stops...you'll probably have nice crispy waffles, too.


If you keep up with what's going on here in Northern CA, we now have three lambs. Two were born a couple of weeks ago and the last lamb was born over the weekend. It's big for a newborn lamb, all black except for a cute white tail that waves madly when it nurses.


Amazing Overnight Blueberry Waffles

Sponge:
1 cup sourdough starter
½ cup all-purpose flour
1 tablespoon sugar
½ cup water
Whisk together and let sit, uncovered, at room temperature for 2 hours

Batter:
1 1/2 cups unbleached all-purpose flour
1/2 cup Irish wholemeal wheat flour
all of the sponge
1/8 teaspoon instant yeast
1 tablespoon sugar
½ teaspoon salt
2 cups milk
6 tablespoons unsalted butter, melted
2 large eggs
1 cup fresh blueberries, washed and drained


Nonstick spray
Butter (and bread) for the waffle iron
Whipped cream if you are feeling decadent or maple syrup if you prefer


Combine the flour, yeast, sugar, and salt in a medium bowl. Add the sponge that has sat for 2 hours waiting for this moment, and whisk to combine. Add the milk and whisk until blended. Cover the bowl tightly with plastic wrap and let stand overnight at room temperature (or put in the fridge if room temp. is over 70 degrees F.)

The next morning, preheat the waffle iron. Melt the 6 tablespoons butter and let cool a bit. Beat the egg is a small bowl (unnecessary if using egg substitute) then beat it into the batter along with the melted butter. 

Lightly spray the hot waffle iron with non stick spray, top and bottom plates, and then butter a piece of bread and use that to rub some butter on top and bottom plates.

Add the blueberries to the batter and stir gently just to coat the blueberries with the batter. Add just enough batter to cover the cooking surface…this varies by waffle iron…about 2/3 cup. Lower the top and cook until golden brown…it’s OK to check now and then. It takes about 2-3 minutes and it's usually when the steam is almost gone. You want it golden brown.

Serve hot, right away, with whipped cream or maple syrup, or toppings of your choice.

Note; If you have too many waffles for the number of people you are feeding, bake the leftover batter a little less than the ones you are eating, let cool on a baking rack, then freeze and store in the freezer tightly wrapped. Re-heat in the toaster.

Saturday, October 23, 2021

Half A Puffy Blueberry Pancake Recipe


Over the summer I played with a Dutch Baby recipe that you bake in a 9 x 13-inch pan and loved it so much that I made it multiple times. Dutch Babies are puffy pancakes that you bake in the oven instead of griddling on the stovetop. The batter is mixed up quickly in a blender and I like to scatter fresh blueberries or raspberries over as soon as the batter is in the pan.

It would be hard to top the original recipe for serving a group, but it's too much pancake for two people. Because this pancake puffs up while baking, but begins to flatten once removed from the oven, it really isn't a good dish for leftovers.

So the solution, since I wanted to have some a few days ago as our morning treat, was to take the original recipe and to divide the ingredient amounts in half. Then I baked it in a 10-inch cast iron skillet. That worked very well and we found room to eat the whole thing. The cast iron heated up well in the pre-heating oven, so the edges were nicely browned. I highly recommend it! 


German Pancakes with Blueberries (smaller version)

Serves 2-3

3 tablespoons butter (or non-dairy margarine or 'butter')
3 large eggs
1/2 cup milk (or nut milk)
1/2 cup all-purpose flour
dash salt
1/2 teaspoon vanilla extract
a few drops lemon oil (optional)
1/2 cup fresh blueberries, washed and drained and picked over for stems or over-ripe berries
1/2 tablespoon granulated sugar (optional)

Preheat oven to 425 degrees F.

As oven preheats, put the butter in an ungreased 9 or 10-inch cast iron skillet (or a 9-inch cake pan with high sides) and place in the oven, just until the butter is melted. (Mine started to brown slightly at the edges)

Place the eggs, milk, flour, salt and vanilla, (and lemon oil, if using) in a blender and process until smooth. Scrape down the sides, if needed, and process again for a few seconds.

Pour the batter into the hot baking pan, over the melted butter. Sprinkle with the blueberries and with the sugar (if using).

Bake, for 16-22 minutes or until edges are golden brown. Pancake will puff up, but will sink down again as it cools once removed from the oven.

Serve at once. Can sprinkle with powdered sugar, with lemon juice, or serve with maple syrup and/or more berries.

Note: you can make this without berries, too, and it will still puff up gloriously and taste wonderful.

Tuesday, June 30, 2020

Fruit Basket Coffee Cake


Summer certainly brings lots of kinds of fruit. Right now we have ripe peaches, luscious dark cherries, olallieberries right off the vine, and raspberries, plus green grapes and some plums that are almost ripe which are turning a lovely shade of red-gold on the tree down the hill. The plums and olallieberries are the only local fruit, but the cherries, peaches and raspberries are certainly seasonal.

Yesterday I made a lovely coffee cake to showcase the peaches, cherries, olallieberries and raspberries. It's a variation of the Nectarine Cake in Lauren Chattman's Cake Keeper Cakes book, one of the great cookbooks we baked from during my time with the Cake Slice Bakers.

I made one and a half times the cake batter because the original recipe only makes a thin layer of cake and I wanted one thick enough to absorb all the fruit juices. I also added some almond extract, while keeping the vanilla extract. For the topping I used brown sugar, pecans and ground nutmeg instead of white sugar and cinnamon...they recipe gave two choices for nuts and pecans were one of them.

I baked it in a nine-inch springform pan instead of a ten-inch one. Because I had such a wonderful choice of fruits, I used cherry halves around the outer edge, then peach slices, then olallieberries and raspberries in the middle.

Do watch this cake because the nuts might get too brown...just tent with foil if that happens. Because  the batter is deeper than the original, it took a while to bake, but came out moist with a nice crumb and browned crust. We actually enjoyed this cake for dinner dessert, so I served it with soy vanilla ice cream and that was a great choice. Sweetie added some whipped cream to his, and you can always add extra prepared fresh fruit.


I've never been a big fan of summer, but sitting outside for dinner because it's still warm by 7 o'clock makes summer a bit easier to take. All of the beautiful flowers that are blooming in the garden also are a benefit of summer. Too bad it gets so hot!

Do try this cake, especially if you have some ripe fruit on hand. You can use all one kind of fruit or two kinds, or three if four is too much. With most kinds of fruit, push them down into the batter a bit to allow the juices to soak into the cake. Enjoy!


Fruit Basket Cake with Nutmeg Nut Topping
based on Nectarine Cake in Lauren Chattman's Cake Keep Cakes
serves 8-10

For the Topping:
2 tablespoons brown sugar, packed
1/4 teaspoon ground nutmeg
1/2 cup pecans, finely chopped

For the Cake:
1 1/2 cups all-purpose flour
1 1/2 teaspoons baking powder
1/2 teaspoon salt
1 1/4 cup sugar
3/4 cup (1 1/2 sticks, 6 oz.), unsalted butter or non-dairy margarine, softened
3 large eggs
1 teaspoon pure vanilla extract
1/2 teaspoon almond extract
2 cups assorted stone fruit and/or berries or one kind or fruit, ripe - peel plums or peaches and pit them, pit cherries, pit nectarines or apricots, wash and dry berries

Preheat the oven to 375 degrees F. Grease the insides of a springform pan, 9-inch or 10-inch preferred.

Combine the brown sugar, nutmeg and chopped nuts in a small bowl. Set aside.

Combine the flour, baking powder and salt in a medium bowl or on a sheet of waxed paper.

In the bowl of a stand mixer, beat the sugar and butter together on medium-high speed until fluffy, about 3 minutes. Scrape bowl and beaters as needed.

With the mixer on low, add the eggs, one at a time, beating to combine the eggs with the butter mixture after each addition. Scrape bowl and beaters as needed.

Beat in the vanilla and almond extracts. With mixer on low, gradually add the flour mixture, a 1/2 cup at a time. Scrape bowl and beaters as needed and at the end. Use scraper to give batter a final stir to make sure all is combined.

Scrape batter into the prepared pan and smooth the top of the batter. Carefully place the prepared fruit, pushing down a bit into the batter. If using more than one kind of fruit, you can create a pattern.

Sprinkle with the topping. Bake until golden and a toothpick inserted in the center comes out clean, about 45-55 minutes. Cool cake in pan for 5 minutes, then run a knife around the sides, unhinge the springform and cool cake on wire rack until tepid. Remove from the springform bottom and place on a serving plate.

Serve with more fruit, ice cream, whip cream or just as is.

Store uneaten cake, if any, in a cake keeper or wrap in plastic and store at room temperature for up to 2 days.

Friday, September 13, 2019

Is It A Cookie Or A Tart?


Recently our local newspaper, the Press Democrat, has a delicious sounding recipe in the Food Section. It was for a Crostata with jam. A crostata is sort of a cross between a cookie and a tart. It's baked in a tart pan, but uses a dough for the base which is cookie-like and fluffier than a usual tart dough. The filling is usually jam. I used a combination of good quality apricot jam and fresh, cooked peaches, lightly mashed and scented and flavored with almond extract. It made for a delightful dessert which I served for afternoon tea yesterday. With a topping of pieces of some of the tart dough and a sprinkle of sliced almonds, it looks very pretty and tastes divine.

My health improves day by day, which is very encouraging. It's nice to finally have enough energy to try a new recipe. Sweetie is happy because I'm also cooking again. Mostly simple things like steamed corn on the cob and salads, but now and again a little more complicated like last night when I marinated some portabella mushrooms for sandwiches. Sweetie did the grilling. I'll try and post the recipe soon.

Back to the crostata. When you are putting the dough into the bottom of the pan, keep flouring your hands as they get sticky for the most even crust. Don't forget to set aside the 1/2 cup of dough for the top. You can chill it while you work on the tart. Do plan on enough time to also chill the dough-filled tart pan for at least 20 minutes.


If you are using some or all pre-made jam (as I did), be sure to taste it and add some lemon juice, as needed, to make it a bit tart. If you are making your own jam, you can taste it and add sugar if needed as you make it. You can also make the jam ahead of time, up to 1 week before making the crostata.

You'll only need small pieces of this crostata. Try it with a nice cup of hot tea and take a few moments to relax. If you used fresh, seasonal fruit, you can think of the wonders of harvest time, too.


Jam Crostata
based on a recipe originally in the New York Times, by Melissa Clark
Makes 8 servings

For the jam - use at least 12 oz. good quality pre-made jam, or make your own as follows:
3 cups blackberries
1 cup blueberries
3/4 cup granulated sugar, plus more as needed
2 teaspoons minced fresh lemon verbena (optional)
1 teaspoon fresh lemon juice, plus more as needed
1/2 teaspoon grated lemon zest
1 teaspoon vanilla extract
topping:
1/3 cup sliced almonds
Demerara sugar, for sprinkling (optional)

In a medium saucepan, stir together the blackberries, blueberries, sugar and lemon verbena (if using). Cook over medium heat, stirring occasionally at first, then more frequently as the mixture starts to bubble and reduce. When the mixture has reduced and looks syrupy (about 30 minutes), stir in lemon juice and zest. Taste and add sugar if necessary. This depends on how sweet your berries were to begin with.
Cook for 3 minutes longer, stirring frequently to prevent burning. When the jam is thickened and shiny but still slightly runnier than you expect jam to be, take it off the heat; it will continue to thicken as it cools.
Scrape jam into a bowl or heatproof container, stir in vanilla and let cool to room temperature.
Taste and stir in a little more lemon juice if jam is very sweet. At this point, the cooled jam can be chilled for up to 1 week.
Note: I used 10 oz. pre-made apricot jam and then used the instructions (but not the quantities) above to make a peach jam to combine with the apricot jam to make my crostata filling. I used a tiny bit of almond extract instead of vanilla and no extra sugar since my peach was quite ripe and sweet.

For the crust - allow time to chill
1 1/2 cups all-purpose flour
3/4 cup whole wheat flour
12 tablespoons butter or margarine, softened
1/2 cup granulated sugar
2 large egg yolks, at room temperature
1 tablespoon finely grated lemon zest (about 1 large lemon)
1 teaspoon vanilla extract
1/2 teaspoon fine sea salt
1/4 teaspoon almond extract

In a medium bowl, whisk together the flours; set aside. In a second bowl, using an electric mixer, beat butter and sugar until pale and fluffy, about 3 minutes. Beat in egg yolks, lemon zest, vanilla, salt, and almond extract until combined, then beat in flour, only beating until flour is incorporated.
Scoop 1/2 cup of the dough into a covered container and chill. Transfer remaining dough into a 9 or 10-inch tart pan with a removable bottom and use floured finders to press the dough into an even layer in the bottom of the tart pan and up the sides. Chill for at least 20 minutes
When ready to bake, preheat the oven to 350 degrees F. Spread cooled jam evenly into the crust the, using your fingers, crumble reserved chilled 1/2 cup dough over the jam. Sprinkle with sliced almonds and Demerara sugar (if using).
Bake until golden, 35 to 48 minutes. Let cool completely to room temperature before serving.

Thursday, May 29, 2014

Lots of Fruit


What would you make if you had some really nice fresh apricots, ripe and fragrant and about the size of a tennis ball? How about ripe, sweet and juicy strawberries? Firm, dusky blueberries? Fat sweet dark red cherries? I have some of all of those from a local farm stand in my kitchen right now and the first of the ollaliberries are going to be ripe within the week. I don't use a lot of jam or jelly except for making cookies at Christmas, so it has to be something else. We do eat lots of fruit fresh and with no preparation other than a quick wash and removal of stems or stem end leaves or inedible peels in the case of mangoes.

If you have a recipe to go with your suggestion, that would be excellent! Don't want the fruits of spring and early summer to come and go without some fun cooking and baking!

Friday, August 09, 2013

Soda Bread with Blueberries


One of my treasured recipes is for Aunt May's Irish Soda Bread. It's in my book (Classic Comfort Food) and I throw it together for tea when I have the time and some buttermilk in the fridge.

Recently I ordered some more Irish Wholemeal Flour from King Arthur Flour. It is the perfect flour to use for this recipe, although I only use half wholemeal and half regular all-purpose flour. Today I also had some fat, ripe, deeply blue blueberries on hand. Never tried fresh blueberries in the soda bread before, but I'm glad I did. The soda bread is just firm enough a batter that the berries don't fall to the bottom like they sometimes do with blueberry muffins. The excellent flavors of wheat and buttermilk of the bread go really well with the tang of the blueberries...and they look pretty.


I only made half the batter, so it was about 1/2 cup of blueberries for this one. For the full recipe I would put in a cup of the blue beauties. Although you can certainly add some butter to the slices once baked, there is enough butter in the batter that you don't need it. With the blueberries bursting with warm juices, you really don't need anything else...except maybe a cup of tea.


Aunt May's Irish Soda Bread with Blueberries(the blueberries are not in Aunt May's version, but are yummy)
4 cups all-purpose flour (I used 2 cups all-purpose and 2 cups Irish whole meal flour)
1 teaspoon baking soda
½ teaspoon baking powder
1 teaspoon salt
6 tablespoons sugar
8 oz. (1 stick) cold butter, in thin slices
2 ¼ cups buttermilk
1 cup blueberries
Sift the dry ingredients over the butter and cut in well with a fork or pastry blender.  Add the buttermilk and mix just until moist - don’t over-handle. Some dry stuff is OK, but the dough should be sticky. Turn dough out onto a parchment-lined cookie sheet, flatten the dough lightly, then pat on the blueberries. Pull dough gently over the fruit and pat into a rough circle. Cut a cross on top. Bake 45 minutes at 3500 F. Cool a bit before slicing.


Wednesday, June 05, 2013

Cakes in the Morning


A good, well-made plain pancake is a delight. Gilding the lily with blueberries is common, but then adding cooked bacon and chopped pecans is not. You might want to try it...the combination is amazing! Sweetie claims they are the best pancakes ever.


Blueberry Bacon Pecan Pancakes
based on a recipe for plain pancakes in The Breakfast Book by Marion Cunningham

1 egg
2 tablespoons water
5 tablespoons butter
1 cup milk
1 1/4 cups all-purpose flour
1 tablespoon sugar
4 teaspoons baking powder
3/4 teaspoon salt (I used 1/2 teaspoon since the butter was salted)
1/2 cup chopped pecans
1/2 cup cooked, chopped bacon
1 cup (about) fresh blueberries, rinsed and dried

Whisk the egg with the water. Set aside. Melt the butter over low heat in a small pot. When melted, add the milk, stir to combine and let cool. When cool, whisk in the egg mixture.

In a large bowl sift together the flour, sugar, baking powder and salt. Stir in the chopped pecans and bacon. Add the butter/milk/egg mixture and stir until just combined. If too thick, add a little more water.

On a preheated, greased skillet or griddle, over medium-high heat, place enough batter for a 4 -5 inch pancake. Top with some of the blueberries, pushing the berries down into the batter a bit. Repeat to fill the skillet or griddle. When small bubbles form around the sides of each pancake, turn the pancake and let the berry side cook until dark brown. Remove pancakes to a plate as they finish cooking. Continue cooking until all of the batter has been used up.

Serve while hot with real maple syrup. We didn't need extra butter with these, but you could if you prefer your pancakes that way.
Serves 3 - 4.

This poppy self-seeded from last year...and it's a beauty!


Friday, March 01, 2013

Warm Blueberries


Once upon a time, a long time ago, I used to have a muffin company. I baked wholesale muffins for a couple of coffee shops, mostly to keep my brain active when my kids were very young. Although my lemon ricotta mega-muffin was my best seller, the next favorite was fresh blueberry muffins. It's been ages since I baked any kind of muffin, but the blueberries in the produce section called to me this week, so on Saturday morning I baked up a batch of fresh blueberry muffins, with some Meyer lemon zest since they go so well with blueberries. When I ate my first bite, the muffins still had warm blueberries...a most delicious and decadent flavor. The muffins were not the airy, overly sweet cakey kind that you often find these days. The texture is delicate but firm, the flavors are of the fruit, lemon and butter, and they were gone in a flash.

One of the keys with muffins is much the same as with most quick breads...delicate care in handling the batter. If you whisk together the dry ingredients, toss in the rinsed blueberries, then toss gently to cover them with flour, all you need to do when you add the mixed wet ingredients is to barely combine the ingredients. Do have your pans prepared and your oven hot. In no time you will have delectable warm blueberries in a lightly lemon, buttery muffin. What a lovely way to start the day.


Blueberry Muffins

based on Basic Muffins in Marion Cunningham's The Fannie Farmer Baking Book

2 cups flour
1 tablespoon baking powder
1 teaspoon salt
1/4 cup sugar
1 teaspoon fresh lemon zest
1 cup firm fresh blueberries, rinsed
2 eggs, slightly beaten, at room temperature
1 cup milk, at room temperature
8 tablespoons (1 stick or 1/2 cup) butter, melted and cooled
1 teaspoon vanilla extract
2-3 tablespoons white sanding sugar (optional)

Preheat the oven to 400 degrees F. Grease muffin pans or line with paper baking cups.

Whisk together the flour, baking powder, salt and sugar in a large bowl. Add the lemon zest and whisk to combine. Add the fresh blueberries and toss to coat lightly with the dry ingredients. Set aside.

In another bowl whisk together the eggs, milk, melted butter and vanilla. Make a well in the center of the dry ingredient/blueberry mixture. Pour in the egg mixture and stir to combine, just long enough to blend. Batter will not be smooth.

Spoon the batter into the prepared muffin pans, filling each cup about two-thirds full. If desired, sprinkle sanding sugar on the tops of each muffin.

Bake muffins for about 20 minutes, or until a toothpick inserted in the center of a muffin comes out clean. Remove the muffins from the pans and serve warm.

Makes 12 muffins

With the unseasonable weather we have been having the seedlings in the sunspace are growing very rapidly. All of the squash seedlings are now in larger peat pots, having outgrown the cell they started in. Some of the squash seeds wrapped in damp paper towels didn't germinate in time to be put into the cells, but are now large enough to go right into the pots! That is vigorous sprouting! I expect great things of these squash plants once they are settled into the garden once the soil warms enough. That might be a while...we have been having frost most nights, even if the days are warm and sunny. Some peopel are yammering on about not enough rain, but we had far more than needed in the fall and early winter, so this is just balancing things out. Bet that March is rainy again.

Wednesday, July 18, 2012

ABC Award and Seasonal Banana Bread


There is a recipe on this post, but it is waaay down there. First there is the ABC Award (Awesome Blog Content) from Katie of Apple and Spice. I've visited Katie's blog for quite a while now and I can confidently say that she is not only a wonderful blogger, well deserving the ABC Award herself, but an intrepid one. She has always baked delicious treats but made the change to gluten-free with such grace that, unless you really look carefully, you can't tell if her goodies have gluten or not...no 'poor me' from this fabulous baker! In some ways it has unleashed an even greater talent for baking and creativity. Do visit her blog so you can see what I mean!

So I thank Katie for the Award, but I took a while to post about it because it came with a list to make. I always have trouble with those lists. You've got to give some random facts about yourself, one for every letter of the alphabet! So here's my 26 alphabet related facts about me, although I'm not sure how fun it is. Mostly these are things I do, 'hats' I 'wear':

a - artist, author These two go together since my book Classic Comfort Food depends on the artistic photographs to shine.

b - baker, bread maker, business woman At one time these went together, too, when I had a wholesale muffin business. Now baking is for fun and gifting. Bread making is a passion that seems to go on and on. Being self-published, I'm running my own business again.

c - cook This is a life-long vocation and pleasurable pursuit. Fortunately, it's something I get to do every day. It is also one of my vehicles for another 'c' word, creative.

d - designer, daughter Although graphic design is my latest effort, I've also had a stenciled designs tee-shirt business, have designed gardens and clothing for myself and lots of other things. I'm grateful that my Mom is still alive so I get to be her daughter a while longer.

e - economist of the household variety

f - friend My first friends were my siblings and they are still my friends. I'm lucky to have a handful of true blue friends whom I can be completely myself with. Virtual friends like Katie are a blessing and I still struggle with how to be a good virtual friend myself.

g - graphics specialist, gardener During the past year these have been two interests that have been really high on my list of priorities. Just finished designing a children's book and have more graphic design projects lined up. The garden is burgeoning with flowers and veggies and I love being out in it enjoying the fragrances and colors.

h - homemaker Although other pursuits often mean my house isn't dust free and pin neat, it is a home and one where visitors say they always feel relaxed. I feel very lucky to live where I do and I love our home.

i - InDesign user Until last September I was a confirmed Pagemaker and QuarkXpress graphic designer. Now I love InDesign. All of these are programs used for page layout and graphic design. I spend a lot of time using them (and Photoshop) so it is really great to have found such a wonderful program.

j - journeyer In truth we are all on a journey into the unknown...exciting isn't it?

k - kitchen wench Anyone who loves to cook and bake as I do either finds someone to help with the clean up or becomes a kitchen wench. Although Sweetie helps sometimes, often it's me and the sink.

l - lover When he was in kindergarten, our son Max made a picture that said he was special because he was loving. It was very true. I think it might be true for me, too. I love a lot of people and I try to let them know it.

m - mom The hardest job of all, and much of the time the best one, too. My daughter Katherine is one of the greatest joys of my life.

n - never bored If you know me at all this one won't surprise you. I always have many more ideas and things I want to do than there is time. Occasionally I find it frustrating but mostly it feels like money in the bank.

o - outside-the-box thinker This sort of goes with the one above. Never met a recipe I didn't itch to change. When I 'problem solve' I often come up with unexpected solutions. Sweetie knows I think differently. My siblings claim I have my own logic system. This is not always the most comfortable trait to have.

p - Pi lover I'm besotted with our new dog, Pi. It's as simple as that.

q - queen of the hill We live at the top of a hill with a nice view back over the plain. Looking out that way from our deck I often feel like the queen of the hill even though most of what I see isn't really mine except to look at. I do appreciate how beautiful it is.

r - reader Books are everywhere in our home and I usually have a stack of unread books next to the bed. I love to read and so am rarely up on the latest TV shows or even music. So many books and so little time is absolutely true in my case.

s - seed starter and saver Growing things from seed is such a creative, life-affirming process. I've figured out how to get a high germination rate and every year start seeds, especially veggies, for the garden. I also save seeds from sweet peas, morning glories, scarlet runner beans (and more) for growing next year.

t - tomato maven There is nothing like a ripe tomato from your own garden, especially some of the heirloom tomatoes. I've gotten pretty good at growing them, plus I always give away seedlings in the spring to friends. If the seeds germinate really well I usually have more than I can plant.

u - universe's child This refers to a belief that, mostly, things are unfolding as they should. It is counter intuitive having lost my son 13 years ago yesterday in an auto accident when he was almost 17, but it still seems to explain a lot of other things.

v - voter This year especially it's an important thing. From the Presidential race to the local fire service race and everything in between, many, many things that impact my life and yours will be influenced by how the people vote and by how many actually cast their ballots. It may be weakened by forces beyond my control, but the democratic process of voting is still essential to America staying free and strong so I vote. You should, too.

w - wife The most important of all my pursuits, and the most enjoyable. I'm lucky in love. Thanks Sweetie!

x - xacto knife wielder Hey, it's getting tough to find activities. I did this the other day when I made special "Signed by Local Author" labels for some cookbooks to be sold at a local market, so it counts.

y - young at heart Now that I see gray hair when I look in the mirror, this one is kind of funny, but true anyway.

zzzz - tired of me yet? zucchini grower extraordinaire Since I'm sharing pounds and pounds of zucchini every week with neighbors and friends, eating some every day, and since I have one plant where the leaves are each about a foot and a half across, I claim this title with happiness.
I think I'm supposed to nominate others for this award, and there are certainly plenty of blogger who qualify, but not sure I want to also 'award' them the list making. Might need a few more days to decide. Stay 'tuned'.


Now for the recipe. Lots of ripe bananas often means Banana Bread! 

The wonderful thing about a basic recipe is that you can use it as the basis for creative changes. My Mom's Banana Bread from Classic Comfort Food has been altered to make it tropical, to use dates and nuts, to be a base for a Christmas time cranberry banana bread and more. I did switch out butter for the vegetable oil and exchanged some of the sugar for either brown sugar or molasses. The fruits and nuts change often and sometimes I throw in something like coconut or (today) shredded zucchini. As you can see it is a versatile recipe.

This time I'm going to add some orange zest for a fresh zing, summer berries for sweetness and a bit of the zucchini that is taking over the garden (because I need to find ways to use it up). It makes a lovely summer tea time treat!


Mashed Up Banana Bread with Berries and Zucchini
based on my mom's banana bread in Classic Comfort Food, 2012
makes one loaf

1/2 cup butter, softened
1/4 cup brown sugar
1/2 cup granulated sugar
2 eggs, beaten
3 ripe bananas (or 2 large), mashed
1 tablespoon orange zest
1/2 teaspoon vanilla extract
1/4 cup milk
1/4 cup plain yogurt
1 cup whole wheat flour
1 1/4 cup all purpose flour
1 teaspoon baking soda
1/2 teaspoon baking powder
1/2 teaspoon salt
1/4 cup fresh blueberries
1/4 cup fresh blackberries
1/4 cup fresh strawberries, sliced
1/2 cup shredded zucchini, loosely packed
1/2 cup chopped walnuts

Preheat oven to 350 degrees F. Grease and flour a 9 x 5 x 3 inch loaf pan.

Beat butter, brown sugar and sugar together until fluffy.

Add eggs and banana pulp and orange zest and beat well.

Sift together the whole wheat flour and all-purpose flour. Set aside 1/4 cup of the mixture. To remaining flour mixture add baking soda, baking powder and salt.

In a small bowl combine the blueberries, blackberries, strawberries and zucchini. Sprinkle the reserved 1/4 cup flour mixture over and lightly stir to coat the fruits and zucchini with the flour mixture. Set aside.

To the banana mixture add sifted dry ingredients, vanilla, and milk and yogurt. Mix just until dry ingredients are incorporated. Stir in fruit-zucchini mixture and nuts.

Pour into prepared loaf pan. Bake about 1 hour. Test for doneness with a toothpick in center. When done, toothpick comes out clean or with a few crumbs on it. Cool well. Store overnight before cutting...if you can wait that long. A serrated knife makes cutting easier.

Tuesday, June 19, 2012

Summer Berries

Summertime may bring heat and weeds in the garden and mosquitoes at dusk when we are trying to finish dinner, but it also brings a wonderland of fresh fruits. Right now we are enjoying ripe, dark red Bing cherries, mostly gorging ourselves by eating lots of them out of hand. No recipe needed!


Ripe white peaches are also starting to show up at the market. There is probably a pie in Sweetie's future with some of those.

The strawberries grown a few miles away are so sweet and juicy. We're having them for breakfast with our melon and bananas, for lunch with blueberries and cottage cheese, and just to snack on.

The olallieberries (an early and very juicy kind of blackberry; genetically, approximately two-thirds blackberry and one-third European red raspberry) down by the road are ripe now, too. To celebrate I made a simple galette and added some blueberries and strawberries, too for a three berry seasonal treat. This kind of free-form cousin of pie is easy to make and to serve as long as you have a large baking sheet. I use my silicon mat so it doesn't stick, even if the juices from the fruit run out during baking. You can follow the amounts of fruit that I used or make your own combination with the total being about 4 1/2 cups of fruit.


Three Berry Galette

enough pie crust dough for one crust - your favorite recipe or use (as I do) on Pillsbury Ready Crust crust.
2 pints blackberries or olallieberries
1/4 cup blueberries
1/4 cup strawberries
sugar to taste
1/4 teaspoon salt (optional)
2 tablespoons cornstarch
1 tablespoon flour
1/8 teaspoon freshly grated nutmeg
1 egg, lightly beaten with 1 tablespoon of water

Take the pie crust dough and, on a lightly floured surface, roll it into a circle about 15 - 16 inches in diameter. Gently fold the dough in half and in half again, then move to a large baking sheet that has been lined with parchment paper or a silicon mat. Gently unfold the crust to a full circle again.

Wash, rinse and dry the fruit. Slice the strawberries unless they are very small. Set aside.

In a large bowl stir together the sugar, salt, cornstarch, flour and nutmeg. Add the berries and toss gently with your clean hands to lightly coat the berries. Pile the mixture into the center of the prepared crust circle leaving a few inches all around the outside uncovered.

Wet your hands and begin folding the outer few inches of dough up over the piled berries, using the dampness on your hands to seal the pleats as you go. Dampen again as needed. Bring the dough up and pleat it until all of the outer dough has been placed up and over the fruit.

Brush the galette with the beaten egg. If desired sprinkle with sanding or regular sugar (optional).

Bake in a preheated 400 degree oven until the crust is golden, about 20 minutes. Cool at least 10 minutes before serving. Serves 6 - 8.

Sunday, July 04, 2010

Tall Berry Freeze

Heat wave, we're havin' a heat wave! But not as hot as some areas where family live, so I'm thankful for the late afternoon or evening breezes that cool things off at night and for the low humidity, too.

Still, it's warm enough to enjoy tall, frosty drinks. Grandma L joined us today for a 4th of July family meal and I made her a favorite drink...iced coffee with lots of ice and half and half.

Another favorite around here are smoothies. I like mine without banana added but most everyone else likes to add the bananas. Since this is berry season and there were leftovers from the sourdough waffles with berries and whipped cream that were a hit at our meal, it was easy to make a nice tall berry freeze beverage. The berry mixture included fresh ollaberries, blueberries, red raspberries and strawberries.


HERE'S HOW:
In a blender place about two cups of ice cubes, a cup or so of mixed berries, a scoop or two of vanilla ice cream, a cup of milk, and 1/2 cup of yogurt for some tang to offset the berries. Since these were dead ripe berries they were plenty sweet. If yours are less sweet, you may need to add some sugar.

Blend on high until everything is mixed and you get a nice, thick frozen beverage. Sure does cool things off!

Thursday, June 24, 2010

Savory and Blueberry

Although strawberries continue to be a daily fruit that brings so much enjoyment, let's hear it for blueberries, just now finding their way to market at a reasonable price.

Lately we hear a lot about the wonderful health benefits of blueberries, but, really, isn't it the intense and sweet tart flavor that brings us back for more?

When I was a kid the usual way to enjoy blueberries was with cream, with cereal and milk, in pancakes and muffins and in pies. These days people are more willing to experiment with this versatile fruit.

I saw a recipe a while back in Bon Appetit magazine (winter of 2007) for game hens cooked with a cranberry sauce. It was very appealing but I never actually made the recipe. Today I decided to see if I could change it up so that I could use fresh blueberries instead, plus other things that I already had in my freezer and pantry. As usual I made a lot of changes...whoever created their recipe wouldn't even recognize it if they look at mine.

Since I am very comfortable with recipe substitutions in baking and less so in cooking when it is this sort of recipe (a savory recipe with fruit is still pretty new territory for me) I'm declaring this one of my High Five recipes.

I felt a bit of trepidation that this would be icky sweet or too fruity for dinner or something, but after I added the pinch of cayenne, it all came together and was wonderful!

The combination of lemon thyme, lemon and blueberry flavors worked so well with the chicken. The brown sugar and jam and lemonade were sweet, but the broth, thyme, and chicken were savory and the hint of heat from the cayenne kept them all friendly. I found that the lemon thyme was less assertive than regular thyme, so I added some dried thyme to reinforce that flavor note. It was great to bite into the warm chicken with sauce and feel the warm blueberry release its juices in my mouth, too. Sort of startling, too because usually that blueberry burst comes with muffin or pancake sweetness as well. Blueberry and savory go together well. I'll be making this recipe again.


Chicken Thighs with Double Blueberry Lemon Thyme Sauce

3 tablespoons butter, divided
1 tablespoon brown sugar
3 teaspoons chopped fresh thyme, divided (I used lemon thyme)
½ teaspoon dried thyme
6 boneless, skinless chicken thighs (but OK to use ones with skin on if that’s what you have)
1 tablespoon all purpose flour
1 cup low-salt chicken broth
½ cup lemonade
zest of one lemon – yellow part only
juice of ½ lemon
2 tablespoons blueberry jam or fruit spread
pinch cayenne pepper
salt and pepper to taste
1 cup fresh blueberries (or frozen, not thawed)

Preheat the oven to 375 degrees F. Line a rimmed baking sheet with heavy duty foil and have a matching piece ready to cover everything with.

Blend 2 tablespoons butter, brown sugar, and 2 teaspoons chopped fresh thyme in a bowl. Sprinkle chicken thighs with pepper. (I rinsed and dried the chicken thighs first.) Spread some of the butter mixture over each thigh on one side only.

Heat a large nonstick skillet over medium-high heat. Add the thighs, butter side down. Let cook for 4 minutes, then turn and sear for one more minute. Remove to the prepared baking sheet. Retain the mixture in the skillet and set aside. Cover the baking pan with the extra piece of foil and bake the chicken thighs in the preheated oven for about 20 minutes, or until juice run clear when pierced with a fork.

While the chicken is cooking prepare the sauce. In a small bowl blend the remaining 1 tablespoon butter and the 1 tablespoon of flour to make a paste. Set aside.

Add the broth, lemonade, lemon zest and juice blueberry jam , the rest of the thyme, the dried thyme and the cayenne pepper to the skillet with the browned bits still in it. Use a wooden spoon to scrape up the browned bits and mix them with the other sauce ingredients. Stir over high heat and boil until the sauce is reduced by 1/3. Whisk in the flour mixture and cook for 2 minutes to allow the sauce to thicken. Add the blueberries and stir to combine with sauce. Lower heat and simmer for a few minutes to warm the berries. Taste and correct for seasonings with salt and pepper.

When the chicken is finished cooking, remove from the baking sheet and place each piece in the sauce, turning over to nap both sides with the sauce. Repeat until all chicken pieces are in the skillet. Serve while hot, making sure to include some of the sauce and berries in each serving.

I served mine with mixed vegetables and orzo pasta. Delicious!
Serves 3-6