Showing posts with label peaches. Show all posts

Tuesday, July 28, 2026

Peach Time


Peaches are one of my favorite foods and now it's high peach season...it's one of the few things I like about summer.

Too late tonight to post the whole thing, but tomorrow I hope to do a post on what I made with these beautiful white peaches! 

Sunday, September 01, 2024

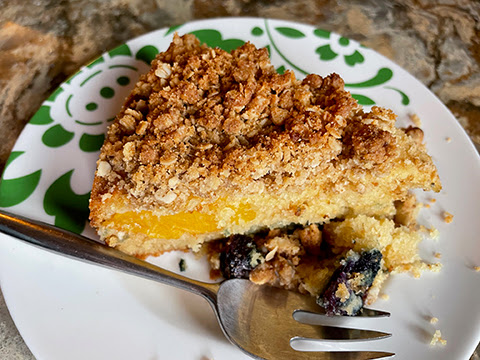
Peach Season Coffee Cake


 I love peaches! There is something about the juicy, tangy fruit and just says 'summer' to me. Right now we are getting some lovely peaches at the farm stand that also sells strawberries. I decided to make a coffee cake using some, plus some blueberries. I looked at a number of recipes online but couldn't find what I wanted...a single layer cake made with self-rising flour and moistened with buttermilk. I decided to make my own recipe and hope that I got the proportions right.

It turned our really well, with a tender, moist cake that had a slight buttermilk tang, soft and sweet peaches and blueberries, and an oatmeal based streusel flavored with a bit of nutmeg that brought it together as a coffee cake. Hope you enjoy my recipe.  Give it a try and you'll see that it's fairly simple and very delicious.


Elle's Peach Blueberry Coffee Cake with Streusel

For the cake:

1/2 cup butter, at room temperature
1/2 cup brown sugar
2 eggs, at room temperature
1/4 teaspoon vanilla
1/4 teaspoon almond extract
1 3/4 cups self-rising flour
1 teaspoon baking soda
pinch of salt
1 cup buttermilk, at room temperature
1 very large or two smaller peaches, peeled, pitted, and sliced into  16 or 18 slices
1 cup fresh blueberries, rinsed and dried with paper towels

Prepare a 9-inch cake pan with at least 2" tall sides, or a 9-inch springform pan by spraying with baking spray. Put a 9-inch round of parchment paper in the bottom and spray the bottom. Set aside. Preheat the oven to 350 degrees F. after centering a rack in the oven

In a large bowl, beat the butter until fluffy, about 1 minute. Add the brown sugar and beat another minute. Add the eggs, one at a time, beating until incorporated, being sure the scrape bowl and beaters after each is incorporated. Add the vanilla and almond extract and beat another few seconds to incorporate.

Add the flour, baking soda and the pinch of salt and beat on low speed for about 20 seconds, just to get some of the flour incorporated, but there will still be lots of flour not mixed in. With mixer running on low, slowly add the buttermilk and then beat 2 minutes until batter is fully mixed and thick. Scrape bowl and beaters, then mix a few more seconds just to fully mix.

Scrape half the batter into the prepared pan and use a spatula to make the batter as even as you can. Evenly sprinkle the blueberries over the batter. Scrape the rest of the batter into the pan and spread it over the blueberries. Take the peaches and place them around the cake, pressing the sharper edge into the batter. The center probably won't have any peaches. Bake for 15 minutes. The peaches will sink a bit into the batter, but that's OK.

While the cake is beginning to bake, prepare the Streusel:

For the streusel:

3/4 cup oatmeal
1/2 cup brown sugar
3/4 cup all-purpose flour
1/8 teaspoon ground nutmeg
pinch of salt
1/2 cup cold butter (I used right out of the fridge)

In a medium bowl combine the first 5 (five) ingredients. Cut the butter into small pieces and add to the bowl. Use your clean fingers to rub the butter into the dry ingredients. When you are done the mixture will be fairly cohesive with some dry bits.

After the cake has baked for 15 minutes, removed from the oven. Place on a baking sheet and, using your clean hands, sprinkle the streusel mixture evenly over the top of the cake. Return the cake on the baking sheet to the oven and bake another 20 -25 minutes. Test for doneness by pressing lightly in the middle of the cake. If it feels at all soft or jiggly, bake longer. If it springs back against your pressure, it's done. Top should be golden brown. Cake might be pulling slightly away from the sides of the pan when baked.

Take the cake off the baking sheet and put the cake pan on a wire rack. Cool for 10 minutes. Run a knife around the sides of the pan, then invert the cake onto a plate. Remove the pan and parchment circle from the bottom of the cake. Put your serving plate, good side down, over the cake and grasp the serving plate and the wire rack. Turn the cake right side up onto the serving plate. Remove the wire rack and extra plate.  Let cake cool completely before serving.


Tuesday, August 27, 2024

Three Kinds Of Cookies and a Peach Dessert


Last week I was part of Team Tea this week as a group of friends put on a tea party for 36. Part of what I volunteered to do was to bake some cookies, so I baked a bar cookie, a cookie press cookie, and a rolled-out cookie that I turned into a sandwich cookie. These are listed by difficulty, too. The easiest is the bar cookie, Butterscotch-Chocolate Chip Cookies, a delicious, somewhat dense cookie that you mix up in a pot. It uses melted butter, so there is no need to bring butter to room temperature before starting to make them. This means that you can have cookies much faster than you think! They also have a mild butterscotch flavor and lots of chocolate chips. I like mine with walnuts, but you can use your favorite nut...or skip nuts. In the photo below, the tan bar cookies are the Butterscotch-Chocolate Chip Cookies.


The next most difficult is the cookie press cookie, Spritz Cookies (the pink ones in the photo at the top and the pink ones and flower shaped ones with yellow centers in the photo above). Usually this is an easy cookie, but this might have been difficult for me because my cookie press is ancient and might not be working as well as it might. I had no trouble pressing the dough out of the cylinder, through the decorative plate, but some of the cookies didn't break off onto the baking sheet, so I had to cut them away from the press. When they worked, they made really pretty cookies! I tried them as the recipe was written, but then added some flour to the dough and that seemed to work better. Chilling the dough seemed to work even better. By then it felt like PlayDoh but I still had some trouble with making the cookies. The good news is that these are tender butter cookies, flavored with both vanilla and almond extracts, so it you stick with it you will have delicious cookies that also like decorative. You can color the dough, too, to make them even more decorative, and don't forget that if you used colored sugar or jimmies that they are even more colorful.

The final cookie was the rolled out one, Fancy Tea Cookies (the fluted ones in the photo at the top). I ended up rolling them out on waxed paper because they stuck when I rolled them out on a floured board. These are delicate cookies that become crisp on the edges. They are flavored with nutmeg and make good sandwich cookies, but are also fine as singles. Chill the dough, work with smallish quantities of dough at a time and flour your cookie cutters.


I made round and heart shaped sandwich cookies, so cut out two pieces of dough for each sandwich cookie. One of those pieces stayed whole and the other had a hole punched out before baking...I used a large icing piping tube...and after they were baked and cooled I used marmalade as a filling and sandwiched a cut out one over a whole one, bottoms together. For decoration I sifted powdered sugar over them. I skipped any buttercream (which is did use the first time I made these), but that tastes wonderful, too.


The Butterscotch cookies makes the most as far as quantity, but the other two are so delicious and pretty that as many as you get will be very appreciated by your family and friends. The Spritz count depends on what disc you use to press the cookies and for the Fancy Tea Cookies the count varies according to the size and shape of the cutter you use.


Since I ran out of time to make more than a dozen or so of the Fancy Tea Cookies, I had left over cookie dough. I decided a couple of days later to make a two person sized dessert for myself and Sweetie. I took about a 1/4 cup of the dough and made a base in a 6-inch diameter springform pan. I made sure to bring the cookie dough up the sides by at least a 1/2 inch, then baked the cookie at 350 degrees F for about 10 minutes. The dough puffed up, but once I removed it from the oven, I flattened the center with a fork and only left the sides puffed up.

For the filling I beat one egg until most of the white had combined with the yolk, added a tablespoon of granulated sugar, a few drops of almond extract, 1/4 cup of soy creamer (or you could use half and half), and a good sized peach which I had peeled, pitted, and cut into 1/2-inch chunks. I mixed all of these together and poured them into the greased springform pan. The mixture came up to just below the top of the pan. I placed the pan on a small sheet pan and baked it for 25 minutes, checked it and continued to bake a bit more until the center was cooked but still a tiny bit jiggly. The filling was just beginning to brown around the edges.


After letting the dessert cool to room temperature, I ran a knife around the sides of the pan, then released the sides. Once cut in half and plated, I added a whoosh of whipped cream and served it. I really enjoyed the combination of cookie crust with it's strong nutmeg element and sweet, juicy peach custard filling. If I did it again, I would probably bake the crust longer so that it was crisper, but otherwise wouldn't change a thing


Tuesday, June 30, 2020

Fruit Basket Coffee Cake


Summer certainly brings lots of kinds of fruit. Right now we have ripe peaches, luscious dark cherries, olallieberries right off the vine, and raspberries, plus green grapes and some plums that are almost ripe which are turning a lovely shade of red-gold on the tree down the hill. The plums and olallieberries are the only local fruit, but the cherries, peaches and raspberries are certainly seasonal.

Yesterday I made a lovely coffee cake to showcase the peaches, cherries, olallieberries and raspberries. It's a variation of the Nectarine Cake in Lauren Chattman's Cake Keeper Cakes book, one of the great cookbooks we baked from during my time with the Cake Slice Bakers.

I made one and a half times the cake batter because the original recipe only makes a thin layer of cake and I wanted one thick enough to absorb all the fruit juices. I also added some almond extract, while keeping the vanilla extract. For the topping I used brown sugar, pecans and ground nutmeg instead of white sugar and cinnamon...they recipe gave two choices for nuts and pecans were one of them.

I baked it in a nine-inch springform pan instead of a ten-inch one. Because I had such a wonderful choice of fruits, I used cherry halves around the outer edge, then peach slices, then olallieberries and raspberries in the middle.

Do watch this cake because the nuts might get too brown...just tent with foil if that happens. Because  the batter is deeper than the original, it took a while to bake, but came out moist with a nice crumb and browned crust. We actually enjoyed this cake for dinner dessert, so I served it with soy vanilla ice cream and that was a great choice. Sweetie added some whipped cream to his, and you can always add extra prepared fresh fruit.


I've never been a big fan of summer, but sitting outside for dinner because it's still warm by 7 o'clock makes summer a bit easier to take. All of the beautiful flowers that are blooming in the garden also are a benefit of summer. Too bad it gets so hot!

Do try this cake, especially if you have some ripe fruit on hand. You can use all one kind of fruit or two kinds, or three if four is too much. With most kinds of fruit, push them down into the batter a bit to allow the juices to soak into the cake. Enjoy!


Fruit Basket Cake with Nutmeg Nut Topping
based on Nectarine Cake in Lauren Chattman's Cake Keep Cakes
serves 8-10

For the Topping:
2 tablespoons brown sugar, packed
1/4 teaspoon ground nutmeg
1/2 cup pecans, finely chopped

For the Cake:
1 1/2 cups all-purpose flour
1 1/2 teaspoons baking powder
1/2 teaspoon salt
1 1/4 cup sugar
3/4 cup (1 1/2 sticks, 6 oz.), unsalted butter or non-dairy margarine, softened
3 large eggs
1 teaspoon pure vanilla extract
1/2 teaspoon almond extract
2 cups assorted stone fruit and/or berries or one kind or fruit, ripe - peel plums or peaches and pit them, pit cherries, pit nectarines or apricots, wash and dry berries

Preheat the oven to 375 degrees F. Grease the insides of a springform pan, 9-inch or 10-inch preferred.

Combine the brown sugar, nutmeg and chopped nuts in a small bowl. Set aside.

Combine the flour, baking powder and salt in a medium bowl or on a sheet of waxed paper.

In the bowl of a stand mixer, beat the sugar and butter together on medium-high speed until fluffy, about 3 minutes. Scrape bowl and beaters as needed.

With the mixer on low, add the eggs, one at a time, beating to combine the eggs with the butter mixture after each addition. Scrape bowl and beaters as needed.

Beat in the vanilla and almond extracts. With mixer on low, gradually add the flour mixture, a 1/2 cup at a time. Scrape bowl and beaters as needed and at the end. Use scraper to give batter a final stir to make sure all is combined.

Scrape batter into the prepared pan and smooth the top of the batter. Carefully place the prepared fruit, pushing down a bit into the batter. If using more than one kind of fruit, you can create a pattern.

Sprinkle with the topping. Bake until golden and a toothpick inserted in the center comes out clean, about 45-55 minutes. Cool cake in pan for 5 minutes, then run a knife around the sides, unhinge the springform and cool cake on wire rack until tepid. Remove from the springform bottom and place on a serving plate.

Serve with more fruit, ice cream, whip cream or just as is.

Store uneaten cake, if any, in a cake keeper or wrap in plastic and store at room temperature for up to 2 days.

Thursday, June 04, 2020

Peach Pie with a Twist


Sweetie loves pie. I think he has favorites, like banana cream pie, but he will eat any pie and he really enjoys doing so.

I'm more of a cake girl, but I really love peach pie. The flavor of peach pie reminds me of summer and since we have had summer heat the last few days, a peach pie was calling my name. It didn't hurt that yellow peaches were on sale at the market a few days ago. The first day we had the peaches I was just too hot to bake anything. I had been working down at the farmhouse, painting trim. Early in the afternoon it was just warm, but by mid-afternoon it was really hot. Fortunately our downstairs stays fairly cool if we open the windows at night and then close everything up in the morning. I retreated to the living room and skipped the baking.

The next day I baked the crust in the morning while it was cool and then did the fruit peeling and slicing and the filling making and putting it all together, plus baking, in the late afternoon when we had turned on the air conditioner. We try to only run it if the temperature outside is over 85 and since it was 90 out that qualified.

This is sort of a mash-up of a traditional peach pie and a frangipane tart. Sweetie really, really loved this one and I think you will, too. The frangipane gives a nice almond flavor that enhances the peaches and raspberries and baking the crust before filling it means that the bottom crust stays crisp. Of course it helps to watch the crust towards the end of blind baking to pull it out of the oven if it bakes too soon. I missed that part and so the crust was pretty brown on the edges even before baking the filling, so I masked the edges with foil during the final bake. I'll bet you can do better than me on that score.

My original plan was to have more raspberries but I discovered that many of them had spoiled, so I used the good ones in the center of the pie. I've resolved that the raspberries will now sit front and center in the fridge so that they get used in a timely manner, instead of being shoved toward the back and forgotten for a few days. The lessons we learn in the kitchen!


Peach and Raspberry Frangipane Pie
Serves 8

Crust:
1 single pie crust, home made or purchased (I use Pillsbury ReadyCrust - 1/2 the package)
pie weights, parchment paper

Place the unbaked pie crust dough into a 9-inch pie pan and trim as needed, then flute edges or press down on edges with the tines of a fork. Place pie shell in freezer for 20 minutes.

Preheat the oven to 375 degrees F. Put the rack in the center of the oven.

Remove pie shell from freezer. Place a circle of parchment paper inside the pie shell, having the parchment go up the sides of the shell. Fill with pie weights (I use lentils that I only use for being pie weights).

Bake for 25 minutes. Let crust cool. Remove the lentils and reserve for the next use. Remove the parchment and discard. Cool crust completely.

Prepare the frangipane filling:
3 tablespoons soft butter or margarine
1/4 teaspoon salt
2/3 cup sugar
1 tablespoon + 2 teaspoons all-purpose flour
1/4 teaspoon almond extract
2 large eggs
3/4 cup almond flour or mixed nut flour
about 3 cups peach slices - used about 5-6 fresh peaches, peel them, remove the pit and slice

Directions:
Preheat the oven to 350°F.

To make the filling:  Beat together the butter, salt, sugar, flour, and almond extract.
Beat in the eggs, then add the almond flour, stirring just to combine.

To assemble the tart: Spread 1/3 the filling in the bottom of the crust. cover with peach slices, flat side down. Pour in the remaining filling and spread over the peach slices. Starting at the outer edge, place peach slices, thin edge down,pushing into the filling. Continue with more peach slices, until about half full. Fill in the remaining space to the center with raspberries, pointed side up, pushing down into the filling.

Bake the pie in the preheated 350 degree F oven for 35 to 40 minutes, until the top is lightly browned. Filling will puff up slightly around the fruit.  Cool slightly or completely before serving. 


Friday, September 13, 2019

Is It A Cookie Or A Tart?


Recently our local newspaper, the Press Democrat, has a delicious sounding recipe in the Food Section. It was for a Crostata with jam. A crostata is sort of a cross between a cookie and a tart. It's baked in a tart pan, but uses a dough for the base which is cookie-like and fluffier than a usual tart dough. The filling is usually jam. I used a combination of good quality apricot jam and fresh, cooked peaches, lightly mashed and scented and flavored with almond extract. It made for a delightful dessert which I served for afternoon tea yesterday. With a topping of pieces of some of the tart dough and a sprinkle of sliced almonds, it looks very pretty and tastes divine.

My health improves day by day, which is very encouraging. It's nice to finally have enough energy to try a new recipe. Sweetie is happy because I'm also cooking again. Mostly simple things like steamed corn on the cob and salads, but now and again a little more complicated like last night when I marinated some portabella mushrooms for sandwiches. Sweetie did the grilling. I'll try and post the recipe soon.

Back to the crostata. When you are putting the dough into the bottom of the pan, keep flouring your hands as they get sticky for the most even crust. Don't forget to set aside the 1/2 cup of dough for the top. You can chill it while you work on the tart. Do plan on enough time to also chill the dough-filled tart pan for at least 20 minutes.


If you are using some or all pre-made jam (as I did), be sure to taste it and add some lemon juice, as needed, to make it a bit tart. If you are making your own jam, you can taste it and add sugar if needed as you make it. You can also make the jam ahead of time, up to 1 week before making the crostata.

You'll only need small pieces of this crostata. Try it with a nice cup of hot tea and take a few moments to relax. If you used fresh, seasonal fruit, you can think of the wonders of harvest time, too.


Jam Crostata
based on a recipe originally in the New York Times, by Melissa Clark
Makes 8 servings

For the jam - use at least 12 oz. good quality pre-made jam, or make your own as follows:
3 cups blackberries
1 cup blueberries
3/4 cup granulated sugar, plus more as needed
2 teaspoons minced fresh lemon verbena (optional)
1 teaspoon fresh lemon juice, plus more as needed
1/2 teaspoon grated lemon zest
1 teaspoon vanilla extract
topping:
1/3 cup sliced almonds
Demerara sugar, for sprinkling (optional)

In a medium saucepan, stir together the blackberries, blueberries, sugar and lemon verbena (if using). Cook over medium heat, stirring occasionally at first, then more frequently as the mixture starts to bubble and reduce. When the mixture has reduced and looks syrupy (about 30 minutes), stir in lemon juice and zest. Taste and add sugar if necessary. This depends on how sweet your berries were to begin with.
Cook for 3 minutes longer, stirring frequently to prevent burning. When the jam is thickened and shiny but still slightly runnier than you expect jam to be, take it off the heat; it will continue to thicken as it cools.
Scrape jam into a bowl or heatproof container, stir in vanilla and let cool to room temperature.
Taste and stir in a little more lemon juice if jam is very sweet. At this point, the cooled jam can be chilled for up to 1 week.
Note: I used 10 oz. pre-made apricot jam and then used the instructions (but not the quantities) above to make a peach jam to combine with the apricot jam to make my crostata filling. I used a tiny bit of almond extract instead of vanilla and no extra sugar since my peach was quite ripe and sweet.

For the crust - allow time to chill
1 1/2 cups all-purpose flour
3/4 cup whole wheat flour
12 tablespoons butter or margarine, softened
1/2 cup granulated sugar
2 large egg yolks, at room temperature
1 tablespoon finely grated lemon zest (about 1 large lemon)
1 teaspoon vanilla extract
1/2 teaspoon fine sea salt
1/4 teaspoon almond extract

In a medium bowl, whisk together the flours; set aside. In a second bowl, using an electric mixer, beat butter and sugar until pale and fluffy, about 3 minutes. Beat in egg yolks, lemon zest, vanilla, salt, and almond extract until combined, then beat in flour, only beating until flour is incorporated.
Scoop 1/2 cup of the dough into a covered container and chill. Transfer remaining dough into a 9 or 10-inch tart pan with a removable bottom and use floured finders to press the dough into an even layer in the bottom of the tart pan and up the sides. Chill for at least 20 minutes
When ready to bake, preheat the oven to 350 degrees F. Spread cooled jam evenly into the crust the, using your fingers, crumble reserved chilled 1/2 cup dough over the jam. Sprinkle with sliced almonds and Demerara sugar (if using).
Bake until golden, 35 to 48 minutes. Let cool completely to room temperature before serving.

Wednesday, September 04, 2019

Pleasures of Peaches and Raptures of Raspberries


The scent is what I first notice about a ripe peach...then how soft it is when the blossom end is lightly pressed. The colors are lovely, too. This morning I peeled some ripe white peaches and enjoyed both the fragrance and the softness while peeling. Once the pit was removed the delight was in the ivory flesh with a ruby tint where the pit had been.

For raspberries I admit the color and shape are what I first notice, followed by the delightful raspberry scent. There were just enough raspberries this morning to join with the peaches in a delicious and fragrant compote to top waffles from the freezer...no not Eggos, but waffles that I had baked a few weeks ago, then frozen the leftovers for just such a morning. The toasted waffle quarters were crispy outside and moist inside and went so well with the fruit mixture. Rapturous and pleasing!

Raspberry Peach Compote
serves 1 but can be expanded

1 perfectly ripe peach, any variety, peeled, pitted, and sliced into wedges
1/2 cup raspberries, rinsed and dried with a paper towel (or leave wet...that's OK too)
1 tablespoon maple syrup (optional)
2 tablespoons water
(because fruit is ripe, no sugar needed)

In a small saucepan, combine the compote ingredients. Place over low heat and cover and cook, stirring occasionally, until raspberries have broken down. Uncover and raise heat. Cook until desired thickness is reached, stirring often. I like the sauce pretty thin, but if you cook the mixture longer, it will become thicker as the moisture boils off. Let cool at least 5 minutes so you don't burn your tongue. Serve over pancakes, waffles, ice cream, pudding, pound cake...you get the idea. Can also be eaten by itself, but it's kinda sweet for that.

Monday, August 13, 2018

Quick Peach Crisp


The other evening I had some very ripe peaches on hand. Unfortunately I didn't have the energy to make a peach pie, which is what I had gotten the peaches for. Still, they weren't improving with age, so I decided to make a peach crisp. It goes together much more quickly than a pie and still gives me that hit of warm, nutmeg scented peaches. The day before I had made a bowl with nothing but warm, nutmeg scented peaches and that was great, but adding a crisp topping makes it special.


I started with two ripe, peeled and pitted peaches. I cut them into chunks and layered them in the bottom of a rectangular baker. In the microwave in another heat safe container I melted butter and added brown sugar and the nutmeg. Then I did the 'quick' part by adding plain granola to the butter mixture (well, not really butter - non-dairy margarine) and stirred it well to coat the granola clusters with the mixture. Usually I would have had to measure out oats and flour and salt, etc., so this was faster.

The crisp topping went over the peaches and it all went into a preheated 350 degree F. oven for 20 minutes. The result? Hot peaches, browned topping, peaches juices scented and flavored with nutmeg. What could be better? A scoop of vanilla soy ice cream. Ooops, Sweetie ate it all, so we went with some soy creamer instead. Delicious...and quick dessert for two.


Quick Peach Crisp
Serves 2

2 ripe peaches, pitted and peeled and cut into chunks
2 tablespoons butter or margarine
2 tablespoons brown sugar
1/8 teaspoon nutmeg
3/4 cup plain granola (I used Bob's Red Mill)

Preheat oven to 350 degrees F.

Layer peach chunks in an even layer in the bottom of a 6 x 9-inch baking pan. (You could use a 9 x 9-inch pan and double the ingredients and have enough for 4 people.)

In a medium bowl microwave the butter, brown sugar and nutmeg until the butter us melted. Stir well. Stir in the granola until all the cereal is coated with the butter mixture. Evenly distribute the granola mixture on top of the peach layer and bake for 20 minutes, or until the crisp topping is golden brown. Serve at once. Garnish with ice cream, whipped cream, or cream.

Sunday, August 28, 2016

A Sweet Peach and Strawberry Pudding


One day last week I have a couple of ripe peaches and a few fresh strawberries that were ready to play with. At first I thought I would do a galette or maybe a cobbler or crisp, but what I ended up making was more like the French clafouti. I sort of made it up as I went along, which sometimes is disastrous, but this time worked out really well.

Fresh peaches are peeled, pitted and sliced, cut into chunks and placed in a small baking dish. Strawberries are hulled and cut into chunks and those are scattered over the peaches. My peaches were so ripe that I knew they would be extra juicy, so I crumbled a almost-stale scone and sprinkled those crumbs over the greased baking dish before I added the fruit. If your fruit isn't super juicy you can skip that step. Juicy but no scone? Dry bread crumbs would work fine.

Over the fruit I poured a mixture of soy creamer (but you could sub in half and half, milk, or cream), brown sugar, nutmeg and an egg. A dash of vanilla or almond extract would be delicious, too, but I really like nutmeg, so I wanted that to shine in the dish.

This gets baked in a medium oven. The top will brown and the edges will brown, but the center should still be a bit wobbly. An overcooked custard is terrible!


This sort of pudding can be eaten for dessert or even for breakfast. The custard is the background flavor so the peaches and strawberries...and nutmeg...are the star flavors here. The texture is soft in the interior and a bit chewy at the edges. If you love peaches and strawberries, here is a new way to enjoy them that I know you will appreciate.


Small Peach and Strawberry Pudding
My own recipe
Serves 3-4

2-3 peaches, peeled, pitted and sliced, then cut into large chunks
6-8 fresh strawberries, hulled and cut into chunks
If needed...1 scone crumbled, or 1/4 cup dry breadcrumbs
butter or grease for the pan
1 cup soy creamer or milk, or 1/2 & 1/2, or cream
1/4 cup brown sugar
1 egg, slightly beaten
1/4 teaspoon nutmeg, preferably freshly grated
1/8 teaspoons salt

Preheat the oven to 350 degrees F. Butter or grease a small baking dish. An 8 x 8-inch pan should work. If fruit is very juicy, sprinkle with crumbled scone or dry bread crumbs, distributing as evenly over the bottom as possible.

Place the peaches, then the strawberries into the pan, distributing as evenly over the bottom as possible. Set aside.

In a medium bowl, whisk together the soy creamer, brown sugar, egg, nutmeg and salt. (Add 1/8 teaspoon vanilla or almond extract, optional, if using.)

Pour egg mixture over the fruit, place pan on a larger baking sheet, and bake for 20-30 minutes. Top will be brown and edges will be brown, but center will still be just a bit soft.

Cool on a wire rack for 10-20 minutes, then serve while still warm. Some folks like a scoop of vanilla ice cream with this. Others like some fresh strawberries with it.

Friday, July 08, 2016

Blackberry Pie For The 4th


Our 4th of July celebrations tend to be pretty subdued since we have a dog who freaks out at the sound of fireworks...even ones going off miles away. There are very close by fireworks on the 3rd every year at our local high school and then on the 4th itself usually three that are close enough to hear. Our solution is to close the windows and play loud music. It works pretty well. Needless to say, we don't go out and leave Pi alone. This year we did cross the road to our neighbors to share freshly made blackberry pie in the afternoon. Mellow and no fireworks except for those on the tastebuds. Blackberries are very flavorful and fragrant when ripe and this pie also added ripe peaches to the mix. It smelled heavenly!

AM made rich, decadent vanilla ice cream using a David Lebovitz recipe. I had soy ice cream but have to admit that the soft serve vanilla was truly decadent looking. (see photo by recipe)

It's been a long time since I made a double crust pie and I'm not sure that I've ever made a blackberry pie. This one was more challenging because I decided to use lard instead of butter or shortening in the crust. The crust was the best ever, but delicate and a challenge to work with. Still, if you like flaky pie crust, it pays to find some lard. I used rendered lard, not the rectangle of hydrogenated lard you find in the market. It has a faint bacon fragrance which was kinda nice. I made a second pie with shortening for my nephew and Sweetie to enjoy the next day and that is the crust you see in the top photo. Much easier to work with!

This was an outstanding pie. I did make some changes to the given recipe (what a surprise, right?), including the step of chilling the dough. I think it's important because it gives the flour time to absorb both the water and the lubricant (lard or shortening) which makes for easier rolling. I also didn't do a lattice crust. It would have been almost impossible with the lard version. Adding the peach was also different, but I've always love the combination of blackberries and peaches, so why not?

This is truly a seasonal treat. See if you can find some ripe blackberries and peaches and enjoy it while they are at their sweet and juicy best.


Blackberry Peach Pie
based on two recipes from The Fannie Farmer Baking Book by Marion Cunningham

Basic Pie Dough (Lard or Shortening)
for a 9-inch two-crust pie
2 1/4 cups all-purpose flour
1/2 teaspoons salt
3/4 cup lard or shortening, cold
6-8 tablespoons ice cold water

Mix the flour and salt together in a bowl, add the shortening, and work it into the flour with a pastry blender, two knives, or your fingertips until the mixture resembles fresh bread crumbs. Use a light hand.

Sprinkle on the water, a tablespoon at a time, stirring lightly with a fork after each addition. Clean off the fork tines after each tablespoon. The free tines help keep the action light. Use just enough water so that the dough holds together. (I tend to work my way around the bowl, leaving clumps of dampened flour, then use the final tablespoon of water to gather it all into one mass.)

Divide the dough in half and put each half on a piece of plastic wrap. Shape into a flattened round, wrap up and refrigerate for 2 hours.

Remove first packet of dough from fridge and place on a lightly floured clean work surface. Roll out the dough until it is about 1/8 inch thick and 2 inches larger than your inverted pie pan. (I find that it is a good idea to turn the dough mass itself a little as you roll it out so that you can add a bit of flour to the work surface as needed to prevent sticking.) Transfer the rolled out dough to the pan using your rolling pin. Center in pan. Set aside. Remove second packet of dough from fridge and place on a lightly floured clean work surface.  Roll out the dough until it is about 1/8 inch thick and 1 inch larger than your inverted pie pan. You are now ready to fill the pie pan with the filling.

Pie Filling:
5-6 cups fresh blackberries (I used 5 cups plus one large peach [peeled, pitted and cut into chunks])
4 tablespoons flour
2 tablespoons cornstarch
1 cup sugar (if fruit is very sweet, you can reduce it to 3/4 cup)
1/2 teaspoon salt
Note: You can substitute other kinds of berries or stone fruit for some or all of the blackberries.

Preheat the oven to 425 degrees F. Make sure that you have the pie plate lined with dough and the top crust rolled out.

Pick over the berries, removing any moldy ones, and wash them only if they have visible dirt on the. Drain if you washed them and pat lightly with a paper towel to dry them some. Place berries and peach chunks in a large mixing bowl.

In another mixing bowl stir together the flour, cornstarch, sugar and salt. Pour this mixture over the berries and toss gently to mix. Pile the fruit into the pastry-lined pie pan. Moisten the edges of the bottom crust with water, then carefully transfer the top crust so that is sits centered on the pie. Press down gently all around the edge to seal, then trim, roll under, and crimp or flute the edges. Slash three to four steam holes near the center of the pie with a small, sharp knife.

Place the pie pan on an aluminum foil lined baking sheet and bake the pie for about 25 minutes, until the crust has begun to brown. Reduce the heat to 350d degrees F. and bake for 20 - 25 minutes more, until the top is well browned. You can place strips of foil over the edges if they start to brown too much.

Remove the baked pie from the oven and cool on a rack.

Monday, August 31, 2015

Peach Cobbler


Summer time and the kitchen is peachy. After months of trying to find ripe peaches at the market I finally found some freestone ones and have been enjoying them in their glorious, peeled, juicy perfection with lunch. No embellishments are necessary when peaches are this good. Each slice was a small miracle of sweet peach flavor, juicy, just firm enough, each with a little tang to offset the sweet.

So why did I make cobbler? Well, Sweetie pointed out to me that there were four or five large peaches and they were perfectly ripe. Since I had been eating one a day, soon there would be a number of peaches that were over-ripe and mushy and not worth bothering with. The solution was to bake with them and eat the cobbler over two or three days.

For this dessert I tried the Bisquick gluten free mix, adding some butter flavored shortening, sugar, egg yolks (because I had two leftover egg yolks) and vanilla, plus water instead milk for the liquid. It made a pretty nice topping, although very yellow from the yolks. If I did it again, I would either make less topping or use more peaches because the proportion felt wrong. Otherwise, a win! As you can see from the photo, the topping was softly biscuit-y and had nice crisp bits where the crust had browned, plus soft, sweet silky peaches, lightly scented with nutmeg. Summer in a bowl.


Peach Cobbler -GF
Elle's own recipe

4-5 large, ripe peaches - peeled, pitted & slices
sugar to taste - if very ripe will not need any
1/4 teaspoon freshly grated (if possible) nutmeg
1/4 cup water
1 cup Bisquick Gluten Free Mix
2 tablespoons sugar
1/4 cup butter flavored shortening
1/4 cup water (add more if topping is too dry)
2 egg yolks
1/2 teaspoon vanilla

Heat oven to 400 degrees F.

In a small bowl, mix the peaches, sugar if using, and nutmeg. Place in a greased 8 x 8-inch baking pan. Pour in the water. Cover tightly with foil and bake 10-15 minutes, or until fruit releases its juices.

When peach baking time is almost finished, mix the Bisquick GF mix and sugar in a small bowl. Cut in the shortening with a pastry cutter or two knives, until fat is in pea sized pieces.

In another small bowl, mix together the water, egg yolks and vanilla. Add to the baking mix mixture and stir with a fork until just mixed. Mixture should be consistency of biscuit dough.

Remove the hot fruit from the oven and dollop the biscuit dough over the hot fruit, distributing over all the fruit, but leaving small places where you can see the fruit, and letting the topping be very uneven.

Bake for 15 minutes, or until topping is golden brown, especially at the highest places. Cool. Serve warm or at room temperature. Garnish with dairy free ice cream, blackberry sauce, or other topping of your choice.

Thursday, August 20, 2015

Getting Peachy With The Cake Slice Bakers


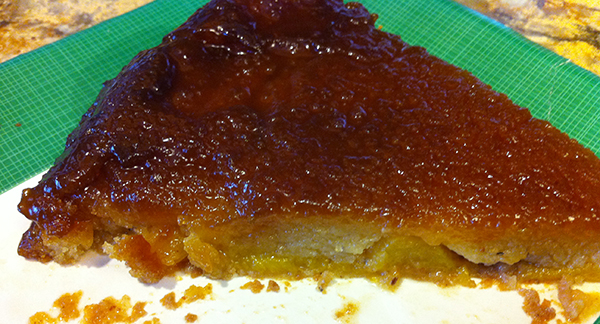
There is something so summery about a cake topped with peaches. This one has a slightly chewy super sweet caramel topping that surrounds the peaches, plus a nutmeg scented very moist cake. 

When I decided to eliminate gluten and dairy from my diet I knew that baking would be a challenge but sort of forgot that baking a recipe with my wonderful baking group, the Cake Slice Bakers would be even more challenging because there are four recipes to choose from, not a whole book's worth, and some recipes really depend on good butter or sour cream or on the gluten's elastic properties.

Fortunately this month the Peach Upside Down Cake is the perfect recipe to make and all I had to do was substitute non-dairy butter in the batter and the topping and to use a GF flour mix that is light and similar to cake flour, which I decided meant white rice flour and cornstarch and some tapioca flour. As it turned out, I probably should have added some egg replacer or maybe oat flour because the cake was a really thin layer...I think some of it dissolved into the topping.


The topping of caramelized brown sugar and sliced peaches was awesome and really made the cake. Baking it in the cast iron skillet worked really well and it came out of the pan easily.


 Sweetie and I shared with a couple of neighbors one evening and then with our daughter the next day and everyone really liked this version of the cake.

Do check out the bottom of the post which should have links to other Cake Slice bakers and consider visiting their blogs to see which cake they chose this month! Sure to be fun.


GF Peach Upside Down Cake
based on The Southern Cake Book

3 - 4 peaches, (about 1.5 pounds)peeled and cut into 1/3-inch thick wedges
1/4 cup cornstarch
1/4 cup tapioca flour
1/2 cup white rice flour
3/4 teaspoon baking powder
1/4 teaspoon baking soda
1/2 teaspoon salt
1/4 teaspoon freshly grated nutmeg
1 1/4 cups granulated sugar, divided
3/4 cup non-dairy butter (like Earth Balance), room temperature, divided
1/2 cup firmly packed brown sugar
1 teaspoon vanilla extract
2 large eggs
1/2 cup yogurt

Preheat oven to 350 degrees F. Line a baking sheet with parchment paper.

Sift together cornstarch, tapioca flour, white rice flour, baking powder, baking soda, salt and nutmeg.
In a 10-inch cast-iron skillet cook 1/2 cup granulated sugar over medium heat 10 minutes or until sugar melts and turns a deep amber color. Remove from heat. Immediately add 1/4 cup non-dairy butter and stir vigorously until incorporated with the melted sugar. Coat bottom of the skillet evenly with the mixture and arrange peaches over the mixture, overlapping as needed. Sprinkle the brown sugar over the peaches. Set aside.

In a stand mixer bowl beat the remaining 1/2 cup non-dairy butter until fluffy. Add the vanilla and remaining 3/4 cup granulated sugar and beat until smooth. Add eggs, 1 at a time, beating until blended after each addition. Scrape sides and bottom of bowl and beater as you go along. Add sour cream, beating until blended. Gradually add sifted flour mixture, beating at low speed just until blended and stopping to scrape bowl as needed. Spoon batter over peaches in skillet. Place skillet on prepared baking sheet.

Bake at 350 degrees F for 40-50 minutes, or until golden brown and a toothpick inserted in center comes out clean. Cool in skillet on a wire rack for 10 minutes. Loosen around the edge of the skillet with a knife and carefully invert the cake onto a serving plate, spooning any remaining liquid over the cake.

Cool a bit before serving as molten sugar can burn.


Garnish with fresh peach slices, whipped cream and/or ice cream.

Check out the August Cake Slice Bakers:


Wednesday, July 08, 2015

Peach Purse Pie


Peaches seem to be coming into their own right now. I think they are a tiny bit early, but that is probably due to the hot weather we have been having and to the drought. A couple of nights ago I had some really ripe peaches on hand and some refrigerated pie dough circles, so I made a quick gallette, which is really just a disc of dough rolled out a bit more and folded over the fruit. Because you don't have to fit the crust into a pie plate, nor seal and crimp a top crust, it is a really speedy way to go and it makes a pie that looks a lot like a draw string purse. I love the folds of dough that result and the rustic look of it, too.


This is another one of those not-really-a-recipe-exactly recipes.
Preheat the oven to 425 degrees F. If you have a baking stone, put it on an upper shelf, but make sure the shelf is low enough to allow for the pie.

Take the dough for a one-crust pie. If you are using the refrigerated stuff, just warm it up a bit and spread it out on a piece of parchment paper. Use a rolling pin to roll it out a little more into a circle about 11 or 12 inches in diameter. If you are being wise and using real pie dough, roll it out into a circle about 11 or 12 inches in diameter on a piece of parchment paper.

Prepare your fruit as you usually would for a pie. I like my peaches peeled, but my nectarines not peeled. Be sure to get rid of the pits and to slice the fruit. Sprinkle with some flour if your peaches are really juice and then toss lightly and gently. Sprinkle with some ground nutmeg. If the peaches are not really sweet, sprinkle with some sugar.

Pile the fruit in the center of the rolled out dough. Fold the dough up around the fruit. The excess dough will fall into folds.

Take an egg and beat it in a small bowl with a teaspoon of water. Brush the pastry with this mixture using a pastry brush. Sprinkle top with sparkling (sanding) sugar if you like.

Bake on the baking stone or slide the parchment and pie carefully onto a baking sheet and put in the oven. Bake for about 20 minutes, until the crust is golden brown and the fruit juices are bubbly.

Remove from oven and cool 10 minutes on a rack. Serve warm or let cool longer and serve cool.

Note: if fruit is really juicy, use a pan with sides under the pie, even if using the baking stone. A pizza pan or sheet pan works well. No one enjoys cleaning spilled peach juice from the oven bottom.


Tuesday, August 14, 2012

Blackberry Friendship

Years and years ago I remember meeting up with a family member about this time of year. We had both come a ways...maybe an hour or two. I had a cardboard box and we were sitting at a picnic table. I opened the box and there was a layer of newspaper. I took that out of the box and there was a layer of scrunched up newspapers. I took those out too, to reveal the top of a casserole, covered in foil. Around the casserole, filling the box at the sides, were more scrunched up newspapers. This was obviously something special nestled in that box.

Once the casserole came out of the box and the foil was removed it all became clear. This was an iconic summer dessert to share...peach blackberry crisp, still warm from the oven, thanks to all that packing material.

I scooped out portions into the paper bowls I had brought along, gave them a splash of cream from the thermos and we feasted! Blackberries are ripe at the same time as peaches and they have a long standing friendship as far as I can tell. They are both juicy and sweet with a bit of tang. I think that heating them up brings out the best of both peaches and blackberries, but somehow the combination of the two together, all sweet and warm and syrupy is sublime.


 Add the crunch of the crisp made with butter, flour, brown sugar, oats, spices and chopped nuts and life is good indeed. Top it with some cool cream and you hit the jackpot of desserts. At home we sometimes substitute vanilla frozen yogurt for the cream.

I wish that our new dog Pi and our longtime favorite cat Merlin got along as well as the peaches and blackberries. Pi has stopped chasing things for weeks now and is settling in. Merlin hangs out under the blackberries, allows Sweetie to feed him, with Merlin complaining all the while, and then Merlin walks a short distance away, and turns his back on Sweetie as he sits down. Not a forgiving cat so far. I go down and pet him and pull the foxtails and weeds out of his fur but he won't come to the house. Now the fragrance of blackberries reminds me of his unhappiness as well as of many other, happy memories. I'll bet as it gets chilly and the rains come that we will again see Merlin up at the house. Hope so.

Peach and Blackberry Crisp

3-4 peaches
1 pint blackberries
2 tablespoons brown sugar
1/4 teaspoon, freshly grated if possible, nutmeg
4 tablespoons butter

1/2 cup all-purpose flour
1/2 cup brown sugar
1 cup rolled oats
1/8 teaspoon baking soda
1/8 teaspoon baking powder
1/8 teaspoon salt
1/2 teaspoon cinnamon
1/4 teaspoon nutmeg
1/4 cup chopped nuts (I used walnuts)

Peel and pit and slice the peaches. Rinse the blackberries and pick out any leaves or similar debris. Place the sliced peaches and the blackberries in an oven-proof bowl or casserole, stir in the brown sugar and nutmeg, cover with foil and bake at 350 degrees F. for 20 minutes. The fruit should be bubbly hot.

While the fruit is cooking, melt the butter in a small pan.  In a large bowl combine the flour, brown sugar, oats, baking soda, baking powder, salt, cinnamon and nutmeg. Stir in the nuts. Mixture will be crumbly.

Remove cooked fruit from the oven, remove the foil and spread the crumb mixture evenly over the hot fruit. Return the fruit to the oven and bake another 15 minutes, or until crisp is golden brown. Let cool 10 minutes.

Serve in bowls. Great topped with cream, half and half, or ice cream. Serves 4-6.

Tuesday, September 20, 2011

Au Revoir Cake Slice Bakers


It has been a pleasure baking with the Cake Slice Bakers the past year, allowing me to find a number of new-to-me and wonderful blogs, and also to try some really nice cakes.

My favorite was the Coffee-Heath Bar Crunch Cake we made in February, but I also enjoyed the first recipe I tried...Pumpkin Chocolate Chip Pound Cake. Sweetie's favorite was the Cranberry Cake we baked in December, with extra almonds due to a senior moment of mine. This month's opportunity to choose our own recipe was great!


Since it is the height of peach season with luscious ripe peaches easily available I did change the fruit from nectarines to peaches. I love nutmeg with peach so I left out the cinnamon and used nutmeg instead. This was my second favorite of all the cakes we have baked...warm peaches, a moist, vanilla scented cake and spicy-nutty topping made an outstanding combination. Do try it!
Please be sure to visit other Cake Slice Bakers this month to see what they have chosen, too. It's sure to be a delight. HERE is the blogroll for the links.

Next month the group will be baking from another cake book. I'm taking a break from the group for a while in order to devote more time to my studies. It turns out that InDesign is very complex and the class I'm taking requires some work so that I can learn the program as well as possible. You, dear reader, can still check in on the 20th of the month and see what the Cake Slice Bakers have been up to...I'll most likely be visiting their blogs myself to 'ooooh' and 'ahhhh' over their creations...using the same link as above.


Peach Cake with Nutmeg-Nut Topping
Adapted from a recipe in Cake Keeper Cakes
by Lauren Chattman

Topping:
1 cup plus 1 tablespoon sugar (Next time I would reduce it to 3/4 cup sugar)
1/4 teaspoon freshly ground nutmeg
1/3 cup finely chopped walnuts

Cake:
1/2 cup unbleached all-purpose flour
1/2 cup whole wheat flour
1 teaspoon baking powder
1/2 teaspoon salt (use 1/4 teaspoon if fruit isn't completely ripe)
1 cup sugar (again I would reduce to 3/4 cup sugar)
1/2 cup (1 stick) unsalted butter, softened
2 large eggs, at room temperature
1/2 teaspoon pure vanilla extract
5 medium ripe peaches, peeled, halved, pitted

Preheat the oven to 375 degrees F. Grease the inside of a 10-inch round springform pan.

Topping: Combine the sugar, nutmeg and nuts in a small bowl. Set aside.

Cake: Combine the flours, baking powder, and salt in a medium bowl. Set aside.

Combine the sugar and butter in a large mixing bowl and cream with an electric mixer on medium-high speed until fluffy, about 3 minutes, scraping down the sides of the bowl and the beaters once or twice. With the mixer on low, add the eggs, one at a time, scraping down the sides of the bowl after each addition. Stir in the vanilla. Add the flour mixture, 1/2 cup at a time, scraping down the sides of the bowl after each addition.

Scrape the batter into the prepared springform pan and smooth the top with a rubber spatula. Arrange the peaches, cut side down, on top of the batter. (I arranged sliced peaches on top of the batter...the peaches were so ripe that some parts had spoiled and had to be removed, so slices worked better).Sprinkle with the topping. Bake the cake until it is golden and a toothpick inserted in the center comes out clean, 50 to 55 minutes. Let the cake cool in the pan on a wire rack for 10 minutes. Release the sides of the pan (run a knife around the cake first if it might stick to the sides), and use a large spatula to slide the cake from the pan bottom to a wire rack.

Cool completely, cut into wedges, and serve.

Store uneaten cake in a cake keeper or wrap in plastic and store at room temperature for up to 2 days.

Now please go visit the other Cake Slice Bakers to see what they chose for this special month. Blogroll is HERE.