Showing posts with label almonds. Show all posts

Wednesday, June 16, 2021

Babes Bake Hungarian


The Bread Baking Babes group has been baking for so many years now that it is something of a challenge just to find breads we haven't baked yet. This month I'm Kitchen of the Month for the Babes, but I've had the recipe ready for months. It's similar to last month's challenge, Povitica, in that it requires a thin, rich dough. It also has a filling using nuts, but this filling is very different. The shaping method is also different, so I do hope that if you like to bake bread that you'll try this one. I'm sorry that this wasn't posted this morning, but we were having work done on the house and my computer was covered with dust cloths until just a little while ago.

I found the recipe for this month's bread during the pandemic, when I was throwing out old magazines. It's from Sunset Magazine from 2001. I used to have a subscription but it's been a while since I had a subscription to any magazine. When I first came to California from the east coast, Sunset was a great resource for living the west coast lifestyle. This recipe isn't Californian, or even west coast, because it's a recipe for a nut roll from Hungary. 


One of the reasons I chose it is because, once baked, it keeps for a week, meaning there is a treat waiting at tea time for that long without heating up the oven again, especially since it is a 2-pound loaf. Another reason is that I was fascinated by the idea of a filling made with cooked milk and almonds. 

The dough is basically a brioche dough, so don't expect a big rise out of it. It is rich tasting and goes really well with the almond and dried fruit filling. I used dried cherries which I soaked for an hour in Kirsch. I'm not sure that you can tell that they were soaked in a liqueur, but they are nice and soft.

I did have some trouble with rolling the dough using a cloth. I used a linen couche and thought that I had it well floured, but it stuck quite a bit as I rolled it. Still, once baked you couldn't really tell. Will probably try this again with an actual tablecloth.

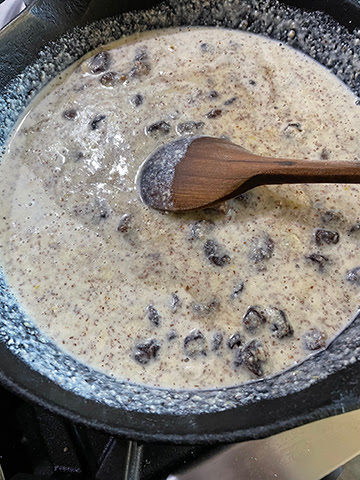
The filling is really fun. You start with a slurry of milk, almonds and dried fruit but with enough heat, it turns into an almost creamy filling with great flavor and fragrance. I did add a few drops of almond extract along with the vanilla because almond flavor really goes well with cherries.

Do try this yourself. If you'd like to be a Buddy, bake it and then email me by June 29th to be included in the round-up. I'd love a photo and a short description of your experience with this bake. Plachman -at-sonic-dot-net.

Also, be sure to visit the other Babes blogs to see what they have done with this tea time treat!


Gigi's Hungarian Almond Roll

 Makes one 2-pound loaf

From Sunset Magazine, Dec 2001

1 package active dry yeast
6 tablespoons warm water
1/4 cup sugar
2 large egg yolks (divided)
About 6 tablespoons butter or margarine, cut into small pieces
About 1 1/2 cups all-purpose flour
Almond Filling (recipe follows)

1 tablespoon milk or water

 Have all ingredients at room temperature except warm water, which should be about 108-110 degrees F.

 In a bowl, sprinkle yeast over the 6 tablespoons warm (about 110 degrees F) water; let stand until soft, about 5 minutes. Add sugar, 1 egg yolk, 6 tablespoons butter pieces, and 1 1/2 cups flour; stir until evenly moistened.

 To knead with a dough hook, beat at medium speed until dough pulls cleanly from bowl, about 5 minutes. To knead by hand, scrape dough onto a lightly floured board and knead until smooth, about 10 minutes, adding flour (as little as possible) if necessary to prevent sticking; return to bowl.

 Cover dough with plastic wrap and let rise in a warm place until it's puffy enough to hold an impression when pressed with a finger (dough won't double in volume), about 1 hour.

 With dough hook or your hands, punch air out of dough; lift dough from bowl and shape into a smooth ball. Set on the center of a floured pastry cloth or clean, smooth-textured dish towel. Pat dough flat; with a rolling pin, roll into a 14-inch to 15-inch square.


Spread or evenly dot Almond Filling over dough to within 1-inch of edges. Lift cloth from one side to roll dough into a compact loaf. Gently lift loaf and lay, seam side down, on a buttered 12-inch x 17-inch baking sheet. Pinch ends to seal, then fold under.


Cover loaf loosely with plastic wrap and let stand in a warm place until dough is slightly puffy, about 45 minutes.


In a small bowl, mix remaining egg yolk with milk. Brush loaf with yolk mixture; discard any remaining.


Bake loaf on the center rack in a 325 degree F regular or convection oven until rich golden brown, about 45 minutes. Transfer to a rack and let cool at least 1 hour. Serve at room temperature. Cut cross-wise into 1/4-inch thick slices.


Almond Filling: In a food processor, whirl 1 cup un-blanched almonds to fine meal. Ina a 10-12-inch nonstick frying pan, combine almonds, 3/4 cup raisins, 3/4 cup sugar, 3/4 cup milk, and 1 teaspoon grated lemon zest. Stir over high heat until mixture is thick enough to hold a clean trail for a few seconds when you draw a spoon across pan bottom. Remove from heat and stir in 1/2 teaspoon vanilla. Let cool at least 30 minutes.

Friday, September 13, 2019

Is It A Cookie Or A Tart?


Recently our local newspaper, the Press Democrat, has a delicious sounding recipe in the Food Section. It was for a Crostata with jam. A crostata is sort of a cross between a cookie and a tart. It's baked in a tart pan, but uses a dough for the base which is cookie-like and fluffier than a usual tart dough. The filling is usually jam. I used a combination of good quality apricot jam and fresh, cooked peaches, lightly mashed and scented and flavored with almond extract. It made for a delightful dessert which I served for afternoon tea yesterday. With a topping of pieces of some of the tart dough and a sprinkle of sliced almonds, it looks very pretty and tastes divine.

My health improves day by day, which is very encouraging. It's nice to finally have enough energy to try a new recipe. Sweetie is happy because I'm also cooking again. Mostly simple things like steamed corn on the cob and salads, but now and again a little more complicated like last night when I marinated some portabella mushrooms for sandwiches. Sweetie did the grilling. I'll try and post the recipe soon.

Back to the crostata. When you are putting the dough into the bottom of the pan, keep flouring your hands as they get sticky for the most even crust. Don't forget to set aside the 1/2 cup of dough for the top. You can chill it while you work on the tart. Do plan on enough time to also chill the dough-filled tart pan for at least 20 minutes.


If you are using some or all pre-made jam (as I did), be sure to taste it and add some lemon juice, as needed, to make it a bit tart. If you are making your own jam, you can taste it and add sugar if needed as you make it. You can also make the jam ahead of time, up to 1 week before making the crostata.

You'll only need small pieces of this crostata. Try it with a nice cup of hot tea and take a few moments to relax. If you used fresh, seasonal fruit, you can think of the wonders of harvest time, too.


Jam Crostata
based on a recipe originally in the New York Times, by Melissa Clark
Makes 8 servings

For the jam - use at least 12 oz. good quality pre-made jam, or make your own as follows:
3 cups blackberries
1 cup blueberries
3/4 cup granulated sugar, plus more as needed
2 teaspoons minced fresh lemon verbena (optional)
1 teaspoon fresh lemon juice, plus more as needed
1/2 teaspoon grated lemon zest
1 teaspoon vanilla extract
topping:
1/3 cup sliced almonds
Demerara sugar, for sprinkling (optional)

In a medium saucepan, stir together the blackberries, blueberries, sugar and lemon verbena (if using). Cook over medium heat, stirring occasionally at first, then more frequently as the mixture starts to bubble and reduce. When the mixture has reduced and looks syrupy (about 30 minutes), stir in lemon juice and zest. Taste and add sugar if necessary. This depends on how sweet your berries were to begin with.
Cook for 3 minutes longer, stirring frequently to prevent burning. When the jam is thickened and shiny but still slightly runnier than you expect jam to be, take it off the heat; it will continue to thicken as it cools.
Scrape jam into a bowl or heatproof container, stir in vanilla and let cool to room temperature.
Taste and stir in a little more lemon juice if jam is very sweet. At this point, the cooled jam can be chilled for up to 1 week.
Note: I used 10 oz. pre-made apricot jam and then used the instructions (but not the quantities) above to make a peach jam to combine with the apricot jam to make my crostata filling. I used a tiny bit of almond extract instead of vanilla and no extra sugar since my peach was quite ripe and sweet.

For the crust - allow time to chill
1 1/2 cups all-purpose flour
3/4 cup whole wheat flour
12 tablespoons butter or margarine, softened
1/2 cup granulated sugar
2 large egg yolks, at room temperature
1 tablespoon finely grated lemon zest (about 1 large lemon)
1 teaspoon vanilla extract
1/2 teaspoon fine sea salt
1/4 teaspoon almond extract

In a medium bowl, whisk together the flours; set aside. In a second bowl, using an electric mixer, beat butter and sugar until pale and fluffy, about 3 minutes. Beat in egg yolks, lemon zest, vanilla, salt, and almond extract until combined, then beat in flour, only beating until flour is incorporated.
Scoop 1/2 cup of the dough into a covered container and chill. Transfer remaining dough into a 9 or 10-inch tart pan with a removable bottom and use floured finders to press the dough into an even layer in the bottom of the tart pan and up the sides. Chill for at least 20 minutes
When ready to bake, preheat the oven to 350 degrees F. Spread cooled jam evenly into the crust the, using your fingers, crumble reserved chilled 1/2 cup dough over the jam. Sprinkle with sliced almonds and Demerara sugar (if using).
Bake until golden, 35 to 48 minutes. Let cool completely to room temperature before serving.

Tuesday, April 16, 2019

Easter Bread with the Babes


Over the years we haven't really had very many Easter breads in April, but I'm really glad that our Kitchen of the Month, Aparna of My Diverse Kitchen, chose this one this year. There is still plenty of time to bake this for Easter and then become a Bread Baking Babe Buddy (see below).

"The Ciambella Mandorlata is an Italian Easter bread that originated in Bologna in the Emilia Romagna region. It is typically baked in the shape of a ring which is supposed to represent the unity of the family." It is basically a brioche type bread with lots of butter and eggs. Most of the sweetness comes from the topping and even that isn't very sweet, so this is a primarily breakfast bread but I think that that you can eat anytime of day with enjoyment.


The instructions given were for making the dough by hand, but I've been gardening and my shoulder is pretty sore from weeding and carrying heavy stuff, so I adapted it to use the stand mixer. I'm including the given recipe, but the changes I made include starting by putting the sugar into the bowl and adding the lemon peel, then blending the peel into the sugar with my fingers. The yeast had already soaked in the slightly warm milk by then. Then I added the butter and eggs and beat it together with a whisk, then added the milk mixture and half the water. In another bowl I combined the bread flour and salt. This mixture I gradually added to the moist mixture in the bowl to form a soft, sticky dough, then let the mixer knead the dough for about 8 minutes.

The dough went into a raising container, got covered with a clean shower cap, and it rose until doubled. After punching it down and letting it sit for 10 minutes, I turned it out onto a lightly floured board, divided it in half, set one half aside and divided the second half in half. Those pieces each were rolled into approximately a 14 inch snake. The two snakes were wrapped around each other, ends connected and the ring went into a greased 9-inch pie plate. Then I repeated the shaping with the other half of the original dough.

Here I really went off the recipe, because I let the rings rise for about an hour and a half, then put them in the fridge overnight. The next day I took them out of the fridge, let them warm up while I made the topping and preheated the oven.


For the topping I mixed the sugar, copious amounts (as called for) of cinnamon, and an egg yolk. I used a small spatula to spread the topping over each strand of the braid, then sprinkled with chopped almonds (unpeeled and untoasted), pressing the almonds down into the topping a bit.


I baked it for about 15 minutes, then reduced the heat to 375 degrees F for the rest of the baking time, which was shorter than the recipe called for since I had made two smaller loaves.


The finished bread had quite a bit of dark brown on the crust, but it wasn't burnt. The topping got crispy and the whole thing was delicious! Great plain or with butter. Also, the whole house smelled of cinnamon...wonderful!!


Do make this one...anytime, not just for Easter. If you do and want to be a Buddy, send an email to Aparna with a photo and your baking experience by April 29th for the round-up...and you'll get a Buddy Badge.


Be sure to visit the other Babe's sites to see what they've done with this lovely rich bread.


Ciambella Mandorlata is from my copy of Ultimate Bread by  Eric Treuille and Ursula Ferrigno

INGREDIENTS

For the dough:
2 tsp dry yeast
1 ⁄2 cup lukewarm milk
41 ⁄2 cups bread flour
2 tsp salt
1 ⁄3 cup sugar
grated zest of 3 lemons
9 tbsp unsalted butter, softened
3 eggs, beaten
1 ⁄2 cup water

For the topping:
4 tsp ground cinnamon
3 tbsp sugar
3 ⁄4 cup blanched almonds, toasted and roughly chopped
1 egg yolk

INSTRUCTIONS
Sprinkle the yeast into the milk in a small bowl. Let stand for 5 minutes; stir to dissolve. Mix the flour, salt, sugar, and lemon zest in a large bowl. Make a well in the center of the mixture and add the butter, eggs, and dissolved yeast.

Mix in the flour from the sides of the well. Add the water 1 tablespoon at a time, as needed, to form a soft, sticky dough.
Turn the dough out onto a lightly floured work surface. Knead until smooth, springy, and elastic, about 10 minutes.

Put the dough in a clean bowl and cover with a dish towel. Let the dough rise until doubled in size, about 4 hours. Punch down the dough, then let rest, covered with a dish towel, for about 10 minutes.

Divide the dough into two equal pieces and roll each piece into a 16-inch-long rope. Twist the two dough ropes together.
Place the dough rope on a buttered baking sheet. Shape it into a ring by bringing the two ends of the rope together. Pinch them to seal and cover with a dish towel. Proof until doubled in size, about 11 ⁄2 hours.

To make the topping mix the cinnamon, sugar, almonds, and egg yolk in a bowl. Use a rubber spatula to spread the mixture evenly over the top of the ring. 

Bake at 200C (400F) in the preheated oven for 45 minutes, until golden and hollow sounding when tapped underneath. Cool on a wire rack.

Friday, February 08, 2019

Almonds and Lemon and Raspberries


My daughter has a new food processor. It was a birthday present and will help her with her new eating regimen but it can be fun, too. It comes with an attachment to make fresh zoodles - veggie noodles - something that she eats a lot, but it can also do smoothies and sauces and she can made ground almonds for the little snack balls that help her stick to the program. She looks awesome so I think it's working.

Since she hadn't tried it out when I arrived last week, we decided to start with grinding almonds to a fine flour. Once we had that done it was a short hop to making dacquoise, a meringue with ground nuts folded in that you make into discs and bake. They are used instead of cake to make a layered dessert.


Fortunately she had an electric mixer with beaters...not a stand mixer, which would have been easier, but for someone who has been trying to simplify her life, it's better that way except for when her baking fool of a Mom shows up. It took a while to beat the egg whites to stiff peaks, but eventually they were beaten and the sugar was added and beaten in gradually. Then she carefully folded in the ground almonds and spread the mixture onto parchment paper. Once baked they cooled on the parchment since we didn't have cooling racks, so I think they stayed a bit floppier than if they had air dried, so to speak.

For the filling, I made my favorite lemon curd (see, still on a lemon jag) and put it in the fridge to chill, which helps thicken it up. Could have used a bit more cooling time, but we were expected for dinner. Each layer got some lemon curd and a sprinkle of fresh raspberries, with the top layer having the berries in a decorative ring and centered. The birthday girl even got a slice with a lit candle so that she can wish for her heart's desire for this year.

We tried to make whipped coconut cream to offset the tartness of the lemon curd, but it didn't whip up at all...probably poor technique and being rushed. Still, this is a fun, fairly simple dessert if you enjoy lemon and raspberries and almonds.


Dacquoise Layers

8 egg whites
1 cup sugar
1 teaspoon almond extract
1/3 cup all-purpose flour
1 1/4 cups whole almonds, unsalted

Prepare sheets of parchment paper - trace 8" circles onto each sheet. This will make 8 circles.

In a stand mixer, whisk the egg white until moist peaks form. Add the almond extract. Slowly add the sugar and beat until stiff peaks form, about 5-6 minutes for all the beating.

Place flour and almonds in a food processor. Pulse until ground into fine crumbs, almost a flour. Gently fold this mixture into the beaten egg whites, keeping as much air as possible in the meringue mixture you are forming.

Using a one cup measure, transfer a cup of the mixture to each circle. Spread out with the back of a spoon to the edges of each circle you drew on the parchment, creating a thin and even layer. (see photo above)

Transfer the parchments to large, flat baking sheets. Bake them, one pan at a time in a preheated 375 degree F oven for 10-12 minutes. Layers will be light golden brown and slightly darker at the edges.

Cool the layers for a few minutes, then peel off the parchment and cool completely on a wire rack.


Use the layers to make a dessert. We used six of the layers for our dessert and froze the other two for later use.

Friday, April 20, 2018

Italian Almond Cake #TheCakeSliceBakers


We had a really nice group of cakes to choose from this month as the Cake Slice Bakers continue to bake from The Perfect Cake by America's Test Kitchen. #atkcake


There was the creamy sweetness of the Tres Leches Cake, the tang of lemon in the Lemon Pudding Cakes, wonderful almond flavor in the Italian Almond Cake and fun and pretty Confetti Cake.


I chose the Italian Almond Cake because I wanted a tea cake that I could enjoy over a few days and one that wasn't too complicated since my energy levels continue to be lower than usual.


In the photo that is with the recipe in the book you can see that with the Italian Almond Cake there is a nice crunchy crust with sliced almonds, and lemon sugar. The photo doesn't really show much of the interior of the cake, but mine had a lovely dense crumb, similar to a pound cake and it was really moist. There is plenty of almond flavor in this cake but it has a nice brightness from the lemon zest, too. I did use melted non-dairy margarine instead of butter, but otherwise I baked it exactly as written in the cookbook.


I'm not going to include the recipe since, if you like to bake cakes, this book is worth purchasing. It has all the classics, plus some new and different ones. Each recipe is well written and the Test Kitchen folks  have clearly tested and tested to come up with recipes that work and are delicious. I expect this to be a book I go to again and again over the years.

Be sure to check out the other Cake Slice Bakers posts, too.

Each month The Cake Slice Bakers are offered a selection of cakes from the current book we are baking through.  This year it is The Perfect Cake from America's Test Kitchen #atkcake.  We each choose one cake to bake, and then on the 20th - never before - we all post about our cake on our blogs. There are a few rules that we follow, but the most important ones are to have fun and enjoy baking & eating cakes!

Follow our Facebook, Instagram, and Pinterest pages where you can find all of our cakes, as well as inspiration for many other cakes. You can also click on the thumbnail pictures below to take you to each of our cakes, or visit our blog where the links are updated each month. If you are interested in joining The Cake Slice Bakers and baking along with us, please send an email to thecakeslicebakers at gmail dot com for more details.

The choices this month were Tres Leches Cake, Lemon Pudding Cake, Italian Almond Cake, and Confetti Cake.

Sunday, May 07, 2017

Raspberry Blondes


One of the joys of living not too far from San Francisco is that family and friends find it no hardship to visit there. We also have family who live in the city, so we are there a number of times a year.

There was a family gathering in San Francisco yesterday, with all four members of the Michigan branch there, all three members of the Sacramento area branch there, Sweetie and I and Coffee Man, the sweetie of T-Rose who lives in SF.

Food is always an important part of any gathering in my family. Mark was in charge of most of the food, so we knew it would be creative, top-notch, perfectly cooked with fresh ingredients, and delicious. In order to work up an appetite, we decided to visit Golden Gate Park, a few blocks away. It was a beautiful day, breezy and bright and not too hot. After a meandering walk in the park, and went up in the De Young museum tower, which gives a 360 degree view.


The entrance to the bay was sort of foggy, but you could see the tops of the Golden Gate Bridge. Then we walked back. There were so many flowers blooming and tiny wild strawberries lined some of the paths. Lots of people, too, but that's part of the fun.

After the walk (which was almost too long for Sweetie as he has been mostly resting the last two weeks), we had mint juleps in honor of Derby Day, watched the running of the race in the terrible muck that the track was, and enjoyed the onion tart which I baked earlier in the day at home. I'll post the tart recipe tomorrow or the next day. It is a variation of this tart. As we caught up on family news, Mark finished off the feast.


The feast was a truly delicious slow cooked pork shoulder with Asian seasonings, served with rice and lettuce cups (well, lettuce and radicchio). Mark had created sauces to go with it which included one with cilantro, lemongrass and ginger, plus a hot one, and some kimchi. There was a delicious salad of roasted corn kernels, avocado, and various kinds of peppers. We almost didn't have room for dessert...almost.

Natasha from Sac area had shared with me that she would be bringing something from Freeport Bakery,


so I knew I should bring something non-dairy for myself. The bakery goody was their famous Princess Cake,


a wonderful creation of sponge cake, chocolate, custard, raspberry jam, much whipped cream and marzipan over it all.

My raspberry blonde bar with fresh raspberries, plenty of aromatic white chocolate, slivered almonds, macadamia nuts and coconut (but no brown sugar) was equally delicious and went really well with a cup of peppermint tea. The bars are moist, very almondy, have lots of mellow but crunchy nuts and the raspberries go so well with the almond and coconut top notes.

Sweetie was fading fast by then, so we headed home. Happy Derby Day! Try some of these Raspberry Blondes yourself the next time you have some fresh raspberries on hand. If you love white chocolate you will love these bars!


Raspberry Blondes 
makes 24

1 cup (2 sticks) butter or non-dairy butter, at room temperature
3 cups granulated sugar
4 large eggs
2 teaspoons almond extract
1 teaspoon salt
2 cups unbleached all-purpose flour
¾ teaspoon baking powder
1/2 cup macadamia nuts
1 1/2 cups blanched slivered almonds
1 cup sweetened shredded coconut
1 cup white chocolate chips and chunks (I used about half chips and half hand broken white chocolate chunks)
1/2 pint fresh raspberries, rinsed and dried lightly with a paper towel (don't crush)

Position oven rack in the middle of the oven and preheat to 350 degrees F. Use cooking spray to lightly coat a 9 x 13 inch baking pan.

Melt the butter and sugar together in a large heavy-bottomed saucepan over medium heat. Cook, stirring constantly, until the butter and sugar are blended and completely melted and starting to bubble gently. Remove the pan from heat and let the mixture cool slightly.

In a bowl, whisk together the eggs, vanilla and salt. Slowly whisk the cooled butter and sugar mixture into the eggs just until combined. Whisk in the flour and baking powder to form a loose batter. (Make sure the batter is cool before stirring in the remaining ingredients, otherwise the chocolate will start to melt before the bars are baked.)

Stir the nuts, coconut, and white chocolate chips and chunks into the cooled batter. Pour half the batter into the prepared pan and smooth with a spatula. Distribute the raspberries over the batter as evenly as possible. Pour the remaining batter over the berries and smooth with a spatula.

Bake until the top is shiny and slightly crackled and feels firm to the touch, 30 – 35 minutes. A wooden skewer inserting into the batter should come out with moist crumbs clinging to it. Let cool on a wire rack to room temperature, then cut into bars and serve.

Sunday, December 11, 2016

Almonds Take This Cookie To Crunchy Town


Often when a recipe calls for toasting the almonds before using them I just ignore it. Although the toasting process gives the almonds a delicious flavor, in a lot of recipes you can barely tell the difference. Not so in this biscotti recipe. The toasting makes all the difference, both in flavor and in the crunchiness of the nuts in the finished cookie.


You start with a cup of toasted almonds. I spread the nuts on a cookie sheet with space between the nuts, bake them at 350 degrees F for about 10 minutes, then let them cool. They sort of pop and crackle when they are cooling.

The dough itself is unusual because you add the whole almonds to the flour mixture and so the nuts get mixed in at the same time...which is a bit hard on the mixer to tell the truth. You can also stir the dry ingredients in with a spoon. Just be sure to keep stirring until a cohesive dough forms.

This recipe is one I got from Jana, still very much missed niece-in-law, whom we lost to ovarian cancer over a decade ago. The cookies are fully flavored with almonds being the main flavor note. They are light and crunchy and delicious as is, or dunked into coffee or hot chocolate. She gave us some at Christmas one year so it seems appropriate to make them for Christmas this year. Give them a try. They are easy to make and when you pat the dough into logs you even get to play with your food and no one minds. Here are what the baked logs/loaves look like.

These are twice baked cookies. First you bake these loaves, then you slice the loaves and put the slices on cookie sheets and bake them some more. The actual time you need to work is short, but because you are baking these twice, the baking time is longer.


I tried baking two sheets at the same time for the second bake, but I forgot to switch the pans around halfway through the baking time (twirling them front to back and putting the pans from the top rack down and the ones from the lower rack up). The result was that the bottom sheet had dark brown bottoms. They taste OK but I like the paler ones better.


These make great gifts!


Jana's Almond Biscotti
makes about 3 dozen

1 cup whole almonds
1 cup sugar
3 cups flour
1/2 teaspoon baking soda
1/2 teaspoon baking powder
3 eggs
1 1/2 teaspoons almond extract

Toast the almonds 10-15 minutes in a 350 degree F. oven. Let cool.

In the large bowl of an electric mixer, beat the sugar and eggs, adding eggs one at a time and beating well after each addition. Add almond extract with the last egg. Scrape sides and beater(s) as needed.
In another bowl stir together flour, baking soda, baking powder and whole, toasted, nuts. Add this dry mixture to the egg mixture on low speed. Let mixer combine them until dough forms.

On a greased 12" x 15" baking sheet, use well-floured hands to pat dough into 2 flat loaves, about 3/4" thick.

Bake in 350 degree F. oven about 20 minutes, until browned at edges and springy to the touch. Let the loaves cool on the sheet until cool, then cut on the diagonal into long 1/2" slices.

Arrange slices on the baking sheet close together with a cut side down. Return baking sheet to oven and bake at 350 degrees F. until cookies are brown, 15-18 minutes longer.


Transfer cookies to a rack to cool completely. Serve or store airtight. These can be frozen for 3-6 months, too.

Thursday, April 16, 2015

Romania Spring Braid with the Babes


Welcome to my Kitchen! This month it's the Kitchen of the Month for the Bread Baking Babes. After spending some very delightful time looking at various bread recipes, I decided that since Easter and spring were going to be here during the bread baking time for April that I would invite all of the Babes around the kitchen table to have fun with a Romanian Easter Braid. Even if Easter isn't your thing, this braid is delicious with its nut filling and spring time flavors of butter, egg, and lemon. I like the idea of filling the braid ropes. Wasn't sure how it would actually go, but that's part of the fun, isn't it?

The description of the recipe in The Festive Bread Book, by Kathy Cutler talks about "The delicious walnut filling" but the recipe calls for ground almonds. I suspect that you could use any ground nut you desire...walnut, almond, pecan, hazelnut...and you will get a nice filling. The full description is, " the delicious walnut filling of this bread helps make it a Romanian classic. Serve it as a snack or with Easter dinner." It doesn't have any icing, so it may be a bread that is somewhat unsweetened. You can always add a sweet glaze and/or nuts once the baked bread has cooled if you prefer it a bit sweeter.

The Wiki information is interesting: " In Romania, the recipes differ rather significantly between regions in what concerns the trimmings. The dough is essentially similar throughout the country: a plain sweet bread made with flour, eggs, milk, butter, sugar and salt. Depending on the region, one may add to it any of the following: raisins,... grated orange or lemon rind, walnuts or hazelnuts, vanilla or rum flavour.

Cozonac, (the Romanian bread for Easter similar to Italian pannettone), may be sprinkled with poppy seeds on top. Other styles dictate the use of a filling, usually a ground walnut mix, ground poppy seeds mixture, cocoa powder, rum essence and raisins. The dough is rolled flat with a pin, the filling is spread and the whole is rolled back into a shape vaguely resembling a pinwheel. In the baked product the filling forms a swirl adding to the character of the bread."  Apparently there is also a Christmas version with dried and/or candied fruit included.

It sounds like this version is the braid that uses lemon rind and a nut filling. Maybe the author prefers almonds to walnuts or poppy seed. I know that we Babes are a creative bunch, so this recipe leaves plenty of room for creativity and should yield a nice loaf for any spring celebration.


Be sure to check out what the other Babes have done with this recipe, then make it yourself. To become a Buddy and get a badge for your blog, just e-mail me by April 29th at elle dot lachman at gmail dot com. Include a photo of your bread and a short description of your baking experience and I'll include you in the round-up. I know Easter has come and gone, but it's still spring and this bread is one your family will love...and pretty. Come join the fun...I know you want to.


This braid has a fairly rich dough, including both butter and eggs, and it has a nut-based filling. After making it and eating a slice the morning I made it, I think the next time I make it that I will spread a thin layer of softened butter on the dough before putting on the filling and I will increase the filling by half as much again to allow for a thicker layer of filling and a bit more flavor. In addition I'm going to increase the citrus zest (I used orange) to twice the amount called for in both the dough and the filling. I might also increase the salt by a 1/4 teaspoon to 3/4 teaspoon...the dough was just a tiny bit flat tasting and I think that will take care of that. The crumb was great and so was the crust. I made a quick glaze of a small amount of hot milk, 1/2 cup confectioners' sugar and a few drops almond extract to be drizzled over the top, then scattered on a few sliced almonds. Made for a pretty loaf and went well with the other flavors in the braid.

After reading over the recipe I just couldn't add yeast to a mixture that was going to be heated to such a high heat, so I put the yeast in 1/4 cup tepid water to proof, then added it to the milk/butter/egg mixture when the mixture had cooled to 100 degrees F before adding all of it to the dry mixture as the recipe calls for. I did mix everything by hand (no stand mixture) and it really is a lovely dough to knead for a while. I let mine sit in the fridge for a day before rolling out and shaping, then again overnight so that I could bake it this morning (it warmed up and did the final proofing this morning) which worked well. Nice oven spring, too. Because I used a little additional liquid in proofing the yeast, I decreased the milk by the same amount. As a result the flour called for was just about right.


Really yummy still slightly warm and taken with a nice hot cup of coffee! Love the swirls of filling...but I wanted more filling. My original plans to bake it again with friends was ruined by my coming down with a case of the flu.


Here are the links for the other Babes:

BakeMy Day  -  Karen
Blog from OUR Kitchen -  Elizabeth
Bread Experience -  Cathy
Girlichef -  Heather
Life's a Feast -  Jaime
Lucullian Delights -  Ilva
My Diverse Kitchen - Aparna
My Kitchen in Half Cups - Tanna
Notitie van Lien - Lien


Romanian Easter Braid
makes one loaf
from The Festive Bread Book, by Kathy Cutler
 
3 1/2 - 4 cups flour, divided
1/2 tablespoon active dry yeast
1/2 teaspoon grated lemon zest (or use orange zest)
2/3 cup milk
4 tablespoons unsalted butter
1/4 cup sugar
1/2 teaspoon salt
2 eggs

Filling:
1/3 cup water
1/3 cup sugar
1 cup finely ground almonds (or walnuts, poppy seeds, etc)
1/2 teaspoon grated lemon zest (or use orange zest)
1/2 teaspoon cinnamon

Glaze:
1 egg beaten with 2 tablespoons milk


Preparation:
Combine 2 cups flour , the yeast, and lemon zest in mixing bowl.

Heat milk, butter, sugar and salt until butter melts; remove from heat and let cool until it reaches 105 - 115 degrees F.

Add milk mixture and eggs to dry ingredients. Mix thoroughly.

Add enough remaining flour to form a soft dough. Knead on lightly floured surface until smooth - about 10 minutes.

Place in greased bowl, turning to coat top. Cover; let rise in warm place until double - about 1 hour.

Punch down dough. Divide dough into 3 equal pieces. Roll each into a 7 x 16-inch rectangle.

Use 1/3 of filling one each rectangle, spreading filling, but leaving a margin around edges; roll up jelly-roll style. Seal seam and ends. You will have three filled and sealed ropes.

Braid ropes; place on greased baking sheet.

Cover; let rise in warm place until double - about 30 minutes.

Make glaze and brush on loaf.

Bake in a preheated 350 degree F oven for 40 minutes or until done. Cool on wire rack.

(Optional: Make a sweet glaze with 1 tablespoon warm milk and enough powdered sugar to make a drizzle glaze. Drizzle cooled bread and then sprinkle with sliced almonds, for decoration, while glaze is still wet. Let dry.)