Showing posts with label brown sugar. Show all posts

Thursday, November 23, 2023

Happy Thanksgiving!


 Wishing you, dear reader, a magnificent turkey day...and lots of turkey with all the trimmings.

One of the trimmings is often cranberry sauce. The tart and sweet condiment offsets the mild comfort food flavors of turkey, dressing, mashed and/or sweet potatoes and even the creaminess of the green bean casserole...all fairly traditional Thanksgiving foods.

I grew up with the jellied kind in the can and I still love that version, but this year I had a bag of fresh cranberries, an orange, a cinnamon stick and enough time to make my own sauce.


Because cranberries carry a lot of natural pectin, making a sauce that thickens up without additional gelatin is easy and fairly quick...about 15-20 minutes total. I looked at a number of recipes online, then crafted this one to suit myself. Besides the fresh cranberries and the orange, I used water, brown sugar, and bourbon. It's a great mixture!


Fresh Cranberry Sauce with Cinnamon, Brown Sugar and Bourbon
Serves 4-6

1 12-oz bag fresh cranberries, rinsed and drained
3/4 cup brown sugar, packed
1/2 cup water
2 tablespoons bourbon
1 cinnamon stick
zest of about 1/4 of an orange, zest cut into long strips
additional water as needed

In a saucepan, place the cranberries, brown sugar, water, bourbon, cinnamon stick, and orange zest strips. Bring to a boil, stirring occasionally, then reduce heat so that mixture simmers. Continue to cook, stirring every minute or so, until the berries begin to pop. Use a wooden spoon or similar tool to both stir the mixture and to push the berries up against the side of the pan to mash them a bit. Continue until most of the berries are mashed, stirring all the while. Reduce the heat to the lowest setting and continue to stir and let the berries cook for about 8-10 minutes, until the mixture starts to get thick. Remove the cinnamon stick and the orange zest strips and discard them. Remove the sauce from the heat and let sit for 10 minutes. If the sauce is too thick, add water, a tablespoon at a time until desired thickness. Put into a bowl or storage container, cover and refrigerate until ready to use.

Below is a photo of the sauce with our Thanksgiving meal. Not the best photo because it was taken with an overhead light, not sunlight, but it gives a sense of the meal...which was delicious!

Thursday, December 30, 2021

Bourbon Glazed Ham


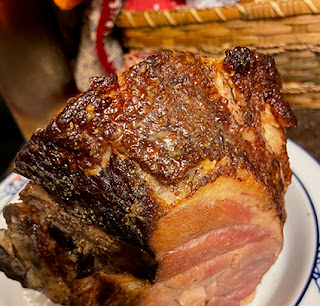
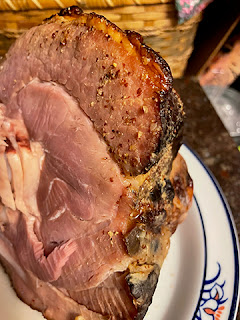
The holidays really rush by, don't they? One of our holiday meals had a centerpiece of Bourbon Glazed Ham, using a recipe from Martha Stewart. You begin with a fully-cooked half ham, so it's pretty easy, and towards the end of heating it fully, you brush on this aromatic bourbon-brown sugar-mustard glaze that you make while the ham does it's initial heating up. As the ham gets to the end of it's time in the oven, the glaze becomes shiny, browned and a bit sticky - altogether delicious. You don't even need to save this for a holiday...it works to dress up a weeknight dinner just as well.


Bourbon Glazed Ham

Adapted from a recipe by Martha Steward, 2009

1 1/2 cups dark brown sugar, packed
1 tablespoon molasses
2 tablespoons grainy mustard
1/4 cup bourbon (could also use brandy if preferred)
1 bone-in, fully cooked half ham, about 6 pounds

Preheat oven to 275 degrees F. Place ham in a roasting pan, cover tightly with foil (or put into a baking bag, like Reynolds Brown-In Bag, as I did, following directions for adding 1 tablespoon flour and cutting vent holes). Cook in preheated oven until thermometer registers 145 degrees F, about 1 1/2 hours.

While ham is in the oven, make the glaze. In a small saucepan combine the brown sugar, molasses, mustard and bourbon. Bring to a boil over medium heat and boil for 3 minutes or until thickened and syrupy. Set aside until the ham has reached XX degrees F.

Remove the cover from the ham, increase oven temperature to 350 degrees F, and brush the glaze generously on the ham, covering all exposed parts. Bake, uncovered, another 30-35 minutes until glaze is shiny and darkened. Serve warm, sliced, or at room temperature.

Saturday, October 20, 2018

Cider-Glazed Apple Bundt Cake for Fall with #theCakeSliceBakers


Can you tell that I love the fall of the year? In our area things like tomatoes and roses do really well in October, plus there are the fall fruits like figs and quince, persimmons  and, of course, apples.


I missed baking with the Cake Slice Bakers last month, but this month I was able to bake one of the recipes, Apple Bundt Cake. I used my Bundt pan that has four small cake molds so that I ended up with four very cute little cakes. The cider is easy to reduce in a wide skillet and only took about 20 minutes, so plan ahead to create your apple reduction in advance. It really adds to the apple flavor to have it in the batter, brushed over the warm cakes, and in the sweet drizzle that decorates the tops.


This is an easy cake to make because you don't even need a mixer...it is all mixed by hand. The dry ingredients go in one bowl, the wet ingredients, vanilla and brown sugar in another one. They get mixed together and then the apples are stirred in...it's as easy as that. The most time consuming part is peeling and shredding the apples and waiting for the cake to bake...if you bake one cake in a full sized Bundt pan it's over an hour of smelling wonderful fragrances of apple and brown sugar and butter.  If you like you can decorate the baked, drizzled cake with seasonal decors...I used a Harvest blend.


Worth the wait for the cake to bake, because the final cake is moist and delightful, almost like a pound cake with apples, but with a more open texture due to the technique used for mixing the batter and due to the shredded apples. Here is what a cut piece looks like (with no decorations or drizzle).


It just so happens that this recipe is available at the American Test Kitchen website, so you can try it and see why you should really buy the book. Every recipe I've tried has been perfect.


Each month The Cake Slice Bakers are offered a selection of cakes from the current book we are baking through.  This year it is The Perfect Cake from America's Test Kitchen #atkcake.  We each choose one cake to bake, and then on the 20th - never before - we all post about our cake on our blogs. There are a few rules that we follow, but the most important ones are to have fun and enjoy baking & eating cakes!

Follow our Facebook, Instagram, and Pinterest pages where you can find all of our cakes, as well as inspiration for many other cakes. You can also click on the thumbnail pictures below to take you to each of our cakes, or visit our blog where the links are updated each month. If you are interested in joining The Cake Slice Bakers and baking along with us, please send an email to thecakeslicebakers at gmail dot com for more details.


Thursday, January 04, 2018

Here's to Mixed Up Blondies


Over the years I've tried a number of different combinations when I bake blondies, the brownie like bar cookie that has butterscotch instead of chocolate as the dominate flavor. I've done Big Blondes, Irish Blondes, Dumpy Blondes and California Blondes. This time I decided to go with Mixed-up Blondes. Mixed-up because I combined the basic blondie recipe with some of the aspects of the Dumpy Blondes, particular the sweet-salty combo you get by adding in potato chips and pretzels, with the Irish wholemeal flour that I used for the Irish Blondes, the fruit I added made them almost like California Blondes.  I added a few macadamia nuts, but not very many since I was almost out of them, some pecans, some dried cranberries, toasted coconut, and, of course, chocolate chips. At the end I added about 2 tablespoons golden raisins, to. Truly a mixed-up bowl of add-ins.


The resulting cookie is moist, sweet, and has some salty elements, some fruity elements and some nutty elements. I'll be taking them to a party tomorrow to honor a friend, Jean Anderson, who died last year. We're celebrating her birthday and I know she would have enjoyed these cookies.

Mixed-up Blondes
A variation of a recipe by Jill O’Connor in Sticky, Chewy, Messy, Gooey, Desserts for the Serious Sweet Tooth.

1 cup (2 sticks) non-dairy margarine
3 cups firmly packed dark brown sugar
4 large eggs
1 tablespoon pure vanilla extract
1 teaspoon salt
1 cup unbleached all-purpose flour
1 cup Irish wholemeal flour (or whole-wheat flour)

¾ teaspoon baking powder

Add-ins: 
1 cup pecan halves
1/4 cup macadamia nuts
1/2 cup sweetened toasted coconut
1/2 cup sweetened dried cranberries
1 cup pretzel pieces (I used small ones and broke them up)
1/2 cup sea salt potato chips, lightly crushed
1 cup semisweet chocolate chips
2 tablespoons golden raisins

Use cooking spray to lightly coat a 9 x 13 inch baking pan.

Melt the butter and brown sugar together in a large heavy-bottomed saucepan over medium heat. Cook, stirring constantly, until the butter and sugar are blended and completely melted and starting to bubble gently. Remove the pan from heat and let the mixture cool slightly. Mixture should be room temperature before you proceed.

Preheat to 350 degrees F. Position oven rack in the middle of the oven.

In a bowl, whisk together the eggs, vanilla and salt. Slowly whisk the cooled butter and sugar mixture into the eggs just until combined. Whisk in the flours and baking powder to form a loose batter. (Make sure the batter is cool before stirring in the remaining ingredients, otherwise the chocolate will start to melt before the bars are baked.)

Stir the nuts, coconut, dried cranberries, pretzel pieces, potato chip pieces, chocolate chips and golden raisins into the cooled batter. (I usually mix together all the Add-ins in a bowl before adding to the batter...it prevents a clump of one ingredient here, another ingredient there...you get a better distribution by mixing before adding.) Pour the batter into the prepared pan and smooth the top with a spatula.
Bake until the top is shiny and slightly crackled and feels firm to the touch, 30 – 35 minutes. A wooden skewer inserting into the batter should come out with moist crumbs clinging to it. Let cool on a wire rack to room temperature, then turn out onto a board and cut into bars and serve.
Makes 15 large or 30 small bars.

Wednesday, March 02, 2016

Crazy Good Cookies


When I was in the LA area my hostess gave me a photocopy of her favorite cookie recipe, grandly called The Best Cookie in the compilation book where it is found. I baked some up this morning for a contest prize at our scholarship meeting and they sure did smell wonderful and they looked delicious, too.


The batter is similar to toll house cookie, but enriched with coconut, oats and walnuts...but no chocolate chips. There is also the 'mystery' ingredient or maybe crazy ingredient...crushed corn flakes. I had to go out and buy those since they are not a usual item in my pantry. The only box I could find was huge, so now I need to find some other recipes that use corn flake cereal!

These are tasty cookies. They are crisp at the edges, a bit chewy if you cook them the shorter time, and delicious if you like coconut, oats and walnuts, plus brown sugar and vanilla. Who knows if they are the best, but they sure are darn good cookies!


The Best Cookies
P.E.O. California Chapter MH

1 cup butter (I used vegan butter substitute)
1 cup brown sugar
1 cup granulated sugar
1 cup vegetable oil
1 cup crushed corn flakes
1 cup rolled oats
1/2 cup shredded coconut
1/2 cup chopped walnuts (you could use pecans instead)
1 teaspoon vanilla
3  1/2 cups sifted all-purpose flour
1 teaspoon baking soda
1 teaspoon salt

Cream together butter and sugars. Add egg and mix well. Add next 6 ingredients (oil, corn flakes, rolled oats, coconut, walnuts, vanilla); mix well. Add the flour, baking soda and salt. Mix until combined.
Shape into small balls, place on ungreased cookie sheet and flatten with a wet fork. Bake 12 to 14 minutes at 325 degrees F.
Makes about 100 small cookies.
The recipe is from Edith Norton, Sebastopol, CA

Monday, January 18, 2016

Bun


Although we have been grateful for weeks of almost-every-other-day rain, the constant moisture created a hazard that we didn't think about. I guess four years of drought gets one out of the habits needed to weather rainy years well. A few days ago Sweetie was going down the back steps towards the room he uses for making train and ship models and he slipped on the wet, slightly slimy steps. His feet flew out from under him and he landed on the edge of the bottom step and then finished up on the landing. In the process he got some world class bruises, especially on his bum, but, fortunately, nothing more serious as far as injuries. His back has been pretty sore but he has been careful to ice his injuries and to rest, so he is doing much better. I am so thankful that he didn't break anything!

Usually we take turns making dinner, but I've been doing it since the fall, so last night I decided to make something that I enjoy ordering when we eat out. The dish is Vietnamese Bun salad, with shredded lettuce on the bottom of the bowl, cooked rice noodles on top of that, a scattering of matchstick carrots, cucumber chunks, minced cilantro and minced mint, and warm cooked chicken pieces. The dressing was fun to make. It has lime juice, fish sauce, brown sugar, minced garlic, water and ginger. Once the salad is dribbled with the dressing, chopped peanuts are scatter on top and it's ready to serve.

I used instructions and recipes from a number of places and put bits of them together, so I don't have a place to send you to. I read of various ways to prepare the rice noodles and finally ended up doing a blend of two of them. The dressing was based on one found on David Liebowitz's blog, but I added garlic and fresh ginger and used more lime juice and less water, so I guess it's my own dressing.

This is a light, refreshing meal with plenty of crunch from the lettuce and peanuts and cucumber and carrots. David uses fried shallots and red onion and I've seen the salad with bean sprouts, too, so feel free to adjust the salad fixin's, too.

I'm still going to order Bun when I eat at Vietnamese restaurants, but it's nice to know that I can make it at home, too.


Vietnamese Bun Rice Noodle Salad

The dressing
  • 4 tablespoons fresh lime juice
  • 1 to 2 tablespoons fish sauce
  • 2 tablespoons light brown sugar
  • 1/4 cup water
  • a few drops hot sauce, or Sriracha sauce to taste
  • 1 small clove garlic, peeled and minced
  • 1/4 teaspoon fresh ginger, peeled and finely minced

The salad 
  • 8 oz. dried thin rice noodles
  • 1/2 head iceberg lettuce, finely shredded
  • 1 large carrot, peeled and cut into bite sized matchstick pieces
  • 1/2 a cucumber, peeled, seeded and cut into bite sized chunks
  • 1 large chicken thigh, cooked, skin removed, and cut or torn into bite sized pieces
    (you can also use other protein like barbecued pork, barbecued shrimp, or small, cooked spring rolls, or tofu)
  • 2 teaspoons chopped fresh mint
  • 2 teaspoons chopped fresh cilantro
  • 3-4 tablespoons chopped roasted peanuts (I like unsalted)
For the dressing 
In a small jar combine the lime juice, fish sauce (more if you really like fish sauce), brown sugar, water, hot sauce, garlic and ginger. Shake to combine well and set aside.
 
For the salad  
Heat water in a large pot big enough to hold the rice noodles. There should be enough water to cover the noodles. Bring the water to a boil, then remove from heat and add the noodles, breaking the mass if necessary to fit it into the pot. Stir gently. Cover and set aside for 5 minutes. Return pot to stove.

In two or three or four large bowls place the iceburg lettuce. Gather all of the rest of the ingredients and heat the protein part. Turn on the heat under the noodles and bring back to a boil. As soon as the water boils, drain the noodles in a colander, rinse thoroughly with cold water, then spread noodles on a clean kitchen towel to drain.

Place some noodles over the iceberg lettuce. Scatter carrot, cucumber and warm protein (chicken in my case) evenly over the portions of noodles. Scatter the mint and cilantro evenly over the portions.

Drizzle some of the dressing over each salad and top with peanuts. Serve additional dressing at the table for those who want more dressing. Serve at once. Makes 2-4 servings, with some noodles and dressing left over for another time.

Saturday, December 19, 2015

Three Kinds of Ginger


Although I've always loved gingerbread, I was an adult before I discovered the joys of fresh ginger and candied ginger. Of late I've been increasing the amount of ginger in my diet since it is not only an effective anti-inflammatory, but it tastes wonderful. Fresh ginger does have some natural heat to it, but I find that I enjoy that much more than the heat from, say, hot peppers.

One way to enjoy three kinds of ginger; fresh, candied and ground dried ginger; is by making gingerbread cake. I recently tried a new recipe that uses all three and it works really well in a Bundt cake pan. It's called the Gramercy Tavern Gingerbread and it's a recipe from Epicurious. I think I decided to try it because the first ingredient is one cup of stout (like Guinness). It also has lots of spices, not just ginger. Cinnamon, nutmeg, cloves and cardamom are also used. The strong flavor of molasses comes from molasses itself, but also from dark brown sugar. The only think it was lacking was the candied ginger, so I chopped up a tablespoon of that and added it anyway. It tended to go to the bottom of the pan, which became the top of the cake. I found that out because it got in the way of slicing the beginning of some slices, but I still think it adds a necessary element to the cake.

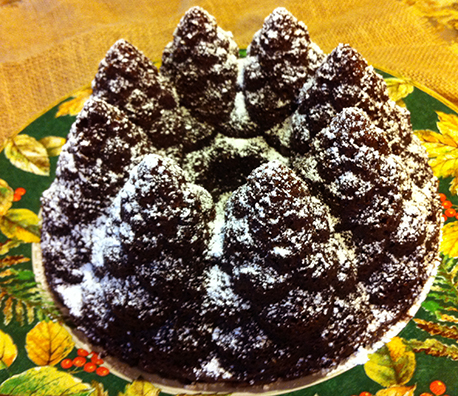
This makes a full Bundt cake, so make sure that your pan is a full sized one, which I think is a ten-cup capacity or larger one. I baked mine in a pan that looked like a circle of Christmas trees. For decoration I sifted on just a little powdered sugar, so they looked like snowy trees. Very pretty and perfect for a party, or your own holiday table.

This gingerbread is moist, spicy, mouthwatering (perhaps due to the wonderful fragrance of the stout and all those spices), with a fine crumb and sturdy form. Everyone who tried it was delighted, especially those who added a dollop of whipped cream to their serving.

Be sure to check back tomorrow to see what I made for the Cake Slice Bakers!


Adapted from
Gramercy Tavern Gingerbread
from Epicurious

1 C stout (like Guinness which is what I used)
1 C dark molasses
1/2 t baking soda
2 C all-purpose flour
1 1/2 t baking powder
1 1/2 T ground ginger
1 t ground cinnamon
1/4 t ground cloves
1/4 t freshly grated nutmeg
pinch ground cardamom
1 T freshly grated fresh, peeled ginger root
1 T finely diced moist candied ginger
3 large eggs
1 C packed dark brown sugar
1 C granulated sugar
3/4 C vegetable oil

Preheat oven to 350 degrees F. Generously butter a 10-inch (10-12 cups) Bundt pan and dust with flour, knocking out excess.

Bring stout and molasses to a boil in a large saucepan and remove from heat. Whisk in baking soda, then cool to room temperature.

Sift together flour, baking powder, and spices in a large bowl. Whisk together eggs and sugars and fresh ginger. Whisk in oil, then molasses mixture. Add to flour mixture and whisk until just combined.

Pour batter into Bundt pan and rap pan sharply on counter to eliminate air bubbles. Bake in the middle of the oven until a tester comes out with just a few moist crumbs adhering, about 50 minutes. Cool cake in pan on a rack 5 minutes. Turn out onto rack and cool completely.

Serve cake, dusted with confectioners' sugar, or serve with whipped cream.

As a reward for reading to the end, here is a recent shot of the sunset in our wintery sky. We have been having rain on and off, which is such a blessing!, so there are often clouds in the sky at sunset. Winter sunsets seem to have a wonderful fragile quality to them that I love.


Tuesday, October 20, 2015

Leaving Southern Cakes


The Cake Slice Bakers have been baking for the last 12 months from The Southern Cake Book by Southern Living. Think lots of pecans, brown sugar and dairy products and you get the general idea. Since I grew up in the South I've enjoyed baking from this book. For the final recipe we got to choose any recipe in the book. I chose Hawaiian Sheet Cake and frosted it with the same easy 7-Minute type frosting I used last month. To tell the truth, I made the sheet cake last month, too, and served it up for the birthday party where I served the chocolate cupcakes, also frosted with that sticky, gooey, sugary frosting.

This cake is really moist and delicious and filled with good things. One of the reasons I chose it was because it was in the 'feed a crowd' section, but I also love the combination of bananas, pineapple and coconut, plus spices. It was a big hit with the crowd and with the birthday girl. I didn't get any photos beforehand and so I only have this one photo after most of the cake had been served. Trust me, it was good cake. I used a gluten free flour mixture and it has no dairy, so I was able to have a piece. The cake is fairly sweet and the soft icing was pretty sweet, so small pieces were enough. I used crushed pineapple packed in juice, not syrup, to cut down a bit on the sweetness and only used 1/2 cup of granulated sugar instead of 1 cup, but kept the full amount of brown sugar, because enough sugar is important to the chemistry of a recipe and I like the mellow flavor of brown sugar.

Next month we start a new book, so be sure to come back November 20th to see which book, OK?

Hawaiian Sheet Cake
Serves 15

3 cups all-purpose flour (I used King Arthur gluten free flour blend)
1 tsp baking soda
1 tsp salt
1 tsp ground cinnamon
1/4 tsp ground allspice
1 cup granulated sugar
1 cup packed brown sugar
1 cup vegetable oil
2 very ripe bananas, mashed (to equal one cup)
3 large eggs, beaten
1 cup flaked coconut
1 (8 oz.) can crushed pineapple, undrained
1/2 recipe 7-Minute frosting
various sprinkles and dragees and candies for decoration

Preheat the oven to 350 degrees F. Use shortening to grease and lightly flour a 9 X 13-inch baking pan.

Mix flour, baking soda, salt, cinnamon, and allspice in a large bowl. Set aside

Mix granulated sugar, brown sugar, oil, bananas, and eggs in a medium bowl. A whisk works well. Stir in the flour mixture, whisking until blended. Stir in the coconut and pineapple (including pineapple juice from the can) just until blended. Pour batter into the prepared pan.

Bake at 350 degrees F for 40-45 minutes, or until a wooden pick inserted in center comes out clean. Cool completely in the pan on a wire rack. Run a knife around the sides of the pan and carefully invert the cake onto a serving platter. Frost with the 7-Minute frosting and decorate as desired.

Monday, April 20, 2015

Why Is It Called Coffee Cake?


April keeps flying along. Having reached the 20th we have landed on the magical day of the Cake Slice Bakers reveal. This month the Cake Slice Bakers had an awesome choice of cakes to bake from the book we are baking from the Southern Cake Book.

From many delicious choices, including cheesecake bars, a decadent carrot cake, a different green tea cake and a brown sugar and pecan coffee cake, I went for the one for which I had the ingredients on hand...the coffee cake. Very glad I did. I was questioned by a friend however. Since there is no coffee in this cake, why is it called a coffee cake. All that I could figure out is that it goes very well with a hot cup of coffee.

This is a simple cake to make. You don't need a mixer, but a pastry tool to cut the butter into the dry ingredients is essential. I know they say you can do it with a couple of knives, but I've tried that and trust me, a pastry blender is a much better tool. Sur la Table has a nice OXO one for $12, but you can ususally find one anywhere that kitchen gear is sold.


Sweet brown sugar, a touch of cinnamon, and chopped pecans are the obvious flavors here, but there is plenty of butter and sour cream in the recipe to add richness. I made a little extra of the crumb mixture and combined it with the pecan mixture for the topping to make it more like the New York Crumb Cake they have at my local eatery. I baked the bottom crust for just a few minutes, too, which made the bottom crust more solid than it might have been otherwise. 

Both of these changes made for an interesting textural contrast. The bottom layer had snap, the middle one with the sour cream was soft and almost pillowy, and the top layer combined both crunch and crumb. I really liked this dessert and so did Sweetie. Surprisingly it kept quite well for a week. I kept it on the counter, wrapped in foil. It makes a big pan of cinnamon sugar goodness, so we gave about half of it away to friends. Probably should have given away more, but it was too delicious to not eat ourselves.

Be sure to check out the other Cake Slice Bakers this month to see which of the selection they chose to bake. You'll be glad you did!


Here is my variation of the Brown Sugar Pecan Coffee Cake from
The Southern Cake Book

This coffee cake has crumbs in the crust, filling and topping. Makes for a quick and delicious cake.

2 1/2 cups all-purpose flour
2 1/2 cups firmly packed brown sugar
1 cup butter, cubed
Shortening
1 teaspoon baking soda
1 cup sour cream
1 large egg, lightly beaten
1 teaspoon vanilla extract
3 tablespoons granulated sugar
1 teaspoon ground cinnamon
1 cup chopped pecans

Preheat the oven to 350 degrees F. Stir together the flour and brown sugar in a large bowl. Cut the butter into the flour mixture with a pastry blender until crumbly and butter is is very small pieces. This mixture will be divided into three parts:

Press 2 3/4 cups crumb mixture on the bottom of a lightly greased 13 x 9-inch pan (that's where the shortening gets used), spreading evenly and packing down. Bake for 8 minutes. Remove from oven and set aside.

While crust is baking, remove 1/2 cup of the crumb mixture remaining and put it in a small bowl. Set aside.

Add the baking soda to the main crumb mixture and stir to combine. In a small bowl, stir together the sour cream, egg and vanilla. Add to the crumb mixture, stirring just until dry ingredients are moistened. Pour sour cream mixture over the crumb crust in the baking pan.

In the small bowl that has the 1/2 cup crumb mixture, mix together that crumb mixture, the granulated sugar, cinnamon and nuts. Sprinkle this mixture evenly over the batter in the baking pan.

Bake at 350 degrees F for 25-30 minutes or until a wooden pick inserted in the center comes out clean. Cool on a wire rack. Cut into portions and serve.
Makes 12 servings


Monday, February 23, 2015

A Muddy Slice of Cake


This month the Cake Slice Bakers had some wonderful choices for the recipe to bake: King Cake for Mardi Gras, Mini Red Velvet cakes or a dramatic chocolate torte for Valentine's Day, or a Mississippi Mud Cake just for fun. You can see what I chose in the photo.

Because February has been waaaay too full of both fun and serious things, including a funeral which included flying to Virginia during one of the many freezes they have had this winter, a tea party, a bladder infection, a birthday bash at a great restaurant, a birthday steak cooked by Sweetie on the actual day, eye surgery, a visit by an old Peace Corps buddy of Charlie's, an Artist's night for Straight Shooter's photo show, and scholarship selection for three P.E.O. State Chapter scholarships which included flying to LA (not in that order) I am late in both making and posting my choice.

I decided to go with the fun Mississippi Mud Cake because I think it will be something that Sweetie enjoys and he has been a rock of support and love during this busy month. Because I don't have any marshmallows and I do have cream cheese, I decided to substitute a cream cheese-brown sugar-bourbon mixture for the marshmallows. It didn't brown up, but I think it goes with the Southern vibe as well as being very good with chocolate and pecans. I also used some espresso powder instead of vanilla because I like a little coffee flavor to up the chocolate flavor in baked goods.

I also made half a recipe and baked it in a square pan. The full recipe is perfect for a crowd, but that isn't going to happen. I'll give the recipe the way I made it. If you visit some of the other Cake Slice Bakers or go online to the Southern Living website you should find the full recipe.


This is one oooey, gooey chocolate marvel of a dessert. It's messy but delicious. Hard to not just go back and have a little more...then a little more. You know, that kind of deliciousness.


Mississippi Mud Cake 
from The Southern Cake Book, by Southern Living Magazine

1/2 cup butter
2 oz. semisweet chocolate (I used Scharfenberger)
1 cup sugar
2 large eggs
3/4 cup flour
1/4 cup cocoa
1/4 teaspoon espresso powder or 1/2 teaspoon vanilla
1/2 teaspoon salt
1/2 cup pecans, toasted and chopped (I used closer to a cup)
4 oz. cream cheese, softened
1/2 cup brown sugar
1 1/2 teaspoons bourbon whiskey
Warm Chocolate Frosting (recipe below)

Preheat oven to 350 degrees F. Grease a 8 x 8-inch or 9 x 9-inch baking pan. Set aside.

Microwave butter and chocolate in a large microwave safe glass bowl on HIGH for 1 minute, stirring half way through the minute. I cut the butter and chocolate into small pieces before microwaving.

Whisk the sugar into the chocolate mixture. Whisk the eggs into the chocolate mixture until well blended. In a small bowl stir together the flour, cocoa, espresso powder (if using), and salt. Stir into the chocolate mixture until well blended. Add the vanilla if using.

Pour the batter into the prepared pan.  Bake at 350 degrees F for 15 minutes.

While the batter is baking, whip the cream cheese, brown sugar and whiskey together with a stand or hand held mixer until well blended and creamy.

When the batter has baked, leave the oven on. Remove the baking pan to a heat proof work area and dollop the cream cheese mixture over the brownie in the pan. Use the back of a spatula to draw the dollops together. Layer will be bumpy with uneven amounts in the layer. Return pan to oven and bake another 10 minutes. Mixture will not brown.

While cream cheese layer is baking, make the Warm Chocolate Frosting (see below). You should just about be done making it when the cake is ready to be removed from the oven.

After 10 minutes of baking, remove pan from oven and pour Warm Chocolate Frosting over it. Spread with a small spatula if necessary. Top with the toasted pecans. Let cool at least 10 minutes for the icing to harden up a bit. Enjoy!

Warm Chocolate Frosting

Melt 1/4 cup butter in a small saucepan. Whisk in 2 tablespoons unsweetened cocoa. Whisk in 3 tablespoons milk. Bring mixture to a boil, whisking constantly. Then gradually whisk in 1 cup confectioner's sugar, whisking all the time. Mixture will thicken slightly. Use at once, as soon as the cake comes out of the oven.

Tuesday, September 09, 2014

Cookies From A Pot


Do you have a favorite snack for times of stress? Lots of folks turn to ice cream and that does have the advantage of being ready to eat from the carton, it come in lots of flavors, and all you need is a spoon.

I tend to go for cookies. When I knew I would be without a stove for a while I baked some blondies, and that really helped. Once they were gone I wished that I had made butterscotch cookies, so I looked here on the blog for the recipe. No way I was going to find the recipe in my recipe card file because the file had disappeared into the whirl of items that used to live in the kitchen cupboard but now were temporarily housed elsewhere for the kitchen remodel. Turns out that I never put up a post on butterscotch cookies, so I had to wait until I found the recipe box. About a week ago I spotted it on a window sill behind a curtain. Sure enough, there was the recipe I wanted, so I brought it inside and put it by the flour in the new baking center. I decided that once I was able to bake again that it would be the first thing I made.

Today was the day! The stove is working, I have sinks in working order and a dishwasher. The new drawers and shelves are starting to be put to use as I sort out my kitchen things and find new homes for them. One of the nice things about this recipe is that you can make the batter in a good sized pot. No mixer needed!

You start with a lot of butter. It gets melted in the pot, then you add a lot of brown sugar. That gets stirred together. I usually let it cool a bit and today I was blessed by a phone call from a friend so we caught up while the mixture cooled.

Once the butter/sugar mixture cools a bit, you beat in the eggs, then, all at once, add the dry ingredients, nuts, chocolate chips and vanilla. As long as your pot is big enough, all this can be done in the same pot you melted the butter in. The batter gets turned out into a greased baking pan and spread out, then it's into the preheated oven. It doesn't take long before the house smells absolutely delicious! This is a very aromatic cookie. After cooling you can cut them into bars of whatever size you like. I wish I knew where I got the recipe from, but the index card gives no clue. It is liberally stained, which shows that I've enjoyed these many times over the years.

These bars of delight ship well and keep well if you can keep them hidden. I usually freeze some so that I don't eat the whole pan in a day...I like them that well. Fortunately we are down to the punch list so my stress level should be pretty low for a while. I bet I make these again before Christmas!

In case you have been following the madness of the kitchen remodel, I'm going to include a photo and am happy to say that the last of the paint touch ups was done today. All appliances, cabinets, floor, sinks, faucets, drawer and door handles on the cabinets, hooks, garbage containers and all but one of the towel racks have been installed. Most of the shelves and drawers are lined, and some are even filled. We found a good buy on bamboo drawer dividers at Costco, so lots of items that can go in them are in drawers and in order. Now I just have to remember which drawer they went to!


I hope to post a lot more often now that I should have more cooking and baking time. I made some amazing lamb meatballs last night which I need to share with you before I forget the ingredients I threw together, plus there are a few things I've made in the last week or so that were too good not to share. Hope you have checked out some of the older posts. If you have a way to go to classic web version there is a photo of a table setting which is a link to the recipe index. The index is a little out of date, but there are some hidden treasures there if you look for them.

Chocolate-Butterscotch Bars or Squares 
Makes 40 squares - not sure how many bars

2/3 cup butter, margarine, or vegetable shortening, melted
1 1/4 cups brown sugar, packed
3 eggs
2 3/4 cups all-purpose flour
1/2 teaspoon salt
2 1/2 teaspoons baking powder
6 oz chocolate chips
1 cup chopped nuts
1 teaspoon vanilla

Mix melted butter and sugar thoroughly. Let cool a bit. Add eggs one at a time, beating well after each addition. Add sifted dry ingredients, chocolate, nuts and vanilla and mix well to combine.Spread in a greased 15" x 10" x 1" pan. Bake in moderate oven (350 degrees F) for about 25 minutes. A toothpick inserted in center of pan will come out with a few crumbs stuck to it.

Cut into 40 squares (or some bars if you prefer) while warm. Store in airtight container. Will keep a week if you don't eat them all long before that as I do.


Monday, January 13, 2014

Breakfast Buns


Bread baking has been on the back burner lately, but I noticed that some mornings I would love to have just a little something to go with the morning cup of coffee and fresh fruit. I decided to put together a breakfast bun that would work, and to put in some healthy ingredients, too. Most of all, it has to be yummy because when you can only have a small amount of bread, it should be delicious bread, right?

For starters I cooked up some oatmeal...1/2 cup rolled oats and twice that amount of water...and set it to cool. I also mixed some yeast, water, a tiny bit of sugar and some flour to make a poolish. It all sat out on the counter while I went to the gym, collecting wild yeast if I was lucky.

Later in the day I mixed the cooked oatmeal, the poolish, some milk, and egg and some more water together. In a bowl I mixed all-purpose flour, whole wheat flour, salt, a little more yeast (in case no wild yeast were around that were strong enough), and a touch of cinnamon and added those to the liquid mix to make a nice dough.

After the dough had time to rise, I turned it out onto a flour board and kneaded in dried cranberries, chopped pecans and golden raisins. Those were stretched into a large rectangle, most of the rectangle was given a light coat of butter, a sprinkle with brown sugar, and also with cinnamon. I rolled it up, jelly-roll fashion, and cut it into buns.

The buns went into a 9 x 13 pan and lightly covered. They rose over time and then were baked in a 350 degree F oven until golden brown.


So now I had a dozen breakfast buns. There is about 1/6 of the usual amount of oatmeal one might eat at breakfast, whole grain, cinnamon for antioxidant and flavor value, dried fruits and nuts, milk and egg and only about 1/3 tablespoon of butter per bun, with even less sugar. Fairly healthy as buns go and very tasty. For one of the buns I added a small amount of an icing of confectioners sugar mixed with hot water. That made it a little too sweet, so I think in the future I'll stick with the 'plain' buns. Each bun went into it's own bag, then into the freezer for future enjoyment on those days when they will be the perfect thing to go with coffee and fruit.

You might think that I would want one every day, but today I had coffee, fruit and some plain yogurt and it was just enough breakfast. Normally I'd give you the recipe, but I didn't really measure a lot of the ingredients, so I'll have to see if I can figure it out and post it later.


Sunday, December 22, 2013


The lucky denizens of the Land of St. Honore' are probably born with the knowledge of how to bake and bake well. The rest of us have to learn as we go along. I was lucky to have picked up a lot of baking lore from my Mom as I grew up. I also love to read cookbooks and I read it all, not just the recipe or three that interests me. Some stuff I've known so long that I don't even think about it.

One of those long known things is to let your ingredients come to room temperature before you bake. Now some recipes will tell you to used a chilled ingredient or ice water, or to melt butter and either use it while it is still warm or to let it cool to room temperature, but it the recipe doesn't specify, you are usually safe to have ALL of your ingredients at room temperature. That might require planning ahead so that you can set out the butter or eggs, or even flour if you store yours in the fridge, well in advance of your baking time.

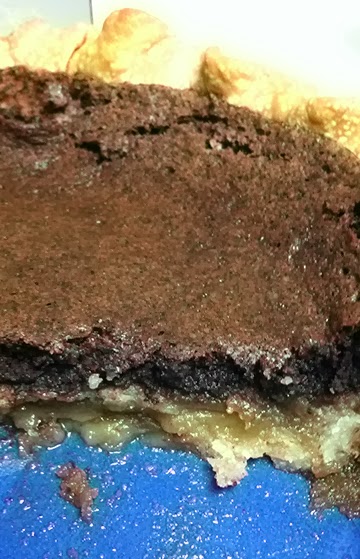
You might wonder what difference it makes. Sometimes it might not make any difference, but a good example of where it can is when you are making something like Chocolate Fudge Pie. The filling needs to almost emulsify in order for it to bake up as  homogeneous  fudginess. If you use, say, cold eggs, you may end up with a fudgy layer on top and another layer that is sticky and almost clear (similar to pecan pie filling) at the bottom, as in this photo. It might also be the result of using melted butter that is still too warm from melting.

Thanks for the photo Natashya! 

Room temperature eggs combine with the butter and sugar in a different way than cold eggs. The same is true of creaming butter, a standard beginning for everything from cookies to cakes. Room temperature butter creams beautifully, letting air mix with the butter as it lightens. Then the sugar gets added and the crystals cut into the fat of the butter as they are creamed together, resulting in a lighter textured cake or cookie.


I recently made some Persimmon Nut Quick Bread using the persimmons from our tree. This is the perfect example of a recipe where all of the ingredients need to be at room temperature, except for the butter. It gets melted, but then needs to cool back to almost room temperature so that, when added to the batter, it doesn't cook the eggs.

Do try this recipe if you can get fresh persimmons. You want the heart shaped Hachiya persimmons, the ones that have very soft fruit when ripe. The persimmon flavor is delicate, but this is a great bread, if made with a light touch. Not too sweet, a little persimmon flavor, a lot of nut flavor, with a moist crumb. I made one batch with walnuts and one with pecans. I think I like the one with pecans slightly better, but they were both delicious. This recipe makes two loaves...one to eat and one to give as a gift (or freeze for later)!


Persimmon Nut Bread
from Baking in America by Greg Patent

6 fully ripe Hachiya persimmons (about 2 pounds)
3 cups (about 12 oz.) walnut or pecan large pieces or whole halves
3 1/4 cups  all-purpose flour
2 teaspoons baking powder
1/2 teaspoon salt
4 large eggs
1 cup sugar
1 cup firmly packed light brown sugar
1 cup (2 sticks/ 1/2 pound) unsalted butter, melted and cooled

Adjust oven rack to lower third of oven. Preheat oven to 375 degrees F.  Butter two 8 1/2 X 4 1/2 X 2 3/4 -inch loaf pans; set aside.

Pull the leaves and stem off of the persimmons. Cut each in half and scoop out the flesh onto a cutting board. Use a pastry blender or small knife to cut the persimmon flesh into small pieces. Put cut up persimmon in a large measuring cup. You should have some small pieces of persimmon mixed with pureed pulp and you need 2 cups. Use any extra for another recipe.


Toast the nuts in a shallow baking pan until fragrant, stirring once or twice, 6 - 8 minutes. Be careful not to burn the nuts. Set aside to cool completely.

Sift the flour, baking powder and salt together; set aside.

Whisk the eggs in a large bowl until thoroughly combined and slightly frothy. Add both sugars and beat in thoroughly with the whisk. Whisk in the butter. Stir in the persimmon pulp and nuts with a rubber spatula. Add the flour mixture and stir only until the batter is smooth. Divide batter between the prepared pans and smooth the tops.

Bake for about 1 hour and 5 minutes, until the loaves are well browned and a toothpick inserted into the center comes out clean. The loaves will be quite dark, especially on the edges, but if they start to brown too much before they are done, lay a piece of aluminum foil, shiny side up, loosely on top during the last 30 minutes of baking.

Cool in the pans on a wire rack for 20 minutes. Run a small sharp knife around the sides to release the loaves, and carefully unmold them. Set them right side up on a rack to cool completely. Wrap airtight. The loaves can be frozen for up to 2 months.

Monday, October 21, 2013

Pumpkin Season Treats


Have you ever been to a kitchen cabinet party? I've never even heard of such a thing, but Sweetie suggested the concept to our neighbors who are putting together their new kitchen and they ran with the idea. On Saturday there were eleven or twelve people spread out in the to-be-kitchen area putting together various Ikea cabinets. Our hostess brought out the parts and we did the assembly. Sweetie and I started with one of the more difficult ones (of course), but eventually we had it together and, in the process, learned how to put together the drawers and to adjust drawers and doors, so we were able to help others.

You can't have a party without food. Our host cooked up sausages and hot dogs on the grill and there were lots of condiments and go-withs. I had brought some pumpkin pie bars since they could be eaten as finger food. They were a hit and when I told G that I was leaving any leftovers with them, he assured me that I would have disappointed everyone if I took them home. Fortunately, these bars are baked in a 9" x 13" pan, so there were a few at home in the fridge.


These great little bars are from Very Best Baking blog and they have a thin cookie crust and a filling that is basically a pumpkin pie custard filling. The topping is a combination of chopped pecans and brown sugar. I think if I did these again I would just sprinkle on the nuts...didn't really need that extra sugar.


I cut these into fairly small bars for the party, but there were a few more that didn't fit on the serving plate for the party, so Sweetie was happy to have them for a snack the next day...and they were cut in slightly larger bars. Either way works and these are a great seasonal treat.


Pumpkin Pie Bars
from Very Best Baking
12 servings

1 cup all-purpose flour
1/2 cup old-fashioned or instant oats
1/2 cup packed brown sugar
1/2 cup butter or margarine, softened
3/4 cup granulated sugar
1 can (15 oz) pumpkin (I had a little extra pumpkin since I was using up leftovers from a larger can, so if you have more, add it. I added an extra 5 oz.)
1 can (12 fl. oz.) evaporated milk
2 large eggs

2 1/4 teaspoons pumpkin pie spice OR 1 1/4 teaspoon cinnamon, 1/2 teaspoon ginger, 1/4 teaspoon cloves and 1/2 teaspoon nutmeg
1/2 cup pecans, chopped
1/4 cup packed brown sugar

PREHEAT oven to 350° F.

COMBINE flour, oats, brown sugar and butter in small mixer bowl. Beat at low speed for 1 to 2 minutes or until crumbly. Press on bottom of ungreased 13 x 9-inch baking pan.

BAKE for 15 minutes.

COMBINE granulated sugar, pumpkin, evaporated milk, eggs and pumpkin pie spice in large mixer bowl. Beat at medium speed for 1 to 2 minutes; pour over crust.

BAKE for 20 minutes. Combine pecans and brown sugar in small bowl. Sprinkle pecan topping over filling. Continue baking for 15 to 25 minutes or until knife inserted in center comes out clean. Cool completely in pan on wire rack. Cut into bars.


Saturday, October 12, 2013

Fuzzy Quince Cake


Well, the quince are fuzzy, not the cake, but, except for the fuzz, from a distance, you might think quince are pears.


But then you get closer to the golden globes and you see the fuzz and smell the amazing scent that ripe quince has...and you wonder if they taste as great as they smell. Be sure to cook them because raw quince are inedible.

So you make an upside down cake and use lots of peeled, cored, sliced quince for the fruit, with a handful of chopped pecans sprinkled around them at the bottom of a cast iron skillet on top of a butter-brown sugar mixture. Before the cake is finished baking in that pan, the whole house smells amazing! Quince, butter, brown sugar all lend their fragrance.


Finally the cake is turned out onto a large plate, a few quince slices that tried to stay in the pan are returned to the cake and slices are cut and plated. The moment of truth has almost arrived...except with that melted sugar a few moments are needed so we don't burn our mouths.

Bliss! The quince still have some firmness but are sweet and delectable and have almost a floral taste. They go really well with the pecans and the slightly crunchy caramelized brown sugar. The buttery soft cake is the perfect complement to those tastes and textures. And it was easier to make than quince jelly!


This is the season for quince, but they are not easy to find. I'm lucky to have a very old quince tree at the end of the drive. This year there were lots of quince, but I truly didn't have enough time to really make use of them. I suspect that this cake will be it for this year. Quince take a bit more effort to prepare than apples (even though the prepared quince slices look a lot like apple slices) but it was worth it.

I used David Lebovitz's recipe for the upside-down cake and there was the perfect fruit-cake ration as he promised. The only changes I made were I used quince and pecans instead of apricots or plums and berries. I bet they would be outstanding, too. Maybe next time.


Quince Pecan Upside Down Cake
based on a recipe by David Lebovitz 
One 10-inch (25cm) cake, 8-10 servings

David says, "You have some latitude with the fruits that you use. Just make sure that whatever you use covers the bottom in a substantial layer, around double-thickness, since the fruit will cook down while baking and settle nicely into place. Berries" (or nuts) "...are good nestled in the gaps between the slices of fruits."
For the fruit layer:
3 tablespoons butter (45g), salted or unsalted
3/4 cup packed (135g) light brown sugar
fruit: 4  medium quince, peeled, cored and sliced thinly
a handful of pecans, roughly chopped (about 1/2 cup)
For the cake layer:
8 tablespoons (115g) unsalted butter
3/4 cup (150g) sugar
1 teaspoon vanilla extract
2 large eggs, at room temperature.
1 1/2 cups (210g) flour
1 1/2 teaspoon baking powder, preferably aluminum-free
1/4 teaspoon salt
1/2 cup (125ml) whole milk, at room temperature

1. Melt the 3 tablespoons (45g) of butter in a cast iron skillet, or cake pan Add the brown sugar and cook while stirring, until the sugar is melted and begins to bubble. Remove from heat and let cool.

2. Once cool, arrange the fruit in a pinwheel design and put the rest over that in a second layer, then scatter the pecans over, letting some settle in the gaps between the quince slices. Set aside.

3. To make the cake, preheat the oven to 350F. (190C)

4. Beat the 8 tablespoons 9115g) of butter and sugar until fluffy. Add the vanilla, then the eggs, one at a time, beating until smooth. Scrape bowl and beaters a few times during this step.

5. Whisk or sift together the flour, baking powder, and salt.

6. Stir in half of the flour mixture, then the milk, then the remaining dry ingredients. Do not overmix: stir just until the flour is barely incorporated into the batter.

7. Spread the batter over the fruit, then bake for 45 minutes to one hour (depending on the size of the pan, and the thickness of the batter.) The cake is ready when it begins to pull away from the sides of the pan and the center feels just set.

8. Remove from oven, let cool about 20 minutes, then place a cake plate on top, and wearing oven mitts, flip the cake out on to the plate, taking care, as there may be some hot caramel that might escape.

Serving: Upside Down Cake is best served warm, perhaps with whipped cream or vanilla ice cream. It can be made in advance, left in the pan, and rewarmed in the cake pan or skillet right before serving. It’s also very good rewarmed in a microwave, and served immediately.