Showing posts with label bourbon. Show all posts

Thursday, November 23, 2023

Happy Thanksgiving!


 Wishing you, dear reader, a magnificent turkey day...and lots of turkey with all the trimmings.

One of the trimmings is often cranberry sauce. The tart and sweet condiment offsets the mild comfort food flavors of turkey, dressing, mashed and/or sweet potatoes and even the creaminess of the green bean casserole...all fairly traditional Thanksgiving foods.

I grew up with the jellied kind in the can and I still love that version, but this year I had a bag of fresh cranberries, an orange, a cinnamon stick and enough time to make my own sauce.


Because cranberries carry a lot of natural pectin, making a sauce that thickens up without additional gelatin is easy and fairly quick...about 15-20 minutes total. I looked at a number of recipes online, then crafted this one to suit myself. Besides the fresh cranberries and the orange, I used water, brown sugar, and bourbon. It's a great mixture!


Fresh Cranberry Sauce with Cinnamon, Brown Sugar and Bourbon
Serves 4-6

1 12-oz bag fresh cranberries, rinsed and drained
3/4 cup brown sugar, packed
1/2 cup water
2 tablespoons bourbon
1 cinnamon stick
zest of about 1/4 of an orange, zest cut into long strips
additional water as needed

In a saucepan, place the cranberries, brown sugar, water, bourbon, cinnamon stick, and orange zest strips. Bring to a boil, stirring occasionally, then reduce heat so that mixture simmers. Continue to cook, stirring every minute or so, until the berries begin to pop. Use a wooden spoon or similar tool to both stir the mixture and to push the berries up against the side of the pan to mash them a bit. Continue until most of the berries are mashed, stirring all the while. Reduce the heat to the lowest setting and continue to stir and let the berries cook for about 8-10 minutes, until the mixture starts to get thick. Remove the cinnamon stick and the orange zest strips and discard them. Remove the sauce from the heat and let sit for 10 minutes. If the sauce is too thick, add water, a tablespoon at a time until desired thickness. Put into a bowl or storage container, cover and refrigerate until ready to use.

Below is a photo of the sauce with our Thanksgiving meal. Not the best photo because it was taken with an overhead light, not sunlight, but it gives a sense of the meal...which was delicious!


Thursday, December 30, 2021

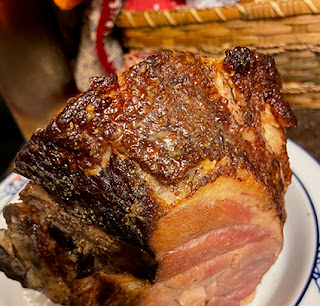
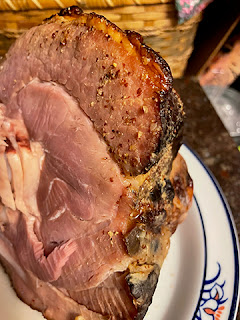
Bourbon Glazed Ham


The holidays really rush by, don't they? One of our holiday meals had a centerpiece of Bourbon Glazed Ham, using a recipe from Martha Stewart. You begin with a fully-cooked half ham, so it's pretty easy, and towards the end of heating it fully, you brush on this aromatic bourbon-brown sugar-mustard glaze that you make while the ham does it's initial heating up. As the ham gets to the end of it's time in the oven, the glaze becomes shiny, browned and a bit sticky - altogether delicious. You don't even need to save this for a holiday...it works to dress up a weeknight dinner just as well.


Bourbon Glazed Ham

Adapted from a recipe by Martha Steward, 2009

1 1/2 cups dark brown sugar, packed
1 tablespoon molasses
2 tablespoons grainy mustard
1/4 cup bourbon (could also use brandy if preferred)
1 bone-in, fully cooked half ham, about 6 pounds

Preheat oven to 275 degrees F. Place ham in a roasting pan, cover tightly with foil (or put into a baking bag, like Reynolds Brown-In Bag, as I did, following directions for adding 1 tablespoon flour and cutting vent holes). Cook in preheated oven until thermometer registers 145 degrees F, about 1 1/2 hours.

While ham is in the oven, make the glaze. In a small saucepan combine the brown sugar, molasses, mustard and bourbon. Bring to a boil over medium heat and boil for 3 minutes or until thickened and syrupy. Set aside until the ham has reached XX degrees F.

Remove the cover from the ham, increase oven temperature to 350 degrees F, and brush the glaze generously on the ham, covering all exposed parts. Bake, uncovered, another 30-35 minutes until glaze is shiny and darkened. Serve warm, sliced, or at room temperature.

Monday, February 15, 2016

Another Birthday Cake


One of the cool things about being a baker is that you can make just what you want for your own birthday. I did just that and was able to really enjoy a moist, fragrant chocolate Bundt cake that had a hint of bourbon. I made it with a combination of margarine and shortening so that the 'no dairy' fairy wouldn't rain on my parade, but otherwise mostly made it as described in this post.


For decoration I sifted some powdered sugar over the high points of the Bundt design and then my darling daughter added some bronze highlights to the sides using a food safe bronzing powder she brought from London. She sent me those roses, too. I'm a lucky woman.

Pretty and delicious and I used some duck eggs from our neighbors, so a little different that way, too. Didn't get a photo of it decorated with candles, but it was even prettier.


Trust me, if you ever need a cake for a chocolate lover, make this one!!

It really was the perfect ending to a great day...a private winery tour of White Rock Winery in Napa, the beautiful drive through green hills dotted with yellow mustard flowers to and from the winery, a down home supper  of Smokehouse BBQ, my slaw, and the cake for dessert. All four of us fit in Straight Shooter's vehicle so he took care of the driving and we were able to enjoy the ride!

Thursday, December 03, 2015

Fluffy Bourbon


One of the delightful things about being in the kitchen with my daughter is that she encourages e to try some things I wouldn't even consider making if left to my own devices. A good example of that is the weird science experiment that led us to create small red balls of flavor to put into mixed drinks.

Yesterday, since I wasn't the one cooking the turkey, there was a little time after making cornbread stuffing, apple crisp, a pecan pie and bacon wrapped stuffed dates. We used that time to whip up a batch of home made marshmallows. To make them even more interesting, she found a recipe by Jerry James Stone of Cooking Stoned for Bourbon Vanilla Marshmallows. I never thought that I would smell the heady fragrance of good bourbon while making fluffy marshmallows, but it was a great experience.


The finished marshmallows were cut and coated in a bit more of their powdered sugar/cornstarch mixture, then stacked in airtight containers. The little sweets were thinner than I expected, but next time we can make them in a smaller pan to get taller marshmallows. The flavor doesn't need any tweaking and they should be a great addition to a cup of cocoa which has a shot of good bourbon in it.


The whole process takes some time, but most of that is letting the marshmallows cure. The initial cooking takes less than an hour. Eggs are separated for the whites, gelatin takes a few minutes to soak, sugar and water gets heated, then some corn syrup is added and


then the soaked gelatin and the whole thing cooks to the hard ball stage (verified by using a candy thermometer). While the sugar syrup cooks, the egg whites get beaten with a little salt. If you have a helper they can sift together some cornstarch and confectioners' sugar for the pan. Otherwise you can do that yourself a little later.

The fun part is when the bourbon and vanilla gets added to the hot syrup and is stirred in. The heat makes the whole kitchen smell of bourbon and the hot mixture hisses and boils up a little bit! Once the egg whites get really fluffy, you slowly pour the hot syrup over them between the beater and the bowl while the stand mixer keeps on beating those egg whites. Be careful while handling the syrup. It can really burn if splashed on your skin, so keep a bowl of ice water handy. As the mixture fluffs some more, you can sift the cornstarch and confectioners' sugar together if it's not done already.

The confectioners' sugar mixture is sifted liberally over the bottom of the baking sheet. The fluffy, cooled marshmallow mixture is poured over that and the mixture is spread and leveled with an offset spatula, then more of the sugar mixture is sifted over it.


After that there's nothing more for you to do for at least 5 hours. We let ours sit on the counter overnight and in the morning they were ready to be cut, dredged in more sugar mixture to coat the cut edges, then packed for use. Takes a little time if you have a whole sheet pan worth, but if you use a smaller pan for taller marshmallows, it shouldn't take too much time and you will still have plenty of wonderful home made marshmallows. The directions are Jerry James's, not mine, but they work.

If you have a loved one who loves marshmallows, this could make a great holiday gift!


Vanilla Bourbon Marshmallows
Jerry James Stone of Cooking Stoned blog


·     3 envelopes unflavored gelatin
·     ½ cup cold water
·     2 cups granulated white sugar
·     ⅓ cup light corn syrup
·     ½ cup Bourbon
·     3 large egg whites
·     ¼ teaspoon salt
·     2 teaspoons vanilla extract
·     1 vanilla bean, halved and scraped
·     ½ cup cornstarch
·     ½ cup powdered sugar

In a small bowl, combine the 3 envelopes of unflavored gelatin and 1/4 cup of the water. Mix and let stand. Be forewarned, it’s gonna look pretty gross once it sets. Also, really, before you go any further, I suggest having all ingredients ready to go.

In a small sauce pan, combine 2 cups of sugar and the remaining water and warm it over a medium low heat. A minute later, add in ⅓ cup corn syrup and turn the heat up to medium-high. You’re going to bring the mixture to 240 degrees F. Corn syrup prevents the mallows from crystallizing and with the addition of bourbon, it is sorta needed.

While that is going on, let’s do some other stuff. Using a stand mixer, mix the three egg whites and ¼ teaspoon salt on low until they are just a bit foamy.

When the sugary syrup hits 240 degrees F, turn off the heat and add the following to the mix: ½ cup of bourbon and the gelatin mixture. While the gelatin melts, turn the stand mixer back on, this time to high, and start whipping those whites. Whip ‘em real good.
Once the whites have become fluffy and pillow-like, slowly pour the syrupy mixture into the mixer bowl where you’re spanking those egg whites. Do this slowly! You do not want to be splashed with boiling hot syrup.

Add in the 2 teaspoons of vanilla extract and scraped vanilla bean seeds and whip it until the mixture is fluffy, stiff and the outside of the bowl is cool to the touch.
While that is going on, using a large mixing bowl, sift together ½ cup cornstarch and ½ cup powdered sugar. This is the coating for the marshmallows.

Now heavily coat a baking sheet with some of the marshmallow coating. Seriously, no bare spots here! Pour the fluffy marshmallow creme onto the baking sheet, using a spatula to even it out. Dust it with some of the coating and then let it sit for about 5 hours, uncovered. Go watch Hulu or something.

Using a pizza cutter, dusted with some of the coating, cut the marshmallows into any shape or size you want. This is a great time to bust out some funky cookie cutters, right? Unicorns anyone? Toss the cut marshmallows into the mixing bowl with the coating, just a few at a time, and using a spoon, make sure they are fully powdered. Then using a wire strainer, give the mallows a good shake to remove the excess coating. These can be made up to a week in advance and stored in an airtight container. 


EAT!


Monday, July 20, 2015

Smooth and Chocolate For The Cake Slice Bakers


As usual there were great choices this month for baking with the Cake Slice Bakers. We are still baking from the Southern Living's The Southern Cake Book.

Lane Cake seemed too wintery to me and the Tiramisu Layer Cake too rich, but the Icebox Lime Cake was appealing. In the end I decided to go with the Mexican Chocolate Pound Cake, but I only made half the recipe and I baked it in a loaf pan. My plan was to create some ice cream sundaes with a slice of cake for the base. This would be rich, too, but it has been so hot here (mid 90's yesterday) that I wanted ice cream. While I was thinking about that I decided to swap out the cinnamon for espresso and bourbon. That would go well with some coffee ice cream, bourbon whipped cream, salted chocolate sauce (thanks Barrel House lady!) and chocolate sprinkles on top for the sundaes.


This cake has both semisweet chocolate, melted, and chocolate syrup. Since our kids have been gone we have not had a reason to buy chocolate syrup, so I had to ask where it could be found in our local market...sort of embarrassing, but it is by the potato chips and mixed nuts. Seems a strange place to me.

This is a simple cake to make. You melt the chocolate and let it cool while you give both the butter and the butter/sugar mixture a good long beating to make it thick and fluffy. In go the eggs, then the cooled melted chocolate and the espresso/bourbon and vanilla. The last step is the alternate the flour mixture with the buttermilk. The batter, once it's finished, is silky and thick. I did increase the flour by 1/4 cup since I dissolved the espresso powder in 2 tablespoons of bourbon which increased the liquid in the recipe.


I love this cake! It is moist and tender with a dense crumb and good chocolate flavor. It made a great base for those sundaes, having enough flavor to stand up to chocolate sauce and coffee ice cream and a lovely sturdiness in contrast to the melting ice cream, fluffy whipped cream and drippy sauce.  Our guests loved them and so did Sweetie. Maybe next time I'll make the whole recipe and have chocolate pound cake for days. We'll need a bigger container of ice cream....


Monday, February 23, 2015

A Muddy Slice of Cake


This month the Cake Slice Bakers had some wonderful choices for the recipe to bake: King Cake for Mardi Gras, Mini Red Velvet cakes or a dramatic chocolate torte for Valentine's Day, or a Mississippi Mud Cake just for fun. You can see what I chose in the photo.

Because February has been waaaay too full of both fun and serious things, including a funeral which included flying to Virginia during one of the many freezes they have had this winter, a tea party, a bladder infection, a birthday bash at a great restaurant, a birthday steak cooked by Sweetie on the actual day, eye surgery, a visit by an old Peace Corps buddy of Charlie's, an Artist's night for Straight Shooter's photo show, and scholarship selection for three P.E.O. State Chapter scholarships which included flying to LA (not in that order) I am late in both making and posting my choice.

I decided to go with the fun Mississippi Mud Cake because I think it will be something that Sweetie enjoys and he has been a rock of support and love during this busy month. Because I don't have any marshmallows and I do have cream cheese, I decided to substitute a cream cheese-brown sugar-bourbon mixture for the marshmallows. It didn't brown up, but I think it goes with the Southern vibe as well as being very good with chocolate and pecans. I also used some espresso powder instead of vanilla because I like a little coffee flavor to up the chocolate flavor in baked goods.

I also made half a recipe and baked it in a square pan. The full recipe is perfect for a crowd, but that isn't going to happen. I'll give the recipe the way I made it. If you visit some of the other Cake Slice Bakers or go online to the Southern Living website you should find the full recipe.


This is one oooey, gooey chocolate marvel of a dessert. It's messy but delicious. Hard to not just go back and have a little more...then a little more. You know, that kind of deliciousness.


Mississippi Mud Cake 
from The Southern Cake Book, by Southern Living Magazine

1/2 cup butter
2 oz. semisweet chocolate (I used Scharfenberger)
1 cup sugar
2 large eggs
3/4 cup flour
1/4 cup cocoa
1/4 teaspoon espresso powder or 1/2 teaspoon vanilla
1/2 teaspoon salt
1/2 cup pecans, toasted and chopped (I used closer to a cup)
4 oz. cream cheese, softened
1/2 cup brown sugar
1 1/2 teaspoons bourbon whiskey
Warm Chocolate Frosting (recipe below)

Preheat oven to 350 degrees F. Grease a 8 x 8-inch or 9 x 9-inch baking pan. Set aside.

Microwave butter and chocolate in a large microwave safe glass bowl on HIGH for 1 minute, stirring half way through the minute. I cut the butter and chocolate into small pieces before microwaving.

Whisk the sugar into the chocolate mixture. Whisk the eggs into the chocolate mixture until well blended. In a small bowl stir together the flour, cocoa, espresso powder (if using), and salt. Stir into the chocolate mixture until well blended. Add the vanilla if using.

Pour the batter into the prepared pan.  Bake at 350 degrees F for 15 minutes.

While the batter is baking, whip the cream cheese, brown sugar and whiskey together with a stand or hand held mixer until well blended and creamy.

When the batter has baked, leave the oven on. Remove the baking pan to a heat proof work area and dollop the cream cheese mixture over the brownie in the pan. Use the back of a spatula to draw the dollops together. Layer will be bumpy with uneven amounts in the layer. Return pan to oven and bake another 10 minutes. Mixture will not brown.

While cream cheese layer is baking, make the Warm Chocolate Frosting (see below). You should just about be done making it when the cake is ready to be removed from the oven.

After 10 minutes of baking, remove pan from oven and pour Warm Chocolate Frosting over it. Spread with a small spatula if necessary. Top with the toasted pecans. Let cool at least 10 minutes for the icing to harden up a bit. Enjoy!

Warm Chocolate Frosting

Melt 1/4 cup butter in a small saucepan. Whisk in 2 tablespoons unsweetened cocoa. Whisk in 3 tablespoons milk. Bring mixture to a boil, whisking constantly. Then gradually whisk in 1 cup confectioner's sugar, whisking all the time. Mixture will thicken slightly. Use at once, as soon as the cake comes out of the oven.

Sunday, November 30, 2014

Parsley Sage Rosemary and Thyme and Bacon!


"It is never too late to be what you might have been."    - George Eliot

A few years ago I read about a challenge that sounded a bit overwhelming. Bloggers were going to do a post to their blog each day for the whole month of November. The idea was to encourage more writing and maybe even to spark an interest in writing as a way of life. At the time I knew it was impossible for me to do a post every day, especially in November. This year I decided that I just might be able to do it, so I began on November 1.

As you may have noticed if you have read my posts, I think of this primarily as a food blog, so it is only right that most of the posts should be about food. Even better if they contain a recipe. A photo or two is part of the look and feel of this blog, so I rarely do a post without at least one photo. Looking back over the month I feel like I've done pretty well, A third of the posts didn't have a recipe, but some of those were about food and all had a photo or illustration.

It's been a good month, although a few friends have had major health problems. I'm glad that the month finishes off with Thanksgiving and post-Thanksgiving thoughts since turkey is one of my favorite foods. Today I cooked a turkey for our family since last Thursday we were treated to our neighbor's heirloom variety home grown turkey for the holiday meal. Mine is a frozen bird from a chain grocery store, so it should be interesting to see the difference.

Soon fall will turn into winter and my favorite season will hibernate until next year. Of course the run-up to Christmas will keep me busy and it means lots of baking, so I have a smile on my face as I type this and think of what great posts there will be in December.

I spoke with my Mom yesterday and she has already gotten an early Christmas gift from me. I created a book of our kitchen remodel project for her and had it published by Blurb, so it has a nice hard cover and lovely paper to really show off the photos I took as we went along and the finished kitchen, too. So glad that she and the family enjoyed learning about how the project went as they read through the book over the weekend while they were visiting her.

I hope dear reader that you have enjoyed the November posts and are getting in touch with your inner elf as we jump into the winter holiday season!

But before we leave November I want to share with you the stuffing I made today. I'm glad I made the stuffing because the frozen bird was not as fully flavored as the turkey raised right across the street that we enjoyed on Thursday. This time I took my Mom's classic recipe and added corn bread, mushrooms, bourbon and bacon. It makes a wonderful stuffing with a hint of Southern style. If I hadn't used up almost all of my pecans for the pies I would have put some pecans in, too. When you make this, and your really should, you can add pecans and think of me.


Parsley Sage Rosemary and Thyme and Bacon! Stuffing 

4 slices bacon, cut into 2-inch pieces
1 medium onion, minced
4 oz. mushrooms, chopped
1 cup celery, chopped
1-2 cloves garlic, finely chopped
1 tablespoons poultry seasoning
1/4 teaspoon dried thyme
1/4 teaspoon dried rosemary, crushed
½ teaspoons salt
1 teaspoon pepper
2 quarts soft stale bread cubes and cornbread
1 cup chicken broth
3 tablespoons bourbon
½ cup parsley, chopped


In a heavy pot or skillet cook the bacon over high heat until almost crisp. Remove and drain on paper towels. Saute’ the onions, mushrooms, and celery in the bacon drippings (grease) on medium heat for 5 minutes, stirring often. Add the garlic and stir well. Continue cooking over medium heat another two minutes. Add the poultry seasoning, dried thyme, dried rosemary, salt and pepper and stir well to combine.


Pile the parsley on top of the bread cubes and cornbread in a very large bowl or pot. Pour sauteed mixture over the parsley. Combine sauteed mixture and the reserved bacon with the bread cubes (I always substitute some cornbread for some of the bread cubes).

In a large bowl or measuring cup combine the chicken broth and bourbon. Moisten the bread crumb mixture with chicken broth mixture. You may also add chopped apples, dried fruit, chopped toasted pecans, or oysters.

Use stuffing to stuff bird. Place inside bird lightly...don't pack tight.Stuffing expands a bit during cooking.  Extra may be baked in 425 degree F. oven ‘til brown (after turkey is out of oven).

Enough for a 10-14 lb. turkey.

Friday, December 28, 2012

Yuletide Treat

When my Mom was a child the family would gather at one of the aunt's homes and the dessert highlight at Christmas was plum pudding with hard sauce. When I was little we always had lots of cookies, but the highlight of Christmas dinner was the Lane Cake. Lane Cake is a layer cake with a plain white cake for the layers and a rich, fruity, bourbon-laced filling and frosting between the layers and on the top and sides.

We used to start making the Lane Cake the day after Thanksgiving to give the concoction time for the bourbon to mellow and mingle with all those dried and candied fruits. Coconut was fresh and grated by hand. The raisins were put through the meat grinder and came out in long black snakes. The candied cherries were bright red and green and had to be cut up by hand...a sticky business. Pecans were chopped, too. It was a good thing that we had lots of willing hands to help out with all the prep. Mom baked the cake layers and I think Dad assigned us the different prep tasks. The most difficult part was getting the filling just right. Cook it for too short a time and it would slide down the sides and cook it for too long and it turned grainy. You served it in thin slices since it was so rich.

When I had children of my own I made Lane Cake once to carry on the tradition, but found that I was the only one who enjoyed it, so it really wasn't worth all the work. I found that gingerbread, both as cookies and as houses, was what my family wanted for Christmas...and cookies, too.

Last spring when I was working on the Classic Comfort Foods Cookbook I found out that my niece Mandy had become the family Lane Cake maker and that she had changed the recipe a bit, especially by using dried natural cherries instead of the candied ones. The family had also discovered that the cake was fine if you only made it a week ahead of Christmas and also that you could just put the filling between the layers and on the top (but not the sides) which made the consistency of the filling less of an issue.

This year we were thrilled to have Mandy's sister T with us for Christmas. I was thrilled that she made and brought a Lane Cake. I even had the pleasure of being consulted by phone on baking tips the day she made it. It was perfect...moist and flavorful and just a bit boozy. Gorgeous to look at, too, like T herself. We took our portion home and had it with some hot cocoa. It brought back sweet childhood memories for me. Thank you T!  Maybe next year we can bake the cake together?

XO Elle


Lane Cake
from Classic Comfort Foods


Prepare 4 cake pans by greasing them and lining them with waxed paper. Preheat oven to 375 degrees F.

Ingredients
1 cup butter at room temperature
2 cups sugar
1 teaspoon vanilla
3¼ cups flour, sifted
3½ teaspoons baking powder
¾ teaspoon salt
1 cup milk
8 egg whites

Cream butter; add sugar and vanilla. Sift together dry ingredients. Alternately add dry ingredients and milk to butter mixture. In separate bowl, beat egg whites to soft, glossy points, but not dry. Fold egg whites into batter until incorporated. Divide into the 4 prepared pans. Bake 2 pans to each rack, for 15-20 minutes in preheated oven. Cool 3-5 minutes, loosen edges, and turn out to cool. Remove waxed paper and turn right side up carefully. Set aside while preparing the filling/frosting.

Filling/Frosting
1½ cups seedless raisins
12 egg yolks
1¾ cups sugar
½ teaspoon salt
¾ cup butter
½ cup bourbon whisky
½ cup pecans, coarsely chopped
½ cup red and green candied cherries, quartered - or try modern version (Mandy’s) below
1½ cups coconut, shredded (fresh or frozen)

Cover raisins with hot water, let stand to plump. Drain and dry. Chop or grind (Note: Dad used to grind the raisins in a meat grinder, but they can be chopped with a knife, too.) Put egg yolks in top of double boiler; beat slightly. Add sugar, salt and butter. Put over simmering water. Cook, stirring constantly, until sugar is dissolved, butter melts, and mixture thickens. Do not overcook. Mixture should be almost translucent and should mound when small amount is dropped on waxed paper. Remove from heat; add bourbon. Beat 1 minute with a beater. At this point, mixture can be transferred to a bowl. Fold in nuts, cherries, coconut and raisins. Cool. Spread between layers and on top of cake. (Sides optional) Wrap cake in plastic wrap and mellow one month (or less, about one week, for less stale cake). Serve in thin slices. Serves 20-24.

Niece Mandy’s Modern Lane Cake: “I made the cake the same as the recipe directs; I just did the cakes in 2 batches of 2 pans. 8” this year and 9” last year.

For the filling/frosting, I did a few things differently:

Rather than using 1½ cups raisins and ½ cup candied cherries, I did about 1 ¼ cups dried Traverse City cherries (I’m biased) and ¾ cup other dried fruits (this year was just raisins, but last year I also used currents). I also soak all of these in a combination of freshly-boiled water and a few splashes of bourbon. Just enough liquid to cover the fruit. I then ground about half the fruit and very coarsely chopped the rest, leaving a few whole.

When at the step of combining the eggs, sugar, salt, and butter on top of the double boiler (or bowl over boiling water, like what I used), note that it will take about 30-45 minutes to thicken.”