Showing posts with label cinnamon. Show all posts

Thursday, November 23, 2023

Happy Thanksgiving!


 Wishing you, dear reader, a magnificent turkey day...and lots of turkey with all the trimmings.

One of the trimmings is often cranberry sauce. The tart and sweet condiment offsets the mild comfort food flavors of turkey, dressing, mashed and/or sweet potatoes and even the creaminess of the green bean casserole...all fairly traditional Thanksgiving foods.

I grew up with the jellied kind in the can and I still love that version, but this year I had a bag of fresh cranberries, an orange, a cinnamon stick and enough time to make my own sauce.


Because cranberries carry a lot of natural pectin, making a sauce that thickens up without additional gelatin is easy and fairly quick...about 15-20 minutes total. I looked at a number of recipes online, then crafted this one to suit myself. Besides the fresh cranberries and the orange, I used water, brown sugar, and bourbon. It's a great mixture!


Fresh Cranberry Sauce with Cinnamon, Brown Sugar and Bourbon
Serves 4-6

1 12-oz bag fresh cranberries, rinsed and drained
3/4 cup brown sugar, packed
1/2 cup water
2 tablespoons bourbon
1 cinnamon stick
zest of about 1/4 of an orange, zest cut into long strips
additional water as needed

In a saucepan, place the cranberries, brown sugar, water, bourbon, cinnamon stick, and orange zest strips. Bring to a boil, stirring occasionally, then reduce heat so that mixture simmers. Continue to cook, stirring every minute or so, until the berries begin to pop. Use a wooden spoon or similar tool to both stir the mixture and to push the berries up against the side of the pan to mash them a bit. Continue until most of the berries are mashed, stirring all the while. Reduce the heat to the lowest setting and continue to stir and let the berries cook for about 8-10 minutes, until the mixture starts to get thick. Remove the cinnamon stick and the orange zest strips and discard them. Remove the sauce from the heat and let sit for 10 minutes. If the sauce is too thick, add water, a tablespoon at a time until desired thickness. Put into a bowl or storage container, cover and refrigerate until ready to use.

Below is a photo of the sauce with our Thanksgiving meal. Not the best photo because it was taken with an overhead light, not sunlight, but it gives a sense of the meal...which was delicious!


Saturday, September 04, 2021

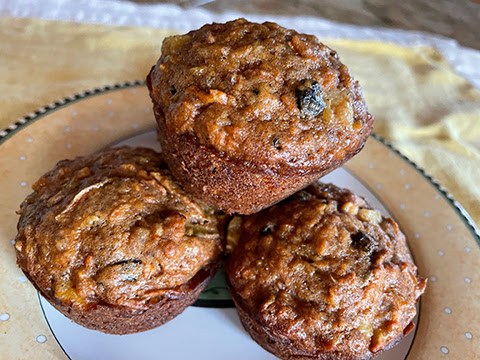
Morning Glory

It's fun to know that you can have a muffin and a flower with the same name...morning glory. At this time of year, the morning glories in my garden are going a little wild, having made their upward climb, some are twining on themselves for support so they can keep going, other are swooping down to attach lower down so they can climb again. I love the flowers...trumpets of pink, magenta, deep purple, pale blue and more. The truth is that they self-seed if not constantly dead-headed and become a weed sometimes, but I love them anyway.


The morning glory muffins are also prolific. One recipe makes a full two dozen muffins...that's a lot! They are filled with all sorts of deliciousness...apples, carrots, pecans, crushed pineapple, coconut, raisins and dried cherries as well as vanilla and spice. The wet ingredients includes apple butter but I found a jar of pumpkin apple butter and decided to use that to welcome in fall now that school is back in session. Since I did that, I also used a bit of pumpkin pie spice along with the cinnamon the recipe calls for. Since my supply of dried cherries was running low, I used some dried currants in their place and that worked well. Seems to me the recipe as written is a takeoff on Hummingbird Cake. 


Between the large quantities (you need two cups shredded carrots and a cup of shredded apple for example) and long list of ingredients, the prep takes a bit of time, but you end up with fragrant, delicious, moist and fairly healthy muffins...and lots of them. Do yourself a favor and make sure you set each and every ingredient on the counter before you start making these because it's easy to miss an ingredient. Better yet, prep and measure everything in advance. That way it will all go together quickly and you'll get the best rise out of the baking soda that is the only rising agent used. 

I removed these from the muffin tins in about 3 minutes after taking them out of the oven and I did have to run a butter knife around the edges on some of them to loosen them. If you stand them on their sides in the muffin cup to finish cooling it saves space and they are sturdy enough to hold their shape, too. 

Do try these delightful muffins. They are great for breakfast but also good for afternoon tea and would be a treat in a school lunch. The recipe came from my family but I suspect that it's been around for a long time. 


Morning Glory Muffins
Makes 2 dozen

2 1/2 cups all purpose flour
1 cup brown sugar, packed
2 teaspoons baking soda
2 teaspoons ground cinnamon
1/2 teaspoon salt
2 cups shredded carrot
1 cup shredded apple
3/4 cups raisins
1/2 cup dried cherries
1/3 cup chopped pecans
1/4 cup flaked coconut (sweet)
one 8-oz. can crushed pineapple, in juice, drained
1/3 cup vegetable oil
1/3 cup apple butter
2 teaspoons vanilla
2 large eggs
2 large egg whites

Preheat the oven to 350 degrees F.

Coat 24 (2 dozen) muffin cups with cooking spray or vegetable oil.
Combine flour, brown sugar, baking soda, cinnamon, and salt in a large mixing bowl.
Stir in carrot, apple, raisins, cherries, pecans, coconut and pineapple and make a well in the center of the mixture when combined.

In another bowl combine the oil, apple butter, vanilla, eggs and egg whites. Stir with a whisk. 
Add oil mixture to flour mixture, stirring with a wooden spoon or silicon spatula until just moist/barely combined.

Spoon the batter evenly in prepared pans, filling about 2/3 full.

Bake at 350 degrees F. for 25 minutes or until muffins spring back when touched lightly in center.

Remove from pan at once and cool on a wire rack. Yields 2 dozen.

NOTE: Can be stored, airtight, in freezer for 1  month. Wrap in foil and reheat at 300 degrees F.

Friday, August 07, 2020

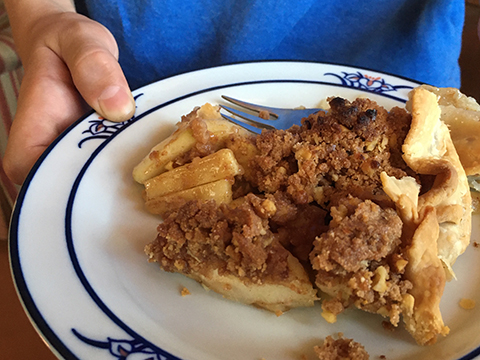
Super Cinnamon Crumble-Topped Apple Pie


The Gravenstein apples are ripe and Sweetie and Raine picked a bucketful yesterday. Pie was promised. There is nothing quite like a Gravenstein apple pie. The apples cook down and become soft and moist and so delicious. They are the perfect balance of sweet and tart. We decided to use a crumble topping instead of a top crust.


This is really Raine's pie. I did peel and slice some apples and assist with advice, but Raine did all the work, including picking most of the apples, peeling and slicing the rest of the apples, rolling out the pie crust, measuring and mixing up the filling...including lots of cinnamon!...and measuring and putting the topping ingredients together, plus assembling the pie. Since we both really, really like cinnamon, we agreed that he could put extra into the filling and the topping, so it's a super cinnamon pie.

For the filling we used my Mom's apple pie recipe in the Classic Comfort Food cookbook, with a bit of brown sugar added, but not too much. She would usually do a two crust pie and would usually make her own pie dough, but this time our attention was on the crumble topping. For the bottom crust we used Pillsbury Ready Crust and we based the topping on a recipe we found online from Bon Appetit. We made enough changes that I'm calling this Raine's Apple Pie.


The crust is buttery, the apples sweet-tart and soft with some cinnamon and the topping is crunchy and rich and full of cinnamon flavor. A slice with some vanilla ice cream and you'll be glad that the Gravensteins have arrived.

No Gravenstein apples where you live? Substitute another favorite apple. Some good ones, although the texture will be different, are Granny Smith, Jonagold, and Honeycrisp.


Raine's Apple Pie

1 - Ready Crust pre-rolled dough for 1 crust (or your favorite pie dough for 1 crust)


6-7 cups (about 3 1/2 pounds) Gravenstein or other good pie apples, peeled and sliced, core and seeds removed
2 Tablespoons all-purpose flour
1 1/2 teaspoons ground cinnamon (we used Penzey's Vietnamese Cinnamon)
2 Tablespoons brown sugar
1-2 Tablespoons soft butter, in small lumps
1 cup all-purpose flour
1/2 cup brown sugar
1/4 cup granulated sugar
2 teaspoons ground cinnamon
1/2 teaspoon salt
6 Tablespoons butter, cold, cut into 6 pieces
1/2 cup chopped walnuts

Preheat oven to 450 degrees F. On a lightly floured work surface roll out the crust gently so that the crust will fill a 9-inch pie plate with an overhang of at least an inch all around. Fit into pie pan. Set aside.


In a large bowl toss the apples with the 2 Tablespoons flour, 1 1/2 teaspoons cinnamon,and the 2 Tablespoons brown sugar until thoroughly coated and mixed. Put apple mixture into prepared pan and dot with the butter lumps. Set aside.

In  a medium bowl mix together the flour, brown sugar, ground cinnamon, and salt. Use a pastry cutter to cut the cold butter into the flour mixture until it looks like we sand. Stir in the chopped walnuts.


Take a handful of the flour/butter mixture and squeeze lightly to make clumps. Distribute the clumps, which may come apart a bit as you distribute, over the top of the apple filling, completely covering the apples. Use all of the topping mixture.

Fold the extra dough up and over the filling and topping, pleating the crust as needed, giving a little pinch now and then to help it stay pleated.


Bake pie in the preheated 450 degree F oven for 10 (ten!) minues. Then reduce the oven temperature to 350 and continue to bake for another 35-40 minutes. Crust will be golden brown. It's a good idea to check on the pie about 10 minutes before it might be done and to tent the top with aluminum foil if the topping is browning too fast. I forgot to do that part, so some of the topping got a bit burnt...but it still tasted great.

Let finished pie cool on a wire rack until thoroughly cool. Serve in wedges with a scoop of vanilla ice cream on the side if you are feeling decadent.

Tuesday, December 04, 2018

December Is For Baking


Sorry I've been away from my desk, but things have been busy. We've replaced some ancient shutters on the farmhouse and removed a door that was impacted by having shrubbery too close for years. A short term closing up with plywood was necessary since we're getting rain tonight and tomorrow, but soon there will be a new door...this is the farmhouse, too.

December started with with baked apples. I baked six of them, but they were small, so yesterday I baked six more. I'm using a nice dark red apple. I bought a bunch so can't remember the variety, but I think it is a Arkansas Black or similar heirloom. Nice, crisp apple with some tartness and good juiciness, plus it keeps it's shape pretty well when cooked. Unfortunately the skin gets a bit tough with cooking, but otherwise it's perfect for this recipe.


When you bake these you first remove the stem end and the core area that holds the seeds, but you leave the bottom intact. That cavity formed by removing the core is filled with a cinnamon-sugar mixture, chopped walnuts, raisins, and a bit more cinnamon on top. With a little water in the baking dish, the apple goodness gets sealed in with aluminum foil and it's baked until the apples are tender.


First of all, your house will smell wonderful with all that cinnamon perfuming the air. Secondly, this is a fairly healthy dessert or snack (or breakfast which is how Sweetie enjoyed one this morning) and it is enhanced by the addition of milk, cream, whipped cream, ice cream, or custard. Nut milk works, too. It's fine all by itself, but I think the dairy brings a lot to the party. It's quite delicious both warm and cold, especially if you like cinnamon.

You can use your favorite apple. Just make sure that they fit snugly in the pan or dish you bake them in. The timing can vary, too, depending on the apple used. I recommend checking after a half hour and then every ten minutes after until a knife inserted goes in easily and you find the interior tender.


Baked Apples

4-6 (or more) apples
1/2 cup sugar (brown, white or a mixture)
1/2 teaspoon cinnamon, divided
1/3 cup chopped walnuts
2 tablespoons raisins (I like golden raisins)
1/4 cup water

Preheat the oven to 350 degrees F.

With a sharp paring knife, remove the stem end and core of each apple, making sure to remove all of the seeds. Be sure to leave the bottom 1/4 of the apple intact.

Place the apples in the baking pan or dish. They should be very close to each other. If not, adjust pan size so that they are. You may have to switch to another pan or baking dish.

Mix the sugar and 1/4 teaspoon cinnamon. You can shake it together in a jar with a lid or in a plastic bag with a zip lock. Divide the cinnamon sugar mixture among the apples in the pan or dish.

Divide the chopped walnuts among the apples. Divide the raisins among the apples. Sprinkle the remaining 1/4 teaspoon of cinnamon over the raisins, dividing it among the apples.

Add the water and place foil over the baking pan or dish. Seal to the sides. Place in the preheated oven and bake for 30 minutes. Remove the foil and check for tenderness. If needed, replace the foil and bake another 10 minutes. Check for tenderness.  If needed, replace the foil and bake another 10 minutes. Check for tenderness.  When apples are tender, remove the foil and let cool slightly in the pan.

Serve warm or cold, preferable with custard or cream or nut milk.

Friday, March 02, 2018

Best Oatmeal Cookies


I have a very thoughtful daughter. She knows that I love to bake. For my birthday she gave me the Zingerman's Bakehouse Cookbook and it is a treasure. The book combines great recipes, both sweet and savory, excellent baking tips and instructions, and an overview of their company both the people and the philosophy.

Finally had some time today to try a recipe from the cookbook. I chose to start with their oatmeal cookies, which they call the Big O Cookies. I'm past the time when a big-o should mean anything other than the best oatmeal cookie ever...and these really are. They are a generous size (although I was baking mine in my countertop oven, so I made them smaller than the recipe called for. They have chewy old-fashioned oats, a nice mixture of brown sugar and maple for sweetness, plus lots of raisins. There is just enough cinnamon and nutmeg and they are almost the right thickness.

I made half the recipe and couldn't figure out a way to halve an egg, so I added a little more flour...about 2 tablespoons...to make up for the added liquid. Turns out I should have only added 1 tablespoon or maybe none since they were slightly more cakey that I had been expecting. However, even with that they were the best oatmeal cookies that Sweetie has ever had (according to him) and I just loved them, too. I did stray from the recipe a tiny bit...I used a bit more cinnamon and used golden raisins instead of flame variety, plus I used less raisins. Of course also I used non-dairy margarine instead of butter.

Thank you K for this great book and thank you to my dear sister G and niece T for letting me know about Zingerman's...an Ann Arbor, MI institution.


Big O Cookies
From Zingerman's Bakehouse Cookbook, slightly revised by me

Notes: There are both cup measures and weights here. I used the weights as much as possible because bakers find that this works better. If you have a scale, please use the weights...you will be glad. Smaller amounts don't have weights. Brown sugar is always packed if measured.

margarine, room temperature          1 cup + 2 tablespoons        250 g
brown sugar                                     3/4 cup + 2 tablespoons     154 g
maple syrup                                     1/2 cup + 1 tablespoon       172 g
large egg                                           1
vanilla extract                                  1 teaspoon
all-purpose flour                              1 3/4 cups + 1 tablespoon  255 g
baking soda                                      1 1/8 teaspoon
sea salt                                              1 1/8 teaspoon
ground cinnamon                             1 1/8 teaspoon
ground nutmeg                                 1/4 teaspoon
old-fashioned rolled oats                  3 cups                                 300 g
flame raisins (I used golden)            2 3/4 cups                           390 g

Preheat oven to 350 degrees F (180C).

Prepare a couple of cookie sheets by lining with parchment paper. Set aside.

In a large mixing bowl use a wooden spoon or stand mixer on medium speed to cream the margarine (or use unsalted butter which will be even better) and sugar until light and fluffy. Add maple syrup in thirds to keep batter from curdling permanently. Add maple syrup slowly to blend it in easily.

Add the egg and vanilla extract and mix until thoroughly incorporated.

In another bowl, combine the flour, baking soda, salt, cinnamon and nutmeg...I used a whisk to mix it all together. Add the flour mixture to the butter mixer. Stir with wooden spoon or with electric mixer on low speed until evenly combined. Add the oats and raisins and mix to distribute evenly.

Scoop about 3 tablespoons of dough, or use a 1 1/2 oz.(48 ml) scoop (disher) onto the prepared cookie sheets, spacing far apart to allow for spreading. Press down so that dough rounds are about 1/2-inch thick.

Bake cookies for 15 -17 minutes, until golden brown around the edges and just set in the middle. Cool on a rack to room temperature.

Tip: Dough can be refrigerated uncooked and kept a week. Bake cookies right from the fridge. Expect to bake for and additional 2-3 minutes since they are cold.

Sunday, November 05, 2017

These Apples


Our time with my younger brother and his family was relaxing and a nice change since, with the exception of mass family gatherings for birthdays and funerals (mostly), we have not spent time with the four of them and no other family.

Kate is a great cook and she made great, fresh, healthy food for us. One of the few things I made in her great kitchen was baked apples. No photos were taken because we were immersed in conversation and laughter, but I made baked apples again today, so I can share the recipe with you.

This is a really easy way to enjoy apples and this is apple season, so go big! Choose your favorite baking apple. I used Jonagolds but Cortlands and Galas work well, so do Pippins and Breaburns. The apple should have a nice apple flavor and hold some of its shape after baking. Gravensteins, for instance, would break down too much and be more like apple sauce. Many farmers markets have a selection of apples these days and you can ask which one would be best for baking.

If you like apple pie, but don't want the added fat and calories of the crust, these apples are for you.


Sweet and Spicy Baked Apples 
makes two, but can be doubled

2 medium to large baking apples, washed
2 tablespoons brown sugar
1/2 teaspoon ground cinnamon
1/8 teaspoon ground cloves
1/8 teaspoon ground nutmeg
2 tablespoons chopped walnuts
4 pitted dates, chopped
1/2 cup water
2 teaspoons butter or margarine

Preheat the oven to 350 degrees F.

Remove the core and seeds from the center of each apple, being sure to leave some apple intact at the bottom. I used a paring knife to remove the stem end, about halfway into the apple, then used a melon ball tool to remove the rest of the seeds. I left the apple below the seeds intact. Set aside.

In a small bowl mix together the brown sugar, cinnamon, cloves, nutmeg, walnuts and dates. Place each apple in a small baking dish large enough to hold it. I used two sizes of ramekins. If you are doing four apples, you might find an 8" square cake pan works. It's OK to have some room between apples, but they get soft, so you only should allow about 1/2 inch maximum between apples. Individual bakers solve that as long as they aren't too big or small. Experiment with what baking dishes you have before you fill the apples.

Place the cored apples in their baking dish(es) and fill the cavity with the brown sugar/spice mixture. Once they are filled, sprinkle any left over into the bottom of the baking dish(es). Put 1 teaspoon butter or margarine on top of the filled core cavity.  Add the water (I used 1/4 cup for each apple in it's individual dish) to the bottom of the dish, and then cover tightly with aluminum foil. Cut a small slit in the foil to let steam escape.

Place the dish(es) containing the apples on a baking sheet, then bake in the preheated over for 40 minutes, or until tender when pierced.


Serve warm or cold (with a splash of cream or scoop of vanilla ice cream, if desired).


Thursday, March 16, 2017

Sweetly Fragrant Sturdy Cinnamon Raisin Struan Bread


Sometimes doing a end of year clear out of the bookcases brings a surprise. That's what happened to me. I found a small paperback by Peter Reinhart mixed in with the mysteries. In it I found what I think is the perfect March bread for gathering round our Bread Baking Babes kitchen table. Since I'm Kitchen of the Month, I'm inviting you, dear reader, to bake it too.

Peter Reinhart has been encouraging bread baking for a long time, especially slow food bread baking where the dough is given plenty of time to develop its flavor. When Struan bread was available commercially at the market in the 90s, I often bought it for making sandwiches. I loved the complex flavors and the substantial body of the bread, still rare at a time when most sandwich bread was soft and squishy. 


I have a copy of a book he wrote in 1994 called Sacramental Magic in a Small-Town Cafe - Recipes and Stories from Brother Juniper's Cafe'. In it he gives the recipe for his (at the time) all time favorite bread - Cinnamon Raisin Struan, which is a variation of Struan bread.

This is supposed to be a complex bread, consisting of lots of grains and ingredients. Brother Peter says, "Struan, incidentally, aside from being the name of a Scottish clan, also means "the convergence of two or more streams" which he feels is quite appropriate considering all the different convergences of ingredients. You will need to cook some brown rice ahead of time and allow it to cool to room temperature and be prepared to knead longer than usual. You might have to make a trip to the store for polenta, wheat bran and/or buttermilk, but most of the ingredients are probably already in your pantry.

This recipe makes a lot of bread - three 1 1/2 pound loaves. As long as you keep the ingredients in proportion, you can reduce the amounts of ingredients to make less.

In keeping with my no-dairy regime, I substituted a combination of soy milk and plain yogurt (which doesn't seem to bother me, probably because of being fermented) for the buttermilk. I also forgot all about doing oil and cinnamon sugar on the top of the loaf (probably because I was baking these well after dinner time and my brain turns off, mostly, after about 7 pm). I also divided the recipe in half and still made two smaller loaves. This bread is fragrant with the cinnamon...a full tablespoon per loaf!...and has a nice sturdy crumb and thin but delicious crust. One loaf received only cinnamon...I forgot all about the sugar...and the other loaf received some melted butter and brown sugar along with the cinnamon. Both were delicious in different ways.


Come on, become a Buddy! Bake this bread and then email me at plachman at sonic dot net, along with a photo of your bread and a short description of your baking experience. Get it to me by March 29th to be included in the round-up. Don't be surprised if this bread is gone in a flash. While it is baking in the oven the kitchen begins to smell like those cinnamon rolls at the mall and soon everyone wants a taste. Just let it cool a bit or you might get a burnt tongue from the hot sugar!

Be sure to visit the blogs of the other Bread Baking Babes, too, to see what they have done with the recipe. I'll do a post tomorrow with links if you don't have them already.


Cinnamon Raisin Struan Bread
makes three 1 1/2 pound loaves
from Sacramental Magic in a Small-Town Cafe by Br Peter Reinhart

7 cups high-gluten bread flour
1/2 cup uncooked polenta (coarse ground cornmeal)
1/2 cup rolled oats
1/2 cup brown sugar
1/3 cup wheat bran
4 teaspoons salt
3 tablespoons active dry yeast activated in 4 tablespoons lukewarm water
(alternately, use 2 tablespoons plus one teaspoon instant yeast, mixed with the dry ingredients)
1/2 cup cooked brown rice
1/4 cup honey
3/4 cup buttermilk
About 1 1/2 cups water (be prepared to add more if needed)
3 cups raisins
1/2 cup cinnamon sugar (1 part cinnamon to 2 parts granulated sugar)
4 tablespoons melted butter, margarine, or vegetable oil

In a large bowl, combine all the dry ingredients, including the salt and yeast (unless you are using active dry yeast, which should be activated in warm water and added with the wet ingredients.)

Add the cooked rice, honey, and buttermilk and mix together. Then add 1 cup of water, reserving the rest to add as needed. With your hands, squeeze the ingredient together until they make a ball. Sprinkle some flour on the counter and turn the ball out of the bowl and begin kneading. Add small quantities of water as needed.

Because Struan has so many whole grains, it takes longer to knead than most breads. Allow at least 15 minutes, but be prepared to knead for 20. The dough will change before your eyes, lightening in color, becoming gradually more elastic and evenly grained. The finished dough should be tacky, not sticky, lightly golden, stretchy and elastic, rather than porridge-like. When you push the heels of your hands into the dough it should give way but not tear. If it flakes or crumbles, add a little more water.

When the dough seems ready, add the raisins and knead for 2 more minutes, until the raisins are evenly distributed. (I kneaded my raisins in after the first rise.)

Wash out the mixing bowl and dry it thoroughly. Put in the dough and cover with a damp towel or plastic wrap, or place the bowl inside a plastic bag. Allow the dough to rise in a warm place for about 1 hour, until it has roughly doubled in size. (Mine took longer...closer to two hours. Once I kneaded in the raisins, I put it in the fridge overnight for more flavor.)

Cut the dough into 3 equal pieces (or more if you want to make smaller loaves). With a rolling pin, roll out each piece into a rectangle. Sprinkle about 1 tablespoon of cinnamon sugar over the surface, spreading it evenly (used brown sugar and some melted butter on one loaf at this stage). From the bottom of the long side, roll up the dough into tight loaves, tucking and pinching the seams into one line on the bottom. Put the loaves, seam side down, in greased bread pans (for full-sized loaves your pan should be around 9 x 4 1/3 x 3 inches). Cover and allow the loaves to rise until doubled in size.

Preheat the oven to 350 degrees F. When the loaves have risen, cresting over the tops of the pans, place on the center shelf and bake for about 45 minutes. The loaves should be nicely domed and dark gold. The bottom and sides should be a uniform light gold and there should be an audible, hollow  thwack when you tap the bottom of the loaf. If the loaves are not ready, remove them from the pans and place them back in the oven until done. They will bake quickly when removed from the pans.

When done, brush a little butter, margarine, or oil over the tops, then sprinkle with the remaining cinnamon sugar, coating each loaf with a layer of cinnamon crust. (Didn't do this part.)


Allow the breads to cool on wire racks for at least 40 minutes before slicing. This bread makes exceptional breakfast toast and French toast!

Sunday, December 20, 2015

Cinnamon Bun Transformation


For the December Cake Slice Bakers, we had the choice of Walnut Raisin Rum Cake which looked wonderful but sounded too much like what I baked last month, Ginger Ginger Cake which was too much like the Gingerbread Cake I had recently made, and Zugar Kirchtorte, a cake I would have loved to make when I was still enjoying butter, but, sadly, butter is no longer my friend.

The fourth choice is the one I chose, Cinnamon Buns, a fine yeast recipe made with fresh mashed potatoes and potato water. I suppose it can be considered, if you stretch the term a bit, as a cake, but I think of it as a sweet bread. I had to make this one as a tip of the hat to my friend Tanna of My Kitchen In Half Cups. She had me make my first potato bread ever, back when we were both Daring Bakers, and I have loved potato breads ever since. Yeast seems to just love potatoes and the dough, once you get past the initial stickiness (which has been known to cause me to swear), potato dough is supple and feels wonderful to work with. It takes a few more minutes to make these with freshly cooked and mashed potatoes, but it is worth the trouble because the yeast bread is superior to that make with reconstituted mashed potatoes. Just be sure to let the water and potatoes cool enough so that your yeast are happy and not cooked.

Because it's the holiday season I decided to transform the standard pan of buns into a wreath shape. I made two of them and gave one as a gift to a friend. Sweetie and some neighbors enjoyed the other. To make this bread properly, you do need to use milk and butter. It's also a good idea to use fresh cinnamon since that is a key ingredient. I used Penzy's Vietnamese Cinnamon. It is full flavored and so fragrant that it was perfect for this bread. I also decided to add some chopped walnuts, which I sprinkled on top of the butter and cinnamon before I rolled up the dough.

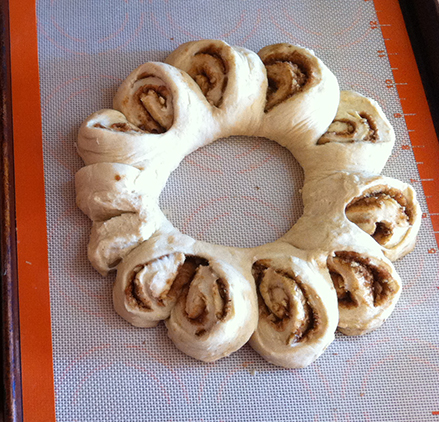
Once the dough is rolled up, which you do for both the buns and the wreath, to make the wreath, form the dough log into a circle and connect the ends together by pinching them. You then take a pair of clean kitchen scissors/shears and cut almost all the way through about every two inches around the circle. You leave the dough connected (uncut) at the inner side of the circle. Once that is done, you turn each of those pieces a bit so that you can see the spiral of bread dough and spice/sugar
.


After that you let the dough rise again and bake it at the same temperature as the buns. I like a bit of decoration, so I mixed together some hot milk and confectioners sugar and drizzled it over the wreath in a decorative pattern. Pretty as a picture and a nice gift, too.

These buns (for those pieces you turned on the wreath become buns when the wreath is cut) are soft and tender with a wonderful taste of cinnamon and sugar. It smells like the best kitchen in the world while they are baking!


Cinnamon Bun Wreaths
and adaption of a recipe from Maida Heatter's Cakes

Dough:
1 cup mashed potatoes (see Notes)
1 cup milk
1/2 cup plus 1 tablespoon granulated sugar, divided
1/2 teaspoon salt
2 oz. (1/2 stick) unsalted butter, cut up
1/4 cup warm water (105-110 degrees F)
1 envelope active dry yeast
1 egg at room temperature
1 teaspoon vanilla extract
About 4 1/4 cups unsifted all-purpose flour or bread flour,
plus additional flour, mostly for kneading
(bread flour is excellent in bread where there is a lot of butter and sugar)

Notes: The mashed potatoes can be made with instant dry mashed potatoes or fresh potatoes.
It takes about 3/4 pound fresh potatoes to make 1 cup mashed. Peel, cut into chunks, place in a small saucepan with water, boil, partially covered, until tender, drain, and then mash the potatoes. Be sure to save the water the potatoes were boiled in and use some of it for dissolving the yeast. Since yeast loves potatoes so much, this will make it extra happy.

Filling:
2 tablespoons granulated sugar (I used brown sugar)
1 1/2 teaspoons cinnamon
1/4 teaspoon nutmeg
1 oz (1/4 stick) unsalted butter, melted
1/2 cup finely chopped walnuts

Instructions:
Generously butter a 4-6 quart bowl or other container for the dough to rise in. Set it aside.

Place the mashed potatoes (which may be warm or cool, as long as below 111 degrees F) in a saucepan and, stirring constantly, add the milk very gradually. Stir in 1/2 cup of the sugar and the salt and butter. Place over low heat and stir occasionally until the mixture is warm (105-110 degrees F).It is not necessary for the butter to have melted completely, but OK if it does.

Meanwhile, in a 1-cup glass measuring cup, stir the warm water (can be potato water) with the remaining 1 tablespoon sugar, sprinkle on the yeast, stir briefly with a knife, and set aside for about 10 minutes until the mixture rises to about the 3/4 cup line.

In a small bowl, beat the egg to mix and add the vanilla.

When the potato-and-milk mixture is warm enough, transfer it to the large bowl of an electric mixer. Beat in the yeast mixture and the egg. On low speed, gradually add about 3 cups of the flour. Beat on low speed for a minute or two. Remove the bowl from the mixer. The dough will be wet and sticky now. With a heavy wooden spoon, gradually stir in the remaining 1 1/4 cups of flour. Dough will still be sticky.

Flour a large work surface. Turn the dough out onto the floured surface. The dough will still be too sticky to knead. Add a bit of additional flour and, with a dough scraper or a wide metal spatula, turn the dough over and over with the additional flour - adding still a bit ore if necessary - until you can handle the dough. (a glass of wine to the side and/or some swearing help when getting through this part - Elle's notes.) You might have to add 1/2 to 3/4 cup additional flour. Remember, though, that potato based dough has a tendency to remain a bit sticky even when enough flour has been added, so do not use more than you must...err on the side of sticky dough.
After about five minutes active kneading, the dough should be smooth and feel alive. If you can be really careful to not add too much flour, you can also do the kneading with your stand mixer.

Place the dough in the buttered bowl, turn it around in the bowl to butter all sides, cover the bowl with plastic wrap (or a clean shower cap) and place it in a clean, draft-free spot to rise for 1 to 1 1/2 hours, until the dough is at least double in volume.

Once dough had doubled in volume, make a fist and punch it down in the middle, then fold in and press down the sides of the dough to deflate all of it. Turn the dough out onto a lightly floured surface and use a knife or bench scraper to divide the dough in half.  Return half the dough to the rising bowl and re-cover.

Take the half dough still on the lightly floured surface and roll it out in a rectangle about 16-18 inches by 10 inches.
The dough may fight you...if so, let it sit for a few minutes while you make the filling components, then return to it and continue shaping.

For the filling, in a small bowl, mix the sugar with the cinnamon and nutmeg. Make sure the walnuts are finely chopped. Brush half the melted butter over the rolled out dough, leaving about 1/2-inch clear around all edges. Sprinkle on half the cinnamon sugar mixture evenly over the butter, then sprinkle half the walnuts over that evenly. Roll up on the long side like a jelly-roll, pinching the edges together once it is all rolled.

Carefully lift the rolled dough onto a parchment lined baking sheet (or use a silicon mat lined baking sheet) and form into a wreath shape. Pinch the ends together. Use a pair of clean scissors or kitchen shears to cut the dough about every two inches, leaving the dough attached at the inner edge of the roll. Carefully take each cut section and turn it so that you can see the filling. Do that with each cut section around the wreath. See the photo above in the beginning of the post to see how it looks at the end, before rising.

Repeat the rolling, filling, rolling up, cutting and turning with the other half of the dough and filling. I used two baking sheets so that they wouldn't stick together.

Set the wreaths in a warm, draft free place and let rise until puffy, about 1 hour. Towards the end of that time, preheat the oven to 375 degrees F. Before preheating, adjust the rack one-third up from the bottom of the oven.

Bake the risen wreaths for about 10 minutes, then reverse the pan from front to back and continue to bake until the wreaths are light golden brown. I baked one pan at a time, but you could probably bake both pans at once if you switched them around half way through baking. Ovens vary, but it will probably take about 25-30 minutes total. Once baked, remove from the oven and let cool on a rack five minutes while you prepare the icing.

Optional Icing
In a small bowl mix together 1 tablespoon warm milk and enough confectioners sugar (about 3/4 cup) to make an icing that is the thickness you like. Drizzle the icing over the cooled wreaths.

A cooled, iced wreath makes a nice gift and is also a lovely addition to your holiday table, especially at breakfast or brunch!
Check out the other Cake Slice Baker creations too.

Saturday, December 19, 2015

Three Kinds of Ginger


Although I've always loved gingerbread, I was an adult before I discovered the joys of fresh ginger and candied ginger. Of late I've been increasing the amount of ginger in my diet since it is not only an effective anti-inflammatory, but it tastes wonderful. Fresh ginger does have some natural heat to it, but I find that I enjoy that much more than the heat from, say, hot peppers.

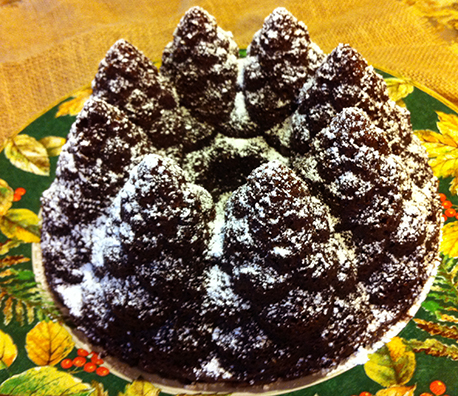
One way to enjoy three kinds of ginger; fresh, candied and ground dried ginger; is by making gingerbread cake. I recently tried a new recipe that uses all three and it works really well in a Bundt cake pan. It's called the Gramercy Tavern Gingerbread and it's a recipe from Epicurious. I think I decided to try it because the first ingredient is one cup of stout (like Guinness). It also has lots of spices, not just ginger. Cinnamon, nutmeg, cloves and cardamom are also used. The strong flavor of molasses comes from molasses itself, but also from dark brown sugar. The only think it was lacking was the candied ginger, so I chopped up a tablespoon of that and added it anyway. It tended to go to the bottom of the pan, which became the top of the cake. I found that out because it got in the way of slicing the beginning of some slices, but I still think it adds a necessary element to the cake.

This makes a full Bundt cake, so make sure that your pan is a full sized one, which I think is a ten-cup capacity or larger one. I baked mine in a pan that looked like a circle of Christmas trees. For decoration I sifted on just a little powdered sugar, so they looked like snowy trees. Very pretty and perfect for a party, or your own holiday table.

This gingerbread is moist, spicy, mouthwatering (perhaps due to the wonderful fragrance of the stout and all those spices), with a fine crumb and sturdy form. Everyone who tried it was delighted, especially those who added a dollop of whipped cream to their serving.

Be sure to check back tomorrow to see what I made for the Cake Slice Bakers!


Adapted from
Gramercy Tavern Gingerbread
from Epicurious

1 C stout (like Guinness which is what I used)
1 C dark molasses
1/2 t baking soda
2 C all-purpose flour
1 1/2 t baking powder
1 1/2 T ground ginger
1 t ground cinnamon
1/4 t ground cloves
1/4 t freshly grated nutmeg
pinch ground cardamom
1 T freshly grated fresh, peeled ginger root
1 T finely diced moist candied ginger
3 large eggs
1 C packed dark brown sugar
1 C granulated sugar
3/4 C vegetable oil

Preheat oven to 350 degrees F. Generously butter a 10-inch (10-12 cups) Bundt pan and dust with flour, knocking out excess.

Bring stout and molasses to a boil in a large saucepan and remove from heat. Whisk in baking soda, then cool to room temperature.

Sift together flour, baking powder, and spices in a large bowl. Whisk together eggs and sugars and fresh ginger. Whisk in oil, then molasses mixture. Add to flour mixture and whisk until just combined.

Pour batter into Bundt pan and rap pan sharply on counter to eliminate air bubbles. Bake in the middle of the oven until a tester comes out with just a few moist crumbs adhering, about 50 minutes. Cool cake in pan on a rack 5 minutes. Turn out onto rack and cool completely.

Serve cake, dusted with confectioners' sugar, or serve with whipped cream.

As a reward for reading to the end, here is a recent shot of the sunset in our wintery sky. We have been having rain on and off, which is such a blessing!, so there are often clouds in the sky at sunset. Winter sunsets seem to have a wonderful fragile quality to them that I love.


Sunday, June 21, 2015

Goes With Hummingbird - Pineapple? Banana? Pecans? Cinnamon?


The Cake Slice Bakers are posting this weekend and the June Cake choices included a lovely blueberry coffee cake, a decadent caramel layer cake, a pretty pink lemonade cake, and my choice, the Celebration Hummingbird Cake. I've never made a Hummingbird Cake before. No one seems to know the origin of the name, but it has been a highly requested recipe from Southern Living Magazine for over 30 years. The recipe itself comes from the Southern Living Cake Book and to make it very celebratory they used Browned Butter Frosting and a Cream Cheese Custard filling, plus piping the icing in a basket weave for the cookbook photo. Not being in a crafty mood, I simplified my version.

The hummingbird cake is very moist because it has crushed pineapple and ripe bananas, along with the usual cake ingredients. It has just a touch of cinnamon and some crunch from toasted pecans. I only made one change to the cake part by substituting a stick of melted, browned butter for 1/2 cup of the oil. For the icing and filling of this delicious, decadent layer cake, I substituted my favorite cream cheese frosting. It has the cream cheese of the called for in the filling and I already used browned butter in the cake, so it's OK it's not in the frosting. The recipe for this wonderful cream cheese frosting is from a good friend and it is over 30 years old, too, so the timing is right. It is softer than the browned butter icing, has a small amount of sour cream which goes a long way to softening the super sweet effect you often get with confectioner's sugar icings. Pretty easy to work with, too.


My smart daughter was here helping with the cake creation and she suggested sprinkling some rum over the cake layers right before icing them to carry out the Caribbean vibe. It was brilliant! you caught just a hint of rum in most bites and a big hit of banana and pineapple. The pecans not only add crunch, but hey looked pretty on the top as decoration. Even though I put waxed paper strips under the edges to keep the icing off the plate edge, it was so delightfully gooey that the icing left tracks where the paper had been as I pulled the paper out. Lori's Cream Cheese Icing the kind of icing that you could just stand over the bowl and eat it with a spoon. Too rich to do it for long though.


I suspect I will be asked to make this one again. We had some friends over and I never did get a morning light photo...the cake was totally gone before I could get a shot. The photos I did get were with night time light. Don't worry too much about how it looks...just make this cake! You'll be glad you did.

Be sure to visit the other Cake Slice Bakers posts to see which of the month's choices they made.

Monday, April 20, 2015

Why Is It Called Coffee Cake?


April keeps flying along. Having reached the 20th we have landed on the magical day of the Cake Slice Bakers reveal. This month the Cake Slice Bakers had an awesome choice of cakes to bake from the book we are baking from the Southern Cake Book.

From many delicious choices, including cheesecake bars, a decadent carrot cake, a different green tea cake and a brown sugar and pecan coffee cake, I went for the one for which I had the ingredients on hand...the coffee cake. Very glad I did. I was questioned by a friend however. Since there is no coffee in this cake, why is it called a coffee cake. All that I could figure out is that it goes very well with a hot cup of coffee.

This is a simple cake to make. You don't need a mixer, but a pastry tool to cut the butter into the dry ingredients is essential. I know they say you can do it with a couple of knives, but I've tried that and trust me, a pastry blender is a much better tool. Sur la Table has a nice OXO one for $12, but you can ususally find one anywhere that kitchen gear is sold.


Sweet brown sugar, a touch of cinnamon, and chopped pecans are the obvious flavors here, but there is plenty of butter and sour cream in the recipe to add richness. I made a little extra of the crumb mixture and combined it with the pecan mixture for the topping to make it more like the New York Crumb Cake they have at my local eatery. I baked the bottom crust for just a few minutes, too, which made the bottom crust more solid than it might have been otherwise. 

Both of these changes made for an interesting textural contrast. The bottom layer had snap, the middle one with the sour cream was soft and almost pillowy, and the top layer combined both crunch and crumb. I really liked this dessert and so did Sweetie. Surprisingly it kept quite well for a week. I kept it on the counter, wrapped in foil. It makes a big pan of cinnamon sugar goodness, so we gave about half of it away to friends. Probably should have given away more, but it was too delicious to not eat ourselves.

Be sure to check out the other Cake Slice Bakers this month to see which of the selection they chose to bake. You'll be glad you did!


Here is my variation of the Brown Sugar Pecan Coffee Cake from
The Southern Cake Book

This coffee cake has crumbs in the crust, filling and topping. Makes for a quick and delicious cake.

2 1/2 cups all-purpose flour
2 1/2 cups firmly packed brown sugar
1 cup butter, cubed
Shortening
1 teaspoon baking soda
1 cup sour cream
1 large egg, lightly beaten
1 teaspoon vanilla extract
3 tablespoons granulated sugar
1 teaspoon ground cinnamon
1 cup chopped pecans

Preheat the oven to 350 degrees F. Stir together the flour and brown sugar in a large bowl. Cut the butter into the flour mixture with a pastry blender until crumbly and butter is is very small pieces. This mixture will be divided into three parts:

Press 2 3/4 cups crumb mixture on the bottom of a lightly greased 13 x 9-inch pan (that's where the shortening gets used), spreading evenly and packing down. Bake for 8 minutes. Remove from oven and set aside.

While crust is baking, remove 1/2 cup of the crumb mixture remaining and put it in a small bowl. Set aside.

Add the baking soda to the main crumb mixture and stir to combine. In a small bowl, stir together the sour cream, egg and vanilla. Add to the crumb mixture, stirring just until dry ingredients are moistened. Pour sour cream mixture over the crumb crust in the baking pan.

In the small bowl that has the 1/2 cup crumb mixture, mix together that crumb mixture, the granulated sugar, cinnamon and nuts. Sprinkle this mixture evenly over the batter in the baking pan.

Bake at 350 degrees F for 25-30 minutes or until a wooden pick inserted in the center comes out clean. Cool on a wire rack. Cut into portions and serve.
Makes 12 servings


Saturday, November 08, 2014

Amazing Overnight Cinnamon Coffee Cake


I was overjoyed when I discovered this recipe on the King Arthur Flour website. It is really great to be able to wake up in the morning knowing that the breakfast treat you want to serve your family and friends is mostly made, with little or no more work required other than baking. I've come to depend on the Amazing Overnight Waffle for those times when I know we will want waffles in the morning, so now I have a great coffee cake that requires nothing more in the a.m. than preheating the oven, taking the pan out of the fridge and sliding it into the preheated oven. Piece of cake, literally.

This make a lot of coffee cake. I took mine to a meeting this morning, so that helped, about three quarters was gone by the time the meeting was finished. Of course if you cut it into bigger pieces it might not take much time at all to polish it off. It has a tender crumb, lightly flavored with vanilla, a ribbon of cinnamon sugar and cocoa running through the middle and a topping of crumbly streusel. Delicious!

My only complaint was that it took a lot of bowls to make since you have one for melting the butter, one for the topping, one for the filling, and at least one more for the batter. I'm going to think about the instructions and see how I could reduce that pile of dirty bowls a bit. I know there has to be a way.

Don't let the dirty bowls deter you from making this. There are also lots of ways to doll it up...nuts and/or dried fruit mixed in the batter or piled on top of the filling, grated apple to put on top of the filling...you get the idea. Nuts could also be added to the streusel. I used the version where you can weight the ingredients on a scale, using the pound version. There is also one for grams and one by volume on the King Arthur site, plus great photos.


Cinnamon-streusel Coffeecake

Streusel Topping
8 3/4 ounces granulated sugar
1/4 teaspoon salt (if you use unsalted butter)
6 1/4 oz. all-purpose flour
1 tablespoon ground cinnamon
3 oz. butter, melted


Filling
7 1/2 ounces brown sugar, light or dark
1 1/2 tablespoons ground cinnamon
1 teaspoon unsweetened cocoa powder

Cake
6 oz. butter
1 teaspoon salt (1 1/4 teaspoons if using unsalted butter)
10 1/2 oz. granulated sugar
2 1/2 oz. brown sugar
2 1/2 teaspoons baking powder
2 teaspoons vanilla extract
3 large eggs
6 oz plain yogurt (or sour cream) 
10 oz. milk (anything from skim to whole...or even milk mixed with buttermilk, which is what I used)
16 oz. all-purpose flour
·        

·     1)    Preheat the oven to 350°F. Lightly grease a 9" x 13" pan, or two 9" round cake pans. (If you are going to  bake the next day, skip the preheating of the oven until before you bake, but allow enough time for      the oven to heat up to 350 degrees F.)

2) Make the topping by whisking together the sugar, salt, flour, and cinnamon. Add the melted butter, stirring till well combined. Set the topping aside.

3) Make the filling by mixing together the brown sugar, cinnamon, and cocoa powder. Note that the cocoa powder is used strictly for color, not flavor; leave it out if you like. Set it aside.

4) To make the cake: In a large bowl, beat together the butter, salt, sugars, baking powder, and vanilla until well combined and smooth.

5) Add the eggs one at a time, beating well after each addition.

6) In a separate bowl, whisk together the sour cream or yogurt and milk till well combined. You don't need to whisk out all the lumps.

7) Add the flour to the butter mixture alternately with the milk/sour cream mixture, beating gently to combine.

8) Pour/spread half the batter (a scant 3 cups) into the prepared pan(s), spreading all the way to the edges. If you're using two 9" round pans, spread 1 1/3 cups batter in each pan.

 9) Sprinkle the filling evenly atop the batter.

 10) Spread the remaining batter atop the filling. Use a table knife to gently swirl the filling into the batter, as though you were making a marble cake. Don't combine filling and batter thoroughly; just swirl the filling through the batter.

 11) Sprinkle the topping over the batter in the pan.

12) Bake the cake until it's a dark golden brown around the edges; medium-golden with no light patches showing on top, and a toothpick or cake tester inserted into the center comes out clean, about 55 to 60 minutes for the 9" x 13" pan, 50 to 55 minutes for the 9" round pans. When pressed gently in the middle, the cake should spring back. (I started checking 10 minutes before time and was glad I did.)

13) Remove the cake from the oven and allow it to cool for 20 minutes before cutting and serving. Serve cake right from the pan.

Want to prepare this coffeecake the night before, then bake in the morning? It's easy; simply cover the unbaked cake with plastic wrap and put into the refrigerator overnight. Next morning, bake the cake as directed. Start testing for doneness before the end of the suggested baking time, but you'll probably have to add 5 minutes or so to the total time, to account for the batter being chilled.