Showing posts with label yeasted sweet bread. Show all posts

Tuesday, November 19, 2019

A Crown for the Babes


A little late, but still close to the middle of November, here is my version of the beautiful Danish Crown challenge for the month brought to us by the talented Kitchen of the Month Cathy of Bread Experience. Having recently spent far too much time with onions for my onion dip appetizer, I went with a holiday version that is sweeter, with a filling that has dried fruits and nuts and no dairy.

This is a lovely dough although a little soft for holding the fillings in. The results are dramatic but easier to accomplish than you might think, so consider being a Buddy this month. Bake the bread (I'm including both the original challenge recipe and my variation) and send an email to Cathy. She'll include you in the round-up and send you a Buddy badge for your blog. Be sure to include a photo, too. Deadline is usually the 29th of the month.

Not interested in being a Buddy, but still want to make the recipe? Go for it! This would make a delightful bread for Thanksgiving. The savory version would be amazing with full flavored cheeses and the sweet version with anything from eggnog to hot tea.

Be sure to check out the gorgeous breads made by the other Babes who baked this month.


November challenge: Sourdough Savory Danish Crown

Adapted from Bread - The breads of the world and how to bake them at home by Christine Ingram and Jennie Shapter

Makes: 1 Crown Loaf

Dough:
·        260 grams + 30 grams unbleached all-purpose flour + more for sprinkling
·        65 grams whole grain rye
·        1 tsp sea salt
·        3 Tbsp + 1 stick butter, softened
·        50 grams sourdough starter, recently fed, active (100% hydration)  or ¾-ounce fresh yeast *
·        ½ cup lukewarm water
·        ½ cup lukewarm milk (I used almond milk)
·        1 egg, lightly beaten or 2 ½ tsp / 8 grams ground flaxseed meal + 3 Tbsp / 40 grams water (whisk; allow to gelatinize)

Filling:
·        2 Tbsp oil
·        2 medium onions, finely chopped
·        ¾ cup fresh bread crumbs or ½ cup dried
·        ¼ cup ground almonds or almond meal
·        ½ cup freshly grated or dried Parmesan cheese
·        1 egg, lightly beaten, divided or ½ Tbsp. chia seeds + 1 ½ - 2 Tbsp water (stir; allow to gelatinize)
·        Salt and freshly ground black pepper, to taste

Topping:
·        1 Tbsp. sesame seeds (I used sunflower seeds)
·        1 Tbsp. freshly ground Parmesan (I used dried)
·        ½ beaten egg from above or 1 tsp. corn starch + enough water to make thin glaze

Using yeast instead of sourdough:

If you choose to use yeast instead of sourdough, reduce the proofing time to about 1 hour for the bulk ferment in the bowl and 30 minutes for the final ferment. You may also need to reduce the milk/water mixture to a scant cup.

Directions:
In a large bowl, whisk together the flours and salt.  Rub in the 3 tablespoons of butter.

In a separate bowl, mix together the sourdough and milk/water mixture using a Danish dough whisk or wooden spoon. 

Add the wet ingredients to the dry ingredients and mix using a Danish dough whisk or wooden spoon or spatula until thoroughly combined.  Switch to a bowl scraper if necessary. 

Cover the bowl and allow the dough to autolyse (rest) for 20 – 30 minutes before adding additional flour. 

After the autolyse, add 30 grams of flour, if necessary.  The dough will be a little sticky, but resist the urge to add more flour until the stretch and fold stage.

Let the dough proof for about 4-6 hours at room temperature. Stretch and fold the dough every 45 minutes for the first 2.25 hours.  To perform the stretch and fold, remove the dough to a work surface sprinkled with flour, and stretch and fold the dough onto itself from all corners.  Do this 3 times.

The dough can probably be rolled and baked at this point, but I found it benefited from a cold ferment in the refrigerator.  I would let it cold ferment for a few hours at least.

After letting the dough proof at room temperature for about 4.25 hours, I covered the bowl tightly and placed it in the refrigerator.  About 44 hours later, I continued with the process (almost 2 days).

Remove the dough from the refrigerator and allow it to warm up slightly on a floured surface.

Roll out into an oblong about ½-inch thick.  Dot half (½ stick) of the remaining butter over the top two-thirds of the rolled dough.  Fold the bottom third up and the top third down, and then seal the edges. Turn the dough 90 degrees and repeat the process with the remaining ½ stick of butter.  Fold and seal the dough as before.  Cover the dough with plastic wrap, bees wrap, or a kitchen towel; let it rest for 15 minutes.

Turn the dough another 90 degrees.  Then roll and fold it as before without adding any butter.  Repeat the turn/fold process once more.  Wrap the dough in lightly oiled plastic wrap or bees wrap sprinkled with flour. Place in the refrigerator for 30 minutes.

In the meantime, prepare the onions. Heat the oil over medium-high heat and cook the onions for 10 minutes until soft and golden.  Remove the pan from the heat and stir in the bread crumbs, almonds, Parmesan, salt and pepper.

Add half the beaten egg, if using, or all of the gelatinized chia seeds to the onion/bread crumb mixture and bind together.

Roll the dough on a floured surface into a rectangle measuring 22x9 inches.  Spread the filling over the dough to within ¾ inch of the edges. Roll up like a Swiss roll from one of the long sides.  Cut the dough in half lengthwise using a sharp knife.  Braid the logs together with the cut sides up and shape into a ring. 

Place on a parchment-lined baking sheet and cover with plastic wrap or bees wrap and let rise for 1-2 hours, depending on the temperature in your kitchen. 

It was a little tricky braiding the two dough pieces so it might be helpful to place the cut logs in the refrigerator a little while before braiding them and forming the ring.

Preheat the oven to 400F.

Brush the remaining beaten egg or the cornstarch wash over the dough.  Sprinkle with sesame seeds (or the seeds of your choice) and Parmesan cheese. 

Bake for 40-50 minutes or until golden.  Transfer the loaf to a wire rack to cool.  Cut into slices.


Elle's version: Fruit and Nut Danish Crown

Adapted from Bread - The breads of the world and how to bake them at home by Christine Ingram and Jennie Shapter

Makes: 1 Crown Loaf

Dough:
·        260 grams + 30 grams unbleached all-purpose flour + more for sprinkling
·        65 grams whole grain wheat flour
·        1 tsp sea salt
·        3 Tbsp + 1 stick non-dairy margarine, softened
·     1/4 oz dry yeast 
·        ½ cup lukewarm water
·        ½ cup lukewarm milk (I used soy creamer)
·       
Filling:
½ Tbsp lemon zest
½ teaspoon cake spice or your favorite spice mixture
½ cup brown sugar
½ cup non-dairy margarine
·       ½ cup pecans, finely chopped
      ½ cup chopped dates & 2 tablespoons rum
      ½ cup mixed candied fruits (fruit cake mix)

Topping:
·        1 Tbsp. sunflower seeds
·        beaten egg 

Using yeast instead of sourdough:
 To use yeast instead of sourdough, reduce the proofing time to about 1 hour for the bulk ferment in the bowl and 30 minutes for the final ferment. You may also need to reduce the milk/water mixture to a scant cup.

Directions:
In a large bowl, whisk together the flours and salt.  Rub in the 3 tablespoons of non-dairy margarine.

In a separate bowl, mix together the dry yeast and milk/water mixture using a Danish dough whisk or wooden spoon. 

Add the wet ingredients to the dry ingredients and mix using a Danish dough whisk or wooden spoon or spatula until thoroughly combined.  Switch to a bowl scraper if necessary. 

Cover the bowl and allow the dough to autolyse (rest) for 20 – 30 minutes before adding additional flour. 

After the autolyse, add 30 grams of flour, if necessary.  The dough will be a little sticky, but resist the urge to add more flour until the stretch and fold stage.

Let the dough proof for about 1 hour at room temperature. Stretch and fold the dough every 15 minutes. To perform the stretch and fold, remove the dough to a work surface sprinkled with flour, and stretch and fold the dough onto itself from all corners.  Do this 3 times.

The dough can probably be rolled and baked at this point, but I found it benefited from a cold ferment in the refrigerator.  I would let it cold ferment for a few hours at least. I fermented mine overnight. That's when I also marinated the dates in the rum in a mug.

Remove the dough from the refrigerator and allow it to warm up slightly on a floured surface.

Roll out into an oblong about ½-inch thick.  Dot half (½ stick) of the remaining non-dairy margarine (in the dough section) over the top two-thirds of the rolled dough.  Fold the bottom third up and the top third down, and then seal the edges. Turn the dough 90 degrees and repeat the process with the remaining ½ stick of butter.  Fold and seal the dough as before.  Cover the dough with plastic wrap, bees wrap, or a kitchen towel; let it rest for 15 minutes. (I chilled mine 30 minutes at this point because the day was very warm.)

Turn the dough another 90 degrees.  Then roll and fold it as before without adding any non-dairy margarine.  Repeat the turn/fold process once more.  Wrap the dough in lightly oiled plastic wrap or bees wrap sprinkled with flour. Place in the refrigerator for 30 minutes.

In the meantime, prepare the filling. Stir together in a small bowl combine the zest, cake spice and brown sugar. Drain the date/rum mixture, discarding the liquid.

Roll the dough on a floured surface into a rectangle measuring 22x9 inches.  Spread the butter mixture over the dough to within an inch of the edges. Sprinkle butter evenly with the brown sugar mixture, then scatter evenly the chopped pecans. Then scatter the candied fruit mixture over the dough to within ¾ inch of the edges. Roll up like a Swiss roll from one of the long sides.  Cut the dough in half lengthwise using a sharp knife.  Braid the logs together with the cut sides up and shape into a ring. 

Place on a parchment-lined baking sheet and cover with plastic wrap or bees wrap and let rise for 1-2 hours, depending on the temperature in your kitchen. 

It was a little tricky braiding the two dough pieces so it might be helpful to place the cut logs in the refrigerator a little while before braiding them and forming the ring. This is a soft dough, so a fair amount of filling fell out, but I probably overfilled it anyway.

Preheat the oven to 400F.

Brush the remaining beaten egg  over the dough.  Sprinkle with sunflower seeds.  

Bake for 40-50 minutes or until golden.  Transfer the loaf to a wire rack to cool.  Cut into slices.


Sunday, December 20, 2015

Cinnamon Bun Transformation


For the December Cake Slice Bakers, we had the choice of Walnut Raisin Rum Cake which looked wonderful but sounded too much like what I baked last month, Ginger Ginger Cake which was too much like the Gingerbread Cake I had recently made, and Zugar Kirchtorte, a cake I would have loved to make when I was still enjoying butter, but, sadly, butter is no longer my friend.

The fourth choice is the one I chose, Cinnamon Buns, a fine yeast recipe made with fresh mashed potatoes and potato water. I suppose it can be considered, if you stretch the term a bit, as a cake, but I think of it as a sweet bread. I had to make this one as a tip of the hat to my friend Tanna of My Kitchen In Half Cups. She had me make my first potato bread ever, back when we were both Daring Bakers, and I have loved potato breads ever since. Yeast seems to just love potatoes and the dough, once you get past the initial stickiness (which has been known to cause me to swear), potato dough is supple and feels wonderful to work with. It takes a few more minutes to make these with freshly cooked and mashed potatoes, but it is worth the trouble because the yeast bread is superior to that make with reconstituted mashed potatoes. Just be sure to let the water and potatoes cool enough so that your yeast are happy and not cooked.

Because it's the holiday season I decided to transform the standard pan of buns into a wreath shape. I made two of them and gave one as a gift to a friend. Sweetie and some neighbors enjoyed the other. To make this bread properly, you do need to use milk and butter. It's also a good idea to use fresh cinnamon since that is a key ingredient. I used Penzy's Vietnamese Cinnamon. It is full flavored and so fragrant that it was perfect for this bread. I also decided to add some chopped walnuts, which I sprinkled on top of the butter and cinnamon before I rolled up the dough.

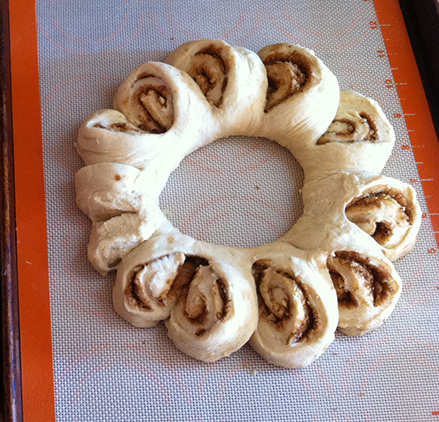
Once the dough is rolled up, which you do for both the buns and the wreath, to make the wreath, form the dough log into a circle and connect the ends together by pinching them. You then take a pair of clean kitchen scissors/shears and cut almost all the way through about every two inches around the circle. You leave the dough connected (uncut) at the inner side of the circle. Once that is done, you turn each of those pieces a bit so that you can see the spiral of bread dough and spice/sugar
.


After that you let the dough rise again and bake it at the same temperature as the buns. I like a bit of decoration, so I mixed together some hot milk and confectioners sugar and drizzled it over the wreath in a decorative pattern. Pretty as a picture and a nice gift, too.

These buns (for those pieces you turned on the wreath become buns when the wreath is cut) are soft and tender with a wonderful taste of cinnamon and sugar. It smells like the best kitchen in the world while they are baking!


Cinnamon Bun Wreaths
and adaption of a recipe from Maida Heatter's Cakes

Dough:
1 cup mashed potatoes (see Notes)
1 cup milk
1/2 cup plus 1 tablespoon granulated sugar, divided
1/2 teaspoon salt
2 oz. (1/2 stick) unsalted butter, cut up
1/4 cup warm water (105-110 degrees F)
1 envelope active dry yeast
1 egg at room temperature
1 teaspoon vanilla extract
About 4 1/4 cups unsifted all-purpose flour or bread flour,
plus additional flour, mostly for kneading
(bread flour is excellent in bread where there is a lot of butter and sugar)

Notes: The mashed potatoes can be made with instant dry mashed potatoes or fresh potatoes.
It takes about 3/4 pound fresh potatoes to make 1 cup mashed. Peel, cut into chunks, place in a small saucepan with water, boil, partially covered, until tender, drain, and then mash the potatoes. Be sure to save the water the potatoes were boiled in and use some of it for dissolving the yeast. Since yeast loves potatoes so much, this will make it extra happy.

Filling:
2 tablespoons granulated sugar (I used brown sugar)
1 1/2 teaspoons cinnamon
1/4 teaspoon nutmeg
1 oz (1/4 stick) unsalted butter, melted
1/2 cup finely chopped walnuts

Instructions:
Generously butter a 4-6 quart bowl or other container for the dough to rise in. Set it aside.

Place the mashed potatoes (which may be warm or cool, as long as below 111 degrees F) in a saucepan and, stirring constantly, add the milk very gradually. Stir in 1/2 cup of the sugar and the salt and butter. Place over low heat and stir occasionally until the mixture is warm (105-110 degrees F).It is not necessary for the butter to have melted completely, but OK if it does.

Meanwhile, in a 1-cup glass measuring cup, stir the warm water (can be potato water) with the remaining 1 tablespoon sugar, sprinkle on the yeast, stir briefly with a knife, and set aside for about 10 minutes until the mixture rises to about the 3/4 cup line.

In a small bowl, beat the egg to mix and add the vanilla.

When the potato-and-milk mixture is warm enough, transfer it to the large bowl of an electric mixer. Beat in the yeast mixture and the egg. On low speed, gradually add about 3 cups of the flour. Beat on low speed for a minute or two. Remove the bowl from the mixer. The dough will be wet and sticky now. With a heavy wooden spoon, gradually stir in the remaining 1 1/4 cups of flour. Dough will still be sticky.

Flour a large work surface. Turn the dough out onto the floured surface. The dough will still be too sticky to knead. Add a bit of additional flour and, with a dough scraper or a wide metal spatula, turn the dough over and over with the additional flour - adding still a bit ore if necessary - until you can handle the dough. (a glass of wine to the side and/or some swearing help when getting through this part - Elle's notes.) You might have to add 1/2 to 3/4 cup additional flour. Remember, though, that potato based dough has a tendency to remain a bit sticky even when enough flour has been added, so do not use more than you must...err on the side of sticky dough.
After about five minutes active kneading, the dough should be smooth and feel alive. If you can be really careful to not add too much flour, you can also do the kneading with your stand mixer.

Place the dough in the buttered bowl, turn it around in the bowl to butter all sides, cover the bowl with plastic wrap (or a clean shower cap) and place it in a clean, draft-free spot to rise for 1 to 1 1/2 hours, until the dough is at least double in volume.

Once dough had doubled in volume, make a fist and punch it down in the middle, then fold in and press down the sides of the dough to deflate all of it. Turn the dough out onto a lightly floured surface and use a knife or bench scraper to divide the dough in half.  Return half the dough to the rising bowl and re-cover.

Take the half dough still on the lightly floured surface and roll it out in a rectangle about 16-18 inches by 10 inches.
The dough may fight you...if so, let it sit for a few minutes while you make the filling components, then return to it and continue shaping.

For the filling, in a small bowl, mix the sugar with the cinnamon and nutmeg. Make sure the walnuts are finely chopped. Brush half the melted butter over the rolled out dough, leaving about 1/2-inch clear around all edges. Sprinkle on half the cinnamon sugar mixture evenly over the butter, then sprinkle half the walnuts over that evenly. Roll up on the long side like a jelly-roll, pinching the edges together once it is all rolled.

Carefully lift the rolled dough onto a parchment lined baking sheet (or use a silicon mat lined baking sheet) and form into a wreath shape. Pinch the ends together. Use a pair of clean scissors or kitchen shears to cut the dough about every two inches, leaving the dough attached at the inner edge of the roll. Carefully take each cut section and turn it so that you can see the filling. Do that with each cut section around the wreath. See the photo above in the beginning of the post to see how it looks at the end, before rising.

Repeat the rolling, filling, rolling up, cutting and turning with the other half of the dough and filling. I used two baking sheets so that they wouldn't stick together.

Set the wreaths in a warm, draft free place and let rise until puffy, about 1 hour. Towards the end of that time, preheat the oven to 375 degrees F. Before preheating, adjust the rack one-third up from the bottom of the oven.

Bake the risen wreaths for about 10 minutes, then reverse the pan from front to back and continue to bake until the wreaths are light golden brown. I baked one pan at a time, but you could probably bake both pans at once if you switched them around half way through baking. Ovens vary, but it will probably take about 25-30 minutes total. Once baked, remove from the oven and let cool on a rack five minutes while you prepare the icing.

Optional Icing
In a small bowl mix together 1 tablespoon warm milk and enough confectioners sugar (about 3/4 cup) to make an icing that is the thickness you like. Drizzle the icing over the cooled wreaths.

A cooled, iced wreath makes a nice gift and is also a lovely addition to your holiday table, especially at breakfast or brunch!
Check out the other Cake Slice Baker creations too.

Monday, March 26, 2012

More Spring Bread


When my friends and I met and I showed them what they could do with thawed frozen bread dough, the most popular bread was a beautiful Almond Raspberry braid with almond paste and raspberry jam filling and a topping of sliced almonds and sparkling sugar. It looks complicated, but is actually pretty easy. The most difficult part was spreading out the bread dough. I guess when they make frozen bread dough they make a dough that isn't very elastic so that it retains the loaf shape its frozen in.

The key to spreading the dough out far enough to be able to do this kind of braid is to be patient. You can roll it or just use your hands to spread it out on a lightly floured board, then let it sit five minutes and spread it a bit further, then again after another five or ten minutes. Be persistent and you will succeed!

I made this braid in advance of our Bread Baking day and then again on the day. For the first trial run I cut the dough with a pizza cutter. On the second baking day I used a sharp knife. Each worked about as well as the other, so choose the cutter that works for you.

Here are some photos showing the dough spread out and layered with almond paste and jam, then cut, then braided, and then how it looked baked. Isn't it beautiful?


Rolling the almond paste out on a board dusted with confectioners sugar seems to work really well. You want the almond paste to be thin enough that when you are eating the pastry that the filling doesn't ooze out too much. I like using seedless jam but seeded jam will work, too. If you prefer another flavor over raspberry, by all means use apricot, strawberry, blueberry or any other favorite jam. Just make sure that it isn't too watery (for the same reason that you want the thin almond paste layer).

This gorgeous pastry looks like you spent hours and hours in the kitchen but in fact it is quick for a yeast dough treat. One of my friends tried it within a few days of seeing me make it and she was thrilled with her braid...and her family ate it up very, very quickly! This is a great recipe to make for Easter or a fancy brunch. Just be ready for rave reviews.

Raspberry Almond Braid

Thaw 1 lb. frozen bread dough, flatten it on a lightly flour board. Working gently, stretch dough to 10 x 12" rectangle.

Take a package of almond paste and divide it in half. Reserve half for another use. Roll one half into a rectangle 11 inches long by 3 inches wide on a board sprinkled with powdered sugar. Take this rectangle and place in the center of the dough rectangle.

Spread 3-4 tablespoons raspberry jam over the almond paste rectangle. Using a sharp knife or pizza cutter, make diagonal slices along the two long sized of the rectangle, cutting almost to the almond paste. The cuts should be about an inch apart.

Fold up the ends about an inch over the almond paste and jam. Then take each of the dough pieces, first from one side, then from the other, and stretch them across the filling. Continue to braid the dough up to the end, then tuck ends under.

Place on parchment or silicone mat lined pan, cover with oiled plastic wrap and a tea towel and let sit until doubled in bulk, about an hour. Brush top of braid with egg wash (1 egg whisked with 1 teaspoon water) and sprinkle with sliced almonds and sparkling sugar. Bake in preheated 375 degree oven until golden brown, about 30-45 minutes. Let cool. If desired drizzle with a glaze of orange juice mixed with confectioners sugar. Slice with serrated knife to serve.