Showing posts with label Bacon. Show all posts

Tuesday, September 07, 2021

Spicy Bean Bake

I'm in the process of re-doing my family cookbook. It's fun! One of the things I did early on in the renovation was to change the font size to make it smaller. Originally I had it larger for my Mom, but this time around I'm looking at this as a resource for the next generation...and, perhaps, beyond, so I think they can handle a smaller type face.

As a result there is more room for extra recipes. In a kind of serendipity, I also found some recipe cards that had been missing, including some in my Mom's handwriting. One of the recipes was for a baked bean concoction that became popular with the family after I left home and moved to the West coast, so I had to ask Mom for the recipe and now it's in the cookbook. It's called Spicy Bean Bake, but it's not really that spicy. I suspect that my hot sauce loving siblings may add extra heat via sauces that contain things like habanero chilis after it's served. My Mom didn't really care for extra spicy things. You could also make this vegan by leaving out the ham or other meat and the bacon and adding a cup of cooked corn. 

What this recipe does have is a lot of flavor! It's also easy to make and makes a lot. The leftovers were even better than the original dish. Score!

I only made half the recipe, but Sweetie liked it so much that next time I'll make the full amount.,


Spicy Bean Bake

Serves 8-12 

One can 40-oz., baked beans
One can 1-pound, red kidney beans
2 large apples, chopped
1/2 cup raisins
1 1/2 cups chopped onion
1 cup chopped bell pepper
3 cups chopped cooked leftover ham, pork or beef
4 slices crumbled crisp bacon
1 cup catsup
1/2 cup pickle relish
1/2 cup brown sugar, packed
1 teaspoon dry mustard
1/2 cup molasses

Mix all ingredients in a 3-quart casserole. Cover and bake in a 250 degrees F. oven about 1 1/2 hours.


Wednesday, March 31, 2021

Asparagus Tart For Spring


One of my favorite early spring foods is asparagus. Those bright green spears not only taste delicious, but their green color welcomes the season. Right now where we live they are also fairly inexpensive. If that is true for you, too, then you might want to make this tart for a meal, even for Easter. The only part that takes any real time is caramelizing the onion. The rest is quick and easy if you use store-bought puff pastry.

We had our tart for dinner along with some lamb chops that our neighbor gifted us with. Both of those foods are spring time treats for me. Now we only need our strawberry stand on Hwy 12 to open and I'll be a happy camper.


Asparagus Tart with Caramelized Onions and Bacon

Serves 4-6    An original Elle recipe

1 large yellow onion, peeled, ends removed, halved and thinly sliced
2 tablespoons olive oil
1/3 cup ricotta cheese (I used Kite Hill almond milk ricotta)
1 medium to large egg
grated zest from half a lemon
salt and pepper to taste
1 sheet frozen puff pastry, thawed (I used Pepperidge Farm)
2 slices bacon, cooked until crisp (can be done in the microwave using scrunched paper towels above and below)
6-8 fresh asparagus stalks, washed, dried and trimmed
egg wash (1 egg combined with 1 tablespoon water)

In a large skillet caramelize the onions in the olive oil by cooking them slowly, stirring often, over medium-low heat, until the onions are golden brown or a been deeper brown. There will be leftovers for another use. Once cooked, remove from pan, spread out on a plate, and cool to room temperature.

In a small bowl, combine the ricotta cheese, egg, lemon zest and salt and pepper. Set aside.

On a baking sheet place a piece of parchment paper or foil or a Silpat silicone mat. Set aside.

Preheat the oven to 425 degrees F.

Sprinkle a clean work surface lightly with flour and spread it to a thin layer. Open the thawed puff pastry to one layer on that prepared surface. Use a sharp knife to cut a one-inch strip off the puff pastry on two facing sides. Dampen that edge in for an inch with water, then place the cut strip on top. You will have a rectangle with facing ends that have an extra layer one-inch wide and the opposite facing ends without.


Spread the ricotta cheese mixture in an even layer between the two built up ends. Using a small offset spatula works well. Leave about an inch without cheese at the un-built up ends, too. Place about 1/3 cup cooled caramelized onion on top of the cheese mixture, spreading it as evenly as possible. Crumble the bacon and sprinkle evenly over the onion. Place the asparagus in a row, starting at one of the raised ends and finishing at the other raised edge. Brush some egg wash, using a pastry brush, on top of the raised edges and at the exposed ends of the other sides, being careful to not let the egg run down the sides.

Bake in a preheated 425 degree F. oven until the pastry is golden brown. Serve warm.


Saturday, March 20, 2021

Keto Honey Garlic Salmon and Shrimp with Garlic and Cream


If you didn't like garlic, you would be in trouble this week at our house. Kate was here for Sweetie's birthday and she treated us two nights in a row to delicious dinners that she made herself. I helped prep the ingredients, including peeling and mincing four cloves of garlic for each dish. Good thing we all love garlic!


The first night we had salmon prepared with garlic and honey and browned butter. It should have been keto honey and butter, but it actually was real honey and plant-based 'butter' because of my allergy, but I'm going to give you the keto version. With it we had green beans and a green salad. The recipe is from Karina of Café Delights. She has some great tips on her post, so it's worth following this link to see them.


The second night she cooked a decadent shrimp dish with more garlic, bacon and 'butter', plus Parmesan (which Sweetie and Kate added to their servings) and the sauce was finished with Silk brand plant-based whipping cream, a new product to me, instead of real whipping cream. I'm sure that with the real deal that the sauce would be thicker and even more delicious, but I was quite happy with our meal, served on a bed of warm zoodles. Finished dish is shown at top of this post.  I'm also giving you the actual keto recipe below. This recipe is by Katerina at Diethood.


We also put together puzzles since the weather went from nice to cold and/or rainy and working on puzzles on the dining room table was fun and a nice contemplative activity too.


We were determined to get out and about for Sweetie's actual birthday (even though the weather wasn't warm or sunny), so we breakfasted at Redwood Cafe', our first inside dining in over a year, took a drive to Pt. Reyes area, stopping in Marshall for a beverage, and ended the drive by heading to Petaluma, passing the McEvoy Ranch where they make an amazing olive oil. For dessert we had a spectacular lemon creme tart, perhaps the best tart ever...recipe to come on this blog soon.

Hope you had a lovely St. Patrick's Day, too.


Browned Butter Honey Garlic Salmon
By Karina or Café Delights

3 main ingredients and only 15 minutes cooking time!

1/4 cup (4 tablespoons) butter
1.4 cup (4 tablespoons) honey (If doing keto, use keto approved honey)
2-4 cloves fresh garlic, minced
1-2 tablespoons fresh squeezed lemon juice, about juice of 1/2 lemon
4 wild-caught salmon fillets (about 1/2 lb or 250 g each), skin on
Lemon wedges to serve
Salt to taste

Arrange oven shelf about 8-inches away from heat element/broiler in your oven. Preheat your oven to broil.

Place butter in a cast iron or oven-proof skillet or pan. Cook over medium heat, stirring while foaming for about 3 minutes or until the foam settles. The butter begins to change color to golden brown and the fragrance will be nutty. Remove from heat to add the honey.

Add honey and let it dissolve into the butter. Return to heat and add the garlic and sauté for about 1 minute until fragrant. Do not let it burn. Add in the lemon juice. Stir well to combine all the elements together.

Add the salmon steaks to the butter mixture. Cook each fillet, skin side down, for 3-4 minutes or until golden, while basting the tops with the pan juices. Season to taste with salt and pepper.

Add the lemon wedges around the salmon. Transfer the pan to your oven to broil for a further 5-6 minutes, or until the tops of the salmon are nicely charred.

To serve, drizzle with the reserved brown butter sauce from the pan.


Easy Garlic Shrimp with Bacon in a Creamy Parmesan Sauce
By Katerina of Diethood

4 slices thick cut bacon, diced (easier to dice if at least partially frozen)
3 tablespoons butter
1.5 pounds shrimp, peeled and deveined
4 cloves garlic, minced
salt and pepper, to taste
1/2 cup chicken broth
1/4 cup whipping cream
1/4 cup grated parmesan cheese
1 tablespoon Italian seasoning
squeeze fresh lemon juice
chopped fresh parsley, for garnish (optional)
lemon wedges, for garnish (optional)

Set a large skillet over medium-high heat.

Sprinkle the chopped bacon into the hot skillet and cook for 2-3 minutes, or to a desired crispiness. Remove to paper towel to drain and set aside.

Add butter to the skillet and melt.

Stir in shrimp and garlic.

Season with salt and pepper and cook for 1-2 minutes per side, or until just cooked through and pink. Remove from skillet and set aside. Cover with foil to keep hot.

Add chicken broth to the skillet and cook for 30 seconds, stirring to scrape up browned bits.

Stir in heavy cream and bring to a simmer.

Whisk in Parmesan cheese and Italian seasoning; lower heat to a steady simmer and cook for 1-2 minutes or until creamy and thickened.

Return bacon and shrimp to the skillet and let simmer for a minute, or just until heated through.

Taste for seasonings and adjust accordingly.

Squeeze lemon juice over the shrimp. Stir and garnish with chopped parsley and lemon wedges.

If not doing keto, use fat free half and half or soy creamer and turkey bacon to lower fat levels.

Tuesday, February 28, 2017

Cranberry Chicken For A Chilly Evening


We finally have gotten a few days of sun, but it's still pretty chilly, so I decided to make a baked chicken dish last night. I found it in a Rachel Ray magazine and it is a keeper! The skinless chicken stays moist under a shingling of bacon, plus the presence of a mixture of chicken broth and red wine. In general I can't drink wine, but I have found that I can eat things where the wine has been cooked. Yay! All the alcohol gets cooked off, but something else must get mellowed, too.

The components, besides the chicken and bacon, are sweet from the dried cranberries, savory from the broth and wine and balsamic vinegar, mellow from the translucent cooked onion wedges, and hearty from the red potato chunks. Add in the flavors of garlic, thyme, pepper and bay leaf and you have a dish that smells wonderful and tastes even better. All you need with it is a small salad or steamed veggies and, perhaps, some bread to sop up the delicious juices.

Because I never make anything quite how it is written up, I did change the chicken to boneless thighs, I added a 1/4 teaspoon fresh orange zest (cranberries  and orange are a match made in heaven), and I reduced the dried cranberries by 1/4 cup...and will reduce them by another 1/4 cup next time. I also didn't have fresh thyme, so I used dried thyme...2 teaspoons in the broth mixture and none for garnish.

There are a number of good reasons to make this dish besides the fact that it is yummy. First of all, it is relatively inexpensive. Then there is the bonus of a short prep time and about 30 minutes cooking time. Add to that the easy clean-up, especially if you line the casserole with heavy duty foil like I did. Last, but not least in my world, there is no dairy in this dish...and you don't miss it either. With no added oil, butter, cheese, or cream, it is fairly healthy, too...well, except for the bacon, but that adds so much flavor and fragrance that it would be a shame to leave it out. Sweetie helped me out by eating half my bacon. Isn't he the best?


Roasted Cranberry Coq au Vin
Serves 4
from Rachael Ray Every Day, March, 2017

1 1/4 cups dried cranberries (I used 1 cup but 3/4 cup would be better)
1 cup red wine, such as Pinot Noir or Beaujolais (I used Zinfandel)
1/2 cup chicken stock
6 large cloves garlic, chopped (don't worry, the garlic gets mellow in the oven)
4 bay leaves
1 tablespoon balsamic vinegar
2 teaspoons onion salt
Optional: 1/4 teaspoon orange zest
3 tablespoons fresh thyme, divided (I used 2 teaspoons dried thyme)
4 bone-in chicken thighs (about 8 oz. each), skin removed (I used boneless skinless chicken thighs)
1 pound red potatoes, cut into 3/4-inch pieces
1 large yellow onion, cut through core into 3/4-inch wedges
4 slices thick-cut hickory-smoked bacon, each cut into 4 pieces
8  1-inch thick slices French bread (didn't have any...didn't miss it)

Position oven rack to upper third of the oven and preheat to 450 degrees F.

In a bowl, mix the first 7 ingredients and 2 tablespoons thyme (or all the dry thyme if using). Optional, but good: add 1/4 teaspoon freshly grated orange zest to the mixture.

In a large baking dish, arrange the chicken, potatoes and onion in a single layer. Shingle the bacon on the chicken. Add the cranberry mixture, pressing cranberries to submerge. Season with salt and pepper.


Roast in preheated 460 degree oven until an instant-read thermometer inserted into a chicken thigh registers 165 degrees F., about 30 minutes. If using fresh thyme, garnish with remaining 1 tablespoon.

Serve at once. If desired serve with bread to mop up the juices.


Monday, November 07, 2016

A Classic For A Reason - Coq au Vin


When I first had my own apartment I wanted to make an impressive dish for a dinner party I was giving, but I was a working girl and didn't have all day to create something fancy. My Dad had given my Mom a copy of Mastering the Art of French Cooking, so I took a look through that and decided that Boeuf Bourguignon would be just the thing. Although it took a few pages for Julia Child to explain how to make it correctly, for someone who already knew how to make stew, it could be compressed to fit on the front and back of an index card, including the separate part of how to cook the onions and mushrooms.

Coq au Vin is a similar dish and just as classic. Bacon is cooked and removed, onions and garlic are cooked and removed (mushrooms, too, if you like them), chicken is browned and removed. The pan is deglazed with wine. Broth, seasonings and all those things removed are added back along with some tomato paste and small onions and then the whole thing is simmered. Pretty easy, right? You can thicken the sauce and serve it up at that point (after about an hour total cooking time, but only a half hour of your time) or you can refrigerate it and serve it later. That time in the fridge lets the flavors blend magnificently, so I try to plan for some fridge time.

When you are getting ready to serve, heat up the chicken mixture, thicken it with a flour and water mixture, make some mashed potatoes and chop up some parsley. Don't leave out the parsley. Not only does the green add to the looks of the dish, but the herbal notes are needed to bring the dish to its full potential.

In a wide shallow bowl or on a rimmed plate you put the mashed potatoes, top them with some hot chicken and sauce and sprinkle some parsley on top. It smells heavenly and tastes even better. Everyone will think you have spent all day making this sophisticated dish. A green salad is a nice addition. Don't forget to serve some baguette slices so that they can chase any sauce left in the bowl or on the plate.

I like to use chicken thighs for this because they take well to the simmering that cooks the chicken pieces. If you use boneless then the dish is easy for your guests (or just yourself!) to eat. You can, of course, use a whole cut up chicken, or any combination of pieces that you enjoy. Just be sure to make the full recipe. The leftovers, if any, taste even better than the original serving. Trust me.

Use a good quality dry red wine. You only need a cup for the recipe and you can drink the rest with the meal. Light a few candles, add some flowers to the table and it's a party, even on a weeknight.

Coq au Vin
Serves 4-6

2 Slices bacon, chopped
1 medium onion, chopped
3 garlic cloves, chopped
1/2 lb (8 oz.) fresh muchrooms, sliced
2 tablespoons olive or grapeseed oil
3.5 - 4 lbs mixed skinless checken breasts (boneless) & thighs (bones OK)
1 cup dry red wine
1 - 14 oz can chicken broth or 14 oz homemade broth
1 tablespoon tomato paste
1 cup whole small onions (jarred, canned, ro frozen for ease)
2 bay leaves
1 teaspoon dried thyme
1/2 teaspoon salt, 1/2 teaspoon pepper
4 tablespoons water
4 tablespoons all-purpose flour

Heat a Dutch oven or heavy, covered pot over medium high heat. Brown the bacon, stirring occasionally. Transfer to paper towels to drain.

To the Dutch oven add chopped onion. Saute 3 minutes. Add the garlic and mushrooms. Saute another 3 minutes, stirring occasionally. Remove from the pan and set aside. Wipe any remaining bits from the pan with a paper towel.

Add olive oil to pan. When hot add half the chicken, browning on both sides. Remove from pan and set aside. Brown the remaining chicken on both sides. Set aside.

Deglaze the pan with the red wine, then add the broth, tomato paste, small onions, bay leaves, thyme, salt and pepper. Stir. Return the bacon, onion mixture and chicken to the pan. Reduce the heat and simmer, covered, about 25 minutes, until the chicken juices run clear when pierced. Remove the bay leaves and discard.

Refrigerate overnight to blend flavors (optional).
Return mixture to a simmer.

Make a thickener by placing the 4 tablespoons flour in a small bowl. Whisk in the water. 
Whisk or stir the thickener into the coq au vin. Stir gently around the chicken pieces as the sauce thickens.

Serve in wide, shallow soup bowls, over mashed potatoes, with a sprinkle of chopped parsley over all.

Wednesday, January 13, 2016

Mushrooms and Rice and Bacon, Oh My


Not sure why, but yesterday I wanted mushrooms with my dinner. We had about 6 oz. of whole crimini mushrooms in the fridge so I just needed to decide what to make. Sweetie didn't have any preferences when I asked him, so I went with a rice dish. There wasn't a recipe for this and I didn't measure some of the ingredients, so I'll write up a recipe as best I can to keep it for the next time and to share it with you.This is a wonderful side dish with nutty flavors and delightful savory notes. If you like mushrooms, you'll love this dish!

The first thing I did was to chop some yellow onion and saute it in olive oil. Then I added the sliced mushrooms and cooked those together with some dried thyme and a little water. It smelled wonderful!

After that I decided that I wanted both bacon and pecans with the rice mixture, but first I started some brown rice mixed with chicken broth in the rice cooker and some wild rice and water in a pot on the stove.

While the rice cooked, I rendered the bacon enough so that it would crumble when it was cooled, poured off almost all of the bacon grease, then toasted the pecans in the pan I cooked the bacon in.

For timing, the wild rice was the key since it takes a little longer to cook than the brown rice. Once the wild rice was done I drained it and added it and the cooked brown rice to the mushroom mixture, along with the crumbled bacon and toasted, chopped pecans. After a quick stir and a minute on low heat to make sure everything was warm, I served it up. It was really delicious. The rice had a little chew, the nuts added crunch, the bacon and caramelized onions perked up the flavor and it all went really, really well with the mushrooms. This is a dish worth making again, and soon.

Mushroom Rice with Bacon and Pecans
Serves 4-6

1 tablespoon olive oil
1/2 medium onion, chopped
6 oz. small crimini mushrooms, cleaned, dried and sliced
1/4 teaspoon dried thyme
2 tablespoons water
1/2 cup brown rice, rinsed
2 cups chicken broth
1/2 cup wild rice, rinsed
2 cups water
1-2 strips bacon
1/2 cup pecans

In a large pot, heat the olive oil over medium-hot heat. Saute' the onions in the hot oil for 1/2 minute, then reduce heat to low and cook, stirring often, until onions become dark golden brown, about 5 minutes. Add the mushrooms and the thyme and the water, stir, cover and let cook over low heat for 5 minutes, stirring occasionally. When time is up, turn off the heat and set aside.

While mushrooms are cooking, put the brown rice into a medium heavy bottomed pot or rice cooker and add the broth. Cover and cook over medium to low heat (mixture should simmer) until rice is cooked and tender. Set aside.

While mushrooms and brown rice are cooking, put the wild rice into a medium heavy bottomed pot or rice cooker and add the water. Cover and cook over medium to low heat (mixture should simmer) until rice is cooked and tender. Drain. Set aside.

The brown rice will take 20 - 30 minutes and the wild rice closer to 45 minutes.

While rice is cooking, in a small frying pan, cook the bacon until it is crisp enough to crumble when cool. Let cool on a paper towel, then crumble. Discard the extra bacon grease in the pan, but don't wipe it. OK to have a little bit of grease left in the pan.

In the pan the bacon was cooked in toast the pecans for 5 minutes over medium-high heat, stirring and turning them over as needed to keep them from burning. Set aside to cool, then chop the nuts.

Once all the rice is cooked, reheat the mushroom mixture over medium heat for about a minute, then add the two kinds of rice, the crumbled bacon and the chopped pecans. Stir well to combine, heat another minute over medium-low heat, covered, then serve while hot.

Monday, December 07, 2015

Bacon and Dates


According to my sources, bacon wrapped stuffed dates have been a popular appetizer for a while, but I guess I missed that. Perhaps I don't eat at the right restaurants.

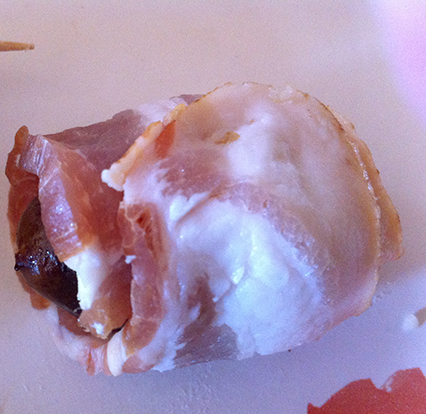
For Thanksgiving I was asked to bring stuffing and an apple crisp. I also brought a pecan pie because pie and Thanksgiving just go together. My lovely daughter brought the stuffed dates, although I helped heavily with the making of them.

We started with moist, large, pitted dates. If your dates aren't moist you may want to steam them briefly before starting, because some of the moisture is cooked off while the bacon cooks.

I like blue cheese with walnuts and since the recipe called for walnuts, we included a nubbin of good quality blue cheese, too. Warm melty cheese is always a treat. Each slice of bacon was cut in thirds and used to wrap three stuffed dates, so make sure you have enough bacon. If your bacon strips are short ones, you may even need to only wrap two dates per strip of bacon...extra bacon can be used for other purposed, right?

I pre-heated some cast iron skillets in the oven and added the stuffed dates to them which helped crisp up the bacon. They weren't fully cooked because we re-warmed them at the home where we were dining.

I warn you, these can be addictive! Who can resist warm and crisp bacon, soft and sweet date, crisp and mellow walnut and piquant blue cheese, all in one bite? Not me.


Bacon Wrapped Stuffed Dates

24 large moist medjool dates
8 or so walnuts, broken
1 oz. blue cheese
8-12 strips bacon - cut in two or three pieces depending on the length

Preheat the oven to 375 degrees F. If you have them, place two cast iron skillets in to preheat.

If dates have pits, remove the pits by slicing carefully from one end to the other with a paring knife and then removing the pit with the tip of the knife. Be sure to only cut the top of the date, NOT all the way through to the bottom. If your dates are not moist, steam them briefly before starting.

Stuff where the pits usually live with pieces of walnut and a nubbin of the blue cheese. You can use goat cheese if you prefer it to blue cheese.


Wrap a strip of bacon around the date, putting the stuffed part face down onto the bacon, overlapping the ends of the bacon on the opposite side. Secure with a toothpick.


If not using a cast iron skillet for baking, line a baking sheet with parchment paper and place the finished dates on the parchment.

Bake on the baking sheet or in the preheated skillets for about 8-10 minutes, turning over halfway. Bacon will start to turn golden and get slightly crispy on the edges. If you prefer, cook for another minute to cook the bacon a bit more.

Remove from the oven and allow to cool for at least 10-15 minutes before serving. Dates should be warm, not hot. They can also be served cold.


If you make them in advance, reheat them for a minute or two in the microwave if you prefer them warm.

Sunday, November 30, 2014

Parsley Sage Rosemary and Thyme and Bacon!


"It is never too late to be what you might have been."    - George Eliot

A few years ago I read about a challenge that sounded a bit overwhelming. Bloggers were going to do a post to their blog each day for the whole month of November. The idea was to encourage more writing and maybe even to spark an interest in writing as a way of life. At the time I knew it was impossible for me to do a post every day, especially in November. This year I decided that I just might be able to do it, so I began on November 1.

As you may have noticed if you have read my posts, I think of this primarily as a food blog, so it is only right that most of the posts should be about food. Even better if they contain a recipe. A photo or two is part of the look and feel of this blog, so I rarely do a post without at least one photo. Looking back over the month I feel like I've done pretty well, A third of the posts didn't have a recipe, but some of those were about food and all had a photo or illustration.

It's been a good month, although a few friends have had major health problems. I'm glad that the month finishes off with Thanksgiving and post-Thanksgiving thoughts since turkey is one of my favorite foods. Today I cooked a turkey for our family since last Thursday we were treated to our neighbor's heirloom variety home grown turkey for the holiday meal. Mine is a frozen bird from a chain grocery store, so it should be interesting to see the difference.

Soon fall will turn into winter and my favorite season will hibernate until next year. Of course the run-up to Christmas will keep me busy and it means lots of baking, so I have a smile on my face as I type this and think of what great posts there will be in December.

I spoke with my Mom yesterday and she has already gotten an early Christmas gift from me. I created a book of our kitchen remodel project for her and had it published by Blurb, so it has a nice hard cover and lovely paper to really show off the photos I took as we went along and the finished kitchen, too. So glad that she and the family enjoyed learning about how the project went as they read through the book over the weekend while they were visiting her.

I hope dear reader that you have enjoyed the November posts and are getting in touch with your inner elf as we jump into the winter holiday season!

But before we leave November I want to share with you the stuffing I made today. I'm glad I made the stuffing because the frozen bird was not as fully flavored as the turkey raised right across the street that we enjoyed on Thursday. This time I took my Mom's classic recipe and added corn bread, mushrooms, bourbon and bacon. It makes a wonderful stuffing with a hint of Southern style. If I hadn't used up almost all of my pecans for the pies I would have put some pecans in, too. When you make this, and your really should, you can add pecans and think of me.


Parsley Sage Rosemary and Thyme and Bacon! Stuffing 

4 slices bacon, cut into 2-inch pieces
1 medium onion, minced
4 oz. mushrooms, chopped
1 cup celery, chopped
1-2 cloves garlic, finely chopped
1 tablespoons poultry seasoning
1/4 teaspoon dried thyme
1/4 teaspoon dried rosemary, crushed
½ teaspoons salt
1 teaspoon pepper
2 quarts soft stale bread cubes and cornbread
1 cup chicken broth
3 tablespoons bourbon
½ cup parsley, chopped


In a heavy pot or skillet cook the bacon over high heat until almost crisp. Remove and drain on paper towels. Saute’ the onions, mushrooms, and celery in the bacon drippings (grease) on medium heat for 5 minutes, stirring often. Add the garlic and stir well. Continue cooking over medium heat another two minutes. Add the poultry seasoning, dried thyme, dried rosemary, salt and pepper and stir well to combine.


Pile the parsley on top of the bread cubes and cornbread in a very large bowl or pot. Pour sauteed mixture over the parsley. Combine sauteed mixture and the reserved bacon with the bread cubes (I always substitute some cornbread for some of the bread cubes).

In a large bowl or measuring cup combine the chicken broth and bourbon. Moisten the bread crumb mixture with chicken broth mixture. You may also add chopped apples, dried fruit, chopped toasted pecans, or oysters.

Use stuffing to stuff bird. Place inside bird lightly...don't pack tight.Stuffing expands a bit during cooking.  Extra may be baked in 425 degree F. oven ‘til brown (after turkey is out of oven).

Enough for a 10-14 lb. turkey.

Monday, June 16, 2014

Poizin Bread With The Babes


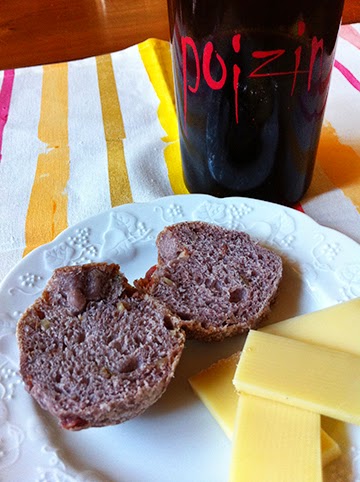
This is one of the most flavorful breads ever! Thanks to our Kitchen of the Month, Tanna or My Kitchen in Half Cups, the Babes are baking red wine bread this month and shaping it like a bunch of grapes. Although the recipe calls for Beaujolais wine, I had an open bottle of Armida winery's lovely Poizin zinfandel wine, so I used that.

Armida happens to be our go-to picnic winery because it has great zinfandel, large and comfortable tables and chairs under red umbrellas on a deck overlooking a pond and the Dry Creek Valley. If no one is using it or kids aren't throwing the balls into the pond, the boccie ball court is a fun place to while away some time and see who has the best pitch.


This is an interesting wine to make because the liquid is totally the wine. I didn't follow the directions as far as putting the dough together, although I was careful to have the wine at just the right temperature and to keep the dough soft with not too much flour. The change was that I mixed it up with my stand mixer and used that for kneading too. The dough was soft and a little tacky when I put it in for the first rise. It didn't rise very much, but the dough felt great. I kept out the additions to the dough until the second rise. Because Tanna recommended trying it, I went for cooked, drained and crumbled bacon (a half cup), finely chopped walnuts (a half cup) and about two tablespoons chopped fresh rosemary. It is a great combination! Very savory, very bacon-y, and just a hint of the rosemary. You can also really taste the wine in this bread, so use one you like drinking. The wine and the walnuts combine to make the bread a purplish color. The texture is fairly dense and a bit chewy. Sweetie had some for lunch with some cheese and I had a hard time keeping him from eating the rest, which we plan to share with our neighbors later today. Even though the individual little grapes are small, it's still a lot of bread.


There isn't a thing I would do differently. One of the changes that I really think you might consider is cutting the dough into smaller chunks. I kept a large piece for the stem and leaf, but cut the dough so that there were 20 'grapes' instead of 15. Some are a bit smaller than others, but that helps make it look like a bunch of grapes. This makes them about a two bite size which is perfect for having with a glass of your favorite wine.


Do try this one, either using the original recipe, found HERE on Tanna's site, or get creative as I did. This bread has enough flavor from the wine to stand up to any number of variations. Perhaps feta and pine nuts? Chopped spinach and Parmesan? Lots of different seeds? If you want to be a Buddy, bake it and post about it by June 29th and let Tanna know what you have done, plus send her a photo. Check out her blog post to see what wonderful bread she made and to get more information on being a Buddy.

Also be sure to visit the blogs of my fellow Bread Baking Babes.


Beaujolais Bread
From: A Passion for Bread, written by Lionel Vatinet

Ingredients:

454 grams white bread flour, unbleached, unbromated, 16 oz; 3.5 cups
7 grams fine sea salt, .24 oz; 1 1/8 teaspoons
5 grams instant dry yeast, .18 oz; 1.5 teaspoons
21  grams honey, .75 oz; 1 tablespoon
320 grams Beaujolais wine, 11.2 oz; 1 1/4 + 2 tablespoons
1/2 cup each cooked and crumbled bacon, finely chopped walnuts
2 tablespoons fresh rosemary, chopped

1. Scale all dry ingredients in a large bowl.


2. In the bowl of a stand mixer, add the honey to wine and check the temperature.The wine should be between 82° F and 84°.
3. With dough hook attached, add the dry ingredients slowly to the wine mixture, letting dough form and climb the dough hook. Knead with the stand mixer at least 8 minutes (more is good) until the dough is smooth and satiny, although still very soft and a bit tacky.

4. Turn the dough out onto the counter.
The dough will be soft and sticky; do not give into the temptation to add more flour.

Kneading  dough for a minute to make sure all is combined. The dough should be soft, pliable and hold it’s shape; it should not be stiff and dry.

Form dough into ball: using both hands, lift front and fold over, quickly dropping it down to the counter.

Repeat 4-5 times until a ball is formed. Use the scraper to ensure all the dough is gathered.

5. Turn the ball of dough into a rising container, coating with oil if that is your preferred method. Cover lightly and set in warm, draft free area to rise for about an hour. Dough will not rise very much and may spread out of the dough shape.

6. Turn dough out of the rising container onto a lightly floured surface. Using the palms of your hands, flatten the dough ball into a rectangle. Scatter half the bacon, walnuts and rosemary evenly over the dough. Wrap the sides up and over filling, pinch dough together, turn and repeat until the filling is incorporated.

Form into a ball. Using the palms of your hands, flatten the dough ball into a rectangle. Scatter the other half of the bacon, walnuts and rosemary evenly over the dough. Wrap the sides up and over filling, pinch dough together, turn and repeat until the filling is incorporated. Knead dough to fully incorporate both sets of filling.
Shape dough into a ball and return it to the rising container. Cover lightly and let ferment 2 hours.

 Total Time: three hours.

7. Dividing
Flour the counter. Scrape the dough onto the counter and allow to rest 30 seconds.
If the dough is very sticky at this point dust your hands with flour but do not add additional flour. Use the bench scraper to lift the dough if it sticks to the counter but do not pull and do not stretch the dough. Press the dough into a rectangle 12 inches by 4 to 5 inches wide. Be sure the dough is not sticking to the counter by lifting it to gently up. Cut the dough into 22 equal pieces with the bench scraper. Set two pieces aside for the stem and leaf.

8. Shaping
Use parchment paper or a silicone liner in a baking sheet.
Roll 20 pieces into a small ball shape for rolls, the last piece will become the grapevine. Create a triangle by setting four balls together in a line followed by a line of three balls then two balls and finally one ball. Stack and angle the remaining  balls over and to one side of the triangle so that the entire piece resembles a large cluster of grapes.

With the last piece of dough roll it into a rope about 10 inches long and shape it into a curved grape vine shape and leaf (if desired) that you attach to the top of the grape cluster. Dust with flour.

9. Final fermentation
Final fermentation may take from 60 to 90 minutes. If it over proofs but dough will be unusable. Place the baking sheet in a warm 75 to 80°F draft free place. Final fermentation will take from 60 to 90 minutes.

Preheat the oven to 450°  with a baking stone about 30 minutes before you are ready to bake. An effective and cheap way to achieve a crisp crust is to cover the bread with a stainless steel bowl when it is first placed in the oven on the lowest oven rack. (I just baked the bread with no covering and it worked out fine.)

Determine the dough is ready to be baked by uncovering and making a small indentation in the center of the role with your fingertip. The dough is ready to be baked if the indentation slowly and evenly disappears.

9. Baking
Slide the baking sheet into the oven onto the pre-heated baking stone. Bake until the bread is golden brown has a thick crust,about 20-25 minutes.


When fully baked transfer to cooling rack for at least one hour to cool.


Wednesday, May 21, 2014

A Tale of Chicken Livers


Raising your own chickens has become increasingly popular in our area. Sweetie has been there, done that and has the tee shirt, too, after helping to start an egg co-op in Micronesia in the early '70s. As a result, he is smart enough to let others raise the chickens. Fortunately our neighbors across the road have taken to chicken farming with delight, raising both egg layers and chickens for eating. Since we help them now and then with chasing the chickens into their coop at night (so as to not get eaten by the local foxes), they gift us now and then with a chicken dinner, fresh broth, and very fresh livers. For a recent chicken dinner, I made one kind of pate', the goodwife made another, plus chicken livers wrapped in bacon and broiled. It was a feast! G made outstanding barbecued chicken for the main meal.

Freshness and careful handling are very important when dealing with chicken livers. Since it was too hot to turn on the oven, I made the kind of pate where you gently simmer the livers in water flavored with celery and peppercorns, then process them with yummy things like cooked onion, garlic, whipping cream, brandy and herbs. Since this makes a light and smooth paste, I added chopped walnuts and crumbled bacon for both flavor and texture. It went well on baguette slices. My friend made a pate' with a bit more texture and deep, wonderful flavor from anchovies and citrus zest, plus wine. Served with toasted slices of country bread it was delightful. The broiled bacon wrapped livers were excellent, too. We enjoyed them all!


Not about chickens, but about a kickstarter campaign you might be interested in. This fellow is not chicken at all and has a great idea for a flavorful bun for sandwiches. Check out Perry Livingston of the Bread Beaker here: https://www.kickstarter.com/projects/1656767705/bread-beaker-an-experiment-in-flavor I wish him every success and am impressed by his initiative.

Back to the regular post - I didn't get a recipe from my friend, but I can give you mine, which was a combination of about four recipes I found in various cookbooks. The uniting theme was the simmer in flavored water until barely cooked...there should be some pink in the center when you cut into the livers. The recipe made enough that we had another crock ready for a picnic this weekend, but it wasn't as nice as the freshly made pate', so consider eating it all at once, or making a smaller amount.


Chicken Liver Pate' de la Maison
Makes enough for 6-8  


2 tablespoons butter
1/2 cup finely chopped onion
1 clove garlic, minced
2 small stalks celery
4 whole peppercorns
1 teaspoon salt
6 cups water
1 lb chicken livers
1 stick softened butter
pinch cayenne pepper
1 teaspoon dried thyme
1/2 teaspoon ground nutmeg
1/4 teaspoon ground allspice
1/2 cup heavy cream
1/4 cup brandy or Cognac
1/2 cup chopped walnuts
1/2 cup cooked, drained, crumbled bacon
2 tablespoons Italian parsley, chopped

Melt butter and sauté onion and garlic over medium heat until translucent, about 5 minutes.

In a medium saucepan, place the celery stalks, peppercorns and salt. Add the water and bring to a boil. Reduce heat so water just simmers. Simmer, covered, for 10 minutes. Remove cover, add rinsed and drained chicken livers, return to a simmer, cover, and simmer gently for 10 minutes. Insides of livers should still be a bit pink.

Drain mixture in pot, discard celery and peppercorns. Placed drained livers in a food processor fitted with a metal blade.

To the food processor add the butter, cayenne pepper, thyme, nutmeg, allspice, heavy cream and brandy or Cognac, and onion mixture. Process until mixture is smooth, scraping down work bowl as needed.

In the same pan you used to sauté the onions, place the walnuts and cooked bacon. Cook over medium-high heat, stirring constantly, until bacon releases a bit more oil and walnuts are fragrant. Add the parsley and stir to combine. Add this mixture to the liver mixture and stir to combine.
Scrape the pate mixture into small crock or crocks. Smooth the top, decorate with a parsley leaf if desired, cover with plastic wrap and chill 4 hours or more. Let stand at room temperature 30 minutes before serving. Serve with slices of baguette or toasts.

Tuesday, September 10, 2013

R in the Month Stew


When I was growing up we were told that the only months that were OK for eating oysters are those with an R in them. Well, it's September, so the season for oysters has begun. Truthfully, I sometimes eat oysters in other months as long as they are local ones. We have companies in our area which grow oysters year-round in Tomales Bay, so there are always some oysters in the right stage of development to be eaten. Still, old tapes are hard to dislodge. September means I can eat oysters and so I do.

Oysters are an acquired taste. If you eat them raw, it is like a slurp of sea brine with a little bit of muscle thrown in. It's hard to imagine why anyone ate them in the first place, but once you get to like them they get a hold on you. I could eat them all the time. Unfortunately they, like most seafood these day, are somewhat expensive, so I save them for a treat.

Tonight's treat was Oyster Stew. Our market had jars of small ones on sale and I had green onions, celery, carrots, parsley, small red potatoes, corn and milk handy, plus some bacon. That, plus some salt, pepper and thyme is all you need to make a warm, hardy bowlful of deliciousness.

There are lots of ways to make Oyster Stew. I started by cooking the red potatoes. Mostly that was because I wanted to keep this a one pot dish. After they were cooked and draining, I used the same pot to cook some bacon, then, after fishing out the cooked bacon, I used the bacon grease to cook the onions, celery and carrots. After that it was a simple matter to drain the oysters, mix a bit of flour with the reserved liquid the oyster had been packed in, and then used that to thicken the milk/veggie combo a bit. Throw in some thyme, salt and pepper, the potatoes, the corn and heat 'em up. Right before you are ready to serve, add the rinsed oysters and stir. Set the timer for 1 minutes, stir again, and let sit one more minute. You'll see the edges of the oysters curl like ruffles on a dress. That's it! Time to ladle the stew into bowls and top with a bit of chopped Italian parsley, then dig in. Mmmm.

Elle's Oyster Stew

3-4 small red potatoes, cut into small bite-sized pieces
3 slices bacon, cut into 1 inch pieces
2 green onions, sliced fine, including part of the greens
1 medium carrot, diced fine
1 stalk celery, diced fine
1 jar small oysters
2-3 tablespoons all-purpose flour
2 cups milk
1/4 teaspoon dried thyme
salt and pepper to taste
1 -2 cups frozen or fresh corn - if frozen, thaw in the microwave
1 tablespoon fresh Italian parsley, chopped


In a large pot, cook the red potatoes in simmering water until tender. Drain and set aside.
In the same pot, cook the bacon until crisp, turning once or twice for even cooking. Remove the bacon and set aside.

In the same pot, sauté the green onions, carrot and celery in the bacon grease until the onions are translucent, about 5 minutes, stirring often.
While the veggies cook, drain the oysters in a fine mesh strainer, reserving the liquid they were packed in. Rinse the oysters under cold running water. If the oysters are large, cut them in half. Set aside.

In a bowl, whisk together the flour and the reserved oyster liquid.  Set aside.
Add the milk, thyme, salt and pepper to the pot of veggies, stirring to release any browned bits on the bottom and sides of the pot. Stir in the flour mixture and cook over medium heat, stirring often, until liquid thickens a bit. Add the reserved potatoes, bacon, and corn. Heat thoroughly but don't boil.

2 minutes before it is time to serve the stew, make sure that the stew is hot, then add the prepared oysters. Set a timer for 1 minutes. When one minute has passed, stir the stew, then let sit a few more seconds. The oyster edges will have ruffled, so you know they are cooked. Ladle stew into bowls and top with a sprinkle of chopped parsley. Serve at once.

Monday, September 09, 2013

This Little Piggie

 
The enthusiasm for all things bacon is still running high, as far as I can tell, around the blogosphere. Although I need to keep my consumption to a minimum, I do love the flavor and crunch of bacon.

In Sebastopol, in Sonoma County, CA, part of the West County in fact, there is a new foodie haven called The Barlow. Since I've been familiar with Sebastopol for decades, I can tell you that The Barlow area used to be Barlow's cannery. That was from the ancient past when Sebastopol was the central point for the cultivation and harvest of the lovely Gravenstein apple, now a Slow Food apple. Gravensteins are not keepers. They tend to turn to mush over time, as I found out when I tried to store a box of them over the winter during our first year in the area. Best to beat them to it and turn them into some of the best applesauce you'll ever have. Hence the Barlow's cannery operation.

With the inroads that grapes for wine have made in Sonoma County, the acreage planted in Gravensteins (or any apple, really) has fallen off and the cannery has been closed for years.

Now it has been transformed into an area for both retail and wholesale distribution of coffee, wine, beer, bread and baked goods, and...bacon.

 
Last week I had lunch at Zazu Kitchen and Farm in The Barlow and my friend and I had a yummy pizza that had bacon, but also a delicious artisan crust, slivers of fresh basil and some fresh and toothsome corn, as well as a nice, thin layer of intensely tomato flavored tomato sauceand a nice, light hand with the cheese. I think it was cooked in a wood fired oven, so the crust was crunchy in places and overall the dish was delightful. They also sell the Black Pig bacon used on the pizza. In fact it is made right there at the Barlow.

New establishments are opening every week, so if you happen to be in the area or live in the Bay Area and want to take a day trip, come see The Barlow, especially Zazu before it becomes too crowded to enjoy.

Wednesday, June 05, 2013

Cakes in the Morning


A good, well-made plain pancake is a delight. Gilding the lily with blueberries is common, but then adding cooked bacon and chopped pecans is not. You might want to try it...the combination is amazing! Sweetie claims they are the best pancakes ever.


Blueberry Bacon Pecan Pancakes
based on a recipe for plain pancakes in The Breakfast Book by Marion Cunningham

1 egg
2 tablespoons water
5 tablespoons butter
1 cup milk
1 1/4 cups all-purpose flour
1 tablespoon sugar
4 teaspoons baking powder
3/4 teaspoon salt (I used 1/2 teaspoon since the butter was salted)
1/2 cup chopped pecans
1/2 cup cooked, chopped bacon
1 cup (about) fresh blueberries, rinsed and dried

Whisk the egg with the water. Set aside. Melt the butter over low heat in a small pot. When melted, add the milk, stir to combine and let cool. When cool, whisk in the egg mixture.

In a large bowl sift together the flour, sugar, baking powder and salt. Stir in the chopped pecans and bacon. Add the butter/milk/egg mixture and stir until just combined. If too thick, add a little more water.

On a preheated, greased skillet or griddle, over medium-high heat, place enough batter for a 4 -5 inch pancake. Top with some of the blueberries, pushing the berries down into the batter a bit. Repeat to fill the skillet or griddle. When small bubbles form around the sides of each pancake, turn the pancake and let the berry side cook until dark brown. Remove pancakes to a plate as they finish cooking. Continue cooking until all of the batter has been used up.

Serve while hot with real maple syrup. We didn't need extra butter with these, but you could if you prefer your pancakes that way.
Serves 3 - 4.

This poppy self-seeded from last year...and it's a beauty!


Thursday, February 21, 2013

A Twist on Irish Soda Bread


It was rainy day before yesterday, the perfect weather for winter in Northern California. It's also good weather for baking. I have been trying to bake less because I'm reducing my caloric intake and Sweetie finds that when I bake less he weighs less, too. Tuesday all those thoughts went out the window because it was the perfect afternoon for tea and something baked. The questions was, what to bake? I have some new baking related cookbooks with recipes begging to be made...and I will. But sometimes the best thing to do is just to put a twist on an old familiar recipe. I discovered a few strips of bacon in the fridge, some pecans in the depths of the bottom shelf of the fridge and a nice jug of maple syrup from Costco that isn't getting any younger. Best of all I had a quart of buttermilk...more than enough for a nice loaf of Irish Soda Bread.

I love making Irish Soda Bread. It doesn't need any eggs, it goes together quickly, it is free form and looks very artisanal without trying, and it is delicious warm or cold. Fresh out of the oven (and cooled only slightly), it is heavenly.

So the twist this time was to make Pecan Bacon Maple Irish Soda Bread. Perhaps that makes it more Southern than Irish, but the original recipe is from my very Irish Aunt May, so I'm calling it that even with the additions.

The bacon was the star here, followed by the pecans. Who can hate bacon combined with pecans? The maple flavor was a harmonious background flavor, less assertive than I had thought it would be given that I used a full 1/2 cup! The buttermilk gave it moistness and a bit of a tang. I had to hide 3/4 of the loaf so that Sweetie wouldn't gobble it all up, it was that good! You don't need any additional butter, but it is hard to resist slathering on some. If you made up some maple butter that would be a grand addition.

The key to success with this recipe is to handle things gently, especially the dough once the liquid has been added. The mass of dough going into the oven looks like it barely holds together, but it bakes up as a nice craggy loaf with a tender interior. Too much or too firm handling will give you something more akin to a brick, so resist making a nice, neat loaf, OK?


Maple Pecan Bacon Soda Bread
Makes one large loaf

4 1/4 cups all-purpose flour
1 teaspoon baking soda
½ teaspoon baking powder
½ teaspoon salt
8 oz. (2 sticks) cold butter, in thin slices
½ cup chopped pecans
1/4 cup cooked, crumbled bacon
½ cup maple syrup
2 cups buttermilk

Sift the dry ingredients over the butter and cut in well with a fork or pastry blender. Add nuts and bacon; mix in gently but well. Add the maple syrup to the buttermilk and make a well in the dry ingredients. Pour in the buttermilk mixture, then mix just until moist - don’t over handle.

Some dry stuff is OK but the dough should be sticky.

Pat into a round on a parchment-lined cookie sheet. Cut a cross on top. Bake 45 minutes at 350 F. Cool a bit before slicing.

Good with a spread made of softened butter and maple syrup, whipped together.
 

Wednesday, September 24, 2008

Al Fresco Florentine

One of the blessings about having Wednesday off is that we can have a mid-week luncheon with friends. Today we ventured north to sun baked Healdsburg for an al fresco feast...you know, a lunch eaten outdoors.

First we had appetisers and white in the shade of the gazebo in comfy chairs with wisteria vines overhead. Conversation meandered from mutual friends and family doings to politics and current events to gardening and restaurants.

For lunch we moved to the deck and enjoyed an excellent salad with red and butter lettuces, radish slices, garden fresh yellow tomatoes, sugar snap peas, asparagus and avocados. The dressing, a French vinaigrette, was sublime.

My contribution was a quiche. I call it Florentine since it contains chopped spinach, but it also was the first quiche I've ever made with leeks and it turns out that leeks, sauteed in butter, add a light onion flavor...quite nice. The filling also had crimini mushrooms,

bacon...shall I say it again?? BACON...and eggs and milk and some nutmeg, salt & pepper. The crust was my favorite 'cheat' of Pillsbury ReadyCrust (see notes with crust recipes below to see why), blind baked with some dry beans I use as pie weights.

This quiche is full flavored and could make a nice brunch or light supper dish, too. The crust recipe and general proportions for the quiche are from The Big Book of Breakfasts by Maryana Vollstedt. Even though the day heated up to the mid-90s, the quiche eaten out of door was a great accompaniment to good conversation and great friends.


Florentine Quiche
¼ cup (4 tablespoons) butter
1 large leek, root removed and sliced into ½ inch slices, those slices halved, and all washed in a strainer to remove any sand or grit
1 cup sliced mushrooms – white or crimmini
½ pkg frozen spinach, thawed, excess liquid squeezed out
1 prepared Quiche crust (recipe follows)
1 cup diced Swiss cheese, divided
¼ cup bacon crumbles (about 3-4 slices, well cooked, drained, then crumbled)
3 large eggs
1 ½ cups whole milk
Salt and pepper to taste
¼ teaspoon grated nutmeg

Preheat oven to 350 degrees F.

In a large skillet melt the butter and sauté’ the leeks until translucent, about 4 minutes, stirring often.
Add the mushroom slices and sauté’ another 4 or 5 minutes while the mushrooms brown and release their juices. Add the squeezed spinach and stir well to distribute.

Sprinkle half the Swiss cheese over the bottom of the quiche crust. Spread the sautéed vegetable mixture over the cheese. Sprinkle the bacon crumbles evenly over the vegetable mixture. Sprinkle the rest of the cheese over that.

In a medium bowl, whisk the eggs and milk together. Add the salt, pepper, and grated nutmeg. Pour this mixture slowly over the ingredients in the quiche crust.

Place quiche in prepared oven and bake 20 – 25 minutes, or until just set and lightly browned on top.

Serve warm. Serves 6 – 8

Crust

After working all day, we went to dinner with friends. I started making this quiche at 8:30 at night, so making a crust from scratch was not an option. (The ‘from scratch’ recipe is below my substitution.)

I used Pillsbury ReadyCrust. One round was fitted into a 9-inch pie pan, the edges were crimped, a round of parchment paper was put inside and dry beans were used as pie weights. Crust was baked in a 450 degree F. oven for about 10 minutes. Pie pan was put on a cooling rack, parchment and beans were removed, and crust was left to cool.

Official Shell for Quiche
1 ½ cups all-purpose flour
1 tablespoon cold shortening, cut into small pieces
½ cup (1 stick) frozen butter, cut into small pieces
¼ teaspoon salt
¼ cup cold water
Place all ingredients in a food processor and process until dough holds together and starts to forma a ball, about 25 seconds. Do not over mix.

Remove dough and shape into a 6-inch disk. Wrap in plastic wrap and chill for at least 1 hour.

Preheat the oven to 450 degrees F. Place disk on a lightly floured surface, and with a lightly floured rolling pin roll dough from the center out to the edges, changing the direction with each stroke, until the circle is 1/8 inch thick and about 1 inch larger than the pie plate. Fold dough in half and transfer to pie plate. Press gently to remove air bubbles. Fold edge under and flute. Do not prick dough for a quiche because the filling will seep under the shell. To partially bake the shell for a quiche, bake it for 8 minutes. Cool slightly on a rack. It should be slightly warm when filling is added.

Turn the oven down to 350 degrees F for the quiche.

Thursday, May 01, 2008

Antidote

I love sugar and butter and cream and cream cheese....all those delish ingredients that are hard on the arteries. Reading many, many, many Daring Baker blogs over the last few days that were full of the cutest cheesecake pops made me want to make another batch. An antidote to all that sugar had to be found.

So reason prevailed. There is a little BACON in this dish, so it's not super healthy, but it's not full of cream cheese, either.

If you want a great side dish that goes together in a snap, tastes savory and wonderful - hey, it has BACON - and would be good any time of year, look no further.

This recipe came together after I checked the fridge. The mushrooms were starting to get a little brown, the seasonings were easily found, and it has BACON so it must be good :)

Steamed Green Beans with Mushrooms and Bacon
Serves 2-4

2 strips bacon, cut into 1 inch pieces
4 oz. fresh mushrooms, diced or sliced into small pieces
1/4 teaspoon dried basil
1/4 teaspoon dried thyme
16 oz whole frozen green beans
water

In a cast iron skillet or non-stick frying pan, saute' the bacon until crisp, but not burnt. Remove to a piece of paper towel to drain.

In the bacon drippings left in the pan, saute' the mushrooms 2 minutes, stirring often. Cover the pan and cook over medium heat another 2 minutes to release some of the juices.

Uncover the pan and sprinkle the mushrooms with the herbs. Stir to combine. Cover and continue to cook another minute over medium heat.

Uncover and add the frozen beans and about 2 tablespoons of water. If the mushrooms have released a lot of liquid, just use 1 tablespoon. Cover, bring heat up to high, and cook another 4 minutes, stirring half way through. Uncover, add the bacon pieces and stir.

Taste and add salt (if needed...with the bacon you might not) and black pepper to taste.

Serve at once, nice and hot.


Thursday, February 14, 2008

Hog Heaven

Way back in the early days of our dating, somehow Sweetie and I adopted cute piggies as personal symbols for our love for each other...might have had something to do with the fact that we both loved to eat.

Recently in art class we were given the opportunity to decorate a heart shaped box for Valentine's day. I ended up with a box graced by two cute pink pigs along with a band of color and some dots in shades of green, pink and blue to go witht he illlustration of the pigs. Then I cut out the box and put it together, ready for today, Valentine's Day.

I wanted to have a little treat for him in the box and very soon decided that bacon and chocolate truffles would be just the thing.

Now I'd never made any truffles with bacon and wasn't sure if it would work, but I had to try.

The bacon flavor with the strained heavy cream is very subtle. Next time I think I'll not strain it, just make sure that the bacon is finely chopped.

Sweetie was duly impressed and we shared a Bacon Bittersweet Truffle with our coffee this morning. I also had oatmeal, so it wasn't too decadent. Just enough :)


Bacon Bittersweet Truffles

2 strips bacon, cooked crisp, cooled, crumbled
1/2 cup heavy cream
1 tablespoons maple syrup
12 oz bittersweet or semi-sweet chocolate chips

Heat the bacon and heavy cream over low heat until just simmering. Turn off heat, stir to mix well, and let steep for ½ hour. Strain the cream mixture through a fine mesh strainer. Use the bacon in the strainer for another use or discard.

In a microwave safe bowl, mix the flavored heavy cream, maple syrup, and chocolate.

Microwave on half power for 1 minute. Stir the mixture Return to the microwave.
Repeat the microwaving the same way, stirring each time after 1 minute at half power, until mixture is smooth and all the chocolate has melted.

Chill the mixture, covered with plastic wrap, at least one hour or over night.

Scoop 1 “ rounds of the mixture a onto waxed paper lined cookie sheet. Refrigerate 1 hour.

Roll the balls in unsweetened cocoa (as I did) OR
dip in 1 cup chopped bittersweet chocolate that has been microwaved in a bowl, 1 minute at a time at half power, until melted, but add 1 tablespoon of shortening to the chocolate before starting the microwave process. If dipping the truffles, remove from the melted chocolate with a fork, transfer to the wax paper lined cookie sheet, and let cool completely by chilling for at least ½ hour.

Note: The bacon flavor is subtle, mostly in the aftertaste. If you want a stronger bacon flavor, don’t strain the mixture. Your truffles centers will be chewier that way, but have more bacon flavor.