Showing posts with label Kite Hill almond milk ricotta cheese. Show all posts

Thursday, January 27, 2022

Butternut Squash in a Quiche

I'm a firm believer that you can put almost anything savory in a quiche. If you look at the index of recipes, you'll see that I've made quite a few variations. The first quiche I ever made was quiche lorraine, a classic for a reason. Now that I only have one kind of cheese that I cook or bake with (almond milk ricotta), the frequency of making quiche has gone down. Still, every once in a while I feel the need, and this time it was joined by the need to use up some recently roasted butternut squash.

In case you don't have any roasted butternut squash in your fridge, let me remind you how easy it is to make. You take a butternut squash, any size really, and carefully cut it in half from stem to blossom end. You scoop out the seeds and stringy bits in the seed cavity, line a baking sheet with foil, spray the foil with cooking spray, then put both squash halves on the foil, cut side down. Roast at 450 degrees F until the squash is tender. I check by poking a sharp knife into the squash...it should slide in easily. Let the squash cool, peel it, and you are ready to use it. 

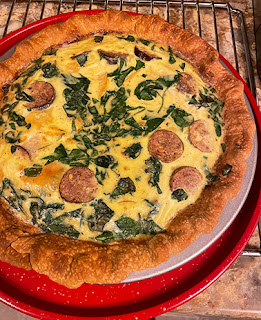
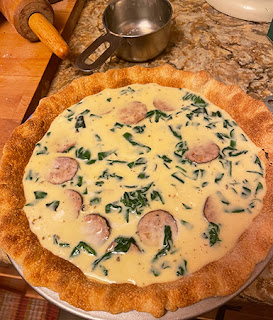
This quiche is a nice combination of slices of the butternut squash, slices of cooked Italian sausage, some lightly steamed miners lettuce (or spinach), chopped, and a custard flavored with Italian seasoning and thyme, salt and pepper. You layer the ingredients into a blind-baked pie crust, then pour in the custard and bake. Pretty easy and quite good. You could even use a frozen pie crust. I actually use the pre-made pie dough circles found in the market (Pillsbury ReadyCrusts in my case). Using pre-made pie dough makes this go together very quickly and this kind of quiche is always a hit.
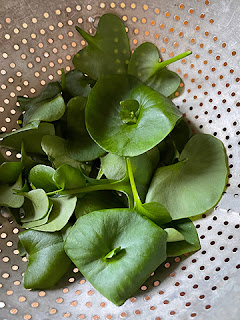
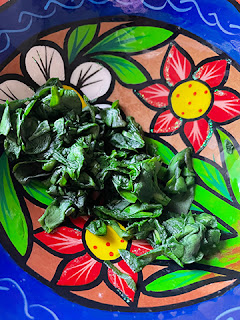


So this is the first time that I've picked and used miners lettuce. It grows wild on our property and this is the perfect time of year to use it, before it flowers. I have a planter that's high enough so the lettuce is pristine and it's also easier to pick being a little higher. My knees have been bothering me lately, so kneeling down to pick greens isn't happening! Still, it's nice to be able to use farm fresh greens in the quiche. Miner's lettuce is pretty mild in flavor, but you can tell it's there. I mixed it into the custard, so a lot of it floated to the top. As you can see from the bottom photo, it cooks down quite a bit...I may have less than 1/2 cup here, but close to that amount.

Tip: If you use a pound of dried beans as pie weights as I do, save them once they have cooled off and you can use them again and again as pie weights...just don't plan on cooking them to eat. At about a dollar and a half for a bag of dried beans, it sure beats the almost $9 you would pay for Pie Weights from King Arthur or a similar amount at Sur la Table.


Quiche with Miner's Lettuce, Butternut Squash and Bacon

1 9inch pie shell, blind baked at 425 degrees F for 10-12 minutes (recipe follows)

½ cup cooked, chopped and drained miner's lettuce or baby spinach, leaves only
½ cup ricotta cheese, crumbled
½ small butternut squash, roasted, skinned, and sliced thinly
1 cooked Italian sausage, sliced
3 eggs (or equivalent egg substitute)
1 ½ cups evaporated milk, or light cream, or soy creamer
¼ teaspoon salt
dash pepper
¼ teaspoon Italian seasoning
¼ teaspoon dried thyme

Preheat oven to 350 degrees F.
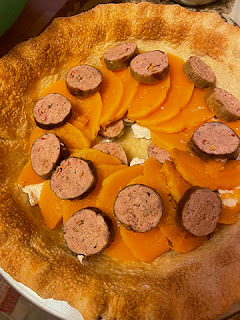


Sprinkle the bottom of the pie shell with the ricotta cheese, distributing evenly. Place the butternut quash slices evenly over the other ingredients. Distribute the sliced sausage evenly over the ingredients in the pie shell.  Set aside.

In a bowl, beat the eggs lightly, then add the milk and beat with a fork to combine, add the salt, pepper, Italian seasoning, thyme, and steamed and chopped miner's lettuce, and beat with a fork to combine.

Pour the egg/milk mixture over the ingredients in the pie shell. Place in the preheated oven and bake 30-45 minutes, or until set and lightly browned. Cool for 10 minutes before cutting to serve.
Serves 6-8

Pastry Pie Shell

1 cup all-purpose flour
¼ teaspoon salt
1/3 cup chilled butter
1 egg, lightly beaten
2 tablespoons ice water
1 teaspoon lemon juice (optional)

Mix the flour and salt in a bowl. Cut in the butter with a pastry blender, or two knives, until particles the size of dried peas are formed.

In a small bowl mix together the egg, ice water and lemon juice (if using). Sprinkle over the flour mixture and toss with a fork lightly. Do not over mix. Gather the particles together in a ball. Wrap airtight and chill in the freezer for 10 minutes. Roll out with a rolling pin on a floured surface until large enough to fill a 9 inch pie pan with some overlap.

Fit into a 9 inch pie pan, smooth to fit, trip excess , tuck edges under and crimp as for any pie crust. Prick lightly all over the surface with a fork. Freeze 10 minutes. Remove from freezer and cover with a circle of parchment paper. Fill the paper with beans or pie weights (blind baking the crust).

Bake at 425 degrees F for 10 – 12 minutes. Cool slightly. Remove and save the beans or pie weights. Fill with filling as called for in recipes needing a pie shell.

Monday, January 10, 2022

Awesome Mushroom Tart on an Almond Freeform Crust


I love getting cookbooks for Christmas! This year I received quite a few of them, so it was challenging to pick the first recipe to make out of a new cookbook. Dorie won out...which is not surprising since her recipes are always top notch. Who is Dorie? Dorie Greenspan , one of my favorite cookbook authors, especially for baked goods. The book, received from my darling daughter and her amazing beau, is called Baking with Dorie. It has lots of sweets that I'll get to later, but the recipe that spoke to me was for a freeform tart topped with mushrooms. It's official title is Free-Style Mushroom, Herb, and Ricotta Tart. You start with a thin, crumbly crust made with almond flour and all-purpose flour, so not gluten free. This crust has lots of herbs in it. As a matter of fact, the whole tart has lots of herbs in it. The crust is topped with a ricotta-rich filling which also has herbs in it, and that is topped with cooked mushrooms...with more herbs. Then to 'gild the lily', you top the whole thing with dressed micro-greens and a drizzle of oil. I added a small amount of chopped walnuts since I used walnut oil for the drizzle and I think they added some needed crunch. Sweetie liked his tart warmed up and it really did taste better that way than at room temperature as called for in the recipe.

As with many Dorie Greenspan recipes, you can play around a bit with this recipe...use whatever herbs appeal to you or that you have on hand, mix up the mushrooms that you use, and so on. It's also a great recipe for entertaining since each of the components can be made in advance. It might seem like a long recipe, but you can make each component on a different day if you like; the spread one day, the mushroom topping another day and the crust the day you will serve it, so it's really quite manageable. You can also do it all on the same day as I did and serve it that day. 

Once it's all together I would recommend putting it on a sheet pan or cookie sheet and heating it for about 10-15 minutes at 325 degrees F. The cheese filling becomes more savory and the mushroom flavor takes over. When it's at room temperature the mushrooms are more subdued in flavor, which is a shame if you have bought the more expensive wild mushrooms.

That said, we loved, loved, loved this tart. It will go into my regular rotation and will be even better in the warmer months of the year when fresh herbs are so easy to get.


Free-Style Mushroom, Herb and Ricotta Tart
from Baking with Dorie, Sweet, Salty and Simple
Six servings

Raggedy Edged Almond-Herb Crust
1 1/2 cups (204 grams) all-purpose flour
1/2 cup (50 grams) almond flour (or an additional 1/3 cup (45 grams) all-purpose flour)
1/2 teaspoon fine sea salt
1 stick (8 tablespoons, 4 oz. 113 grams) cold unsalted butter, cut into bits (I used non-dairy margarine)
2-3 tablespoons minced fresh herbs (a mix is good - parsley, thyme, chives, dill, rosemary, scallion greens or any of them by themselves)
1 cold, large egg, lightly beaten

Put both flours and the salt in a food processor and pulse to blend. Add pieces of butter and do long pulses about 15 times until it looks like crumbs, not sand. Scrape work bowl and under blade as needed.

Drop in the herbs and pulse only to blend. Add the egg in three additions, pulsing after each addition until dough forms clumps and curds. Pinch and it should hold together. If not, add a splash of water and pulse again.

Turn the dough out and gather into a ball. Knead a few time to make dough cohesive, then gather and flatten into a disc. (I substituted the working dough with heel of your hand for the kneading and the results were good.)

Place the dough between two sheets of parchment and roll to a thickness of 1/8 inch, rolling into a rough circle of dough with ragged edges. As you roll, now and then lift of and replace the parchment...both sides in turn...to make sure to not crease dough. Remove top sheet, prick dough all over with a fork, replace parchment and slide parchment/dough/parchment sandwich onto a baking sheet. Refrigerate for at least 2 hours or freeze for at least one hour.

When ready to bake, center a rack in the oven and preheat to 400 degrees F. Peel top sheet of parchment, place it on a baking sheet, place the dough on it and cover with the other sheet of parchment, loosely, to keep tart from browning too much. Bake for 18-20 minutes, or until crust is golden around the edges. Remove the top sheet of parchment and bake for and additional 2-3 minutes to firm up the crust and give it more color. Transfer baking sheet to a cooling rack and let crust cook to room temperature. Can be made ahead but best to use within 8 hours.


The Tart

1 Raggedy Edged Almond-Herb Crust
1 recipe Ricotta Spread
1 recipe Mushroom Topping
Extra-virgin olive oil or walnut oil or toasted sesame oil
A handful of micro-greens tossed with oil, lemon juice, salt and pepper
A couple tablespoons toasted walnuts, chopped roughly


Ricotta Spread

1 cup (212 grams) ricotta
1/4 cup (60 ml) plain yogurt, preferable Greek
1/2 shallot, finely chopped, rinsed in cold water and patted dry
2 scallions, trimmed and finely sliced
1-2 tablespoons minced fresh herbs (see description in Raggedy Edged Crust above)
Fine sea salt and freshly grounds black pepper to taste

Drain the ricotta and yogurt if needed. Put into a bowl and whisk until smooth. Add the rest of the ingredients and whisk to combine. Add more salt and pepper if needed. Cover and refrigerate until ready to serve the tart. If liquid has accumulated, drain it off before using on the tart. Spread can be refrigerated up to two days.


Mushroom Topping

1 tablespoon unsalted butter (I used non-dairy margarine)
1 tablespoon olive oil
1 1/2 pounds (680 grams) mushrooms - a mix is good - ordinary ones from the market are fine, too - cleaned, trimmed and sliced
1-2 garlic cloves, minced (to taste)
3 tablespoons white wine
fine sea salt and freshly ground black pepper
3 scallions, trimmed and finely sliced (I only used one)
2 tablespoons minced fresh herbs (see description in Raggedy Edged Crust above)

Warm the butter and oil in a large skillet over medium-high heat. When the bubbles have subsided, toss in the mushrooms and garlic and cook, stirring, until the mushrooms are brown and tender and the pan is almost dry. Pour in the wine, stir and cook until it's almost evaporated. Season with salt and pepper to taste and remove the pan from the heat. Leave the topping at room temperature for up to 3 hours or pack into a covered container and refrigerate for up to 2 days; reheat in a skillet with a little water before using.


To Assemble and Serve the Tart:
Place the crust on a baking sheet and cover with the ricotta-yogurt spread.


 Stir the scallions and herbs into the mushroom topping and spoon it over the spread. 


Scatter on the walnuts and drizzle with the oil.


Reheat the tart in 325 degree F oven for 10-15 minutes, just enough to warm the tart. Remove from the oven, slide onto a cutting board or plate, and top with dressed the micro-greens. Cut the tart at the table using a pizza wheel or a long chef's knife. Serve at once while still warm.


Friday, October 08, 2021

Fig and Walnut Tart

It really feels like fall today, with cooler temperatures and lots of trees changing into their autumn colors. One of the lovely fruits of fall is fresh figs. A neighbor gifted us with some that she grew...the purple ones that have a sort of magenta seed section that is so pretty. I decided to combine them with another fall crop...walnuts...in a tart.

Frozen puff pastry is such a delightful thing to have on hand. You just defrost it overnight in the fridge and it's ready to use. Having made puff pastry from scratch, with all the rolling, folding, and successive bouts of chilling, I know how much work is saved by using the pastry from the store. Since I can't do dairy, I use the kind made with shortening. Perhaps it doesn't have as much flavor as that made with butter, but it is still delicious and flaky.

You start by rolling out a piece of the thawed puff pastry to make it a bit bigger. With a sharp knife you trim around the edges to create thin strips which become the sides of the tart once you 'glue' them onto the remaining base with water.


Inside the tart, you spread a mixture that is a combination of ricotta cheese (I used the non-dairy Kite Hill ricotta - it's very hard to tell it apart from dairy ricotta), sugar, orange zest, and an egg yolk. On top of that you place wedges of the fresh fig in a nice pattern...I just used rows. Chopped walnuts get sprinkled between the fig wedges. An egg  wash, using the egg white that remained when the yolk was used in the filling, is brushed carefully over the pieces of pastry that make up the sides...carefully because you don't want any wash to go down the sides or it won't rise properly.


The tart gets baked in a hot over...425 degrees F until the fruit juices start to run and the crust is golden brown. After a bit of time cooling, treat yourself to a rectangle of pure autumn deliciousness! The nuts have roasted, the filling has firmed up, and the fruit is juicy and mellowed by the cooking. Sublime! 

The actual recipe will be posted here tomorrow.


Wednesday, March 31, 2021

Asparagus Tart For Spring


One of my favorite early spring foods is asparagus. Those bright green spears not only taste delicious, but their green color welcomes the season. Right now where we live they are also fairly inexpensive. If that is true for you, too, then you might want to make this tart for a meal, even for Easter. The only part that takes any real time is caramelizing the onion. The rest is quick and easy if you use store-bought puff pastry.

We had our tart for dinner along with some lamb chops that our neighbor gifted us with. Both of those foods are spring time treats for me. Now we only need our strawberry stand on Hwy 12 to open and I'll be a happy camper.


Asparagus Tart with Caramelized Onions and Bacon

Serves 4-6    An original Elle recipe

1 large yellow onion, peeled, ends removed, halved and thinly sliced
2 tablespoons olive oil
1/3 cup ricotta cheese (I used Kite Hill almond milk ricotta)
1 medium to large egg
grated zest from half a lemon
salt and pepper to taste
1 sheet frozen puff pastry, thawed (I used Pepperidge Farm)
2 slices bacon, cooked until crisp (can be done in the microwave using scrunched paper towels above and below)
6-8 fresh asparagus stalks, washed, dried and trimmed
egg wash (1 egg combined with 1 tablespoon water)

In a large skillet caramelize the onions in the olive oil by cooking them slowly, stirring often, over medium-low heat, until the onions are golden brown or a been deeper brown. There will be leftovers for another use. Once cooked, remove from pan, spread out on a plate, and cool to room temperature.

In a small bowl, combine the ricotta cheese, egg, lemon zest and salt and pepper. Set aside.

On a baking sheet place a piece of parchment paper or foil or a Silpat silicone mat. Set aside.

Preheat the oven to 425 degrees F.

Sprinkle a clean work surface lightly with flour and spread it to a thin layer. Open the thawed puff pastry to one layer on that prepared surface. Use a sharp knife to cut a one-inch strip off the puff pastry on two facing sides. Dampen that edge in for an inch with water, then place the cut strip on top. You will have a rectangle with facing ends that have an extra layer one-inch wide and the opposite facing ends without.


Spread the ricotta cheese mixture in an even layer between the two built up ends. Using a small offset spatula works well. Leave about an inch without cheese at the un-built up ends, too. Place about 1/3 cup cooled caramelized onion on top of the cheese mixture, spreading it as evenly as possible. Crumble the bacon and sprinkle evenly over the onion. Place the asparagus in a row, starting at one of the raised ends and finishing at the other raised edge. Brush some egg wash, using a pastry brush, on top of the raised edges and at the exposed ends of the other sides, being careful to not let the egg run down the sides.

Bake in a preheated 425 degree F. oven until the pastry is golden brown. Serve warm.


Sunday, October 04, 2020

Fall Is Here So Try This Savory Gallette


It's not as easy as it once was to celebrate the coming of autumn. For the last four years each fall we have had wildland fires, smoke, evacuations, power outages, heat, and a general sense of dread. This year you can add the pandemic to that!

Still, one thing that doesn't change is my desire to bake delicious things. I grew butternut squash this year. I also actually harvested and shelled some walnuts from our trees. They are both elements of this yummy galette. The other elements include roasted garlic, caramelized onion, fresh thyme, and (non-dairy) ricotta cheese, as well as a store-bought pie crust dough. Together they create the perfect fall dish for sharing with friends and neighbors as we did yesterday evening once the air had cooled and the smoke had mostly disappeared. We had good air quality for the first time in days! That meant we could sit outside on our neighbor's deck, socially distanced, of course, and enjoy this savory galette, plus AM's delicious guacamole and G's fresh strawberry margaritas. AM had watermelon wheat beer with hers. We were able to really see their two new kittens Remy and Emil, catch up on things and generally enjoy the lovely evening.

The way I approached this recipe, which is a variation of one I found in the Press Democrat, our regional newspaper, was to split up the prep of the filling ingredients. First I prepared the squash, peeling it, cutting it up, removing the seeds, then dicing it fairly small so that it would roast to a nice soft consistency before getting too brown or hard on the outside. The whole head of garlic that flavors the cheese was roasted at the same time, then later when the head had cooled, the inside roasted cloves were removed and mashed up. I folded them into the cheese to mellow and then stopped for lunch.

Later in the day I made the caramelized onions since they require a lot of attention and stirring. It's worth it because you really taste the onions in this tart. Don't try to hurry them...they need long, slow cooking. While they were cooking I chopped the walnuts. Now all the elements were ready.

The easiest part if putting it all together. While the oven (and a baking stone!) preheated, I rolled out the dough a bit more, then carefully transferred the dough to a piece of baking parchment placed on a baking peel. The cheese was spread over the bottom, some walnuts sprinkled over that, the onions spread over the cheese and walnuts, then the squash was spread over it all. I gently folded up the dough over the squash, pleating it as needed, then sprinkled some walnuts over the exposed squash. After brushing the dough with non-dairy creamer, I sprinkled a few more chopped walnuts over the dough, then slid the galette, still on the parchment paper, onto the preheated baking stone. This way you get a crisp, cooked bottom.

This galette can be vegan if you use a vegan pie crust and non-dairy ricotta and milk.


This is an awesome blending of flavors and textures. Do try this yourself. It's the season after all.


Butternut Squash Galette with Roasted Garlic, Caramelized Onions and Walnuts

A variation of a recipe in the Press Democrat newspaper, Sept. 30, 2020

Makes 4-6 servings

1 butternut squash, peeled, seeded and diced
4 tablespoons olive oil, divided
2 teaspoons fresh thyme leaves, chopped
1 teaspoon salt
1/2 teaspoon pepper
1 large head garlic, whole and unpeeled, top cut off
1 large yellow onion, peeled and very thinly sliced
1/2 cup fresh ricotta (I used a non-dairy Kite Hill ricotta)
1 dough for one crust pie (I used Pillsbury ReadyCrust - half the package)
1/2 cup walnuts, chopped, divided
1 tablespoon milk (I used soy creamer)

Preheat the oven to 400 degrees F, placing a baking stone on the middle rack. Line a baking sheet with parchment paper and cut another piece of parchment paper at least 10-inches in all directions and place on a bread paddle or a rimless cookie sheet. If you don't have a baking stone, put the parchment on a pizza pan or another baking sheet.


Here are some photos of the prep on the squash.

peeled & seeds removed


diced


In a large bowl, or in a clean, large, plastic produce bag place the prepared butternut squash and add 2 tablespoons of the olive oil. Toss in the bowl or close the bag and shake vigorously to coat the squash with the oil. Add the thyme, salt and pepper and combine with the squash. Spread the squash, in a single layer if possible, onto one of the prepared baking sheets. Add the prepared head of garlic at one corner, and place in the oven. Bake until squash and garlic are tender. (Check at 20 minutes. If squash is tender but garlic isn't, remove the squash to a bowl to cook and continue cooking the garlic.) Total cooking time is about 25 minutes. Removed pan from oven and let squash and garlic cool. Set aside.


whole garlic head, prepped


While the squash and garlic are roasting, heat the remaining 2 tablespoons olive oil in a medium saute' pan over medium-high heat. Add prepared onions and a pinch of salt and stir to combine. Cook onions, stirring occasionally, until they begin to brown and soften. Reduce heat to low and continue to cook until onions are very soft and deep golden brown, about 20 minutes. Set aside. If the dough is still in the refrigerator, remove now to warm just a bit.


caramelized onions and the walnuts


When the garlic has cooled, peel the cloves and put in a small bowl. Mash with the back of a wooden spoon until smooth. Stir in the ricotta.


cheese and garlic layer


Roll the dough out on a lightly floured surface until at least 10 inches in diameter. Carefully transfer the dough circle to the parchment paper on the bread paddle or pizza pan or baking sheet. Use the back of a spoon to spread the ricotta mixture over the center of the dough, leaving a 2-3-inch outer edge uncovered. Sprinkle 2 tablespoons chopped walnuts over the ricotta. Put the cooled caramelized onions on top and spread over the cheese and walnuts. Top with the cooled butternut squash, spreading the squash out to completely cover the onions and cheese.


walnut layer


onion layer


   squash layer


Fold the edges of the dough toward the center of the galette, pleating as you go. Sprinkle most of the walnuts in the center where there is no dough, then brush the dough with the milk using a pastry brush, and sprinkle the dough with the rest of the walnuts.

baking on stone


Bake in the preheated oven. If using the bread paddle or rimless cookie sheet and baking stone, slide the parchment and galette onto the baking stone. If not using the baking stone, place the sheet pan with the galette into the oven. Bake until crust is golden brown. Check at 20 minutes, but this usually takes about 25-30 minutes. Cool on a rack. Carefully transfer to a serving platter and garnish, if desired, with more fresh thyme. Serve slightly warm or at room temperature.