Showing posts with label quick bread. Show all posts

Saturday, February 25, 2017

Intensely Lemon


This post has been sitting in my files, waiting until I'm feeling better (have had a nasty cold since about Feb. 10), but I think it is getting stale, while I'm still coughing, so posting it anyway! I would probably be completely back to normal but I have kept doing scholarship group work and have even gone out for a couple of meals, so not everything has been on hold. True, I've read a lot of books and spent time in bed...never a terrible thing, right? The lemon bread is long gone, but I will make it again...it was really good!

I've always loved the flavor of fresh lemon. Lemonade is still one of my favorite beverages and lemon sugar cookies were my favorite as a child, even more than chocolate chip. Our local dairy made a lemon custard ice cream to die for. There is something fresh and bold about lemon that wakes things up.

Recently a friend gave me some Meyer lemons from her home garden. It took me longer than I would have liked to get to this next recipe, but life has been super busy, so what can you do?

Although I've made lemon quick breads before, this time I tried a new recipe from Rosemary of An Italian In My Kitchen. I was intrigued that you cut soft butter into the dry ingredients as you do for pie crust, then add the egg-milk mixture. I really wanted to see how that turned out! It also meant that I could do everything by hand and in just two bowls...one for the egg-milk mixture one one for the batter. Of course I used soy milk and cut in soft non-dairy margarine, but I'll bet it would be even better with unsalted butter and whole milk. Keep an eye on it toward the end of baking time. There is enough sugar in the batter that it burns easily. Check it with a toothpick earlier than the suggested time, just to be sure.


This is a delicious, intensely lemon flavored loaf, with the texture of a pound cake. I doubled the amount of lemon zest called for and doubled the amount of syrup for brushing on after the loaf is finished, while still warm. I also poked some thin holes all over the top before adding the syrup, so that it could penetrate into the loaf. All of that added to the lemon effect and to making each bite moist and delicious. With a cup of hot tea it's pure heaven!

If you only have one lemon, I'm sure that you could follow the recipe and it would still be a yummy lemon loaf. This would make a wonderful gift, too, and it is dense enough that it would probably ship well. Extra lemons? Make one to give and one to keep!


Fresh Lemon Bread
adapted from Rosemary at An Italian In My Kitchen

1 tablespoon grated lemon zest (zest from one lemon) (I used zest from 2 lemons)
4 1/2 teaspoons lemon juice (22 ml) (I used about twice this amount, juice from two lemons)
2 1/4 cups flour (270 grams)
1 1/2 teaspoons baking powder (7 1/2 grams)
3/4 teaspoon salt (4 grams)
1 1/4 cups + 2 tablespoons sugar, divided (276 grams)(I added another tablespoon for the pan)
3/4 cup butter softened (170 grams) (I used non-dairy margarine)
3 eggs, large
3/4 cup milk (177 ml) (I used soy milk)

Pre-heat the oven to 350 degrees F (180 C), grease a 9 x 5 inch loaf pan. (I sprinkled a tablespoon extra of sugar over the part I greased, but it would be fine without and might not burn so easily).

In a large bowl whisk together flour, baking powder, salt and 1 1/4 cups sugar, add the softened butter and, with a pastry blender, blend until mixture resembles coarse crumbs. Stir in the lemon peel.

In a small bowl, put the eggs and beat lightly with a fork, add milk, and mix until combined, then pour this mixture into the flour mixture and stir just until flour is moistened.

In the prepared loaf pan add the batter. Bake for 1 - 1 1/4 hours (or until toothpick comes out clean). Cool, then move to a wire rack.

In a small pot add 4 1/2 teaspoons of lemon juice and 2 tablespoons of sugar. Stir to combine. Over medium heat, stirring constantly, bring to a boil until thickened. With a pastry brush, brush syrup over the top of the bread. (I poked holes with a wooden skewer while bread was warm and then brushed on the syrup over the warm bread until it was all absorbed. I let it sit in the pan until cool, then turned it out onto a serving board.)

Tightly wrap any leftovers and store in the refrigerator.

Tuesday, January 24, 2017

A Good Bread For A Cast Iron Skillet


I love my cast iron skillet. I have a small one and a large one and I use one or both almost every day. The little one is great for the breakfast egg and the big one is perfect for so many things, from pan-seared pork chops to home fries. It has been rainy around here for so long that most meals are cooked in the kitchen, not the BBQ, and they have to be ones that warm you up.

A great way to make cornbread is in a cast iron skillet that you pre-heat in the oven while you mix the batter. You get an amazing crust that way, but the bread in the middle stays soft and moist. It's the way my Mom learned to make cornbread in North Carolina when she was a new bride.

I made this recently to take to a dinner party where the menu included smoked chicken and brisket, steamed mustard greens, delicious slow cooked beans and some dilly bean pickles that were familiar. I used some stone ground cornmeal from a friend and instead of buttermilk used 3/4 cup soy creamer mixed with 1/4 cup plain yogurt. So delicious! Didn't need butter or anything.

This is a quick, easy bread to go with soups and stews, so it's perfect for this time of year.

Here is Mom's recipe:

Mom’s Skillet Corn Bread

 1 ¼ cup yellow corn meal
½ cup all-purpose flour
1 teaspoon sugar
1 ½ teaspoons baking powder
½ teaspoon baking soda
¼ teaspoon salt (I used just a bit more, but not quite 1/2 teaspoon)
1 egg, beaten or 2 egg whites
1 cup buttermilk (or 3/4 cup soy creamer and 1/4 cup plain yogurt, mixed)
¼ cup vegetable oil, divided

Preheat the oven to 425 degrees F. Place 1 tablespoon oil in a large cast iron skillet and place in preheated oven for 5 minutes.

Combine dry ingredients in a large bowl. Add the egg, buttermilk and 3 tablespoons of the oil. Pour batter into preheated skillet and for 20 minutes. Top will be barely golden brown and edges by sides of skillet will be brown.


Serve hot.

Wednesday, July 20, 2016

Summertime Cake


The Cake Slice Bakers had some great choices this month. The Black and White Layer Cake sounded great and so did the Sour Cream Coffee Cake and Blueberry Surprise, but the one that grabbed my attention was the Zucchini Loaf from Seattle. It's baked in a large loaf pan, is moist from the shredded zucchini and uses veggie oil instead of butter.


I'm a summer gardener. I love planting flowers like morning glory and zinnia and veggies like cucumbers and beans. My two favorites are tomatoes and zucchini. Some years the snails decimate the veggie starts and so we only get one or two zucchini a week. Other years, like this one, we are harvesting a decent sized zucchini from at least four plants every day. Now we love zucchini and eat it just about every day, plus we give lots away, but that's a lot of zucchini. This recipe used up one and a half zucchini. Maybe I should make multiple recipes to freeze as Christmas gifts?

Anyway I decided to make the zucchini loaf, but since I discovered chocolate zucchini bread a few years ago I can't go back to plain, spiced loaves. It was easy to convert this recipe to chocolate, so that's what I did. I actually like this recipe better than my old one, so thank you Maida!

Be sure to check out what the other Cake Slice Bakers have baked this month. It's always fun to see which recipe had their name on it!


Zucchini Loaf From Seattle - Amended
from Maida Heatter's Cakes

3 cups sifted all-purpose flour
scant 1 teaspoon salt
1 teaspoon baking soda
1/2 teaspoon baking powder
1 teaspoon espresso powder
1/3 cup cocoa powder (I used Bensdorp Dutch-processed cocoa from King Arthur Flour)
2 cups shredded zucchini, packed, about 1 pound zucchini
2 eggs
2 cups granulated sugar
1 cup vegetable oil
2 teaspoons vanilla extract
1 cup chocolate chips

Preheat oven to 350 degrees F. Butter or grease a 10 x 5 x 3-inch loaf pan (10-cup capacity) or two loaf pans with combined 10-cup capacity. (I used a 9.5 x 5 x 2 1/2-inch pan and a tiny loaf pan for the remaining batter.) Dust the pan or pans with fine, dry bread crumbs and tap to shake out excess crumbs.

Sift together flour, salt, baking soda, baking powder, espresso powder and cocoa powder. Set aside.
Clean the zucchini well and cut off the ends, then shred into large slivers. Don't drain. Pack into a 2-cup measure and set aside.

Beat together the eggs, sugar and oil, then add the vanilla and beat to combine. Add the sifted dry ingredients and beat to mix. Mixture will be thick. Add the zucchini, along with any moisture that has collected and mix thoroughly. The zucchini shreds thin the batter a little. Stir in the chocolate chips.

Scoop dough into the prepared pan(s), smooth the top(s), and bake. A large pan will take about 1 hour and 35-50 minutes. A cake tester gently inserted into the middle comes out clean and dry (except, maybe, for melted chocolate chips). Batter will rise up as it bakes and form a crack on top. That's O.K. 
Smaller pans will take less time. Check after 40 minutes. My tiny one was done in 30 minutes.

Cool in the pan for 15 minutes. Cover with a rack, turn over and remove the pan, turn over again. Cake will be right side up.


This cake is delicious when still slightly warm.


Thursday, September 03, 2015

A Bread For Zucchini Madness


It happens every year...too many zucchini. It may be from your own plant, it may be the sneaky neighbor who deposited a big bag of them on your porch early in the morning, or maybe you got carried away at the farmer's market. Now you are looking for ways to use them up...look no further.

My great good friend NoHandle sent another wonderful guest post. You are going to want to make this zucchini bread my friend. If you really like it, maybe I can get some of my extra zucchini to you (just kidding). The best part about this bread is there is no chocolate. Although I love chocolate, it doesn't love me at present. Thanks NoHandle!

Zucchini Bread Again?

Perhaps the only thing more pervasive than the excessive production of the zucchini plant (it would be considered a weed if the fruits weren't edible) is the profusion of recipes you find about now to create uses for the aforementioned excessive production. Leaving bags of the stuff on neighbor's porches can go undetected for only so long, and then they force you to stop. And no fair setting the bag on fire; that is a different prank. 

At any rate, I noticed, in my hour of need, that  my favorite blog (this one) had almost all chocolate zucchini bread recipes, and so cried out for a non-chocolate rendition. (I'm a big fan of chocolate, but not everyone in the household is, and I don't want to be the only consumer of the bread; that would partially defeat the purpose. She really likes this one.) So, I cast about and found a decent looking one on the Food and Wine site. It had only one ingredient that I didn't currently have in the cupboard (and that was just a matter of timing) so I printed a copy and off I went.


To begin with, most recipes say a “medium” zucchini produces 1 cup of shredded (and squeezed out) flesh. I must have had a monster then. It produced a bit over three cups, so although the (doubled) recipe called for two cups, three cups it was to be. The remaining quarter of a cup or so went to compost.


The next issue was with the yogurt, for which the recipe the recipe called “non-fat” which in my mind meant “not really food” and the grocery store was apparently in the former camp. I ended up with a honey-flavored full-fat product, which meant there was a measure of sugar in it. The amount of sugar called for in the recipe seemed excessive, so I didn't feel bad about cutting it back in this case. I also ended up a bit short on the flour, so in included a half-cup or so (I didn't measure it) of whole wheat flour to round it out. With the extra zucchini, I wasn't too concerned with exact measurement, I just added a bit to just about everything (except sugar and oil; with full-fat yogurt, I slacked off on the oil too). And of course this was double the recipe (two loaves instead of one) which led to needing an extra large bowl to combine everything where the recipe called for only a large bowl. I think we've all been there when scaling up recipes. Mine was a glass salad bowl.


Oh, the recipe calls for coarse chopped walnuts, but we prefer smaller bits, so I used my trusty nut grinder, which produces bits about the size of half of a lentil, and smaller.


My other departure was to not consider sugar a “wet” ingredient, and including it with the dry. I mixed the eggs and oil first to create an emulsion, then added the yogurt, which preserved it. The dry (plus sugar) ingredients were already combined, so I added some shreds, and some of the liquid, to the dry, mixed that up, and added the rest. I don't have a stand mixer, but I recommend one for this application. Mix at slow speed, as the flour and batter tend to fly. My heavy-duty hand mixer was adequate to the task, but a lesser one might have started smoking, quite literally, from the strain, and that would have ruined the aroma from baking. It is a very, very dense batter. I also poured the batter alternately into the pans to keep the results consistent. I weighed them both to ensure they had about the same amounts. It was about 56 ounces each (including the weight of the pan, a bit over a pound) in case you were wondering. 

The baking time is a rather lengthy hour and ten minutes, and with two moist cakes in the same oven, a bit longer is better. I was satisfied at one hour and fifteen minutes, but another five or so wouldn't hurt. There is another long wait as the loaves cool, at least a half-hour. This is quick bread for the patient.


Note that even with surplus zucchini the pans were not quite full when baking was done. Freeze at least one to bring back memories of the closing days of summer (and the bounty of the zucchini plant) in the midst of winter, and enjoy the other while still warm (and for a few days thereafter). 

Your neighbors will appreciate this more than the raw fruit, so bake some more! (You have more zucchini, don't you?)

Here is the recipe as I did it. The measurements are approximate, but this is forgiving one.

Zucchini Bread

Ingredients:
1 ½ cup walnut halves
4 cups all-purpose flour (substituting about ½ cup whole wheat flour works too)
1 tsp. baking powder
1 tsp. baking soda
1 ½ cup sugar (scant)
4 large eggs
¾ cup vegetable oil (I used pure olive oil; not extra virgin nor even virgin. It has nearly no olive taste.)
1 cup honey-flavored Greek yogurt
3 cups coarsely grated zucchini, squeezed in a ta towel to remove as much liquid as you can

Directions:
Preheat the oven to 325 degrees. Butter (or cooking spray) and flour two 9-by-4 ½ inch metal loaf pans. Spread the walnut halves on a small (cookie) sheet pan, and toast them for about 10 minutes, until they are fragrant. Cool them in the freezer for 5 minutes while you make the batter, then chop in fine pieces.

In a very large bowl, whisk the flower with baking powder, baking soda, and salt. If you combine the sugar at this point the dish still works. In a medium (medium is still big enough) bowl, beat the eggs and vegetable oil together until well combined, and then beat in the yogurt. Add the wet ingredients to the dry ingredients, along with the grated zucchini and toasted, chopped walnuts. I found adding about 1/3 first of both, beating, and then the remaining made the process easier and the result smoother. Beat until the batter is evenly moistened.


Pour the batter into the prepared pans and bake for 1 hour 15 minutes, until the loaf is risen and a toothpick inserted in the center comes out clean (about 195 degrees in an instant read thermometer).

Let the loaf cool on a rack for 30 minutes before un-molding and serving. A few additional minutes cooling of the released loaf will make slicing easier, as the center is still fairly moist.


Enjoy, NoHandle.

Friday, January 16, 2015

Bread Baking Babes Get Puffed Up


It's the 16th of the month, and reveal day for this month's Bread Baking Babes bread. Our kitchen of the month, the ever popular and witty Elizabeth of Blog From OUR Kitchen, has gathered us around the table to make Chapatis, that wonderful staple of Indian cuisine. I'd never made these before and got a thrill when the first one I cooked puffed up just like it was supposed to when I turned it over to cook the second side and held it over the gas flame. It didn't really get brown when it puffed, but the flame caught an edge, so there was a bit of burning. Dangerous stuff this Bread Baking Babes baking!


The results were delicious and the texture was awesome with firm outer surface and almost flaking interiors. Sweetie ate most of them before I noticed, but I did snag two. My plan had been to have some butternut squash biryani and chicken cooked with coconut milk, but my late morning eye exam was brutal and so I didn't have the energy to do anything more than make the chapatis. Glad that I did and I'll make them again soon and do the full meal.

One of the things that I discovered while mixing up the dough was that it takes a little while for the flour to be absorbed. Glad that I stopped adding the boiling water long before all of the flour had gotten wet. I kept stirring with the fork and gradually all of the dry flour found its way into the dough and it seemed to have that silly putty texture. The kneading was relaxing and there was no need to add very much flour to the board, although my hand did stick a few times.


Do try this easy and fun recipe yourself! Check out the experiences that the rest of our BBB crew had to get tips for creating this wonderful and fast hot bread.

Bake My Day - Karen, Blog From OUR Kitchen - Elizabeth, Bread Experience - Cathy, Girlichef - Heather, Life's A Feast - Jaime, Lucullian Delights - Ilva, My Diverse Kitchen - Aparna, My Kitchen in Half Cups - Tanna, Notitie van Lien - Lien, Thyme for Cooking - Katie (who does the round-up).

If you do make these, consider becoming a Bread Baking Babe Buddy by making the recipe by Jan. 29th and sending Elizabeth an e-mail with a photo and a description of your experience making chapatis. She'll do a round-up shortly after that.

Here are the wonderful directions and recipe that Elizabeth gave us. Have fun!


CHAPATIS, AKA ROTIS (INDIAN FLATBREAD)
based on "Flat Wholewheat Bread - Roti" in A Taste of India by Madhur Jaffrey

After struggling for months trying to make these, I now understand why all the recipes I looked at seemed to be so vague. Here is how we have finally managed to make pretty good rotis, using an electric stove and North American flour. I apologize in advance for any vagueness and urge you to keep trying even if your rotis don't turn out perfectly the first (second, third, fourth...) time(s). As Shehzad Husain says in Entertaining Indian Style:

Do not get disheartened [...] you will improve with practice.
Equipment 

  • stove
  • open wire rack (single burner open wire rack on feet that set the rack about an inch off the burner)
  • rolling pin
  • heavy carbon steel shallow frying pan (tava)
  • tongs
  • lidded pot
(We went to our local India town to get the tava and wire rack. They are not very expensive items. You can probably use a flat heavy griddle in place of the tava.)

Ingredients to make 8 rotis

  • 1 c. unbleached all purpose flour
  • ½ c. whole wheat flour 
  • 1 tsp. salt
  • up to 1 c. just-boiled water


  1. In a bowl, mix flours and salt. Add hot water gradually, stirring with a fork until you have a soft dough. The amount of water will vary drastically depending on air temperature and humidity. You just have to play with it. You are aiming for dough that resembles silly putty.
  2. Using as little extra flour as possible, knead on a board or in the air for 10 minutes until the dough is soft and silky.
  3. Put the dough back in the bowl. Cover with a damp cloth or plate and let sit on the counter for 30 minutes to one hour.
  4. Put the tava on medium heat. Do not oil it. Put the wire rack on another burner at the highest heat possible. (I used a cast iron skillet. The tava would be better, but it worked.)
  5. Cut the dough into 8 equal pieces. Lightly flour each one and put 7 pieces back in the bowl. Cover the bowl. Form the piece of dough into a ball and flatten it. Roll it out into a round til it is quite thin but not too thin (this is again is one of those infuriating things where you will just have to practice to find out what thinness works best for you) - about 2 mm?? As you roll out the dough, make sure it is not sticking to the board and that there are no holes. Keep the rolling pin lightly dusted with as little flour as possible and the board the same way.
  6. Place the round of dough on the hot tava (griddle). As soon as you see little bubbles form, turn it over using tongs. As soon as there are little bubbles on the reverse side, lift the bread off the tava with the tongs and place it on the wire rack. It should puff up. Turn it over once or twice to ensure that it puffs up completely. Don't be worried to see a few dark brown spots on it. (If you are lucky enough to have a gas stove, you can hold the bread directly over the flame. - I did this and supported the other side with a spatula. Worked OK, but then I put the chapati back into the hot skillet to brown a few spots.)
  7. Put the finished bread into a pot and cover it with a lid. Keep it in a warm oven. Roll out the next piece of dough and repeat til you have 8 rotis. As you put a new roti on the stack, turn the finished rotis over to keep the bottom ones from getting wet. (I kept the finished rotis on a paper plate set on a heavy pot holder and covered it with an inverted paper plate. That seemed to work well and was easy because it was on the counter next to the stove, readu for the next rotis to be added.)

Thursday, May 01, 2014

Pantry Perfect


This morning I brought a lovely quick bread I'd baked to a meeting, so my worry about not baking during the project wasn't justified. Some baking will continue...it's one of my creative outlets after all.

Because the project does come with time constraints, I headed to my pantry for the ingredients, especially the canned pumpkin. I know that pumpkin seems like a fall and winter flavor, but a good pumpkin bread is delicious any time of the year. This one has vanilla, nutmeg, cinnamon and ginger for flavor, plus a dollop of Irish whiskey, for fun. I used both white and brown sugar, some eggs, some room temperature butter, and all purpose flour leavened with both baking soda and baking powder. At the end I threw in some dried cranberries, too. The finished bread was a golden brown with a lovely deep gold interior.

The recipe began as a King Arthur Flour recipe without the cinnamon, ginger, Irish whiskey, brown sugar or butter. I also changed the method because I used butter and creamed it with the sugars and vanilla, then added the eggs and water. Once these liquid ingredients were combined, the addition of the mixed dry ingredients went very quickly, yielding a very light and tender bread. It makes two good sized loaves. You could even freeze a loaf for later enjoyment. Since it goes together so quickly, give it a try.

You might wonder why I end up changing so many things. Why not start with a recipe that is closer to what I want to bake? Well, King Arthur Flour's website has so many recipes that I know I'll find one that will work as a starting point. They really seem to test their recipes, so I know the proportions will work. After that it is easy for me to make the substitutions since I have so much experience with baking. For this one, for instance, I wanted something similar to pound cake, so I used the creamed butter and sugar base instead of the melted butter or oil. Those give a slightly heavier texture to the finished bread. I can assure you that you won't want to leave out the Irish Whiskey (unless you replace it with bourbon) because it adds a hint of smokiness that is wonderful with pumpkin.


Spiced Pumpkin Bread with Dried Cranberries
Loosely based on a recipe found at King Arthur Flours

  • 1 cup butter, softened
  • 1 2/3 cups granulated sugar
  • 1 cup brown sugar
  • 4 large eggs
  • 2 cups (or one 15-ounce can) pumpkin (not pumpkin pie filling)
  • 1/2 cup water
  • 1/4 cup Irish Whiskey
  • 3 1/2 cups all-purpose flour
  • 1/2 teaspoon baking powder
  • 2 teaspoons baking soda
  • 1 1/2 teaspoons salt
  • 1 teaspoon nutmeg
  • 1 teaspoon cinnamon
  • 1/4 teaspoon ginger
  • 1 teaspoon pure vanilla extract
  • 3/4 cup dried cranberries
Preheat the oven to 350°F. Lightly grease two 8 1/2" x 4 1/2" loaf pans.

In a large bowl, cream the butter, then cream in the sugars.

Add the eggs, one at a time, beating each egg into the batter before adding the next egg.

Add the pumpkin, water,  and the Irish Whiskey and mix to combine well.

In a large bowl combine the flour, baking powder, baking soda, salt and spices. Add the flour mixture to the batter and beat only until barely combined.

Mix in the dried cranberries, if you're using them.

Spoon the batter into the prepared pans. and smooth tops a bit.

Bake the bread for 60 to 80 minutes, or until a cake tester or toothpick inserted in the center of the loaf comes out clean; and that same tester inserted about 1/2" into the top of the loaf doesn't encounter any totally unbaked batter.

Remove the bread from the oven, and cool it on a rack. When it's completely cool, wrap it well in plastic wrap, and store it overnight before serving.


Yield: 2 loaves.

Sunday, April 13, 2014

Playing Around With Apricots And Pecan


One of the many things I love about Dorie Greenspan's recipes is that she often includes a sidebar with suggestions for changes one can make to the recipe. My favorites are the ones she calls 'Playing Around' because it resembles what I often do with recipes, which is to substitute out ingredients to give a whole new flavor blend to the recipe.

I recently baked up one of her quick breads, the Date-Nut Loaf found in Baking: from my home to yours. In the Playing Around section she suggests that the dates can be exchanged for other dried fruits, including apricots. Sweetie loves apricots, plus the dates I thought I could use turned out to be too old, so I used a cup of diced dried apricots (which are actually moist and sticky, so they were also dusted with some flour before being added to the batter) instead of the dates. Because I like apricots and pecans, the nuts used were pecans instead of walnuts. I also left out the almond extract so that the apricot and pecan flavors would shine. They did! The crumb on this is moist and fairly light. Some quick breads have a dense texture, but not this one. This was one of four recipes I made for a meeting of our regional scholarship group. The others might show up here later: Bran Muffins with Walnuts and Raisins baked in mini-muffin pans, Cranberry Orange Yeast Braid, and Rosemary Focaccia Bread, which I've made before, but this time I baked it in a 9 x 13-inch pan instead of two cake pans. Still very yummy!

Did I mention that I also baked the Apricot Pecan batter in four mini-loaves? So cute and perfect for the meeting where I was serving them! The only difficult thing about these is remembering to set out the butter and cream cheese to allow them to come to room temperature and then to let the loaves cool before slicing. They smell so good that it is cruel to have to wait, but they need the time to be firm enough to slice. Give this a try with apricots and pecans, or go with the original combo of dates and walnuts. Both are sure to put a smile on your face.


Apricot Pecan Loaf
a variation of a recipe in Dorie Greenspan's marvelous Baking: From my home to yours

2 cups all-purpose flour
2 teaspoons baking powder
1/4 teaspoon salt
2 sticks (8 oz.) unsalted butter, at room temperature
3 oz. cream cheese, at room temperature
3/4 cup (packed) light brown sugar
4 large eggs
1 teaspoon pure vanilla extract
1 cup dried apricots, diced and dusted with a bit of flour
1 cup coarsely chopped pecans

Center a rack in the oven and preheat the oven to 325 degrees F. Butter a 9 x 5-inch loaf pan, dust the inside with flour and tap out the excess. Put the pan on an insulated baking sheet or two regular sheets stacked on on top of the other.

Whisk together the flour, baking powder and salt.

Working with a stand mixer and paddle attachment, beat the butter and cream cheese on medium speed until very smooth, about 2 minutes.You can do the same thing using a hand mixer and a large bowl.

Add the sugar and beat until the mixture is light and fluffy, another 3 minutes or so. Add the eggs one at a time, beating for 1 minute after each addition, then beat in the vanilla. The batter may look curdled (mine did), but don't worry, it will come together after you add the flour mixture.

Reduce the mixer speed to low and mix in the flour mixture, mixing only until they are incorporated. Using a rubber spatula, fold in the apricots and pecans. (This step is important. Folding in the fruit and nuts makes for a lighter loaf than adding them with the mixer would.) Turn the batter into the pan.

Bake for 40 minutes. Cover the top of the loaf loosely with a foil tent and bake for another 40 minutes or so (total baking time about 1 hour, 20 minutes), until the top is honey brown, bumpy and cracked and a thin knife inserted into the center of the loaf comes out clean. (Since I used the four small pans, it took about 40 minutes total.) Transfer the pan to a rack and cool about 10 minutes before turning the loaf out of the pan, then cool to room temperature right side up on the rack.


Sunday, December 22, 2013


The lucky denizens of the Land of St. Honore' are probably born with the knowledge of how to bake and bake well. The rest of us have to learn as we go along. I was lucky to have picked up a lot of baking lore from my Mom as I grew up. I also love to read cookbooks and I read it all, not just the recipe or three that interests me. Some stuff I've known so long that I don't even think about it.

One of those long known things is to let your ingredients come to room temperature before you bake. Now some recipes will tell you to used a chilled ingredient or ice water, or to melt butter and either use it while it is still warm or to let it cool to room temperature, but it the recipe doesn't specify, you are usually safe to have ALL of your ingredients at room temperature. That might require planning ahead so that you can set out the butter or eggs, or even flour if you store yours in the fridge, well in advance of your baking time.

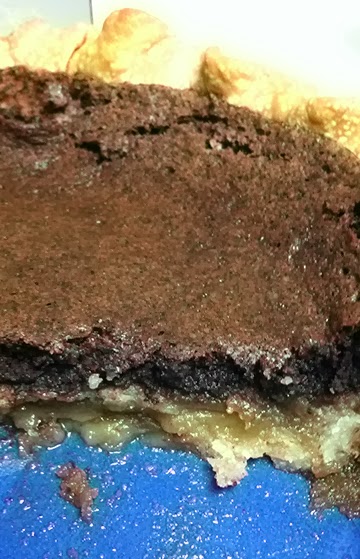
You might wonder what difference it makes. Sometimes it might not make any difference, but a good example of where it can is when you are making something like Chocolate Fudge Pie. The filling needs to almost emulsify in order for it to bake up as  homogeneous  fudginess. If you use, say, cold eggs, you may end up with a fudgy layer on top and another layer that is sticky and almost clear (similar to pecan pie filling) at the bottom, as in this photo. It might also be the result of using melted butter that is still too warm from melting.

Thanks for the photo Natashya! 

Room temperature eggs combine with the butter and sugar in a different way than cold eggs. The same is true of creaming butter, a standard beginning for everything from cookies to cakes. Room temperature butter creams beautifully, letting air mix with the butter as it lightens. Then the sugar gets added and the crystals cut into the fat of the butter as they are creamed together, resulting in a lighter textured cake or cookie.


I recently made some Persimmon Nut Quick Bread using the persimmons from our tree. This is the perfect example of a recipe where all of the ingredients need to be at room temperature, except for the butter. It gets melted, but then needs to cool back to almost room temperature so that, when added to the batter, it doesn't cook the eggs.

Do try this recipe if you can get fresh persimmons. You want the heart shaped Hachiya persimmons, the ones that have very soft fruit when ripe. The persimmon flavor is delicate, but this is a great bread, if made with a light touch. Not too sweet, a little persimmon flavor, a lot of nut flavor, with a moist crumb. I made one batch with walnuts and one with pecans. I think I like the one with pecans slightly better, but they were both delicious. This recipe makes two loaves...one to eat and one to give as a gift (or freeze for later)!


Persimmon Nut Bread
from Baking in America by Greg Patent

6 fully ripe Hachiya persimmons (about 2 pounds)
3 cups (about 12 oz.) walnut or pecan large pieces or whole halves
3 1/4 cups  all-purpose flour
2 teaspoons baking powder
1/2 teaspoon salt
4 large eggs
1 cup sugar
1 cup firmly packed light brown sugar
1 cup (2 sticks/ 1/2 pound) unsalted butter, melted and cooled

Adjust oven rack to lower third of oven. Preheat oven to 375 degrees F.  Butter two 8 1/2 X 4 1/2 X 2 3/4 -inch loaf pans; set aside.

Pull the leaves and stem off of the persimmons. Cut each in half and scoop out the flesh onto a cutting board. Use a pastry blender or small knife to cut the persimmon flesh into small pieces. Put cut up persimmon in a large measuring cup. You should have some small pieces of persimmon mixed with pureed pulp and you need 2 cups. Use any extra for another recipe.


Toast the nuts in a shallow baking pan until fragrant, stirring once or twice, 6 - 8 minutes. Be careful not to burn the nuts. Set aside to cool completely.

Sift the flour, baking powder and salt together; set aside.

Whisk the eggs in a large bowl until thoroughly combined and slightly frothy. Add both sugars and beat in thoroughly with the whisk. Whisk in the butter. Stir in the persimmon pulp and nuts with a rubber spatula. Add the flour mixture and stir only until the batter is smooth. Divide batter between the prepared pans and smooth the tops.

Bake for about 1 hour and 5 minutes, until the loaves are well browned and a toothpick inserted into the center comes out clean. The loaves will be quite dark, especially on the edges, but if they start to brown too much before they are done, lay a piece of aluminum foil, shiny side up, loosely on top during the last 30 minutes of baking.

Cool in the pans on a wire rack for 20 minutes. Run a small sharp knife around the sides to release the loaves, and carefully unmold them. Set them right side up on a rack to cool completely. Wrap airtight. The loaves can be frozen for up to 2 months.

Sunday, October 06, 2013

Pumpkin Zing


The yellow and brown leaves were swirling around this week in the brisk breezes. Autumn is such a great time of year. Pumpkins are showing up at the market and in front of the hardware store, ready to add their cheery color and wicked smiles once they become jack o'lanterns. Although this is the season of the year when things are ending in nature, it is often a time of new beginnings for me.

A couple of days ago a new stove and new dishwasher were installed. Any renovation of the kitchen that involves new cabinets or flooring or lighting or counter tops or new doorways or fewer wall will have to wait a while. The entry project has taken far longer than expected and Sweetie and I need a break from the stresses of construction. A new stove and dishwasher, however, are fine because they were installed in the very same places that the appliances they replaced lived. They are both stainless steel and quite beautiful in a way.


I decided that the best way to try out the new oven was to make a quick bread. Very little time is wasted if the loaf doesn't turn out well. We had some super ripe bananas, so banana bread went in first. Then I gave in to the rush of fall feelings and made pumpkin bread. Both were done in a much shorter time than in the recipe, probably because this oven has a convection feature. Unfortunately both were a little burnt on the bottom, too. I think I'll need to bake things on a rack that is higher in the oven.

Have you ever wanted to combine the flavors of pumpkin bread with the zing of a triple ginger molasses cookie? That's what I did and it is an exciting bread. The texture is moist from the pumpkin and the color is a nice deep orange, but the best part is the flavor. Pumpkin is the first note, but it is followed by spices of cinnamon and cloves and a burst of ginger. I sprinkled some sanding sugar on top as a reference to the sugar that the cookies are rolled in and it give a bit of a crunch which is really nice.

The banana bread was my usual one, so no recipe today, but I do want to give you the pumpkin bread recipe. It's a keeper.


Super Ginger Pumpkin Bread
a very gingery, molasses-y, nutty, pumpkin-y sweet bread

 2 cups all-purpose flour
½ teaspoon baking soda
2 teaspoons baking powder
½ teaspoon salt
1 teaspoon ground cinnamon
1½ teaspoon ground ginger
¼ teaspoon ground cloves
2 tablespoons chopped crystallized ginger
1 teaspoon finely grated peeled fresh ginger
1 cup canned solid pack pumpkin (not pumpkin pie filling)
1 cup brown sugar, packed
¼ cup milk
¼ light (mild) molasses
2 eggs
1 cup chopped walnuts
Sanding sugar topping

Preheat oven to 350 degrees F. Grease a 9x5x3 loaf pan.


Combine dry ingredients in a large bowl (both flours, soda and powder, spices).

Put the crystallized ginger, fresh ginger, pumpkin, brown sugar, milk, molasses and eggs in a mixing bowl and mix until well blended.

Add the dry ingredients and begin to combine. Add the nuts and mix just until all are well blended.

Pour into the prepared pan and smooth the top. Top with sanding sugar, sprinkled on thickly. Bake in preheated oven 45 to 55 minutes or until toothpick inserted in center comes out clean.

Cool in pan five minutes, then turn out of pan and cool on a cooling rack.

Thursday, August 29, 2013

Going Bananas in the Land of St. Honore'


She woke with a start. It had been a horrible dream. The twins, her granddaughters who live on the other side of the country, were grown up in the dream. One was a dental tech and the other was a personal trainer at a gym...and neither one of them knew what to do with the ingredients on the kitchen counter in her dream; the softened butter, the sugar, flour, molasses, eggs, nuts, chocolate chips. They had a birth right, as anyone in our land has, to bake, yet they had no idea how to measure flour, soften butter, or even how to crack an egg. This was terrible! No child in the Land of St. Honore' should be flummoxed about baking something.

Eva decided she would do something so that this dream never became a reality. Well, maybe they would become a personal trainer and a dental tech, but she would make sure that they knew how to bake. Not only would they not be mystified at the sight of an egg, they would know how to separate eggs and whisk whites and bake a lovely, light, luscious, delectable cake.


First she waited until a decent hour, then called her daughter, their mom. She had to time the call just right because Grace would be leaving home soon to go to work. She was a CPA high up in her firm. Although she had been taught, she never baked. 'No time' was her excuse.

"Grace, I would love to have the girls visit me at Christmas, or even Thanksgiving, if that's possible. I know that they are always busy with volleyball and chess club and the debate team, but could you find a few days when they could spend a little time with me?" Eva was tempted to add "before its too late" but didn't think her daughter would be so easily led.

Grace had a particularly difficult client at the moment, so she agreed. Better that her girls have some fun instead of being saddled with a babysitter when she had to work extra. At eleven years old they were getting a bit beyond babysitters anyway.


Eva was thrilled. They were coming the day before Thanksgiving. They could bake pies for Thanksgiving, perhaps make dinner rolls, and surely they could make a cake, too. She could hardly wait!

Plans changed and they arrived the day after Thanksgiving. No one wanted pies or dinner rolls and a cake seemed too rich after all the holiday food. Still, there were some ripe bananas to use up. Time to bake a classic banana bread...with a twist. She wanted to use molasses and to add chocolate chips, just for fun.


The girls were a bit hesitant at first, but soon got into the swing of things, measuring flour and sugar, mashing bananas, and, yes, cracking some eggs and finding out that bits of shells could be removed from the eggs in the bowl, with care.

They giggled at the slow movement of the molasses and had fun getting their fingers greasy while using the butter wrapper to grease the bread pan.


Their faces beamed with big smiles when they brought the first piece of baked banana bread to their Granddad. They were even happier when he exclaimed over the texture, flavor and deliciousness. They were hooked! Eva knew that on their next visit that they would bake that cake with her. Their heritage was intact.

You, too, can keep the arts of baking alive. This banana bread is easy, uses up very ripe bananas, and can be packed in a lunchbox or used as an afternoon pickup or quick bite in the morning. If you make it with half regular flour and half whole wheat flour it is almost healthy...after all, it has fruit.

Banana Bread with Walnuts and Chocolate
makes one loaf

1/2 cup butter, softened
1/4 cup molasses, dark is best
1/2 cup granulated sugar
2 eggs, beaten
3 ripe bananas (or 2 large), mashed
1 cup whole wheat flour
1 cup all purpose flour
1 teaspoon baking soda
1/2 teaspoon baking powder
1/2 teaspoon salt
1 teaspoon vanilla extract
1/4 cup buttermilk
1/2 cup chopped walnuts
1 cup chocolate chips

Preheat oven to 350 degrees F. Grease and flour a 9 x 5 x 3 inch loaf pan (you can use the butter wrapper if you've already put the soft butter into the mixing bowl. That is what the twins did).

Beat butter, molasses and sugar together until fluffy. It's OK if it looks curdled.

Add eggs and banana pulp and beat well.

Add sifted dry ingredient's, vanilla, and buttermilk. Mix just until dry ingredients are incorporated. Stir in nuts, and chocolate chips.

Pour into prepared loaf pan. Bake about 1 hour. Test for doneness with a toothpick in center. When done, toothpick comes out clean or with a few crumbs on it. Cool well.

Store overnight before cutting...if you can wait that long. A serrated knife makes cutting easier.

Friday, August 09, 2013

Soda Bread with Blueberries


One of my treasured recipes is for Aunt May's Irish Soda Bread. It's in my book (Classic Comfort Food) and I throw it together for tea when I have the time and some buttermilk in the fridge.

Recently I ordered some more Irish Wholemeal Flour from King Arthur Flour. It is the perfect flour to use for this recipe, although I only use half wholemeal and half regular all-purpose flour. Today I also had some fat, ripe, deeply blue blueberries on hand. Never tried fresh blueberries in the soda bread before, but I'm glad I did. The soda bread is just firm enough a batter that the berries don't fall to the bottom like they sometimes do with blueberry muffins. The excellent flavors of wheat and buttermilk of the bread go really well with the tang of the blueberries...and they look pretty.


I only made half the batter, so it was about 1/2 cup of blueberries for this one. For the full recipe I would put in a cup of the blue beauties. Although you can certainly add some butter to the slices once baked, there is enough butter in the batter that you don't need it. With the blueberries bursting with warm juices, you really don't need anything else...except maybe a cup of tea.


Aunt May's Irish Soda Bread with Blueberries(the blueberries are not in Aunt May's version, but are yummy)
4 cups all-purpose flour (I used 2 cups all-purpose and 2 cups Irish whole meal flour)
1 teaspoon baking soda
½ teaspoon baking powder
1 teaspoon salt
6 tablespoons sugar
8 oz. (1 stick) cold butter, in thin slices
2 ¼ cups buttermilk
1 cup blueberries
Sift the dry ingredients over the butter and cut in well with a fork or pastry blender.  Add the buttermilk and mix just until moist - don’t over-handle. Some dry stuff is OK, but the dough should be sticky. Turn dough out onto a parchment-lined cookie sheet, flatten the dough lightly, then pat on the blueberries. Pull dough gently over the fruit and pat into a rough circle. Cut a cross on top. Bake 45 minutes at 3500 F. Cool a bit before slicing.


Tuesday, May 07, 2013

Date Bread from the Clipping File


We all have them if we like to browse recipes...the stack, pile, file full of things we keep meaning to make. Looking over a few file folders chock full of recipes that I found yesterday while cleaning up in the studio, I sighed over some of the 'death by chocolate' ones that I probably shouldn't make considering my complete lack of willpower when it comes to chocolate, wondered that I would save a recipe on how to hull strawberries, and found my mouth watering over and over again as I read lots of good ones.

Out of the file I pulled one for a date quick bread from our local paper written in January of 1994. It was in an article all about recapturing frugal ingredients and rich flavors from the war years...as in World War II. It uses boiling water to soften the dates, melt the butter, and give the base for a moist, tender sweet bread, perfect for an afternoon snack.

The only changes I made to the ingredients was to use egg substitute instead of the two eggs called for, and to add some chopped walnuts. As for the method, I added the vanilla to the wet ingredients and added the nuts to the dry ingredients before I stirred them into the wet ones. Those changes were mostly to keep me from forgetting to add the vanilla and nuts.

The resulting bread was delightful!

One Bowl Date Quick Bread
by Flo Braker, cookbook author

1 1/4 cups boiling water
8 oz. (1 3/4 cups) pitted dates, chopped
4 oz. unsalted butter (1 stick) cut into small pieces
1 1/2 cups unbleached all-purpose flour
1/2 cup whole-wheat flour
1 teaspoon baking powder
1 teaspoon baking soda
1/4 teaspoon salt1/2 cup walnuts, chopped1 1/2 teaspoons vanilla
1 cup light brown sugar
2 eggs, lightly beaten (or equivalent egg substitute)

Combine the boiling water, dates and butter in a large bowl. Stir until the butter melts. Set aside to cool.

Preheat the oven to 350 degrees F. Grease and flour a 9 x 5-inch loaf pan.

Sift together the all-purpose flour, whole-wheat flour, baking powder, baking soda and salt. Stir in the chopped walnuts. Set aside.

Stir the vanilla into the cooled date mixture. Add the light brown sugar and the eggs. Stir to combine.

Add the flour mixture and stir just until combined. Don't over mix. Mixture may be a little thin. Pour into prepared pan.

Bake for 50 - 60 minutes, or until a toothpick inserted in the center comes out clean.

Cool 10-15 minutes, then turn out onto a wire rack, turn right side up and let cool completely on the rack.

To serve, cut into 1/4 inch thick slices. Makes about 24 slices.

Thursday, February 21, 2013

A Twist on Irish Soda Bread


It was rainy day before yesterday, the perfect weather for winter in Northern California. It's also good weather for baking. I have been trying to bake less because I'm reducing my caloric intake and Sweetie finds that when I bake less he weighs less, too. Tuesday all those thoughts went out the window because it was the perfect afternoon for tea and something baked. The questions was, what to bake? I have some new baking related cookbooks with recipes begging to be made...and I will. But sometimes the best thing to do is just to put a twist on an old familiar recipe. I discovered a few strips of bacon in the fridge, some pecans in the depths of the bottom shelf of the fridge and a nice jug of maple syrup from Costco that isn't getting any younger. Best of all I had a quart of buttermilk...more than enough for a nice loaf of Irish Soda Bread.

I love making Irish Soda Bread. It doesn't need any eggs, it goes together quickly, it is free form and looks very artisanal without trying, and it is delicious warm or cold. Fresh out of the oven (and cooled only slightly), it is heavenly.

So the twist this time was to make Pecan Bacon Maple Irish Soda Bread. Perhaps that makes it more Southern than Irish, but the original recipe is from my very Irish Aunt May, so I'm calling it that even with the additions.

The bacon was the star here, followed by the pecans. Who can hate bacon combined with pecans? The maple flavor was a harmonious background flavor, less assertive than I had thought it would be given that I used a full 1/2 cup! The buttermilk gave it moistness and a bit of a tang. I had to hide 3/4 of the loaf so that Sweetie wouldn't gobble it all up, it was that good! You don't need any additional butter, but it is hard to resist slathering on some. If you made up some maple butter that would be a grand addition.

The key to success with this recipe is to handle things gently, especially the dough once the liquid has been added. The mass of dough going into the oven looks like it barely holds together, but it bakes up as a nice craggy loaf with a tender interior. Too much or too firm handling will give you something more akin to a brick, so resist making a nice, neat loaf, OK?


Maple Pecan Bacon Soda Bread
Makes one large loaf

4 1/4 cups all-purpose flour
1 teaspoon baking soda
½ teaspoon baking powder
½ teaspoon salt
8 oz. (2 sticks) cold butter, in thin slices
½ cup chopped pecans
1/4 cup cooked, crumbled bacon
½ cup maple syrup
2 cups buttermilk

Sift the dry ingredients over the butter and cut in well with a fork or pastry blender. Add nuts and bacon; mix in gently but well. Add the maple syrup to the buttermilk and make a well in the dry ingredients. Pour in the buttermilk mixture, then mix just until moist - don’t over handle.

Some dry stuff is OK but the dough should be sticky.

Pat into a round on a parchment-lined cookie sheet. Cut a cross on top. Bake 45 minutes at 350 F. Cool a bit before slicing.

Good with a spread made of softened butter and maple syrup, whipped together.
 

Saturday, April 14, 2012

Orange-Lemon Yogurt Bread

Our scholarship group met this morning and had some of this bread with our coffee and some red grapes. I think you might enjoy this quick bread, too.

Orange-Lemon Yogurt Bread makes one loaf
2/3 cup butter softened
1 1/4 cups sugar
2 eggs
1/2 cup plain yogurt
1/2 cup freshly squeezed orange juice (I substituted 2 tablespoons Meyer lemon juice for some of the OJ)
1 tablespoon orange zest
1 1/2 cups all purpose flour
1 cup whole wheat flour
1/2 teaspoon baking powder
1/2 teaspoon baking soda
1/2 teaspoon salt

Glaze
1/2 cup confectioners' sugar
2-3 teaspoons orange juice
some grated orange zest

Topping
1/2 cup confectioners' sugar
1 teaspoon lemon juice
1 teaspoon lemon zest

Preheat the oven to 350 degrees F. Grease a 9"x5"x3" loaf pan. Set aside.

Cream the butter and sugar for 3 minutes until light and fluffy. Add the eggs, one at a time, beating to combine after each addition. Add the yogurt, orange juice and zest and combine. Mixture may be curdled looking...that is OK.


Combine the dry ingredients and add to the batter and mix just until combines.

Pour into prepared loaf pan and bake 55-60 minutes. Cover loosely with foil if top browns to quickly.

Place warm bread, still in pan or on a platter or board, where you can glaze it. Mix together the glaze. Poke holes in the top of the bread and pour the glaze over the top, letting the glaze settle into the holes. OK if some runs down the side. Let bread cool completely. (I refrigerated it at this point.) Mix together the topping and pour over the top. Because the topping is less runny than the glaze, it should cover the holes. Let topping setup, about 1 hour. Cut and serve in thin slices.


This is a moist, tangy loaf and goes great with your favorite cup or coffee or tea. This photo doesn't show the final topping, so you can see those holes in the top.