Showing posts with label birthday cake. Show all posts

Saturday, February 17, 2024

Birthday and Valentines Fun

 In my world, a holiday or life event is a reason to bake. Since I'm doing less of that all the time in an effort to eliminate excess calories, having two dates back to back to bake for has been fun, exhausting, and calorie-laden, but full of joy.


For my birthday I not only baked, but I also braised lamb shanks for dinner. The good news is that it can be done ahead, so I did. The lamb was uber-local...thanks AM and G!...and delicious. You can find the recipe HERE.


For the birthday cake I made one of my favorite chocolate cakes, the Queen Mother Cake. Because there are only two of us, I made it in two pans...a 6-inch springform and a heart shaped 9-inch. As it turned out, I was so full from the lamb shanks dinner, which also included steamed rice and fresh asparagus, that we had the birthday cake on Valentine's Day after Sweetie's fire board meeting.

It was one of the best cakes ever. It was super moist inside, covered in decadent ganache, and a smaller portion than usual but just the right amount. If you look closely at the photo, you will see that, contrary to popular opinion, I'm not perfect and I can and do make a ganache that isn't perfectly smooth...although it was delicious.

The second cake was served the next day to friends at an afternoon tea party.


For my Valentine, I made, at his request, a Lemon-Lime Tart, but we saved it for Thursday evening when our daughter and fiancĂ©' arrived.  We are all happy with pies and tarts. This one is a lemon-lime one and I'll post, with the recipe, soon. Next sister down also gifted me with an amazing cookbook with recipes for making geometric inspired pies and tarts. Will post about that, too, soon.

Monday, February 14, 2022

Birthday Memories


Anyone who knows me knows that I'm a bit of a nut about birthdays. I love to celebrate birthdays, especially other people's. I love to make birthday cakes, too. When I was a child, as soon as I was old enough to make a layer cake, I became the family birthday cake maker most of the time, which was great. Who can hate birthday cake? This past weekend was full of great birthday memories.

This is the cake I was trying for...I even wrote in what icing tips to use!

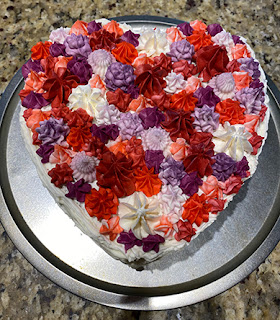
Day before yesterday my awesome daughter and I made great memories as we each decorated a chocolate cake we had baked earlier. We both have an Alexa device with screen, so she could see and hear me and I could see and hear her. There was a lot of laughter! When close ups were needed, we FaceTimed. So why did we decide to spend a Saturday morning making buttercream and decorating cakes? Well, King Arthur Baking sent out a catalog with a heart shaped cake on the cover and it was stunning. The bakers had used a variety of decorating tips and colors to cover the cake all over the top with buttercream rosettes. I immediately wanted to try my hand at that, despite the fact that my skills in that department are pretty rusty. For Kate it was a completely new experience. She even bought a thirty tip cake decorating kit so she had a wide variety of possible shapes. She got an awesome buttercream recipe from a neighbor who makes cakes all the time. I should have used that recipe.

My cake turned out to be a "Nailed It" kind of cake. You'll understand what that means if you have ever watched the Netflix show Nailed It. Bakers who are not skilled in the kitchen compete for prizes by making very complicated sweet baked creations that I think were mostly inspired by professional baked goods found on Pinterest. To make it even harder, the time allowed is much too short. The results are hilarious and each contestant says, enthusiastically, "Nailed It!" when they present their fairly strange looking approximation of the one shown at the beginning.

Not a terrible cake, but nothing like the King Arthur one or the even more beautiful one Kate made.

Why, you ask, did I have trouble? Well, this was the first time I was trying to make my favorite buttercream not using actual butter. I guess the margarine and plant based 'butter' just had too much water or something, because the buttercream broke and all the usual ways to fix it didn't work. The uncolored buttercream was OK but too soft, but once I started adding color, it was a disaster. The color only mixed partially with the icing. I did end up with something that wasn't too bad, but it was nothing like what I was going for, and nothing like the gorgeous creation my daughter made. Check it out! This is her's:

Isn't it awesome !!?

Even with my disaster with buttercream, it was a wonderful morning. I still had a cake for later, Kate created a beautiful cake and expanded her cake decorating skills,  we had the best time together, and that best time together was my birthday present...one of the awesome kind, where memories are made.

On Sunday Sweetie and I took my cake to a birthday lunch and shared it and even though it was fairly plain looking, it was really, really delicious. Looks aren't everything, which is probably a good mantra for being a year older, too.

Happy Birthday to me!

Monday, November 05, 2018

The Birthday One


As we continue the Food Memories journey we come to January, where there is a birthday at the beginning of the month. This is followed with at least one birthday a month except for April (which gets Easter), June (which gets our parents' anniversary), and July (which has 4th of July). As an adult with my own family, all the other months have either one or more birthdays for a parent or sibling or one for my spouse or kid or myself. That's a lot of birthdays!


Those of you who are regular readers know that birthdays are a thing for me...I love them. That could be due to my enjoyment of a party, the joy of a celebration of someone I love, or...most likely...cake. I love cake and baking cakes and decorating them. A slice of cake and a cup of tea makes me really happy. Another reason I like birthdays is that the celebration is focused on one person. Growing up in a large family it's perhaps understandable that having the focus on one person in a positive way was rare. This was before the time when parents thought that building self esteem meant lots of compliments and little prizes. Self esteem wasn't much of a consideration. Building character was, and that was supposed to lead to self esteem I guess.


So a birthday was a celebration of the birthday boy or girl, a  way to let them know that you were glad they had been born, and a day to feel special. In our family when I was young, you were able to choose your cake and sometimes the whole meal. There was usually a birthday party with friends and then a birthday dinner with family. Since I enjoyed cake baking, after I was old enough to bake cakes without help, I became the family birthday cake maker. We had the usual layer cake, in different flavors and with all sorts of icing.


My older sister particularly loved a coconut layer cake.


My Mom had a spring birthday and usually had a strawberry shortcake birthday cake.

Sometimes I tried things like making a single layer that was a number. There was at least one decorated like an animal...a frog I think. With so many to make, my memories of any one in particular is sort of fuzzy.


I do know that my favorite was chocolate cake with chocolate icing and it was often baked in a heart shape. My older sister baked this one for me a few years ago...and it's chocolate cake!


At some point in time we started using Grandmother's special plate for birthday cakes. It's a little small for the job, but so pretty. It's pressed glass with little points on the edges, plus a luster finish to the glass that gives it a rainbow effect when the sun hits it. I was lucky enough to inherit it and I use it myself for cakes now and then.


The children's birthday party was fun and usually included games like pin the tail on the donkey or hide and seek. All the kids in the family would be there, not just the friends of the birthday honoree. When the older of us were old enough, we were the organizers of the parties. My Mom probably breathed a sigh of relief once that happened. A house full of her own children was challenge enough...imagine adding a half dozen more neighborhood kids!


I think my favorite birthday party besides my own was the one in late spring for a younger sister. We could have it outside and let everyone run around the yard and be as noisy as they wanted!


When my own children had birthdays they usually chose the cake and that seemed to change from year to year. Until they were school aged, birthday parties were usually just family and maybe a friend or two. Even when they went to school the parties were pretty simple for a few years. Later we had things like a movie party at a local museum or bumper cars at the fun center but the number of kids invited was fairly small. A favorite of my daughter was one at a raceway when we lived in Berkeley and, as a teen, one in the old farmhouse that included silly string and concluded with an Indiana Jones movie. The birthdays were more about friends and fun than food. Still cake and ice cream was never turned down...even mini-cakes like the one below that I made for a friend.


Max liked pies, but really he would eat almost anything so cake was fine with him. Sweetie prefers pie or cheesecake for his birthday and my California sister prefers pecan pie for her birthday, so it doesn't even have to be cake.


What are the birthday food traditions in your family. Wanna share?

Monday, February 05, 2018

Queen Mum Revisited


I've baked Maida Heatter's version of the Queen Mother Cake a number of times and it is always a hit.

 After hearing a request for a chocolate cake, covered in chocolate...well, anything covered in chocolate actually, I had some fun paging through cookbooks and visiting online sources, too.


In the end the Queen Mother Cake sounded like the perfect thing to make, but with a slight variation. I decided to make it birthday worthy by including some sour cherries that had been bathed in cognac for awhile. It made for a surprise here and there in the cake rather than a dominant theme.

Of course the star of the dessert was the moist, dense but tender cake and that awesome ganache covering it. This is a flourless chocolate cake made with ground almonds instead of the flour. Spend plenty of time creaming the butter and the sugar and adding the eggs because that, plus the whipped egg whites, are what keeps the cake from being flat and too dense to enjoy. The finished cake was fragrant with chocolate and so rich that you only needed a small slice. To gild the lily (and provide a nice contrast to the intensity of the chocolate), those who enjoy dairy had a dollop of softly whipped cream with their slice. Decadent, and delicious. Happy Birthday G!


Queen Mother's Cherry Chocolate Cake with Ganache On Top
12 portions
A variation of Queen Mother Cake in Maida Heatter's Book of Great Chocolate Desserts


6 oz. almond flour (I used King Arthur Flour's)
6 oz. semisweet chocolate, cut into small pieces (I used Scharffen Berger's)
3/4 cup granulated sugar, divided
6 oz. (1 1/2 sticks) non-dairy margarine or butter, at room temperature
6 eggs, separated
1/8 teaspoon salt
1 teaspoon lemon juice
1 cup pitted sour cherries, drained if needed
Enough cognac to cover the cherries, about 3/4 cup

Adjust a rack one-third up in the oven. Preheat the oven to 375 degrees F.

Grease the bottom and sides of a 9 x 3-inch springform pan and line the bottom with a round of baking-pan liner (parchment works well) cut to fit. Grease the paper. Dust the pan all over the inside with fine, dry bread crumbs. Invert the pan over paper, and tap lightly to shake out excess crumbs. Set the prepared pan aside.

In a small bowl marinate the cherries for at least an hour, pouring the cognac over the cherries. When ready to make the cake, drain the cherries thoroughly. The liquid can be used in cocktails or discarded.

Sift the almond flour into a small bowl and stir in 1/4 cup granulated sugar. Set aside

Place the chocolate in the top of a small double boiler over warm water on moderate heat. Cover until partially melted, then uncover and stir until just melted and smooth. Remove top pan from double boiler and set it aside until tepid or room temperature.

In a stand mixer bowl put the butter. Beat the butter until soft. Add the remaining 1/4 cup granulated sugar and beat to mix. Add the egg yolks one at a time, beating and scraping the sides of the bowl as necessary until smooth. On low speed add the chocolate and beat until mixed. Then add the almond flour/sugar mixture and beat, scraping the bowl, until incorporated. If you have only one stand mixer bowl, transfer batter to another large bowl. If you have two, leave batter in stand mixer bowl and set aside while you prepare the egg whites.

Wash and rinse out and dry the stand mixer bowl if there is batter clinging to the sides. In that large bowl of a stand mixer, with clean beaters (I used the whisk attachment) beat the whites with the salt and lemon juice, starting on low speed and increasing it gradually. When the whites barely hold a soft shape, reduce the speed a bit and gradually add 1/4 cup granulated sugar. On high speed continue to beat until the whites hold a straight point when the beaters are slowly raised. Do not overbeat. Whites should not be stiff or dry.

Stir a large spoonful of the beaten whites into the chocolate mixture to soften it a bit. Then, in three additions, fold in the remaining whites. Do not fold thoroughly until the last addition and do not handle any more than necessary.

Turn 1/2 the batter into the prepared pan and spread to sides. Scatter the marinated cherries over the batter evenly. Cover with the remaining batter. Rotate the pan a bit briskly from left to right in order to level the batter.

Bake for 20 minutes at 375 degrees F. and then reduce the temperature to 350 degrees F. and continue to bake for an additional 50 minutes (total baking time is 1 hour and 10 minutes). Do not over bake; the cake should remain soft and moist in the center. (The top might crack a bit, but that is OK.) NOTE: I found that I needed to check the cake after about 30 minutes and that it was done, so check early and often.

Let cake stand on cooling rack until tepid, 50 - 60 minutes.

Release and remove the sides of the pan. Do not cut around the sides with a knife - it will make the rim of the cake messy. Let the cake stand until it is completely cool, or longer if you wish.

The cake will sink a little in the middle as it cools. Use a long, thin, sharp knife and cut the top level, removing the higher sides. Brush away loose crumbs. (I skipped this part, iced the cake right side up, and was very happy with the results. When the icing goes on its a little thicker in the center, which we found to be fine.)

Place a rack or a small board over the cake and carefully invert. Remove the bottom of the pan and the paper lining. The cake is now upside down; that is the way it will be iced (unless you do as I did and ice the top). Place four strips of baking-pan liner paper (each about 3 x 12 inches) around the edges of a cake plate (although I forgot to do this and the drips were enchanting). With a large, wide spatula, carefully  transfer the cake to the plate; check to be sure that the cake is touching the papers all around. The paper help to keep the icing off the plate when you ice the cake. (I chilled the cake, still on the springform pan bottom, overnight, then turned it out onto my hand, finger spread, removed the pan bottom & the paper and set the cake on a cake plate. Because it was cold it wasn't difficult to work with.)

Icing
1/2 cup soy creamer (or whipping cream)
6 oz. semisweet chocolate, cut into small pieces (I used Scharffen Berger semisweet for both cake and icing)
Scald the soy creamer  or whipping cream in a 5-6 cup saucepan over moderate heat until it begins to form small bubbles around the edges.  Add the chocolate and stir occasionally over heat for 1 minutes. Then remove the pan from the heat and whisk or stir until the chocolate is all melted and the mixture is smooth.

Let the icing stand at room temperature, stirring occasionally, for about 15 minutes or until the icing barely begins to thicken.

Stir to  mix the icing and pour it slowly over the top of the cake, pouring onto the middle. Use a long, narrow metal spatula to smooth the top and spread the icing until a little runs down the sides, then use a small, narrow metal spatula to smooth that icing over the sides. The icing on the sides should be thinner than that on the top.

Remove the strips of paper by pulling each on out toward a narrow end.

If desired, sprinkle decorations on top while icing is still wet.


Thursday, February 25, 2016

Marvelous Marmalade Cake


Right at the start I have to say that my photos for this post are not the best. They were taken after dark and I hadn't thought to take any, so not much thought went into them. That said, I hope they convey the convivial nature of the evening and a little bit of how wonderful this marmalade cake was. If the cake weren't so delicious, with the perfect moist crumb and just the right tang of orange, you never would have been subjected to my poor photos.


The star of all this is the baker, a warm and delightful, multi-talented woman who makes amazing food but understands that the food comes in second to the fun. She is a beautiful flower in the garden of eastern LA. I was lucky to not only be included for this birthday party of Mr. Let's Get This Justice Thing Right, but the nephews drove me to and fro on the LA freeways to make it happen. I am most grateful! The drives also gave me a chance to catch up with them.

Included in the fun was Ms. Designer, currently designing the most beautiful baby girl no doubt. Always a delight to visit with her. The youngster in the photo had a sunny smile the whole afternoon and evening. Heard about art from his brother and about favorite books from his cousins; always a great topic. All in all I'm so lucky to have shared the afternoon and evening with them all!


This cake is a plain one but one that goes perfectly with a dollop of whipped cream ... and champagne if you are lucky! It has a moist, crumbly texture, a delightful orange flavor with hints of almond and comes from Orangette's blog, one that I've been reading a long time. There were birthday candles, but I missed taking that photo.

Marmalade Cake just sounds good and she made it in February, 2010, so you know it's seasonal. It has marmalade, almonds and olive oil and is perfect for someone like me who is dairy intolerant. Here is what Orangette said about it, "As birthday cakes go, it was unassuming, even rustic: a single layer, pale gold and coarse-crumbed... But its flavor was something else: big, gutsy, rich with toasted nuts, and saturated, absolutely saturated, with the perfume of citrus." Check out the recipe by clicking on the link and let me know if you make it. I'm sure going to bake it now that I'm home and see if mine is anywhere near as good as the birthday cake from last weekend. Thank you Mimi!

Monday, February 15, 2016

Another Birthday Cake


One of the cool things about being a baker is that you can make just what you want for your own birthday. I did just that and was able to really enjoy a moist, fragrant chocolate Bundt cake that had a hint of bourbon. I made it with a combination of margarine and shortening so that the 'no dairy' fairy wouldn't rain on my parade, but otherwise mostly made it as described in this post.


For decoration I sifted some powdered sugar over the high points of the Bundt design and then my darling daughter added some bronze highlights to the sides using a food safe bronzing powder she brought from London. She sent me those roses, too. I'm a lucky woman.

Pretty and delicious and I used some duck eggs from our neighbors, so a little different that way, too. Didn't get a photo of it decorated with candles, but it was even prettier.


Trust me, if you ever need a cake for a chocolate lover, make this one!!

It really was the perfect ending to a great day...a private winery tour of White Rock Winery in Napa, the beautiful drive through green hills dotted with yellow mustard flowers to and from the winery, a down home supper  of Smokehouse BBQ, my slaw, and the cake for dessert. All four of us fit in Straight Shooter's vehicle so he took care of the driving and we were able to enjoy the ride!

Sunday, October 04, 2015

Truly Fall - A Time For Ganache


The signs of fall are all around. It takes the sun a much longer time...til after 7 am...to rise in the morning and evening comes much sooner, too.


The acorns are falling all around the base of the oak tree by the barn and the oak leaves are turning gold and brown and falling.


I collected a whole basket of walnuts on the deck yesterday. I prefer to gather them from the deck than from the ground because they bake on the deck and are ready to shell. The tomatoes are winding down and I harvested almost all of my pumpkins this morning and set them marching up the front steps. I changed out the wreath by the door to my fall one.


Since fall is my favorite season, it's great to see the signs of the season. There are also quite a few family birthdays around this time of year. Happy birthday to each of you...you know who you are, including the great guy in the photo at the top of the post (enjoying his cake with ganache topping)  who started celebrating early, for which I am grateful.

Even though I love the crisp fall air, it was lovely that yesterday was warm and dry. Our darling daughter visited and we sat out at the table on the front deck at lunch time catching up and


admiring her new painted rock art. Isn't she talented?


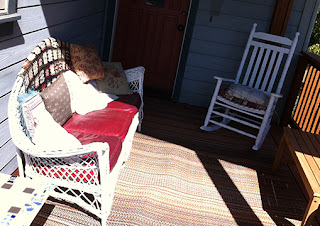
Later we lounged on the wicker couch and in the rocking chair on the newer part of the front deck after gathering morning glory seeds from the little dried pods left on the plant for just that reason. Next year we will have an amazing array of morning glories if all the seeds germinate. In the evening we went into town and ate outside so as to enjoy the lingering warmth of the evening. Soon there will be chilly evenings and (we hope!) rain to keep us inside. The furniture and rug will go inside, too, for the late fall and winter.

When we were back East for our visit, I made my sailing brother his favorite birthday cake ...chocolate cake, chocolate icing and raspberry jam in the middle. Just to make it even more decadent (and because I was using a cake mix and pre-made frosting due to a scarcity of baking equipment, especially a stand mixer, in the Marshall St. kitchen) I left the frosting off most of the top of the cake and instead poured on ganache, a decadent mixture of chocolate and cream. The birthday 'boy' even got to lick the bowl.

The trick to doing this kind of topping on a cake is to let the ganache mixture cool enough that it thickens a bit and doesn't run off the top of the cake, but is still warm enough that it will pour and spread without much help from your spatula. If you pour a little out and it is too thin, just wait a bit more and try again. Those drips down the side of the cake should be drips, not fountains.


I had fun with the decorations, using star shaped multi-colored sprinkles, spiral candles and some tiny silver dragees that everyone decided were about 30 years old. My Mom was not one to throw things away that still had use. She was a keeper.


Chocolate Ganache to top a cake 

4 oz. semi-sweet good quality chocolate, chopped fine
4 oz. heavy cream

Place the chopped chocolate into a medium bowl.
Over medium heat, bring the heavy cream to a simmer. Stir or swirl the cream to make sure all of it is hot. Pour heated cream over the chocolate and stir until mixture is smooth. Let cool, stirring gently every few minutes, until mixture reaches desired consistency.

Pour cooled ganache over the top of your cake. Use a spatula if necessary to smooth the top and encourage some of the ganache to drip down the sides. Chill in the refrigerator to set the ganache.

Sunday, May 25, 2014

Birthday Cake On A Hot Evening


When you know that the birthday party for a dear friend will include his two grandsons, it makes sense to plan for a birthday cake. I don't know about you, but I feel almost as much joy now as I did when I was a kid when a beautiful cake topped with lit candles is brought to the table and placed in front of the person having the birthday. The traditional birthday song is sung with whatever success can be expected, depending on the singing talents of the group.  What was sweet this time is that the eldest grandson, a second grader, was asked to step over and help blow out the candles after the song. I'm not sure that the birthday 'boy' blew at all. Fortunately there were only three candles, each representing a significant chunk of his life.

The cake requested was chocolate with vanilla icing. It has been a couple of years since I've baked a frosted layer cake...sad, isn't it? I do remember that chocolate cake crumbs just love to lodge in the vanilla icing, so I decided to do chocolate whipped cream on the sides and vanilla whipped cream between the layers and on top. What I didn't count on was a heat wave that had my kitchen hot enough to melt whipped cream.

Fortunately we had a new refrigerator delivered the day before, so the old one was virtually empty, although cold. I got my workout going up and down the new front steps numerous times carting baked layers to the old freezer section to firm up, whipped cream to the fridge section, to keep the whipped cream thick, frozen layers back into the kitchen, partially frosted cake to the freezer and then back in again later for the final topping of snowy whipped cream, a sprinkle of mixed sugar decorations, and a last trip to the freezer to get that cake as cold as we could for the drive to the birthday boy's home. I carried it on my lap during the drive and watched the frosting thaw on the way. It stayed on the cake, so back into the freezer it went while we ate dinner, then onto the counter to thaw a bit as we kept talking after dinner. Worked like a charm. The icing was firm enough that it didn't slide off the cake and the cake was thawed enough to enjoy its lovely texture and great chocolate flavor.

The cake was one I had been wanting to try from Maida Heatter's Book of Great Chocolate Desserts, a collection of amazingly wonderful chocolate desserts, including my favorite chocolate bundt cake, a silky chocolate pie and so much more. If you love chocolate, track down this book! I have at least a half a dozen places bookmarked to make in the future. This cake was one of them. It uses melted chocolate chips and buttermilk and is a moist, fine-grained, fairly light cake with a good chocolate flavor, but not one so intense that it would put off kids or people who don't adore chocolate. For those who adore chocolate I turn to the Sin City Cake, but I wasn't sure if it would be too intense for the kids.

The Chocolate Buttermilk Layer Cake recipe makes not two, but three nice layers, so it becomes a pretty impressive cake once you put it together. It is not a quick recipe, so allow time to prepare the pans, to cool the melted chocolate and the chill the baked, cooled cake layers for easier handling. Putting on icing can take some time, too. If you use whipped cream, be sure to ice with the whipped cream the same day you will serve the cake, and keep it chilled between icing the cake and serving it.

This tall, beautiful cake was a big hit and the hostess made sure to move it to her own plate after those who wanted them had seconds, so that there would be cake for breakfast! Since I have to make sure to not eat too much chocolate, that was just fine with me.

I'm not going to give a recipe for the whipped cream frosting since I was unhappy with the chocolate version and the vanilla version was just heavy cream whipped with a little sugar and 1 teaspoon of vanilla added once the cream started to hold its shape.

If you are keeping up with our kitchen spruce up, I painted the ceiling a flat, bright white in the old front hall and hallway on Friday and have picked out a nice gold color for the accent walls facing the barn. And there is the new Frigidaire side by side refrigerator, too...and cake! Life is good.


Chocolate Buttermilk Layer Cake

6 oz. (1 cup) semisweet chocolate morsels
1/4 cup water or prepared, cooled, coffee
2 1/3 cups sifted, unbleached all-purpose flour, divided
3 tablespoons unsweetened cocoa powder
1 teaspoon baking soda
1/4 teaspoon salt
6 oz. (1 1/2 sticks) sweet butter, at room temperature
1 teaspoon vanilla extract
1 3/4 cups granulated sugar
3 eggs (graded large or extra-large) at room temperature
1 cup buttermilk, at room temperature

Adjust two racks to divide the oven into thirds and preheat oven to 375 degrees F. Butter (or use pan spray) three 9-inch round layer-cake pans. Line the bottoms with wax paper cut to fit. Butter (or use pan spray) the wax paper. Mix together 1/3 cup flour and the cocoa in a small bowl. Use a fine-mesh strainer to dust the mixture over the bottom of each pan and then tilt the pan to make sure all inner surfaces are coated with the flour mixture. Shake out excess. (Working over the sink makes for easy clean up because this is messy work.) Set the prepared pans aside.

Place the chocolate morsels and water or coffee n the top of a small double boiled over hot water on moderate heat and cover until the chocolate is partially melted. Then uncover and stir until completely melted and smooth. Remove the top of the double boiler and set aside uncovered to cool.

Sift together the flour, baking soda, and salt and set aside.

In the large bowl of an electric mixer, cream the butter. Add the vanilla and then the sugar and beat to mix well. Add the eggs one at a time, scraping the bowl with a rubber or silicone spatula and beating until well mixed before adding the next egg. (The mixture might look curdled...that's O.K.) Add the melted, cooled chocolate and stir until smooth. On low speed gradually add the sifted dry ingredients in three additions, alternating with the buttermilk in two additions. Scrape the bowl with the spatula and beat only until smooth after each addition.

Divide the batter evenly between the prepared pans and smooth the tops.

Place one pan on one rack and the other two on the other rack. Do not place one directly above another one.

Bake for about 25 minutes, or until a toothpick gently inserted in the middle of the cake comes out clean and dry. (I switched two of the pans about half way through the baking and turned all the pans 180 degrees to help them bake evenly.) Check each pan carefully...don't overbake. I checked 5 minutes earlier, just in case.

Let the layers stand in the pans on a cooling rack for 10 - 15 minutes. Then, with a small sharp knife carefully cut around the sides to release. Cover each pan with a rack, invert pan and rack, remove the pan and the wax paper lining, cover with another rack and invert again, leaving the layers right side up. Let stand until completely cool. I put a sheet of baking parchment under each layer before I did the second inversion...that way each layer sat of parchment as it cooled and that made it easy to move the rack and layer to the freezer when they had cooled. These are somewhat delicate layers, so freezing makes them easier to handle when icing them.

Prepare a flat cake plate by placing four strips of wax paper around the outer edges. Place one layer upside down on the plate, checking to be sure that the wax papers touch the cake all around. Ice the first layer with about 1/2 cup of your favorite icing, then put the second layer on right side up. Ice the second layer with another 1/2 cup or so of icing, then place the final layer, right side up, on top. I like to ice the sides and then the top, but many people ice the top and then the sides. Choose which ever you like. Using an offset spatula makes it easier to apply the icing. Decorate as you choose. Chill for a while if your icing needs to set, then let the cake come to room temperature before serving. Cut yourself a piece and enjoy!


Saturday, July 13, 2013

A Special Birthday Girl


You probably know someone like her. She always thinks of others first. She has a huge heart, a love of family and community, makes sure that her neighbors are OK, works hard, and is a stellar friend. She is the kind of woman who doesn't expect thanks or recognition. She has a wicked sense of humor and a ready laugh. She uses her talents to enrich the lives of those she cares for.

I've been blessed with her friendship and she introduced me to the women's scholarship group I enjoy so much, P.E.O. We were soccer Moms before that and share a love of working with our hands and a skill for working with paperwork that drives others slightly mad.

Today I joined another mutual friend and Pam for a birthday lunch. We had delicious sandwiches and salad...and birthday cake of course.


I made the Perfect Party Cake, although I used whole eggs instead of egg whites, reducing the buttermilk by 2 tablespoons to keep the liquid proportions about right. I wanted a small cake since there were only three of us, so I used a metal cookie tin as the cake pan. Worked like a charm! The rest of the batter I baked up in a loaf pan for another use.

For the icing I used my favorite buttercream recipe, replacing the rum and mocha with some strawberry syrup I had on hand. With a few drops of red food color added, it was pretty and pink.

Since it was a small cake I cut it in half to make two layers...three layers would have been too much. The bottom cut side was given a nice thin layer of raspberry jam. Then I used a pastry bag to squirt buttercream over the jam, added the top layer of cake and frosted the whole thing with buttercream. Using the star tip, I added decorative edging and a few frosting stars on top for securing fresh raspberries. A final sprinkle of white, pink and red heart decors and the cake was ready to go.


 At the party I added some birthday candles (but have no photos since I left my camera at home by mistake).

Pam was delighted! She had no idea that I was baking her a cake. There was even a piece left over for Sweetie, who had been hard at work at home on the entry project.


So, if you have a friend like Pam, surprise her with this cute cake. It doesn't even have to be her birthday. You'll be glad you did... she will know that she is as cared for as those she takes care of.

Friday, July 20, 2012

Not Quite Health Food

Yes, you CAN eat your vegetables and get a chocolate fix at the same time. It still isn't exactly health food but with the right recipe it can be close (as long as you don't add icing like I did). A few days ago King Arthur Flour added its recipe to the many out there for Chocolate Zucchini Bread. It isn't often that I believe I have a better recipe than King Arthur Flour's kitchens have, but this time it's true. Thanks to amazing YA writer Tanita Davis and her friends, I have a super special chocolate zucchini bread that also has double chocolate due to the chocolate chips and is easy to jazz up with ingredients like dried or fresh cherries, dried cranberries, etc. It even makes a spectacular 'cake' to celebrate a round number birthday, which is how I used it this week. Trust me, that added fruit makes it an extra-special recipe as does the fact that it uses plain yogurt which adds tang, helps reduce the amount of oil needed and helps the bread stay moist. Recipe is below, along with an icing recipe.


The owner of Cool Fitness in Santa Rosa, an inspirational and delightful personal trainer, coach, athlete and businesswoman, reached a round number birthday a few days ago. To celebrate I brought in a 'cake' made out of chocolate zucchini bread mini-muffins which were arranged in the shape of the birthday being celebrated, then frosted and decorated. It was almost as sparkly as she is. The idea of making a 'cake' this way was borrowed. I'm pretty sure I first saw it in a book about cupcakes, but since I do surf the web, it really could have been anyplace. You can make almost any shape that way, although this was the first time I tried it. I used the version of the chocolate zucchini bread with the dried cherries. Thanks to second sister down and her family for the great Michigan dried cherries!

One of the nice things about this week was that I also had some time to do some things that had been on my list for a while. One was making a new cover for the seat of a chair in the living room. Turned out that the base had broken down, so Sweetie fashioned another from some plywood. I covered that with multiple layers of batting and then the fashion fabric cover. I found the fabric in Monterey...it is sort of a batik style. It has always been a chair with a stiff seat and straight back, but sometimes that is the perfect chair. Grandma L loves sitting in it. Here is how it looks:


The other thing I've been meaning to do is to play around with a borrowed SLR camera, a Canon Rebel. Very cool camera! Here is the second photo I took with it:

Not bad for a beginner, right? Pi was, as usual, right by my side keeping me company. He really is a lovely dog, even if he STILL is chasing cats.


PHENOMENAL CHOCOLATE CHERRY ZUCCHINI BREAD or MINI-CAKES
based on a recipe by Tanita Davis & Robin Brande & Jama Rattigan

3 cups flour
1/4 cup unsweetened cocoa powder
1 tsp baking soda
1/2 tsp baking powder
1 tsp salt
1 ½ cups sugar
3 eggs or equivalent egg substitute
1/3 cup vegetable oil
½ cup plus 2 tablespoons plain yogurt
1 tsp vanilla
2 cups shredded zucchini (about 2-3 medium zucchini)
½ cup chopped nuts ( I used walnuts)
½ cup chocolate chips
½ cup sweet dried cherries (preferably from Michigan), chopped into about ¼ inch dice

Preheat oven to 350 degrees. Lightly grease two 9x5" loaf pans with canola spray. Alternatively, lightly grease 24 mini-muffin pans.

In a large bowl, combine flour, cocoa, soda, baking powder, and salt. Mix well. In a separate bowl, beat eggs (or egg substitute and water) with the sugar until well combined. Add oil, yogurt and vanilla. Beat to combine, then stir in zucchini. Add wet bowl to dry bowl and stir until just moistened. Stir in nuts and chocolate chips and cherries.

Spoon evenly into pans. Bake 55-60 minutes or until toothpick comes out clean if baking in loaf pans. If baking in mini-muffin pans, bake 15. Cool 10 minutes in pans, then turn onto racks. This bread is yummy when eaten still warm...the chips are melty and the fragrance is full chocolate!

To make a 'cake' out of the mini-cakes, line a flat serving plate or board with foil. Group the mini-cakes into a shape, then swirl on icing to join the cakes into the shape. Decorate as desired. I used the following buttercream icing:

Vanilla Easy Buttercream Icing

1/2 pound confectioners' sugar
4 tablespoons butter, softened
3 tablespoons hot milk
1/2 teaspoon pure vanilla extract

Sieve the sugar into a bowl. In another bowl beat the butter until soft and fluffy. Beat in the sugar.

In another, small, bowl mix together the hot milk and the vanilla. Add to the sugar mixture and beat until smooth. If mixture is too stiff, add a bit of hot milk. If too thin, add a bit more sugar.

Enough for 12 cupcakes or 24 mini-cupcakes.

Sunday, March 21, 2010

How Sweet It Is

March is just full of sweet opportunities. A number of my scholarship sisters have March birthdays, so does Sweetie, and so do other family members and friends.

For Sweetie's birthday we had a deluxe dinner at home...just the two of us...and I made a variation of the March Daring Baker challenge...so I'll tell you about it when I post about the challenge later in the month. I can tell you that the birthday version included shamrock cookies since it was St. Patrick's day. I can show you a photo of those cookies.

Then the Darling Mother had her birthday...and DM asked for a vanilla cake with chocolate icing. My Mom (who is darling in her own way, but not DM) teased me about having to make a boring, same old same old cake.

Now I could have made a yellow cake from a mix and swirled on some chocolate icing from a can. But, really, can you imagine that I would? Much more fun to delve into some cookbooks and old files and come up with something just a little different and way more sophisticated.

For starters I took the Perfect Party cake that the Daring Bakers baked last year and made it a vanilla instead of lemon cake. I think I over baked it because it was drier than I would have liked,but had great flavor.


For the filling I made a chocolate custard from a recipe in a great cookbook called Butter Sugar Flour Eggs by Gale Gand that was like a very deep, dark chocolate cornstarch pudding.

I used some Bensdorp Dutch-process cocoa from King Arthur...very delicious stuff...and it made the filling very intensely chocolate.

When I filled the layers it slipped a bit so the cake was a bit lopsided. I was worried that the filling wouldn't set up enough and that when it was cut that it would fall apart. Fortunately the cake was dry...I guess it soaked up some of the custard's extra moisture.


The top and sides were slathered with semi-sweet chocolate ganache. I love the stuff, but it sure is messy to work with.

There was some left after the top and sides were finished so I chilled it a little bit and then whipped it to use to decorate the bottom edge with tiny stars and to make some swirls on the top to hold candles.


It was a hit with the birthday girl and sure did look pretty.

Now I want to try making the full recipe that the filling came from. It's called Brooklyn Blackout Cake and is a cocoa chocolate cake with the cocoa filling and crumbled cake on the top and sides. Sounds wicked good! Might have to make it for one of those later in the month birthdays.


Jazzy Vanilla and Chocolate Party Cake

Vanilla Party Cake
based on Perfect Party Cake in Baking: from my home to yours by Dorie Greenspan

2 ¼ cups cake flour
1 tablespoon baking powder
½ teaspoon salt
1 ¼ cups whole milk or buttermilk (I prefer buttermilk)
4 large egg whites
1 ½ cups sugar
1 stick (8 tablespoons or 4 ounces) unsalted butter, at room temperature
1 teaspoon pure vanilla extract (if you want a really white cake, use clear vanilla extract)

Centre a rack in the oven and preheat the oven to 350 degrees F. Butter two 9 x 2 inch round cake pans and line the bottom of each pan with a round of buttered parchment or wax paper. Put the pans on a baking sheet.

Sift together the flour, baking powder and salt.

Whisk together the milk and egg whites in a medium bowl.

In a large bowl or a stand mixer bowl, cream the sugar and the butter, working with the paddle or whisk attachment, or with a hand mixer, and beat at medium speed for a full 3 minutes, until the butter and sugar are very light.

Beat in the extract, then add one third of the flour mixture, still beating on medium speed.
Beat in half of the milk-egg mixture, then beat in half of the remaining dry ingredients until incorporated.

Add the rest of the milk and eggs beating until the batter is homogeneous, then add the last of the dry ingredients.

Finally, give the batter a good 2- minute beating to ensure that it is thoroughly mixed and well aerated.

Divide the batter between the two pans and smooth the tops with a rubber spatula.

Bake for 30-35 minutes, or until the cakes are well risen and springy to the touch – a thin knife inserted into the centers should come out clean.

Transfer the cakes to cooling racks and cool for about 5 minutes, then run a knife around the sides of the cakes, unfold them and peel off the paper liners.

Invert and cool to room temperature, right side up (the cooled cake layers can be wrapped airtight and stored at room temperature overnight or frozen for up to two months).

Chocolate Custard Filling
from Butter, Sugar, Flour, Eggs by Gale Gand

3 cups water
2 ½ cups sugar
1 tablespoon corn syrup
1 ½ cups cocoa powder, preferably Dutch-process
Scant 2/3 cup cornstarch
6 tablespoons (3/4 stick) unsalted butter, cut into pieces
½ teaspoon pure vanilla extract

Pour 2 ½ cups of the water, the sugar, corn syrup, and cocoa powder into a large saucepan and bring to a boil over medium-high heat, whisking occasionally. Dissolve the cornstarch in ½ cup of water. Whisk into the cocoa mixture in the saucepan and return the mixture to a boil, whisking constantly. Cook, whisking constantly, until very thick, 4 to 5 minutes. Remove from the heat and stir in the butter and vanilla. Pour into a bowl. Cover with plastic wrap, lightly pressing the plastic against the surface to prevent a skin from forming. Chill until firm, about 45 minutes.
Fills a three or four layer 9 inch cake.

Ganache Frosting
8 ounces bittersweet or semisweet chocolate, finely chopped (use your favorite…you will really taste the chocolate)
8 ounces heavy cream (I use whipping cream)

Set the chopped chocolate in a mixing bowl.

Pour on the cream and mix well.

At half power in the microwave, heat the mixture for a minute. Stir well. Repeat until the chocolate is melted and the mixture is smooth. Let the ganache stand and come to room temperature before using.

If it thickens too much to frost with and get a nice shiny glaze, reheat at half power for 30 seconds and stir. If it is too thin, let cool some more to thicken a bit.

To Assemble the Cake
Using a sharp serrated knife and a gentle sawing motion, slice each layer horizontally in half.
Put one layer cut side up on a cardboard cake round or a cake plate protected by strips of wax or parchment paper. (I was sooo glad I used wax paper strips because the ganache was sooo messy...or else it was because I was sooo tired that I was messy...either way, use the strips)

Spread it with one cup of the chocolate custard.

Top with another layer, spread with one cup chocolate custard and then do the same with a third layer (you’ll have used about half the custard - reserve the rest for another use).

Place the last layer cut side down on top of the cake.

Pour the ganache frosting over the top and use a thin spatula to spread evenly. Use the spatula to frost the sides with more ganache. If it seems too liquid, let cool a bit until firmer before frosting the sides. Let remaining ganache, if any, cool some more until firm, then use to pipe a shell or other decorative border where the cake meets the serving plate.

Chill until frosting is firm, about 15 minutes, then remove the wax or parchment paper strips (if using) and discard them.

The cake is ready to serve as soon as it is chilled, but you can let it sit and set for a couple of hours in the refrigerator. Whether you wait or slice and enjoy it immediately, the cake should be served at room temperature; the ganache is too firm when served cold.

Storing
The cake is best the day it is made, but you can refrigerate it, well covered, for up to two days. Bring it to room temperature before serving. If you want to freeze the cake, slide it into the freezer to set, then wrap it really well – it will keep for up to 2 months in the freezer; defrost it, still wrapped overnight in the refrigerator.