Showing posts with label buttercream. Show all posts

Saturday, March 04, 2023

Cupcakes and Buttercream


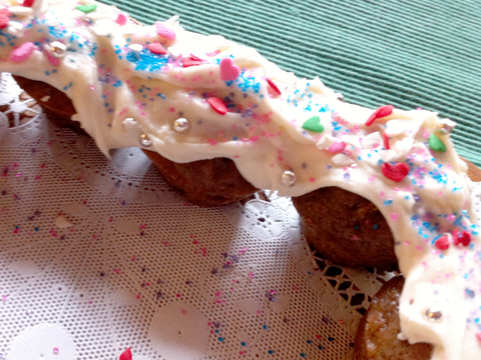
Not doing too much baking these days. I save it for special occasions like a recent birthday celebration. Didn't get the best photos, but they were truly outstanding cupcakes...I think it was the buttercream! If I share like this I'm not as tempted to eat them all myself. Would like to look OK in a bathing suit this summer...no, not a bikini...it would take forever to get that slim!

I decided to do cupcakes since they are easy serve and can be cut in half if the celebrants want a small dessert. The buttercream is a recipe that my daughter gave me. She has been baking amazing layer cakes as a hobby and giving the cakes to co-workers and this is the buttercream she uses. The cupcakes are from the book Perfect Cakes by America's Test Kitchen. On page 70 there is a cupcake recipe that produces a lovely yellow cupcake that is moist and fine textured. You can use it for cupcakes with any frosting, not just this buttercream. You use a stand mixer, start with the dry ingredients in the bowl, add the butter a piece at a time and the paddle combines it with the dry ingredient until it looks like sand, then you beat in the eggs and, finally the milk and vanilla extract. I added a bit of lemon oil, too, since I wanted lemon flavor. There was also lemon in the buttercream. Ignore the chocolate mini muffins in the photos...they were purchased and a lot were left over because, hello, buttercream!


Vanilla Cupcakes

Makes 12

1 3/4 cups (8 3/4 ounces) all-purpose flour
1 cup (7 ounces) granulated sugar
1 1/2 teaspoons baking powder
3/4 teaspoon salt
12 tablespoons unsalted butter, cut into 12 pieces and softened
3 large eggs at room temperature
3/4 cup milk
1 1/2 teaspoons vanilla extract

Adjust the oven rack to middle position and preheat to 350 degrees F. Line 12-cup muffin tin with paper or foil liner cups.

Using a stand mixer and paddle attachment, mix flour, sugar, baking powder and salt together on low speed. Add butter, 1 piece at a time, and mix until mixture resembles coarse sand, about 1 minute. Add eggs, one at a time, beating until combined and scraping beater and bowl as needed. Add milk and vanilla, increase speed to medium, and mix until light and fluffy, with no lumps remaining, about 3 minutes.

Portion batter evenly between the 12 lined cups. Bake until toothpick inserted in center comes out clean, about 18-20 minutes. Rotate pan about halfway through baking. Cool cupcakes in the tin 10 minutes on a wire rack. Remove cupcakes from tin and cool directly on the wire rack until fully cool, about 1 hour.

Frost with favorite frosting and decorate as desired.

Lemon Buttercream Frosting
from Kate  - enough for a layer cake - divide in half for 12 cupcakes
(Note: 4 sticks of butter and a 32 oz bag of powdered sugar will yield enough frosting to crumb coat and frost a 3-layer 6" cake. Use 1 cup powdered sugar to every stick (8 tablespoons) of butter.)

8 cups powdered sugar
4 sticks salted butter at room temperature (1 pound)
1/4 to 1/2 cup heavy whipping cream 
lemon extract to taste (for vanilla frosting use vanilla extract)

Use the paddle attachment for your stand mixer and whip the butter well, scraping down the sides as needed, until it is uniform and fluffy and light colored.

After the sugar is all mixed in, add 1/4 cup heavy whipping cream and about 2 teaspoons flavoring, then whip that together. If consistency doesn't seem right, add additional whipping cream 1 tablespoon at a time, whipping well after each addition. Use to ice cupcakes. Use pastry bag and tips to do decorative icing. Add color to buttercream if desired.

Gel or powder food coloring is best for coloring the frosting. A splurge is oil-based coloring brand Colour Mill - the best and some very cool colors...found on Amazon.


Saturday, July 13, 2013

A Special Birthday Girl


You probably know someone like her. She always thinks of others first. She has a huge heart, a love of family and community, makes sure that her neighbors are OK, works hard, and is a stellar friend. She is the kind of woman who doesn't expect thanks or recognition. She has a wicked sense of humor and a ready laugh. She uses her talents to enrich the lives of those she cares for.

I've been blessed with her friendship and she introduced me to the women's scholarship group I enjoy so much, P.E.O. We were soccer Moms before that and share a love of working with our hands and a skill for working with paperwork that drives others slightly mad.

Today I joined another mutual friend and Pam for a birthday lunch. We had delicious sandwiches and salad...and birthday cake of course.


I made the Perfect Party Cake, although I used whole eggs instead of egg whites, reducing the buttermilk by 2 tablespoons to keep the liquid proportions about right. I wanted a small cake since there were only three of us, so I used a metal cookie tin as the cake pan. Worked like a charm! The rest of the batter I baked up in a loaf pan for another use.

For the icing I used my favorite buttercream recipe, replacing the rum and mocha with some strawberry syrup I had on hand. With a few drops of red food color added, it was pretty and pink.

Since it was a small cake I cut it in half to make two layers...three layers would have been too much. The bottom cut side was given a nice thin layer of raspberry jam. Then I used a pastry bag to squirt buttercream over the jam, added the top layer of cake and frosted the whole thing with buttercream. Using the star tip, I added decorative edging and a few frosting stars on top for securing fresh raspberries. A final sprinkle of white, pink and red heart decors and the cake was ready to go.


 At the party I added some birthday candles (but have no photos since I left my camera at home by mistake).

Pam was delighted! She had no idea that I was baking her a cake. There was even a piece left over for Sweetie, who had been hard at work at home on the entry project.


So, if you have a friend like Pam, surprise her with this cute cake. It doesn't even have to be her birthday. You'll be glad you did... she will know that she is as cared for as those she takes care of.

Friday, July 20, 2012

Not Quite Health Food

Yes, you CAN eat your vegetables and get a chocolate fix at the same time. It still isn't exactly health food but with the right recipe it can be close (as long as you don't add icing like I did). A few days ago King Arthur Flour added its recipe to the many out there for Chocolate Zucchini Bread. It isn't often that I believe I have a better recipe than King Arthur Flour's kitchens have, but this time it's true. Thanks to amazing YA writer Tanita Davis and her friends, I have a super special chocolate zucchini bread that also has double chocolate due to the chocolate chips and is easy to jazz up with ingredients like dried or fresh cherries, dried cranberries, etc. It even makes a spectacular 'cake' to celebrate a round number birthday, which is how I used it this week. Trust me, that added fruit makes it an extra-special recipe as does the fact that it uses plain yogurt which adds tang, helps reduce the amount of oil needed and helps the bread stay moist. Recipe is below, along with an icing recipe.


The owner of Cool Fitness in Santa Rosa, an inspirational and delightful personal trainer, coach, athlete and businesswoman, reached a round number birthday a few days ago. To celebrate I brought in a 'cake' made out of chocolate zucchini bread mini-muffins which were arranged in the shape of the birthday being celebrated, then frosted and decorated. It was almost as sparkly as she is. The idea of making a 'cake' this way was borrowed. I'm pretty sure I first saw it in a book about cupcakes, but since I do surf the web, it really could have been anyplace. You can make almost any shape that way, although this was the first time I tried it. I used the version of the chocolate zucchini bread with the dried cherries. Thanks to second sister down and her family for the great Michigan dried cherries!

One of the nice things about this week was that I also had some time to do some things that had been on my list for a while. One was making a new cover for the seat of a chair in the living room. Turned out that the base had broken down, so Sweetie fashioned another from some plywood. I covered that with multiple layers of batting and then the fashion fabric cover. I found the fabric in Monterey...it is sort of a batik style. It has always been a chair with a stiff seat and straight back, but sometimes that is the perfect chair. Grandma L loves sitting in it. Here is how it looks:


The other thing I've been meaning to do is to play around with a borrowed SLR camera, a Canon Rebel. Very cool camera! Here is the second photo I took with it:

Not bad for a beginner, right? Pi was, as usual, right by my side keeping me company. He really is a lovely dog, even if he STILL is chasing cats.


PHENOMENAL CHOCOLATE CHERRY ZUCCHINI BREAD or MINI-CAKES
based on a recipe by Tanita Davis & Robin Brande & Jama Rattigan

3 cups flour
1/4 cup unsweetened cocoa powder
1 tsp baking soda
1/2 tsp baking powder
1 tsp salt
1 ½ cups sugar
3 eggs or equivalent egg substitute
1/3 cup vegetable oil
½ cup plus 2 tablespoons plain yogurt
1 tsp vanilla
2 cups shredded zucchini (about 2-3 medium zucchini)
½ cup chopped nuts ( I used walnuts)
½ cup chocolate chips
½ cup sweet dried cherries (preferably from Michigan), chopped into about ¼ inch dice

Preheat oven to 350 degrees. Lightly grease two 9x5" loaf pans with canola spray. Alternatively, lightly grease 24 mini-muffin pans.

In a large bowl, combine flour, cocoa, soda, baking powder, and salt. Mix well. In a separate bowl, beat eggs (or egg substitute and water) with the sugar until well combined. Add oil, yogurt and vanilla. Beat to combine, then stir in zucchini. Add wet bowl to dry bowl and stir until just moistened. Stir in nuts and chocolate chips and cherries.

Spoon evenly into pans. Bake 55-60 minutes or until toothpick comes out clean if baking in loaf pans. If baking in mini-muffin pans, bake 15. Cool 10 minutes in pans, then turn onto racks. This bread is yummy when eaten still warm...the chips are melty and the fragrance is full chocolate!

To make a 'cake' out of the mini-cakes, line a flat serving plate or board with foil. Group the mini-cakes into a shape, then swirl on icing to join the cakes into the shape. Decorate as desired. I used the following buttercream icing:

Vanilla Easy Buttercream Icing

1/2 pound confectioners' sugar
4 tablespoons butter, softened
3 tablespoons hot milk
1/2 teaspoon pure vanilla extract

Sieve the sugar into a bowl. In another bowl beat the butter until soft and fluffy. Beat in the sugar.

In another, small, bowl mix together the hot milk and the vanilla. Add to the sugar mixture and beat until smooth. If mixture is too stiff, add a bit of hot milk. If too thin, add a bit more sugar.

Enough for 12 cupcakes or 24 mini-cupcakes.

Tuesday, September 21, 2010

Yes, We Have Cupcakes

Amazing as it may seem to those of us who know how to bake cupcakes, on the retail market people are willing to pay over $3 per cupcake and I know of a place that gets over $5 per cupcake. I think that makes this a craze...a cupcake craze.

What is the appeal of cupcakes?

For one thing, most cupcakes are pretty, even fanciful. Adorned with swirls of icing, sprinkles, coconut or nuts, sparkling sugar in clear or colored form, and cute candies or candied flowers, too, they look good enough to eat.

That's the second part...they are a small indulgence. If you cut them in halves or quarters, you can share them with friends. If you buy four kinds and have four friends, each of you can taste four flavor combinations!

A variety of flavor combos is another part of the appeal. One place might combine chocolate and peanut butter for a proven pairing of compatible tastes, while another place might combine salted caramel and peanut butter for something a bit trendier.

Another winning notion is that these beauties are portable and usually less expensive than a whole cake...but cuter than a cake slice.

Last, but certainly not least, they look like a party! How many of us remember cupcakes as the main attraction at school birthday parties? Since busy Moms could purchase them at a bakery but stay at home Moms could make a batch themselves, it was a treat that provided equal opportunity to Moms...and we got to eat cake!

So no matter what reason you like for enjoying a cupcake, I hope you will find one so that you consider making a batch yourself.

Last week I made a batch of chocolate ones to celebrate a friend's birthday. I used packaged chocolate cake mix (but I added more dark cocoa and some additional vanilla extract and almond extract to mask some of the chemical taste that is often found with commercial cake mixes). I really didn't have the time to make from scratch cupcakes since I needed the time for the frosting.

One of the best parts of a cupcake should truly be the frosting. In this case it really was! I made Coffee Rum Buttercream and piped it on in a nice swirl. Notice that this recipe allows you to make really well defined swirls of buttercream. Since I'm in a fall mood already, I added orange and chocolate sprinkles and popped a candy corn in the middle of each.

Pretty?...check. Dividable?...check. Interesting flavor combo?...check. Cute and portable?...check. Looks like a party?...absolutely!

Since you probably have your own favorite chocolate cake recipe or cake mix, I'm just going to give you the buttercream recipe. You can use the photos for inspiration to make them cute, or create your own decorations. It's hard to go wrong with cupcakes.

Coffee Rum Buttercream

4 large egg whites
1 cup sugar
24 tablespoons (3 sticks or 1 ½ cups) unsalted butter, softened
2 tablespoons espresso powder
2 tablespoons rum

1. Whisk the egg whites and sugar together in the bowl of an electric mixer. Set the bowl over simmering water (but don’t let the bottom of the bowl touch the water) and whisk gently until the sugar is dissolved and the egg whites are hot, about 3 minutes.

2. Attach the bowl to the mixer and whip with the whisk on medium speed until cooled, about 5 minutes. Switch to the paddles and beat in the softened butter a few small pieces at a time, and continue beating until the buttercream is smooth, about 6 – 10 minutes. While the buttercream is becoming smooth, dissolve the espresso powder in the rum in a small bowl. Once the buttercream is smooth, add the espresso mixture, a little at a time and beat until everything is smooth again.

3. Put the buttercream in a piping bag fitted with a large star tip. Pipe swirls of buttercream on the top of each cupcake and decorate as you like. Any leftover buttercream can be stored in the fridge for up to a week.

Sunday, March 30, 2008

Perfectly Delicious


At some point in your life you, too, will want to have the Perfect Party Cake. Dorie Greenspan’s book Baking: from my home to yours has the recipe and you can also find it on many Daring Baker’s sites this month and on our hostess, Morven’s blog Food Art and Random Thoughts here. She certainly made a great choice for the challenge! The recipe is also at the bottom of this post

Go to the Daring Baker’s blogroll HERE to browse through the many, many versions of this lovely cake.


PERFECT PARTY CAKE
From Dorie Greenspan’s Baking from My Home to Yours (pages 250-252)

Words from Dorie
Stick a bright-coloured Post-it to this page, so you’ll always know where to turn for a just-right cake for any celebration. The original recipe was given to me by my great dear friend Nick Malgieri, of baking fame, and since getting it, I’ve found endless opportunities to make it – you will too. The cake is snow white, with an elegant tight crumb and an easygoing nature: it always bakes up perfectly; it is delicate on the tongue but sturdy in the kitchen – no fussing when it comes to slicing the layers in half or cutting tall, beautiful wedges for serving; and, it tastes just as you’d want a party cake to taste – special. The base recipe is for a cake flavoured with lemon, layered with a little raspberry jam and filled and frosted with a classic (and so simple) pure white lemony hot-meringue buttercream but, because the elements are so fundamental, they lend themselves to variation (see Playing Around), making the cake not just perfect, but also versatile.

For the Cake
2 ¼ cups cake flour
1 tablespoon baking powder
½ teaspoon salt
1 ¼ cups whole milk or buttermilk (I prefer buttermilk with the lemon)
4 large egg whites
1 ½ cups sugar
2 teaspoons grated lemon zest
1 stick (8 tablespoons or 4 ounces) unsalted butter, at room temperature
½ teaspoon pure lemon extract

For the Buttercream
1 cup sugar
4 large egg whites
3 sticks (12 ounces) unsalted butter, at room temperature
¼ cup fresh lemon juice (from 2 large lemons)
1 teaspoon pure vanilla extract

For Finishing
2/3 cup seedless raspberry preserves stirred vigorously or warmed gently until spreadable
About 1 ½ cups sweetened shredded coconut

Getting Ready
Centre a rack in the oven and preheat the oven to 350 degrees F. Butter two 9 x 2 inch round cake pans and line the bottom of each pan with a round of buttered parchment or wax paper. Put the pans on a baking sheet.

To Make the Cake
Sift together the flour, baking powder and salt.
Whisk together the milk and egg whites in a medium bowl.
Whisk together the sugar and lemon zest in a mixer bowl or another large bowl and rub them together with your fingers until the sugar is moist and fragrant.
Add the butter and working with the paddle or whisk attachment, or with a hand mixer, beat at medium speed for a full 3 minutes, until the butter and sugar are very light.
Beat in the extract, then add one third of the flour mixture, still beating on medium speed.
Beat in half of the milk-egg mixture, then beat in half of the remaining dry ingredients until incorporated.
Add the rest of the milk and eggs beating until the batter is homogeneous, then add the last of the dry ingredients.
Finally, give the batter a good 2- minute beating to ensure that it is thoroughly mixed and well aerated.
Divide the batter between the two pans and smooth the tops with a rubber spatula.
Bake for 30-35 minutes, or until the cakes are well risen and springy to the touch – a thin knife inserted into the centers should come out clean
Transfer the cakes to cooling racks and cool for about 5 minutes, then run a knife around the sides of the cakes, unfold them and peel off the paper liners.
Invert and cool to room temperature, right side up (the cooled cake layers can be wrapped airtight and stored at room temperature overnight or frozen for up to two months).

To Make the Buttercream
Put the sugar and egg whites in a mixer bowl or another large heatproof bowl, fit the bowl over a plan of simmering water and whisk constantly, keeping the mixture over the heat, until it feels hot to the touch, about 3 minutes.
The sugar should be dissolved, and the mixture will look like shiny marshmallow cream.
Remove the bowl from the heat.
Working with the whisk attachment or with a hand mixer, beat the meringue on medium speed until it is cool, about 5 minutes.
Switch to the paddle attachment if you have one, and add the butter a stick at a time, beating until smooth.
Once all the butter is in, beat in the buttercream on medium-high speed until it is thick and very smooth, 6-10 minutes.
During this time the buttercream may curdle or separate – just keep beating and it will come together again.
On medium speed, gradually beat in more lemon juice, waiting until each addition is absorbed before adding more, and then the vanilla.
You should have a shiny smooth, velvety, pristine white buttercream. Press a piece of plastic against the surface of the buttercream and set aside briefly.

To Assemble the Cake
Using a sharp serrated knife and a gentle sawing motion, slice each layer horizontally in half.
Put one layer cut side up on a cardboard cake round or a cake plate protected by strips of wax or parchment paper.
Spread it with one third of the preserves.
Cover the jam evenly with about one quarter of the buttercream.
Top with another layer, spread with preserves and buttercream and then do the same with a third layer (you’ll have used all the jam and have buttercream leftover).
Place the last layer cut side down on top of the cake and use the remaining buttercream to frost the sides and top.
Press the coconut into the frosting, patting it gently all over the sides and top.

Serving
The cake is ready to serve as soon as it is assembled, but I think it’s best to let it sit and set for a couple of hours in a cool room – not the refrigerator. Whether you wait or slice and enjoy it immediately, the cake should be served at room temperature; it loses all its subtlety when it’s cold. Depending on your audience you can serve the cake with just about anything from milk to sweet or bubbly wine.

Storing
The cake is best the day it is made, but you can refrigerate it, well covered, for up to two days. Bring it to room temperature before serving. If you want to freeze the cake, slide it into the freezer to set, then wrap it really well – it will keep for up to 2 months in the freezer; defrost it, still wrapped overnight in the refrigerator.

Playing Around
Since lemon is such a friendly flavour, feel free to make changes in the preserves: other red preserves – cherry or strawberry – look especially nice, but you can even use plum or blueberry jam.

Fresh Berry Party Cake
If you will be serving the cake the day it is made, cover each layer of buttercream with fresh berries – use whole raspberries, sliced or halved strawberries or whole blackberries, and match the preserves to the fruit. You can replace the coconut on top of the cake with a crown of berries, or use both coconut and berries. You can also replace the buttercream between the layers with fairly firmly whipped sweetened cream and then either frost the cake with buttercream (the contrast between the lighter whipped cream and the firmer buttercream is nice) or finish it with more whipped cream. If you use whipped cream, you’ll have to store the cake the in the refrigerator – let it sit for about 20 minutes at room temperature before serving.

Sunday, December 23, 2007

A Yule Tale for Daring Bakers

Once upon a time in the land of St. Honore’, far off in the woods of the west country, lived a woodcutter. One day as he headed for home after a day of gathering wood, he came upon the largest, oldest, most amazing looking log you can imagine, half buried in moss and old leaves, surrounded with ferns and tiny mushrooms, and dusted with snow. He left the wood he had gathered and, with a mighty heave, pulled the huge log to his home. The days were growing short and the nights long as the Winter Solstice drew near. A good, long burning Yule log was a most welcome find.

It was not the easiest log to get started, but soon he had it burning and discovered that it had a wonderful unexpected charm…no matter how long it burned, it never seemed to get smaller.

As the days grew shorter and the night longer, the woodcutter became sadder and sadder. He missed the sunlight. Sitting in front of the Yule log, he took a nap. Hoping to cheer him up, his goodwife gathered her bowls and spoons and flour and sugar and eggs and butter and began to bake something wonderful.

First she made a flat layer of a cake like a sponge…called a genoise. Here she is sifting in the flour mixture, then folding it into the beaten eggs and sugar mixture.


While it was baking she made a delicious chocolate and Amaretto flavored buttercream. Once the cake had cooled enough to handle, she laid it on parchment and brushed it with more Amaretto liquor.

Then she spread half the buttercream over the cake and rolled it up like a jelly roll. A quick chilling soon had it firm enough so that she could work the magic she had in mind.

She cut off the ends at an angle, showing the swirl of light cake and darker buttercream. One of those ends was placed on the side of the roll. Oooh now do you understand? She is making a charmed log of her own!
The log and branch were then swirled with the rest of the buttercream. Now it really looked like a single piece of wood, especially when she took the tines of a fork and pulled them through the buttercream to look like bark.

For the final decoration, she had planned to create meringue mushrooms to place in tiny clusters about the log. Unfortunately she slipped on a mossy step and hurt her back, so no mushrooms. A dusting of confectioners sugar gave the appearance of a light snowfall.

When her husband awoke from his nap, she took him gently by the hand and brought him to the sideboard where the beautiful log she had made was sitting. Smiling sweetly she told him that this log, this Buche de Noel, was her Christmas gift to him. It would be gone much, much faster than the magic Yule log he had brought home, but it would carry memories of their time together this Christmas tide and the joy of sharing the cake with friends and family. She told him that she would make another one each year to remind them of the light returning to the world that Christmas brings.

The woodcutter was wonderfully cheered by the cake, impressed with her baking skills and with his goodwife’s kindness in making it. He knew that it would be a merry Christmas indeed.

As a Winter Solstice gift to you, Gentle Reader, the Daring Bakers from all over the globe have made many, many Buche De Noels. Our hostesses Lis and Ivonne, also the founders of the Daring Bakers, have chosen a superb recipe that reminds us of the presence of light during the darkest time of the year. Thank you Lis of Mia La Cucina and Ivonne of Creampuffs in Venice for this holiday gift, for all of your work in the background making this baking group such a wonderful online community, and for starting it all with a recipe for pretzels a little over a year ago.


I had never made a Buche de Noel and had such a good time playing with it that I again used the convention of a fairy tale to tell about making the cake. Unfortunately, the slip and fall is true, so that is why no mushrooms. *Sigh* Gentle Reader, the story is my own (as is the last one), but there are many stories today around the blogosphere. Check out the other Daring Bakers’ Buche de Noel’s by going to the Daring Baker Blogroll here. The recipe can be found at the bottom of this post if you want to make your own to capture your own winter memories.


Yule Log
(from Perfect Cakes by Nick Malgieri and The Williams-Sonoma Collection: Dessert)
Daring Bakers Challenge #14: December 2007

Hosts: Daring Baker Founders Ivonne (Cream Puffs in Venice) and Lisa (La Mia Cucina)

Posting Date: Saturday December 22, 2007 or Sunday December 23, 2007 (Note: To accommodate the fact that some of you want to serve this for Christmas, for the first time we're allowing you to choose your posting date. You can post on the Saturday or the Sunday.)
Recipe Quantity: Serves 12

Cake should be stored in a cool, dry place. Leftovers should be refrigerated

Challenge Requirements:

1. A genoise cake using the recipe below
2. A coffee buttercream frosting using the recipe below (Note: For those of you that have an aversion to coffee, you can use another flavour for your buttercream, however, the buttercream must be dark in colour. We don't want any white or cream-coloured Yule Logs!
3. Meringue or Marzipan mushrooms using the recipes below

Additional Information about Challenge:
If you are not going to use the coffee buttercream to fill your log, be sure to have the filling ready once the genoise comes out of the oven. If you do fill your Yule Log with fruit or with soemthing other than buttercream, please note that you may not be able to freeze the Log because the filling may not last.

Recipes:
Plain Genoise:

3 large eggs
3 large egg yolks
pinch of salt
¾ cup of sugar
½ cup cake flour - spoon flour into dry-measure cup and level off (also known as cake & pastry flour)
¼ cup cornstarch

one (1) 10 x 15 inch jelly-roll pan that has been buttered and lined with parchment paper and then buttered again

1.Set a rack in the middle of the oven and preheat to 400 degrees F.

2.Half-fill a medium saucepan with water and bring it to a boil over high heat. Lower the heat so the water is simmering.

3.Whisk the eggs, egg yolks, salt and sugar together in the bowl of a heavy-duty mixer. Place over the pan of simmering water and whisk gently until the mixture is just lukewarm, about 100 degrees if you have a thermometer (or test with your finger - it should be warm to the touch).

4.Attach the bowl to the mixer and, with the whisk attachment, whip on medium-high speed until the egg mixture is cooled (touch the outside of the bowl to tell) and tripled in volume. The egg foam will be thick and will form a slowly dissolving ribbon falling back onto the bowl of whipped eggs when the whisk is lifted.

5.While the eggs are whipping, stir together the flour and cornstarch.

6.Sift one-third of the flour mixture over the beaten eggs. Use a rubber spatula to fold in the flour mixture, making sure to scrape all the way to the bottom of the bowl on every pass through the batter to prevent the flour mixture from accumulating there and making lumps. Repeat with another third of the flour mixture and finally with the remainder.

7.Scrape the batter into the prepared pan and smooth the top.

8.Bake the genoise for about 10 to 12 minutes. Make sure the cake doesn’t overbake and become too dry or it will not roll properly.

9.While the cake is baking, begin making the buttercream.

10.Once the cake is done (a tester will come out clean and if you press the cake lightly it will spring back), remove it from the oven and let it cool on a rack.

Coffee Buttercream:

4 large egg whites
1 cup sugar
24 tablespoons (3 sticks or 1-1/2 cups) unsalted butter, softened
2 tablespoons instant espresso powder
2 tablespoons rum or brandy

1.Whisk the egg whites and sugar together in the bowl of an electric mixer. Set the bowl over simmering water and whisk gently until the sugar is dissolved and the egg whites are hot.

2.Attach the bowl to the mixer and whip with the whisk on medium speed until cooled. Switch to the paddle and beat in the softened butter and continue beating until the buttercream is smooth. Dissolve the instant coffee in the liquor and beat into the buttercream.

Meringue Mushrooms:

3 large egg whites, at room temperature
¼ teaspoon cream of tartar
½ cup (3-1/2 ounces/105 g.) granulated sugar
1/3 cup (1-1/3 ounces/40 g.) icing sugar
Unsweetened cocoa powder for dusting

1.Preheat the oven to 225 degrees F. Line 2 baking sheets with parchment. Have ready a pastry bag fitted with a small (no. 6) plain tip. In a bowl, using a mixer on medium-low speed, beat together the egg whites and cream of tartar until very foamy. Slowly add the granulated sugar while beating. Increase the speed to high and beat until soft peaks form when the beaters are lifted. Continue until the whites hold stiff, shiny peaks. Sift the icing sugar over the whites and, using a rubber spatula, fold in until well blended.

2.Scoop the mixture into the bag. On one baking sheet, pipe 48 stems, each ½ inch (12 mm.) wide at the base and tapering off to a point at the top, ¾ inch (2 cm.) tall, and spaced about ½ inch (12 mm.) apart. On the other sheet, pipe 48 mounds for the tops, each about 1-1/4 inches (3 cm.) wide and ¾ inch (2 cm.) high, also spaced ½ inch (12 mm.) apart. With a damp fingertip, gently smooth any pointy tips. Dust with cocoa. Reserve the remaining meringue.

3.Bake until dry and firm enough to lift off the paper, 50-55 minutes. Set the pans on the counter and turn the mounds flat side up. With the tip of a knife, carefully make a small hole in the flat side of each mound. Pipe small dabs of the remaining meringue into the holes and insert the stems tip first. Return to the oven until completely dry, about 15 minutes longer. Let cool completely on the sheets.

Marzipan Mushrooms:

8 ounces almond paste
2 cups icing sugar
3 to 5 tablespoons light corn syrup
Cocoa powder

1.To make the marzipan combine the almond paste and 1 cup of the icing sugar in the bowl of an electric mixer and beat with the paddle attachment on low speed until sugar is almost absorbed.

2.Add the remaining 1 cup of sugar and mix until the mixture resembles fine crumbs.

3.Add half the corn syrup, then continue mixing until a bit of the marzipan holds together when squeezed, adding additional corn syrup a little at a time, as necessary: the marzipan in the bowl will still appear crumbly.

4.Transfer the marzipan to a work surface and knead until smooth.

5.Roll one-third of the marzipan into a 6 inches long cylinder and cut into 1-inch lengths.

6.Roll half the lengths into balls. Press the remaining cylindrical lengths (stems) into the balls (caps) to make mushrooms.

7.Smudge with cocoa powder.


Assembling the Yule Log:

1.Run a sharp knife around the edges of the genoise to loosen it from the pan.

2.Turn the genoise layer over (unmolding it from the sheet pan onto a flat surface) and peel away the paper.

3.Carefully invert your genoise onto a fresh piece of parchment paper.

4.Spread with half the coffee buttercream (or whatever filling you’re using).

5.Use the parchment paper to help you roll the cake into a tight cylinder.

6.Transfer back to the baking sheet and refrigerate for several hours.

7.Unwrap the cake. Trim the ends on the diagonal, starting the cuts about 2 inches away from each end.

8.Position the larger cut piece on each log about 2/3 across the top.

9.Cover the log with the reserved buttercream, making sure to curve around the protruding stump.

10.Streak the buttercream with a fork or decorating comb to resemble bark.

11.Transfer the log to a platter and decorate with your mushrooms and whatever other decorations you’ve chosen.