Showing posts with label apricot. Show all posts
Monday, September 14, 2015
Apricot Scone with Almond Flour
Although I had a really bad loaf of bread recently using gluten free sourdough starter and buckwheat flour, in general I'm starting to get the hang of gluten free baking. Recently I made some delicious scones with dried apricots. I used King Arthur Flour almond flour and white rice flour, plus some tapioca flour to replace the all-purpose wheat flour and I increased the baking soda to a teaspoon, plus used yogurt and water instead of buttermilk, but otherwise it was pretty much the same as one I baked before. I big difference was using very cold butter flavored vegetable shortening instead of butter. Needless to say, it doesn't taste like a wheat flour/butter scone, but it was tasty and the texture was pretty good, if just a bit gritty from the almond flour.
In case you are keeping track, I cut the last pieces today for Phil's stained glass piece and finished the copper foiling. Hope to work on it some more tomorrow.
Apricot Almond GF Scones
Heat oven to 425 degrees F. Grease a cookie sheet.
3 cups all-purpose flour (substitute equal parts almond flour, white rice flour and tapioca flour)
½ cup sugar
2 ½ teaspoons baking powder
1 teaspoon salt
1 teaspoon baking soda
¾ cup unsalted butter, at room temperature (substitute equal amount very cold butter flavored vegetable shortening)
¾ cup finely diced dried apricots
1 cup buttermilk (substitute 3/4 cup plain yogurt mixed with 1/4 cup water)
1/2 teaspoon almond extract
2 egg yolks
Combine flours, sugar, baking powder, salt, and baking soda in a large bowl. With pastry blender or two knives, cut in vegetable shortening until mixture resembles coarse crumbs. Add diced dried apricots.
Combine yogurt mixture and almond extract in a bowl or measuring cup. Whisk in the egg yolks. Pour over crumb mixture. Stir together with fork just until mixture comes together. Gather dough gently into a ball; knead 4 or 5 times to make sure all components are combined well.
Cut dough in half and transfer pieces to prepared cookie sheets. Shape each piece into a 6 inch x 1/4 inch thick circle. Using floured knife, cut each circle into 8 wedges.
Optional: Brush top with egg beaten with 1 tablespoons water, then sprinkle with sugar.
Bake 15 – 20 minutes until toothpick inserted in the center comes out clean. Serve warm or at room temperature.
Makes 16 scones.
Thursday, June 11, 2015
At Last
Yesterday was exactly three month since my cataract surgery on the second eye and a day past 16 weeks since the first cataract surgery. During those 16 weeks I couldn't really drive due to double vision, which is usually corrected with glasses. At first it was because I was healing from the surgeries, so no glasses could be ordered. It takes a little while for the eyes to get to the point where the eye doctor will write a prescription. I had figured on about three weeks for the glasses to be produced but instead they had to be sent back a number of times, so it ended up being 9 weeks on top of all those weeks of healing! Poor Sweetie had a lot of extra driving to do, even though I curtailed my social schedule a lot on optional visits and events.
At last the glasses I tried on this Monday were correct. Not perfect, but correct enough for driving and general wear. Not as good on the close work, but I have readers and, frankly, couldn't imaging sending them back again. The optometrist was probably even more upset than I was and did a terrific job of nagging the lab, but apparently the lab had new people who messed up, trouble with machines breaking and terrible quality control. The optometrist has switched now to a new lab for their current and future orders, thank heavens.
So here they are. They look exactly like my old ones. The new frames I picked out were part of the production problem, so the gave me, no charge, frames like my old ones, plus my old frame to keep (which is unusable because we messed up the screw area when we removed one of the lenses after the first surgery so I could use them for the other eye. Sorry if that doesn't make sense, but trust me, it's all good.
To celebrate I went to lunch and a movie with my good friend Barbara. Saw a sweet flick called 'I'll See You In My Dreams' about friendship, love, loss and karaoke. On the way home I though about all the lovely berries and apricots in the kitchen and decided to see if I could adapt the 5 Minute Chocolate Mug Cake to a vanilla cake with fruit. A surprise for Sweetie for dessert, right?
First I helped him with fitting and securing the second new post of the front porch, then watered a couple of plants in the garden which were wilting in the heat despite the overnight and early morning light rain (rain in June...so unusual for us), and checked out the color of the stain I'll use on the whole porch once the new section is installed. The new stuff will replace the 30 year old deck that has led to the old front porch since before we moved in. The joists underneath are dry rotted here and there, too, so it will probably be some time in July before all that stain goes on.
Finally I was able to get in the bake center and make the cake. Amazing how quickly it all went together. I diced an apricot and some strawberries into a small dice and added a handful of blueberries to the mix, then measured and stirred the dry ingredients and sprinkled some of that over the fruit and tossed it a bit. In another bowl I whisked together egg, oil and milk then added a splash of vanilla. The fruit was tossed into the dry ingredients, the wet mixture went on top of that and it was all stirred together with a fork. That batter went into a Pyrex bowl which I had buttered lightly. The bowl went into the microwave (on high) for five minutes.
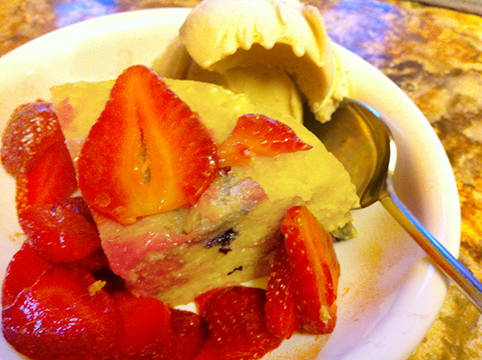
That's it! Turned it out to cool, added sliced strawberries when it was time to serve and added scoops of vanilla soy ice cream to the bowl at the last minute. Delicious! You couldn't really taste the apricot because the blueberries and strawberries were more dominant flavors. The cake was a moist sponge and went perfectly with the fresh berries and ice cream. I'm going to try this again with other flavors. Sweetie had two servings, so I know 'he who doesn't like cake' will eat it anyway...and enjoy it.
5 Minute Apricot Berry Mug Cake
A variation of a recipe from Don
Fulton
Serves 1-2
Serves 1-2
(I doubled the recipe and cooked
it in a Pyrex bowl big enough that the mixture didn't go over the sides,
although it did reach the top edge during baking...then settled down to about
an inch below the edge)
4 tablespoons self-rising flour
4 tablespoons sugar
1/8 teaspoon orange zest
4 tablespoons self-rising flour
4 tablespoons sugar
1/8 teaspoon orange zest
dash ground nutmeg
dash salt
1/2 apricot, diced small
1/4 cup strawberries, washed and diced small
1 egg
3 tablespoons milk
3 tablespoons oil
a small splash of vanilla extract
1 large coffee mug
Add dry ingredients to mug, and mix well. Sprinkle some of the dry ingredients over the fruit and toss lightly. Add to the dry ingredients. Mix together in another bowl the egg, the milk and oil and mix well. Add the vanilla extract, and mix again. Pour the wet mixture into the dry mixture and mix well. Pour the batter into a lightly buttered large mug.
Put your mug in the microwave and cook for 3 minutes at 1000 watts (high). (If doubling the recipe as I did, use a larger container and cook for 5 minutes on high.) The cake will rise over the top of the mug, but don't be alarmed! Allow to cool a little, and tip out onto a plate if desired.
EAT! (this can serve 2 if you want to feel slightly more virtuous). And why is this the most dangerous cake recipe in the world? Because now we are all only 5 minutes away from apricot berry cake at any time of the day or night!
I served the cake in bowls with lots of sliced fresh strawberries and a small scoop of ice cream, but the cake all by itself is delicious!
The photo suffers from being taken at night, but I wanted you to see the inside to see how moist and spongy it is.
Labels:
apricot
,
fresh strawberries
,
mug cake
,
quick dessert
Saturday, May 30, 2015
Fruit Tart Season Is Here
I'm not a huge fan of summer, but one of the things that warmer weather brings are tarts with all sorts of fruit toppings.
It's been more than a week since I made one that had fresh apricots and cherries on top, but the memory of how delicious it was lingers. The crust uses olive oil and it was nicely crisp and flavorful. The fruit was wonderful and both had softened to tenderness. The topping was too sweet, so next time I"ll reduce the sugar quite a bit. I may lose a bit of the sugary crust that makes a nice textural contrast to the soft fruit, but the fruit flavors will shine more without the extra sugar making them taste more like candy than fruit.
We are just starting to get ripe ollaliberries down by the road, so I think the next time will be apricots and ollaliberries, with maybe some strawberries thrown in. It won't be too long before we have plums and other stone fruit that would be wonderful with this tart. The recipe was one I found online at Food52 via Facebook. The recipe is by Amanda Hesser and I think the topping (as a concept) is brilliant.
Peach (or
Apricot-Cherry) Tart
from Food52 blog, Amanda Hesser
Makes one
11-inch tart; serves 8
·
1
1/2 cups plus 2 tablespoons all-purpose
flour
·
3/4
teaspoon kosher salt
·
3/4
cup plus 1 teaspoon sugar (or less)
·
1/4
cup vegetable or canola oil (I used Meyer lemon olive oil instead)
·
1/4
cup mild olive oil
·
2
tablespoons whole milk
·
1/2
teaspoon almond extract
·
2
tablespoons cold, unsalted butter
·
3
to 5 small ripe peaches, pitted and
thickly sliced (about 1/2-inch wide) (I used apricots and cherries)
1. Heat the oven to 425 degrees. In a mixing bowl, stir
together 1 1/2 cups flour, 1/2 teaspoon salt and 1 teaspoon sugar. Stirring
enables the salt and sugar to sift the flour, so you don’t need to sift it in
advance. In a small bowl, whisk together the oils, milk and almond extract.
Pour this mixture into the flour mixture and mix gently with a fork, just
enough to dampen; do not over work it. Then, transfer the dough to an 11-inch
tart pan (you can use a smaller one if needed), and use your hands to pat out
the dough so it covers the bottom of the pan, pushing it up the sides to meet
the edge. This will work if you pat firmly and confidently, but not if you curl
your fingertips into the dough. It should be about 1/ 8-inch thick all around;
trim and discard excess dough.
2. In a bowl, combine 3/4 cup sugar (I would only use 1/2 cup and if the fruit is very sweet, 1/3 cup), 2 tablespoons flour, 1/4
teaspoon salt and the butter. (If your peaches are especially juicy, add 1
tablespoon additional flour.) Using your fingers, pinch the butter into the dry
ingredients until crumbly, with a mixture of fine granules and tiny pebbles.
3. Starting on the outside, arrange the peaches overlapping in
a concentric circle over the pastry; fill in the center in whatever pattern
makes sense. The peaches should fit snugly. Sprinkle the pebbly butter mixture
over top (it will seem like a lot). Bake for 35 to 45 minutes, until shiny,
thick bubbles begin enveloping the fruit and the crust is slightly brown. Cool
on a rack. Serve warm or room temperature, preferably with generous dollops of
whipped cream.
Labels:
apricot
,
cherry
,
fruit tart
,
Meyer lemon olive oil
,
olive oil
Subscribe to:
Posts
(
Atom
)


