Showing posts with label flatbread. Show all posts

Sunday, October 16, 2022

Babes Bake Figgy Flatbread


It's the 16th of the month...the day for the Bread Baking Babes to share what they have been up to this month.

I'm Kitchen of the Month for October and I chose a lovely flatbread recipe for fall, enhanced with rosemary and figs and nuts. The recipe is from a cookbook that I found on sale at a local bookstore. The book is Joanne Weir's More Cooking in the Wine Country. The author, Joanne Weir is on a Public Televisions series 'Weir Cooking in the Wine Country II' and there are lots of delicious sounding recipes in the book. The first time I baked it I followed the recipe, but divided the dough in half and baked half with walnuts and half with pecans, plus I added some fresh figs to the dried figs. It was delicious!

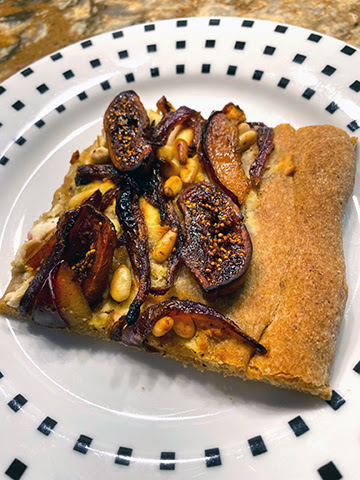
For the second bake I left out the rosemary but added lemon zest along with the orange zest in the original recipe, plus I substituted pine nuts, and some whole wheat flour for part of the flour. As you can see, this is a versatile recipe. This time I had intended to weigh the ingredients, using the amounts provided by Elizabeth of Blogging from OUR Kitchen (THANK YOU Elizabeth!), but forgot to and used the cup measurements. I also used some fresh Italian prune plumbs along with the dried figs. They are in season now and added, along with the pine nuts, to the Italian feel of this flatbread. The whole wheat bread was nicely nutty but bland without the rosemary. Next time I'll stop being lazy and put in the rosemary as called for...it really does make a difference.

This is an easy dough to work with. It might seem a bit stickier than you are used to, due to the use of potato water, but use wet hands and it will be fine. If you bake this and would like to be a Bread Baking Babes Buddy, just send me an email with a brief description of your bake and a photo and the URL of your post by Oct. 29th. Email is plachman*at*sonic*dot*net. I'll send you a Buddy Badge and include you in the round-up at the end of the month. The description and photos below are from my first bake. At the bottom I have some photos from the one with pine nuts and prune plums.

Be sure to visit the rest of the Bread Baking Babes to see what marvelous flatbreads they have created.

Kelly - A Messy Kitchen - Flatbread with figs and pears

Karen - Karen's Kitchen Stories - Flatbread with figs and sherry

Cathy - Bread Experience - Sourdough flatbread with home-grown dried figs 

Judy - Judy's Gross Eats - Flatbread with apricots and almonds

Aparna - My Diverse Kitchen - Flatbread with dried figs and walnuts and onions

Elizabeth - Flatbread with dates and pine nuts and red onions

This is one of those recipes where you can do parts in advance. I made the rosemary-infused olive oil a day ahead, cooked the potatoes the evening before I made the dough, saving the potato water and re-warming it, I even soaked the figs a day early and stored them in the marsala. Even though the recipe only calls for dried figs, it's fresh fig season, so I also included sliced fresh figs and I highly recommend this change! 

The dough is slightly sticky but not a high-hydration one, just soft. Once it rose and was punched down, it was pretty easy to work with. The first piece rolled out easily but the second one needed to have relaxation time after it was flattened before it would  roll out large enough. It baked up light on the inside and crisp and lightly brown on the outside.

Because I was working with fresh figs as well as dried, I watched the flatbread carefully towards the end of baking to avoid burning the fruit...which has so much natural sugar. I had the flatbreads on pieces of parchment which made it easier to get them onto the baking stone and then out of the oven when finished, although I did use a peel, with the parchment pieces on the peel.

 I typed this up exactly as it is in the cookbook...make changes as desired, although I do encourage you to make the bread dough with the potato water and rosemary oil and chopped rosemary. If you want to use your sourdough starter, just skip the yeast/bread flour/potato water initial poolish and use 1/2 cup sourdough starter. You might need more bread flour to get the dough right, but sourdough would be great with the topping. The recipe with weights, courtesy of Elizabeth, will be at the bottom, along with the photos of the flatbread baked using those measurements.

Happy Baking!


Fig and Walnut Flatbread

from Joanne Weir's More Cooking in the Wine Country cookbook
makes 1 flatbread, serves 6

Dough
1/4 cup extra virgin olive oil
3 sprigs fresh rosemary
2 1/2 teaspoons (I package) dry yeast
1/2 cup plus 2 cups unbleached bread flour, divided
1/2 cup lukewarm potato water or plain water (110 degrees F)
1 teaspoon coarsely chopped fresh rosemary
1/2 cup potato water (additional)
1 teaspoon salt

Topping
6 to 8 dried figs, sliced
1 cup Marsala wine
3 tablespoons extra virgin olive oil
1 red onion, cut into 1/2-inch thick vertical slices
1 tablespoon sugar
1/2 teaspoon greated orange zest
salt and freshly ground black pepper
3/4 cup walnut halves

Directions
In a small saucepan, warm the olive oil and rosemary. Remove from the heat and let cool for I hour. Discard the rosemary sprigs. Set aside.

In a large bowl, mix together the yeast, 1/2 cup flour, and 1/2 cup warm potato water. Let stand 1 hour, until it bubbles up and rises. Then add the remaining 2 cups flour, the rosemary olive oil, chopped rosemary, additional potato water, and salt. Mix the dough thoroughly. Knead the dough on a floured board until it is soft but still moist, 7-8 minutes. Place the dough in an oiled bowl, turning it once to cover it with oil. Cover the bowl with plastic wrap and put it in a warm place (about 75 degrees F). Let the dough rise for 1-2 hours, until doubled in volume.

In the meantime, prepare the topping. Place the figs and Marsala in a small saucepan, and heat over medium heat until the Marsala bubbles around the edges, 1 minute. Remove from the heat and let stand for 1 hour.


Heat the 3 tablespoons olive oil in a large frying pan over medium heat. Add the onions and sugar and cook, stirring occasionally, until the onions are very soft, 15-20 minutes. Add the orange zest, season with salt and pepper, stir thoroughly, and set aside to cool.

Place a pizza stone on the bottom shelf of the oven, and preheat the oven to 500 degrees F for 30 minutes.


Form the dough into a round ball. Let it rest for 5 minutes. On a floured surface, roll the dough out to form a 9x12-inch oval, 1/2-inch thick. Place it on a well-floured pizza peel. 


Drain the figs and distribute the figs, onions, and walnuts evenly over the dough. Lightly press them into the dough. Let it rest for 10 minutes. Then transfer the flatbread to the pizza stone and bake until golden brown and crispy, 12-15 minutes. Serve immediately.


Here are the measurements by weight. Just use the instructions above to make the flatbreads.

Dough
1/4 cup extra virgin olive oil [60 ml/55 grams]

3 sprigs fresh rosemary (I skipped the rosemary in the whole wheat version)
2 1/2 teaspoons (1 package) dry yeast [7 grams]
1/2 cup plus 2 cups unbleached bread flour, divided [68 plus 274 grams] (I used all whole wheat flour)
1/2 cup lukewarm potato water or plain water (110 degrees F) [120 grams]
1 teaspoon coarsely chopped fresh rosemary [1 gram] (skipped this for whole wheat version)
1/2 cup potato water (additional) [120 grams]
1 teaspoon salt [6 grams]

Topping
6 to 8 dried figs, sliced [50 to 67 grams]
1 cup Marsala wine [240ml/240grams]
3 tablespoons extra virgin olive oil [45 ml/41 grams]
1 red onion, cut into 1/2-inch thick vertical slices
1 tablespoon sugar [12 grams]
1/2 teaspoon grated orange zest [1 gram]
1/2 teaspoon grated lemon zest [1 gram]
salt and freshly ground black pepper
3/4 cup walnut halves [75 grams] (I used untoasted pine nuts)
(I used three small prune plums, pits removed and thinly sliced...forgot to weigh them) Below is a photo of the topping. I added the drained figs and the plums once the mixture was off the heat.

Whole wheat version baked:
and served:


Friday, September 16, 2022

Babes Bake Onion Board


We're finally getting some cooler weather...and maybe even rain on Sunday and Monday!!...so it's fun to bake again. Our September challenge was chosen by Karen.  It's an Ashkenazi Jewish flatbread and is sometimes called Onion Board. This is an easy flatbread topped with a thick layer of savory sautéed onions. Over that is sprinkled a nice amount of poppy seeds. I even sprinkled on a few flax seeds that I found in the freezer. I recommend adding a sprinkle of sea salt over the whole topping because the onions cook up fairly sweet.

The bread itself is simple, but you do have to make it ahead of time so that it has overnight (or at least 10 hours) to rise and ripen. I used part white whole wheat flour and it was tasty, although it didn't rise very much. Sweetie really loved the topping. We had it with a dinner that included steelhead trout and a mixed green salad with fresh from the garden tomatoes, cucumber, and carrots. It went really well!

Do bake with us and become a Buddy. Our Kitchen of the Month, Karen of Karen's Kitchen Stories, will send you a beautiful Buddy Badge, designed by Elizabeth, if you send her an email with a description of your bake and a photo by Sept. 29th. You'll also be included in the round-up! There is also more information about the bread on her website.


Also, check out the sites for the other Babes to see their take on this simple but delicious yeasted flatbread with onion topping. 

Happy September!


Sept 2022 - Onion Board 


Dough

375 grams (3 cups) all purpose flour

7 grams (2 1/4 teaspoons) instant yeast

7 grams (2 teaspoons) Diamond Crystal kosher salt

3 tablespoons, olive oil, divided

294 grams (1 1/4 cups) warm water (about 110 degrees F)

Spray oil

Topping

1 tablespoon olive oil, plus more for stretching

3 large yellow or brown onions, about 3/8 inch dice

1 3/4 grams (1/2 teaspoon) kosher salt

1 tablespoon (plus more if desired) poppy seeds

1/2 teaspoon flax seeds (optional)

Flake sea salt (optional)


Instructions:

Mix the dough ingredients with a dough whisk until all of the flour is absorbed. 

Spray a large bowl or dough rising bucket with spray oil and scrape it into the dough. Spray the top lightly with spray oil, cover with plastic wrap, and let rise overnight, about 10 to 15 hours. It should double. 

Remove the dough from the refrigerator while you heat the oven and prepare the onions. 

If you have a baking stone, set it on a rack in the middle or slightly below. Heat your oven to 450 degrees F. 

Heat 1 tablespoon of olive oil over medium heat in a large skillet and add the onions. Cook, stirring regularly, until the onion is translucent and slightly browned about the edges, about 20 to 30 minutes. When they are almost done, stir in the salt. Remove the onions from the pan and let cool in a bowl. 

Line a half sheet pan with parchment paper and spread with 1 tablespoon of olive oil over the paper. Scrape the dough onto the parchment and spread it by dimpling it with your oiled fingertips while pushing to the edges. If the dough is resistant, let it rest for 10 minutes, and start spreading it again (until you have about a 10 inch by 14 inch rectangle). 


Brush the edges of the dough lightly with olive oil. Spread the onion mixture over the dough, leaving about a 1 inch border. Sprinkle with onions with the poppy seeds. Lightly sprinkle with the optional sea salt. Let rest, uncovered, for about 10 to 15 minutes. 


Place the baking sheet on top of the baking stone and bake for 25 to 30 minutes. 

Cut with a pizza wheel. It's best fresh from the oven, but can be reheated, just like pizza. 


Wednesday, May 16, 2018

Red Pepper Coques and A Different Topping


There are times when I can just look at a recipe and know that the resulting food will be wonderful. This was one of those. Karen of Karen's Kitchen Stories is our Kitchen of the Month for May for the busy Bread Baking Babes. She chose Red Pepper Coques from "Bread Illustrated from America's Test Kitchen. According to the recipe, Coques are the Catalan version of the thin and crunchy tapas dish that can be found in bars in the Mediterranean region of Spain, including Barcelona."

This has been a busy month for me, starting with the final day of my visit to Denver and continuing on with massive catch-up in the garden, especially with weeding. The soil and overnight temperatures finally warmed up enough for planting, too, so there are now tomato plants, bean seedlings, cucumber seedlings, and lots of kinds of flower seedlings getting bigger. The zucchini I planted in April are getting bigger and so is the one from a neighbor...the other one was eaten by snails. I still have planting and weeding to do, but now its just a few of each.

Fitting in a bread that needs to start at least the day before it will be eaten was a bit of a challenge, but I'm glad I did. This recipe makes 4 coques, which are long ovals of flatbread, topped with a wonderful, tangy topping of roasted red pepper, caramelized onions and pine nuts (among other things). I decided that since there are only two of us enjoying these that I would make two at a time and used two different toppings on the two different bakes.

The first night I used the red pepper topping. The dough was difficult to make flat enough since it just wanted to spring back into a smaller shape. I eventually shaped the coques using gravity in a similar way to how I shape pizza dough. This left a thicker ridge around the edges, but that just helped keep the topping in the center, so no harm done. I love the topping, so do try it. The red peppers and yellow onions and pine nuts go really well together. Don't substitute on the sherry vinegar, either. It really makes the dish!

The second night I used a topping that I found in the food section of our local paper. It was meant to go on crostini, but went well on the coques, too. It is a combination of a homemade fig jam, caramelized red onions, and some soft cheese. I used Kite Hill fresh cheese mixed with a bit of soy milk in place of ricotta, but I'm sure that fresh ricotta would be lovely. I topped it with chopped walnuts since I had enjoyed the pine nuts topping the red pepper mixture the previous night. The experience was completely different, but I enjoyed this combination, too. The sweetness of the figs and onions was offset a bit by the balsamic vinegar and slight bitterness of the walnuts.

This recipe is going into the 'keep' file and will be used when I want appetizers for a party or pot luck. Except for the baking, the components can be made ahead, too, which is wonderful.

Do visit the other Bread Baking Babes sites to see their takes on this delightful bread. Bake it yourself and become a Buddy by sending Karen an email with your URL, photo and experience with making the bread. Deadline is May 29th. You'll be glad you did.


RED PEPPER COQUES
from Bread Illustrated from America's Test Kitchen

INGREDIENTS:
Dough
468 grams (16 1/2 ounces/3 cups) bread flour
2 teaspoons sugar
1/2 teaspoon instant yeast
10 2/3 ounces (1 1/3 cups) ice water
3 tablespoons extra-virgin olive oil
1 1/2 teaspoons table or fine sea salt

Red Pepper Topping
1/2 cup extra-virgin olive oil
2 large onions, peeled, halved, and thinly sliced
2 cups jarred roasted sliced red peppers
3 tablespoons sugar
3 cloves garlic, thinly sliced
1 1/2 teaspoons salt
1/2 teaspoon crushed red pepper flakes
2 bay leaves
3 tablespoons sherry vinegar
1/4 cup pine nuts
1 tablespoon minced fresh parsley


INSTRUCTIONS:
Dough
In the bowl of a food processor, pulse the flour, sugar, and yeast about 5 times. Turn the processor on, and slowly pour in the ice water and process for about 10 seconds. Let the dough rest for 10 minutes. 

Add the oil and the salt to the dough and process for 30 to 60 seconds, until the dough forms a ball. Remove the dough from the the processor, and knead by hand for a few seconds, and form it into a ball. Place it into an oiled bowl, cover, and refrigerate for at least 24 hours, and up to 3 days. 

Red Pepper Topping
Heat three tablespoons of the olive oil in a 12 inch non stick frying pan over medium heat. Add the onions, red peppers, sugar, garlic, salt, pepper flakes, and bay leaves. Cover the pan and cook for 10 minutes over medium low. 

Remove the lid and continue to cook, stirring regularly, for another 10 to 15 minutes, until the onions are golden brown. Remove the pan from the heat and discard the bay leaves. Transfer the mixture to a heatproof bowl and stir in the vinegar. Cool completely before using. You can make the mixture in advance and refrigerate overnight. 

Deflate the dough and divide it into four equal sized pieces. Shape each piece into a tight ball and place, seam side down  on your work surface, and cover with oiled plastic wrap. Let rest for an hour. 

Place oven racks in the upper and lower third positions and preheat the oven to 500 degrees F. Brush two half sheet pans with 2 tablespoons of olive oil each. 

Place one dough ball on your work surface, and roll it out to a 15 inch by 5 inch oval. Place it on the baking sheet, lengthwise. Repeat with the rest of the dough balls, two per baking sheet. If the dough springs back, let it rest for another 10 to 20 minutes, and re-roll. Dock each about 15 times with a fork. Brush each oblong piece of dough with the rest of the olive oil. 

Bake the dough for 8 minutes, switching the pans at the four minute mark. 

Remove the pans from the oven, and spread them with the red pepper and onion mixture. Sprinkle with the pine nuts. (To make the Fig and Caramelized Onion Coques, use the topping below at this point instead of the red pepper and onion mixture. Top with the walnuts instead of the pine nuts.) Place the baking sheets back into the oven, and bake for 16 minutes, switching and rotating the pans at the 8 minute mark. Continue to bake until the flatbreads are golden and crispy.

Topping
To Make the Coques:
Remove the pans from the oven and let cool on the pans for about 5 minutes. Sprinkle with the parsley, and transfer to a cutting board to slice and serve. 


Fig and Caramelized Onion Topping for Coques
adapted from Ramekins Culinary School recipe
1/4 cup dried Black Mission figs (stemmed and chopped into 1/-inch dice)- about 4 figs
1/2 cup + 2 tablespoons dry red wine
1 tablespoon granulated sugar
1 small bay leaf
pinch salt
1/2 teaspoon red wine vinegar
1 teaspoon butter or margarine
1 teaspoon olive oil
1/2 medium red onion (peeled and cut into 1/4-inch dice)
1 tablespoon red wine vinegar
1/4 teaspoon granulated sugar
1/4 teaspoon salt
1/8 teaspoon freshly ground black pepper

1/2 cup fresh ricotta cheese or Kite Hill fresh almond cheese+ 1 tablespoon soy creamer
2 tablespoons finely chopped walnuts.

Place the figs in a small saucepan. Add the red wine, sugar, bay leaf and salt. Bring to a boil, stirring to dissolve the sugar. Reduce the heat to simmer and simmer until the figs are tender and the liquid is syrupy, about 15 minutes, stirring occasionally. Add the vinegar and cook and additional minute. Removed from the heat and let cool.

Melt the butter or margarine and stir in the olive oil. Over medium-high heat sauté the onion until it is beginning to soften and brown, about 5 minutes.

Reduce the heat to low and add the vinegar and sugar. Sprinkle with salt and pepper. Stir until the vinegar has almost evaporated, about 1 minute. Remove from the heat and let cool.

If using this topping for the coques, drain the ricotta, if using, in a strainer lined with a coffee filter or cheesecloth. Transfer to a small bowl and season with salt and pepper to taste. If using the Kite Hill nut cheese, place in a small bowl and season with salt and pepper to taste.

Once the coques have baked for 8 minutes, removed from the oven, leaving the oven on, and spread the two coques with the ricotta or almond cheese mixture, dividing evenly.

Top with the onions, dividing evenly and spreading to cover each coque, then top with the figs, dividing evenly and spread to cover each cocque. Sprinkle one tablespoon finely chopped walnuts over each coque and bake an additional 10-16 minutes, or until coque is deep golden brown.

Friday, June 21, 2013

Veggie Skewers and Pluot Appetizers


This has been a great week for the farm box. There were ears of fresh, sweet, juicy white corn. There were multicolored Gypsy pepper, sort of like bell peppers, but with a thinner wall. There were amazing ripe apricots and pluots, plus two kinds of squash, fingerling sweet potatoes...I know...who knew sweet potatoes could be tiny and super sweet, plus a lovely honeydew melon, and Nantes carrots. Probably the perfect farm box for late spring...and very inspiring, too.


We used the Gypsy peppers and the squash for veggie skewers to go with the yummy Persian flatbread that I made as part of the Bread Baking Babes challenge for June. I used some Meyer lemons that a friend had just given me in the dressing for the veggies and it added just the right bright note. Sweetie cooked them on the grill just long enough to char them here and there, but not so much that they had a soggy texture (a problem sometimes with squash).


A few days later I sliced that same flatbread very thin, brushed each slice on both sides with olive oil, and Sweetie grilled them so that they crisped up. I used them as the base for an unusual appetizer inspired by something similar I had at the Camilla Tea Room in Benicia. Fresh, ripe, juicy pluots ( a cross between an apricot and a plum, but you could use plums instead) are cut into a small dice and doused with balsamic vinegar. I added a touch of cardamom as a counterpoint to the sweetness. Once the mixture marinates for at least 1/2 an hour you spoon some onto the toasts. Chopped, toasted walnuts are sprinkled on, lending a toasty crunch. Blue cheese bits are crumbled on as a nice contrasting zing to the pluots. It has it all...crunchy, sweet, sour, salty, toasty, nutty and zingy from the cheese. Quite a mouthful of delight.


Who knows what recipes the next farm box will inspire. The recipes below are written so that you can size them for the number of people you are serving. Have fun and, if at all possible, use fresh, local produce.


Pluot or Plum Bruchetta

Very thin slices of flatbread or focaccia (about 3 per person)
olive oil
1 pluot or small plum per person
2 teaspoons balsamic vinegar per pluot or plum
dash of cardamom per pluot or plum
1 teaspoon chopped toasted walnuts per pluot or plum
about 1 tablespoon blue cheese crumbles per pluot or plum

Brush the thin slices of bread with the olive oil on both sides. Grill or toast each slice until toasted and crispy. Let cool.

Finely dice the pluot(s) or plum(s). Place in a non-reactive dish and add the balsamic vinegar and the cardamom. Stir to combine. Let sit for at least 1/2 hour or up to 4 hours.

When ready to serve the bruchetta, place a slice on work surface. Spoon on the plums with a slotted spoon, leaving some space on the bread slice for the walnuts and cheese. Sprinkle with the walnuts, then the cheese.

 Serve at once. There will be about three slices per person.

Veggie Skewers

wooden skewers - two per person
veggies cut into chunks...I used zucchini squash, pattypan squash and Gypsy peppers, but you could also use fresh corn on the cob, cut into chunks, cherry tomatoes, or any other veggie that will thread onto a skewer.
Marinade for two people:
Juice of 1 lemon
3 tablespoons olive oil
salt and pepper to taste

Soak wooden skewers in water for at least 1/2 hour.

While skewers are soaking, mix together the marinade in a non-reactive bowl and add the veggie chunks. Stir to coat the veggies. Let veggies marinate, stirring occasionally, until you are ready to grill them.

Thread the veggies on skewers, leaving room at the bottom (for holding) and top (so veggies won't fall off the top). Brush with the marinade and grill on one side until charred. Turn to other side, brush with marinade, and cook until desired doneness.

Serve at once.

Sunday, June 16, 2013

Bread Baking Babes Bake One For Summer


It's the time of year for cooking out of doors, with today in the U.S. being a big one...Father's Day. I was hoping to bake the June Bread Baking Babes bread, Nan e Barbari in the Weber but that didn't happen. Maybe next time. Our Kitchen of the Month hostess, Elizabeth of blog from OUR kitchen had us gather around the BBQ to make a lovely flatbread topped with seeds.


One of its virtues is that it can be started and baked the same day, plus it is an easy bread as long as you don't mind a very slack dough. Another virtue is that the slack dough, very hydrated, lends the finished bread a nice spongy texture with big and little holes, making it perfect for sopping up the last of the juices on the plate from whatever you made for dinner. Although my plan was to make lamb meatballs and veggie kebabs, in the end we had left over pot roast with delicious mushroom/red wine pan juices, plus the veggie kebabs (which will show up in the next post).


 Sweetie really enjoyed using pieces of the bread to soak up the rich sauce and he said he really liked the chewy texture, too.

I could see thin slices of this bread being toasted and used for bruchetta, too. It has a wonderful mellow flavor. So gather together some yeast, water and flour, plus a few seeds and some baking soda. Fire up the grill or oven and make it. Then get your Buddy badge by sending an e-mail to Elizabeth with a photo of your results and a few words about your bread baking experience.

I'm sending this to Yeastspotting, too. Susan of Wild Yeast hosts this weekly round-up of delicious yeasted breads and things made with them. Check it out!

Also, please visit the other Bread Baking Babes to see their take on this delightful flatbread. Links are on the right in the Web version of this blog.

Thank you Elizabeth for choosing this yummy flatbread for June...perfect for warm weather and the food that goes with it!  Here are Elizabeth's instructions, with some comments from me in Italics. By the way, I'm posting much later than I had thought I would because our daughter came over with her boyfriend and we went out the Sturgeon's Sawmill for Fathers' Day under the redwoods. I think they will be open again later in the summer, or in early fall. It's a great place to visit and to see how lumber used to be milled. Check it out if you are able to get to western Sonoma County this around September 14th or 15th.


Nan e Barbari (Persian flatbread)
based on Lida's recipe for Barbari Bread at 1001recipe.com

This is a same day bread. It takes 4-5 hours at most to make.

dough
5 gm (~1.5 tsp) active dry yeast
360 gm (1.5 c) water, at 90F (32C)
60 gm (~0.5 c) 100% whole wheat flour (I used white whole wheat)
360 gm (~2.75 c) unbleached all purpose flour (I used and additional 2 tablespoons of flour)
6 gm (1 tsp) salt
nigella seeds (or black sesame, poppy, sesame seeds) (I used sesame seeds)

sauce
1/2 tsp flour
1/2 tsp baking soda
160 gm (2/3 c) 80 gm (1/3 c) water

1. Mixing the dough Pour the water into a largish bowl. Whisk in the yeast.

2. Add the flours, baking powder and salt and stir with a wooden spoon until the dough pulls away from the sides of the bowl.

3. Kneading: Turn the dough out onto an UNfloured board. Wash and dry the mixing bowl. Please do not be tempted to skip this step.

4. Using both hands on either side of the dough and thumbs resting on the top in the center, lift it up and flip it over in the air before plopping it back down on the board. Fold the dough in half away from you as you plop the dough down. Keep repeating until the dough is smooth. Every so often, use the dough scraper to clean the board. Stretching the dough is desired on the turns. But this won't start happening right away. (Please look at this video for clarification.)

5. When the dough is smooth, place it in the clean mixing bowl (there is no need to oil the bowl). Cover the bowl with a plate and leave in a draft-free area to rise to double.

6. Prepare the sauce: Whisk flour, baking soda and water in a small pot. Bring it to a boil. Remove from heat and set aside to cool.

7. Pre-shaping: Line a cookie sheet with parchment paper. Scatter a light dusting of flour on the board and gently remove the risen dough onto it. Don't worry that the dough is quite slack. Cut the dough in half. Form each piece into a ball and place well apart on the cookie sheet. Cover with a clean tea towel followed by a plastic grocery bag and allow to rise to double in a draft-free area. (about an hour)

8. Final Shaping: Brush each round with the sauce. Really slather the sauce on. It will keep your hands from sticking to the dough.

9. Dip your fingers in the sauce and dimple the rounds down to form two ovals with lengthwise furrows. (Please see photos below; also see photos on the right side of the page at http://www.1001recipe.com/recipes/food/barbari_bread/)

10. Liberally brush ovals with the sauce once more and sprinkle with nigella seeds. Allow the ovals to stand for about 30 min.


11. Baking: Put a stone into the barbecue and preheat it to high. Before putting them onto the stone, pull each oval with your hands to lengthen it. Wet your hands so they won't stick to the ovals and pull the dough from the bottom with your palms facing downwards. (Please see photos below; also see photos on the right side of the page at http://www.1001recipe.com/recipes/food/barbari_bread/)

12. Put the lengthened ovals onto the hot stone. Move the stone over to cook the bread on indirect heat. Close the barbecue lid. Every so often turn the bread around to account for uneven heat in the barbecue. Cook the bread until it is golden (about 15 minutes).

Notes:

1.) Water: Please do not use water from the hot water tap. Instead, heat the water in a kettle or microwave (to create lukewarm water, add cold water until it is the correct temperature of 90F (32C). If you are allergic to using a thermometer, you can do the baby bottle test on the back of your wrist.) Please note that before the yeast is added, the water temperature must be BELOW 120F (49C) because yeast begins to die when the temperature is higher than 120F.

2.) Baking Powder and Baking Soda: Some of the other BBBabes said they detected a chemical flavour from the baking powder and/or the baking soda. If you're worried about it, it's probably safe to omit them entirely to let the yeast do all the leavening and the flour and water in the sauce (Romal) do all the caramelizing. (I used the baking soda in the sauce, but no baking powder in the bread...seemed fine.)

3.) Mixing: I always mix by hand, because we don't have an electric stand mixer. If you usually use your stand mixer to mix and knead, go to town and do so. But bear in mind that making this bread by hand is not only traditional, it's dead-easy and may well add flavor. Lida notes that if you are using a bread machine, you should add the main ingredients in the order suggested by your bread machine manual and continue to follow the manual instructions for mixing and kneading the dough. If you are determined to get your money's worth out of your electric stand mixer, I suspect that at least one of the other BBBabes has left instructions on her site about how to mix and knead using the machine. Then skip to the "pre-shaping" step. (I used my stand mixer because I was lacking patience yesterday...it worked just fine with the addition of 2 more tablespoons of flour.)

4.) Baking: If you do not have a barbecue, this bread can be baked in a conventional oven. Lida suggests baking it in a preheated 375F (190C) oven for about 30 minutes until golden brown. (I baked it in a 400 degree oven on a preheated baking stone, sliding the parchment with the shaped bread on it onto the stone. I baked them for 20 minutes each, baking the loaves one at a time.)

Serve the bread warm.