Sunday, October 30, 2011

Goodbye October!


I'ts getting chilly at night around here...and our new stove is taking the chill off in the morning. We won't be making s'mores using that stove, but maybe a Halloween pumpkin will do the trick.

Happy Halloween dear reader!

Thursday, October 27, 2011

Rum and Raisins Love Bananas


Sometimes there are ingredients hanging around the kitchen that need to be used up and my feeling is along the lines of mending a hem before it unravels more or picking the flowering tops off the basil to keep them growing...a task that is undoubtedly worthy but not particularly inspiring. Turning left over salad into soup falls into this area in my opinion.

Other times the ingredients are the kind you hope for...left over bread that will eventually be turned into stuffing or bread pudding, the end of a chunk of Parmesan that gives a great flavor to some soup, or one of my favorites...ripe bananas. A really ripe banana has golden yellow skin with dark brown spots. If all the skin is brown you may have gone too far, but it will still make some great banana bread.

That's what I did last week...made banana bread. The three medium bananas I used looked a bit like giraffes necks...the blotches of brown were pretty big but the skin was still golden, too. I used a recipe from one of my favorite baking books, Marion Cunningham's The Fannie Farmer Baking Book. This one is almost scone-like in texture and is less sweet than some but it has the benefit of raisins soaked in rum...the perfect complement to bananas.

About the only thing to know about this recipe is that the pan sizes are on the small size so plan accordingly. You can find the dimensions right under the recipe title. It also helps to remember that this kind of quick bread does best with minimal mixing of the batter once the dry ingredients are added.

Do give this bread a try when you find yourself with an overabundance of bananas...and some rum and raisins in the pantry.


Rum-Raisin Banana Bread
Makes two 8 1/2 x 4 1/2 x 2 1/2 inch loaves

1 cup raisins
6 tablespoons rum
3 cups flour
1 teaspoon baking powder
1 teaspoon baking soda
1 teaspoon salt
8 tablespoons (1 stick or 1/2 cup) butter, softened
1 cup sugar
2 eggs, slightly beaten
1/3 cup milk
1 cup ripe banana (about 2 large or 3 medium bananas)
1/2 cup chopped walnuts

Note: I used 1/2 cup regular raisins and 1/2 cup golden raisins.

Stir the raisins and rum together and let stand for at least 30 minutes or up to several hours, stirring occasionally. You can soak the raisins in the rum the night before and they will be plump and moist.

Preheat the oven to 350 degrees F. Grease and flour two loaf pans.

Stir and toss together the flour, baking powder, baking soda, and salt. Stir together the butter, sugar, eggs, milk, mashed banana, walnuts, and the raisins and their rum. Add the mixed dry ingredients and stir just until the batter is thoroughly blended. Over mixing causes the bread to become dry and tough.

Spread the batter evenly in the prepared pans. Bake for 1 hour or until a toothpick inserted in the center of the loaf comes out clean. Remove from the oven, let cool in the pans for 5 minutes, then turn out onto a rack to cool completely. I find it hard to wait until the loaves are completely cool. Slightly warm banana bread is hard to beat.

Saturday, October 22, 2011

Celebrating Another Year


Due to various things going on in my life...particularly work issues but also house projects, family feuds, Sweetie's shoulder issues, my knee injury, and on and on...this year has not been stellar in the blogging department, but another year of this blog has indeed passed. The challenge has been find in the time to post, but also finding the focus to remember to photograph food. I do prefer posts with photos of the dishes I'm talking about, don't you? Thanks to you, dear reader, the blog continues to pull me toward the computer so that I can share what I've made with you. Sometimes I wish I had a secret tunnel to your house (a fantasy I first read about on the Bread Baking Babes site) so that I could give you some of this freshly cooked or baked yumminess!

Now that some of last year's issues have been resolved I'm hoping to do a few more posts each month. I'm also dedicated to slowly but surely reducing the clutter and possessions in the house...and painting the walls in rooms that really need it, like my bedroom and the guest bedroom and parts of the living room, too. We'll see how far I get by Christmas!

To start off Feeding My Enthusiasms newest year let's turn to the King Arthur Flour Baker's Companion cookbook. I've become a big fan of King Arthur's products even though they don't send me any free samples or anything. Their specialty flours are wonderful. I use two of them this time. One flour is the Irish Whole Meal wheat flour which has a great texture with bits of the outer layer of the wheat berry that get lost when flour is processed a lot. The second one is the Ancient Grains flour which includes flours like amaranth...how cool is that? It add some subtle flavors that you don't get with plain flour.

So what are we baking today? A baked treat with nuts and chocolate chips. A seasonal favorite that can be baked year 'round because it uses canned pumpkin. I know that it is almost impossible to find canned pumpkin in some areas outside of the U.S., but you should be able to use cooked butternut squash...just be sure to run it through a food mill or process it in a food processor to make the cooked squash nice and smooth. If it's very watery, you may want to drain it in some cheesecloth. Canned pumpkin is pretty solid with minimal water.

Pumpkin Chocolate Chip Bread...doesn't that sound wonderful? This recipe is so easy and it make TWO large loaves. I froze the second one for future tea parties or when I need something sweet and baked but don't have time to bake (or I have too much paint on my hands...and face...but still want something to go with a cup of pick-me-up tea. I recommend using the butter/margarine combination. The sugar creams so much better with it and the texture of the loaf is a bit lighter, too.

Not a loaf bread kinda person? This batter would also make quite a few delicious muffins...just be sure to bake for a much shorter time.

Pumpkin Chocolate Chip Bread
from the King Arthur Baker's Companion Cookbook
Makes two loaves

2/3 cup shortening or 1 cup vegetable oil (I used one stick of butter and one stick of margarine, both partially melted in the microwave when I found that my vegetable oil had gone rancid. I rarely have shortening in the house)
2 2/3 cups sugar
4 large eggs
2 cups (or one 15-oz can) pumpkin - NOT pumpkin pie filling
2/3 cup water
3 1/2 cups unbleached all-purpose flour (I used 2 1/2 cups unbleached, 1/2 cup whole meal wheat (Irish whole meal flour from King Arthur, and 1/2 cup ancient grains flour mix from King Arthur.)
1/2 teaspoon baking powder
2 teaspoons baking soda
1 1/2 teaspoons salt
1 teaspoon nutmeg
1/2 teaspoon cinnamon (optional)
1 teaspoon vanilla extract
1 cup chopped pecans
1 1/2 cups chocolate chips

Preheat the oven to 350 degrees F.

In a large bowl, cream together the shortening, or oil or butter or margarine and the sugar. Beat in the eggs, pumpkin, and water. Add the flour, baking powder, baking soda, salt, nutmeg, cinnamon, and vanilla, stirring to blend, then mix in the nuts and chips.

Spoon the batter into two lightly greased 9 x 5 inch loaf pans. Bake the bread for 1 hour, or until a cake tester inserted in the center of one loaf come out clean. Remove bread from the oven. Cool it on a rack. Turn out of the pans and wrap completely cooled loaves well in plastic wrap and store it overnight before serving. (I ate some the same day and a slice the next day...didn't seem to be any different, so I vote for eating some while still slightly warm for that melted chocolate chip delight sensation.)

Sunday, October 16, 2011

Leaf Bread for Fall

The bodacious Bread Baking Babes are celebrating autumn this month by baking Fougasse, a delightful leaf-shaped bread, at the invitation of Elizabeth of blog from OUR kitchen, our Kitchen of the month.


Our regular posting day, the 16th of the month, coincides this month with World Bread Day, the annual event that encourages us to bake bread. We are asked also to honor the fact that we have enough food, a situation that isn't true for too many people in the world.

So today we celebrate both World Bread Day and baking with the Babes by baking fougasse, a shaped flatbread.

Fougasse is perfect for fall since it is traditionally shaped like a leaf, with the dough cut and stretched in such a way that, once baked, there is a lot of crustiness. That's a lovely thing in a flatbread like this, especially if you are serving it as an appetizer as I did, or with a nice cooler weather soup or stew.

Elizabeth gave us a couple of choices for the bread dough but indicated that we could also use our own recipe. I'd posted a foccacia recipe during the winter of 2008 and it used sourdough starter, so that's what I used. It made enough dough for me to make two loaves each of two variations. I was inspired by a fougasse that fellow Babe Susan of Wild Yeast had made which used gorgonzola cheese and figs to add flavor and texture to a fougasse which included rye flour.

I only used unbleached bread flour... no rye or other fancy flours this time... and paired the gorgonzola cheese with chopped walnuts. The result was awesome! There was no need for any additional butter or oil, although we did find that some slices of Golden Delicious apple went really well with that version of fougasse.

As Elizabeth days, "Because fougasse is baked on a stone instead of on an oiled pan, there are more crispy bits. Not too crispy though... it's juuuuust right! Of course, it can be cut with a knife but we think that fougasse tastes better torn apart."

The other half of the dough was flavored with freshly chopped herbs...Italian parsley, basil, and rosemary. I'm grateful to have not only enough for myself and Sweetie, but enough to share. I gave one of the herbed loaves to our renter because she loves bread and is on a fixed income so it helps her stretch her food budget a bit, too. Seems appropriate as we honor World Bread Day.

Try baking this easy and delicious Fougasse yourself...you'll be glad you did. There is only one rising, only a few ingredients, and trying out the shaping is fun and gives you another skill in the kitchen. You can choose your own additions or bake it plain and slather on the butter or dip the torn pieces of fougasse bread in a mixture of good olive oil and balsamic vinegar for an Italian touch. If you do bake it this month (by October 29th) be sure and send an e-mail with a link to your post (or a description of the bread and if you liked making it added to the e-mail if you don't blog) and a photo of the finished bread to Elizabeth to become a Bread Baking Buddy. She'll send you a badge and include you in the roundup.

Elizabeth was daring and baked her fougasse on a grill. I baked mine in the oven. Since I was using a baking stone (actually a pizza stone)


I shaped each leaf on a piece of baking parchment which I had laid on a wooden tray. Each was covered with oiled plastic wrap to rise. No corn meal was used on the parchment paper since I slid the bread and parchment paper on to the baking stone, then removed the loaf directly to the stone half way through baking (throwing the used parchment away).

Each loaf was shaped to fit the stone and they were baked one at a time. One day I'll have to spring for a larger stone so that I can bake two at a time. I also added moisture at the start of baking to help with crust development. I put ice cubes into a pie plate below the baking stone, plus sprayed the walls of the oven with water when I put the loaves in. The latter part of the baking time was done without the steam.

Now that you've heard how I did it, do visit the blogs of the other Bread Baking Babes (see links to the right). I'm also sending this over to Susan at Wild Yeast for the weekly Yeastspotting event. This week is sure to be a good one with entries from lots of World Bread Day posts, so check it out.


Sourdough Focaccia (with instructions for making Gorgonzola-Walnut Fougasse and Fresh Herb Fougasse)

2 cups 100% hydration sourdough starter
4 tablespoons olive oil, divided
1 cup water, divided
1/4 teaspoon active dry yeast
4 - 5.5 cups unbleached bread flour
2 teaspoons salt
additions like cheese, nuts, herbs, citrus peels, olives, etc.

In the bowl of a stand mixer place the sourdough starter. Add 3 tablespoons of the olive oil and mix briefly with the paddle attachment just until the oil is mixed in.

Make sure the water is lukewarm. Take 1/4 cup of it and add the dry yeast. Let sit 5 minutes until foamy.

Add the yeast, the rest of the warm water, and about half the flour. Mix with the paddle.

Switch to the dough hook. On slow speed add the flour, a half cup or so at a time, adding only a few tablespoons at a time toward the end. The dough will be soft. Add the salt and then knead with the dough hook on low to medium low speed for about 6 minutes, until the dough cleans the sides of the bowl and is smooth. Turn out on a lightly floured board or counter and knead in most of the rosemary, leaving about a teaspoon for the top.

Form the dough into a ball. Oil a large bowl (not metal) and turn the dough ball in the oil to coat. Cover with plastic wrap and place in a warm place and let rise until doubled in bulk. It took mine four hours, but even my 'warm' place wasn't as warm as it should have been.

Punch dough down, turn out of the bowl onto a lightly floured surface, knead a few time to get rid of the extra trapped gas.

At this point check out the directions below to make fougasse. To make focaccia, follow this link.


These were the instructions we were given. Notes on my variations are in italics below:

1. Mix, knead and allow your favourite bread dough to rise to double (I used the focaccia recipe above). If you are adding anything like olives, sun-dried tomatoes, onions, caramelized garlic cloves and/or walnuts, mix them into the dough near the end of kneading it or on the first turn of the dough (I added mine once the dough had risen and was ready to shape...just kneading the cheese and nuts into half the dough, then cutting that dough ball in half and shaping each into a leaf shape...then doing the same for the other half of the dough by adding the herbs for the second two loaves which were each shaped into a leaf shape:

for the nut/cheese versions:
1/2 cup chopped walnuts
1/2 cup crumbled gorgonzola cheese

for the herbed:
1 tablespoon EACH chopped Italian parsley, basil and rosemary).

2. If you are wanting herbs/spices on top, please add them just before baking.

3. Shaping: About an hour before baking the fougasse, turn the dough out onto a lightly floured board and press it out into an oval (or a rectangle; or a circle). Using a floured rolling pin, roll the dough out until it is about 1 cm (1/2 in.) thick. (I shaped it into a tall triangle.)

4. Sprinkle corn meal (to act as ball-bearings) on the peel - or an upside-down cookie sheet. Lay the shaped dough on the peel. Using a pizza wheel and "swift, decisive strokes" cut a design of a leaf or ladder into the dough. Take care not to cut through the outer edges. From the edges, pull the dough outwards to make sure the cuts are spaced. (I used parchment paper instead, but the dough with a stiff plastic scraper, then gently spread out the dough to open up the cuts to create the leaf shapes...sort of triangular)

Cover with a clean tea towel followed by a plastic grocery bag and allow to rise. (Robertson allows the shaped bread to rise first and does the slashes at the last minute. Naturally, because of my stellar reading skills, I didn't notice that until I had already made fougasse several times by slashing it directly after shaping it.) (I did notice that I had to open up {gently} some of the gaps that had closed up during the rising time. Since my loaves were on parchment and covered with oiled plastic wrap, it was easy to uncover them and gently move the dough to open up the shape again.)

5. Just Before Baking: Drizzle with olive oil and scatter coarsely ground sea salt over top. (You can also do this step just after the bread is baked; that is what Robertson suggests. Or you can forget to add the olive oil at all, as I did the last time.) (I skipped the olive oil and salt part since the additions were flavorful enough.)

6. Baking in the Oven: Put a pizza stone on the middle or top shelf of the oven and turn it to 400F (200C) (I used 450 degrees and added steam with ice cubes and water spray for extra crunch in the crust). Transfer the fougasse onto the hot stone and bake for about 15 minutes, turning it around at least once to account for uneven oven heat. (You may need 20 minutes or more of baking time if you want a darker crust.)

7. When the fougasse done, remove it from the heat and allow to cool on a well-ventilated rack. To serve, break it apart and dip it into good quality olive oil with herbs if you want.


Thank you Elizabeth for a wonderful, delicious, will-make-this-again challenge. My only other attempt at making fougasse was a dud so it was a lot of fun to do it again and discover that it is a great bread. The ultimate test is how quickly it is gone. All four loaves were finished in less than two days (with Straight Shooter having almost a whole one for breakfast yesterday!) so it truly was a success.

Monday, October 10, 2011

Still Harvesting

There are still tomatoes ripening on the window sill as the rain comes down outside. I know that there will be green tomatoes with thin skins that will crack or split from the rain, so once it stops I'll try to bring them in and see if I can use them for chutney or, if they are almost ripe, see if I can encourage them to ripen before they spoil.

Fortunately there are lots of ripe ones ready to use so yesterday I made a lentil soup that gets it's bright flavors from fresh garlic, tomato, lemon juice and Italian parsley which are added at the end. I found the recipe on Natashya's wonderful blog, Living in the Kitchen with Puppies. She has a number of lentil soup recipes but this one matched up with ingredients I had on hand and sounded like a perfect use for some of the fresh tomatoes.

I made the cooked part of the soup yesterday so that it could sit overnight in the fridge, letting all the savory flavors of onion, carrot and celery mingle over time. After reheating today I was able to add the garlic, tomato, lemon juice and parsley and serve it up for lunch pretty quickly. It was perfect for a chilly rainy day and pretty filling, too.

To go with the soup I made some bruchetta (using MORE tomatoes). Using some oatmeal bread I made a few days ago, I made thin slices, brushed them with olive oil on one side, and toasted them in a hot cast iron skillet, turning the slices to grill them on the second side. Once they were toasty, I turned them all with the olive oil side up and rubbed that side of each with a raw garlic clove. Don't skip this step...it really makes a difference in the final bruchetta's taste. While the toasts were cooking I finished up the bruchetta topping. Earlier I had finely chopped a ripe Brandywine tomato. It had very few seeds, so I left on the skin and kept the seeds. If my chosen tomato has a lot of juice, seeds, or a thick skin, I would probably remove them and just finely chop the tomato flesh. For finishing up, I added finely minced garlic, chopped basil and a splash of olive oil and smaller splash of aged balsamic vinegar. These were mixed together with the chopped tomato. To serve, this mixture is piled on the bruchetta toasts.

They should be served right away while the toasts are still crisp and crunchy. The contrast of textures and flavors is delicious! This only really works with ripe tomatoes, so when you have some do give this a try. The standard recipes call for baguette sliced on the diagonal to give the largest real estate for holding the topping. If you have some other kind of sturdy country bread, by all means use it.

For those readers who are interested, we are to the point of painting the new walls in the new stove area in the living room. (This stove will help heat the downstairs part of the house. The upstairs stays chilly but I like to sleep in chilly rooms.) We have also chosen the new lights for the stove area to replace the old can lights. The walls have also been cleaned and the blue tape to keep the paint off of the wood at the ceiling and the wood trip around the door out to the deck has been applied. The freshly painted wall is going to be two-toned with the outer wall in Swiss coffee and the inner wall in Antique White which has a golden glow but is very pale. We also discovered that a local hardware store that had gone downhill has new ownership and now is a great resource. I need new door and drawer handles for the new storage and they have some great ones that I haven't seen elsewhere. Good times.


Here is that great Lentil Soup...pretty easy and very delicious:

Lemon Parsley Lentil Soup
- serves 4-6

2 tbsp vegetable oil
1 onion, halved and sliced
1 rib celery, sliced
1 large carrot, diced
1 tsp salt
6 cups chicken or vegetable stock, or a mix of the two.
1 cup lentils
1 diced tomato
4 cloves garlic, minced
Juice of 1 lemon
1 cup chopped parsley
Black pepper

Rinse and pick over lentils.
In a small soup pot, heat vegetable oil on medium/high.
Add onions. Sauté until soft and starting to brown, about 10 minutes.
Add celery, carrots and 1 tsp salt. Sauté 5 minutes more.
Add stock and bring to a boil.
Add lentils and bring back to a boil.
Drop heat to gentle simmer and simmer until soft, about ½ hour.
Add tomato and garlic, heat through. Add lemon juice and parsley, heat through.
Season to taste and serve.

Bruchetta with Fresh Tomatoes and Basil
- serves 2

1/2 baguette, sliced in elongated thin rounds (or your own country loaf cut into thin slices)
1 tablespoon olive oil
1 clove garlic, sliced in half
1 medium to large ripe tomato, finely chopped
1 clove of garlic, finely minced
1/2 tablespoon olive oil
1/2 teaspoon aged balsamic vinegar
2 teaspoons finely chopped fresh basil
salt and pepper

Lightly brush the slices of bread with the olive oil. Grill on a barbecue or on a cast iron grill or skillet, first on the olive oiled side, then on the other side. Rub the toasted olive oiled side with the garlic clove. Set aside. (I kept mine warm in a low oven until time to serve them.)

In a small bowl combine the chopped tomato, minced garlic, olive oil, balsamic vinegar and chopped basil. Taste and add salt and/or pepper to taste.

When ready to serve, arrange the toasts, olive oil side up, on a plate or bread board. Scoop some of the topping on each. Serve at once while bread is crisp and warm.

Saturday, October 08, 2011

Harvest

When we first moved to our part of northern California, we tried out being exhibitors at the local county fair. Both kids won some ribbons for craft entries and I eventually won at the fall Harvest Fair for an over the top Victorian gingerbread house. Although the kids loved the summer fair with its fun carnival rides and contests and lots of animals and fair food, Sweetie and I have always been fond to the Harvest Fair which has more of a focus on local products and local wines. There are still lots of crafts and cute animals and fair food but the crowds are smaller and the pace is more relaxed.


This year I was lucky enough to do something I've wanted to do for a long time...work the Harvest Fair. Although the long days and challenging cash register set-up were tiring, I had a great time. The people I worked with were old hands at doing the wine sales (yes, that's where I ended up...ringing up wine sales! Isn't that a hoot?) and they were generous with their knowledge and welcoming as co-workers. I felt very fortunate to have such a positive work experience and to meet them. When there were slow times we were able to chat a bit. Each one was a stellar human being and interesting, too. I hope I see them again....maybe next year I'll work the fair again.


Speaking of harvest, we have been harvesting lots of tomatoes. Due to the cool and rainy spring and early summer everything is late, but there is something very special about being inside on a cool, rainy October evening and eating ripe heirloom tomatoes

that were only picked a day or two before. That wonderful fresh tomato fragrance is still strong, the slices are juicy and succulent, especially with a sprinkle of good olive oil, another sprinkle of aged balsamic vinegar, and a dash of garlic salt and fresh pepper.
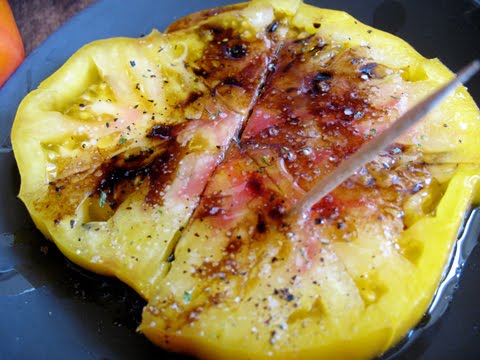

It's hard to beat and makes the waiting worthwhile.


Some of the plum type tomatoes were cooked and the skins and seeds removed to make a fresh tomato sauce. Although I neglected to take a photo (thought I had, but the memory is not as reliable as it once was), I can assure you that the baked pasta dish I made using that sauce was excellent. I'll share the recipe at the end of the post.


The other harvest that is going on right now is of seeds. I have let some of the French thin green beans go to seed and the seed pod to dry out.


Before the rains came this week I was able to bring in the dry pods and remove the beans...I felt a little like Jack in the fairy tale


...those few beans will sit in the freezer until about March, then I'll plant them for the spring and summer harvest of fresh, delicious tender green beans. This kind of bean produces all at once (over about a week and a half), so I do succession plantings to keep the beans coming so having a lot of beans (seeds) is a good thing.


I also harvested some sweet pea and morning glory seeds to plant early next spring. I've tried planting them now but the snails usually munch them right up during the winter. Come spring I have no seed and no seedlings. If I can figure out how, I'll also collect tomato seeds and dry them, then freeze them for next years' seedlings.


Sorry about the lack of photos, but I'm sure you've baked a penne pasta casserole before...and that's what it looked like. The flavors went really well together. Besides, who can hate melty cheese?


Spinach Chicken Pasta Bake with Three Cheeses

1/2 lb (dry) penne, cooked according to package directions and drained. (I used whole grain penne but any kind will do...you could use another type of pasta, too, if no penne is in your pantry)
1 1/2 cups cooked chicken, cut into bite sized pieces
5 oz (half a box) frozen spinach, thawed and drained
2 cups tomato sauce, fresh if possible
1/2 cup feta cheese
1/2 cup grated Parmesan cheese
1 tablespoon dry oregano
1 teaspoon dry basil
salt and pepper to taste
three sticks string cheese (or about a cup grated mozzarella cheese)

Preheat oven to 375 degrees F. Grease a 9 x 13 inch baking dish. Set aside.

In the pot that the penne was cooked in, mix together the cooked chicken, frozen spinach, tomato sauce, feta cheese, Parmesan cheese, oregano, basil and salt and pepper. Add the cooked and drained penne and stir to combine. Put this mixture into the prepared baking dish.

Cut the string cheese into coins and place evenly over the pasta mixture (or scatter the grated mozzarella evenly over the casserole.)

Bake in the preheated oven for 45 -50 minutes or until heated through and the cheese is melted on top.
Serve while hot. A salad and some crusty bread is a nice addition to this dish.

Serves 6 -8.

Tuesday, October 04, 2011

Pretzel Buddies


One of the joys of the Bread Baking Babes is the fun of baking bread...another is baking with the Bread Baking Buddies because it expands our world and gives us the opportunity to visit other blogs and see wonderful photos of the bread of the month and to see if our experience was anything like theirs. Sometimes the Buddy is new to bread baking, but often they are very experienced and I learn a lot by reading their posts.

In September we gathered around the virtual kitchen table and baked Pretzels. Some of the Babes even did a Google+ virtual group bake! The Internet is wonderful...makes the world smaller and brings us closer together. Now if only we could smell the lovely fragrances in each other's kitchen as the bread bakes.

Our intrepid Buddies this month did some excellent twisting. They baked pretzels both sweet and savory. Their Buddy Badges have been sent and now it is our reader's turns. Do visit their sites by clicking on the links so that you can read all about it. To whet your appetite here is the round-up:

KELLY :
GOSIA :
JUDY :
CATHY :
MICHELLE :

Thank you Cathy, Gosia, Michelle, Kelly and Judy! You are great bakers and wonderful Buddies and I hope you bake with us again.

Dear readers, do check out their posts and be inspired yourselves...it is still a great time for soft pretzels.

Wednesday, September 28, 2011

Calling All Buddies!


One of the fun things about the Bread Baking Babes is that lots of bloggers who bake the bread of the month get to be Buddies. Not only do you get to make something delicious, you can read all of the Babe posts to get our take on it, you can always e-mail the Kitchen of the Month (this month that's moi) to get help with the recipe and, after the 29th, you get a Bread Baking Buddy Badge to display on your site if you have a blog. As you can see, tomorrow is the last day for posting your bread and sending me a link at plachman at sonic dot net.


Since life is rearely simple, I'll make the cut-off midnight East Coast of America Daylight Savings Time (9 pm my time) and send badges to everyone who have e-mailed me by then. The round-up will have to wait until Monday or Tuesday of next week due to circumstances that are allowing me to have fun and earn money all weekend.


So give those pretzels a try, send me an e-mail with info on how the baking went, how you liked them, etc, and please include a photo.


XO Elle

Saturday, September 24, 2011

Plethora


Doesn't English have the oddest words? Due to the chilly and wet spring and early summer, we had a dearth of ripe tomatoes, even in August. Dearth sounds so heavy and sad (and means a lack of or inadequate supply or [even more so] a scarcity that makes something dear) which is appropriate since the scarcity of tomatoes was a sad thing. Now, with the onset of almost a full week of hot weather, we have a plethora of ripe tomatoes!Plethora is another one of those unusual words but it is perfect for the current situation; we do indeed have an excess, superfluity, over supply, profusion and abundance of a rainbow of heirloom tomatoes.

I've been giving them away to friends, eating them at almost every meal, and still there are plenty of bright red Costoluttos, yellow-orange Persimmons, striped Green Zebra tomatoes with a yellow tinge under the stripes to let me know its ripe, big fat Marvel Stripes and dark green brown and pink Black Krims, plus a dusky plum shaped one that is twice the size of my old favorite Romas. This makes me the opposite of sad as you can imagine. The wait was worth it. Don't you just love it when you finally get something you've been waiting patiently for and it actually lives up to your expectations?

I have to boast a little. One of the plants that I fed and watered for so long produced an absolutely huge tomato. Here is a photo of it by the KitchenAid mixer paddle to give you a visual idea of just how much of a big guy it was. There have been a few more that were large, but that one was giant.


Once each season when we get to this point and there are tomatoes to choose from, each more luscious looking than the other, I make a classic BLT sandwich.


This time it took a day longer than planned because the sourdough bread I baked to use to hold the sandwich together and to capture those delicious fresh tomato juices baked up too thin. It made great toast but I wanted a nice tall sandwich bread. The next day I made some for my sandwich and some to share with friends. I tried something different. I fastened a folded parchment collar around a small spring form pan and put the dough ball in that. It rose up beautifully so I had the perfect tall sandwich loaf, even if it was round instead of loaf shaped.

Some thoughtfully cooked platter bacon from our local market (not undercooked with flabby parts where the fat didn't crisp up, not overcooked so it would be crumbly, a handful of baby lettuce leaves, light mayonnaise (the only thing I should have made from scratch instead...but the taste was still just fine), freshly ground pepper and slices of juicy tomato fresh from the vine...it made a really iconic BLT!


I ended up wiping tomato juices from my chin because the bread just couldn't soak them all up. It was like biting into the best of summer.


Best BLT
two slices bread, if possible a sourdough bread (I made a sourdough herb bread with whole wheat flour)
2-4 slices good quality bacon
2 tablespoons mayonnaise
1-2 ripe tomatoes, home grow if possible
1-2 full sized lettuce leaves or a handful of baby leaves
pepper to taste

Toast the bread.
Fry the bacon until just barely crisp, turning a few times as the slices cook. Lay cooked slices on paper towels or brown paper to drain.
Spread both slices with the mayonnaise. Slice the tomato in thick (about 1/2 inch) slices. On one slice arrange the tomato slices. Top tomatoes with the cooked bacon strips. Top with the lettuce. Add pepper to taste on the other slice of bread. Freshly ground pepper is the best.
Place the peppered bread on top of the bacon. Press the sandwich together slightly. Serve at once. Be sure to have some napkins on hand to handle those fresh tomato juices that might escape the sandwich.

Tuesday, September 20, 2011

Au Revoir Cake Slice Bakers


It has been a pleasure baking with the Cake Slice Bakers the past year, allowing me to find a number of new-to-me and wonderful blogs, and also to try some really nice cakes.

My favorite was the Coffee-Heath Bar Crunch Cake we made in February, but I also enjoyed the first recipe I tried...Pumpkin Chocolate Chip Pound Cake. Sweetie's favorite was the Cranberry Cake we baked in December, with extra almonds due to a senior moment of mine. This month's opportunity to choose our own recipe was great!


Since it is the height of peach season with luscious ripe peaches easily available I did change the fruit from nectarines to peaches. I love nutmeg with peach so I left out the cinnamon and used nutmeg instead. This was my second favorite of all the cakes we have baked...warm peaches, a moist, vanilla scented cake and spicy-nutty topping made an outstanding combination. Do try it!
Please be sure to visit other Cake Slice Bakers this month to see what they have chosen, too. It's sure to be a delight. HERE is the blogroll for the links.

Next month the group will be baking from another cake book. I'm taking a break from the group for a while in order to devote more time to my studies. It turns out that InDesign is very complex and the class I'm taking requires some work so that I can learn the program as well as possible. You, dear reader, can still check in on the 20th of the month and see what the Cake Slice Bakers have been up to...I'll most likely be visiting their blogs myself to 'ooooh' and 'ahhhh' over their creations...using the same link as above.


Peach Cake with Nutmeg-Nut Topping
Adapted from a recipe in Cake Keeper Cakes
by Lauren Chattman

Topping:
1 cup plus 1 tablespoon sugar (Next time I would reduce it to 3/4 cup sugar)
1/4 teaspoon freshly ground nutmeg
1/3 cup finely chopped walnuts

Cake:
1/2 cup unbleached all-purpose flour
1/2 cup whole wheat flour
1 teaspoon baking powder
1/2 teaspoon salt (use 1/4 teaspoon if fruit isn't completely ripe)
1 cup sugar (again I would reduce to 3/4 cup sugar)
1/2 cup (1 stick) unsalted butter, softened
2 large eggs, at room temperature
1/2 teaspoon pure vanilla extract
5 medium ripe peaches, peeled, halved, pitted

Preheat the oven to 375 degrees F. Grease the inside of a 10-inch round springform pan.

Topping: Combine the sugar, nutmeg and nuts in a small bowl. Set aside.

Cake: Combine the flours, baking powder, and salt in a medium bowl. Set aside.

Combine the sugar and butter in a large mixing bowl and cream with an electric mixer on medium-high speed until fluffy, about 3 minutes, scraping down the sides of the bowl and the beaters once or twice. With the mixer on low, add the eggs, one at a time, scraping down the sides of the bowl after each addition. Stir in the vanilla. Add the flour mixture, 1/2 cup at a time, scraping down the sides of the bowl after each addition.

Scrape the batter into the prepared springform pan and smooth the top with a rubber spatula. Arrange the peaches, cut side down, on top of the batter. (I arranged sliced peaches on top of the batter...the peaches were so ripe that some parts had spoiled and had to be removed, so slices worked better).Sprinkle with the topping. Bake the cake until it is golden and a toothpick inserted in the center comes out clean, 50 to 55 minutes. Let the cake cool in the pan on a wire rack for 10 minutes. Release the sides of the pan (run a knife around the cake first if it might stick to the sides), and use a large spatula to slide the cake from the pan bottom to a wire rack.

Cool completely, cut into wedges, and serve.

Store uneaten cake in a cake keeper or wrap in plastic and store at room temperature for up to 2 days.

Now please go visit the other Cake Slice Bakers to see what they chose for this special month. Blogroll is HERE.

Friday, September 16, 2011

Bread Baking Babes Get Twisted


For September let's gather around the kitchen table as the fabulous Bread Baking Babes delve into the past...610 AD in fact...and we can decide if we believe that these bread morsels were used by monks of that time to teach little boys to pray or to reward them for staying quiet during Mass...or both. That's the story behind Soft Pretzels, called Bretzels in German. The traditional shape resembles hands folded in prayer. Even if it isn't true, it's true that soft pretzels are a county fair and mall favorite snack food. I've included directions for the traditional salted soft pretzels and for the more contemporary cinnamon sugar ones. However you flavor them, they give you a chance to have fun shaping the dough.


They make a wonderful snack, are pretty easy to make, get their chewy, slightly craggy exterior from a dip in a caustic boiling bath.


After the dip the pretzels are put on parchment lined baking sheets (I used a silicone mat instead),


brushed with the egg and water mixture, which gives them a shine (and a double dose of egg wash, with drying time in between gives an even shinier finish), then sprinkled with a topping. Here is your chance to get creative, or you can go classic by using pretzel salt or kosher salt.


One baker added roasted garlic to the dough. Bet they would be good with chopped rosemary, too.

They puff up slightly in the oven and turn an appealing dark golden brown. I used a single egg wash but next time plan to let the first wash dry, then give them another dose of egg wash right before putting them in the oven for a more lacquered look. I might also throw a few ice cubes into a pan on the bottom of the oven for a crustier crust. For authentic pretzels the water bath should contain lye...a weak solution but still a bit dangerous to work with. Most of the recipes I saw used baking soda instead. I'm giving instructions for boiling the pretzels in the baking soda enriched water. You could also just dip them in water than has baking soda dissolved in it, but the 30 seconds in the simmering water seemed to firm up the dough, making it easier to handle the shaped pretzels.

The only major difference between the MyRecipes Soft Pretzel recipe and mine is that they called for 3 1/4 cups flour. I found that I only needed 2 1/2 cups of flour, and I was careful to measure by spooning the flour into the measuring cup. Too bad that there was no weight measurements. I suspect that would have been better. As you can see this amount of flour created a nice dough to work with. This rope is less tapered at the end but still made a nice pretzel shape.

The traditional dip for the salted ones is a good mustard. If you like beer these are great with beer...and maybe some cheese for a light lunch. Sweetie preferred the cinnamon sugar ones.

So let's gather around the kitchen table for September and bake up some soft pretzels! If you are having folks over to watch a ball game you might want to double the recipe. If it's just you, these don't keep well (neither airtight nor at room temperature) so your best bet is to make 'em plain and freeze what you don't eat freshly made. You can brush the thawed pretzel with water, sprinkle on the salt and re-heat in the microwave or oven and they will be soft and yummy. For the sweet and spicy ones, just reheat and dip in melted butter and then into cinnamon sugar.

Saturday morning: OK, my brain was sooo tired yesterday when I posted (not to mention I'd had some wine before hand) so I completely left out three important messages:

1) I really, really hope you will bake these Pretzels and become a Bread Baking Buddy! They are pretty easy, lots of fun, and yummy. To become a Buddy and get the Pretzel badge you just e-mail me at "plachman-at-sonic-dot-net" and include your URL for your post and a photo. You don't need a blog and you can write about the bread, with photo, in email and we'll post that. We do want to know something about your bread baking experience or how you liked or didn't like the bread. We need your e-mail by September 30 so that I can post a round-up. The last official date to post is September 29th (Thursday). Looking forward to getting lots of e-mails!

2) Please be sure to visit the rest of the Fabulous Bread Baking Babes to see how beautifully they have made their pretzels! The links are to the right.

3) I'm sending this over to Susan at Wild Yeast for Yeastspotting, the weekly extravaganza of wonderful yeasted recipes. Visit often to be inspired and impressed.


Soft Pretzels
Found at MyRecipes: http://www.myrecipes.com/recipe/soft-pretzels
(NOTE: Because I only used 2.5 cups of flour, I made 8 pretzels, not 12)
• YIELD: 12 servings (serving size: 1 pretzel)

Ingredients
1 package dry yeast (about 2 1/4 teaspoons)
1 1/2 teaspoons sugar
1 cup warm water (100° to 110°)
3 1/4 cups all-purpose flour, divided (about 14 1/2 ounces) (I used 2 1/2 cups total)
1 teaspoon salt
Cooking spray
6 cups water
2 tablespoons baking soda
1 teaspoon cornmeal (Didn't use this on the silicone mat)
1 teaspoon water
1 large egg
2 teaspoons kosher salt

Preparation
Dissolve yeast and sugar in warm water in a large bowl, and let stand for 5 minutes.
Lightly spoon flour into dry measuring cups; level with a knife. Add 3 cups flour and 1 teaspoon salt to yeast mixture; stir until a soft dough forms. Turn dough out onto a lightly floured surface; knead until smooth and elastic (about 8 minutes). Add enough of remaining flour, 1 tablespoon at a time, to prevent dough from sticking to hands (dough will feel slightly sticky).

Place dough in a large bowl coated with cooking spray, turning to coat top.


Cover and let rise in a warm place (85°), free from drafts, 40 minutes or until doubled in size. (Gently press two fingers into dough. If indentation remains, the dough has risen enough.) Punch dough down; cover and let rest 5 minutes.

Preheat oven to 425°.

Divide dough into 12 equal portions. Working with one portion at a time (cover remaining dough to prevent drying), roll each portion into an 18-inch-long rope with tapered ends.


Cross one end of rope over the other to form a circle, leaving about 4 inches at end of each rope. Twist the rope at the base of the circle.


Fold the ends over the circle and into a traditional pretzel shape, pinching gently to seal.


Place pretzels on a baking sheet lightly coated with cooking spray. Cover and let rise 10 minutes (pretzels will rise only slightly).

Combine 6 cups water and baking soda in a nonaluminum Dutch oven. Bring to a boil; reduce heat, and simmer.


Gently lower 1 pretzel into simmering water mixture; cook 15 seconds. Turn pretzel with a slotted spatula; cook an additional 15 seconds. Transfer pretzel to a wire rack coated with cooking spray. Repeat procedure with remaining pretzels.

Place pretzels on a baking sheet sprinkled with cornmeal. Combine 1 teaspoon water and egg in a small bowl, stirring with a fork until smooth. Brush a thin layer of egg mixture over pretzels; sprinkle with kosher salt. Bake at 425° for 12 minutes or until pretzels are deep golden brown.


Transfer to a wire rack to cool.

from Cooking Light OCTOBER 2005
To make Cinnamon Sugar Soft Pretzels: (see photo at top of post)
When you put on the egg glaze in the above recipe, don't add any toppings. When the pretzels are baked and still a little warm, dip them in melted butter (I used unsalted) and then into a cinnamon-sugar mixture. I made 4 of the pretzels as cinnamon sugar ones and used 1/2 stick of melted butter (and there was plenty left over), plus 1/2 cup sugar and about 1 teaspoon cinnamon (I like cinnamon) but make use the cinnamon amount that suits your taste.