Showing posts with label basil. Show all posts

Wednesday, July 31, 2024

Polenta and Basil and Cheese


I don't remember eating polenta when I was young. If we had spaghetti sauce, or 'gravy' if you're Italian I guess, Mom served it with spaghetti. 

I really, really like polenta. It's good by itself, a sort of variation of grits, and it's great as a base for roasted veggies, or a pork stew, or for any version of spaghetti sauce with a tomato base. If you chill it, it becomes a great side to warm up on a grill or in a cast iron skillet. The toasting of those corn bits gives it a different flavor than the soft version straight out of the pot.

This time we're doing a variation on the chilled polenta. Parmesan cheese, pepper and a bit of butter gets stirred into the soft, hot polenta, and then half of it gets poured into a greased pan, that gets topped with fresh basil leaves (which is why I'm making it now when my basil bush is really producing lots of fresh basil) and some mozzarella cheese, then that is topped with the rest of the polenta.

After that concoction chills to firm up, you cut it into portions and cook it until golden brown on a grill or in your cast iron skillet. The polenta gets a bit crusty and the cheese in the middle gets gooey. I like to heat a little spaghetti sauce in the microwave to spoon over the top since basil and tomato are such a great match of flavors. This can be a side dish or, with a larger portion, a full meal. Imagine that, plus a crisp green salad, maybe tossed with an Italian dressing...bliss! 


Grilled Cheese and Basil Polenta
Based on a Donna Hay (#40) recipe 

3 cups (750ml) water 
1 teaspoon salt
1 cup (170g) instant polenta (I used an equal amount of regular polenta and cooked 10 minutes or so)

60g butter, chopped (I only used a tablespoon of butter)
½ cup (50g) finely grated parmesan
 freshly ground black pepper to taste
½ cup basil leaves
1 cup (100g) grated mozzarella
olive oil, for brushing

Place water in a saucepan over medium heat and bring to the boil. Stir in salt. Gradually whisk in the polenta and cook, stirring, for 2-3 minutes or until thickened. Remove from the heat and stir through the butter, parmesan, and pepper. Pour half of the polenta into a 20cm square pan lined with non-stick baking paper and spread to smooth. (I used a 9-inch round pie pan, lined with foil and then sprayed with olive oil spray.) Top with the basil, mozzarella and remaining polenta. Refrigerate for 45 minutes or until set.
Cut into squares/rectangles/wedges and brush with oil. Heat a char-grill pan or barbecue over high heat. (I used my cast iron skillet, well heated) Cook the polenta for 3-4 minutes each side or until golden and the cheese has melted.

Serve topped with a generous serving of the pasta sauce or a ragu of your choice. A nice green salad completes the meal.

Thursday, July 27, 2023

Puffy Pancake for Dinner


 If you think that pancakes are just for breakfast, have I got a surprise for you. This Dutch Baby, a kind of pancake you bake in the oven, is savory and it's topped with the flavors of summer - fresh corn, tomatoes, zucchini and basil. It goes together quickly, aside from the chopping time, and makes a great supper or delightful side dish.

I made mine with all-purpose flour, but the original recipe calls for whole wheat or half and half. If you are gluten free, I would just use a gluten free all-purpose flour mixture. King Arthur Baking sells a nice one, but many stores carry others.

You could also substitute other veggies live beans or summer squash, although the trio I used is wonderful and is just the taste of summer for me. I did use a sweet white onion, but I suspect that a yellow onion, red onion, or scallions/green onions would work well, too if that is what you have on hand. Fresh corn can be replaced with frozen corn, which is what I did since I didn't have fresh corn on hand.

The recipe says to mix the flour with the salt and pepper, but I think that with all the whisking going on to make the batter for the pancake that you could just add it along with the flour, which would save a dirty bowl. Whisk the flour in slowly so that it doesn't clump up as much.

Be ready to eat this while it is hot from the oven. I had a quarter left over and reheated it in the microwave the next day for another dinner, topped with a little shredded cooked pork shoulder. That was delicious, too.


Savory Dutch Baby with Summer Veggies

Serves 2-3 as dinner, 4-6 as a side
I apologize - this recipe came from the Washington Post, or Better Homes and Gardens or Southern Living...should have written down where.

For the Veggies:

1 tablespoon olive oil
1/2 cup sweet onion, diced 
3/4 cup corn kernels, cut from the cob (about 1 ear - OK to use frozen)
3/4 cup zucchini, diced 
1/8 teaspoon each salt and pepper
3/4 cup grape tomatoes, quartered
4 large basil leaves cut into chiffonade ribbons for garnish

Use a 10-inch cast iron or oven proof skillet to heat the oil to shimmering. Add the onion, stir, and sauté for 3 minutes, until slightly softened. Add the corn and the zucchini, salt and pepper, stir and sauté  for another 2 minutes. Add the tomatoes, stir and sauté another minute. Place veggies in a bowl. Cover and keep warm while the Dutch Baby cooks.

For the Savory Dutch Baby:

1/2 cup flour...whole-wheat entirely, or 1/4 cup whole-wheat and 1/4 cup all-purpose, or 1/2 cup all-purpose, or 1/2 cup gluten free flour mix
3/4 cup milk (I used unsweetened oat milk)
4 large eggs
1/4 cup grated parmesan cheese
1 tablespoon olive oil

Wipe out the skillet used to cook the veggies. Preheat the oven to 425 degrees F and move the oven rack to the middle of the oven.

In a large bowl whisk the eggs to combine, then whisk in the milk until well-combined. Add 1/4 teaspoon salt and a dash of pepper and then slowly whisk in the flour to fully combine. Stir in the parmesan cheese.
Add 1 tablespoon olive oil to the skilled and swirl to coat the pan and sides. Place into the oven and heat for 10 minutes - you want the skillet to be good and hot. Carefully add the batter to the hot skillet and then put it into the oven and bake for 12-15 minutes. The pancake will puff up! When golden brown, remove from the oven and top the pancake, still in the skillet, with the warm veggie mixture. Garnish with the basil chiffonade ribbons. Serve at once.


Sunday, September 11, 2022

Pesto with My Garden's Basil


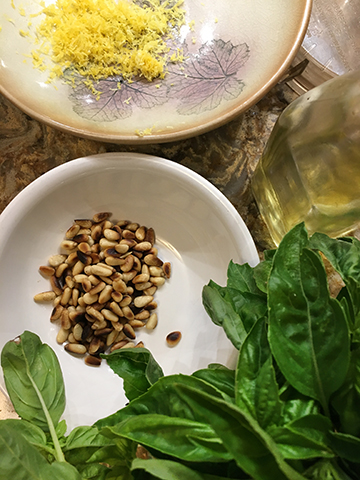
Pesto made with pine nuts and basil is a classic sauce for a good reason. For one thing, it smells heavenly! The bright green is enticing, too. Best of all are the robust flavors. Since I'm still not eating cheeses, I made my sauce without Parmesan cheese, but I did add nutritional yeast, plus lemon juice and zested lemon peel. Those added some complexity and the lemon added zing. 


My basil started to flower, so it was time to harvest...perhaps past time. Once rinsed, I stripped the leaves off the stem (even tiny ones) and didn't use the flowers. You need a cup, packed, so that's a lot of basil.


One of the keys to this recipe is to use a food processor and to scrape down the sides frequently so that all of the ingredients are incorporated.

This is an intensely flavored sauce, so use sparingly at first until you are familiar with the intensity.

I lightly coated cooked tortellini with this pesto and it was soooo delicious!


No Cheese Pesto


1 cup, packed, fresh basil leaves...stems discarded
2/3 cup toasted pine nuts
1teaspoon nutritional yeast
1 teaspoon lemon zest
juice from a lemon
1/3 cup olive oil, or to taste
salt and pepper to taste

In a food processor bowl fitted with the steel blade place the basil, pine nuts, nutritional yeast, lemon zest and lemon juice. Process until fairly smooth, scraping down sides as needed. With machine running, use the feed tube and add the olive oil in a thin stream until pesto is to your liking. Add salt and pepper to taste. Serve at once.

Leftover can be stored in a small glass jar. Pour a little additional olive oil gently to create a thin layer of oil on top of the pesto. This keep air out and prevents the pesto from turning brown.

Thursday, August 09, 2018

Fresh Basil in Pesto


Most years I plant basil seeds in a wide and somewhat shallow planter. Some years the basil does well and fills up the planter. Some years I get a few spindly plants. This year the basil is happy and the planter is packed and the plants are getting tall. Time to use them and a great way to use basil is in pesto. Normally I'd make a mixture of basil, pine nuts,olive oil and parmesan cheese, with some salt and pepper added to taste.

Now that cheese is in my past, I decided to try making it without parmesan. I used fresh lemon juice and lemon zest to add some zing and some almond flour for body. Of course the star is the basil, which is as it should be. We had it mixed with some potato gnocchi that were a bit unstable so that half turned to mashed potatoes when heated in simmering water. It was a new brand of gnocchi. Wonderful in taste but I think I'll go back to the more stable kind.

The pesto was just right...lots of basil flavor heightened by the lemon and mellowed by the nuts. I toasted the pine nuts a little too much but with all that basil you would never know. The olive oil wasn't the real fancy kind used for finishing...it would be wasted for the same reason...it's all about the basil. You could taste the lemon, mostly as an afternote. A touch of salt was necessary. There is still enough in the fridge for another pasta or gnocchi dish...YAY!

No Cheese Pesto

1 cup, packed, fresh basil leaves...stems discarded
1/3 cup toasted pine nuts
1/3 cup almond flour
1 teaspoon lemon zest
juice from a lemon
1/3 cup olive oil, or to taste
salt and pepper to taste

In a food processor bowl fitted with the steel blade place the basil, pine nuts, almond flour, lemon zest and lemon juice. Process until fairly smooth, scraping down sides as needed. With machine running, use the feed tube and add the olive oil in a thin stream until pesto is to your liking. Add salt and pepper to taste. Serve at once.

Leftover can be stored in a small glass jar. Pour a little additional olive oil gently to create a thin layer of oil on top of the pesto. This keep air out and prevents the pesto from turning brown.

Wednesday, October 21, 2015

Don't Cook? Try This Salad


Sometimes you need a salad recipe that will be easy to assemble somewhere other than your kitchen, one that is a main dish salad, one that is fairly healthy with vibrant flavors, too. Then to have a salad that is also pretty good for non-cooks as long as they are comfortable with grilling chicken and you have a winner. Did I mention that it's delicious? It is. I served it with rolls just like THESE.

This recipe is based on a couple of recipes I saw online, but, as usual, I changed it so much that I'm not going to attribute it to anyone in particular.

For starters you can use a number of things for the salad greens. You can use pre-washed bagged salad mix. You can wash and dry and chop or tear your own greens. You can use almost any mixture of greens, so this is great for greens from your garden. I went with heads of romaine lettuce from Costco, which I washed, spun dry and chopped.

The next piece is balsamic dressing. You can use bottled dressing and most stores have a number of choices for you. You can also have a little fun in the kitchen and mix up a simple dressing with garlic, mustard, honey, olive oil, salt and pepper and balsamic vinegar. The dressing is used to marinate chicken breasts and also to dress the salad when it is serving time.

The chicken breasts should be boneless, but they can also be skinless. You could also use boneless chicken thighs as long as you spread them out to cook so they cook evenly. You use 1/3 cup of the balsamic dressing as a marinade and put the chicken and marinade in a seal-able plastic bag in the fridge for about 3 hours, turning the bag over every hour. Not too difficult, right?

While the chicken is marinating you get to do some chopping. You need 2 cups prepared tomatoes. The recipes usually recommend getting rid of the seeds, but it is actually OK to just chop the tomatoes or dice them. If you are using cherry tomatoes, cut each of them in four pieces.

You will also need to slice or chop some fresh basil (1/4 cup) and stir that and some dried oregano into the chopped tomatoes.

A can of sliced olives, drained and some feta cheese finishes what is needed.

Once the chicken has finished it's time in the fridge, drain off the marinade and grill it until just cooked. Let it cool slightly, then cut into bite sized chunks. If you are lucky, someone who loves to grill things will do this for you as Sweetie did for me. I'm a lucky girl! I haven't tried it, but I suspect that if you bought a pre-cooked whole chicken and removed the meat and cut it in chunks and marinated it for a short time in the dressing that you could even skip the grilling part, although you will lose the great flavor one gets from grilling.

Now for the fun part, assembling the salads. If you are serving this somewhere other than you own kitchen, you will have a container of salad greens, a container of cooked chicken, a container of sliced olives, a container of the prepared tomatoes, some feta cheese and some balsamic dressing.

Put the greens in a large bowl. Drizzle with some of the dressing and toss to coat. This is a great time to use short tongs if you have them. Divide the greens among the plates. Top with a serving of chicken chunks (about 1/2 cup), then top that with 1/4 cup of the tomato mixture, add some of the sliced olives, sprinkle with some feta cheese chunks/crumbles and drizzle a tiny bit more dressing over it all. If you have extra basil, it makes a pretty garnish. That's it. Serve with pride and enjoy the flavors of the Mediterranean. I served some mini-carrots on the side, but a nice bunch of grapes would go well, too.

The recipe serves 8, but you can cut it in half or double it depending on how many you are serving.


Chicken and Tomato Over Greens Salad - 8 luncheon sized servings

  • 6 boneless chicken breast halves (can be skinless, too, if desired)
  • 12-14 cups salad greens of choice (about one and a half large heads, chopped, or two large bags)
  • 1/3 cup balsamic salad dressing per pound of chicken, plus more for tossing with greens (recipe follows; may substitute your favorite store-bought option)
  • 2 cups seeded and chopped tomatoes
  • 4 tablespoons fresh basil leaves, thinly sliced
  • 1/4 teaspoon dried oregano
  • Freshly ground black pepper to taste
  • 1 can sliced black olives
  • 1/2 cup crumbled feta cheese

For the balsamic salad  dressing:
  • 1 small garlic clove, smashed and minced
  • 1 teaspoon kosher salt and 1/4 teaspoon freshly ground pepper
  • 1 tablespoon Dijon mustard
  • 1 tablespoon plus 1 teaspoon honey
  • 1/4 cup plus 2 tablespoons balsamic vinegar
  • 1/2 cup olive oil

  1. For the balsamic salad dressing: In a bowl whisk together the garlic, salt and pepper, Dijon, honey and balsamic vinegar. Drizzle the olive oil in a slow, steady stream, whisking as you go, until the dressing is emulsified.  You may also add everything to a jar with a tight-fitting lid and shake well.

  2. Cover and refrigerate for a couple of hours to allow flavors to blend. The vinaigrette will keep for several weeks in the refrigerator. Shake well prior to using.  If the olive oil has solidified due to the cold, simply allow the jar to sit at room temperature for a few minutes before using.

  3. For the grilled chicken: Place the chicken in a large, resealable plastic bag. Pour the vinaigrette over top (1/3 cup per pound of chicken), seal, and marinate in the refrigerator for at least 3 hours or overnight if possible. I like to flip the bag a few times (every hour or so during the day) to distribute the marinade.

  4. Prepare the grill or heat a large cast iron skillet or grill pan. Remove the chicken from the marinade, discarding the remaining marinade, and cook the chicken over medium heat for 7-8 minutes per side, depending on thickness, or until the chicken is just cooked through. Cut into center...if still pink, keep cooking, if not you are done...don't overcook.  If cooking in a skillet or on a grill pan, you may need to do this in two batches.  Remove from the heat and allow the chicken to rest for 5 minutes. Cube into bite sized cubes. Set aside for 5 minutes and then package into ziploc type plastic bag. Refrigerate if not made right before serving.

  5. For the tomato mixture: Gently mix the tomato, basil, dried oregano and a few grinds of fresh pepper in a ziploc type plastic bag. Close and shake bag to mix the ingredients. Refrigerate if not made right before serving.

  6. Gather salad components: Washed, dried, and  chopped chilled salad greens or pre-washed chilled greens in the bag, chicken pieces in ziploc type bag, tomato mixture in ziploc type bag, drained olives, feta cheese in chunks and crumbles, extra vinaigrette.

  7. Assembling the salad: Reheat the chicken in the oven if one is available or serve at room temperature. (Chill any unused chicken right away). Place the salad greens in a bowl and toss with enough vinaigrette to lightly coat.  Distribute the dressed greens among eight plates. Top with chicken breast pieces (chunks) followed by one eighth of the tomato-basil mixture (about 1/4 cup). Sprinkle with some of the sliced black olives, drained. Sprinkle on one eighth of the feta cheese.  Drizzle a little extra balsamic vinaigrette over top  and garnish with extra basil if desired. Serve and enjoy!

Tuesday, September 01, 2015

Harvest Time Combo


September is finally here. That means a number of things, but two that thrill me are that fall is just around the corner and that the garden is producing at capacity, with lots and lots of delicious veggies, herbs and fruits to enjoy.

The smaller tomatoes have been prolific for weeks, but the large tomato plants (this year only three plants-because of the drought-and all the Black Krim variety) are just now providing ripe fruit to enjoy. My favorite way to enjoy them is sliced, with some olive oil and balsamic vinegar splashed on, a grinding of black pepper, and a sprinkle of chopped basil lending both fragrance and flavor.

One of my favorite recipes using the smaller grape tomatoes is Mediterranean Couscous with Chicken, but wheat couscous is off my list of foods at the moment. I was pleasantly surprised to find Lundberg's brown rice couscous at the store Monday morning. They are a California company that grows all sorts of rice, so I bought a box and immediately thought of making that recipe. I had some chicken, the lemon, basil and small tomatoes and, although it would effect the flavor, I decided to forgo the feta cheese since cheese is also off the list. The pine nuts would come from my fridge, not the couscous box, and would be for Sweetie...yes, another food not on the list. Actually we never did get the pine nuts on this dish but I did get a nice phone visit with our daughter instead.

It has been very warm around here for the last week or so and I have been sort of hibernating, especially in the afternoons. If we cool down the house overnight and then close the downstairs windows and connecting doors, the downstairs keep pretty cool until dinner time. I have been doing a lot of reading. In the mornings when it is cooler, I've been working on a stained glass piece I'm making for my younger brother's round number birthday. It's been ten years since I've done any stained glass work, so my skills are rusty, but I finally have all the pieces ready and on the lightbox and it looks pretty nice. Now for foiling, fluxing and soldering. It may not end up being a perfect piece, but I think it will be lovely and suit my brother, too...although he may be perfect.


The brown rice couscous is prepared differently than regular couscous, which is basically steamed. With the brown rice version you begin by simmering the broth and couscous, then taking it off the heat and letting it steam. It adds about 15 minutes to the process, so build that into your meal prep plan. You can increase the lemon zest and lemon juice and it will be even better. I decided that about 2/3 of the tomatoes (picked right before dinner) were plenty but go for the whole amount if you just love cherry tomatoes.


Mediterranean Chicken Couscous
Serves 8 (more if part of a buffet or potluck)

1 1/4 cups low-sodium fat-free chicken broth
1/4 teaspoon dried thyme
1/4 teaspoon poultry seasoning
1 (5.6 oz.) package Lundberg brown rice couscous
3 cups chopped cooked chicken (or turkey - I used roasted turkey thigh meat)
1/4 cup chopped fresh basil
1 pint cherry or grape tomatoes, halved
1 1/2 tablespoon fresh lemon juice
1 teaspoon grated lemon rind
1/4 teaspoon freshly ground pepper
Garnish: fresh basil leaves

(Note: You'll need to buy a 2/3 oz. package of fresh basil and 1 rotisserie chicken to get the right amount of basil and chicken for this recipe. Substitute 3-4 teaspoons (I used 3) dried basil if you can't get fresh. 3 cups of leftover cooked chicken or turkey in large dice works fine, too.)

Place chicken broth in a medium saucepan and bring to a boil. Add the dried thyme and the poultry seasoning.  Place couscous in the pot, and stir. Cover and simmer over low heat for 11 minutes, then remove from the heat, keep covered, and let stand 10 minutes. Fluff couscous with a fork, stir in chicken and next 5 ingredients. Serve warm or cold. Garnish with fresh basil leaves or a sprinkle of toasted pine nuts, if desired.

Friday, September 12, 2014

Gluten Free Baked Lamb Meatballs


It's been great being back in the kitchen cooking. I had no idea that finding new homes for all my cooking and baking equipment and supplies would be so challenging. It isn't that there isn't room, nor that I hadn't planned where to put most of it, the problem is that I find that where I thought things should go is not truly where they fit best when actually using the kitchen. That means rethinking a lot of my original plan.

I look pretty crazy sometimes as I open and close drawer after drawer and door after door of the cabinets, looking for a whisk or grater, a citrus juicer or colander. Some things have been moved four or five times since the project started and my memory just isn't what it used to be.


Still, I wouldn't go back to the old kitchen and I love all of the work space. I even used the little table this week while I was preparing pounds of home grown, just picked cherry tomatoes for roasting. Sitting instead of standing to remove all of those little tomato tops before I prepared them for roasting was a treat. After the tomatoes were roasted I decided that as long as the oven was hot, I could make meatballs for dinner.

I had thawed some frozen ground lamb from the freezer and somewhere recently I read a recipe where they used almond meal instead of bread crumbs for making meatballs, so I decided to see what I could come up with using items already in the pantry and fridge. I'm not eating gluten free myself, in general, but it's always nice to have a dish to make that is when I might have guests who need to eat gluten free. This dish is not vegan or vegetarian however, but it is dairy free. Because Sweetie is not a big fan of mint, it is a mint free dish, too. Mostly I would make these again because they were awesomely yummy.

There was just over a pound of ground lamb. The fridge had a wonderful caramelized red onion and fig conserve, some Dijon mustard, an egg yolk left over from another recipe, eggs, fresh basil, and the almond meal. The pantry had salt and pepper. That was all I needed. Because the onion and fig conserve was ready to go and very full flavored, the meatballs went together very quickly.


I scooped them on to a foil lined baking sheet and baked them in a 400 degree F oven for about 18 minutes. I was going for 20 minutes, but they seemed to be done at 18 and I hate overcooked lamb.


A key thing to remember if you decide to make these is to handle the mixture lightly. That keeps 'em tender and juicy. The other thing to know is that they may flatten just a bit, so don't expect tight, round meatballs. Instead look forward to light, juicy, delicious meatballs with some crispy bits where they sat on the pan. The lamb flavor shines and is enhanced by the slightly sweet onions and figs. The mustard and basil are background flavors and I didn't really taste the egg or almond meal at all. You can serve them with some more of the conserve or a bit of tomato sauce, or some yogurt...all three would be good. I served them with a neighbor's gift of fresh from the garden broccoli, which I roasted with garlic, and corn on the cob, and that was wonderful, too.


Elle's Gluten Free Baked No Mint Lamb Meatballs

1 pound ground lamb
1 egg yolk
1 medium or large egg
1/4 cup caramelized red onion and fig conserve (any kind of onion-fig jam or conserve will work)
1 tablespoon Dijon mustard
1/2 cup almond meal (ground blanched almonds)
2 - 3 tablespoons minced fresh basil
salt and pepper to taste (I used 1/2 teaspoon salt and 1/4 teaspoon freshly ground pepper)

In a mixing bowl, using a fork, lightly stir together the above ingredients. Scoop balls about the size of a walnut on to a foil lined baking sheet, leaving about an inch to two inches between balls. (You can make the meatballs any size you like, but the smaller size bakes more quickly than larger ones.)

Bake in a preheated 400 degree F oven for 12-20 minutes. Check after 12 minutes to see how done they are - they should be browned around the edges and spring back a bit when prodded - turn the pan 180 degrees and continue baking until done.

Serve at once and enjoy! Serves 3-4.

Tuesday, August 26, 2014

Height of Summer Chicken and Corn


The garden is so beautiful right now! The cherry tomato plants have taken over most of a 4 foot by 6 foot planter box, but there is a sky blue morning glory with flowers as big as saucers that has climbed up and through those tomatoes and up some more.


There is a smaller Early Girl plant that is starting to produce red, ripe tennis ball size tomatoes, too. I used both the cherry and Early Girl tomatoes in today's dish. The squash plants yield about one a week, which is fine since there has been no baking to speak of until today for about 5 weeks, and not much real cooking either. Sweetie grills the squash, just like using a campfire. Come to think of it, having no working kitchen is a bit like camping out, without the bugs. Fun for a while, but it was so nice to finally bake today!

A good friend has corn that has all ripened at once, so she gave us some a few days ago. The first eating was lightly steamed and right off the cob. Today I cut the kernels off the cobs and added them at the last minute to a chicken casserole which also has fresh tomatoes, white wine, onions and fresh basil. It's based on a recipe I've loved for years, Chicken Cacciatore. This is a fresher combination and really delicious.


It is also one to bookmark because you can make it up the night before, or even a few days before you eat it and then reheat it when you have had a busy, busy day. Sitting overnight or longer melds the flavors and it is even better than freshly made. Just be sure to add the corn 5 minutes before you serve the dish. It really only needs to warm up!

I served this with fresh from the garden steamed green beans, but it would be lovely with a salad and some nice bread, too. Bread baking coming soon, I promise.


Chicken with Corn, Onion, Tomato and Basil

1 chicken, cut up (I used 4 chicken breasts, each cut in half)
1 large onion, sliced thin
1 pound fresh tomatoes, washed, stem end removed, and cut up (I used about 14 oz. Early Girl and the rest cherry tomato...with the cherry tomatoes cut in quarters)
3 tablespoons fresh basil, sliced in thin slices or chopped
2 ears fresh corn, cut from the cob
salt & pepper to taste & olive oil for the bottom of the pan

Sprinkle chicken with salt. In a large, heavy ovenproof skillet, over medium heat, brown chicken in hot oil. (I use just enough oil to coat the pan bottom to keep the chicken from sticking. If you have a large, heavy ovenproof non-stick skillet, you don’t even need the oil.)
Add the onion; cook about 3 minutes, stirring, until the onion is crispy-tender. (If using chicken breasts, remove them to a bowl...which retains the juices...while you stir the onions, then place them over the mixture once the tomatoes have been added. Otherwise they may cook too long and become tough)
Remove pan from the heat. Stir in the tomatoes and pepper. Sprinkle with the basil.
Bake in a pre-heated 350 degree F. oven for about 30-40 minutes, or until tender. 5 minutes before dish is cooked, add the corn, cover, and return to oven for 5 minutes. Serve at once.
 If you will be reheating the dish, don't add the corn until you have reheated the dish. Keep the corn refrigerated until ready to use.
If you are reheating the dish, place it in a preheated oven, without the corn, and heat it until internal temperature registers 165 degrees F. Uncover, add the corn, cover and keep heating for 5 minutes. Serve at once.
It is OK to let the casserole stand in turned off oven up to 1 hour, but the corn will not be as sweet.
Serves 4-6.

Wednesday, July 30, 2014

Still Eating


From the looks of this blog...no posts for a while...you'd think we'd stopped eating of something. The truth is that I've almost stopped cooking. Having everything pulled out of your kitchen will lead to that. It's been almost two weeks and last night was the first time I really used the alternate kitchen that Sweetie created in my art studio.

We had both used the sink a few times for washing up, but lately we have been eating prepared foods. I cooked some things and put them in the freezer before the demolition, but we have also enjoyed Pasta King lasagna, bagged salads with tomatoes from the farm stand and similar foods. Steamed freshly picked green beans are possible using the microwave in the living room.

Yesterday I decided that the time had come to do some real cooking, but I still wanted to keep it simple. I used the toaster oven mid-day to bake some boneless, skinless chicken thighs. After cooling slightly, they went into the studio fridge. Closer to dinner time. I used the studio microwave to boil broth in a large glass measuring cup. I added a flavor packet from a package of couscous. That mixture was poured over a bowl of couscous from the package, covered and it sat for 5 minutes to allow the couscous to absorb the broth.

While the couscous was cooking, I cut up the chicken and basil, juiced the lemon and rounded up the pepper grinder. I had forgotten to get the feta from the fridge in the living room, so I added it once I went back in the house. All of the ingredients except the lemon zest (which I skipped...who knew where the zester had gotten to?) and feta were stirred into the fluffed couscous.


 All that was left was to add the feta, heat some bread and serve it up.

Sweetie has always loved this recipe and was thrilled to have a home cooked meal that was this delicious. Tomorrow we may be back to bagged salad to use up the rest of the chicken, but I'll bet I'll be cooking in the alternate kitchen the next day. I'll try to post what I cook, but the next few days are full of flooring work and wall painting, so who knows if I'll have the energy. I do love to paint walls, but it does tire me out.

Hope you make this dish. It is a lovely meal for a summer day with bright, fresh flavors and it's easy, too.


Mediterranean Chicken Couscous
Serves 8 (more if part of a buffet or potluck)

1 1/4 cups low-sodium fat-free chicken broth
1 (5.6 oz.) package toasted pine nut couscous mix
3 cups chopped cooked chicken
1/4 cup chopped fresh basil
1 (4 oz.) package crumbled feta cheese (I used about half that amount)
1 pint cherry or grape tomatoes, halved
1 1/2 tablespoon fresh lemon juice
1 teaspoon grated lemon rind (optional)
1/4 teaspoon freshly ground pepper
Garnish: fresh basil leaves

(Note:  Substitute 3-4 teaspoons (I used 3) dried basil if you can't get fresh. 3 cups of leftover cooked chicken or turkey in large dice works fine, too.)

Microwave chicken broth and seasoning packet from couscous package at HIGH for 3-5 minutes or until broth begins to boil. Place couscous in a large bowl, and stir in broth mixture. Cover and let stand 5 minutes. Fluff couscous with a fork, stir in chicken and next 6 ingredients. Serve warm or cold. Garnish with fresh basil leaves or a sprinkle of toasted pine nuts, if desired.

Sunday, August 18, 2013

Tomato Love


I get a bit emotional about tomatoes. First because I spend a lot of time and thought on them: I start them from seeds in the late days of winter, tend the little plants with care, give a boatload of older, re-potted plants away to friends since there are almost always way more seedlings than I can handle, harden them off and then plant them in the spring. It is hard to see the seedlings that are left...unloved and unplanted...so I usually plant more than I should.

It doesn't stop there. Daily watering allows me to follow the growth of each plant, the formation of tiny tomatoes (often after a long, frustrating period when I get lots of blossoms and no fruit setting up) and the growth of those tomatoes to see what kind they might become. That last was especially true this year because when the plants were re-potted into larger peat pots I was deranged due to morphine residual from the hospitalization with a kidney stone, so I didn't really keep track of the varieties very well. It was actually kinda fun to see what I ended up with.


Then there is the looooooong wait until the tomatoes actually ripen. This year the cherry tomatoes came first and were a delight, but that first plate of sliced tomatoes, lightly seasoned with pepper, olive oil, balsamic vinegar sprinkles and a little garlic salt or sea salt is the ultimate pleasure. Until I have the first of the season BLT.

Now we are to the point where there are enough large tomatoes (and way too many cherry tomatoes) that I can share them. I also begin making different recipes that showcase the tomato.

Yesterday I threw together a seasonal veggie stew you might like. Chunks of juicy ripe Mortgage Lifter tomatoes added their summery flavor and color, but it also had sautéed onions and garlic, lots of fresh basil for fragrance, flavor and bite, slices of zucchini because I love zucchini, plus some yellow wax beans for color and texture and just a bit of beany flavor. Of course there was some pepper added, but no salt this time. Instead I added a splash of balsamic vinegar. All that was missing was eggplant, but I don't actually like eggplant, so I was fine with that.

This mixture went perfectly with a couple of small rectangles of this cheese and polenta grill that I posted about HERE. I suspect that it would also work well over almost any grain, as a filling for rolled up tortillas, maybe with some cheese, or even over pasta. For pasta you might want to cut up the veggies smaller when you start.

Do you have a favorite tomato recipe?


Tomato, Basil and Beans Together

1/2 medium onion, chopped
2 cloves garlic, minced
1 tablespoon olive oil
1 1/2 cups fresh tomato chunks
1 cup sliced zucchini
1 cup fresh beans (I used yellow wax beans, but green string beans are great, too)
2-3 tablespoons chopped fresh basil
salt and pepper to taste

In a large pot, sautee' the onions and garlic in the oil until tender and translucent, about 5 minutes.

Reduce the heat to medium and add the tomato chunks, zucchini, beans, basil, and salt and pepper.

Stir to combine and heat until the zucchini is tender, about 8 minutes. Taste for seasoning and serve.

Thursday, July 25, 2013

Cherry Tomato Is One Of Five Ingredients


Some days it is so wonderful to have something easy to serve for dinner. After a good portion of a day spent installing flashing and siding, Sweetie and I were certainly hungry, but not full of energy. As the sun set behind the trees


it was time to create a fast feast. I started with tomatoes, already picked. So far the only tomatoes I've gotten from the many I planted are the cherry type. The most numerous are orange, a few are red, and a few are yellow.


 I based this recipe on one in the latest Bon Appetit magazine (August 2013) because I had the tomatoes and olive oil and sea salt and last time I was at the appropriate store, I had made sure to purchase the burrata and fresh basil once I saw the recipe, knowing that I would make it pretty soon.

This is one of those recipes that you won't make often if you value your health since the cheese is very rich, but it is the perfect indulgence when the tomatoes finally ripen. It also goes together fast and is impressive, so keep it in mind for your next dinner party or on a day when the kids have worn you out. You can use mozzarella di bufala (made with buffalo milk I think) instead of the burrata...Bon Appetit did. You can also add a few chunks of seedless watermelon for some crunch and another flavor and have six ingredients. Don't be tempted to use dried basil...fresh basil, fresh tomatoes, good quality olive oil and sea salt, plus a lovely, rich, runny cheese are important components.

It looks pretty, too. Since we eat with our eyes first, that counts!


Five Ingredient Cherry Tomato Salad

1 ball of mozzarella di bufala or burrata
1 pint cherry tomatoes, sliced in half
about 2 tablespoons fresh basil, in chiffonade or chopped
2-3 tablespoons best quality olive oil
a sprinkle of sea salt to taste

Shred or spread the cheese on a serving plate. Top with the tomatoes, basil, olive oil and salt. Let sit 10 minutes so the flavors can mingle. Serve. It's that easy!
Serves 4 - 6.

Tuesday, April 16, 2013

Babes Bake Italian


The colors of the Italian flag...red, green and white...are all on display in this month's delicious bread, Pane Bianco with Garlic, Basil and Sun-Dried Tomatoes, brought to us by Kitchen of the Month Natashya of Living in the Kitchen with Puppies. The fragrance that fills your kitchen when you bake this seems very Italian, too. The best part about this bread isn't the colors or the fragrance, but the taste. It is savory and you can really taste the sun-dried tomatoes, followed by the herby basil, warm garlic and wonderful melty cheese. I used some roasted garlic, as suggested by fellow Babe, Elizabeth, and it brought a depth of flavor that was delightful. Otherwise I pretty much followed the recipe as written (shocking!) until it came time to shape the second half of the dough. (Well, my dough did take longer to rise, but it was a chilly day.)


For the first half I made the lovely 'S' shape that the recipe gave directions for. I really enjoyed working with this dough. It was easy to shape.


For the second half I decided to make mini-buns to take to a morning meeting the following morning. I baked them a little less than golden (see photo), then reheated them in the morning until they were warm and golden. They were a hit!

The key to the mini buns is to roll the dough very thin and about twice as wide as the shaped loaf. Since you are spreading the same amount of filling ingredients over twice the amount of rolled dough, the buns don't get too filled and stay small. The last 'trick' is to then divide the filled dough in half (I used my bench scraper) so that each piece is about the same width (8 1/2 inches) as the big loaf, then roll up the dough from that point, one roll to the right, one to the left, which gives you two thin snakes of rolled dough. Cut each snake in pieces about an inch thick and lay those pieces cut side down in a greased cake pan...or two. Cover and let rise as you do the big loaf, but bake them for a shorter time, about 25 - 30 minutes. You should end up with a nice tray of savory, cute mini-buns with all the flavor and cheesy goodness of the big loaf.

Thank you Natashya for choosing this great recipe, and for giving us recipes by weight, volume, etc. I used the one by grams and it worked out perfectly.
Also sending this over to Susan at Wild Yeast for the wonderful weekly Yeastpotting event. Check it out!

With a bread this delicious and fun to play with, I'm sure you want to be a Bread Baking Buddy, right? Just bake this bread, take a photo or two to share, and e-mail Natashya with a short description of your experience that that photo or two. She'll get a Buddy Badge to you and include you in the round-up. You have until April 29th, so do consider making Pane Bianco with Tomatoes, Basil and Garlic!
Tomato Basil Garlic Filled Pane Bianco
Ingredients by grams: (direct from King Arthur Flour website)

• 113g warm water
• 50g sugar
• 4 teaspoons instant yeast
• 227g warm low-fat milk
• 67g extra-virgin olive oil
• 2 large eggs
• 2 teaspoons salt
• 723g bread flour
• 1 (241g) jar oil-packed sun-dried tomatoes
• 4 cloves roasted garlic (or more if you really like garlic) my change
• 170g shredded Italian blend cheese, divided
• 14g chopped fresh basil

Directions
1) Combine the water, sugar, yeast, milk, olive oil, eggs, salt, and flour, and mix and knead by hand, stand mixer, or bread machine until you've made a cohesive, soft dough. If you're kneading in a stand mixer, it should take 5 to 7 minutes at second speed, and the dough should barely clean the sides of the bowl, perhaps sticking a bit at the bottom. In a bread machine (or by hand), it should form a smooth ball. Place the dough in a greased bowl, and turn to grease the top. Cover and let rise in a warm place until double, about 45 minutes.

2) Meanwhile, thoroughly drain the sun-dried tomatoes; lay them on a paper towel to absorb any excess oil. Using kitchen shears, finely chop the tomatoes.

3) Line two baking sheets with parchment. Gently deflate the dough and divide it in half. Roll one piece into a 22" x 8 1/2" rectangle. Sprinkle on half the garlic, cheese, basil, and tomatoes.


4) Starting with one long edge, roll the dough into a log the long way.


 Pinch the edges to seal.

5) Place the log seam-side down on a baking sheet. Using kitchen shears, start 1/2" from one end and cut the log lengthwise down the center about 1" deep, to within 1/2" of the other end.


6) Keeping the cut side up, form an "S" shape. Tuck both ends under the center of the "S" to form a "figure 8"; pinch the ends together to seal.
Cover and let rise in a warm place until double, 45 to 60 minutes. Repeat with the remaining dough.

7) While the loaves are rising, preheat the oven to 350°F.

8) Bake the first loaf for 35 to 40 minutes. Tent the loaf with foil after 15 to 20 minutes to prevent over-browning. Bake the remaining loaf.

9) Remove loaves from their pans; cook on racks. Store any leftovers well-wrapped, at room temperature.
Yield: 2 loaves.

For mini-bun directions, see the post, above the recipe.

Thursday, August 02, 2012

Fresh Cranberry Beans

It's always a pleasure to stop by the strawberry farm along Hwy 12 to buy some fresh-from-the-fields sweet, juicy, gorgeous strawberries. Now they also have a selection of veggies that they have grown right there in the fields by the Laguna. Recently they had a bag of fresh cranberry beans for sale. I've never cooked with fresh cranberry beans. In fact I've rarely cooked with fresh shelling beans of any kind, but I've been trying to add whole grains and legumes to my diet and this seemed like a great thing to add.

A quick surf on the Internet yielded a recipe for a salad made with the beans, herbs, cherry tomatoes, red onion, cucumber, and and olive oil and red wine vinegar dressing. The beans are cooked until tender at a simmer and you add things like celery tops and carrots (which get discarded) to give the beans more flavor as they cook.

I really liked the flavor combo when I made the salad as written, but it needed more vinegar since the beans, as beans often are, were bland. We have also cut back on the oil we use both in cooking and at the table, so I would reduce the olive oil by two-thirds. There was waaaay more oil than I like.

Shelling the beans was sort of relaxing. Sweetie helped me and we were sitting outside with the dog enjoying the summer day as we worked. They are really pretty beans. The pods are streaked with dark pink and the beans look like porcelain, with ivory background and dark pink streaks. When they cook they turn sort of gray so enjoy them while you shell them.

Some of the pods had started to dry out so I kept them intact and laid the pods out on the porch railing in full sun to dry completely. Now I have about 1/2 cup dried beans, too.

The bag of beans yielded about 3 1/2 cups total. I cooked 3 cups of beans and used 2 cups for the salad. Now I get to try them in another recipe, as long as it only needs 1 cup cooked beans. For now, here is the promised Cranberry Bean Salad with Cucumbers, Tomatoes and Herbs.

Cranberry Bean Salad
Insalata di Fagioli Borlotti
from La Tavola Marche
serves 4

2 cups fresh borlotti or cranberry beans
couple of handfuls of cherry tomatoes, halved
1/2 medium red onion, sliced thinly
1 cucumber, peeled & sliced
fresh herbs of your choice, chopped: marjoram, oregano, Italian parsley or basil work well
4 tablespoons red wine vinegar
3 tablespoons extra virgin olive
salt pepper
vegetable scraps

In a pot with plenty of water, bring the beans to a boil with vegetable scraps: celery tops, dried out carrots, half an onion sitting in your fridge - toss it in! (The veggies give the beans a bit more flavor.)

Bring to boil then lower to simmer 20-30 minutes until the beans are tender.

Drain beans and discard the vegetables.


In a bowl combine the beans, tomatoes, onion, cucumber. Add in the herbs.

Combine the oil & vinegar then toss with the salad.

Season with salt & pepper.

Let stand 10-15 minutes to let the flavors come together. Recheck your seasonings (taste it) and adjust. Serve.

I would recommend increasing the vinegar by 1 tablespoon and decreasing the oil by two-thirds because the beans need that ooomph of vinegar and I don't like so much oil in my salads. Otherwise it worked perfectly...I went with fresh oregano, Italian parsley and basil for my herbs.