Showing posts with label cheese. Show all posts

Saturday, January 01, 2022

Easy Seasonal Appetizer


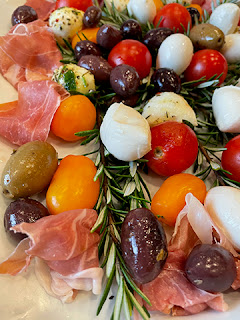
If you are anything like me, you get a lot of suggested recipes on your smart phone. One of the ones I like to check out is Allrecipes. Recently they had a colorful, easy and delicious appetizer which worked well for a dinner before Christmas. We basically catered the whole deal, appetizer to dessert, as sort of a Christmas gift to my sister who lives three hours (about) away from here. All of the components were packed up and brought (including the patter for serving, mostly because I knew everything would fit nicely on it...my sister has beautiful platters which I could have used), and then I put it together on site.

We are fortunate in having a huge rosemary shrub, so I was able to bring lots of rosemary. If you are purchasing yours, you can tuck in sprigs for color, but they don't have to be so plentiful...no one eats the rosemary!

I bought two tubs of plain mozzarella balls and then marinated one tub (drained) in olive oil, Italian herbs, and minced garlic. It's usually less expensive than the ones you buy marinated and you get to make sure you use good ingredients. I like Penzey's Italian mixed herbs, but use your favorite herbs. Let the cheese balls marinate at least a day and up to a week before serving on this appetizer.

You can adjust this for your preferences. The prosciutto wasn't part of the original recipe, but I knew that it would be appreciated by this group. Marinated mushrooms would also be good, as would roasted red pepper strips.

Appetizer Wreath or Platter for the Holidays 

Make a wreath shape or other shape with fresh rosemary sprigs on a large platter or cheese board. Add mixed olives, red and yellow or orange cherry tomatoes, mozzarella cheese balls, plain and/or marinated, and, if desired, thinly sliced prosciutto gathered into roughly ball shapes. Include toothpics and small plates or cocktail napkins to hold the olive pits.

Saturday, January 16, 2016

Bread Baking Babes Boat Bread


Georgia, Georgia... That's the place in Russia where this month's recipe comes from. Thanks to our Kitchen of the Month, Aparna of My Diverse Kitchen, we were treated to an easy to make, delicious boat-shaped bread, Acharuli Khachapuri, that is usually filled with cheese, topped with a soft-cooked egg and butter and eaten hot.

I made the dough in my stand mixer and used the optional egg, which meant I needed more flour. It made a very nice, supple dough which was easy to handle and shape like a boat. I made the dough without dairy since I wanted to be able to taste it and to use one of the two boat shaped breads for a filling I could eat.

I made the first one with the filling given, just making up half the amount. I skipped the egg topping and the butter at the end, but Sweetie still really enjoyed it and even asked for more for breakfast this morning. The second boat was filled with a thin layer of plain yogurt, sprinkled with a bit of sugar, then topped with small blobs of cherry jam. I enjoyed that, even though the dough is a bit salty. If I were to make it in a sweet version again, I would reduce the amount of salt in the dough by at least 1/2 teaspoon.

This is a fun bread to make and fairly quick since it doesn't require a second rise. I'll bet you could come up with quite a few topping ideas yourself! To become a Buddy, be sure to e-mail Aparna with a photo and brief description of your baking experience. Here is a link to her site.

Be sure to check out the breads made by the other Babes. Links will eventually be at the bottom of the post.


Acharuli/ Adjaruli Khachapuri (A Boat Shaped Georgian Egg & Cheese Bread)


Ingredients:

For the Dough:
1 tsp instant yeast
1/2 tsp sugar
2/3 cup milk (I used soy milk)
1 tbsp. olive oil
1 egg (optional)*
1 1/2 cups flour, plus more for dusting
1 tsp salt

For the Filling:
1 1/2 cups grated/ shredded Mozzarella
1 1/2 cups crumbled feta cheese
2 eggs (or any other topping of choice  - I used  sliced tomatoes, pickled jalapenos and herbs)
Skipped the eggs or any topping except the cheese for one, used plain yogurt and cherry jam instead of any cheese or other topping for the second Acharuli.

For topping after baking:

4 tbsp. unsalted butter, cubed

Method:
I usually make my bread dough using the processor but this is easily done by hand.  Put all the ingredients for the dough into the processor bowl and knead together until everything comes together into a smooth and somewhat loose elastic dough that’s just short of sticky. (I used my stand mixer and some additional flour since I used the egg in the dough.)

Transfer the ball of dough to a well-oiled bowl, turning it so it is coated all over. Loosely cover and let it rise till double in volume – about 1 to 1 1/2 hours.

Place a pizza stone, or a baking sheet on a rack in lower third of oven. Preheat oven to 250C (500F).

Combine the cheeses in a bowl and  set aside. Deflate the dough and divide it into two halves. Working with one piece at a time,  roll it out to a rectangle about 10” thick and 1/8” thick on a piece of lightly floured parchment.  This makes it easier to transfer the dough to your baking sheet.

Roll the long sides in a bit curving them inwards at the ends and seal well (with a little water) or the edges will open up during baking. Then bring the edges close and pinch together on both ends to form a “boat” like shape. Again, make sure the ends are sealed well. Transfer the “boats” to the baking sheet, but if you’re going to bake them directly on the pizza stone just omit this step.

Dock the centre “well” area and fill with half of the cheese mixture so it is a little higher than the edges of the dough “boat”. Repeat with the other half of dough and  bake them for about 12 to 15 minutes until the Khachapuri are golden brown.


Take the breads out of the oven and gently crack an egg on each bread without breaking the yolk (or add the sliced tomatoes, pickled jalapeƱos and herbs like I did) and return them to the oven. Bake for another 3 to 4 minutes till the egg is set. Take the Adjaruli Khachapuri out, and place a couple of cubes (2 tbsp) butter on each. (Skipped the eggs and the butter both.) Serve them hot. It helps to wait for about 10 minutes before eating them so you don’t burn your mouth! This recipe should serve 4 to 6 people.

Tuesday, November 25, 2014

Delicious Local Snack


As a theory, I support the idea of locavorism...eating things grown or produced nearby to where you live. Since I am lucky and live where there are lots of good things grown and produced, it is not a hardship. The main thing getting in the way seems to be finding the time to shop that way without breaking the bank. My nearby Whole Foods has the nickname 'whole paycheck' for a reason. Even farmers markets seem to have sent prices sky high for many items. I do belong to a fruit CSA where the annual 'fee' is to purchase something like six bottles of an outstanding Asian pear juice. It is reasonably priced and so are the pears and apples we pick up at the farm.


Of  course I also have the blackberries, ollalberries, mint, apples, pears, persimmons, quince and plums that grow on our property, plus whatever veggies I plant as annuals. I hope we get a lot of rain so that I can expand what I plant next spring.


Today we went to a friend's house for lunch. Before we went we stopped at a deli near the gym for the amazing apricot chutney that they make there. Ulia's chutney is only available near Thanksgiving and between then and Christmas. It has the perfect balance between sweet and savory, with a tang of vinegar. The fruit pieces are large.  It goes really well with turkey.


We also stopped after that at our local cheese factory where they make a semi-hard Portuguese cheese from raw milk called St. Jorge. It is mellow and tangy at the same time. The piece we had was extra aged, so it was also just a bit crumbly and fully flavored. Heaven! The chutney went well with it and we served it up with crackers. Unfortunately I was enjoying eating it and the conversation around the table and forgot to take photos. We left the remaining cheese and chutney with our host and hostess, so the photos I took of the wrapped up local goodies will have to do.

Do you have any local foods that you particularly enjoy? Do you buy any at the source?


Ulia's Deli and Catering              Joe Matos Cheese Factory
130 Stony Point Rd,                    3669 Llano Rd
Santa Rosa, CA 95401                Santa Rosa, CA 95407                          
(707) 525-8542                            (707) 584-5283

Sunday, November 23, 2014

Let's Pretend


Should have posted early in the day when the computer was working, but for a while I've been posting in the evening. Bad idea. By evening the computer was having trouble finding Windows (according to my tech guru), so I turned it off to give it a rest. Of course that meant no post on Saturday, breaking the chain. Let's pretend that I posted this yesterday as planned, OK?

I've been doing a happy dance because we got about 2 inches of rain between Wednesday night and Saturday noon. We still have a long way to go, but it really helps put a little moisture in the aquifer.
Although we had leftover pork roast and steamed yams and peas for dinner, I do have a recipe for a wonderful casserole that I made earlier in the week.

It is sort of a strata or maybe a savory bread pudding with cheese. Elaine, who gave me the recipe, calls it a cheese souffle. It does puff up during baking, but by the time I was able to serve it, it had deflated. Not low calorie, but pretty easy to make and you make most of it ahead, a bonus at this time of year when time seems to just fly by!

You butter day old bread and cut off the crusts. Pi was quite taken with the crusts that kept showing up in his food bowl. Then you cut the buttered bread into cubes. The cubes get layered in a buttered baking dish with shredded cheddar cheese and green onions. A custard mixture which includes Worcestershire sauce, brown sugar and cayenne pepper gets poured over it all. Seems like an odd combination of flavors, but it works. The baking dish gets covered and the whole thing sits overnight and is baked the next day. Don't forget to take the baking dish out of the fridge enough in advance to let the whole thing warm up to room temperature before baking.

You could get creative and add things like cubed ham, or cooked bacon, or add some chopped spinach to the custard or to the layers. Herbs or a different kind of cheese would change the flavors but it would still be easy to make. Since it serves 12 it's great for a holiday buffet. Imagine what other times you could serve it!


CHEESE SOUFFLE

10 slices day old bread, trim, butter and cube. ½ tsp. pepper
1 lb. sharp cheddar cheese, grated ½ tsp. Beau Monde Seasoning (I used Penzy's Mural of Flavor and it worked fine)
6 eggs beaten ½ tsp. Salt
1 tsp. brown sugar ½ tsp. Worcestershire Sauce
1 bunch green onion, chopped 2 ½ cups milk
¼ tsp. paprika
½ tsp. dry mustard

Put ½ of the bread in a buttered 9 x 13 casserole. Top with half of the cheese and the chopped onions. Repeat the layers.

Mix all remaining ingredients and pour over bread mixture. Let covered casserole set over night in refrigerator.


The following day, remove from refrigerator and let stand at room temperature for 30 minutes. Bake uncovered in a 300 degree preheated oven for 1 hour. Serves 12.

Friday, November 23, 2012

Say Cheese

Do you like having your picture taken? I don't care one way or another but it amazes me how many people cringe when the camera is aimed their way. Often these are good looking people, too. I know that the mental picture I have of myself usually doesn't match up with what the camera sees, but I think it's fairly usual to have a different view of ourselves than others do. I'm hoping you'll tell me if that isn't true. Anyway, I hope you ignore the photo-phobes now and again because one thing I do know is that it is a great comfort to have nice photos of loved ones when they are no longer with us.  Can't guarantee you will get a smile in that photo, but you might. Sweetie dislikes having his photos taken, but recently I went though lots of old digital photos to find some choices for him to use for his Facebook page and I discovered a few that I took when he wasn't aware of it and even some where he was smiling. Now he is glad to have 'em. See.

While we are on the subject of cheese (you DO have everyone say 'cheese' when you snap their picture, right?) let me tell you about an appetizer we had yesterday for our Thanksgiving feast. It was a big hit with everyone (all 5 of us!) and was easy to do. I was inspired by a recipe in the catalog of a local company, Kozlowski Farms. They make wonderful jams, jellies, salad dressings, mustards, pies, cookies and more goodies. The recipe was for a cheese ball coated with toasted pistachios. First they layered softened, whipped cream cheese with some of their yummy fig and muscat wine preserve. Since I had neither the nuts nor the preserve I went with what I did have. I also added a tablespoon of Greek style plain yogurt so that the cheese ball would stay just a little softer, which makes it easier to serve.

I had a delicious fig and caramelized red onion confit in the 'fridge which I used in place of the Kozlowski preserves. You could also use a pepper jelly. For the nuts I used toasted pine nuts. I also used reduced fat cream cheese and you would never know the difference in this kind of recipe. It was delicious on toasted baguette slices...the crunch of the toasts was a nice contrast with the creamy cheese. I only have a photo of the cheese ball before it was served. Once we started digging in no thought was given to taking pictures.

Fig and Caramelized Red Onion Cheese Ball with Pine Nuts
Base on a recipe from Kozlowski Farms

5 oz. Fig and Caramelized Red Onion Conserve
(or use a pepper jam)
2 -8 oz. packages lower fat cream cheese, softened to room temperature
1/4 teaspoon herbs de Provence
1 tablespoon nonfat, plain Greek yogurt
3/4 cup pine nuts, toasted
1 bread baguette, sliced thin and toasted in the oven

Toast pine nuts in a pan over medium heat, stirring often, for about 2 minutes until golden. Set aside.

With a mixer, whip the cream cheese, herbs de Provence, and Greek yogurt until smooth and creamy.

Spread a length of plastic wrap at least 12 inches long over a clean counter or cutting board. Using a spatula spread on some of the cheese mixture. Using a teaspoon, spoon on some of the conserve. Repeat, with the top layer being cheese, until all the cheese mixture is used up. Some of the conserve may remain and can be used for another purpose.

Lift the edges of the plastic wrap, creating a ball of the cheese/conserve mixture. Tightly wrap the plastic wrap around the ball. Secure the plastic wrap. Place the ball in a bowl and refrigerate about 15 minutes to help the ball retain its shape.

Lay another two layer of plastic wrap on a clean counter or cutting board, with the second layer perpendicular to the first. Sprinkle the pine nuts in a circle in the middle. Take the chilled cheese ball and put it in the middle of the circle of nuts. Bring up the sides of the plastic wrap. If necessary, use your hands to help coat the sides and top with pine nuts. Wrap the cheese and nut ball in the plastic wrap and return it to the bowl. Chill until the ball is firm, about 3 - 4 hours.

Unwrap cheese/nut ball. Arrange on a platter and serve garnished with figs and slices of toasted baguette slices. Be sure to include a spreader for serving the cheese.

Wednesday, July 27, 2011

Old Time Milling and Polenta


Last weekend we drove over the hills to Calistoga, then down the road to the Bale Grist Mill, a California State Park, to watch them mill corn into polenta.


Here is a diagram of the mill, with the water coming in by flume to the top of the water wheel which turns the wheel, which turns various gears, which in turn turn the millstone to grind the grain, also known as grist. The numbers refer to the description and photos below.

We had a very good guide in the miller. He knew the history and brought it to life with vivid descriptions of the Napa valley full of wheat fields (instead of grape vines), of the mill being a community center where neighbors met and gossiped while the grain was being turned into flour or corn meal or polenta (a coarser corn meal), of the flume being built to the newly constructed mill pond on higher ground so that there was year round water with some force behind it to turn the water wheel,(#1)


and stories about Dr. Bale who founded the mill and of Dr. Bale's widow making sure that after he died the mill had good French mill stones instead of the local quartz ones that the mill started with...and those stones are still in use!

He did a wonderful job of explaining the working parts of the mill, too, including the gears under the main floor.(#2)


Who knew that wooden gears were better than metal ones in a mill? The teeth could be replaced and the metal teeth could cause sparks and start a fire with all that flour flying around.

This mill had a set of mill stones for grinding flour and a set for grinding corn. Since the miller's helper had gone home sick, he asked for volunteers. Cucumber Spraygun was asked to turn the crank which engaged one set of gear with the ones turning the mill wheel on top (the bottom one is fixed). Here he is in action.(#3)


The miller was grinding polenta the afternoon we were there. They used to use Indian corn which is very colorful but some of the kernels grind into black specks...not too good for sales. Now they use plain yellow corn. Here is the set up for milling. The round box contains the stone wheels, the wedged box above holds the grain and there is a chute from it to the opening into the eye of the top stone wheel. From there is goes in between the stones and the grains sort of grind themselves...the stones never touch. (#4)


If you are lucky enough to obtain stone ground polenta, you can make this recipe, but if not, just shorten the cooking time by 3-4 minutes and use regular instant polenta from the store. Either way you can enjoy a grain that is very healthy for you, delicious, and in a dish that you can make ahead.

If you get to Napa County, California, check to see if the Bale Grist Mill is open. If it is, treat yourself to a journey to the past, plus a real-time opportunity to purchase delicious stone ground wheat flour, spelt flour and corn meal as well as this yummy polenta.

Grilled Cheese and Basil Polenta
Adapted from a Donna Hay (#40) recipe as posted on Technicolor Kitchen blog

3 cups (750ml) water
1 cup (170g) stone ground polenta
60g butter, chopped (I only used a tablespoon of butter)
½ cup (50g) finely grated Parmesan
sea salt and freshly ground black pepper
½ cup basil leaves
2 cups (200g) shredded mozzarella cheese
olive oil, for brushing
ragu or marinara sauce, if desired

Place water in a saucepan over medium heat and bring to a boil. Gradually whisk in the polenta and cook, stirring, for 5-8 minutes or until thickened and grains are no longer hard. Remove from the heat and stir in the butter, Parmesan, salt and pepper. Pour half of the polenta into a 20cm (8 inch) square pan lined with non-stick baking paper (I used foil) and spread to smooth. Top with the basil, mozzarella and remaining polenta. Refrigerate for 45 minutes or until set.

Cut into squares/rectangles and brush with oil. Heat a char-grill pan or barbecue over high heat. (I used my cast iron skillet, well heated.) Cook the polenta for 3-4 minutes each side or until golden and the cheese has melted.

Serve topped with a generous serving of the pasta sauce or a ragu or marinara sauce of your choice.

Thursday, December 23, 2010

Savory Rice Pie

Growing up I remember that my Mom often referred to herself as frugal...and sometime as a frugal French housewife (although she is pure Irish as far as I know) probably because she rarely let anything go to waste. Dry bread ends were cut into cubes and frozen, to be resurrected later as part of stuffing or bread pudding. The drippings of bacon grease in the pan after the bacon was cooked were saved and used later to flavor steamed green beans or grits. Similar economies were practiced daily. It's a fine quality to have as long as it doesn't go too far. Fortunately she never made head cheese.

For Thanksgiving I purchase an assortment of small, colorful squash and sugar pumpkins for decorations. Once fall turned into the Christmas season I decided to emulate my Mom and use the squash for eating now that it had done its thing as decor. This actually happened over a week ago...but it has been busy people!

The squash were each cut in half, seeds and goop scooped out, laid cut side down on an oiled piece of foil which was placed in a large baking sheet. The lot were roasted in a 425 degree F oven until tender. Once cool, I peeled the skin off each and then cut the squash meat into a small dice.

Great...very thrifty...but now what? Well, the prepared squash sat in the fridge a few days waiting for me to be inspired. Fortunately inspiration came before the squash got tired of waiting.

Rice pie...similar to Easter time savory rice pie eaten in Italy...or at least that was the inspiration.

So this totally yummy way to make good use of cooked winter squash combines rice, meatballs, milk and eggs, cheese, onions, garlic and a pie shell...and the squash. It is hearty, savory, and delicious. I served it with steamed spinach and a bowl of seasonal fruit the first time, then with a large green salad the second time...both worked really well.

You can actually make this with winter squash that you have just purchased, too. It might even be better...but not as frugal. *grin*

Savory Rice Pie with Winter Squash

½ onion, chopped
1 tablespoon olive or grapeseed oil
1 clove garlic, chopped
3 eggs
1 cup cooked rice (I cooked mine in chicken broth, but plain is fine)
1 cup evaporated milk, undiluted
½ teaspoon salt
½ teaspoon dried basil
¼ teaspoon freshly ground pepper
¼ teaspoon nutmeg
½ cup grated Parmesan cheese
2 cups roasted squash, seeds and skin removed, diced
8 oz. meatballs – I used chicken pesto meatballs, but any kind
of prepared meatballs…or your own…are fine. They do not need to
be cooked meatballs…they cook in the pie
1 cup shredded mozzarella cheese
1 unbaked pie shell

Heat oil in a skillet and cook onions over medium-high heat, stirring often, until translucent, about 5 minutes. About one minute before the onions are done, add the garlic and stir to combine with the onions. After onions are translucent, remove from heat and cool. Once mixture is just warm, spread it in the bottom of the unbaked pie shell. Set aside.

In a medium bowl whisk together the eggs. Add the rice, milk, salt, basil, pepper, nutmeg and Parmesan cheese. Stir to combine. Gently stir in the squash until just combined. Set aside.

Place the meatballs on top of the onion mixture in the bottom of the pie shell, distributing evenly. Cover with the rice mixture. Use a spatula to even out the mixture. Sprinkle liberally with the cheese.

Bake in preheated 425 degree oven for 10 minutes, then reduce heat and bake at 350 degrees F for about 30 minutes, or until set. Cool on a rack for 5 minutes, then serve.

Makes 6-8 servings.

For a vegetarian version, cook the rice in water and omit the meatballs. Add a ½ lb chopped mushrooms and another ½ tablespoon oil to the onions after the onions have cooked 2 minutes and stir well. Continue to cook the onion mixture as described. Otherwise continue to cook the recipe as written.

Monday, November 08, 2010

Mmmm Magic Potatoes

It must be the Irish in me...I love potatoes in almost any form. Baked, fried, boiled, mashed, gratin, French fried, chips, in bread...you get the idea.

Today I put the food processor to work and made a variation of potatoes in the savoyarde style. Thinly sliced, unpeeled (but you can also do it with peeled potatoes which is more elegant) potatoes are layered, in a buttered casserole, with a mince of onions and garlic, some cubed ham, some salt and pepper, a dash of nutmeg and a dash of dried sage. Once the layers are done you add chicken broth and milk, cover it with foil and bake to let the potatoes cook and absorb the liquids. After 30 minutes you uncover the casserole, check for tenderness, add some shredded cheese on top, and bake a little more so that the cheese melts and browns and the potatoes finish getting all nice and soft and lovely. There is something magical about how these flavors combine and it's a perfect dish for cooler weather.

This delightful (although not low calorie) casserole is a meal in itself. All you need to add is a green salad or fruit compote. If you have a food processor with a slicer attachment this potato dish goes together and into the oven in about 20 -25 minutes. The baking takes a while but it's worth it. Just the wonderful smell when it is almost done is enough to make me salivate. I'll try to post some photos of servings later, but right now just look at they browned cheese goodness!

If you prefer, you can layer white potato slices, then yam slices, then white, then yam, and so on, with or without the addition of the ham. Hot, hearty, savory and filling...that's the magic of these potatoes.

Ham and Potatoes Savoyarde Style
serves 6

enough butter to grease the casserole (about 1 teaspoon)
about 2 pounds potatoes, thinly sliced
1/2 onion, finely chopped
1 clove garlic, finely chopped
1 cup diced ham
about 1/8 teaspoon nutmeg
about 1/8 teaspoon dried sage
salt and pepper to taste
1 cup chicken stock
1 cup milk
1 1/2 cups shredded sharp cheddar cheese (or Swiss is nice, too)

Preheat the oven to 375 degrees F.

Butter a 2 quart casserole. The best kind is more shallow than deep and wider to give you more top surface.

Layer the potatoes, overlapping slightly in a single layer on the bottom of the casserole. Sprinkle with about 1/4 of the onion and garlic. Sprinkle with salt and pepper and a dash of nutmeg and sage. Scatter about 1/4 cup diced ham over the layer. Repeat with remaining potatoes, onion, garlic, and ham, seasoning to taste as you go.

Pour the chicken broth over the potatoes and then pour in the milk. Cover tightly with aluminum foil and bake for 45 minutes.

Remove foil and distribute the cheese evenly over the top of the casserole. Return it to the oven and bake for another 25 - 35 minutes or until the cheese is browned and the potatoes are tender.
Serve warm.