Showing posts with label yams. Show all posts

Thursday, January 30, 2025

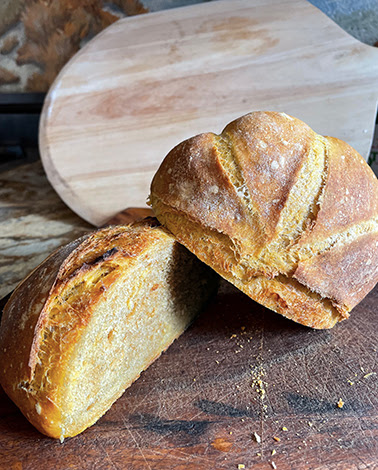
Full Moon Yam and Garlic Bread


 Happy Lunar New Year! It's the Year of the Snake, symbol of resilience and wisdom, so I wish you both. I recently joined a book club and we had a feast today, almost all dishes with a Lunar New Year theme. 


I brought a round loaf of yam and garlic bread that looks like a full moon and tastes devine. It is a soft bread, moist and golden from the yams, with a subtle garlic flavor. We had it warm, with butter for those who wanted it, and there was only a little bit left at the end of lunch.

If you use oil instead of butter to grease the pan the bread is baked in, it's a vegan bread.


Except for putting the dough into a ball shape, there is no fancy shaping and you can bake it in a cast iron skillet, round casserole dish, or a round cake pan. I started the dough yesterday, let it rise, punched it down, covered it and put it in the fridge until this morning. After letting the dough warm up, I punched it down on a floured board, shaped it into the ball, put it in the greased pan, and let it rise, then baked it. No topping, slashing, etc. needed. Hope you enjoy making it!


Full Moon Yam and Garlic Bread
By Narsai David

 1 cup warm water (preferably the water the yams were boiled in)

1 cup mashed yams (boil until tender, then peel and mash)

2 teaspoons sugar

1 package yeast, or 1 tablespoon dry yeast

2 small cloves garlic, crushed

3 cups white bread or all-purpose flour (about)

1 teaspoon salt

2 tablespoons butter, softened or salad oil

 Place the water, sweet potatoes sugar, and yeast in a mixing bowl. Let rest for 5 minutes. Add the garlic, flour and salt. Mix well with a dough hook or heavy paddle. The dough will be quite soft and sticky. If using a dough hook, you may need to add a little more to keep the dough around the hook. Continue mixing for 2-3 minutes if you are using a mixing machine, 3 to 4 minutes by hand. Spread 1 tablespoon of butter or oil over the dough.

 Place the dough in a warm plate to rise, covered with a dish towel. When the dough has doubled in volume, anywhere between 1 and 2 hours, turn it out onto a floured surface and punch it down to get out the air that has inflated it. Kneading a few times also helps in this step. (This is where you can stop and put it back onto the plate, cover it, and put in fridge overnight.)  Shape the deflated dough into a ball. This is a very soft dough, so handle it gently and use plenty of flour to keep it from sticking to the board.

 Butter or oil a 10-inch skillet. Put the dough in the skillet, and set aside, uncovered, in a warm place until double in volume.

 About halfway through the rising, preheat the oven to 400 degrees F.

 When the dough has doubled, bake for 35 to 40 minutes to brown well. Turn out onto a rack to cool.

Makes 1 round loaf.


Saturday, October 16, 2021

Babes Bake Pumpkin-Shaped Bread


You know fall has arrived when everywhere you turn there is pumpkin spice this and pumpkin spice that...and lots of actual carving pumpkins at the market, too.

For October, the Bread Baking Babes have been given a seasonal challenge by Cathy of Bread Experience, our Kitchen of the Month. She asked us to make boules (round loaves of bread) shaped with string to resemble pumpkins. She gave us a recipe for the bread, but I struck out in another direction, making a bread that I last made in 2007. It's a potato bread, with the potato part being boiled and mashed garnet yams. They impart a light orange color to the bread and contribute both flavor and moisture as well. In 2007 I made the bread with garlic as the recipe called for, but this time I wanted a more neutral bread so I skipped the garlic and added just a touch of...wait for it!...pumpkin spice.


Shaping these little loaves was fun if challenging. Mine had quite a bit of oven spring, so they tore a bit. The first one did that and I blamed it on my forgetting to cut any slashes to allow for expansion, but I did quite a few slashes on the second one and still had it tear . Fortunately, they both still had shape from the string and looked somewhat pumpkin-like. I used bakers twine which I marinated in olive oil for a while and I had no trouble removing the string once the loaves were done. The crust was thin but crisp and the crumb was moist and tight. I loved the flavor. It wasn't sweet, had a taste of yam and a hint of the spice mix. I liked it best with just a bit of non-dairy butter, but tried it toasted, too. Both were delicious. Sweetie says this is the best bread yet, but I think it's because its been so long since I baked bread.


Do try this yourself. The given recipe can be found on Cathy's site, and she also has great photos of the process of laying out the strings that shape the ball into a squash shape (after oiling the strings), and all the information you need to be successful.

Be sure to visit the other Babes sites, too, to see what they did with this fully fall bread! 


Yam Bread 'Pumpkins'

based on a recipe by Narsai David

1 cup warm water (preferably the water the yams were boiled in)
1 cup mashed yams (boil until tender, then peel and mash and cool to room temperature)
2 teaspoons sugar
1 package active dry yeast
3 - 4 cups white bread or all-purpose flour (about)
1 teaspoon salt
1/4 teaspoon pumpkin pie spice (optional)
spray oil

Place the water, sweet potatoes (yams), sugar, and yeast in a mixing bowl. Let rest for 5 minutes. Add half the flour and all the salt, and pie spice if using. Mix well with a dough hook or heavy paddle. The dough will be quite soft and sticky. Add another cup of flour. If using a dough hook, you may need to add a little more flour to keep the dough around the hook and to make the dough firm enough to shape. Continue mixing for 4-5 minutes if you are using a mixing machine, knead about the same amount of time if kneading by hand.  Spray oil (I use olive oil spray) to coat a large bowl or rising container. Put in the dough and turn to coat the dough with oil. Cover with oiled plastic wrap or with a clean shower cap.

Place the dough in a warm place to rise.. When the dough has doubled in volume, anywhere between 1 and 2 hours, turn it out onto a floured surface and punch it down to get out the air that has inflated it. Kneading a few times also helps in this step. Divide the dough into two equal pieces. Shape each piece of dough into a ball, pulling the dough to the 'back' of the ball repeatedly to form a skin of dough. This is a very soft dough, so use plenty of flour to keep it from sticking to the board.

Now it's time to shape these balls into pumpkins! Use a round piece of parchment - either a pre-cut one or one that you cut to fit your Dutch oven or other baking pot.

Use a food safe string for tying. I used baker's twine. The key thing is to oil your string well. I cut eight lengths (four for each 'pumpkin') that would encircle the dough ball with a fair amount left over for tying, then put these, one by one, into a bowl. I added olive oil and pushed the string down into the oil and let them soak until it was time to use them. I had no trouble peeling the string off the pumpkins once the breads were baked, but if you do, use a sharp paring knife to help loosen the string if it sticks.


Lay four pieces of string on the parchment circle with the ends beyond the parchment paper. Lay two in a cross and the other two between those. Put the dough ball right where the strings all cross, then pick up the ends of the strings and gather them together and tie at the top. Don't tie the string too tight in order to give the loaf room to expand in the oven. However, you don't want it to have too much oven spring because it could tear and mess up the shape. (I had too much oven spring, so mine did tear and the pumpkin shape wasn't as clear, but it was still pretty.

Put each shaped and tied dough ball (boule) into a lined and floured banneton or flour two tea towels well and use them to line two bowls, then put the dough balls in those. Cover lightly with oiled plastic wrap and allow to rise for about half an hour. Balls will get puffy. Reserve the parchment circles for baking time.

When it is about 45 minutes before baking time, preheat the oven and a deep cast iron pot or Dutch oven, with lid, to 450 degrees F. If you don't have that kind of pot, a baking stone with either a deep sauce pan or an overturned metal bowl will work. You are creating a mini-oven for each 'pumpkin' to bake in, in turn.

When ready to bake, return the bread to the parchment circles,  Score the bread in a pattern (I used a short vertical slash three time for each section) and then carefully remove the pot to a heavy towel.  Using hands protected with oven mitts, remove the lid and lower the 'pumpkin' loaf on the parchment paper into the pot. Immediately put on the lid and return the pot to the oven. Bake for 15-20 minutes, then remove the lid and bake an additional 15-20 minutes. Loaf will be golden to medium brown and when the bottom of the loaf is tapped, it will sound hollow. Immediately remove the strings and set the loaf to cool on a wire rack. Repeat the baking with the second shaped ball of dough.

Makes two medium-sized pumpkin shaped rustic loaves. 

Tuesday, April 03, 2018

Yam and Pork and Veggie Hash


Sweetie made a slow cooked pork roast on the BBQ a few days ago using a pork shoulder. It was a big one, so there was a lot left. Last night I made a kind of a hash using some of it. I didn't really have a recipe, but I've been looking at this kind of recipe for a while, so figured it couldn't be too difficult.

First I cooked some chopped onions over slow heat in a little olive oil. Later I added some diced celery, diced yellow pepper, and a sliced zucchini, cut into quarters and sliced. Once all the veggie were nicely cooked, I removed them from the pan and used the same frying pan to brown some diced pork roast. While all these were cooking, a nice fat yam was steaming to doneness. That, once cooked, was peeled and cut into a small dice. I put the dice on top of the pork and added seasonings: pepper, thyme, sage and garlic. Those cooked together a minute, then I flipped the mixture so the yam was on the bottom, then put the cooked veggie mixture over the top. With the pan covered, that cooked for a couple of minutes, then I flipped it all again and cooked it another minute. That was it...Pork and Yam Hash. Had it with a salad for a nice meal, then the leftovers (heated up) as the bed for a fried egg this morning for breakfast.


This one take some time with all the chopping and slow cooking, but it is worth it. The pork gets some crispy bits, the veggies are soft and delicious and, if you add the egg, it is almost comfort food.

I'm not going to give an actual recipe, but I used about 1 1/2 - 2 cups diced pork, 1/2 a yellow onion, 1 small zucchini, 1 stalk celery, about the same amount diced yellow pepper, 1 large yam...and an egg.

Friday, October 30, 2015

Root Veg Duo Harvest Meal


When I went to a local farm market this week they had the most beautiful delicata squash, so I bought a couple. I grew them year before last and have been in love with them ever since. For a winter squash they have a very thin skin so they are easy to prepare and they have a nice smooth texture when cooked and are just a little sweet and with a delicate squash flavor. They are pretty in an arrangement on your table, too, with a torpedo shape and nice green, yellow and rust stripes.

For dinner the other night I cut them in half, scooped out the seeds, then peeled them with a vegetable peeler. I cut them in slices which looks sort of crescent shaped.

Because I was going to roast them in a hot oven, I decided to peel and chunk up some garnet yam for the other half of the sheet pan. I tossed the peeled chunks into a plastic produce bag, added about a couple of teaspoons of olive oil, then a grinding of Moroccan spices. After I shook the yams to coat them with the oil and spices, they went on to a sheet pan which was lined with s silicone mat.

I took the delicata squash crescents and put them into the produce bag, added some more olive oil and freshly ground black pepper and about a tablespoon of maple syrup. I shook them up until all the squash pieces were coated, then put them on the other half of the sheet pan. All of the pieces of veggies were in a single layer.


After roasting for 10 minutes, I turned all the pieces over, using a spatula, so that the other side would brown. It took about another 10 minutes and they were all cooked through and had some lovely brown spots. I served them mixed together and Sweetie had grilled some turkey sausages, so we had a nice, easy meal, full of flavor and warm colors. Sweetie wants me to make the yam and squash duo for Thanksgiving. Hope your hostess wants me to bring a side dish!

Friday, October 25, 2013

Soup's On!


With the coming of cooler weather, leaves are turning bright and muted shades of red, gold, bronze and orange. The summer crops are finishing up in the garden, with just a few cherry tomatoes still on the vines. I've harvested the butternut squash and have put them in storage, ready for winter cooking and baking, their sunflower color serving as a reminder that summer will come again.

Time, also, to make soup. A few days ago I made a quick soup with canned beef broth, celery, carrots, onions, corn, zucchini and some frozen meatballs and cheese-filled tortellini, plus herbs and spices. Four days ago I started some butternut squash soup based on a recipe from the Press Democrat October 9th newspaper. The recipe follows much of the one from Kay Baumhefner of Come Home to Cooking. I used half the amounts since it would take a week for us to finish 8 servings worth of this hearty soup. I used dried thyme instead of fresh, no bay leaf, Scotch whiskey instead of Grand Marnier and left out the spinach. For the onions I used some that I had cooked in the crockpot so there was no butter used, either, only a bit of olive oil. I'm going to post that crockpot caramelized onion recipe next because it is a keeper if you like your onions slow cooked, mellow, and brown.


This is a think ahead recipe; it takes two days before it's ready to eat. For this recipe you'll need either an immersion blender (preferred) or a food processor or blender, because part of the joy of this soup is the thick texture and creaminess. You make it over a couple of days, as I did. I roasted the squash and garnet yam first, then peeled and cut them into chunks (I cut the squash in half before roasting and used that opportunity to remove the seeds and stringy bits). They were stored overnight. The next morning I started the crockpot onions. That afternoon I used some of those onions, added them in a pot to the squash and yam pieces, added the herb and spices and stirred it all up with a cup of chicken broth. This sat in the fridge for a couple of hours until I had time to finish off the soup and fix the rest of the meal. I like to think that the passage of time helped meld the flavors, too.

The finished soup was fairly smooth, creamy, thick, beautifully flavored, hot and filling. I garnished each bowl with a dribble of heavy cream and a sprinkle of freshly chopped Italian parsley. Served up with a salad and grilled cheese sandwiches, it was a wonderful meal for a chilly evening in fall.


Butternut and Yam Soup with Crockpot OnionsBased on a recipe by Kay Baumhefner of Come Home to Cooking
Serves 4
2 1/2 pounds butternut squash
1 large garnet yam
1 tablespoon oil (I used only oil, no butter)
1 tablespoon butter
2 cups thinly sliced onions (1 large)
1 bay leaf (I didn't use this)
1/2 teaspoon dried thyme
1/2 teaspoon ground ginger
1/4 teaspoon freshly ground nutmeg
1 teaspoon salt
pepper to taste
1 tablespoon Grand Marnier (I used Scotch whiskey)
3-4 cups hot chicken stock, homemade if possible
1 can evaporated milk
drizzle heavy cream
garnish: finely chopped Italian parsley


Cut squash in half and remove seeds and stringy bits. Place cut side down on lightly oiled foil or parchment lined baking sheet with rim. Wash and pierce yam in a few places and place on baking sheet.

Bake in preheated 400 degree F. oven until tender (time will vary with size of squash). Remove from oven, let cool, peel both squash and yam, then cut each into small pieces. Set aside until onions are cooked.

Meanwhile, peel the onions, slice in half, then slice thinly. Spray the insides of a crockpot crock and add the onions. Drizzle with the oil (OK to use 2 tablespoons), cover tightly and cook on high for 6-8 hours. Onions will be light gold.

In a large, heavy bottomed pot, place the squash and yam pieces, the onions, one cup of stock, the dried thyme, ground ginger, and ground nutmeg. Stir, cover and let sit in fridge overnight. You can also cook the onions the following day and add them then, instead, but be sure to allow a few hours for the soup, including onions, to sit.

The next day, about 1/2 hour before serving time, add the salt, pepper and Scotch, then add 1 cup more of stock and the can of evaporated milk. Use an immersion blender to blend to a smooth consistency. If you don't have an immersion blender, process small batches in a food processor or regular blender.

When mixture is smooth, add additional stock until mixture is a little thinner than desired thickness. Set over low heat with a pot lid askew and heat gently, stirring often, until soup is heated through and thickens a little, about 15 - 30 minutes. Taste and adjust seasonings.

Ladle soup into soup bowls, drizzle with about a teaspoon heavy cream, swirl with a spoon, then sprinkle with parsley. Serve at once.

Saturday, January 05, 2013

Soup for the New Year


Happy New Year dear reader! I hope that your holidays were wonderful. With all of the rich foods I ate for the last month I'm ready for soup. It's usually fairly healthy, and perfect when the weather is chilly...which it is now here. Soup is one of my favorite foods...along with chocolate. I rarely write down recipes for the soups I make because my favorite ones are mixtures of onions, often garlic, sometimes carrots and celery, usually various veggies and broth, plus appropriate herbs and some pepper. I use what is in the pantry, in the fridge, in the garden and adjust the amounts both to what is on hand and what I feel like highlighting that day. Often the soup is a wonderful way to use up leftovers so I don't find little containers with exotic decomposed bits of this and that when I clean the fridge.

 Day before yesterday I finally found the time to make soup with my last garden grown butternut squash. The peeled chunks of squash were the most gorgeous golden color, even after being roasted in a very hot oven until soft. The pot also contained my usual chopped onions and some garlic, chunks of peeled garnet yam, chunks of a half a Granny Smith apple, peels left on, and chicken broth. After everything was nice and soft from simmering, I added cayenne pepper to contrast with the sweetness of the squash, apple and yams. I also added some ground ginger and some thyme, rosemary and mint for herbs plus lots of freshly ground black pepper.

I used an immersion blender to smooth it out a bit, but there was still plenty of texture. I also added a half cup of buttermilk and a half cup regular milk, plus some more broth until I had just the right consistency.

A few days before I had made a meatloaf with some ground pork, similar herbs to those used in the soup, onion, garlic, cooked bulgher wheat, feta cheese and Parmesan cheese. Once it was baked we had it for dinner with a nice salad, but there was still some left.

At dinnertime yesterday I had one of those 'light bulb' moments when I realized that the flavors of the meatloaf would go really well with those of the soup. I also decided that the soup needed some greens. Just before I was ready to serve, I reheated the meatloaf and cut it into bite sized chunks. In two soup bowls I placed handfuls of washed baby spinach, then microwaved the bowls on high for 2 minutes to wilt the greens. The soup was ladled on top and the chunks of meatloaf topped it all. The photo only shows the soup, with no spinach or meatloaf chunks...seems I forgot to take a photo at dinnertime and was able to do a quick snapshot yesterday at lunchtime when Sweetie was just about ready to polish off the last of the soup in this unadorned state.

The dinnertime soup looked lovely with that golden colored soup and some green from the spinach when I stirred it up. It also smelled wonderful! Best of all the flavors all came together. Sweetie is convinced that this is the best soup I've ever made. I'll let him think that until the next time that inspiration strikes!

Butternut Squash Soup with Spinach

1 tablespoon vegetable oil
1 average-sized Butternut Squash
1 tablespoon vegetable oil
1 medium yellow onion
1 clove garlic, minced
1 medium to large sweet potato or yam
½ large Granny Smith Apple
2 ½ - 3 cups low-sodium chicken stock
½ cup milk
½ cup fat-free buttermilk
½ teaspoon dried ginger powder
½ teaspoon dried thyme
¼ teaspoon dried mint
¼ teaspoon dried rosemary, crushed
¼ teaspoon cayenne pepper
fresh ground pepper to taste (I used a LOT - gave it a nice kick)
a large handfuls washed baby spinach for each serving
meatloaf chunks (optional)

1. Peel and seed the squash. Cut into 1/2 inch chunks. In a large food safe bag (I use recycled plastic bags from the produce section of the grocery store), combine the squash chunks, 1 tablespoon olive or vegetable oil, salt and pepper. Spread the squash chunks on a parchment lined baking sheet and roast in a preheated 400 degree F oven for 20 minutes. Remove from oven and set aside.

2. Peel onion and chop. Set aside. Peel potato and apples and cut into ¼ inch chunks.

3. Over medium heat in a large saucepan/stock pot, heat 1 tablespoon oil and stir onion and garlic until tender.

4. Add stock, yam chunks, apple chunks, and seasonings. Give it a good stir, reduce heat to medium-low and let simmer for about 20 minutes until the yam and apple chunks are fork tender. Add the reserved roasted squash chunks and stir. Heat another 2-3 minutes to heat the squash. Remove from heat.

5. In a blender or food processor scoop about ½ of the mixture into blender. On low speed, blend until nicely pureed. While doing this, add about ¼ cup of milk and ¼ cup of buttermilk until creamy. Transfer this to a bowl or a 2nd pot. Alternately, use an immersion blender to puree the whole pot of soup in the pot, being sure to add the milk and buttermilk (a total of ½ cup each milk and buttermilk) .

6. Repeat step 5, adding another ¼ cup of milk and ¼ cup buttermilk and transfer to bowl or pot; continue until all soup has been creamed.

7. Put soup back on very low heat, stirring to blend, and adding lots of black pepper...yum! Simmer for 15 minutes and taste soup. Adjust seasonings and, if needed, more broth, to get the consistency you like. Simmer another 2 minutes at very low heat.

8. To serve, place a handful of washed baby spinach leaves in the bottom of each microwavable bowl for the number you are serving. Microwave on high for 2 minutes. Top each portion of wilted spinach with a serving of the soup. Garnish as desired. For a hearty soup, top with chunks of warm meatloaf as I did.

Saturday, November 13, 2010

Miss Kitty and the Sweet Potato Rolls

Once upon a time in the Land of St. Honore' Elle had been missing seeing some of her friends. One was Miss Kitty, a delightful, intelligent and funny woman who is a fantastic cook and a huge Giants fan. Now that baseball season was over and Elle was putting work into perspective, she invited Miss Kitty and her hubby over for lunch. Sweetie wanted to plan the main course, so Elle gathered the last tomatoes of the season for the mixed greens salad and then she decided to make some dinner rolls that suited the season.

She started them the night before so that they could retard in the fridge overnight. On the day of the luncheon she carefully divided the dough into 24 pieces and created plump round dough balls which baked up, after rising, into the most beautiful golden rolls! One of the best things was that the house was fragrant with the delicious smell of freshly baked bread when the guests arrived for lunch. There was plenty to eat and even extra rolls to take home.

Plus, Miss Kitty brought dessert...a decadent chocolate hazelnut mousse cake! The sun was shining, good conversation and laughter flew around the table, and we basked in the small luxury of good food shared with good friends. St. Honore' would have been please with both the rolls and the cake...Elle, Sweetie, Miss Kitty and PowerMan were!

Of all the people who read the blog, Miss Kitty is probably the most enthusiastic. Her feedback is always such an encouragement, so Elle decided to create a dinner roll just for Miss Kitty.

The finished rolls were golden in color from the mashed yams, soft, warm, just slightly sour from the sourdough starter and very tender. (Since the photos were taken later, at night, the rolls may look a little more golden than they were, but not by much!)

The starting point for the recipe was the recipe for Sweet-Potato rolls found in The Fannie Farmer Baking Book by Marion Cunningham, but many things were changed to make this special for Miss Kitty.

Garnet yams were used instead of sweet potatoes, a sourdough starter was the base instead of dry yeast (although a little commercial yeast was added), mashed potato flakes added to the tenderness. The dry milk was left out because none was in the pantry, and butter was used instead of shortening...bah on trans fats! Last, but not least, some of the proportions were changed and some white whole wheat flour was used instead of all regular flour.

Do you have someone you'd like to surprise with some fragrant, soft, totally decadent rolls, glowing with autumn gold? Try this recipe and see if they, too, want to take home some extra rolls...always a compliment to the cook! Thanks Miss Kitty! Hope to see you soon.

Sending this along to Susan at Wild Yeast for her weekly Yeastspotting event...a fabulous wonderland of yeasted bread recipes...check it out!


Sourdough Sweet Potato Rolls
Adapted from The Fannie Farmer Baking Book by Marion Cunningham
Makes 24 rolls

1 ½ cup sour starter (or a smaller amount of starter that has been fed with a 100% hydration flour-water mixture to equal 1 ½ cups total, and then let sit at room temperature for 2 hours to mature)
½ cup warm water
¼ teaspoon active dry yeast
2 Tablespoons dry mashed potato flakes
2 Tablespoons sugar
1 ½ teaspoons salt
3 ½ cups flour (I used a mixture of 1 cup King Arthur White Whole Wheat and 2 ½ cups all-purpose flour)
1 egg, slightly beaten
½ cup cooled, cooked, mashed sweet potato (I used Garnet Yam instead)
5 tablespoons butter, softened

Place the starter in a stand mixer bowl.

In a small bowl mix the barely warm water and the active dry yeast to proof for 5 minutes.

In a medium bowl whisk together the mashed potato flakes, sugar, salt and flour(s). Set aside.

Add the proofed yeast to the sourdough starter in the stand mixer bowl and stir with a wooden spoon to blend. Add the egg, sweet potato or yam mash, and butter and stir with a wooden spoon to blend.

Attach the dough hook to the stand mixer and put the mixer bowl in place. With mixer running on low speed, add the dry ingredients to the sourdough mixture, starting with ½ cup at a time and finishing with a Tablespoon at a time until you have a soft dough. Knead with the mixer for 5 minutes.

Turn the dough out into an oiled container big enough for rising the dough. Turn dough over to coat with the oil, then cover lightly with plastic wrap and place in the refrigerator overnight or at least 4 hours.

Remove from the ‘fridge and let sit at room temperature to warm for at least ½ hour, or until dough is no longer cold.

Turn dough out onto a lightly floured work surface. Punch down and shape into a rough square. Using a sharp knife or a bench scraper, cut the dough into four even pieces. Set three of the pieces aside and take the remaining piece and divide into 6 pieces. Using floured hands, shape each piece into a plump ball, pulling the edges under. Place an inch apart in greased cake pans. Repeat with each large piece of dough until you have 24 balls of dough in the pans. Cover each pan with oiled plastic wrap and cover with a tea towel. Let rise an hour or two until doubled in size.

Bake in preheated 400 degree F. oven for about 15 – 20 minutes, or until golden brown. Remove from the oven and cool on racks.

Sunday, April 15, 2007

A Full Moon Bread


For years, on and off, I've baked bread. It's sort of soothing to mix up the batter, knead it, smell that fresh yeasty smell, and be pleased when it rises, then rises again, and again when it is baked.


Andrew of Spitoon Extra is hosting Waiter, There's Something In My...Bread this month and I've had a lot of fun looking through various cookbooks getting ideas for a bread to bake. Today I came upon a bread I'd never heard of in Monday Night at Narsai's by Narsai David and Doris Muscatine. It's Sweet Potato and Garlic Bread and you bake it in a skillet, so it makes a lovely golden loaf that looks like a full moon in the autumn.

I used yams instead of sweet potatoes, since that is what I had in the pantry, and that worked just fine. The yeast got 'proofed' in a little of the water that the yams were cooked in because I wasn't sure if it was too old or not. Because of that I added some extra flour during the last part of the machine mixing to make up for the extra liquid. Otherwise I followed the directions given.

The garlic taste here is mild but present and the yams give it a faint sweetness as well as the mellow color. Yams are also fairly healthy with lots of fiber and vitamin A and beta carotene. The crumb of this bread is tender and moist and the crust is thin but crisp. This is a great bread to go with soup.


Yam and Garlic Bread
Narsai David

1 cup warm water (preferably the water the yams were boiled in)
1 cup mashed yams (boil until tender, then peel and mash)
2 teaspoons sugar
1 package yeast, or 1 tablespoon dry yeast
2 small cloves garlic, crushed
3 cups white bread or all-purpose flour (about)
1 teaspoon salt
2 tablespoons butter, softened or salad oil

Place the water, sweet potatoes sugar, and yeast in a mixing bowl. Let rest for 5 minutes. Add the garlic, flour and salt. Mix well with a dough hook or heavy paddle. The dough will be quite soft and sticky. If using a dough hook, you may need to add a little more to keep the dough around the hook. Continue mixing for 2-3 minutes if you are using a mixing machine, 3 to 4 minutes by hand. Spread 1 tablespoon of butter or oil over the dough.

Place the dough in a warm plate to rise, covered with a dish towel. When the dough has doubled in volume, anywhere between 1 and 2 hours, turn it out onto a floured surface and punch it down to get out the air that has inflated it. Kneading a few times also helps in this step. Shape the deflated dough into a ball. This is a very soft dough, so handle it gently and use plenty of flour to keep it from sticking to the board.

Butter or oil a 10-inch skillet. Put the dough in the skillet, and set aside, uncovered, in a warm place until double in volume.

About halfway throught the rising, preheat the oven to 400 degrees F.

When the dough has doubled, bake for 35 to 40 minutes to brown well. Turn out onto a rack to cool.
Makes 1 round loaf.