Monday, October 31, 2022

Cakes as Gifts


Happy Halloween! This lovely cake has three layers of apple cake filled with vanilla buttercream. The outside is frosted with salted caramel buttercream tinted orange and decorated with seasonal sprinkles and white chocolate ghosts. Isn't it delightful? My daughter made it to take to work today for Halloween...out of bits and pieces saved from other cakes she made on Saturday. It's a hobby that gives pleasure to others...quite a gift.

Our daughter has always been artistic. When she was in middle school she and a friend created a line of t-shirts decorated with puffy paints and sold them at a Christmas Boutique at the fairgrounds. Later, as a hobby, she painted mandala rocks with tiny dots of paint in mandala designs...so detailed and with amazing color combinations. Her latest artistic creations are even edible...gorgeous small-scale cakes.

These creations are about 6-inches in diameter, so they are about 1/4 smaller than regular layer cakes. Other than the size, they are just as complicated as the larger versions. She has perfected a buttercream recipe, figured out a combination of chocolate-espresso cake with chocolate icing that is the fan favorite combo, and learned all sorts of techniques and tricks.

She almost always makes them as gifts...to friends or for the birthday celebrant (who might be a friend or a friend of a friend). A few times she made them at a request from a friend. Since it's a hobby, she won't accept any payment for the requested ones except to cover the cost of supplies. The rest are gifts.

As you may guess, I am very proud of her skills and talents in this area. You might think that I taught her, but in reality all I gave her was (probably) good genetics...the rest is all her!

Here are some examples of her cakes. 


This is one that she did in the early spring as a birthday gift. Almost all of the succulents were piped onto small pieces of parchment paper, then put on a sheet pan and frozen. As you can see, she really knows how to mix color. Once the cake was iced, she used a palette knife to place the frozen shapes on the cake, then tied it all together with the green icing 'vines'.


This beautiful cake is decorated with icing dahlias and glittery sprinkles The same technique that she used for the succulents was used for the flowers.


She made this lovely strawberry cake for her fiance' for Father's Day. The drips are white chocolate and I think she used some freeze-dried strawberry powder for the outer icing.


This one is a bit easier to do than some of them. The 'ice cream' is actually a cake pop made by mixing cake removed to flatten the cake top, mixed with some of the icing. It certainly looks like a birthday!


This one was made for a friend to take to a baby shower with a jungle theme. The cute animals were purchased and so were the round balls. Pretty cute!


Another strawberry cake, this time with three layers and a more opaque white chocolate drip.


This is a more classic design but the ombre' color effect is a challenge and roses are not easy to pipe.


This is probably my favorite cake...I just love the impressionist sky and the tiny stars on the sides, plus the black chocolate trees. It's like a painting.


This one is fun...an 'earthquake' cake with multi-color and multi-shape sprinkles and gold edging. Inside is the favorite cake...chocolate espresso with chocolate icing. 


Another birthday cake and a pretty elegant one at that. This cake is apple with salted caramel buttercream...sounds delicious. Some of the batter that was left over from this small cake was baked in larger pans to create the beauty at the top of the post.

By the way, this is not a business. This is her hobby and a way to be creative and to de-stress from a fulfilling but high-energy job. Can't wait to see what she creates next!

Sunday, October 30, 2022

Butternut Squash For Fall - Zucchini For Summer


By now we have usually taken in our front porch wicker furniture because of rain, but this year we continue to have weather more like June than October...including some fog, which I love. No rain.

This recipe reflects the two seasons in a way. I'm just beginning my use of winter squash...in this case butternut and have almost finished using the zucchini from my garden because we are not getting very much any more and mostly little ones at that. This recipe has both, plus some mushrooms and two kinds of rice, plus pecans and orange juice and zest. What ties it together is olive oil and balsamic vinegar, plus a bit of maple syrup on the roast veggies.

I saw a recipe on my phone for something similar to this a week or so ago, but couldn't find it when it was time to make this dish, so I sort of put things together that sounded right in proportions that seemed right and it worked out pretty well. Sweetie raved and had two servings.

 Although I often peel, de-seed and cut up fresh butternut squash, today I used a container from the grocery store that had already prepared chunks in it. I did cut a few of the larger chunks in half, but other wise just threw them into the mixing bag. The zucchini were small so I used two, cutting off the ends and cutting them in half, then slicing them. The mushrooms were already cleaned and sliced. You can use any kind of mushroom you like...these are plain white ones but cremini or one of the fancy ones would be delicious, too.

Do use a fresh orange for this. The zest and fresh juice are a background note, but make a big difference and that won't happen without the fresh oils in the zest and the unmistakable taste of fresh OJ.

I used a rice cooker for the rice but just prepare it in your favorite way. You can skip the wild rice if you want this to be less costly and it will still take great, but the wild rice really adds to the taste. This would make a great stuffing for duck if the butternut squash were chopped in smaller cubes. The flavors would be excellent with duck...or turkey. We had it with grilled chicken thighs and it was lovely.

Need to prep ahead? You can roast the veggie mixture in advance, keep in fridge, then warm in the microwave before mixing into the rice mixture. Both kinds of rice can be made ahead and rewarmed with about a teaspoon of water in the microwave with waxed paper over the container to keep the moisture in. Do mix up the 'dressing' at the time you are going to serve because fresh orange juice will taste fresher that way...and it matters. Pecans can be toasted ahead and kept in a airtight container.

Two Kinds of Rice with Butternut Squash and Maple
Serves 4-6

3-4 cups butternut squash, peeled, de-seeded, and cut into cubes of about an inch
2 tablespoons olive oil
2 tablespoons maple syrup
2 tablespoons balsamic vinegar
1/4 teaspoon dry thyme
1/8 teaspoon (or more if you like it spicier) cayenne pepper, ground
1/4 teaspoon freshly ground black pepper
1 tablespoon fresh orange zest
1/2 cup sliced mushrooms
2 small or 1 medium-large zucchini, ends trimmed, halved lengthwise and sliced in1/4-inch thick slices
1/4 cup chicken broth
1/4 cup fresh orange juice
1 tablespoon balsamic vinegar
2 tablespoons olive oil
salt and pepper to taste
1 cup cooked wild rice
1 1/2 cups cooked brown rice
1/4 cup toasted pecans, broken in large pieces
1 tablespoon parsley, minced

Preheat the oven to 450 degrees F.

Place the butternut squash, olive oil, maple syrup, balsamic vinegar, thyme, cayenne pepper, ground black pepper, and orange zest into a large plastic bag (I use a clean produce bag) and shake vigorously to coat the squash in the other ingredients. Line a sheet pan with heavy duty foil and spray with spray oil (I used spray olive oil). Pour the squash mixture onto the prepared sheet pan. Let as much of the mixture as you can drip from the bag. Use the outside of the bag to pat the squash into a single layer, with the cubes separated from each other. Roast in the preheated oven for 10 minutes.

Add the sliced mushrooms and sliced zucchini to the sheet pan and use tongs or a wooden spatula to carefully mix them into the squash mixture while also turning the squash to another side. Try not to tear the foil since the coating mixture is sticky and could burn if it leaks underneath. Make sure that the mushrooms and zucchini are laying on a flat side on the surface of the sheet pan foil, then return the pan to the oven and roast another 10-15 minutes, or until butternut squash is tender.

While the squash is roasting, in a small bowl mix together the chicken broth, balsamic vinegar, olive oil, salt and pepper.

In a large bowl place the two kinds of rice, warmed, the roasted veggies and any sauce, and the fresh orange juice dressing. Gently stir to combine. Add the toasted pecans and the minced parsley and gently stir to combine. Serve at once for warm dish, or serve at room temperature later.

Sunday, October 16, 2022

Babes Bake Figgy Flatbread


It's the 16th of the month...the day for the Bread Baking Babes to share what they have been up to this month.

I'm Kitchen of the Month for October and I chose a lovely flatbread recipe for fall, enhanced with rosemary and figs and nuts. The recipe is from a cookbook that I found on sale at a local bookstore. The book is Joanne Weir's More Cooking in the Wine Country. The author, Joanne Weir is on a Public Televisions series 'Weir Cooking in the Wine Country II' and there are lots of delicious sounding recipes in the book. The first time I baked it I followed the recipe, but divided the dough in half and baked half with walnuts and half with pecans, plus I added some fresh figs to the dried figs. It was delicious!

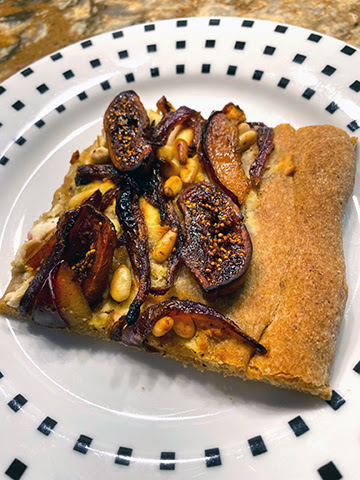
For the second bake I left out the rosemary but added lemon zest along with the orange zest in the original recipe, plus I substituted pine nuts, and some whole wheat flour for part of the flour. As you can see, this is a versatile recipe. This time I had intended to weigh the ingredients, using the amounts provided by Elizabeth of Blogging from OUR Kitchen (THANK YOU Elizabeth!), but forgot to and used the cup measurements. I also used some fresh Italian prune plumbs along with the dried figs. They are in season now and added, along with the pine nuts, to the Italian feel of this flatbread. The whole wheat bread was nicely nutty but bland without the rosemary. Next time I'll stop being lazy and put in the rosemary as called for...it really does make a difference.

This is an easy dough to work with. It might seem a bit stickier than you are used to, due to the use of potato water, but use wet hands and it will be fine. If you bake this and would like to be a Bread Baking Babes Buddy, just send me an email with a brief description of your bake and a photo and the URL of your post by Oct. 29th. Email is plachman*at*sonic*dot*net. I'll send you a Buddy Badge and include you in the round-up at the end of the month. The description and photos below are from my first bake. At the bottom I have some photos from the one with pine nuts and prune plums.

Be sure to visit the rest of the Bread Baking Babes to see what marvelous flatbreads they have created.

Kelly - A Messy Kitchen - Flatbread with figs and pears

Karen - Karen's Kitchen Stories - Flatbread with figs and sherry

Cathy - Bread Experience - Sourdough flatbread with home-grown dried figs 

Judy - Judy's Gross Eats - Flatbread with apricots and almonds

Aparna - My Diverse Kitchen - Flatbread with dried figs and walnuts and onions

Elizabeth - Flatbread with dates and pine nuts and red onions

This is one of those recipes where you can do parts in advance. I made the rosemary-infused olive oil a day ahead, cooked the potatoes the evening before I made the dough, saving the potato water and re-warming it, I even soaked the figs a day early and stored them in the marsala. Even though the recipe only calls for dried figs, it's fresh fig season, so I also included sliced fresh figs and I highly recommend this change! 

The dough is slightly sticky but not a high-hydration one, just soft. Once it rose and was punched down, it was pretty easy to work with. The first piece rolled out easily but the second one needed to have relaxation time after it was flattened before it would  roll out large enough. It baked up light on the inside and crisp and lightly brown on the outside.

Because I was working with fresh figs as well as dried, I watched the flatbread carefully towards the end of baking to avoid burning the fruit...which has so much natural sugar. I had the flatbreads on pieces of parchment which made it easier to get them onto the baking stone and then out of the oven when finished, although I did use a peel, with the parchment pieces on the peel.

 I typed this up exactly as it is in the cookbook...make changes as desired, although I do encourage you to make the bread dough with the potato water and rosemary oil and chopped rosemary. If you want to use your sourdough starter, just skip the yeast/bread flour/potato water initial poolish and use 1/2 cup sourdough starter. You might need more bread flour to get the dough right, but sourdough would be great with the topping. The recipe with weights, courtesy of Elizabeth, will be at the bottom, along with the photos of the flatbread baked using those measurements.

Happy Baking!


Fig and Walnut Flatbread

from Joanne Weir's More Cooking in the Wine Country cookbook
makes 1 flatbread, serves 6

Dough
1/4 cup extra virgin olive oil
3 sprigs fresh rosemary
2 1/2 teaspoons (I package) dry yeast
1/2 cup plus 2 cups unbleached bread flour, divided
1/2 cup lukewarm potato water or plain water (110 degrees F)
1 teaspoon coarsely chopped fresh rosemary
1/2 cup potato water (additional)
1 teaspoon salt

Topping
6 to 8 dried figs, sliced
1 cup Marsala wine
3 tablespoons extra virgin olive oil
1 red onion, cut into 1/2-inch thick vertical slices
1 tablespoon sugar
1/2 teaspoon greated orange zest
salt and freshly ground black pepper
3/4 cup walnut halves

Directions
In a small saucepan, warm the olive oil and rosemary. Remove from the heat and let cool for I hour. Discard the rosemary sprigs. Set aside.

In a large bowl, mix together the yeast, 1/2 cup flour, and 1/2 cup warm potato water. Let stand 1 hour, until it bubbles up and rises. Then add the remaining 2 cups flour, the rosemary olive oil, chopped rosemary, additional potato water, and salt. Mix the dough thoroughly. Knead the dough on a floured board until it is soft but still moist, 7-8 minutes. Place the dough in an oiled bowl, turning it once to cover it with oil. Cover the bowl with plastic wrap and put it in a warm place (about 75 degrees F). Let the dough rise for 1-2 hours, until doubled in volume.

In the meantime, prepare the topping. Place the figs and Marsala in a small saucepan, and heat over medium heat until the Marsala bubbles around the edges, 1 minute. Remove from the heat and let stand for 1 hour.


Heat the 3 tablespoons olive oil in a large frying pan over medium heat. Add the onions and sugar and cook, stirring occasionally, until the onions are very soft, 15-20 minutes. Add the orange zest, season with salt and pepper, stir thoroughly, and set aside to cool.

Place a pizza stone on the bottom shelf of the oven, and preheat the oven to 500 degrees F for 30 minutes.


Form the dough into a round ball. Let it rest for 5 minutes. On a floured surface, roll the dough out to form a 9x12-inch oval, 1/2-inch thick. Place it on a well-floured pizza peel. 


Drain the figs and distribute the figs, onions, and walnuts evenly over the dough. Lightly press them into the dough. Let it rest for 10 minutes. Then transfer the flatbread to the pizza stone and bake until golden brown and crispy, 12-15 minutes. Serve immediately.


Here are the measurements by weight. Just use the instructions above to make the flatbreads.

Dough
1/4 cup extra virgin olive oil [60 ml/55 grams]

3 sprigs fresh rosemary (I skipped the rosemary in the whole wheat version)
2 1/2 teaspoons (1 package) dry yeast [7 grams]
1/2 cup plus 2 cups unbleached bread flour, divided [68 plus 274 grams] (I used all whole wheat flour)
1/2 cup lukewarm potato water or plain water (110 degrees F) [120 grams]
1 teaspoon coarsely chopped fresh rosemary [1 gram] (skipped this for whole wheat version)
1/2 cup potato water (additional) [120 grams]
1 teaspoon salt [6 grams]

Topping
6 to 8 dried figs, sliced [50 to 67 grams]
1 cup Marsala wine [240ml/240grams]
3 tablespoons extra virgin olive oil [45 ml/41 grams]
1 red onion, cut into 1/2-inch thick vertical slices
1 tablespoon sugar [12 grams]
1/2 teaspoon grated orange zest [1 gram]
1/2 teaspoon grated lemon zest [1 gram]
salt and freshly ground black pepper
3/4 cup walnut halves [75 grams] (I used untoasted pine nuts)
(I used three small prune plums, pits removed and thinly sliced...forgot to weigh them) Below is a photo of the topping. I added the drained figs and the plums once the mixture was off the heat.

Whole wheat version baked:
and served:


Wednesday, October 12, 2022

A Single Serving


Sometimes you just need one serving. One day in the last few weeks...I should know when but things have been busy, with very little baking and only a bit more cooking...Sweetie wasn't here for breakfast...I think he was volunteering with the group in Petaluma that fixes up old train cars...so I made a single serving of the Dutch Baby with blueberries. Sooo good.

You keep the same proportions for this mini-baby as you do for the large one, you just make it in a smaller pan. I was lucky enough to recently find a small Pyrex baking dish just the right size...the size of a small loaf pan, but about an inch wider. Be sure to use a dish or pan that is meant to be used with high heat and you will be fine. If it's even wider, the mixture might not puff up as much in the middle, but it will still rise at the sides and you will have a delicious single-person treat.

I ate mine with just a small drizzle of maple syrup, but you can use syrup, whipped cream, yogurt or any other topping that you like.


Dutch Baby for One with Blueberries

Serves 1-2

1 tablespoons butter (or non-dairy margarine or 'butter')
1 large eggs
1/4 cup milk (or nut milk)
1/2 cup all-purpose flour
dash salt
1/4 teaspoon vanilla extract
1/4 cup fresh blueberries, washed and drained and picked over for stems or over-ripe berries
1/4 tablespoon granulated sugar (optional)

Preheat oven to 425 degrees F.

As oven preheats, put the butter in an ungreased 3x5-inch baking pan and place in the oven, just until the butter is melted. (Mine started to brown slightly at the edges)

Place the eggs, milk, flour, salt and vanilla, (and lemon oil, if using) in a blender and process until smooth. Scrape down the sides, if needed, and process again for a few seconds.

Pour the batter into the hot baking pan, over the melted butter, using a spatula to scrape out as much batter as possible. Sprinkle with the blueberries and with the sugar (if using).

Bake, for 15-20 minutes or until edges are golden brown. Pancake will puff up, but will sink down again as it cools once removed from the oven.

Serve at once. Can sprinkle with powdered sugar, with lemon juice, or serve with maple syrup and/or more berries.

Note: you can make this without berries, too, and it will still puff up gloriously and taste wonderful.


Monday, September 26, 2022

Peaches and Blueberries


It's a bit past the season for blueberries here in Sonoma Co., so this isn't exactly seasonal, but peaches are still in season here and I bought some at the local farmers market that were just a tiny bit unripe, but still delicious. I decided to make a gallette to take for dessert at a dinner party a few days ago. I followed the usual method of rolling the dough out to at least 12-inches in diameter.

For the filling, I first put dry unseasoned bread crumbs in a thin layer on the bottom from the middle, having it about 8-inches in diameter. In a bowl I combined 2 Tablespoons flour, with 1 Tablespoon cornstarch and 2 Tablespoons brown sugar. I grated in about 1/8 teaspoon fresh nutmeg and mixed it all together with clean hands. I had already prepared the peaches by peeling, pitting, slicing, and cutting the slices into three pieces per slice. The blueberries just needed rinsing. I used about 1 cup blueberries and 5 medium peaches. The 6th peach was just sliced to use for topping. Except for the topping peaches, the fruit was put into the bowl with the thickeners, then tossed with clean hands to coat.

The peach and berry mixture was then mounded in the center of the dough circle and gently arranged over the bread crumbs. The peach slice topping pieces were arranged over that and then the uncovered dough was folded up over the peach mixture. I used wet clean hands for that. The moisture allowed me to pleat the dough and sort of glue the folds into place.

The last step, besides preheating the oven to 400 degrees F., was to make a glaze by beating an egg, then brushing it over the dough. A sprinkle of plain sanding sugar over the egg glaze and the fruit was the last touch. Into the preheated oven it went for 10 minutes.

After 10 minutes, the oven was reduced to 350 degrees F. The gallette baked for another 20 minutes. By that time it was gently browned and the juices had broken through the crust at one place.

The final bit was to take some marmalade, warm it in the microwave, put it into a fine mesh small sieve, push the jelly part through to a small bowl and then use the warm jelly and a small pastry brush to glaze the peaches in the topping. You can skip that part, but it really adds a nice shine and makes it look professional. I used about a tablespoon marmalade.

You can use any fruit filling you like - it takes about 5 cups of fruit. If the fruit is juicy, be sure to coat with some flour/cornstarch mixture. Sugar is optional and depends on the sweetness of your fruit.

It's easy enough for a young person to do but it's always a welcome treat and there is never any left!

Friday, September 23, 2022

Rushing Water

Between the garden and the art studio time, I'm not in the kitchen very often making different things. Usually I have granola and fruit for breakfast, leftovers for lunch...or sardines and crackers and apples...and for dinner it's usually something already posted on this blog. The net result is that I'm not posting as often and not posting recipes.

Instead, I'm sharing today a photograph of a recently finished painting. It started life as a painting of koi but ended as a seascape, with lots of water rushing over golden rocks. Pure fantasy, but fun.


Sweetie has started a new project...a changed entry into our storage area. I'll put up a photo when its done.


Friday, September 16, 2022

Babes Bake Onion Board


We're finally getting some cooler weather...and maybe even rain on Sunday and Monday!!...so it's fun to bake again. Our September challenge was chosen by Karen.  It's an Ashkenazi Jewish flatbread and is sometimes called Onion Board. This is an easy flatbread topped with a thick layer of savory sautéed onions. Over that is sprinkled a nice amount of poppy seeds. I even sprinkled on a few flax seeds that I found in the freezer. I recommend adding a sprinkle of sea salt over the whole topping because the onions cook up fairly sweet.

The bread itself is simple, but you do have to make it ahead of time so that it has overnight (or at least 10 hours) to rise and ripen. I used part white whole wheat flour and it was tasty, although it didn't rise very much. Sweetie really loved the topping. We had it with a dinner that included steelhead trout and a mixed green salad with fresh from the garden tomatoes, cucumber, and carrots. It went really well!

Do bake with us and become a Buddy. Our Kitchen of the Month, Karen of Karen's Kitchen Stories, will send you a beautiful Buddy Badge, designed by Elizabeth, if you send her an email with a description of your bake and a photo by Sept. 29th. You'll also be included in the round-up! There is also more information about the bread on her website.


Also, check out the sites for the other Babes to see their take on this simple but delicious yeasted flatbread with onion topping. 

Happy September!


Sept 2022 - Onion Board 


Dough

375 grams (3 cups) all purpose flour

7 grams (2 1/4 teaspoons) instant yeast

7 grams (2 teaspoons) Diamond Crystal kosher salt

3 tablespoons, olive oil, divided

294 grams (1 1/4 cups) warm water (about 110 degrees F)

Spray oil

Topping

1 tablespoon olive oil, plus more for stretching

3 large yellow or brown onions, about 3/8 inch dice

1 3/4 grams (1/2 teaspoon) kosher salt

1 tablespoon (plus more if desired) poppy seeds

1/2 teaspoon flax seeds (optional)

Flake sea salt (optional)


Instructions:

Mix the dough ingredients with a dough whisk until all of the flour is absorbed. 

Spray a large bowl or dough rising bucket with spray oil and scrape it into the dough. Spray the top lightly with spray oil, cover with plastic wrap, and let rise overnight, about 10 to 15 hours. It should double. 

Remove the dough from the refrigerator while you heat the oven and prepare the onions. 

If you have a baking stone, set it on a rack in the middle or slightly below. Heat your oven to 450 degrees F. 

Heat 1 tablespoon of olive oil over medium heat in a large skillet and add the onions. Cook, stirring regularly, until the onion is translucent and slightly browned about the edges, about 20 to 30 minutes. When they are almost done, stir in the salt. Remove the onions from the pan and let cool in a bowl. 

Line a half sheet pan with parchment paper and spread with 1 tablespoon of olive oil over the paper. Scrape the dough onto the parchment and spread it by dimpling it with your oiled fingertips while pushing to the edges. If the dough is resistant, let it rest for 10 minutes, and start spreading it again (until you have about a 10 inch by 14 inch rectangle). 


Brush the edges of the dough lightly with olive oil. Spread the onion mixture over the dough, leaving about a 1 inch border. Sprinkle with onions with the poppy seeds. Lightly sprinkle with the optional sea salt. Let rest, uncovered, for about 10 to 15 minutes. 


Place the baking sheet on top of the baking stone and bake for 25 to 30 minutes. 

Cut with a pizza wheel. It's best fresh from the oven, but can be reheated, just like pizza. 


Sunday, September 11, 2022

Pesto with My Garden's Basil


Pesto made with pine nuts and basil is a classic sauce for a good reason. For one thing, it smells heavenly! The bright green is enticing, too. Best of all are the robust flavors. Since I'm still not eating cheeses, I made my sauce without Parmesan cheese, but I did add nutritional yeast, plus lemon juice and zested lemon peel. Those added some complexity and the lemon added zing. 


My basil started to flower, so it was time to harvest...perhaps past time. Once rinsed, I stripped the leaves off the stem (even tiny ones) and didn't use the flowers. You need a cup, packed, so that's a lot of basil.


One of the keys to this recipe is to use a food processor and to scrape down the sides frequently so that all of the ingredients are incorporated.

This is an intensely flavored sauce, so use sparingly at first until you are familiar with the intensity.

I lightly coated cooked tortellini with this pesto and it was soooo delicious!


No Cheese Pesto


1 cup, packed, fresh basil leaves...stems discarded
2/3 cup toasted pine nuts
1teaspoon nutritional yeast
1 teaspoon lemon zest
juice from a lemon
1/3 cup olive oil, or to taste
salt and pepper to taste

In a food processor bowl fitted with the steel blade place the basil, pine nuts, nutritional yeast, lemon zest and lemon juice. Process until fairly smooth, scraping down sides as needed. With machine running, use the feed tube and add the olive oil in a thin stream until pesto is to your liking. Add salt and pepper to taste. Serve at once.

Leftover can be stored in a small glass jar. Pour a little additional olive oil gently to create a thin layer of oil on top of the pesto. This keep air out and prevents the pesto from turning brown.

Thursday, September 01, 2022

Eating More Fiber


I recently had a colonoscopy and everything looks good except for one thing. If medical stuff is TMI, don't read on.

I have internal hemerrhoids and the doc says that I need to increase my fiber and hydration to fix the problem. The easy way is to use a prescription stool softener and also to add something like Metamucil or psyllium husk powder for the added 5 grams of fiber per meal. The more task intensive way is to eat lots of food with at least 5 grams of fiber, plus increase intake of water. I'm doing a combination, but I hope to eventually be handling it with only food.

Some foods are easy because they have long been known to help with constipation. An example would be prunes and fresh apples (leaving the skin on). Pulses like lentils are also a good source, as is oatmeal.


In the area of fresh fruits and veg I was surprised to learn that raspberries and blackberries are good sources. Pears, too...who knew? Yams and potatoes with the skin on are good. The list goes on, but it's been fun to know that corn on the cob, which is in season right now and delicious just steamed and eaten, is helping my gut in multiple ways.

Do you have a favorite food source of fiber?

Tuesday, August 23, 2022

Grandad's Apple Cake


My Irish grandfather really loved this apple cake. My Mom would make it anytime that he was coming to visit. Since it uses applesauce it can be made any time of year, but this special version uses freshly made applesauce using the Gravenstein apples growing in our orchard, plus peeled, diced fresh apples...something that isn't in the favorite recipe, but I think grandad would have loved this variation.

This cake is a somewhat rustic tea cake and is moist and flavorful from the apples. I used white whole wheat flour from King Arthur for some additional fiber and goodness. I used golden raisins and walnuts, too, plus cinnamon, cloves and nutmeg. If you are yearning for just a bit of fall flavors as we begin to leave summer, this recipe is perfect for you!

If you are making this with homemade applesauce as I did, don't worry if yours is slightly thicker (as mine was) or thinner than the commercial kind...it will be fine after the cake bakes. I used half the sugar since I prefer my tea cake a bit less sweet and the applesauce adds natural sugars, but I'm leaving the recipe as written and you can adjust the amount of sugar to your own preferences.

I baked this up in four small loaves, plus one six-inch round pan. That way I can enjoy one small loaf with Sweetie, have another for the fire folks last night and still have some for the freezer, ready for tea time with friends after a brief thaw. The recipe has you bake it in a Bundt pan. I've done it that way and it works really well, too.

You can use any kind of apple for this but one with good apple flavor will be the best. I didn't peel the apples in the applesauce, but I did peel the fresh diced ones, but you can peel or not and it will still be a delicious cake.


Applesauce Cake

Makes 1 10" Bundt cake

3 cups flour

1 ½ teaspoon soda

½ teaspoon salt

1 teaspoon cinnamon

½ teaspoon cloves

¼ teaspoon nutmeg

¾ cup shortening

2 cups sugar

3 eggs, beaten lightly

1 ½ cup applesauce

1 cup raisins

1 cup nuts - chopped (walnuts are good)

2 medium apples, peeled, cored, and diced into 1" pieces (optional)


Instructions:
Preheat oven to 350 degrees F.

Sift flour with soda, salt and spices. Set aside.

Cream shortening and add sugar gradually; cream until light. Add beaten eggs and beat to combine.

Add flour mixture alternately with the applesauce, beginning and ending with the flour mixture.

Fold in the raisins and nuts (and diced fresh apples if using). Turn batter into a greased and floured Bundt pan.

Bake in Bundt pan in preheated 350 degree F oven for one hour or until done. Toothpick inserted will come out clean or with only a few crumbs stuck to it.

Cool on a rack 10 minutes, then turn out on a wire rack to cool.


Tuesday, August 16, 2022

Twist Again...with the BBBs


It's the 16th of the month, the traditional posting day for the Bread Baking Babes. This month our Kitchen of the Month is Aparna's My Diverse Kitchen. She has asked us to make twisted coconut buns. We've baked twisted breads before, but these are special. Sweetie was quite taken with them, scarfing down two, one right after the other, as soon as they were cool enough to eat.

The filling brings the coconut flavor forward. I added some freeze-dried raspberry powder that I bought in London in May...first time I've used it...but the coconut flavor outpaced the raspberry flavor quite a bit. It was still a delicious bun.

This dough is delicious and easy to work with. I do have to say that my life lately has not been simple, so the dough sat in the fridge a couple of days before I could bake with it and that may have added some nice flavor. It was easy to work with and I could make strudel with it...very easy to stretch very thin. As a matter of fact, I found it easier to stretch it than roll it with a pin. It is a bit sticky, but that helps keep it stretched out on the work surface. I did make a few changes, including using soy creamer instead of coconut or regular milk, dried potato flakes instead of dried milk, non-dairy margarine instead of butter since I can't do dairy. Not sure if that made it a better dough or not, but it really is a great dough.

I divided my  buns into 8 pieces because the buns made when dividing the dough into six seemed to me to be too large. These were a nice size; about the same as you would find in most bakeries for sweet yeast buns. The weight of each piece of dough was right around 89 grams.

I found that a pizza cutter did a great job of cutting the long, thin cuts needed to make this shaping work. The knots are pretty with the filling showing here and there, the "inside-out" part. I used a soy milk wash but added some sparkling (sanding) sugar to make them even prettier.

Do try these lovely sweet buns, then send an email with a photo and a short description of your bake to Aparna so that she can send you a Buddy badge. It's always a delight to have Bread Baking Babes Buddies! She will do a round-up at the end of the month. Check our her post for all the deets.


Also, be sure to check out the other Babes and see what marvelous things they have done with twisted coconut buns!


INSIDE OUT COCONUT BUNS

Ingredients :

For the Dough :

175 ml coconut milk (I used soy creamer) , 3/4 cup

30 gm sugar, 3 tablespoons

3 gm active dry or instant yeast, 1 teaspoon

360 gm bread flour, 3 cups measured with spoon and sweep method (see note 1)

dried potato flakes, 2 tablespoon

2 gm salt, 1/2 teaspoon

50 gm unsalted butter, melted (I used non-dairy margarine)

1 large egg

For the Coconut Filling :

50 gm unsweetened shredded/ desiccated coconut, 1/2 cup

45 gm sugar, 3 tablespoons plus 1 teaspoon

1 teaspoon powdered freeze-dried raspberries

45 gm unsalted butter, soft at room temperature 3 tablespoons, melted (I used non-dairy margarine)

1 egg yolk, from a large egg

1 tsp vanilla extract

For Brushing :

Egg Wash or milk (I used soy creamer)

Method:

To Make the Dough :

Combine the milk, a little sugar and yeast in a small bowl. Set aside for 5 to 10 minutes till foamy.

Put this and all other ingredients for the dough in a large bowl or bowl of your dough kneading machine. Knead until you have a soft, smooth and elastic dough. Adjust liquid and flour, in small increments, as required to each this consistency. Scrape the dough out of the bowl onto a surface and knead a few times. Ideally, your dough should pass the “window pane” test.

Shape the dough into a ball and place in a well-oiled bowl.  Cover the bowl with a damp towel (or a silicone lid) and let it rise for about 1 hour, until the dough doubles in size.

To Make the Filling :

Using a spoon, mix together in a bowl all the ingredients for the filling, till combined.

Cover and refrigerate the filling for about 20 to 30 minutes to chill. The filling should still be of a spreading consistency when you take it out. Do not let it harden.

To Shape the Buns :

Gently knead the risen dough to degas it. Divide the dough into 6 equal pieces. Work with one portion at a time keeping the others covered. Shape the dough into an oval. Cover 5 pieces of dough with a towel while you shape the first bun.

Take the chilled filling out of the refrigerator and divide it into 6 pieces as well. Each portion should be equal to about 1 ½ tablespoons of filling worth. The directions below are to shape twisted round buns.


Roll out one piece of dough until you get a rectangle of about 10 x 4 inches long. You don’t need to flour your work surface. Take one portion of the filling and spread it over half of the rectangle, along its length. Fold the other side over the filling and press lightly to seal the edges. You should now have a long and thin rectangle.


Using a sharp knife, make 2 or 3 cuts along the length inside the rectangle, leaving about 1/4 to 1/2 inch at the short edges intact. Holding the short edges with your hands, pull very gently to stretch the dough, then twist the dough a few times. Fold into a knot. Tuck both ends under. The filling should show up in layers on the shaped dough. 


Place the shaped buns on a lightly greased or parchment lined tray. Transfer the knotted dough onto the lined baking sheet. Cover them loosely and allow them to rise till almost in size.


Cover the knotted buns with plastic wrap and let the buns rise for an hour, until they double in size. When ready. Brush the tops with egg wash or milk.

Bake them in a pre-heated oven at 180C (350F) for about 25 minutes till they’re done and a beautiful golden brown in color. Let them cool on the baking sheet for 5 minutes before transferring them to a cooling rack. These buns are best consumed while they’re still a little warm.

They will keep for 2 or 3 days, but it is best to refrigerate them if you live in warmer climates. Warm them up before eating.