Wednesday, July 30, 2014
Still Eating
From the looks of this blog...no posts for a while...you'd think we'd stopped eating of something. The truth is that I've almost stopped cooking. Having everything pulled out of your kitchen will lead to that. It's been almost two weeks and last night was the first time I really used the alternate kitchen that Sweetie created in my art studio.
We had both used the sink a few times for washing up, but lately we have been eating prepared foods. I cooked some things and put them in the freezer before the demolition, but we have also enjoyed Pasta King lasagna, bagged salads with tomatoes from the farm stand and similar foods. Steamed freshly picked green beans are possible using the microwave in the living room.
Yesterday I decided that the time had come to do some real cooking, but I still wanted to keep it simple. I used the toaster oven mid-day to bake some boneless, skinless chicken thighs. After cooling slightly, they went into the studio fridge. Closer to dinner time. I used the studio microwave to boil broth in a large glass measuring cup. I added a flavor packet from a package of couscous. That mixture was poured over a bowl of couscous from the package, covered and it sat for 5 minutes to allow the couscous to absorb the broth.
While the couscous was cooking, I cut up the chicken and basil, juiced the lemon and rounded up the pepper grinder. I had forgotten to get the feta from the fridge in the living room, so I added it once I went back in the house. All of the ingredients except the lemon zest (which I skipped...who knew where the zester had gotten to?) and feta were stirred into the fluffed couscous.
All that was left was to add the feta, heat some bread and serve it up.
Sweetie has always loved this recipe and was thrilled to have a home cooked meal that was this delicious. Tomorrow we may be back to bagged salad to use up the rest of the chicken, but I'll bet I'll be cooking in the alternate kitchen the next day. I'll try to post what I cook, but the next few days are full of flooring work and wall painting, so who knows if I'll have the energy. I do love to paint walls, but it does tire me out.
Hope you make this dish. It is a lovely meal for a summer day with bright, fresh flavors and it's easy, too.
Mediterranean Chicken Couscous
Serves 8 (more if part of a buffet or potluck)
1 1/4 cups low-sodium fat-free chicken broth
1 (5.6 oz.) package toasted pine nut couscous mix
3 cups chopped cooked chicken
1/4 cup chopped fresh basil
1 (4 oz.) package crumbled feta cheese (I used about half that amount)
1 pint cherry or grape tomatoes, halved
1 1/2 tablespoon fresh lemon juice
1 teaspoon grated lemon rind (optional)
1/4 teaspoon freshly ground pepper
Garnish: fresh basil leaves
(Note: Substitute 3-4 teaspoons (I used 3) dried basil if you can't get fresh. 3 cups of leftover cooked chicken or turkey in large dice works fine, too.)
Microwave chicken broth and seasoning packet from couscous package at HIGH for 3-5 minutes or until broth begins to boil. Place couscous in a large bowl, and stir in broth mixture. Cover and let stand 5 minutes. Fluff couscous with a fork, stir in chicken and next 6 ingredients. Serve warm or cold. Garnish with fresh basil leaves or a sprinkle of toasted pine nuts, if desired.
Wednesday, July 16, 2014
Rosemary - That's For Remembrance
Flowers and herbs used to have secret, hidden meanings, sort of like a secret handshake or something. Rosemary is for remembrance, but I almost forgot to post today...things have been hopping around our house as the first part of the kitchen remodel is underway and almost complete...and we are starting work on the second part. Fortunately, I baked this bread the first time in June and the second time a few weeks ago when all my baking supplies were still in their usual place.
The first time around I was in a hurry and didn't allow enough time for rising, nor for baking. The result had great flavor, but was dense and under-cooked.That'll teach me to try to rush bread making. Tsk, tsk.
The second time I made some changes, partly because I seem to be compelled to change recipes and partly because I wanted a bread that was less dense.
Final Dough:
Preparing the Biga:
Combine the bread flour, water and yeast in a large mixing bowl. Stir with a wooden spoon until well blended. Scrape down the edge of the bowl, cover with plastic wrap, and let it rest at 75 degrees F. for 14 to 16 hours.
Making the Final Dough:
In the bowl of a stand mixer, combine the water, milk, and biga. Using the dough hook, mix on low speed until blended.
Add the salt and yeast to the bread flour in a bowl and whisk to combine. Add bread flour mixture a cup at a time and mix on low speed until incorporated, then add more. When about half the flour is added, add the olive oil, mix with the dough hook to combine, then continue to add the flour mixture. You may need to add by tablespoonfuls at the end. Mix with dough hook on low for 5 minutes. Increase the speed to medium and mix for about 7 more minutes, or until the dough is smooth.
Lightly oil a large bowl. Scrape the dough into the bowl and cover with plastic wrap. Let the dough ferment for 45 minutes.
Remove the dough to a lightly-floured work surface and knead in the fresh rosemary. Divide the dough into four 450-gram /16-ounce pieces (or divide into three pieces to shape as desired, as I did). Shape the dough pieces into rounds. Cover with plastic wrap and let them bench rest for 15 minutes.
Place two couches on a separate work surface or bread board and dust them with flour.
Uncover the dough and, if necessary, lightly flour the work surface. Gently press on the dough to degas and carefully shape each piece into a tight and neat rounds (or into rolls or loaves, as I did. I also shaped my round loaf in a heavily floured brotform). Place one loaf on one side of the couche, fold the couche up to make a double layer of cloth to serve as a divider between the loaves, and place a second loaf next to the fold. Repeat the process with the remaining two loaves and the second couche. Cover with plastic wrap and proof for 1 hour.
About an hour before you plan to bake the loaves, place a baking stone (or tiles) into the oven along with a steam pan (underneath) or iron skillet (on the top rack) and preheat the oven to 450 degrees F.
Uncover the dough and score the top of each loaf in a star pattern using a lame or sharp knife. This particular formula doesn't say to do this, but you can sprinkle sea salt into the crevices as the original baker did to make it "sparkle with diamonds."
(I did this with my first try, but didn't with my second. Didn't think it contributed much to the bread.)
Carefully transfer the loaves to the preheated baking stone using a peel or the back of a baking sheet. To make the steam, add 1 cup of ice to the iron skillet or steam pan.
Bake for 40 minutes, or until the crust is light brown and crisp and the loaves make a hollow sound when tapped on the bottom.
Remove the loaves from the oven and transfer to a wire rack to cool.
The Bread Baking Babes Kitchen of the Month, Cathy of Bread Experience, chose Panmarino, an Italian bread created in Ferrara near Venice for our baking and eating pleasure. Perhaps the ultimate gift of this bread is that the scent of rosemary permeates the kitchen while it bakes and also rises up when you take a bite.
Of course that requires fresh rosemary, not dried, with all its delicious and scented essential oils. I'm fortunate that the people who owned our property before we did planted a small rosemary shrub in the perfect spot. I know it's the perfect spot because it has grown and grown over the years and now covers an area about the size of a VW bus. Plenty of fresh rosemary to go into my favorite lamb marinade, plenty of long skinny branches of rosemary to use as skewers for food for the BBQ, plenty more for baking with olive oil coated potatoes, and lots to go into bread, too. If you don't own a rosemary plant, you might consider planting one. If you put it in a good sized pot, but one not too heavy to move, you can find a sunny spot for it and be able to move it indoors if it gets too cold outside. Keep the soil on the dry side and don't give it too much fertilizer and you, too, can have lots of fresh rosemary.
The first time around I was in a hurry and didn't allow enough time for rising, nor for baking. The result had great flavor, but was dense and under-cooked.That'll teach me to try to rush bread making. Tsk, tsk.
The second time I made some changes, partly because I seem to be compelled to change recipes and partly because I wanted a bread that was less dense.
The second time I increased the water and the milk a little,
added more yeast, reduced the salt in the dough a bit and kneaded the rosemary
into the dough after its first rise. That way I could have nine dinner rolls
with rosemary, a round loaf with rosemary, and a sandwich loaf without
rosemary. I skipped the slashing and salt crystals this time, so it wasn't
authentic, but it was lighter in crumb (Sweetie said the crumb was perfect!)
but still sturdy, had a nice crust (yes, I did put ice cubes in a preheated pan
for extra steam), and delicious. It makes great toast!
You are going to want to try this bread, then take a photo,
write up your experience and e-mail them to
Cathy so that you can be a Buddy. Deadline is July 29. Do visit all the
other Babes to see what their bread looks like, too. I think you will find
variations on a theme. We are baking fools and love to have you visit and see
what fun we have been having.
I also want to make a moment of remembrance of my son Maxwell. He was only a few weeks short of being 17 when we lost him 15 years ago tomorrow in an auto accident. I remember his smile, his generous and loving ways, and his curiosity and empathy. He was blessed with so many talents and many friends. Perhaps the rosemary plant has grown so large because we have so much good to remember. I miss him very much.
Panmarino
Makes: 4 Loaves Original Panmarino created in Ferrara near
Venice
Biga (which I made exactly as described):
Bread flour 143 grams/
5 ounces
Water 122 grams/ 4
1/4 ounces
Pinch of instant yeast
Final Dough:
Bread flour 884 grams/
1 pound 15 ounces
Water 487 grams/ 2
cups
Milk 2 ounces/ 1/4 cup
Biga 265 grams/ 9
1/3 ounces
Salt 1/2 ounce/ 2 teaspoons
1 teaspoon instant yeast
Olive oil 88 grams/
3 ounces
Chopped fresh rosemary 9 grams/ 1/3 ounce
Preparing the Biga:
Combine the bread flour, water and yeast in a large mixing bowl. Stir with a wooden spoon until well blended. Scrape down the edge of the bowl, cover with plastic wrap, and let it rest at 75 degrees F. for 14 to 16 hours.
Making the Final Dough:
In the bowl of a stand mixer, combine the water, milk, and biga. Using the dough hook, mix on low speed until blended.
Add the salt and yeast to the bread flour in a bowl and whisk to combine. Add bread flour mixture a cup at a time and mix on low speed until incorporated, then add more. When about half the flour is added, add the olive oil, mix with the dough hook to combine, then continue to add the flour mixture. You may need to add by tablespoonfuls at the end. Mix with dough hook on low for 5 minutes. Increase the speed to medium and mix for about 7 more minutes, or until the dough is smooth.
Lightly oil a large bowl. Scrape the dough into the bowl and cover with plastic wrap. Let the dough ferment for 45 minutes.
Remove the dough to a lightly-floured work surface and knead in the fresh rosemary. Divide the dough into four 450-gram /16-ounce pieces (or divide into three pieces to shape as desired, as I did). Shape the dough pieces into rounds. Cover with plastic wrap and let them bench rest for 15 minutes.
Place two couches on a separate work surface or bread board and dust them with flour.
Uncover the dough and, if necessary, lightly flour the work surface. Gently press on the dough to degas and carefully shape each piece into a tight and neat rounds (or into rolls or loaves, as I did. I also shaped my round loaf in a heavily floured brotform). Place one loaf on one side of the couche, fold the couche up to make a double layer of cloth to serve as a divider between the loaves, and place a second loaf next to the fold. Repeat the process with the remaining two loaves and the second couche. Cover with plastic wrap and proof for 1 hour.
About an hour before you plan to bake the loaves, place a baking stone (or tiles) into the oven along with a steam pan (underneath) or iron skillet (on the top rack) and preheat the oven to 450 degrees F.
Uncover the dough and score the top of each loaf in a star pattern using a lame or sharp knife. This particular formula doesn't say to do this, but you can sprinkle sea salt into the crevices as the original baker did to make it "sparkle with diamonds."
(I did this with my first try, but didn't with my second. Didn't think it contributed much to the bread.)
Carefully transfer the loaves to the preheated baking stone using a peel or the back of a baking sheet. To make the steam, add 1 cup of ice to the iron skillet or steam pan.
Bake for 40 minutes, or until the crust is light brown and crisp and the loaves make a hollow sound when tapped on the bottom.
Remove the loaves from the oven and transfer to a wire rack to cool.
Tuesday, July 15, 2014
California Blondes
I was working at a drugstore in the cosmetics department when a hair coloring company found the model Cheryl Tiegs and had her be the image of the California Blonde for their ad campaign. She was immediately the 'it' girl for young women. The company sold a lot of blonde hair color kits. The song "California Girls" was in that same era, and the Summer of Love wasn't far behind. Everyone wanted that sunny California look, or to live in California. Of course the older generation saw all of the sex, drugs and rock 'n roll as a sign that California was the hotbed of degeneracy and a land of fruits (gays) and nuts. Having lived in California most of my adult life, they may have a point, but there are just as many ordinary folks here as anywhere else...the wild ones and ones that seem different just get more media attention. Being someone who often felt different while I was growing up, I like the feeling of' being accepted for who I am' that is a California hallmark, at least in much of the state.
Today's cookie celebrates the fruits and nuts, as well as the sunny because it's a blondie, the sister of a brownie because it's like a brownie without chocolate. I added fruits and nuts and used plenty of vanilla. It makes a moist, rich, delicious bar cookie, a bit on the sweet side like a young California girl. Hope you enjoy your California Blondes.
California Blondes
A variation of a recipe by
Jill O’Connor in Sticky, Chewy, Messy,
Gooey, Desserts for the Serious Sweet Tooth.
1 cup (2 sticks) butter
2 cups firmly packed dark
brown sugar
1 cup granulated sugar
4 large eggs
1 tablespoon pure vanilla
extract
1 teaspoon salt
2 cups unbleached all-purpose
flour
¾ teaspoon baking powder
MIX-IN INGREDIENTS:
2 cups mixed nuts – I used half and half of pecans and walnut pieces
MIX-IN INGREDIENTS:
2 cups mixed nuts – I used half and half of pecans and walnut pieces
1 cup mixed dried fruits - I
used regular and golden raisins and dried cranberries
1 cup white chocolate chips
1 cup semisweet chocolate
chips
Position oven rack in the
middle of the oven and preheat to 350 degrees F. Use cooking spray to lightly
coat a 9 x 13 inch baking pan.
Melt the butter and sugars
together in a large heavy-bottomed saucepan over medium heat. Cook, stirring
constantly, until the butter and sugars are blended and completely melted and
starting to bubble gently. Remove the pan from heat and let the mixture cool
slightly.
In a bowl, whisk together the
eggs, vanilla and salt. Slowly whisk the cooled butter and sugar mixture into
the eggs just until combined. Whisk in the flour and baking powder to form a
loose batter. (Make sure the batter is cool before stirring in the remaining
ingredients, otherwise the chocolate will start to melt before the bars are
baked.)
Stir the chopped nuts, dried fruits, and white and dark chocolate
chips into the cooled batter. (I mixed all of the "mix-in"
ingredients together in a very large measuring cup before adding to the batter.
That way I knew that there wouldn’t be a clump of nuts here and a clump of
white chocolate there, but rather a nice mix of all the goodies.) Pour the
batter into the prepared pan and smooth the top with a spatula.
Bake until the top is shiny
and slightly crackled and feels firm to the touch, 30 – 35 minutes. A wooden
skewer inserting into the batter should come out with moist crumbs clinging to
it. Let cool on a wire rack to room temperature, then cut into bars and serve.
Makes 16 large or 32 small
bars.
Labels:
Bar Cookies
,
chocolate chips
,
cookies
,
dried cranberries
,
pecans
,
raisins
,
walnuts
,
white chocolate
Thursday, July 10, 2014
Mural
The kitchen remodel is coming along. The old front hall will become my baking center in less than a week! Because I have decided to get rid of grout as much as possible in this house, I was looking for another treatment than tile for the back splash between the counter material and the upper cabinet. A few months ago I began thinking about a mural. This past week I actually painted a mural, sort of a bird's eye view of the bay area water and hills, with some vineyards and golden summer fields, too.
I've never painted a mural, so I was really anxious about starting. I decided to do it in pieces, starting with a sketch, using a white paint pen over the pumpkin butter wall color. After that I used some wall paint samples that didn't work out, one in a very pale gold and one in a khaki color, to paint in the general design...sort of creating a canvas. The photo at the start of the post shows how that worked out.
The following day I used more paint samples and some acrylic paints that were a gift from Straight Shooter. This allowed me to put some color on those hills and in the sky and on the water, making them very much three dimensional.
Now I was feeling more confident, so the next day I added the golden fields, trees and shrubs near and far, other detail, depth, and even some washes of color.
The best part was later in the day when I was able to add the details to the fields and more shades of green to the trees, plus closer trees on the left (below). That really made it work for me. Sweetie suggested that I add a horizon line and he was right. The deeper gold out past the hills, on the left, works very well. The whole painting is about 48 inches wide by 20 inches tall. There is a window just to the left, so it gets light from that side. That's why I had the light in the painting coming mostly from the left. The very upper and very lower sections will be covered by cabinets and counter top material, so not much work needed to happen there.
Today I deepened some color, added a wash of blue at the top of the hills and over the right side to suggest distance, then used tiny dots of yellow and white paint to suggest flowers in the nearest field. No photo of that yet, but when the cabinets are installed, I'll take a photo that shows how it all turned out and share it with you.
It has been a lot of fun learning how to get the effects I want and letting the paint take over some of the time, too, and just enjoying the unexpected results. My experience doing watercolor really helped, and my love of color and skill with color mixing helped, too. I'm often glad that I have creative talents, but today I really felt like an artist when I saw the finished mural. The cabinets arrive next week and then I'll be able to see how it all fits together. Best of all, I can enjoy looking at it while I bake once everything is finished!
Labels:
art
,
artist
,
bay area scene
,
mural
,
no tile
,
painting with wall paints
Tuesday, July 08, 2014
Summer Simple Pie
There are all kinds of pies but, by their nature, pies are approachable. A butter cream embellished multi-layered cake is fancy and fine, but pies are usually much more simple. A pie like the one I made a few days ago is simplicity itself...one crust, a mixture of fruit dusted with some flour to help thicken the juices, a brush of milk over the finished crust for color and a sprinkle of sparkling sugar for crunch. Even simpler would be to make it with one kind of fruit. If that fruit were, for instance, blueberries, then there is no peeling or cutting; no prep to speak of except of washing the berries and drying them off a bit.
I had fresh, ripe peaches on hand which only required peeling and cutting into curved slices. The pits and skins went into the wet garbage, but could also go into the compost pile. Strawberries needed to be hulled and some were large enough that I cut them in half. Blackberries from the bushes down the driveway were rinsed along with the blueberries and allowed to drain and air dry a bit while I prepared the crust.
Although I can make a delightful pie crust from scratch, if I'm going for simple I use a ready made crust. I use the rolling pin to flatten and enlarge it about another two inches all around. Then it goes onto a piece of parchment paper. This time I should have put that paper on a rimmed baking sheet because all of the fruit was very juicy. Even with the flour added I had too much juice seeping from the pie. That juice ended up spilling off of the parchment paper as I removed the pie from the oven. Hot fruit juice went all over the oven! It cleaned up nicely once the oven cooled, but I felt foolish for not containing the pie to avoid the spill.
The finished pie is rustic to look at but very, very tasty. Such a summery mix! Peaches, blueberries, blackberries and strawberries, barely held together with crisp pastry. Each slice had some of the fruit juices from the parchment paper, too. We could have embellished it with whipped cream or ice cream, but it truly didn't need that. It was a simple summer pie and a true seasonal delight.
Simple Summer Pie
1/2 pint fresh strawberries, rinsed,drained, hulled and sliced in half if large
3-4 ripe peaches, peeled, pit removed, and sliced...about 8 slices per peach
1/2 pint ripe blackberries, rinsed and drained
1/4 pint ripe blueberries, rinsed and drained
3-4 tablespoons flour
1/4 teaspoon ground nutmeg
1 prepared pie crust round (I use Pillsbury ReadyCrust)
1-2 tablespoons milk
1-2 tablespoons sparkling sugar (optional)
Preheat oven to 425 degrees F.
In a large bowl gently combine the strawberries, peach slices, blackberries and blueberries. Sprinkle with the flour and nutmeg and gently toss the fruit until it absorbs the flour. Set aside.
On a lightly floured surface, roll out the pie crust round to about 11 or 12 inches in diameter. Place on a sheet of parchment paper. Place parchment paper on a rimmed baking sheet. Pour the prepared fruit mixture in the middle of the crust and mound it, leaving the outer 2-3 inches without fruit. Fold the outer 2-3 inches of crust up over the mounded fruit, pleating as necessary to bring it over the fruit. If needed, use a finger dipped in clear water to lightly wet the pastry at the folds, so that the pastry sticks together.
Use a pastry brush to brush the milk over the crust and sprinkle, if desired, with sparkling sugar. Bake in the preheated oven for 10 minutes, then turn heat down to 375 degrees F. and continue to bake until juices bubble and pastry is golden brown.
Remove from oven and let cool for 10 minutes on a cooling rack before serving. Serves 4-6.
Saturday, July 05, 2014
Cool Dinner Salad
Well, here we are in the middle of the year, the beginning of July. Hot evenings are part of that mid year time, at least above the equator. Some evenings the fog rolls in, like last night, and we can enjoy eating indoors and scarfing down a warm lamb braise over rice. (Yes, I know it was national hot dog and hamburger day, the 4th of July, but we had lamb. I'm still a patriot, but it was pretty chilly out around here.)
It was much warmer earlier in the week when we enjoyed this delicious chicken salad with pecans and grapes. I had some a couple of days later for lunch, surrounded by wedges of local tomatoes. Great combo! I had been inspired by a chicken and grape salad I saw at a local deli, but I basically threw together what I thought should go into this kind of salad, without a recipe. Hope you like it.
Chicken Salad with Grapes and Pecans
3-4 cups diced cooked chicken (I poached chicken breasts in chicken broth, with some celery tops and peppercorns added, then cooled them, drained them and diced them up into bite sized pieces)
1 cup red or green seedless grapes, halved
1/2 cup pecans, roughly chopped
3 stalks celery, diced
1/2 cup mayonnaise
1/4 cup plain yogurt
2 teaspoons Dijon mustard
1/4 teaspoon dried thyme
juice of 1/2 a lemon
milk as needed
1 teaspoon Italian parsley, finely chopped
In a large bowl gently mix together the chicken, grapes, pecans and celery.
In a small bowl mix together the mayonnaise, yogurt, mustard, thyme, and lemon juice. Add enough milk to make the dressing as thick as Ranch dressing (a little thicker than heavy cream). Pour over the chicken mixture and gently stir to combine thoroughly. Chill for at least 1 hour.
When read to serve, garnish with the parsley. Serve as is, over a bed of lettuce, in cups made from hollowed out tomatoes, garnished with more grapes or with wedges of tomato.
Serves 4 - 6
Wednesday, July 02, 2014
Bee Cake
Although I love to bake, there are times, like last evening's family gathering, when there is too much else going on and a purchased cake is the ultimate indulgence. Although there are a few really great cake places nearby, my favorite bakery for cakes is still Freeport Bakery in Sacramento. I've been enjoying their cakes for a long time and because I only get to have some, on average, about two or three years apart, I really make sure to savor every bite.
For the gathering our Sacramento area contingent brought two of their baked goodies, a delicious Key lime pie and a Bee Cake. Although I enjoyed the pie, I really loved the bee cake, with it's honey butter cream and delicate vanilla cake. If you ever get a chance to visit the Freeport Bakery, I can tell you that every variety of cake I've ever had there has been outstanding, so enjoy and indulge.
Labels:
cake
,
Eurpoean style cake
,
Freeport Bakery
,
gathering
Thursday, June 19, 2014
A New Light
Tonight we had fresh wild salmon steaks, grilled to perfection by Sweetie, grilled baby squash, and a tomato salad with fresh mozzarella slices, heirloom tomato slices, basil, olive oil and balsamic vinegar. So good and pretty healthy, too. No photos, but it was a great combination, so I want to remember that.
Yesterday we not only put up a new parking shelter for Grandma Loyce, but we installed a new light fixture in the kitchen. I had been trying to think of something that would work that was close to the ceiling (our kitchen ceiling is just 8 feet, so no chandeliers when we will be walking) and would shed a lot of light in the area. The long tube fluorescent fixture is going to be taken out but we still need general lighting like that. Sweetie doesn't like can fixtures and I don't like fluorescent. What we came up with has two high watt bulbs, but we can have them be LED for energy efficiency, and it is a drum shape. Best of all it has stained glass! I love how colorful it is. The photo doesn't really do it justice. Some of the areas that look white in the photo are actually cream colored. I hope to pick up some of the colors in the back splash and on some valences at the windows.There will be two of the light fixtures in the main kitchen and one in the baking center area. The fixture really lights up the area and is so cheerful, too. It has a modern vibe, too, but will still go well with the Shaker style cabinets.
Next up: finding the perfect drawer pulls and cabinet knobs and faucets for the two sinks.
Labels:
kitchen project
,
new light fixture
,
salmon dinner combo
Monday, June 16, 2014
Poizin Bread With The Babes
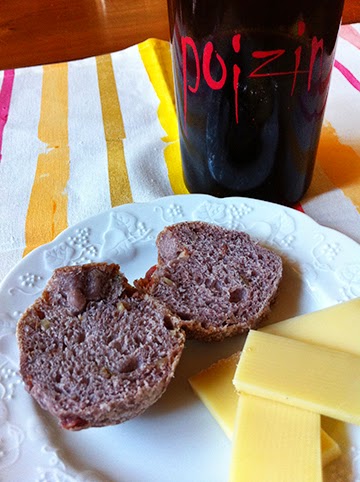
This is one of the most flavorful breads ever! Thanks to our Kitchen of the Month, Tanna or My Kitchen in Half Cups, the Babes are baking red wine bread this month and shaping it like a bunch of grapes. Although the recipe calls for Beaujolais wine, I had an open bottle of Armida winery's lovely Poizin zinfandel wine, so I used that.
Armida happens to be our go-to picnic winery because it has great zinfandel, large and comfortable tables and chairs under red umbrellas on a deck overlooking a pond and the Dry Creek Valley. If no one is using it or kids aren't throwing the balls into the pond, the boccie ball court is a fun place to while away some time and see who has the best pitch.
This is an interesting wine to make because the liquid is totally the wine. I didn't follow the directions as far as putting the dough together, although I was careful to have the wine at just the right temperature and to keep the dough soft with not too much flour. The change was that I mixed it up with my stand mixer and used that for kneading too. The dough was soft and a little tacky when I put it in for the first rise. It didn't rise very much, but the dough felt great. I kept out the additions to the dough until the second rise. Because Tanna recommended trying it, I went for cooked, drained and crumbled bacon (a half cup), finely chopped walnuts (a half cup) and about two tablespoons chopped fresh rosemary. It is a great combination! Very savory, very bacon-y, and just a hint of the rosemary. You can also really taste the wine in this bread, so use one you like drinking. The wine and the walnuts combine to make the bread a purplish color. The texture is fairly dense and a bit chewy. Sweetie had some for lunch with some cheese and I had a hard time keeping him from eating the rest, which we plan to share with our neighbors later today. Even though the individual little grapes are small, it's still a lot of bread.
There isn't a thing I would do differently. One of the changes that I really think you might consider is cutting the dough into smaller chunks. I kept a large piece for the stem and leaf, but cut the dough so that there were 20 'grapes' instead of 15. Some are a bit smaller than others, but that helps make it look like a bunch of grapes. This makes them about a two bite size which is perfect for having with a glass of your favorite wine.
Do try this one, either using the original recipe, found HERE on Tanna's site, or get creative as I did. This bread has enough flavor from the wine to stand up to any number of variations. Perhaps feta and pine nuts? Chopped spinach and Parmesan? Lots of different seeds? If you want to be a Buddy, bake it and post about it by June 29th and let Tanna know what you have done, plus send her a photo. Check out her blog post to see what wonderful bread she made and to get more information on being a Buddy.
Also be sure to visit the blogs of my fellow Bread Baking Babes.
Beaujolais Bread
From: A Passion for Bread, written by Lionel Vatinet
Ingredients:
454 grams white bread flour, unbleached, unbromated, 16 oz; 3.5 cups
7 grams fine sea salt, .24 oz; 1 1/8 teaspoons
5 grams instant dry yeast, .18 oz; 1.5 teaspoons
21 grams honey, .75 oz; 1 tablespoon
320 grams Beaujolais wine, 11.2 oz; 1 1/4 + 2 tablespoons
1/2 cup each cooked and crumbled bacon, finely chopped walnuts
2 tablespoons fresh rosemary, chopped
454 grams white bread flour, unbleached, unbromated, 16 oz; 3.5 cups
7 grams fine sea salt, .24 oz; 1 1/8 teaspoons
5 grams instant dry yeast, .18 oz; 1.5 teaspoons
21 grams honey, .75 oz; 1 tablespoon
320 grams Beaujolais wine, 11.2 oz; 1 1/4 + 2 tablespoons
1/2 cup each cooked and crumbled bacon, finely chopped walnuts
2 tablespoons fresh rosemary, chopped
1. Scale all dry ingredients in a large bowl.
2. In the bowl of a stand mixer, add the honey to wine and check the temperature.The wine should be between 82° F and 84°.
3. With dough hook attached, add the dry ingredients slowly to the wine mixture, letting dough form and climb the dough hook. Knead with the stand mixer at least 8 minutes (more is good) until the dough is smooth and satiny, although still very soft and a bit tacky.
4. Turn the dough out onto the counter.
The dough will be soft and sticky; do not give into the temptation to add more flour.
Kneading dough for a minute to make sure all is combined. The dough should be soft, pliable and hold it’s shape; it should not be stiff and dry.
4. Turn the dough out onto the counter.
The dough will be soft and sticky; do not give into the temptation to add more flour.
Kneading dough for a minute to make sure all is combined. The dough should be soft, pliable and hold it’s shape; it should not be stiff and dry.
Form dough into ball: using both hands, lift front and fold
over, quickly dropping it down to the counter.
Repeat 4-5 times until a ball is
formed. Use the scraper to ensure all the dough is gathered.
5. Turn the ball of dough into a rising container, coating with oil if that is your preferred method. Cover lightly and set in warm, draft free area to rise for about an hour. Dough will not rise very much and may spread out of the dough shape.
6. Turn dough out of the rising container onto a lightly floured surface. Using the palms of your hands, flatten the dough ball into a
rectangle. Scatter half the bacon, walnuts and rosemary evenly over the dough. Wrap the sides up and
over filling, pinch dough together, turn and repeat until the filling is
incorporated.
Form into a ball. Using the palms of your hands, flatten the dough ball into a rectangle. Scatter the other half of the bacon, walnuts and rosemary evenly over the dough. Wrap the sides up and over filling, pinch dough together, turn and repeat until the filling is incorporated. Knead dough to fully incorporate both sets of filling.
Shape dough into a ball and return it to the rising container. Cover lightly and let ferment 2 hours.
Total Time: three hours.
7. Dividing
Flour the counter. Scrape the dough onto the counter and allow to rest 30 seconds.
If the dough is very sticky at this point dust your hands with flour but do not add additional flour. Use the bench scraper to lift the dough if it sticks to the counter but do not pull and do not stretch the dough. Press the dough into a rectangle 12 inches by 4 to 5 inches wide. Be sure the dough is not sticking to the counter by lifting it to gently up. Cut the dough into 22 equal pieces with the bench scraper. Set two pieces aside for the stem and leaf.
Flour the counter. Scrape the dough onto the counter and allow to rest 30 seconds.
If the dough is very sticky at this point dust your hands with flour but do not add additional flour. Use the bench scraper to lift the dough if it sticks to the counter but do not pull and do not stretch the dough. Press the dough into a rectangle 12 inches by 4 to 5 inches wide. Be sure the dough is not sticking to the counter by lifting it to gently up. Cut the dough into 22 equal pieces with the bench scraper. Set two pieces aside for the stem and leaf.
8. Shaping
Use parchment paper or a silicone liner in a baking sheet.
Roll 20 pieces into a small ball shape for rolls, the last piece will become the grapevine. Create a triangle by setting four balls together in a line followed by a line of three balls then two balls and finally one ball. Stack and angle the remaining balls over and to one side of the triangle so that the entire piece resembles a large cluster of grapes.
With the last piece of dough roll it into a rope about 10 inches long and shape it into a curved grape vine shape and leaf (if desired) that you attach to the top of the grape cluster. Dust with flour.
Use parchment paper or a silicone liner in a baking sheet.
Roll 20 pieces into a small ball shape for rolls, the last piece will become the grapevine. Create a triangle by setting four balls together in a line followed by a line of three balls then two balls and finally one ball. Stack and angle the remaining balls over and to one side of the triangle so that the entire piece resembles a large cluster of grapes.
With the last piece of dough roll it into a rope about 10 inches long and shape it into a curved grape vine shape and leaf (if desired) that you attach to the top of the grape cluster. Dust with flour.
9. Final fermentation
Final fermentation may take from 60 to 90 minutes. If it
over proofs but dough will be unusable. Place the baking sheet in a warm
75 to 80°F draft free place. Final fermentation will take from 60 to 90
minutes.
Preheat the oven to 450° with a baking stone about 30
minutes before you are ready to bake. An effective and cheap way to achieve a
crisp crust is to cover the bread with a stainless steel bowl when it is first
placed in the oven on the lowest oven rack. (I just baked the bread with no covering and it worked out fine.)
Determine the dough is ready to be baked by uncovering and
making a small indentation in the center of the role with your fingertip. The
dough is ready to be baked if the indentation slowly and evenly disappears.
9. Baking
Slide the baking sheet into the oven onto the pre-heated
baking stone. Bake until the bread is golden brown has a thick crust,about 20-25 minutes.
When fully baked transfer to cooling rack for at least one
hour to cool.
Labels:
Armida winery
,
Bacon
,
grape cluster bread
,
Poizin zinfandel wine
,
rosemary
,
walnuts
,
wine bread
Sunday, June 15, 2014
They Both Prefer Pie or Tarts
It's Father's Day so my thoughts turn to fatherhood and my Dad as well as Sweetie. According to my Mom, Sweetie is a wonderful father who deserves sushi for Fathers Day, so we had a sushi feast last night at our favorite sushi place. Our daughter was in town for the day so a Saturday celebration was just fine.
When I was growing up we celebrated Fathers Day on the correct Sunday as we did Mothers Day in May. By the time I had been away from home for a few years somehow those days morphed into Parent's Day and it was a movable feast. Perhaps the change happened because with so many grown children it made it more possible to gather a greater number of the family to celebrate and one day was far easier than two. Our Saturday celebration and week before celebration of Mothers Day this year just carried on a grand tradition.
Living so far to the west of my parents, I was usually only present for Parents Day by phone, so the one time we had Parents Day in Berkeley, exactly 30 years ago this month, was memorable. One of my west coast sisters was getting married, so many of the family came to California that June. Three of us were already living in Berkeley and the gathering was our home a few blocks from the downtown. We had a small but sunny backyard and a newly renovated kitchen with lots of counter space, so it made sense. I remember lots of laughter and good conversation and my Dad's hugs.
He gave good hugs. I'm pretty sure that Mom made a pie, probably a cherry pie. My Dad really loved fruit pies, something he and Sweetie share.
For Fathers Day this year I made Sweetie a tart, at his request. It has a lovely light, crisp, buttery crust using a new-to-me recipe by David Lebovitz. Unlike the usual method for making tart crust where you cut very cold butter into flour, then add icy water and, perhaps, egg yolk, this crust is created by putting butter, oil, water and sugar, plus a little salt, into the oven and cooking it until it browns just a bit. Once the mixture is removed from the oven, you stir in some flour and you have tart dough! Super easy and it makes a very delicate and delicious crust.
The crust was filled with my version of Quick Chiboust Pastry Cream (which is used for the decadent Gateau St. Honore), made all the more interesting by the omission of the gelatin. I had it soaked but forgot to add it when the pastry cream came off the stove. By the time I remembered as I was folding in the whipped egg whites, it was too late to add. I refrigerated the cream while we went to dinner and it was still soft but thick enough by the time we were home to put into the tart shell, topped by fresh blueberries and sliced local strawberries, tiny and sweet. I think my Dad would have loved the tart. I know we did. Here are the three parts of the tart:
Saint Honore Cream (Rapid Chiboust or Diplomat Cream)
1 envelope unflavored gelatin (7 gr.) (try to remember to add this instead of leaving it out like I did)
1/4 cup cold water (60 ml)
1/2 cup + 2 tablespoons sugar (130 gr.)
1/2 cup all-purpose flour (70 gr.)
1/4 teaspoons salt
5 egg yolks
2 cups whole milk (500 ml)
1 tablespoon rum or 1 teaspoon vanilla extract (also forgotten this time)
1/4 cup whipping cream (57 gr.)
3 egg whites
dash salt
1/2 cup sugar (105 gr.) I used about half of that amount
Soak the gelatin in the 1/4 cup cold water
Put the sugar, flour, and salt into a saucepan and stir together with a whisk. Add the yolks and enough milk to make a paste. Whisk in the remainder of the milk.
Place over low heat and, stirring constantly, cook until thick. Remove from heat and pour into a mixing bowl and !! stir in the vanilla and the gelatin mixture. Stir until the gelatin is completely dissolved.
Stir in whipping cream. Set the mixing bowl in cold water and stir until the cream is cool.
Place the egg whites in a clean bowl and, using clean beaters, whip them with the dash salt. As soon as the whites begin to stiffen, gradually add the 1/2 cup of sugar (or less) and beat until they are fairly stiff but still glossy. Fold the egg whites into the cooled cream. Use at once or place a piece of plastic wrap directly on top of the cream and refrigerate.
David Lebovitz's French Pastry Tart Shell
One 9-inch (23 cm) tart shell
Adapted from a recipe by Paule Caillat of Promenades Gourmandes
American all-purpose flour and butter work well in this recipe. Small crack in the dough are normal so it is not appropriate for a thin, custardy filling but works well filled with fresh berries resting on a base of pastry cream.
Be really careful with the hot bowl of butter. The butter spatters when you add the flour but the hot bowl can burn your hands if you grab it, so wear mitts and use a trivet or towel between the bowl and your counter if necessary to protect the counter.
3 ounces (90 g) unsalted butter, cut into pieces
1 tablespoon flavorless vegetable oil
3 tablespoons water
1 tablespoons sugar
1/8 teaspoon salt
1 slightly rounded cup all-purpose flour (5 ounces or 150 g)
Preheat the oven to 410 degrees F or 210 degrees C.
In a medium-sized ovenproof bowl, such as a Pyrex bowl, combine the butter, oil, water, sugar and salt.
Place the bowl in the oven for 15 minutes, until the butter is bubbling and starts to brown just around the edges.
When done, remove the bowl from the oven (and be careful, since the bowl will be hot and the mixture might sputter a bit), dump in the flour and stir it quickly, until it comes together and forms a ball which pulls away from the sides of the bowl.
Transfer the dough to a 9-inch (23 cm) tart mold with a removable bottom and spread it a bit with a spatula.
Once the dough is cool enough to handle, pat it into the shell with the heel of your hand, and use your fingers to press it up the sides of the tart mold, reserving a small piece of dough, about the size of a raspberry, for patching any cracks.
Prick the dough all over with the tines of a fork about ten times, then bake the tart shell in the oven for 15 minutes, or until the dough is golden brown.
Remove from the oven and if there are any sizable cracks, use the bits of reserved dough to fill in and patch them.
I put the shell back into the oven for 2 minutes, with the oven off, after the patching, to cook the patches just a bit.
Let the shell cool completely before filling.
Fruit Tart
Take cooled tart shell and mound in pastry cream. There will likely be far more cream than you need. Use in another tart or go wild and eat it out of the bowl with a spoon, because it is too good to waste.
Use the back of a spoon or an offset spatula to spread the cream evenly in the shell.
Top with fresh fruit arranged in a nice pattern.
If desired, glaze with melted apricot preserved or current jelly, then cool in the fridge for a short time to firm up the tart and set the glaze.
Friday, June 13, 2014
Life Rolls On
Hard to believe how long it's been since my last post. It's not that we haven't been eating, but, mostly, what we've eaten has been variations of our usual fare, with nothing to base a new post on, foodwise.
We have been moving along on the project, with paint on the walls and trim. Today Sweetie showed me how to use a battery operated airless sprayer to paint the pantry door. It is so light and much easier to use than the corded version. He has a real feel for spray painting and a supple wrist to make it happen. Because the weather today was perfect for painting we were able to paint both sides and get the door back where it belongs by dinner time. Dinner was lasagna from the freezer and carrot sticks...see, food has taken a backseat for a while.
Last weekend we visited our neighbor's pigs. They are so cute (and I never thought I'd say that about pigs!) and big show-offs. You could even say hams. Sorry, couldn't resist.
We try to take a walk with Pi at least every other day. One day this week the waterway we like to walk by was pretty as a picture.
We walked past blooming blackberry bushes, past blooming anise plants, past wild grapes that were in flower, too.
The heat the weekend before is encouraging rampant growth of the blackberries, so Sweetie brought clippers and snipped off the ones that were headed across the path. Pi walked along with his tail swinging; a very happy dog.
It was foggy most mornings during the week until today, but now we will have a row of days with high heat. That seems to be the way of it in summer. Maybe I'll beat the heat by trying bread baking on the BBQ like Elizabeth does. If I do, I'll let you know how it goes.For now, there are cabinet knobs and pulls to pick out, faucets to find and more painting to do. Life rolls on. Hope yours has been as enjoyable.
We have been moving along on the project, with paint on the walls and trim. Today Sweetie showed me how to use a battery operated airless sprayer to paint the pantry door. It is so light and much easier to use than the corded version. He has a real feel for spray painting and a supple wrist to make it happen. Because the weather today was perfect for painting we were able to paint both sides and get the door back where it belongs by dinner time. Dinner was lasagna from the freezer and carrot sticks...see, food has taken a backseat for a while.
Last weekend we visited our neighbor's pigs. They are so cute (and I never thought I'd say that about pigs!) and big show-offs. You could even say hams. Sorry, couldn't resist.
We try to take a walk with Pi at least every other day. One day this week the waterway we like to walk by was pretty as a picture.
We walked past blooming blackberry bushes, past blooming anise plants, past wild grapes that were in flower, too.
The heat the weekend before is encouraging rampant growth of the blackberries, so Sweetie brought clippers and snipped off the ones that were headed across the path. Pi walked along with his tail swinging; a very happy dog.
It was foggy most mornings during the week until today, but now we will have a row of days with high heat. That seems to be the way of it in summer. Maybe I'll beat the heat by trying bread baking on the BBQ like Elizabeth does. If I do, I'll let you know how it goes.For now, there are cabinet knobs and pulls to pick out, faucets to find and more painting to do. Life rolls on. Hope yours has been as enjoyable.
Labels:
bakeless
,
carrot sticks
,
dog walks
,
pigs
,
projects
,
summer heat
Sunday, June 08, 2014
Apricot Coffee Cake
I know that the post title is boring, but the coffee cake wasn't. It was zingy with fresh apricots, crunchy due to the sugary topping, and warm and mellow and tangy because it was warm from the oven and had some buttermilk in it. I love that this one is baked in a cast iron skillet because it gets a bit crusty on the bottom, too. We had some the evening it was made, but I didn't take photos. The next morning we had some for breakfast with our fruit bowl and some coffee. Heavenly!
The fresh apricots came for our local strawberry farm on Hwy 12. The wonderful family that farms there are from Thailand and the stand was recently written up in the regional paper. Lo and behold, the lines became longer and longer, especially on weekends. A couple of years ago hardly anyone knew about the place, which seriously has the sweetest strawberries ever. You never know when they will be open, so if we drove by and the flag was out, we would pull over and buy berries, or what ever else they were selling.
Last year they started putting in a lot of other crops including onions, garlic, melons, cabbage, green beans, and more. The stand started to be open more, too. Everybody wins and some great recipes are swapped while we are in line waiting for our turn. I have yet to see anybody grumpy about the wait, probably because they know that in the end will be amazing strawberries! Recently there have also been sweet cherries, blueberries, and these apricots. It's pretty hot this weekend, so next week there should be even more bounty.
My Mom received a digital photo frame for Mothers Day so I have been spending time recently going through my photo files and putting pictures up on the frame. I'm starting to scan old photos from pre-digital days so that they can go on the frame, too. Good times and good memories overall.
Happy Sunday, dear reader.
Apricot Almond Coffee Cake
An Elle original recipe
4 tablespoons sweet butter, at room temperature
1/4 cup granulated sugar
1 egg, at room temperature
1/4 cup buttermilk, at room temperature
1/4 teaspoon almond extract
1 cup unbleached all-purpose flour
1 1/2 teaspoons baking powder
1/2 teaspoon salt
4-5 fresh, ripe apricots, peeled, pitted, and sliced
Preheat oven to 350 degrees F. Butter well a heavy 9-inch skillet that can go in the oven.
Cream butter and sugar until light. Beat in egg. Scrape beater and bowl.
An Elle original recipe
4 tablespoons sweet butter, at room temperature
1/4 cup granulated sugar
1 egg, at room temperature
1/4 cup buttermilk, at room temperature
1/4 teaspoon almond extract
1 cup unbleached all-purpose flour
1 1/2 teaspoons baking powder
1/2 teaspoon salt
4-5 fresh, ripe apricots, peeled, pitted, and sliced
Preheat oven to 350 degrees F. Butter well a heavy 9-inch skillet that can go in the oven.
Cream butter and sugar until light. Beat in egg. Scrape beater and bowl.
Stir together the
buttermilk and almond extract. Set aside.
Sift dry ingredients together. Beat half into creamed mixture, beat in half of the milk, Repeat, beating well.
Pour batter into prepared skillet. Arrange apricot slices on top of batter...5 pretty much covers the top.
Sift dry ingredients together. Beat half into creamed mixture, beat in half of the milk, Repeat, beating well.
Pour batter into prepared skillet. Arrange apricot slices on top of batter...5 pretty much covers the top.
Bake for 25 minutes. While
cake bakes, prepare the topping.
Topping
1/2 cup granulated sugar
1/4 teaspoon grated nutmeg
1/2 cup chopped almonds (I used whole raw almonds with skin on them)
4 tablespoons sweet butter
Cut ingredients for topping together in a small bowl with a fork.
Topping
1/2 cup granulated sugar
1/4 teaspoon grated nutmeg
1/2 cup chopped almonds (I used whole raw almonds with skin on them)
4 tablespoons sweet butter
Cut ingredients for topping together in a small bowl with a fork.
After cake has baked for
25 minutes, open oven and quickly crumble topping over apricot slices.
Close oven and bake for another 8 minutes, or until cake is firm and has pulled away from edges of the skillet.
Monday, June 02, 2014
Spring Fruits in Scones
If you read through some of my blog posts it probably seems like I bake all the time, just because. In truth I used to do just that, but for a while now I've had to curtail my impulse to bake for a couple of reasons, but mainly because as we get older it seems to be harder to burn off those extra calories and so fewer calories are needed. While I would love to eat nothing but baked goods, good sense encourages me to fill up on fruits and veggies and quality protein instead.
That said, I still love to bake, so it is wonderful when I have a reason to bake something as delicious as scones. This past weekend I attended a P.E.O. conference in LA and we had a very early flight, so I made scones for Sweetie and I to enjoy at the start of our trip, plus I made a few extra to enjoy with committee members during our early morning committee meeting on Sunday. Since I had fresh blueberries and apricots on hand, plus a bag of sweet, moist dried apricots, I decided to make scones with them, some sliced almonds, and to use buttermilk for the liquid. It's tang goes so well with those fruits and it helped to keep the scones moist until Sunday morning, even though I baked them on Friday. P.E.O. supports women in their educational goals through scholarships and low interest loans, plus we own a college, Cottey College. The effort is almost all done by volunteers, like my fellow committee members, so they deserved some fine scones for getting up so early, right?
These were rough looking because I barely gathered the dough bits together, similar in technique to making Irish soda bread. The upside of that is they were tender and almost flaky. There was enough butter that you didn't need to add any and the flavor combination with the apricot, blueberry, lemon and almond flavors, combined with buttermilk, was excellent and hit the spot in the early morning with a cup of coffee. These don't take much time and would take even less without the dried apricots and if you left the peel on the fresh apricots, so mix up a batch yourself. You'll be glad you did.
Blueberry and Double Apricot Scones
Adapted from a Ladies Home Journal recipe March ‘97
Heat oven to 425 degrees F. Grease a cookie sheet or use parchment or silicone mat.
3 1/4 cups all-purpose flour
½ cup sugar
2 ½ teaspoons baking powder
1 teaspoon salt
½ teaspoon baking soda
¾ cup unsalted butter, at room temperature (no substitutions)
1/4 cup finely diced dried apricots
½ cup chopped fresh, peeled apricots½ cup fresh blueberries, dusted with a bit of flour
½ cup sliced almonds
1 1/4 cup buttermilk
1 egg
1 tablespoon grated lemon peel
Glaze: 2 tablespoons heavy cream
2 tablespoons sparkling sugar
Combine flour, sugar, baking powder, salt, and baking soda in a large bowl. With pastry blender or two knives, cut in butter until mixture resembles coarse crumbs. Add diced dried fruit, fresh apricot pieces and the blueberries and sliced almonds.
Combine buttermilk, egg and lemon peel in a bowl or measuring cup. Pour over crumb mixture. Stir together with fork just until mixture comes together. Gather dough gently into a ball; it might be crumbly...that is OK. Divide dough in half and transfer to prepared cookie sheets. Shape each piece into a 6 inch x 1 inch thick circle, 2 inches apart. Using floured knife, cut each circle into 6 wedges.
For glaze, brush tops with cream and sprinkle with sugar.
Bake 20 – 25 minutes until toothpick inserted in the center comes out clean. Serve warm or at room temperature.
Makes 12 scones.
Labels:
apricots
,
baking
,
citrus
,
dried apricots
,
fresh blueberries
,
lemon
,
P.E.O.
,
scones
,
sliced almonds
Thursday, May 29, 2014
Lots of Fruit
What would you make if you had some really nice fresh apricots, ripe and fragrant and about the size of a tennis ball? How about ripe, sweet and juicy strawberries? Firm, dusky blueberries? Fat sweet dark red cherries? I have some of all of those from a local farm stand in my kitchen right now and the first of the ollaliberries are going to be ripe within the week. I don't use a lot of jam or jelly except for making cookies at Christmas, so it has to be something else. We do eat lots of fruit fresh and with no preparation other than a quick wash and removal of stems or stem end leaves or inedible peels in the case of mangoes.
If you have a recipe to go with your suggestion, that would be excellent! Don't want the fruits of spring and early summer to come and go without some fun cooking and baking!
Labels:
apricots
,
blueberries
,
cherries
,
ideas
,
j
,
local strawberries
,
recipes
,
spring fruits
Tuesday, May 27, 2014
Ooodles of Asian Noodles and More
When warm weather hits like it has this weekend, it's nice to be able to turn to a fairly quick and easy and filling pasta salad to sit on the plate with chicken fresh off the grill. Sweetie brushed on some teriyaki sauce while he grilled them, so that had a nice dark color and Asian flavor. I contributed a dish I'd seen on the Food Network a week or so ago.
It's called Sesame Peanut Noodles, and it has two kinds of peanuts - peanut butter and chopped peanuts, plus cilantro, lime, fresh ginger, rice vinegar and soy sauce which combine together to make a great sauce, along with a little honey and some toasted sesame oil. The recipe called for toasted sesame seeds, too, but I'm supposed to take it easy on sesame seeds, so I skipped that part. The pasta is whole wheat linguine and the salad part includes sliced cabbage, green onion, red pepper (and some broccoli slaw because I had some and wanted to add it). Sweetie and Straight Shooter both loved it and even though it makes a big bowl, we somehow managed to polish off every strand and chunk.
The most time consuming part of this was measuring out the ingredients for the sauce, grating the fresh ginger and lime zest, and juicing the lime. The pasta cooks while you make the sauce and chop up the veggies and then you just toss the drained pasta with the veggies and sauce and sprinkle chopped peanuts on top. Yum!
Sesame Peanut Noodles
from the Food Network
Ingredients
12 oz. linguine
Peanut Dressing:
1/4 cup creamy peanut butter
3 tablespoons soy sauce
2 tablespoons rice vinegar
1 tablespoon grated fresh ginger
1 tablespoon water
1 tablespoon honey
1 tablespoon Sriracha (I used some cayenne pepper instead)
1 teaspoon sesame oil
Zest and juice of 1/2 lime
Salad:
1/2 cup loosely-packed chopped fresh cilantro
2 green onions, sliced
1/2 head green cabbage, thinly sliced (I used some broccoli slaw mix, too)
1/3 red bell pepper, in thin strips
1/4 cup roughly chopped skinless roasted peanuts, for garnish
12 oz. linguine
Peanut Dressing:
1/4 cup creamy peanut butter
3 tablespoons soy sauce
2 tablespoons rice vinegar
1 tablespoon grated fresh ginger
1 tablespoon water
1 tablespoon honey
1 tablespoon Sriracha (I used some cayenne pepper instead)
1 teaspoon sesame oil
Zest and juice of 1/2 lime
Salad:
1/2 cup loosely-packed chopped fresh cilantro
2 green onions, sliced
1/2 head green cabbage, thinly sliced (I used some broccoli slaw mix, too)
1/3 red bell pepper, in thin strips
1/4 cup roughly chopped skinless roasted peanuts, for garnish
Put a large pot of water on to boil. When water is boiling, add the pasta. Cook the pasta until al dente. Do not overcook. Drain, reserving some of the starchy pasta water, rinse and set aside.
For the peanut dressing: Place the peanut butter in a large measuring cup and microwave to soften, 15 seconds. Whisk in with the soy sauce, vinegar, canola oil, ginger, honey, Sriracha, sesame oil and lime zest and juice in a small bowl. Thin with the starchy pasta water if needed, 1 tablespoon at a time. (Dressing should be thick, but pourable.)
For the salad: Place the pasta in a large mixing bowl and add the cilantro and vegetables and toss with the dressing. Top with the chopped peanuts and serve.
Labels:
cabbage
,
cilantro
,
green onions
,
honey
,
hot weather side
,
lime
,
linguine
,
peanut butter
,
peanut sauce
,
peanuts
,
red pepper
,
sesame oil
,
soy sauce
Sunday, May 25, 2014
Birthday Cake On A Hot Evening
When you know that the birthday party for a dear friend will
include his two grandsons, it makes sense to plan for a birthday cake. I don't
know about you, but I feel almost as much joy now as I did when I was a kid
when a beautiful cake topped with lit candles is brought to the table and
placed in front of the person having the birthday. The traditional birthday song is sung with whatever success can be expected, depending on the singing talents of the group. What was sweet this time is that the eldest
grandson, a second grader, was asked to step over and help blow out the
candles after the song. I'm not sure that the birthday 'boy' blew at all. Fortunately there
were only three candles, each representing a significant chunk of his life.
The cake requested was chocolate with vanilla icing. It has
been a couple of years since I've baked a frosted layer cake...sad, isn't it? I
do remember that chocolate cake crumbs just love to lodge in the vanilla icing,
so I decided to do chocolate whipped cream on the sides and vanilla whipped
cream between the layers and on top. What I didn't count on was a heat wave
that had my kitchen hot enough to melt whipped cream.
Fortunately we had a new
refrigerator delivered the day before, so the old one was virtually empty,
although cold. I got my workout going up and down the new front steps numerous
times carting baked layers to the old freezer section to firm up, whipped cream to the
fridge section, to keep the whipped cream thick, frozen layers back into the kitchen, partially frosted
cake to the freezer and then back in again later for the final topping of snowy
whipped cream, a sprinkle of mixed sugar decorations, and a last trip to the
freezer to get that cake as cold as we could for the drive to the birthday
boy's home. I carried it on my lap during the drive and watched the frosting thaw on the way. It
stayed on the cake, so back into the freezer it went while we ate dinner, then
onto the counter to thaw a bit as we kept talking after dinner. Worked like a charm. The icing was firm enough that it didn't slide off the cake and the cake was thawed enough to enjoy its lovely texture and great chocolate flavor.
The cake was one I had been wanting to try from Maida Heatter's
Book of Great Chocolate Desserts, a collection of amazingly wonderful chocolate desserts, including my favorite
chocolate bundt cake, a silky chocolate pie and so much more. If you love
chocolate, track down this book! I have at least a half a dozen places
bookmarked to make in the future. This cake was one of them. It uses melted chocolate chips and
buttermilk and is a moist, fine-grained, fairly light cake with a good chocolate flavor, but
not one so intense that it would put off kids or people who don't adore
chocolate. For those who adore chocolate I turn to the Sin City Cake, but I
wasn't sure if it would be too intense for the kids.
The Chocolate Buttermilk Layer Cake recipe makes not two, but three nice layers, so it becomes a
pretty impressive cake once you put it together. It is not a quick recipe, so allow time to prepare the pans, to cool the melted chocolate and the chill the baked, cooled cake layers for easier handling. Putting on icing can take some time, too. If you use whipped cream, be sure to ice with the whipped cream the same day you will serve the cake, and keep it chilled between icing the cake and serving it.
This tall, beautiful cake was a big hit and the hostess made sure to move it to her own plate after those who wanted them had seconds, so that there would be cake for breakfast! Since I have to make sure to not eat too much chocolate, that was just fine with me.
I'm not going to give a recipe for the whipped cream
frosting since I was unhappy with the chocolate version and the vanilla version
was just heavy cream whipped with a little sugar and 1 teaspoon of vanilla
added once the cream started to hold its shape.
If you are keeping up with our kitchen spruce up, I painted
the ceiling a flat, bright white in the old front hall and hallway on Friday and have picked out a
nice gold color for the accent walls facing the barn. And there is the new Frigidaire side by side refrigerator, too...and cake! Life is good.
Chocolate Buttermilk Layer Cake
6 oz. (1 cup) semisweet chocolate morsels
1/4 cup water or prepared, cooled, coffee
2 1/3 cups sifted, unbleached all-purpose flour, divided
3 tablespoons unsweetened cocoa powder
1 teaspoon baking soda
1/4 teaspoon salt
6 oz. (1 1/2 sticks) sweet butter, at room temperature
1 teaspoon vanilla extract
1 3/4 cups granulated sugar
3 eggs (graded large or extra-large) at room temperature
1 cup buttermilk, at room temperature
Adjust two racks to divide the oven into thirds and preheat oven to 375 degrees F. Butter (or use pan spray) three 9-inch round layer-cake pans. Line the bottoms with wax paper cut to fit. Butter (or use pan spray) the wax paper. Mix together 1/3 cup flour and the cocoa in a small bowl. Use a fine-mesh strainer to dust the mixture over the bottom of each pan and then tilt the pan to make sure all inner surfaces are coated with the flour mixture. Shake out excess. (Working over the sink makes for easy clean up because this is messy work.) Set the prepared pans aside.
Place the chocolate morsels and water or coffee n the top of a small double boiled over hot water on moderate heat and cover until the chocolate is partially melted. Then uncover and stir until completely melted and smooth. Remove the top of the double boiler and set aside uncovered to cool.
Sift together the flour, baking soda, and salt and set aside.
In the large bowl of an electric mixer, cream the butter. Add the vanilla and then the sugar and beat to mix well. Add the eggs one at a time, scraping the bowl with a rubber or silicone spatula and beating until well mixed before adding the next egg. (The mixture might look curdled...that's O.K.) Add the melted, cooled chocolate and stir until smooth. On low speed gradually add the sifted dry ingredients in three additions, alternating with the buttermilk in two additions. Scrape the bowl with the spatula and beat only until smooth after each addition.
Divide the batter evenly between the prepared pans and smooth the tops.
Place one pan on one rack and the other two on the other rack. Do not place one directly above another one.
Bake for about 25 minutes, or until a toothpick gently inserted in the middle of the cake comes out clean and dry. (I switched two of the pans about half way through the baking and turned all the pans 180 degrees to help them bake evenly.) Check each pan carefully...don't overbake. I checked 5 minutes earlier, just in case.
Let the layers stand in the pans on a cooling rack for 10 - 15 minutes. Then, with a small sharp knife carefully cut around the sides to release. Cover each pan with a rack, invert pan and rack, remove the pan and the wax paper lining, cover with another rack and invert again, leaving the layers right side up. Let stand until completely cool. I put a sheet of baking parchment under each layer before I did the second inversion...that way each layer sat of parchment as it cooled and that made it easy to move the rack and layer to the freezer when they had cooled. These are somewhat delicate layers, so freezing makes them easier to handle when icing them.
Prepare a flat cake plate by placing four strips of wax paper around the outer edges. Place one layer upside down on the plate, checking to be sure that the wax papers touch the cake all around. Ice the first layer with about 1/2 cup of your favorite icing, then put the second layer on right side up. Ice the second layer with another 1/2 cup or so of icing, then place the final layer, right side up, on top. I like to ice the sides and then the top, but many people ice the top and then the sides. Choose which ever you like. Using an offset spatula makes it easier to apply the icing. Decorate as you choose. Chill for a while if your icing needs to set, then let the cake come to room temperature before serving. Cut yourself a piece and enjoy!
1/4 cup water or prepared, cooled, coffee
2 1/3 cups sifted, unbleached all-purpose flour, divided
3 tablespoons unsweetened cocoa powder
1 teaspoon baking soda
1/4 teaspoon salt
6 oz. (1 1/2 sticks) sweet butter, at room temperature
1 teaspoon vanilla extract
1 3/4 cups granulated sugar
3 eggs (graded large or extra-large) at room temperature
1 cup buttermilk, at room temperature
Adjust two racks to divide the oven into thirds and preheat oven to 375 degrees F. Butter (or use pan spray) three 9-inch round layer-cake pans. Line the bottoms with wax paper cut to fit. Butter (or use pan spray) the wax paper. Mix together 1/3 cup flour and the cocoa in a small bowl. Use a fine-mesh strainer to dust the mixture over the bottom of each pan and then tilt the pan to make sure all inner surfaces are coated with the flour mixture. Shake out excess. (Working over the sink makes for easy clean up because this is messy work.) Set the prepared pans aside.
Place the chocolate morsels and water or coffee n the top of a small double boiled over hot water on moderate heat and cover until the chocolate is partially melted. Then uncover and stir until completely melted and smooth. Remove the top of the double boiler and set aside uncovered to cool.
Sift together the flour, baking soda, and salt and set aside.
In the large bowl of an electric mixer, cream the butter. Add the vanilla and then the sugar and beat to mix well. Add the eggs one at a time, scraping the bowl with a rubber or silicone spatula and beating until well mixed before adding the next egg. (The mixture might look curdled...that's O.K.) Add the melted, cooled chocolate and stir until smooth. On low speed gradually add the sifted dry ingredients in three additions, alternating with the buttermilk in two additions. Scrape the bowl with the spatula and beat only until smooth after each addition.
Divide the batter evenly between the prepared pans and smooth the tops.
Place one pan on one rack and the other two on the other rack. Do not place one directly above another one.
Bake for about 25 minutes, or until a toothpick gently inserted in the middle of the cake comes out clean and dry. (I switched two of the pans about half way through the baking and turned all the pans 180 degrees to help them bake evenly.) Check each pan carefully...don't overbake. I checked 5 minutes earlier, just in case.
Let the layers stand in the pans on a cooling rack for 10 - 15 minutes. Then, with a small sharp knife carefully cut around the sides to release. Cover each pan with a rack, invert pan and rack, remove the pan and the wax paper lining, cover with another rack and invert again, leaving the layers right side up. Let stand until completely cool. I put a sheet of baking parchment under each layer before I did the second inversion...that way each layer sat of parchment as it cooled and that made it easy to move the rack and layer to the freezer when they had cooled. These are somewhat delicate layers, so freezing makes them easier to handle when icing them.
Prepare a flat cake plate by placing four strips of wax paper around the outer edges. Place one layer upside down on the plate, checking to be sure that the wax papers touch the cake all around. Ice the first layer with about 1/2 cup of your favorite icing, then put the second layer on right side up. Ice the second layer with another 1/2 cup or so of icing, then place the final layer, right side up, on top. I like to ice the sides and then the top, but many people ice the top and then the sides. Choose which ever you like. Using an offset spatula makes it easier to apply the icing. Decorate as you choose. Chill for a while if your icing needs to set, then let the cake come to room temperature before serving. Cut yourself a piece and enjoy!
Labels:
birthday cake
,
buttermilk
,
chocolate
,
chocolate cake
,
three layers
Wednesday, May 21, 2014
A Tale of Chicken Livers
Raising your own chickens has become increasingly popular in our area. Sweetie has been there, done that and has the tee shirt, too, after helping to start an egg co-op in Micronesia in the early '70s. As a result, he is smart enough to let others raise the chickens. Fortunately our neighbors across the road have taken to chicken farming with delight, raising both egg layers and chickens for eating. Since we help them now and then with chasing the chickens into their coop at night (so as to not get eaten by the local foxes), they gift us now and then with a chicken dinner, fresh broth, and very fresh livers. For a recent chicken dinner, I made one kind of pate', the goodwife made another, plus chicken livers wrapped in bacon and broiled. It was a feast! G made outstanding barbecued chicken for the main meal.
Freshness and careful handling are very important when dealing with chicken livers. Since it was too hot to turn on the oven, I made the kind of pate where you gently simmer the livers in water flavored with celery and peppercorns, then process them with yummy things like cooked onion, garlic, whipping cream, brandy and herbs. Since this makes a light and smooth paste, I added chopped walnuts and crumbled bacon for both flavor and texture. It went well on baguette slices. My friend made a pate' with a bit more texture and deep, wonderful flavor from anchovies and citrus zest, plus wine. Served with toasted slices of country bread it was delightful. The broiled bacon wrapped livers were excellent, too. We enjoyed them all!
Not about chickens, but about a kickstarter campaign you might be interested in. This fellow is not chicken at all and has a great idea for a flavorful bun for sandwiches. Check out Perry Livingston of the Bread Beaker here: https://www.kickstarter.com/projects/1656767705/bread-beaker-an-experiment-in-flavor I wish him every success and am impressed by his initiative.
Back to the regular post - I didn't get a recipe from my friend, but I can give you mine, which was a combination of about four recipes I found in various cookbooks. The uniting theme was the simmer in flavored water until barely cooked...there should be some pink in the center when you cut into the livers. The recipe made enough that we had another crock ready for a picnic this weekend, but it wasn't as nice as the freshly made pate', so consider eating it all at once, or making a smaller amount.
Chicken Liver Pate' de la Maison
Makes enough for 6-8
2 tablespoons butter
1/2 cup finely chopped onion
1 clove garlic, minced
1/2 cup finely chopped onion
1 clove garlic, minced
2 small stalks celery
4 whole peppercorns
1 teaspoon salt
6 cups water
4 whole peppercorns
1 teaspoon salt
6 cups water
1 lb chicken livers
1 stick softened butter
pinch cayenne pepper
1 teaspoon dried thyme
1/2 teaspoon ground nutmeg
1/4 teaspoon ground allspice
1/2 cup heavy cream
1/4 cup brandy or Cognac
1/2 cup chopped walnuts
1/2 cup cooked, drained, crumbled bacon
2 tablespoons Italian parsley, chopped
pinch cayenne pepper
1 teaspoon dried thyme
1/2 teaspoon ground nutmeg
1/4 teaspoon ground allspice
1/2 cup heavy cream
1/4 cup brandy or Cognac
1/2 cup chopped walnuts
1/2 cup cooked, drained, crumbled bacon
2 tablespoons Italian parsley, chopped
Melt butter and sauté onion and garlic over medium heat
until translucent, about 5 minutes.
In a medium saucepan, place the celery stalks, peppercorns
and salt. Add the water and bring to a boil. Reduce heat so water just simmers.
Simmer, covered, for 10 minutes. Remove cover, add rinsed and drained chicken
livers, return to a simmer, cover, and simmer gently for 10 minutes. Insides of
livers should still be a bit pink.
Drain mixture in pot, discard celery and peppercorns. Placed
drained livers in a food processor fitted with a metal blade.
To the food processor add the butter, cayenne pepper, thyme,
nutmeg, allspice, heavy cream and brandy or Cognac, and onion mixture. Process
until mixture is smooth, scraping down work bowl as needed.
In the same pan you used to sauté the onions, place the
walnuts and cooked bacon. Cook over medium-high heat, stirring constantly,
until bacon releases a bit more oil and walnuts are fragrant. Add the parsley
and stir to combine. Add this mixture to the liver mixture and stir to combine.
Scrape
the pate mixture into small crock or crocks. Smooth the top, decorate with a
parsley leaf if desired, cover with plastic wrap and chill 4 hours or more. Let
stand at room temperature 30 minutes before serving. Serve with slices of
baguette or toasts.
Labels:
Bacon
,
brandy
,
Bread Beaker
,
chicken livers
,
herbs
,
kickstarter
,
pate
,
walnuts
,
whipping cream
Subscribe to:
Posts
(
Atom
)


.jpg)