Sunday, January 31, 2016

Deeply Darkly Chocolate


It's always fun to make a treat for a friend for their birthday. Since I'm no longer doing dairy, it's extra nice to be able to bake with butter since the resulting sweet will be given away and not tempt me.

Yesterday I made these dark chocolate, intensely chocolate brownies to give away, but saved a few for Straight Shooter, who told me that they were delicious and very chocolaty. They were moist and fairly dense, but still had crumbs and the stout just intensified the chocolate sensation. You wouldn't know there was stout in them if no one told you. They were fine as is, but I suspect that a nice ganache topping wouldn't go amiss, either, should you choose to make them very decadent.

Except for chopping the chocolate these are really easy to make. I didn't even use a mixer. I just stirred everything together. If you cut these out with a heart cutter after they baked it would make an awesome Valentine's gift...and you could eat the scraps.


Stout Brownies
From Cooking Light Magazine

1/3 cup flour
1/4 cup cocoa
1/2 teaspoon salt
4.5 oz. bittersweet chocolate, divided
1/4 cup butter, cut into pieces
2 tablespoons canola oil
1/3 cup granulated sugar
2 tablespoons brown sugar
1 teaspoon vanilla
1 egg
1 egg yolk
2/3 cup stout

Preheat oven to 350 degrees F. Line an 8"x8" baking pan with aluminum foil, then spray pan with cooking spray. Set aside.

Sift together the flour, cocoa and salt in a bowl or onto a sheet of waxed paper. Set aside.

Divide the chocolate into a 3 oz. portion and a 1.5 oz. portion. Finely chop the 1/5 oz portion.

In a large bowl, melt the butter and chunked up 3 oz. of the chocolate. I used a microwave on 1/2 power, 1 minute at a time, stirring well after each minute. Add the oil and stir to combine. Cool slightly.

Add the sugars and mix well. Add the vanilla, egg and egg yolk and mix well. Add the stout and mix well. Add the flour mixture and mix just to combine. Fold in the remaining 1.5 oz. chocolate, chopped fine.

Put the batter into the prepared pan and bake for 25-30 minutes. A toothpick inserted in the center should have a few moist crumbs clinging to it when brownies are done.

Remove from oven and cool on a rack 10 minutes. Use foil to remove brownies from pan. Cut into squares and serve.

Note: The ingredients are as listed in the magazine, but the instructions are just a bit different.

Saturday, January 30, 2016

Mustard With Your Meat


When I was a kid one of the cool things was when my Dad would come home from packaging shows with new products like shrink wrapped items and Velcro fasteners and lunch boxes that folded flat. He also brought home silly things like a records. One of the most memorable was a Christmas record from a company called Line Materials. One of the songs on that record, which became a family favorite in my silly family, was called "People Should Listen To Me" or something similar to that. It was a song sung by a baritone guy who said he knew what the right way of doing things was...for everything! One of the lines called for 'mustard with your meat, galoshes on your feet' to give us two examples of what was right.

A few days ago I decided to see if that mustard with meat part was correct. I know I like mustard on hamburgers, but I had never used it for meat loaf and I was making a meat loaf using ground beef, which is rare for me...usually I use ground turkey. HERE is one I made using turkey and pork.

The other change was that I added cooked mushrooms seasoned with dried thyme. I wanted to add mushrooms but was worried that the moisture they give off when cooked would mess up the firmness of the meat loaf, so I cooked them first. Since I love the combination of mushrooms and thyme, that's what I used.

For the recipe I started with my Mom's Oatmeal Meat Loaf from the Classic Comfort Food cookbook (see link at top right corner of this blog, in web view). By cooking the mushrooms first and adding the mustard to the tomato juice, it didn't change the recipe too much and the results were not only delicious, but, according to Sweetie, the best meat loaf I ever made. I guess that officious guy on the record was right about mustard anyway.


Oatmeal Meat Loaf With Mushrooms and Mustard

1/2 teaspoon dried thyme
4 oz. fresh mushrooms, finely chopped
1 1/2 pounds ground beef or turkey, or a combination
1/4 teaspoon salt
1/4 teaspoon pepper
1 cup tomato juice
1 teaspoon Dijon mustard
1/2 onion, peeled & chopped
1 egg, beaten
3/4 cup rolled oats, uncooked

Spray a large skillet lightly with cooking spray (I used olive oil spray) and heat over medium-high heat. Add the mushrooms and the thyme and cook, stirring often, for 3-5 minutes, until mushrooms are browned and have given off most of their juice. The juices should evaporate as you brown the mushrooms. The idea is to have cooked mushrooms that will add little moisture to the meat loaf.

In a large bowl mix the ground meat or poultry, cooked mushrooms, salt and pepper.
Mix the mustard with the tomato juice and add to the mixture. Add the onions and egg and mix again. Add the oatmeal and mix thoroughly until everything is incorporated. Pack firmly into an ungreased loaf pan.


Bake for 1 hour and 15 minutes in a preheated 350 degree F. oven. Let stand for 5 minutes before slicing. Serves 8.

Monday, January 25, 2016

Duck!


Recently there was a great buy on duck legs at the market. I rarely cook duck, so I took the opportunity to do some online searching for a good recipe. I ended up using a recipe from the New York Times, but also changed it a bit to include red wine because I think duck and red wine go so well together.

The results were awesome, like dining at a fancy restaurant, probably a French one. The dish was rich in flavor, full of roasted veggies, had a wonderful sauce in the bottom of the pot and went really well with some boiled red potatoes. It took a little more time than usual, but was well worth it.


Braised Duck Legs with Veggies
based on recipe at Diners Journal/NY Times

Ingredients
  • 2 duck legs, trimmed of excess fat
  • Salt and pepper to taste
  • 1/2 cup red wine (I used a nice Pinot)
  • 2 large onion
  • 3-4 cloves garlic, peeled and sliced
  • 1 pound carrots
  • 6 celery stalks
  • 1 teaspoon dried thyme
  • 4 oz. sliced, cleaned mushrooms
  • 2 cups chicken stock, preferably homemade.
Method

  • 1. Put duck legs, skin side down, in a skillet large enough to accommodate all ingredients comfortably; turn heat to medium. Heat oven to 400 degrees. Brown duck legs carefully and evenly, sprinkling them with salt and pepper as they cook. Meanwhile, peel and dice vegetables.
  • 2. When legs are nicely browned, turn them over and sear for just a minute or two. Remove to a plate; remove fat to a small bowl. Add red wine to deglaze the pan, then simmer wine for 1o minutes to reduce. Pour red wine over chicken and wipe out skillet. Add just enough of the reserved fat to cook the vegetables. Discard rest of fat or use for another purpose.  Add vegetables and thyme to skillet along with some salt and pepper. Cook over medium-high heat, stirring occasionally, until they begin to brown, 10 to 15 minutes. Return duck legs to pan, skin side up and juices/wine, and add stock; it should come about halfway up duck legs but should not cover them. Turn heat to high, bring to a boil, and transfer to oven.
  • 3. Cook uncovered for 30 minutes, then lower heat to 350 degrees. Continue to cook, uncovered & undisturbed, until duck is tender and liquid reduced, at least another half hour. The duck is done when a thin-bladed knife pierces the meat with little resistance. When done, duck will hold nicely in a warm oven for another hour. Serve hot.

Wednesday, January 20, 2016

Citrus For Cake Slice Bakers January Cake


It's always gratifying when you make a cake for someone for their birthday and they love it. I did that for the January Cake Slice Bakers challenge by making The Best Damn Lemon Cake in a small Bundt pan for a good friend who is 90+ this year...I won't tell you how many years plus, because a lady doesn't talk about that, right?

Here is what my friend wrote after she and her family had enjoyed the cake, "The lemon bundt cake was without a doubt the best dessert I've ever eaten. It really hit the spot. I think I liked it better than my favorite brownie. I did share it and they all agreed. So much so  - we need the recipe. I can see this as being a household must for all the time."

So there you have it...a cake good enough for a party, but a must for all the time...and it is pretty easy to make, too. The only wild card is that you must have a full ounce of lemon extract on hand...and lemons, of course.


Be sure to visit the other Cake Slice Bakers to see what great cakes they made this month. There were so many good choices that I made another one...which will get posted in a day or so.

An update on Sweetie...he went to the doc this morning and was told that he was healing well and was lucky to have escaped with nothing broken and no impacted disc on his back either. He is feeling much better and back to modeling. Right now he is working on the masts for a wooden ship...really awesome.


The Best Damn Lemon Cake
from Maida Heatter's Cakes

Cake
1/2 cup blanched almonds  (I used 1/2 cup almond flour from King Arthur Flour)
1 1/2 cups all-purpose flour
1 teaspoon baking powder
3/4 teaspoon salt
1/4 pound (1 stick) unsalted butter (I used non-dairy margarine)
1 cup granulated sugar
2 eggs
1/2 cup milk (I used soy milk)
one 1-ounce bottle lemon extract
finely grated rind of 2 extra-large or 3 medium-sized lemons
(most of the juice will be used for the Glaze)

Glaze
1/3 cup plus 2 tablespoons granulated sugar
1/3 cup fresh lemon juice

Note: The recipe calls for a 6-cup loaf pan to be used, but I used two small Bundt pans and the batter was about 1/2 cup short in each pan, so they were smaller cakes but still delightful.

Adjust a rack one-third up from the bottom of the oven and preheat the oven to 350 degrees F. Butter an 8 1/2 x 4 1/2 x 2 3/4-inch loaf pan with a 6-cup capacity. Dust it all with fine, dry bread crumbs (I used almond flour put through a very fine strainer), invert over a piece of paper, and tap firmly to shake out excess. Set the pan aside.

The almonds must be ground very fine. It can be done in a food processor or a nut grinder, or use almond flour made from blanched almonds. Set aside.

Sift together the flour, baking powder, salt, almonds (Maida does not include the almonds here, but folds them in at the end. I also mixed the grated lemon peel into the dry mixture rather than fold it in at the end). Set aside.

In a small, heavy saucepan over low heat, melt the butter. (Can be done in the microwave, too.)

Transfer the melted butter to the large bowl of an electric mixer. Add the sugar and beat a bit to mix. On low speed, beat in the eggs, one at a time, beating only to mix well. (At this point I added the lemon extract and beat it in just to mix.) Then, still on low speed, add the sifted dry ingredients in three addition alternating with the milk in two additions, scraping the bowl with a rubber spatula and beating until mixed after each addition. Mix in the lemon extract (if not already added).

Remove from the mixer. Stir in the grated rind and then the ground almonds (if not already added).

The mixture will be a rather thin mixture. Turn it into the prepared pan(s).

Bake for 65 to 75 minutes, until a cake tester carefully inserted into the center of the cake, all the way to the bottom, comes out just barely clean and dry. If using a pan that is long and narrow, the cake will bake in less time than if it is short and wide. If using two small pans as I did, check after 30 minutes and every two to three minutes after that until cake tester test works. During baking, the cake will form a large crack or two on the top; this is fine and crack(s) will remain light in color.

Two or 3 minutes before the cake is done, prepare the glaze.

Stir the sugar and juice in a small, heavy saucepan over moderate heat only until the sugar is dissolved; do not boil the mixture.

When the cake is removed from the oven, let it stand for 2 - 3 minutes. Then, with a brush, brush the hot glaze very gradually over the hot cake(s). The glaze should not be applied quickly - it should take about 5 minutes to apply it all. (If putting on two small cakes, try to divide it evenly.)

Let stand until tepid, not quite completely cool. Then, gently invert the cake onto a rack. (If the cake sticks in the pan, cover it loosely with foil or wax paper, turn it upside down onto your right hand, tap the bottom of the pan with your left hand, and the cake will slide out.)Turn the cake right side up for loaf pan. Leave with fancy part up for small bundt cakes.

When the cake is completely cool, wrap it in plastic wrap or foil and let stand for 12 to 24 hours before serving. Or place it in the freezer for about 2 hours, or in the refrigerator for about 4 hours, before serving. This is wonderful with fresh raspberries served on the side.


This cake could probably be easily made into a gluten free cake, but I was making it for gifts, so used regular flour. If making with gluten free flour mix, use a long, narrow pan to bake it in and reduce the baking time a bit.

Monday, January 18, 2016

Bun


Although we have been grateful for weeks of almost-every-other-day rain, the constant moisture created a hazard that we didn't think about. I guess four years of drought gets one out of the habits needed to weather rainy years well. A few days ago Sweetie was going down the back steps towards the room he uses for making train and ship models and he slipped on the wet, slightly slimy steps. His feet flew out from under him and he landed on the edge of the bottom step and then finished up on the landing. In the process he got some world class bruises, especially on his bum, but, fortunately, nothing more serious as far as injuries. His back has been pretty sore but he has been careful to ice his injuries and to rest, so he is doing much better. I am so thankful that he didn't break anything!

Usually we take turns making dinner, but I've been doing it since the fall, so last night I decided to make something that I enjoy ordering when we eat out. The dish is Vietnamese Bun salad, with shredded lettuce on the bottom of the bowl, cooked rice noodles on top of that, a scattering of matchstick carrots, cucumber chunks, minced cilantro and minced mint, and warm cooked chicken pieces. The dressing was fun to make. It has lime juice, fish sauce, brown sugar, minced garlic, water and ginger. Once the salad is dribbled with the dressing, chopped peanuts are scatter on top and it's ready to serve.

I used instructions and recipes from a number of places and put bits of them together, so I don't have a place to send you to. I read of various ways to prepare the rice noodles and finally ended up doing a blend of two of them. The dressing was based on one found on David Liebowitz's blog, but I added garlic and fresh ginger and used more lime juice and less water, so I guess it's my own dressing.

This is a light, refreshing meal with plenty of crunch from the lettuce and peanuts and cucumber and carrots. David uses fried shallots and red onion and I've seen the salad with bean sprouts, too, so feel free to adjust the salad fixin's, too.

I'm still going to order Bun when I eat at Vietnamese restaurants, but it's nice to know that I can make it at home, too.


Vietnamese Bun Rice Noodle Salad

The dressing
  • 4 tablespoons fresh lime juice
  • 1 to 2 tablespoons fish sauce
  • 2 tablespoons light brown sugar
  • 1/4 cup water
  • a few drops hot sauce, or Sriracha sauce to taste
  • 1 small clove garlic, peeled and minced
  • 1/4 teaspoon fresh ginger, peeled and finely minced

The salad 
  • 8 oz. dried thin rice noodles
  • 1/2 head iceberg lettuce, finely shredded
  • 1 large carrot, peeled and cut into bite sized matchstick pieces
  • 1/2 a cucumber, peeled, seeded and cut into bite sized chunks
  • 1 large chicken thigh, cooked, skin removed, and cut or torn into bite sized pieces
    (you can also use other protein like barbecued pork, barbecued shrimp, or small, cooked spring rolls, or tofu)
  • 2 teaspoons chopped fresh mint
  • 2 teaspoons chopped fresh cilantro
  • 3-4 tablespoons chopped roasted peanuts (I like unsalted)
For the dressing 
In a small jar combine the lime juice, fish sauce (more if you really like fish sauce), brown sugar, water, hot sauce, garlic and ginger. Shake to combine well and set aside.
 
For the salad  
Heat water in a large pot big enough to hold the rice noodles. There should be enough water to cover the noodles. Bring the water to a boil, then remove from heat and add the noodles, breaking the mass if necessary to fit it into the pot. Stir gently. Cover and set aside for 5 minutes. Return pot to stove.

In two or three or four large bowls place the iceburg lettuce. Gather all of the rest of the ingredients and heat the protein part. Turn on the heat under the noodles and bring back to a boil. As soon as the water boils, drain the noodles in a colander, rinse thoroughly with cold water, then spread noodles on a clean kitchen towel to drain.

Place some noodles over the iceberg lettuce. Scatter carrot, cucumber and warm protein (chicken in my case) evenly over the portions of noodles. Scatter the mint and cilantro evenly over the portions.

Drizzle some of the dressing over each salad and top with peanuts. Serve additional dressing at the table for those who want more dressing. Serve at once. Makes 2-4 servings, with some noodles and dressing left over for another time.

Saturday, January 16, 2016

Bread Baking Babes Boat Bread


Georgia, Georgia... That's the place in Russia where this month's recipe comes from. Thanks to our Kitchen of the Month, Aparna of My Diverse Kitchen, we were treated to an easy to make, delicious boat-shaped bread, Acharuli Khachapuri, that is usually filled with cheese, topped with a soft-cooked egg and butter and eaten hot.

I made the dough in my stand mixer and used the optional egg, which meant I needed more flour. It made a very nice, supple dough which was easy to handle and shape like a boat. I made the dough without dairy since I wanted to be able to taste it and to use one of the two boat shaped breads for a filling I could eat.

I made the first one with the filling given, just making up half the amount. I skipped the egg topping and the butter at the end, but Sweetie still really enjoyed it and even asked for more for breakfast this morning. The second boat was filled with a thin layer of plain yogurt, sprinkled with a bit of sugar, then topped with small blobs of cherry jam. I enjoyed that, even though the dough is a bit salty. If I were to make it in a sweet version again, I would reduce the amount of salt in the dough by at least 1/2 teaspoon.

This is a fun bread to make and fairly quick since it doesn't require a second rise. I'll bet you could come up with quite a few topping ideas yourself! To become a Buddy, be sure to e-mail Aparna with a photo and brief description of your baking experience. Here is a link to her site.

Be sure to check out the breads made by the other Babes. Links will eventually be at the bottom of the post.


Acharuli/ Adjaruli Khachapuri (A Boat Shaped Georgian Egg & Cheese Bread)


Ingredients:

For the Dough:
1 tsp instant yeast
1/2 tsp sugar
2/3 cup milk (I used soy milk)
1 tbsp. olive oil
1 egg (optional)*
1 1/2 cups flour, plus more for dusting
1 tsp salt

For the Filling:
1 1/2 cups grated/ shredded Mozzarella
1 1/2 cups crumbled feta cheese
2 eggs (or any other topping of choice  - I used  sliced tomatoes, pickled jalapenos and herbs)
Skipped the eggs or any topping except the cheese for one, used plain yogurt and cherry jam instead of any cheese or other topping for the second Acharuli.

For topping after baking:

4 tbsp. unsalted butter, cubed

Method:
I usually make my bread dough using the processor but this is easily done by hand.  Put all the ingredients for the dough into the processor bowl and knead together until everything comes together into a smooth and somewhat loose elastic dough that’s just short of sticky. (I used my stand mixer and some additional flour since I used the egg in the dough.)

Transfer the ball of dough to a well-oiled bowl, turning it so it is coated all over. Loosely cover and let it rise till double in volume – about 1 to 1 1/2 hours.

Place a pizza stone, or a baking sheet on a rack in lower third of oven. Preheat oven to 250C (500F).

Combine the cheeses in a bowl and  set aside. Deflate the dough and divide it into two halves. Working with one piece at a time,  roll it out to a rectangle about 10” thick and 1/8” thick on a piece of lightly floured parchment.  This makes it easier to transfer the dough to your baking sheet.

Roll the long sides in a bit curving them inwards at the ends and seal well (with a little water) or the edges will open up during baking. Then bring the edges close and pinch together on both ends to form a “boat” like shape. Again, make sure the ends are sealed well. Transfer the “boats” to the baking sheet, but if you’re going to bake them directly on the pizza stone just omit this step.

Dock the centre “well” area and fill with half of the cheese mixture so it is a little higher than the edges of the dough “boat”. Repeat with the other half of dough and  bake them for about 12 to 15 minutes until the Khachapuri are golden brown.


Take the breads out of the oven and gently crack an egg on each bread without breaking the yolk (or add the sliced tomatoes, pickled jalapeños and herbs like I did) and return them to the oven. Bake for another 3 to 4 minutes till the egg is set. Take the Adjaruli Khachapuri out, and place a couple of cubes (2 tbsp) butter on each. (Skipped the eggs and the butter both.) Serve them hot. It helps to wait for about 10 minutes before eating them so you don’t burn your mouth! This recipe should serve 4 to 6 people.

Wednesday, January 13, 2016

Mushrooms and Rice and Bacon, Oh My


Not sure why, but yesterday I wanted mushrooms with my dinner. We had about 6 oz. of whole crimini mushrooms in the fridge so I just needed to decide what to make. Sweetie didn't have any preferences when I asked him, so I went with a rice dish. There wasn't a recipe for this and I didn't measure some of the ingredients, so I'll write up a recipe as best I can to keep it for the next time and to share it with you.This is a wonderful side dish with nutty flavors and delightful savory notes. If you like mushrooms, you'll love this dish!

The first thing I did was to chop some yellow onion and saute it in olive oil. Then I added the sliced mushrooms and cooked those together with some dried thyme and a little water. It smelled wonderful!

After that I decided that I wanted both bacon and pecans with the rice mixture, but first I started some brown rice mixed with chicken broth in the rice cooker and some wild rice and water in a pot on the stove.

While the rice cooked, I rendered the bacon enough so that it would crumble when it was cooled, poured off almost all of the bacon grease, then toasted the pecans in the pan I cooked the bacon in.

For timing, the wild rice was the key since it takes a little longer to cook than the brown rice. Once the wild rice was done I drained it and added it and the cooked brown rice to the mushroom mixture, along with the crumbled bacon and toasted, chopped pecans. After a quick stir and a minute on low heat to make sure everything was warm, I served it up. It was really delicious. The rice had a little chew, the nuts added crunch, the bacon and caramelized onions perked up the flavor and it all went really, really well with the mushrooms. This is a dish worth making again, and soon.

Mushroom Rice with Bacon and Pecans
Serves 4-6

1 tablespoon olive oil
1/2 medium onion, chopped
6 oz. small crimini mushrooms, cleaned, dried and sliced
1/4 teaspoon dried thyme
2 tablespoons water
1/2 cup brown rice, rinsed
2 cups chicken broth
1/2 cup wild rice, rinsed
2 cups water
1-2 strips bacon
1/2 cup pecans

In a large pot, heat the olive oil over medium-hot heat. Saute' the onions in the hot oil for 1/2 minute, then reduce heat to low and cook, stirring often, until onions become dark golden brown, about 5 minutes. Add the mushrooms and the thyme and the water, stir, cover and let cook over low heat for 5 minutes, stirring occasionally. When time is up, turn off the heat and set aside.

While mushrooms are cooking, put the brown rice into a medium heavy bottomed pot or rice cooker and add the broth. Cover and cook over medium to low heat (mixture should simmer) until rice is cooked and tender. Set aside.

While mushrooms and brown rice are cooking, put the wild rice into a medium heavy bottomed pot or rice cooker and add the water. Cover and cook over medium to low heat (mixture should simmer) until rice is cooked and tender. Drain. Set aside.

The brown rice will take 20 - 30 minutes and the wild rice closer to 45 minutes.

While rice is cooking, in a small frying pan, cook the bacon until it is crisp enough to crumble when cool. Let cool on a paper towel, then crumble. Discard the extra bacon grease in the pan, but don't wipe it. OK to have a little bit of grease left in the pan.

In the pan the bacon was cooked in toast the pecans for 5 minutes over medium-high heat, stirring and turning them over as needed to keep them from burning. Set aside to cool, then chop the nuts.

Once all the rice is cooked, reheat the mushroom mixture over medium heat for about a minute, then add the two kinds of rice, the crumbled bacon and the chopped pecans. Stir well to combine, heat another minute over medium-low heat, covered, then serve while hot.

Sunday, January 10, 2016

Buddies Bake Anadama Bread

Not sure what happened, but I completely forgot to do a round-up post for the Anadama Bread. So sorry dear Buddies! Perhaps this being my first post for 2016 will make it more acceptable.

We had at least two lovely breads baked by our Buddies Kelly of A Messy Kitchen and Carola of Sweet and That's It.   I thought there was a third one, but can't find any e-mails. Many thanks to each of your for baking with the Bread Baking Babes!


Kelly of A Messy Kitchen  found this month's bread a stroll down memory lane since she had made the bread in high school. She says, "For my loaf, I used a blend of flours, all purpose, spelt, and einkorn.  Because spelt and einkorn don't absorb liquid like regular flour, I ended up having to add a lot more, between ¾ and 1 cup of regular flour (to boost the gluten).  I still left the dough on the sticky side though because too much einkorn can give you a dry or dense loaf.  I must have hit it right because I got neither of those.  The loaf was hearty, for certain, but not heavy and still nicely moist.  I only figured out today that I used double the sugar as the original post, because I looked at another babe's post first which did the same.  Maybe that was why my loaf took so long to rise, the sugar inhibits the yeast.  I might use less next time but it was really good as it turned out!  And I still got fantastic oven spring."


Carola of Sweet and That's It posted on our Facebook page and not on her blog, but her Anadama bread was gorgeous, with a lovely pattern made using the seeds on top. She found that not all cornmeal is created equal but I hope she will try again to make this bread, even using the fascinating pan she tried.

I think a lot of the Babes had a good time with the Anadama bread and the variety of seeds was stunning. The Bread Baking Babes will be posting the January recipe on Jan. 16th. It's a different one, so do check back then.

Thursday, December 31, 2015

Happy New Year!


Happy to see 2015 coming to an end. It has certainly not been my favorite year, mostly due to health reasons, but also because of the drought (which seems to be abating). I looked through my posts to see what I had cooked and baked and I found one recipe, almost in the middle of the 2015 posts, which I think was my favorite for the year.

But before I tell you what it is, I want to say that there are a couple of recipes that I've made over and over during the year, with cole slaw using my favorite creamy cole slaw dressing being the leader. I posted it on January 1, 2008 and have been making it often ever since. There is something about finely chopped green cabbage and a creamy sweet-tart dressing that just go together. Strangely enough, I don't have a good photo for this, even though I made it tonight for dinner. Maybe I'll get a decent photo tomorrow when there is natural light, then I can update this post with a good photo.

Here it is.


I've also repeatedly made the Amazing Overnight Waffles


and Anzac cookies.

Both are easy and so delicious that I get requests for more. If you use the Anzac link, don't be fooled by the pink cake you see first. The Anzac recipe is just further down the post.

The newest repeat recipe is for a roasted mixture of yams and delicata squash with a sweet and spicy glaze.


Sweetie raves about that recipe and it's perfect for the fall and winter when winter squash are plentiful and wonderful. This was posted for the first time in October of this year, so it, unlike those above is a current recipe.

So my favorite recipe? It's a King Arthur Flour recipe for a French fruit tart. I made it in July.


Tender buttery almond crust, almond meal-rich filling and fresh raspberries and blackberries made it a hit and, although it looked impressive and tasted divine, it was fairly easy to make. Besides, it was fun to use the rectangular tart pan! I love the balance between the crust, filling and fruit that this recipe achieves. as well as the fact that it makes a stunning presentation.

So there we have it, my favorite recipes from 2015. Did you have a favorite I didn't include? Want to share?

Wednesday, December 30, 2015

2015 With The Bread Baking Babes

I usually do a recap that covers various areas of cooking and baking on the blog throughout the year, but I'm going to focus on the breads baked by the intrepid Bread Baking Babes because, as I  reviewed the recipes baked, I noticed that we had spent almost the entire year baking breads from a wide swath of the globe.

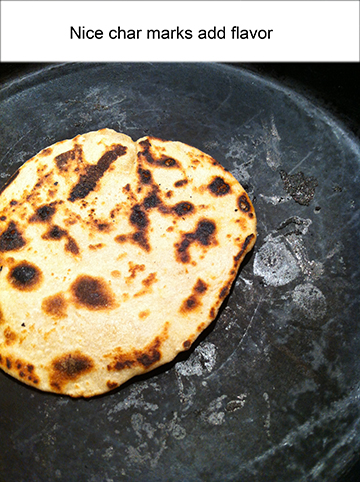
From India we had Chapatis in January,

our February anniversary recipe was the French Kougin Amman.


I was thrilled to see that it was a featured recipe on the Great British Bake Off and that they didn't have much more success than I did. Small of me I know, but they were delicious even if far from perfect in my rendition, so that's OK.

A self-styled Global Baker gave us the recipe for Muesli Rolls


and we had Italian Ciabatta bread, enhanced with seeds and prunes.


I missed the August bread, but it was Italian, too.

We had both Romanian Easter Bread in the spring


and Russian Chrysanthemum Bread in November.


We baked Mexican Conchas


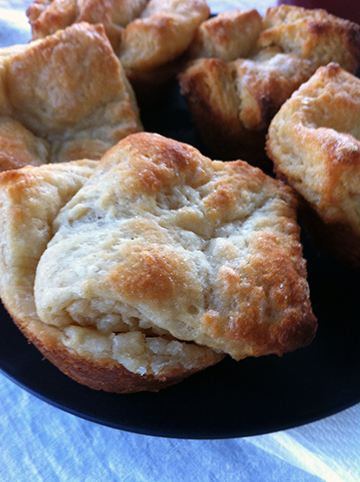
and Japanese Milk Bread. I baked the latter as rolls and they are now my go-to recipe for the perfect dinner roll.


For some American recipes we had Power Bread


and, from New England, Anadama Bread.


For the bread with, perhaps, the most variations we had Granary Loaf from England.


It really was and around the world trip while baking with the Babes this year and that is certainly part of the fun. Who knows what we will bake next year?

Tuesday, December 29, 2015

The Fire Is Going....


It's still pretty chilly, but it feels like winter, which I love. With the tree up, a plate of cookies from friends, a bowl of mandarin oranges for snacking and a comfy chair pulled up near the gas fire, the long winter evening is a pleasure to enjoy. Want a cookie anyone? Some egg nog?

Monday, December 28, 2015

Comfort Chicken


If you combine chilly weather with a desire to have a made-ahead and read-to-heat meal that is also comfort food, you would probably end up with this recipe, too. This Chicken Stew with Biscuit Toppers is a made-from-scratch one dish wonder. Better than a pot pie, especially the ones from the freezer section in your market. You know the ones...the crust is like cardboard and about as tasty. Better than beef stew when one of the folks who will be eating with you doesn't eat beef. Although it is a humble dish, this stew will warm you and charm you with the tender chicken, almost caramelized onions, and wonderful savory gravy. Add the heft of potatoes and sweetness of peas and you can understand why this might become one of our family's go-to recipes.

I made this for a crowd, so I used a lot of chicken - eight good sized chicken thighs as a matter of fact. I ended up with two and a half pounds of chicken chunks and a nice amount of chicken broth. I cooked down the left over broth when I finished making the stew and it's ready to be part of a nice chicken soup, so don't throw out the chicken poaching water, OK?

You can adjust the amount of aromatic vegetables and potatoes and peas to suit yourself. I used red potatoes, but you can also use Yukon gold or Idaho brown, just be sure to not over cook them. They should be tender and cooked just enough so you and pierce them with a knife. You can also cook the onions, carrots and celery in butter instead of olive oil if you prefer. The biscuits can be made with a mix like Bisquik, or you can make them from scratch or you can purchase refrigerated biscuits in a package. Just be sure to make the rest from scratch for the best flavor and because it just tastes so good!

By the way, you can eat this the same day you make it. I usually try to make it a day before because I find that dishes like this with cooked onions often taste better after sitting a day to let the flavors meld.

Chicken Stew Topped With Biscuits

3 lbs boneless, skinless chicken thighs
water
4-5 medium Yukon gold potatoes or thin-skinned red potatoes
1 large onion, peeled and finely chopped
2 stalks celery, washed and finely chopped
2 carrots, washed, peeled, and cut into half coins
2 cloves garlic, minced
1 teaspoon dried thyme
1/2 teaspoon dried rubbed sage
salt and pepper to taste
1/2 cup all-purpose flour
3 cups chicken stock

your favorite biscuits (savory)

Rinse the chicken thighs and place in a large heavy bottomed pot. It's OK to stack them on top of each other. Cover with cold water and then bring the water to a boil, with the pot covered. Once boiling, remove lid and simmer until chicken is tender, about thirty minutes. (At this point I let the pot cool off for a short while, then placed the covered pot into the refrigerator until the next day).

Let pot cool, then removed chicken with tongs and simmer broth while you cut up the chicken. You can use this broth for the 3 cups of chicken stock later in the recipe. The chicken should be cut into bite-sized pieces. You should have about 2.5 pounds of those pieces when you are done. Set aside.

Cut the potatoes into bite sized pieces and cook over medium-high heat, covered in water, until tender and just cooked enough that you can pierce them with a knife. Drain the potatoes and set aside.

In a large heavy bottomed pot heat the olive oil, then add the onion and celery and carrots. Cook over medium heat, stirring often for about 10 minutes. Onions will be translucent. Add the garlic, lower the heat, and cook another 10 minutes, stirring often, Onions will be browned here and there. Add the dried thyme and sage, salt and pepper and stir to combine with the vegetables in the pot. Cook 1 minute. Raise the heat to medium-high and add the flour, stirring constantly. Cook 1 minute, still stirring, to cook the flour. Add the chicken broth all at once, stirring constantly. Continue to stir and cook until mixture thickens. Add the cooked chicken and the potatoes and stir gently to combine and coat all with the gravy. At this point I usually cover the pot and let the stew sit in the refrigerator until the next afternoon or evening. If you do this, then gently re-heat the stew the next day and continue on with the recipe.

Preheat the oven to 425 degrees F and make your favorite biscuits, either from scratch, from a mix or use refrigerated biscuits. Bake the biscuits according to package directions or the recipe directions.

While biscuits are baking, heat 2 cups frozen peas (the microwave works well for this). Put the stew in a large casserole dish, top with the hot peas, and put into the oven until the biscuits finish cooking. When the biscuits are baked, take the casserole from the oven, top with the biscuits, spacing the biscuits apart, then serve at once. Serve 6-8 people.

Sunday, December 27, 2015

Post-Christmas Reflections


The run up to Christmas was hectic and fun, as it often is. We were blessed this year to have time with our wonderful daughter from Wednesday through Saturday evening and we packed in a lot of good times. There was a game night with neighbors and adult libations, viewing of two movies, including the current box office hit Star Wars - The Force Awakens. We saw most of the Warriors NBA game on Christmas, preceded by lots of gift opening and a nice walk with Pi doggie at the Laguna.

We enjoyed sushi on Wednesday, New York deli pastrami and corned beef (and my own turkey) sandwiches on Christmas Eve, a wonderful Christmas morning brunch which included sweet rolls and scrambled eggs and baked ham and lots of coffee (and tea for me and Straight Shooter), then an easy Christmas dinner with fresh-baked biscuits on top of a chicken stew I cooked on Christmas Eve, plus a delicious fruit and nut salad that Grandma brought. I made the stew early because I knew I would be tired by Christmas dinner time and because most things made with cooked onions seem to taste better the next day.

Of course there were also Christmas cookies now and again throughout the time we were all together, Santa's Whiskers, white chocolate and dried cranberry ones and molasses ginger cookies, plus some crescents and some delicious cookies that Sweetie's sister in Virginia sent. I won't even go into the beverages, except to say that the spiced Old Fashioned drinks with good quality bourbon were a good reason to forgo my self-imposed ban on alcohol.The day after Christmas we saw more family and some friends and ate and drank again with gusto.


 I hope that your holidays included some fun times and some spiritual reflection, too. I am the fortunate caretaker of the family nativity scene that graced my parent's mantle for many years. The photo at the top of the blog is of where it sits this year on the Willett hutch cabinet. You can't see it in this photo, but Mom's photo in the blue sweater was on the right of the greenery arrangement as I know she was with us in spirit. It seems to me that one of the reasons that Christmas has been embraced as a special holiday is because love and the arrival of divine love is the reason for the holiday and there is never too much love. Love inspires us to give to those we love and to cook for those we love and celebrate with them the return of light to the winter world. Although I hope that "Santa" gave you what you were most wishing for, my true hope is that you experienced the gift of love in abundance this Christmas season.


Wednesday, December 23, 2015

Half Way


Two days ago we hit the half way mark - the winter solstice. We have reached the darkest day of the year after that day more light each day returns to the world until around the 21st of June, when days begin to grow shorter again. Since it was a cold, damp, rainy day it wasn't really obvious. It was sort of dim all day.

 One of the fun things to do on a rainy day is bake cookies. Since it's been blessedly rainy (remember, we are in a four year long drought) for days now, I've been baking for a few days, too. One of the things I baked was a gluten-free, dairy-free version of Santa's Whiskers cookies, so that I can have some at Christmas. I also made a dairy-free and gluten-free molasses cookie which is tasty but not as chewy as I had hoped. The last recipe is for a cookie that seems very seasonal to me, but this one has butter and regular flour, so I won't have any. Sweetie, on the other hand, can eat pretty much anything. He enjoyed these white chocolate-dried cranberry cookies and I can recommend them as easy to make, although not particularly photogenic.

 I looked at a number of recipes, so I don't have attribution for these, having borrowed a bit from here and a bit from there. I think you could add in some nuts if you like and they would probably be even better.


White Chocolate Cranberry Cookies

1/2 cup butter, softened
1/2 cup sugar
1 egg
1 teaspoon vanilla
1 cup + 2 tablespoons all-purpose flour
1/2 teaspoon baking soda
1/4 teaspoon salt
1/2 cup white chocolate morsels or chunks
1/2 cup dried soft cranberries

 In a large bowl beat the butter and sugar together until light and fluffy.

 Blend in the egg and vanilla
.
On a sheet of waxed paper, or in a bowl, mix together the flour, baking soda and salt. Add to the butter mixture and beat to combine.

Stir in the white chocolate and dried cranberries.

Drop 2 tablespoonful dollops of the dough about an inch and a half apart on baking sheets that have been lined with silicone mats or with parchment paper
.
Bake in a preheated 375 degree oven for about nine minutes. The edges of the cookies will be golden brown.

Cool the cookies on a rack, then store in an airtight container.

This recipe makes about 18 cookies, but it can be doubled for about 3 dozen cookies.

Sunday, December 20, 2015

Cinnamon Bun Transformation


For the December Cake Slice Bakers, we had the choice of Walnut Raisin Rum Cake which looked wonderful but sounded too much like what I baked last month, Ginger Ginger Cake which was too much like the Gingerbread Cake I had recently made, and Zugar Kirchtorte, a cake I would have loved to make when I was still enjoying butter, but, sadly, butter is no longer my friend.

The fourth choice is the one I chose, Cinnamon Buns, a fine yeast recipe made with fresh mashed potatoes and potato water. I suppose it can be considered, if you stretch the term a bit, as a cake, but I think of it as a sweet bread. I had to make this one as a tip of the hat to my friend Tanna of My Kitchen In Half Cups. She had me make my first potato bread ever, back when we were both Daring Bakers, and I have loved potato breads ever since. Yeast seems to just love potatoes and the dough, once you get past the initial stickiness (which has been known to cause me to swear), potato dough is supple and feels wonderful to work with. It takes a few more minutes to make these with freshly cooked and mashed potatoes, but it is worth the trouble because the yeast bread is superior to that make with reconstituted mashed potatoes. Just be sure to let the water and potatoes cool enough so that your yeast are happy and not cooked.

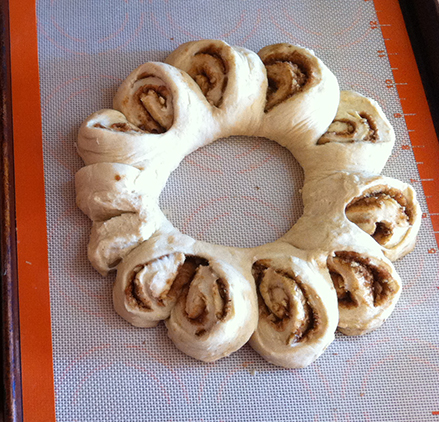
Because it's the holiday season I decided to transform the standard pan of buns into a wreath shape. I made two of them and gave one as a gift to a friend. Sweetie and some neighbors enjoyed the other. To make this bread properly, you do need to use milk and butter. It's also a good idea to use fresh cinnamon since that is a key ingredient. I used Penzy's Vietnamese Cinnamon. It is full flavored and so fragrant that it was perfect for this bread. I also decided to add some chopped walnuts, which I sprinkled on top of the butter and cinnamon before I rolled up the dough.

Once the dough is rolled up, which you do for both the buns and the wreath, to make the wreath, form the dough log into a circle and connect the ends together by pinching them. You then take a pair of clean kitchen scissors/shears and cut almost all the way through about every two inches around the circle. You leave the dough connected (uncut) at the inner side of the circle. Once that is done, you turn each of those pieces a bit so that you can see the spiral of bread dough and spice/sugar
.


After that you let the dough rise again and bake it at the same temperature as the buns. I like a bit of decoration, so I mixed together some hot milk and confectioners sugar and drizzled it over the wreath in a decorative pattern. Pretty as a picture and a nice gift, too.

These buns (for those pieces you turned on the wreath become buns when the wreath is cut) are soft and tender with a wonderful taste of cinnamon and sugar. It smells like the best kitchen in the world while they are baking!


Cinnamon Bun Wreaths
and adaption of a recipe from Maida Heatter's Cakes

Dough:
1 cup mashed potatoes (see Notes)
1 cup milk
1/2 cup plus 1 tablespoon granulated sugar, divided
1/2 teaspoon salt
2 oz. (1/2 stick) unsalted butter, cut up
1/4 cup warm water (105-110 degrees F)
1 envelope active dry yeast
1 egg at room temperature
1 teaspoon vanilla extract
About 4 1/4 cups unsifted all-purpose flour or bread flour,
plus additional flour, mostly for kneading
(bread flour is excellent in bread where there is a lot of butter and sugar)

Notes: The mashed potatoes can be made with instant dry mashed potatoes or fresh potatoes.
It takes about 3/4 pound fresh potatoes to make 1 cup mashed. Peel, cut into chunks, place in a small saucepan with water, boil, partially covered, until tender, drain, and then mash the potatoes. Be sure to save the water the potatoes were boiled in and use some of it for dissolving the yeast. Since yeast loves potatoes so much, this will make it extra happy.

Filling:
2 tablespoons granulated sugar (I used brown sugar)
1 1/2 teaspoons cinnamon
1/4 teaspoon nutmeg
1 oz (1/4 stick) unsalted butter, melted
1/2 cup finely chopped walnuts

Instructions:
Generously butter a 4-6 quart bowl or other container for the dough to rise in. Set it aside.

Place the mashed potatoes (which may be warm or cool, as long as below 111 degrees F) in a saucepan and, stirring constantly, add the milk very gradually. Stir in 1/2 cup of the sugar and the salt and butter. Place over low heat and stir occasionally until the mixture is warm (105-110 degrees F).It is not necessary for the butter to have melted completely, but OK if it does.

Meanwhile, in a 1-cup glass measuring cup, stir the warm water (can be potato water) with the remaining 1 tablespoon sugar, sprinkle on the yeast, stir briefly with a knife, and set aside for about 10 minutes until the mixture rises to about the 3/4 cup line.

In a small bowl, beat the egg to mix and add the vanilla.

When the potato-and-milk mixture is warm enough, transfer it to the large bowl of an electric mixer. Beat in the yeast mixture and the egg. On low speed, gradually add about 3 cups of the flour. Beat on low speed for a minute or two. Remove the bowl from the mixer. The dough will be wet and sticky now. With a heavy wooden spoon, gradually stir in the remaining 1 1/4 cups of flour. Dough will still be sticky.

Flour a large work surface. Turn the dough out onto the floured surface. The dough will still be too sticky to knead. Add a bit of additional flour and, with a dough scraper or a wide metal spatula, turn the dough over and over with the additional flour - adding still a bit ore if necessary - until you can handle the dough. (a glass of wine to the side and/or some swearing help when getting through this part - Elle's notes.) You might have to add 1/2 to 3/4 cup additional flour. Remember, though, that potato based dough has a tendency to remain a bit sticky even when enough flour has been added, so do not use more than you must...err on the side of sticky dough.
After about five minutes active kneading, the dough should be smooth and feel alive. If you can be really careful to not add too much flour, you can also do the kneading with your stand mixer.

Place the dough in the buttered bowl, turn it around in the bowl to butter all sides, cover the bowl with plastic wrap (or a clean shower cap) and place it in a clean, draft-free spot to rise for 1 to 1 1/2 hours, until the dough is at least double in volume.

Once dough had doubled in volume, make a fist and punch it down in the middle, then fold in and press down the sides of the dough to deflate all of it. Turn the dough out onto a lightly floured surface and use a knife or bench scraper to divide the dough in half.  Return half the dough to the rising bowl and re-cover.

Take the half dough still on the lightly floured surface and roll it out in a rectangle about 16-18 inches by 10 inches.
The dough may fight you...if so, let it sit for a few minutes while you make the filling components, then return to it and continue shaping.

For the filling, in a small bowl, mix the sugar with the cinnamon and nutmeg. Make sure the walnuts are finely chopped. Brush half the melted butter over the rolled out dough, leaving about 1/2-inch clear around all edges. Sprinkle on half the cinnamon sugar mixture evenly over the butter, then sprinkle half the walnuts over that evenly. Roll up on the long side like a jelly-roll, pinching the edges together once it is all rolled.

Carefully lift the rolled dough onto a parchment lined baking sheet (or use a silicon mat lined baking sheet) and form into a wreath shape. Pinch the ends together. Use a pair of clean scissors or kitchen shears to cut the dough about every two inches, leaving the dough attached at the inner edge of the roll. Carefully take each cut section and turn it so that you can see the filling. Do that with each cut section around the wreath. See the photo above in the beginning of the post to see how it looks at the end, before rising.

Repeat the rolling, filling, rolling up, cutting and turning with the other half of the dough and filling. I used two baking sheets so that they wouldn't stick together.

Set the wreaths in a warm, draft free place and let rise until puffy, about 1 hour. Towards the end of that time, preheat the oven to 375 degrees F. Before preheating, adjust the rack one-third up from the bottom of the oven.

Bake the risen wreaths for about 10 minutes, then reverse the pan from front to back and continue to bake until the wreaths are light golden brown. I baked one pan at a time, but you could probably bake both pans at once if you switched them around half way through baking. Ovens vary, but it will probably take about 25-30 minutes total. Once baked, remove from the oven and let cool on a rack five minutes while you prepare the icing.

Optional Icing
In a small bowl mix together 1 tablespoon warm milk and enough confectioners sugar (about 3/4 cup) to make an icing that is the thickness you like. Drizzle the icing over the cooled wreaths.

A cooled, iced wreath makes a nice gift and is also a lovely addition to your holiday table, especially at breakfast or brunch!
Check out the other Cake Slice Baker creations too.

Saturday, December 19, 2015

Three Kinds of Ginger


Although I've always loved gingerbread, I was an adult before I discovered the joys of fresh ginger and candied ginger. Of late I've been increasing the amount of ginger in my diet since it is not only an effective anti-inflammatory, but it tastes wonderful. Fresh ginger does have some natural heat to it, but I find that I enjoy that much more than the heat from, say, hot peppers.

One way to enjoy three kinds of ginger; fresh, candied and ground dried ginger; is by making gingerbread cake. I recently tried a new recipe that uses all three and it works really well in a Bundt cake pan. It's called the Gramercy Tavern Gingerbread and it's a recipe from Epicurious. I think I decided to try it because the first ingredient is one cup of stout (like Guinness). It also has lots of spices, not just ginger. Cinnamon, nutmeg, cloves and cardamom are also used. The strong flavor of molasses comes from molasses itself, but also from dark brown sugar. The only think it was lacking was the candied ginger, so I chopped up a tablespoon of that and added it anyway. It tended to go to the bottom of the pan, which became the top of the cake. I found that out because it got in the way of slicing the beginning of some slices, but I still think it adds a necessary element to the cake.

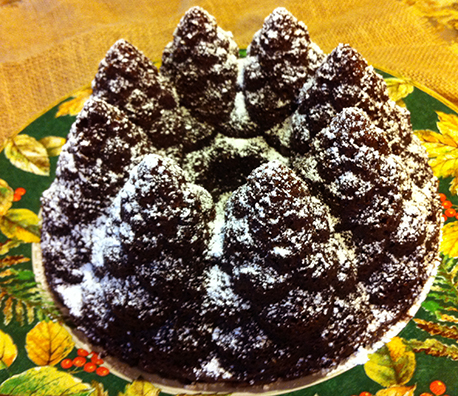
This makes a full Bundt cake, so make sure that your pan is a full sized one, which I think is a ten-cup capacity or larger one. I baked mine in a pan that looked like a circle of Christmas trees. For decoration I sifted on just a little powdered sugar, so they looked like snowy trees. Very pretty and perfect for a party, or your own holiday table.

This gingerbread is moist, spicy, mouthwatering (perhaps due to the wonderful fragrance of the stout and all those spices), with a fine crumb and sturdy form. Everyone who tried it was delighted, especially those who added a dollop of whipped cream to their serving.

Be sure to check back tomorrow to see what I made for the Cake Slice Bakers!


Adapted from
Gramercy Tavern Gingerbread
from Epicurious

1 C stout (like Guinness which is what I used)
1 C dark molasses
1/2 t baking soda
2 C all-purpose flour
1 1/2 t baking powder
1 1/2 T ground ginger
1 t ground cinnamon
1/4 t ground cloves
1/4 t freshly grated nutmeg
pinch ground cardamom
1 T freshly grated fresh, peeled ginger root
1 T finely diced moist candied ginger
3 large eggs
1 C packed dark brown sugar
1 C granulated sugar
3/4 C vegetable oil

Preheat oven to 350 degrees F. Generously butter a 10-inch (10-12 cups) Bundt pan and dust with flour, knocking out excess.

Bring stout and molasses to a boil in a large saucepan and remove from heat. Whisk in baking soda, then cool to room temperature.

Sift together flour, baking powder, and spices in a large bowl. Whisk together eggs and sugars and fresh ginger. Whisk in oil, then molasses mixture. Add to flour mixture and whisk until just combined.

Pour batter into Bundt pan and rap pan sharply on counter to eliminate air bubbles. Bake in the middle of the oven until a tester comes out with just a few moist crumbs adhering, about 50 minutes. Cool cake in pan on a rack 5 minutes. Turn out onto rack and cool completely.

Serve cake, dusted with confectioners' sugar, or serve with whipped cream.

As a reward for reading to the end, here is a recent shot of the sunset in our wintery sky. We have been having rain on and off, which is such a blessing!, so there are often clouds in the sky at sunset. Winter sunsets seem to have a wonderful fragile quality to them that I love.