Monday, January 29, 2007

Keep It Simple


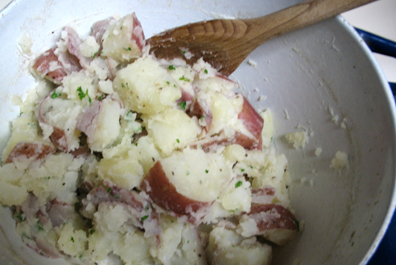
Some days the side dish for dinner needs to be really simple. Today is one of those days. So I kept the main dish spare and wanted something warm and comfort food-ish without a lot of bother. These red potatoes with parsley fit the bill.

Red Potatoes with Parsley

5 medium red potatoes, scrubbed
2 tablespoons butter
1 tablespoon fresh parsely, minced
1/4 teaspoon or so of salt

Cut potatoes in half, then cut halves in thirds. Put them in a heavy pot with just enough water to cover, bring to a boil, reduce heat, and simmer until tender.
Drain potatoes in a collander
While they drain, melt the butter in the bottom of the pot. Return the potatoes to the pot, sprinkle with the parsley and salt and stir. Some of the cooked potato will mix with the butter and be sort of like mashed potatoes and some will stay in meltingly tender chunks, flavored with the butter, salt and parsley. If you like, you can turn on the heat again and brown them a bit. Serve hot. Serves 2-3.


(This edit is taking place in 2008) Keeping track of the Daring Baker challenges before I joined I've added this to the above post. This was the January 2007 challenge and seeing it posted by some of my favorite bloggers inspired me to ask to join the group)

The group has now grown and Veronica of Veronica's Test Kitchen posted the recipe for this month, plus her notes.

Croissants

Because of the lengthy procedure, I’ve decided to incorporate some of my cooking notes within the original instructions prefaced with Veronica’s Notes and in parenthesis.

Preferment:
¾ cup non-fat milk (6 oz/150 ml)
1 tbsp active dry yeast (15ml)
1 1/3 cup all-purpose flour (6 ¼ oz/175g)


Dough:
1 tbsp + 1 tsp active dry yeast (20ml)
1 ¾ cup whole milk (14 oz/425 ml)
6 cups all purpose flour (28 oz/800g)
1/3 cup sugar (2 ½ oz/70g)
1 tbsp + 1 tsp salt (20 ml)
1 tbsp unsalted butter (15ml)

Roll-in butter:
2 ¾ cup unsalted butter (22 oz/625g)

Egg wash:
4 large egg yolks 2 oz/60 ml
¼ cup heavy cream
pinch salt

To Make the Preferment:
In a small saucepan, warm the milk to take the chill off (between 80° to 90 °F). Pour the milk into a mixing bowl, sprinkle the yeast over the milk, stir to dissolve the yeast with a wooden spoon, and then add the flour, mixing with a wooden spoon until a smooth batter forms. Cover the bowl with cheesecloth and let the mixture rise until almost double in volume, 2 to 3 hours at moderate temperature or overnight in the refrigerator. (Veronica’s Note: Being paranoid, I made two preferments. One ended up like a batter, and the other was like dough. I decided to use the one that looked like dough because the other one got stuck to the bowl.)


To Make the Dough:
First measure out all your ingredients and keep them near at hand. Transfer the preferment and then the yeast to the large bowl of a stand mixer fitted with the dough hook. Mix on low speed until the yeast is incorporated into the preferment batter, which will take a minute or two. Stop the mixer as needed and use a spatula to clean the bottom and sides of the bowl, folding the loosened portion into the mixture to incorporate all the elements fully. When the mixture has come together into an even, well-mixed mass, increase the speed to medium, and mix for a couple of minutes. Slowly add half of the milk and continue to mix until the milk is fully incorporated.
(Veronica’s Note: I don’t know what I did, but my milk never incorporated into the dough. I might have over- kneaded the preferment, as it became a smooth elastic mass; maybe that’s why the milk couldn’t be absorbed. Or maybe when they said slowly add the milk they really meant S-L-O-W-L-Y.)

Reduce the speed to low, add the flour, sugar, salt, melted butter, and the rest of the milk, and mix until the mass comes together in a loose dough, about 3 minutes. Turn off the mixer and let the dough rest for 15 to 20 minutes. This resting period helps to shorten the final mixing phase, which comes next. (Veronica’s Note: Easier said than done. My mixer was heaving and hawing but it got through the 3 minutes without stalling. Uh-oh, some of the butter got stuck to the ingredient bowl…wonder if that will be a problem.)

Engage the mixer again on low speed and mix until the dough is smooth and elastic, a maximum of 4 minutes. If the dough is very firm, add a little milk, 1 tablespoon at a time. Take care not to overmix the dough, which will result in a tough croissant that also turns stale more quickly. Remember, too, you will be rolling out the dough several times, which will further develop the gluten structure, so though you want a smooth dough, the less mixing you do to achieve that goal, the better. Cover the bowl with cheesecloth and let the dough rise in a cool place until the volume increases by half, about 1-½ hours. (Veronica’s Note. Oh boy, I know the instructions said smooth and elastic and that was what I had. But the other girls said their dough was not smooth. Another case of over-kneading? Crap!)

Lightly flour a work surface. Transfer the dough to the floured surface and press into a rectangle 2 inches thick. Wrap the rectangle in plastic wrap, or slip it into a plastic bag and seal closed. Place the dough in the refrigerator to chill for 4 to 6 hours. (Veronica’s Note: Make sure that there will be room for the dough to rise. The other ladies put theirs in Ziploc; I had mine in polyvinyl wrap, and it was busting out of its seams after 6 hours.)

To Make the Roll-in butter:
About 1 hour before you are ready to start laminating the dough, put the butter that you will be rolling into the dough in the bowl of the mixer fitted with the paddle attachment. Mix on medium speed until malleable but not warm or soft, about 3 minutes. Remove the butter from the bowl, wrap in plastic wrap, and place in the refrigerator to chill but not resolidify. (Veronica’s Note: Now I did not read the malleable part at first and was very frustrated getting my mixer to whip the butter that was straight out of the refrigerator. I had to pound the butter a little with my rolling pin- that worked phenomenally. It is very important that there be no lumps left in the butter, or it is going to push through the dough as you laminate. I took Ivonne’s suggestion and split my dough in half.)

Laminating the dough:
Lightly dust a cool work surface, and then remove the chilled dough and the butter from the refrigerator. Unwrap the dough and place it on the floured surface. Roll out the dough into a rectangle 28 by 12 inches. With the long side of the rectangle facing you, and starting from the left side, spread and spot the butter over two-thirds of the length of the rectangle. Fold the uncovered third over the butter and then fold the left-hand third over the center, as if folding a business letter. The resulting rectangle is known as a plaque. With your fingers, push down along the seams on the top and the bottom to seal in the plaque. (Veronica’s Note: Because I have only half a dough, I rolled it out to 14x6. It was a lot more manageable, especially for short people like me!)

Second turn:
Give the plaque a quarter turn so the seams are to your right and left, rather than at the top and bottom. Again, roll out the dough into a rectangle 28 by 12 inches, and fold again in the same manner. Wrap in plastic wrap or slip into a plastic bag and place in the refrigerator for 1 ½ to 2 hours to relax the gluten in the dough before you make the third fold, or “turn”. (Veronica’s Note: Crap! I think I did over- knead the dough! This dang thing is hard to roll out! )

Third turn:
Clean the work surface, dust again with flour, and remove the dough from the refrigerator. Unwrap, place on the floured surface, and again roll out into a rectangle 28 by 12 inches. Fold into thirds in the same manner. You should have a plaque of dough measuring about 9 by 12 inches, about the size of a quarter sheet pan, and 1 ½ to 2 inches thick. Wrap in plastic wrap or slip into the plastic bag, place on a quarter sheet pan, and immediately place in the freezer to chill for at least 1 hour. If you intend to make the croissants the next morning, leave the dough in the freezer until the evening and then transfer it to the refrigerator before retiring. The next morning, the dough will be ready to roll out and form into croissants, proof, and bake. Or, you can leave the dough in the freezer for up to 1 week; just remember to transfer it to the refrigerator to thaw overnight before using. (Veronica’s Note:. Again taking Ivonne’s lead, I did an extra 4th turn to fully laminate the butter.)

Making the croissant:
When you are ready to roll out the dough, dust the work surface again. Roll out the dough into a rectangle 32 by 12 inches and 3/8 inches thick. Using a pizza wheel or chef’s knife, cut the dough into long triangles that measure 10 to 12 inches on each side and about 4 inches along the base. (Veronica’s Note:. Crap, crap, crap! I COULD NOT roll out this dough! It is fighting me every inch of the way and I feel like I’m getting carpal tunnel just doing this. I’m really tired now. Guess we will just have humongous croissants after all. Or as Brilynn so aptly put it , croissants on steroids!)

Line a half sheet pan (about 13 by 18 inches) with parchment paper. To shape each croissant, position a triangle with the base facing you. Positioning your palms on the two outer points of the base, carefully rolling the base toward the point. To finish, grab the point with one hand, stretching it slightly, and continue to roll, tucking the point underneath the rolled dough so that the croissant will stand tall when you place it on the sheet pan. If you have properly shaped the croissant, it will have 6 or 7 ridges. (Veronica’s Note: At this point, my hands and arms are dead; I just cut the dough by eyeballing the required triangle. It did not turn out too bad until I was going to bake it. I have croissants of all sizes. “Great Veronica, did it not occur to you that they will cook unevenly?” my inner voice said. Well too late. I am just going to run with this. )

As you form the croissants, place them, well-spaced, on the prepared half-sheet pan. When all the croissants are on the pan, set the pan in a draft-free area with relatively high humidity, and let the pastries rise for 2 to 3 hours. The ideal temperature is 75 °F. A bit cooler or warmer is all right, as long as the temperature is not warm enough to melt the layers of butter in the dough, which would yield greasy pastries. Cooler is preferable and will increase the rising time and with it the flavor development. For example, the home oven (turned off) with a pan of steaming water placed in the bottom is a good place for proofing leavened baked items. To make sure that no skin forms on the pastries during this final rising, refresh the pan of water halfway through the rising.

During this final rising, the croissants should at least double in size and look noticeably puffy. If when you press a croissant lightly with a fingertip, the indentation fills in slowly, the croissants are almost ready to bake. At this point, the croissants should still be slightly “firm” and holding their shape and neither spongy nor starting to slouch. If you have put the croissants into the oven to proof, remove them now and set the oven to 425 °F to preheat for 20 to 30 minutes.(Veronica’s Note: Just follow this baking instructions. They are relatively goof-proof unless you are me.)
About 10 minutes before you are ready to bake the croissants, make the egg wash. In a small bowl, whisk together the egg yolks, cream, and salt until you have a pale yellow mixture. Using a pastry brush, lightly and carefully brush the yolk mixture on the pastries, being careful not to allow the egg wash to drip onto the pan. Let the wash dry slightly, about 10 minutes, before baking.

Place the croissants into the oven, immediately turn down the oven temperature to 400 °F, and leave the door shut for the first 10 minutes. Then working quickly, open the oven door, rotate the pan 180 degrees, and close the door. This rotation will help the pastries to bake evenly. Bake for 6 to 10 minutes longer, rotating the pan again during this time if the croissants do not appear to be baking evenly. The croissants should be done in 15 to 20 minutes total. They are ready when they are a deep golden brown on the top and bottom, crisp on the outside and light when they are picked up, indicating that the interior is cooked through. (Veronica’s Note: I forgot to do the “pick-up” test and some of my croissants, especially the heavier ones, were really weighty. Also, there was a pool of butter that developed in the pan. Ivonne and Peabody both acknowledge that this is expected. I think mine was a bit excessive, though. How about some fried croissants?!)

Remove the croissants from the oven and place them on a wire rack to cool. As they cool, their moist interiors will set up. They are best if eaten while they are still slightly warm. If they have just cooled to room temperature, they are fine as well, or you can rewarm them in a 375°F oven for 6 to 8 minutes to recrisp them before serving. You can also store leftover croissants in an airtight container at room temperature for 1 day, and then afterward in the refrigerator for up to 3 days. If you have stored them, recrisp them in the oven before serving.

More Cooking Notes:
I had so much fun doing this croissant weekend event. I think the girls and I accumulated over 100 emails just corresponding back and forth doing the blow-by-blow on the croissant process as well as giving each other much-needed moral support. So Lisa, Ivonne, Jenny , Brilynn, Helen and Peabody, thanks for an action-packed weekend!

I am far from an authority on croissants and I’m glad that this is a test kitchen because the results, as one can tell from the pictures, are not what a croissant is suppose to look like. It’s supposed to have layers, but mine are just too distinct and not beautifully-blended. Though not pleasing to the eye, the taste was wonderfully developed into a complex buttery flavor! And to me taste always comes first before presentation, but if I could have both that would be ideal.

So what went wrong with my croissant? I think the problem started with the main dough development. I carelessly added the butter, which was a necessary component of making the dough easier to roll. Next was the over-kneading itself, which then made the dough so elastic that it was near impossible to roll it out quickly, which is essential to keeping the butter cold.

After more research, it occurs to me that I have puny little hands. I read this interesting story from Sherry Yard’s
The Secrets of Baking.She had two assistants: a dainty 5-foot-2 inch girl and a burly 6-foot-4 inch guy. The girl made beautiful puff pastry but horrible croissants. The guy made wonderful croissants but terrible puff pastry. After watching how the two of them worked, Sherry determined that the girl did not have the heft and muscle to handle the tight glutinous yeasted dough of croissants while the guy pounded the delicate layers of the puff pastry, resulting in a poor rise. Now, I am far from dainty but my hands are really small and I have zero upper-body strength.

So what would I have done if I have known this beforehand? Hmmn, I don’t know. Maybe teach the “hungry” hubby how to use a rolling pin, I guess.

Sunday, January 21, 2007

Waiter There Is Something in My... Is This Stew?


One of the delights of blogging is the opportunity to join food blogging events, but this month there seem to be a fair number of them happening right about now. So if it seems like I'm only blogging for events, you are absolutely correct at the moment.

New for '07 is an event with a different theme each month, but always starting out with Waiter There is Something in My... It's a creation of Cooksister, Passionate Cook and Andrew, our host this month at Spittoon Extra. This month the theme is Stew.

When I clipped out a recipe for Veal or Chicken Paprikash by Marlena Spieler from the San Francisco Chronicle a few weeks ago (Jan 3 '07) because it had bay leaves, it didn't occur to me that it was a stew, but when it was cooked it sure seemed like a stew, so here it is; Chicken Paprikash Stew.

I did part of the cooking and Sweetie did part of the cooking, then I finished it off a few days later. That time in the fridge allowed the flavors to mingle a bit. The changes are minor: I decided to use boneless, skinless chicken breasts, cut into bite sized pieces instead of the 3-pound chicken with skin and bones. Never did plan to cook the veal version, but I might someday.

The flavor was fairly mild considering how much paprika went into it. The onions, tomato and peppers all cook up slightly sweet, and I think Sweetie forgot the cayenne, so a liberal addition of freshly ground black pepper and sour cream added a bit of punch. This is real comfort food. Great with noodles, it would also be good and authentic with fresh dumplings or spaetzle.

Chicken Paprikash Stew Elle's Way
1 large onion, peeled and chopped
3 tablespoons vegetable oil or olive oil
3 garlic cloves, thinly sliced
2 bell peppers (I used red for both, but you can use red and/or green),
stemmed, seeded and thinly sliced or chopped

2 tablespoons mild (preferably Hungarian) paprika
2 bay leaves
4 boneless, skinless chicken breasts, thawed and cut into bite sized chunks
1/2 cup dry white wine
1 cup chicken broth
1 can diced tomatoes
1 1/2 cups sour cream
1 1/2 tablespoons flour
1 teaspoon marjoram
Salt and a pinch of cayenne
Black pepper to taste

In a heavy nonreactive casserole or large skillet, lightly saute the onion in the oil until softened, then add the garlic and peppers and cook about 5 minutes until the peppers are also soft.
Remove from the heat and stir in the paprika (if you add it on the heat the high sugar content of the paprika will scorch and give the sauce a bitter flavor).
Add the bay leaves and chicken, then reurn to the heat for about 5 minutes, and cook to gild the meat slightly. Pour in the wine and continue cooking a few minutes, then add the broth and tomatoes. Bring to a boil, then reuce the heat to very, very low and simmer, covered, for 25-35 minutes, until very tender.
Mix the sour cream with the flour and stir until smooth. Stir into the stew, then season with marjoram, salt, cayenne and black pepper. Cook uncovered about 15 minutes, or until thickened. Remove the bay leaves, season to taste and serve. Serves 6.


Saturday, January 20, 2007

Twice the Terroir - Part Two


Yesterday was for truffles, but this part is for a favorite local food item - the Gravenstein Apple. Anna of Anna's Cool Finds is hosting an event, A Taste of Terroir, and these apples are very much a part of the place where I've lived for 20 years.

One of the great things about living close to the small rural town of Sebastopol in northern California is that twice a year they celebrate our local product, the Gravenstein Apple.

In the spring there is the Apple Blossom Parade and Festival which has been held yearly, almost without a break, since near the turn of the twentieth century. The parade is quintessential small town. Folks place blankets and chairs along the parade route down Main Street early in the morning and those items are still in place around 10 a.m. when they close down Main Street through town and the Parade starts. The Parade itself has marching bands from local elementary and high schools, preschoolers on tricycles, Scout troops, Little League, tap dancers and more. It's hard to find a child over the age of 5 who isn't going to be in the Parade in some capacity.

In mid August when the very perishable Gravenstein apples are ripe, a Gravenstein Apple Fair is held at the county park on the west side of town. The Community Church bakes hundreds of their famous Gravenstein apple pies, local apple ranchers sell boxes of apples, there are booths, an art show, live music, beekeeper demonstrations, wine and beer tasting and much more. This area used to be one of the largest producers of Gravenstein apples in the U.S. Now wine grapes have edged out the apples, but there are still enough grown that in late summer and early fall you can buy them in quantity. They are wonderful eaten out of hand, with the sweet-tart juices running down your fingers after you bite into the crisp pale flesh. Gravensteins have distinctive look with a base color of apple green liberally striped with red streaks. They make great pies, cobblers, and cookies when fresh.

When we moved here I was thrilled to see that we had a few old apple trees on the property. I didn't know what kind they were, but I gathered them in late August and stored them in the cellar, thinking that it would be great during the winter to go down and take out a few for a pie or eating out of hand. Imagine my dismay when I tried to use some for a Thanksgiving pie and discovered that they had all turned brown and mushy. A neighbor just laughed and said that they were obviously Gravenstein, which don't store well. Although they make great apple pies when fresh, they make exceptional apple sauce for year round enjoyment.

Now the trees are mostly gone, but I can buy Gravenstein apple sauce at Trader Joe's any time. The apples are juicy and sweet tart. The apple sauce is unsweetened, which is perfect. It makes a nice addition to my morning oatmeal and raisins. Maybe in late Auguest I'll make a pie from some of our remaining apples and take a photo for the blog. In the meantime, apple sauce will fine.

Oatmeal with Raisins and Apple Sauce
1/3 cup Quaker Quick - 1 minute - rolled oats
2/3 cups water
1-2 tablespoons raisins
1/4 cup milk or soy milk or half and half
1/4 cup unsweetened Gravenstein apple sauce (I use Trader Joe's)

In a microwave safe bowl combine the oats, water and raisins. Microwave on high for one minute. Stir. Microwave on high one more minute. (Microwave ovens vary. These times work for me, but try yours to see if your oven needs different times to cook.)
Let cool slightly, then pour on milk and mound some apple sauce on top. Eat while oatmeal is warm and apple sauce is cool. Serves 1.


Friday, January 19, 2007

Twice the Taste of Terroir - Part 1


Anna of Anna's Cool Finds has created a blogging event, A Taste of Terroir, surrounding the idea of terroir, which includes a sense of place for foods and traditional foods of an area. A good friend of mine is heading up to Oregon next weekend to experience a truly wonderful kind of regional food, the Oregon White Truffle. She will join family members at Shirewood Farm for the 2007 Oregon Truffle Festival. You can find them at: http://www.shirewoodfarm.com/ ShireWood Farm is best known for it's Oregon White Truffles ~ "the ultimate culinary delicacy."

There is a lot going on at the Oregon Truffle Festival and lots of the packages have sold out, but there are still some part of the event available if you make your reservation soon. Go to: http://www.oregontrufflefestival.com/ to find out more. The events include seminars, tours, dinners, a winery tour, and both a truffle dog demonstration and a foray to find truffles at ShireWood Farm.

The following is from the web site for the festival, as are the photos at the top of this post.

“Who ever says truffle, pronounces a great word, which awakens erotic and gourmand ideas both in the sex dressed in petticoats and in the bearded portion of humanity." Brillat-Savarin, 1825

Oregon truffles are emerging as one of the world's great delicacies, taking their richly-deserved place next to their legendary European cousins. The Second Annual Oregon Truffle Festival in Eugene, Oregon brings together harvesters, chefs, growers and gastronomic aficionados in an unparalleled celebration of one of Oregon's most incredible treasures. The Oregon Truffle Festival, held during three brisk winter days starting January 26 and concluding on January 28, 2007, celebrates the magnificent Oregon truffles as they reach the peak of ripeness in their native soil. It is the first festival of its kind in North America, dedicated to sharing the experience of the chefs, foragers and fans of Oregon's wild truffles—from their hidden source in the forest to their glory on the table.

All events are located in and around Eugene, Oregon

In the rarified world of truffles, Oregon is known as the premier center of research and expertise outside of Europe. A lineage of eminent scientists has maintained that standing for almost a century, and continues to hold it to this day. Oregon is also blessed with an abundance of wild truffles with culinary qualities equal to those of Europe, and as with French grapes, Oregon has the perfect climate for cultivation of the renowned French truffles. As the ultimate culinary delicacies, truffles serve as emblems of the good life in every region where they grow, and in Oregon they are complemented by our wealth of other wild and cultivated gourmet foods, and an increasing number of extraordinarily talented and award winning chefs.

Despite Oregon’s long history of truffle research, its truffle industry is young and undiscovered. The few sources for wild truffles are avidly sought and jealously protected by harvesters who sell the truffles quietly here and there throughout the country. Secrecy pervades the world of truffles and is a part of their mystique, but it has not served Oregon’s truffles well. Here it also conceals knowledge necessary to bring the real potential of the Oregon truffles to light. Simple details like how to choose and handle a truffle to tease out its grandeur are known to only a few harvesters and chefs. As a result, Oregon truffles have not received the recognition that those who have experienced their essential magnificence know they deserve.

Keep in mind that it is winter, and Oregon can be wet, so dress appropriately. Although the average temperature in the southern Willamette Valley in January is mid-30’s to mid-40’s, and one in ten years can result in snow on the valley floor, it is just as likely to be a brilliantly sunny day in the last week in January. Thus, we recommend a both a raincoat and sunglasses!

Warm layers of wool or fleece, with a final waterproof, breathable layer are best. A scarf, gloves and a hat will make your head and hands happy.

The Oregon Truffle Festival 2007 offers a multitude of exciting ways to participate. Mark out January 26-28, 2007 in your calendar for your truffle experience!


Thursday, January 18, 2007

Breadstick Black and White


Time to party again! Stephanie at Dispensing Happiness has invited us to a Black and White Party this month. Being so close to San Francisco, when I hear Black and White for a party theme, I think of the Black and White Ball at the beginning of the opera season, and also of tuxedos and white tie and tails, all dripping with elegance and sophistication.

Not being a particularly sophisticated soul, the closest I came in deciding what to cook for the party was that puff pastry is elegant by nature. The idea of slathering the puff pastry dough with garlic infused cream cheese and then sprinkling it with poppy seeds and freshly ground black pepper was my own idea. Twisting the sticks was inspired by a photo in a Martha Stewart book, but it's surely been done many times before.

These came out of the oven flaky and savory and it was truly difficult to photograph them because Sweetie was very happy eating any that were not claimed. The perfect thing to go with them on an icy evening like today's is a nice Irish Coffee combining strong coffee, Irish whiskey and cool whipped cream. Let's party!

Black and White Breadsticks
1 sheet frozen puff pastry, thawed
4 oz. cream cheese, softened

1/2 teaspoon garlic powder
2-3 tablespoons poppy seeds
1/4 teaspoon pepper, preferably freshly ground

Preheat oven to 400 degrees F. Line two cookie sheets with parchment paper.
Place the cream cheese in s small bowl. Add the garlic powder and work in well, until completely mixed.
Place the thawed dough, unfolded, on a lightly floured work surface. Roll in one direction with a lightly floured rolling pin until the dough is 1/8 inch thick. Spread thinly with the cream cheese mixture, completely covering the puff pastry dough. Sprinkle with the poppy seeds and pepper.
Using a pizza cutter or zig-zag pastry cutter, cut the pastry lengthwise in roughly 1/2 inch strips.
Twist each strip from either end and place twisted pastry strip on parchment paper. If strip starts to unwind, push the ends down to stick to the parchment paper.
Bake for 10-12 minutes until golden brown. Let cool slightly on pan, then serve while warm.


Friday, January 12, 2007

Take Good Care of Yourself

Not only is it a good idea to "Button Up Your Overcoat" this time of year as the old song says, but it can also be a good idea to look at what else is needed to take good care of yourself.

It doesn't matter if you are single, living with roommates or family, the time you put into taking care of yourself will pay off for yourself and anyone who cares about you far into the future.

My 80+ year old mother is a 5+ year survivor of lung cancer. If you know anyone who has fought the fight against lung cancer, you know that she is among the lucky few. She has been good, far better than I will ever be, at eating right and exercising for most of her life. She credits that, along with excellent medical care and a very early diagnosis, with her survival. Her children, her extended family and many friends are glad that it worked out that way. With her care as a role model, I've been focused on doing a better job of that myself, but it's not easy.

With all of the items on my real and virtual 'to do' list that tug at me for attention, it's hard to focus on anything beyond that. Despite that, in the last six months I've done a series of screening tests and a few procedures after years of hoping that if I ignored what I didn't want to deal with the things would go away. Silly me.

The latest was a colonoscopy this week. Results were great. The reason I'm blogging about it is that if you decide to take that screening test or any other one that required a pre-screening regimen to clean out your digestive system, there are a few tricks I tried that really helped make it easier to prep.

Start four days in advance of the day you will prep. At that point begin eating more easily digestible food. In particular stop eating red meat. Indeed, if possible, stop eating meat altogether for the last four days. The second day before I had eggs and fruit and toast for breakfast and soup with chicken and brown rice for dinner. Lunch was yogurt and some almonds. I drank a fair amount of water that day. The day before was all liquids including fresh orange juice, broth, and lots of tea. The day of I had some fresh orange juice and herbal tea in the morning. I started the prep at noon. Since I had done this type of prep before I was pleasantly surprised that this time there was very little cramping and I was all finished up by 6 P.M. Last time I was up all night. If you are over 55 and have never had a colonoscopy, please think about having one soon. The prep is the most difficult part and if you follow a similar eating regimen to the one above it is very likely that your experience will also be that it is easier than a stomach flu and shorter, too. The upside is that you will catch anything that needs attention when it is tiny and easy to deal with and be around to tease your great-grandchildren or great-neices and great-nephews at least.

Not ready for that or too young (50 may be the best age to start...don't know but your doctor does)? Maybe with the new year you resolved to exercise more or eat more fish or veggies or fruit or whatever. Those are all good goals. Maybe you actually were brave and did the blood work-up and doctor physical thing and know that you need to tackle the eating better and exercising more thing to avoid medications instead. Go for it! You can do it, somehow, if you want to. Find a buddy to do it with if that suits you. Misery loves company. So does success.

Live long and prosper.


Monday, January 08, 2007

More Cake


Just to make you really want to bake the cake, here is another shot, up close enough to almost taste it. Enjoy!

Dorie to the Rescue


This past weekend we had dinner in Healdsburg with P&P and with their daughter, her husband, who is Sweetie's nephew, and with the rug rat who shares Sweetie's first name. We last saw the little one in August. Four months later he is even more his own person and enthralling. I love babies in general, but really enjoy spending time with babies who are calm and observant as this rug rat is.

But what does all this have to do with Dorie or rescuing? Our part of the dinner was to bring a dessert and I wanted something that would easily serve our crowd with a few servings left over for seconds if needed. I also had a lot going on the day before, so wanted something I could bake on Friday which would be even better by Saturday. Looking through Dorie Greenspan's Baking, From My Home to Yours book provided the perfect inspiration. Her Holiday all-in-one Bundt Cake was a great jumping off place for the dessert I wanted to make. Not only does it have all the great holiday spices like cinnamon, nutmeg and ginger, but it has pumpkin, fresh cranberries and fresh apple, plus pecans. Yum!

I made a few changes - I always do - and my Sweetie was very pleased. He is very fond of molasses and I replaced the white sugar with an equal amount of dark brown sugar, then used a good dark molassas in place of the 1/2 cup light brown sugar called for in Dorie's recipe. The result was wonderful, like a cross between a pumpkin cake and gingerbread. I followed her suggestion for a glaze made from maple syrup and confectioners sugar, but next time will probably make the glaze with lemon juice instead of the syrup.

Do try this cake. It is great for a party, looks great, can be made ahead and keeps well in the unlikely event that there are any leftovers. If you make it ahead, wrap well in plastic wrap and keep in a cool place. I made it Friday evening and served it Saturday evening. It stayed moist and had a wonderful crumb.


All-In-One Pumpkin-Molasses Bundt Cake
Inspired by Dorie Greenspan's All-In-One Holiday Bundt Cake

2 cups all-purpose flour
2 teaspoons baking powder
1/2 teaspoon baking soda
2 teaspoons ground cinnamon
1/4 teaspoon freshly ground nutmeg
pinch of salt
1 teaspoon ground ginger (or 1 1/2 teaspoons grated fresh ginger)
1 1/4 sticks (10 tablespoons) unsalted butter, at room temperature
1 cup dark brown sugar, packed
1/2 cup dark molasses
2 large eggs, at room temperature
1 teaspoon vanilla extract
1 1/4 cups canned unsweetened pumpkin puree
1 large apple, peeled, cored and finely chopped
1 cup fresh cranberries, rinsed and halved or coarsely chopped (or use unthawed frozen cranberries)
1 cup pecans, coarsely chopped (plus a few to decorate the glaze)
2 tablespoons maple syrup
6 tablespoons confectioners sugar

Center a rack in the oven and preheat the oven to 350 degrees F. Butter a 9 to 10 inch (12 cup) Bundt cake pan. Don't butter if pan is silicon.

Whisk together the flour, baking powder, baking sod, cinnamon, nutmeg, salt and ground ginger. (If using grated ginger, it gets added later.)

In a large bowl beat together the butter and brown sugar at medium speed until light and fluffy. Add the molasses and mix well. Scrape beaters and bowl. Mixture may looked curdled. It's O.K. Add the eggs, one at a time, and beat for 1 minute after each addition. Beat in the vanilla. Scrape beaters and bowl. Reduce the mixer speed to low and add the pumpkin, chopped apple (and grated ginger if using). Still on low speed, add the dry ingredients, mixing only until they are incorporated. With a rubber spatula, stir in the cranberries and pecans. Scrape the batter into the Bundt pan and smooth the top with the rubber spatula.

Bake for 60 to 70 minutes, or until cake tests clean with thin knife or toothpick. Transfer the cake to a rack and cool for 10 minutes before unmolding, then cool to room temperature on the rack.

When cake is cool, make the glaze. Sift the confectioners sugar into a bowl. Stir in the maple syrup. Add more, little by little, until you have the consistancy you like. Place cake on waxed paper or serving plate and drizzle glaze over the cake. Sprinkle pecans on glaze. Let glaze dry.

If you prefer, skip the glaze and dust the cake with confectioners sugar right before serving. Serves 12.


Thursday, January 04, 2007

More Generosity


It was difficult to leave our sweet black lab and fluffy gray cat for Christmas but it was also hard to leave the beautiful bay wreath from ML and CH of La La Land. It arrived only a few days before we flew out and the sweet bay scent filled the whole downstairs beautifully. Williams Sonoma put together a lush green circle which looks great as a seasonal wreath on the sunspace door. After a few weeks of sun and heat from the woodstove, it looks like the photo, a little dryer, a little curled and less fragrant. The good news is that it will keep me in bay leaves for cooking for a good long time! Eagle Rockers, you generosity is appreciated!

I would be grateful for any recipes any of you might have that use bay leaves, especially multiple bay leaves. I'm also planning on passing some leaves around to friends who make soups and stews and such. Want some?

Tonight I used only one bay leaf in a family favorite, Barley Soup. This recipe is on the Quick Quaker Barley box. It makes a hearty soup just right for both a winter night and some of those 'I must lose some of the holiday weight' promises we make about this time of year. It's pretty quick if you use the rolled barley. I use ground turkey instead of ground beef, but otherwise pretty much follow the recipe.

Quick Barley Soup with Vegetables

1/2 lb lean ground meat (Quaker calls for beef, I use turkey)
1/2 cup chopped onion
1 clove garlic, minced
5 cups water
one 15 oz. can diced tomatoes in juice, undrained
3/4 cup Quaker Quick barley
1/2 cup sliced celery
1/2 cup sliced carrot
2 beef boullion cubes
1/2 teaspoon dried basil, crushed
1 bay leaf
One 9 oz pkg. frozen mixed vegetables

In 4 quart saucepan or Dutch oven, brown meat in a little olive oil. Add onion and garlic, cook until onion is tender. Drain. Stir in remaining ingredients except frozen vegetables. Cover; bring to a boil. Reduce heat and simmer 10 minutes, stirring occasionally. Add frozen vegetables, cook about 10 minutes more, or until vegetables are tender. Additional water may be added if soup becomes too thick upon standing. Makes eight 1 cup servings.

Note: Tastes even better the next day. elle


Wednesday, January 03, 2007

Generosity


It is better to give than receive, but it is still awesome, especially as a foodie, to see how generous family members have been to us this Christmas.

The Healdsburg branch of the family gave us an enormous and lovely basket filled with things like a whole hard salami which was gone in a flash, a jug of apple cider syrup, the addictive nut cake with brandy (also gone), a cute sack with hot chocolate mix, a yummy sounding asparagus soup mix, and more.

Tonight we enjoyed the black bean and rice soup. It started out as a mix. The beans were in one packet, the seasoning in another, and the rice and some dried red pepper in another.


We started by rinsing the beans using another generous gift, the folding strainer, which my sister and brother-in-law from Sac gave us. It's pretty nifty and well designed. Don't the beans look great next to that bright red silicon?


You could cook this without a mix, but the amounts are approximate in the recipe below - I'm just guessing at what was in the mix. While the beans were cooking, our own onion, garlic, red bell peppers (fresh) and olive oil were sauteed together and added as directed. It didn't ask for the fresh bell peppers, but I thought that they would add a bit of fresher taste, which they did. Once the rice and dried peppers were added and cooked, I put the whole thing in the 'fridge overnight. Today I reheated it and served it with a butter lettuce, mandarin orange and avacado salad, garnished with sliced almonds. Some fresh multi-grain bread rounded out the meal. The soup was pretty spicy, but good and filling. Thank you P-P & T-W!

Black Bean Soup with Rice and Red Peppers

1 1/2 cups small black beans, rinsed and sorted
1 teaspoon salt
1 tablespoon sugar
1/2 teaspoon dried parsley
1/2 teaspoon cumin
1/4 teaspoon cayenne pepper (or more to taste)
1/4 teaspoon ground black pepper
10 cups water
1 (15 oz) can diced tomatoes
1 cup medium or long grained white rice
2 tablespoons olive oil
2 garlic cloves, crushed
1 large onion, chopped
1 large red bell pepper, stem and seeds removed, chopped

Put beans in a large pot, add the water and bring to a boil. Reduce heat, cover, and simmer for 1 hour 15 minutes.

While beans are cooking, saute the garlic, onion, and fresh bell pepper in the olive oil over medium-high heat until the onion is transluscent. After beans have cooked, add the seasonings, tomatoes, rice, and sauted mixture. Stir well. Simmer, covered, for an additional 30 minutes. Stir frequently to keep rice from sticking to the bottom of the pot. If desired, cool and refrigerate overnight, then reheat to serve. Makes about 8 on cup servings.


Welcome 2007


Yes, it's a few days late. Nasty cough and cold got in the way. But how could I wait any longer to wish y'all Happy New Year?! So many fascinating food blogs in 2006, great writers, great photographs and recipes and even the blessed 'lurker'. I was such a creature for a while. Blogging is much more fun. If you are lurking out there, consider blogging. Google makes it pretty easy.

This orchid is showing a new set of flowers. It started blooming right before we left for Christmas and this past weekend another flower opened up. It is too beautiful not to share, especially since in the past I always managed to kill the plant after the first blooming. New year, new blossoms, and, soon, new posts with food in them.