
Hope that you and yours have a most happy holiday season! XO, Elle


The last few years have been unusual due to the pandemic. Last year we still had our daughter and her fiancé and his son here for Christmas but there was far less gathering than usual and no big Open House the day after Christmas as we had done prior to 2019.
This year isn't that different, but we won't have R with us this year, which is sad but understandable since we need to share, plus our gathering is smaller, with just some of the family and no neighbors or friends. This year not only is there COVID, but there is also the flu and a respiratory virus, so even our group is a bit large. Fortunately, the weather will be fairly mild (in the mid-60s), so we can be outside some of the time and/or have windows open.
The tree is up, plenty of food in the pantry and fridge, the cider with spices was in the slow cooker to stay warm. K arrived Wednesday and yesterday we gathered!
It is hard for me to believe, but I have hardly baked anything for this Christmas. I did make fruitcake a while ago, and I have made a couple kinds of cookies, but that's about it. My youngest sister and her family brought a delicious chocolate cake, which everyone loved, so my baking wasn't even missed.
The spread included chips and chutneys, meats and cheeses, hummus and crackers, veggies and dips and, the hit of the party, steamed shrimp and cocktail sauce. The photo above was taken when most had finished the savory part and the dessert part was still to come.
The best part was having family together and all of the varied conversations. Since we often socialize with Sweetie's side of the family separately from my side of the family, but didn't this time, it was an opportunity for local family from both sides to get to know each other better.
Sweetie is encouraging me to stay calm and enjoy life and what it brings instead of planning things to distraction and setting myself up for being in a tizzy by having too many things that I'm going to make. So far, so good.
I'm sure there will be another post before Christmas, but right now I wish you a no-tizzy time yourself and hopefully lots of fun with family and/or friends to celebrate the solstice just past, Hanukkah still in progress, and the holidays still to come!
XO, Elle

Some tips for large gatherings:
Place the drinks in a separate place, away from the food. This avoids bottlenecks and allows for more mixing of guests. We put our drinks, and ice, into the bake center sink. The hit of the party was our spiced warm apple juice, a combination of apple juice (but you could use cider), big strips of orange peel, a few whole cloves, and a couple cinnamon sticks. We warm ours in a large crock pot, but you can also simmer it on the stove. Provide a ladle and hot cups. If you like there can also be a bottle of spirits (we like bourbon) next to the warm cider so that folks can add a dollop to their cider if they like.
Be sure to have openers for the bottles...cap openers for beer, wine openers for wine, etc..
Group chairs in different parts of your entertaining space if you can, so that there can be small group discussions.
If it's a pot luck, have some serving bowls and plates, cutting board and knives, serving spoons, etc. handy, plus some trivets to put under hot items.
Have a plan for where to put coats, purses, etc. We have hooks in our front hall so we cleared off all of our own coats and hats and put them upstairs, leaving the hooks free for our guests. If you have a bedroom on the same floor, hosts often suggest that the bed in that bedroom be the repository for coats.
Have plenty of ice, both to chill drinks and to put into drinks. 16 pounds was the right amount just to chill the beverages in our utility sink. If you have a full size sink or tub, you'll need more, plus more for putting into drinks. The ice for that can be put into a medium bowl or an ice bucket.
Although more disposables for the landfill is hard to take, for the once a year party we use paper plates and napkins, and disposable plastic forks, knives and spoons, plus plastic cold cups and paper hot cups. There is still plenty of clean-up needed after the party of serving trays and plates, etc., along with putting away what wasn't eaten.
Towards the end of the party check with those driving to see if they want coffee or tea and if they take decafe or regular. This is particularly important if you have been serving alcohol.
Have fun! Take photos if you like! Enjoy the gathering.

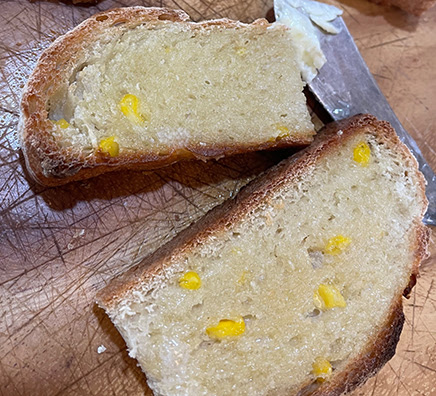
No, not corny because it's malarkey, but actually a loaf or braid with both corn flour and corn kernels. It's a fine bread to go with soup or stew or chowder, but also makes great toast.

This challenge is brought to us by Karen of Karen's Kitchen Stories. It is a nice one because it goes together fairly quickly. You can either use sourdough starter if you have it, or do as I did and mix together equal amounts of flour and water to make the 1/2 cup starter. You won't get the lovely depth of flavor that you get with starter, but the recipe calls for so much instant yeast that your loaf...or braid...will rise just fine without the sourdough starter.
The challenge was to make a very large loaf, but I went with a braid instead because it's been a long time since I made one and because I felt like it. I'm sure that the loaf is a fine way to go, too. Do check out our other Bread Baking Babes to see their take on the challenge.
.png)
Want to make this bread? Consider posting about your bake and sending the URL and a photo with short description to Karen to be a Bread Baking Buddy and be included in the Buddy round-up. Just get it to her by Nov. 29th. More information is on her blog.

Yeasted Corn Bread
Ingredients:
425 grams (1 3/4 cups plus 1 teaspoon) lukewarm (80-90 degrees F) water
100 grams ( a little less than 1/2 cup) flour mixture ( 1/2 cup flour mixed with just slightly less water OR 1/2 cup sourdough starter)
400 grams (2 3/4 cups plus 2 teaspoons) bread flour
175 grams (1 1/2 cups plus 1 teaspoon) corn flour - I used Bob's Red Mill millet flour
175 grams (1 cup) corn kernels - I used frozen corn kernels, thawed
14 grams (2 3/4 teaspoons) fine sea salt
2 grams (1/2 teaspoon) instant yeast - I used 2 packets
Instructions:
In a large container, such as 6-quart tub, add the water. Add the flour mixture or sourdough starter to the water and mix with your hand or a whisk.
Add the bread flour, corn flour, corn kernels if using. Mix by hand until incorporated. (I mixed the flours together in a large bowl, then used a whisk for the first 1/2 cup or so, then my clean hand. The dough came together in a shaggy mass.
Sprinkle the salt (to one side) and the yeast (to the other side) over the top, cover, and let rest for 20 minutes.
Mix with a wet hand, using your fingers to pinch the dough to incorporate the salt and yeast, and then stretch and fold a few times to fully incorporate salt and yeast. Finish with a stretch and fold. Let rest a couple of minutes and then stretch and fold a few more times.
Cover and let rest for 30 minutes. Stretch and fold again, cover and let rest for 30 more minutes. Do a final stretch and fold, cover, and let rise until it's 2 1/2 to 3 times it's original size but still domed and not flattened. If you're using a tub with level marks, it should reach the 2-quart mark.
In the meantime, spray a loaf pan with spray oil or spray a baking sheet if you are doing a braid as I did.
When it's ready, gently turn the dough out onto your work floured surface.
If you are making a braid as I did, use a bench scraper to divide the dough into three pieces. Keep the surface floured as you work. Roll each of the pieces into a snake about 15-inches long. Move to the prepared pan, pinch the ends together and loosely braid, tucking ends under when braided. Cover with oiled plastic wrap, oiled side to loaf, and let rise about an hour until puffy and almost doubled in size.
If you are making a loaf, gently flatten the dough into a rectangle to 2 to 3 times its original width and about as wide. Fold the ends back over each other creating a rectangle double the width of the pan. Roll up the dough to form a tube about the same length as your pan. Place it in your pan seam side up."
Brush the loaf with water.
Cover loosely with plastic wrap and let rise for about an hour, until slightly crested over the top of the pan (if using a 10 inch x 5 inch loaf pan).
For either shape:
Heat the oven to 450 degrees F. Bake. For the braid it will be for about 30-45 minutes, until it is browned and sounds hollow when tapped on the back. For the loaf, bake for about 50 minutes, turning halfway through for even baking.
Move or turn it out onto a wire rack and let cool at least an hour. It actually gets better if you wait a bit longer.

Welcome December! We had lots of rain last night and this morning!! With the prolonged drought we have been in here in California, this is cause for celebration. Of course the coming holidays are also cause for joy...and lots of baking and making. Here is the first recipe I recommend to you, dear reader, for you holiday baking. It's a keeper. Do read through the full post before making it...there are tips for you.
I bought a bag of fresh cranberries sometime in early November. I do this almost every year because I know that before they get too old I'll come across a recipe or recipe idea where you need fresh cranberries...and there they will be in the bottom crisper drawer in the fridge.
That happened last week. There was no time to make the tart for Thanksgiving, but that weekend I had the time, so I made this delicious tart which combines walnuts, fresh cranberries, orange, and some brandy.
Instead of making a tart dough, I just used a refrigerated, rolled out pie dough circle. Once I fit it into my 9" tart base and pushed the dough up the sides, there was just enough to fold the rest of the dough down along the sides and push it into the sides...so I had double thick sides but a single thickness on the bottom. Of course a home made pie dough is delicious, so if you prefer to do that, the recipe is below the recipe for the tart.
Because I didn't have the size tart pan called for in the recipe (10-inch is called for but I had a 9-inch one), I knew that there would be extra filling. My solution was to let the fruit and nuts settle a bit after I mixed them into the filling, and then I poured out about a third of the filling into a spare bowl. I poured the rest into the tart shell and then topped it up with the filling in the spare bowl. It worked just fine, but I had leftover filling...without many bits of cranberry or nuts. My solution was to spray a pie dish with baking spray and then I added about a half cup of walnuts to the spare bowl and the filling still left in it. That mixture went into the prepared pie dish and it was baked at the same temperature...but for only about 15-20 minutes until the mixture was set. Sweetie had some after it cooled and he liked the mostly nuts version...without any crust!...better than the tart. I liked the tart better. I think that the cranberry added a freshness that the 'mainly nuts' filling didn't have. Still, if you would like to put in more walnuts and fewer cranberries (or none), feel free. I think you'll find that the orange-brandy-brown sugar filling works well with both.
Bakers tip: Zest the orange before you juice it.

by Michele Anna Jordan, as published in the Nov. 23,2022 Press Democrat newspaper
Makes 6-8 servings
Pastry dough (recipe follows) (or do as I did and use ready made pie dough circles)
3 eggs
1/2 cup brown sugar, packed
1 cup agave nectar or maple syrup (I used 1/2 cup pure maple syrup and 1/2 cup dark brown Karo syrup)
1/2 cup (1 stick) butter, melted and cooled
1 teaspoon vanilla
1 tablespoon brandy
1 tablespoon fresh orange juice
2 teaspoons grated orange zest
3/4 teaspoon salt
3/4 cup fresh cranberries, minced
1 cup walnuts, toasted and coarsely chopped
First, make the pastry dough and chill it according to the instructions in the recipe. Then, on a well-floured surface, roll out the dough into a 12-inch circle. Carefully lift the dough and put it into a 10-inch tart pan with a removable bottom, pressing it gentle at the inner edge and crimping it all around. Cover and refrigerate until ready to fill. (Alternately, use a refrigerated pre-rolled pie dough round, folding the extra dough down the inside circumference and pressing gently into the indentations to make a double sided crust. Chill as described above.)
Preheat the oven to 350 degrees.
Put the eggs into a medium bowl and whisk until they are thick and frothy, about 3 minutes. Add the brown sugar and agave nectar or maple syrup and stir well. Add the melted butter, vanilla, brandy, orange juice, orange zest, and salt. Fold in the cranberries and walnuts, pour the mixture into the tart shell and set on a baking sheet. Set the baking sheet on the middle rack of the preheated oven and bake until the edges of the crust are golden brown and the filling is set, about 40 minutes. (Check at about 20 minutes and thereafter; if the top is getting too brown, tent loosely with foil.)
Remove from the oven and let rest at room temperature for at least 1 hour before cutting into wedges and serving.
Pastry Dough for Pies
1 cup all-purpose flour
1/2 teaspoon salt
1/2 cup unsalted butter, chilled and cut into 4 pieces , or 4 ounces of lard, chilled
3-4 tablespoons ice water
Combine the flour and salt in a medium mixing bowl. With your fingers or a pastry cutter, cut in the butter or lard until the mixture resembles coarse cornmeal; work very quickly so that the mixture doesn't get too warm.
Make a well in the center and pour in 3 tablespoons of water. Use your fingers to mix the dough together quickly; add more water if needed for the dough to come together.
Press the dough into a ball, wrap it in wax paper and refrigerate it for at least 30 minutes and as long as 2 hours.


Sometimes you need a bread that is a showstopper, but isn't actually too difficult to make. This star-shaped braided bread seems to me to fit that description. Check out the recipe and see if you agree.
It's useful to have a working kitchen scale for this one, although I tend to use my scale for baking as much as possible. Baking is all about the proportions of one ingredient to each of the others, so weighing the ingredients is a sure way to keep the proportions solid. In this recipe it also makes it easy to keep the dough amounts for each of the five star points even so that you end up with a nice shape.
This dough is a classic Anadama Bread, which is a bread with cooked cornmeal, molasses, some whole wheat flour and some regular flour. It has lots of flavor and the dough is easy to work with, which is a must when you are making a shaped bread like this. Best of all, it's delicious! A bonus is that with this recipe you also get a loaf, so you can have the shaped bread for a special occasion and still have slices for toast. It makes great toast!
You start by cooking some cornmeal and water. If you use coarsely ground cornmeal or stone ground whole meal cornmeal, you'll want to cook it until the grains soften, so just keep stirring and be patient.
Never a good idea to add really hot cooked grains to a yeast mixture, so let the mixture cool down, but be sure to add in the butter first. I forgot to do that, so I had to warm up the mixture in the microwave a few seconds so that the butter would mix in well.
Take your time with the kneading, too. Any time that you are going to braid bread dough it helps to have plenty of gluten developed...which is the whole point of kneading as far as I know. This bread is an old New England favorite but in colonial times they had to do all the kneading by hand. We can use a stand mixer, if we desire, to do some of the work.
After the dough rises and it's time to shape it, use your scale and a bench scraper to divide the dough into six pieces that all weight within a couple of grams of each other. You can pinch off a bit from a heavy lump and add it to a light lump of dough if you need to adjust to even them out. Use the same process when you divide each lump into three pieces. The closer in weight that each piece is, the easier it will be to make a nicely shaped star.
When you are braiding the dough for each arm of the star, roll the dough pieces in a tapered long cone shape. You'll gather each pointed tip end of the cone together and braid towards the fatter end. That way the three fatter ends will create a great 'upper arm' for that point of the star. When all five are done, you place them so that those fat ends barely touch and each point is pointing out; it becomes a star shape. The final part is to roll the sixth piece of dough into a long snake, with the whole length the same thickness. Once that is formed in a spiral over the center, it ties all five arms together. Here is a photo of mine at that point. I shaped mine on a 12-inch pizza pan, which worked well.


It's the 16th and our wonderful Kitchen of the Month, Judy of Judy's Gross Eats has challenged us to bake a seasonal favorite, panettone, an Italian sweet bread that rises high and has dried fruit and candied peel in most variations.

My version is based on the recipe that Judy gave us, one where the panettone is baked in a 2-quart straight sided saucepan! It worked really well and if you do it this way you don't have to hang it upside down as it cools as often happens with the paper molds. I did line it with parchment paper to make it easy to release from the pot.
For the fruit I used dried golden raisins, candied orange peel, lemon peel, and citron. Those flavors complemented the orange oil and vanilla used in the dough. I soaked the fruit in warmed bourbon. That and the overnight starter combined to create a moist, delicious bread. I used the weights except for the candied fruits.
This is a rich dough, much like a brioche, and mine was silky in the middle, with a fairly soft crust as well. It's almost a cake, but truly a bread. Try it toasted...toasting really enhances the flavors and makes a nice textural contrast, too. If you can do butter, butter it after toasting for a decadent experience you won't soon forget.
I was baking this on a rainy day, so that might be why I needed at least a half cup additional flour. It does make a soft dough and if you allow plenty of rising time you can probably make a very slack dough, but I didn't have that kind of time. Our faithful companion, an elderly black lab named Pi, requires quite a bit of time and care right now as he recovers from a bad case of vertigo that left him unable to stand or walk for over a week. Now he is walking all over our property, but still has some trouble walking for long in a straight line; it's more like a sailboat tacking. Each day he improves so we are hopeful that soon he will be going in the car with us and taking his walk in his favorite park. Last night he even stood up on his own for the first time in three weeks...a big milestone.

In the unlikely event that you have leftovers, this bread also makes a fine component of either French Toast or Bread Pudding.
Do visit our other Bread Baking Babes to see their versions.

Want to make this bread? Consider posting about your bake and sending the URL and a photo with short description to Judy to be a Bread Baking Buddy and be included in the Buddy round-up. Just get it to her by Nov. 29th. More information is on her blog. You can also post on our Facebook page. for 'extra credit'.

Overnight Panettone
This traditional Italian holiday bread will stay fresh longer when it's made with an overnight starter.
Prep: 20 mins
Bake: 45 mins
Total: 13 hrs 20 mins
Yield: 1 large loaf
Bake in 2 quart sauce pan
Starter
Dough
1. To make the starter: Weigh your flour; or measure it by gently spooning it into a cup, then sweeping off any excess. Combine the starter ingredients in a medium-sized mixing bowl, cover, and allow them to rest overnight (8 to 12 hours).
2. To make the dough: Combine all of the dough ingredients except the fruit and zest, and mix and knead them together — by hand, mixer or bread machine — until you've made a soft, smooth dough.
3. Allow the dough to rise, covered, for 1 to 1 1/2 hours, or until it's puffy (though not necessarily doubled in bulk).
4. Gently deflate the dough, and knead in the fruits and zest. (Soak fruits in hot/boiling water (or bourbon as I did) to soften. Drain before adding them)
5. Shape the dough into a ball and place it in a panettone pan or other straight-sided, tall 1 1/2- to 2-quart pan. Cover the pan and let the dough rise until it's just crested over the rim of the pan, about 1 hour. (Helpful to line the pan.)
6. Bake the bread in a preheated 400°F oven for 10 minutes; reduce the oven heat to 375°F and bake an additional 10 minutes; then reduce the heat to 350°F and bake for 25 to 35 minutes, tenting with aluminum foil if the crust appears to be browning too quickly. Panettone should be a deep brown when done, should sound hollow when tapped, and will read 190°F at the center using a digital thermometer. (It's easy to under-bake, since it browns so quickly!)
7. Remove the panettone from the oven and cool completely. Store at room temperature, well-wrapped, for up to a week; freeze for longer storage.


We are only four days away from the Bread Baking Babes post...it's a seasonal bread, so don't miss it...but it's also time to start planning for Thanksgiving here in the U.S.A. I'm already thankful that the election is mostly over and thankful that it was a bit of a surprise how some races turned out. I'm also thankful that Pi continues to improve a bit each day.
Planning for Thanksgiving varies depending on if you are the person providing the turkey and gravy (and usually the stuffing) or if you are the pie baker or the sides maker or the one who takes care of the libations. Below are some links to recipes that will help if you need to bring pies or the stuffing.
This year we have been invited to Thanksgiving with our family in Healdsburg and I suspect that I'll be bringing pies...probably pumpkin and pecan. For the pumpkin I generally use the recipe on the Libby's canned pumpkin can, but I add some extra cloves, a bit more ginger and I include 1/8 teaspoon of allspice and the same amount of nutmeg, although the recipe doesn't include either of the last two.

If you want to be more interesting, there is always Pumpkin Pie Spectacular (above)! Gingersnap crust and Streusel both make this a more glamorous pie and one with lots of flavor.

The classic pecan pie recipe found on the Karo Dark Corn Syrup label is a classic for a reason...it always works and is delicious, if very sweet. To make it show-worthy, be sure to turn all of the pecan halves curved side up before baking. It's little touches like that which elevate a standard into a showstopper.
Of course you'll need a good pie crust recipe. I have two to recommend: a food processor butter version that always works, and a non-dairy version of the one I learned from my Mom. Both make two discs of dough, so you could make both the pumpkin and the pecan version...or maybe you would prefer to make a cream pie like coconut cream (below)

or banana cream...both are sure to be hits.

There is also a nice recipe for a cinnamon-crumble topped apple pie that is perfect for fall and easy enough that my grandson made this one.

Want to go a bit more sophisticated? How about a milk chocolate and caramel tart? Oooh La La!

So that's dessert taken care of if you like pies. Still, an iconic dish for Thanksgiving, along with turkey, is stuffing. There are lots of ways to go for this side and many folks have their favorite. Since Thanksgiving is all about the eating and about traditions, go for the favorite. My family likes one that uses both stale bread and fresh cornbread, along with a saute' of onions, celery, and parsley and other herbs. Sometimes the mixture includes chopped apple, and/or pecans and it's always moistened with chicken broth. I like to bake most of it in a greased casserole pan but I always use at least a cup or two of it in the cavity of the turkey to add the flavors and fragrance of the stuffing to the bird.
Well, that's a good start on recipes. I'll try to do some more side dishes for you in the next day or two and then type up the recipe I use for the turkey. I've been using oven bags to cook the Thanksgiving turkey for a very long time...over 40 years I think...and the turkey is always moist with them, so why change?

If you have ever been in the woods after the fall rains begin you may have been lucky enough to see mushrooms growing there. I'm not sure why there seems to be a co-relation, but the few times that I have seen mushrooms growing in the wild it was after rain.
We have been blessed with well over an inch of rain this past week. Considering our years of drought, that is a lot! I do hope that it's the beginning of a rainy winter and not just a tease.
The part that sucks about all that rain is that our older lab dog, Pi, came home just about when the rains were setting in. We still had to get him outside to do his business, so we set up an EZ-UP tent just past the end of the ramp that Sweetie built for the express purpose of getting him outside. The first day and a half we pretty much had to carry him, but then he started being able to walk with some weight on his legs and now can sometimes bear his full weight as he climbs up and down (although we still have to hold on to his harness for helping with balance). Once on solid ground he is able to walk on his own and today walked an area about 20 feet in diameter a couple of the times we took him out. Progress!
But back to mushrooms! For dinner I made a mushroom soup using a recipe I found in the paper. The recipe is by Ellie Krieger from the Washington Post.

The interesting things about this recipe are that the mushrooms and shallots are roasted first, and the soup is thickened with cannellini beans. Once the soup is cooked, you use an immersion blender or regular blender to liquify all the soup ingredients and it becomes fairly smooth and truly delicious. Ellie Krieger writes, "Along with all that flavor, this soup also has considerable nutritional bragging rights. Besides the wealth of B vitamins, potassium, and health-protective compounds in mushrooms, the soup gets it's creaminess not from cream, but from being pureed with a can of canellini beans, which - in additions to essential minerals, fiber and more - deliver enough protein to make it a meal in a bowl." We served it with soda crackers and a yummy green salad that Sweetie made. A great dinner for our first day after the rains.

By the way, I use a plastic produce bag to coat the mushrooms and shallots. If it is a clean bag, you can also use the outside of it to spread out the oiled veggies in the pans once you dump them out of the bag...keeping you hands clean...and then toss it. Since Sweetie insists on putting produce in the bags, I keep finding ways to re-use them, including using them to collect our compostable fruit and veggie scraps, tea bags and egg shells, etc.

Creamy Roasted Mushroom Soup
Makes 4 servings (about 6 cups)
by Ellie Krieger, Washington Post newspaper
1 1/2 pounds mixed mushrooms, such as oyster, baby bella, shiitake and/or maitake, sliced
3 large shallots (9 oz. total), cut into 3/4-inch wedges
5 tablespoons olive oil, divided
3/4 teaspoon fine salt, divided, plus more to taste
2 cloves garlic, minced or finely grated
2 teaspoons chopped fresh thyme leaves
4 cups n-salt-added or low-sodium beef or vegetable broth, plus more broth or water as needed (I used low-sodium chicken broth)
1 (15-oz.) can no-salt-added cannellini beans, drained and rinsed
1/2 teaspoon freshly ground black pepper, plus more as needed
1/4 cup dry sherry (or use 1/4 cup broth and 1 tablespoons sherry or white wine vinegar)
Chopped fresh flat-leaf (Italian) parsley, for garnish
Position racks in the top and bottom thirds of the oven and preheat to 425 degrees F.
In a large bowl (or plastic produce bag in my case) toss the mushrooms, shallots and 3 tablespoons of the oil and 1/2 teaspoon of the salt. Spread the coated mushroom mixture across 2 large, rimmed baking sheets and roast for 10 minutes in the preheated oven.
After 10 minutes, stir veggie in each pan, then return to the oven, switching the pans top and bottom and back to front. Roast another 10-15 minutes, or until the mushrooms release their water and brown, and the shallots soften. Remove from the oven and set aside.
In a large pot over medium heat, heat the remaining 2 tablespoons of oil until shimmering. Add the garlic and thyme and cook, stirring, until aromatic, 30 seconds. Reserve 1/4 cup of the mushrooms for garnish (I forgot to do this!). Add the remaining mushrooms and the shallots to the pot, along with the broth, beans, pepper and the remaining 1/4 teaspoon salt.
Increase the heat to high and bring to a boil, Reduce the heat to low and simmer, uncovered, for 10 minutes. Stir in the sherry and cook until the flavors meld, 3 minutes more.
Using an immersion blender, puree the soup in the pot until smooth. (Alternatively, let cool until not scalding and puree in batches in a regular blender.) Stir additional broth or water if needed to thin to get your desired consistency.
Rewarm the soup if needed. Taste, and season with additional salt, if desired.
Ladle soup into bowls and garnish with mushrooms (if you remembered to set some aside) and chopped parsley. Serve at once.

He can now walk a little, but still needs help going for anything over a few steps. He wears a harness so we can do that, including carrying him up and down a ramp to get outside. Even with the cool, misty weather we are having today, he likes being outside and holds his pee until we get him out and standing on his own for five minutes or so.
The future is uncertain because this syndrome usually takes 2-3 weeks to clear up but sometimes doesn't. In the meantime we are sooo happy to have him home! His head is still cocked a little all the time and he tends to walk in circles when he walks. We've had him 11 or 12 years and he was about three when we got him from the rescue folks, so he has lived a long time for a large dog...and he IS large as we have discovered when carrying him in and out...about 85 lbs. large!

One of the joys of cooking is trying different things...different cooking techniques, different ingredients, different combinations and more.
Last night I was having trouble getting to sleep so I rummaged through a box of old magazines and found the April 2019 issue of Bon Appetit magazine. In it I found a recipe using chicken, greek yogurt, red onions, garlic, and a spice mix called za'atar. Za'atar is a blend of sumac, dried herbs and sesame seeds and is used in Middle Eastern cooking. I have a jar from Penzey's spices which I've used once or twice before, but this recipe sounded like it really showcased the za'atar. Something different! Of course I may have made this before and forgotten all about it...my memory sometimes more closely resembles my years and not my appearance.
It's a fairly easy recipe and most of the work is done by the oven over a period of 1 hour, 15 minutes or so. The recipe as written serves four. I changed it slightly by using three boneless, skinless chicken thighs instead of the four whole chicken legs, so we got three servings. I also served directly to plates, so that made it harder to estimate the amount of the yogurt sauce to put on the plate. It also meant that I only needed to roast the chicken for the original 50-60 minutes...with no bones it cooks faster and with no skin it doesn't need to brown up.
Be sure to choose a nice fat head of garlic or two...you will be cutting two in half and cooking it with the chicken. If you love roasted garlic cloves as much as Sweetie and I do you will be making this recipe again! There are some lovely pan juices, too, plus garlic-infused plain Greek yogurt, so naan or a baguette or similar bread to wipe up juices and yogurt adds to the fun and delight.
I don't think that the roasted lemon quarters added much, but the citrus zest in the za'atar sauce was essential to the success of the dish, so don't skip putting in both kinds of zest.
This is a lovely dish to serve for company who love garlic since you spread the yogurt on a platter, top with the chicken, scatter the cooked onions and garlic cloves around and top with the zesty za'atar oil...it looks so appealing and tastes wonderful!

Za'atar Chicken with Garlicky Yogurt
Serves 4
From April 2019 Bon Appetit magazine
4 chicken legs (thighs and drumstick; about 2 1/2 lbs. total)
2 medium red onions, cut into 1-inch thick wedges
2 heads of garlic, halved crosswise, plus 2 cloves
1 lemon, quartered, seeds removed
Kosher salt
1/3 cup extra-virgin olive oil
1 1/2 cups plain whole-milk Greek yogurt
3 tablespoons za'atar
1 teaspoon coriander
1 teaspoon finely grated lemon zest
1 teaspoon finely grated lime zest
Preheat oven to 325 degree F. Pat chicken legs dry with paper towels. (If desired, cut into drumstick and thigh pieces for each leg.) Season chicken with salt. Lightly oil bottom of pan. Arrange chicken, onions, halved garlic heads, and lemon in a 13 x 9-inch baking pan. Pour in rest of oil over ingredients and toss as necessary to coat. urn garlic cut side down and nestle it in so it is in contact with the baking dish.
Roast, rotating pan halfway through, until meat is almost falling off the bone, 50-60 minutes.
Meanwhile, finely grate 1 garlic clove into a small bowl. Add yogurt, a big pinch of salt and 1 tablespoon water and mix well. Set aside yogurt sauce.
Remove baking dish from oven and transfer onions, garlic, and lemon to a plate. Increase oven temperature to 425 degrees F and continue to roast chicken until skin is golden brown, 10-15 minutes more. Transfer chicken to a cutting board and let rest 10 minutes. Set aside pan with juices.
Finely grate remaining 1 clove garlic into another small bowl. Add za'atar, coriander, lemon zest, lime zest. Pour reserved pan juices into za'atar mixture until you've reached an oily consistency (about 1/3 cup). Mix in a pinch of salt.
Spread reserved yogurt sauce over a platter and arrange chicken legs on top. Scatter onions, garlic, and lemon around; drizzle with za'atar oil and serve.

Happy Halloween! This lovely cake has three layers of apple cake filled with vanilla buttercream. The outside is frosted with salted caramel buttercream tinted orange and decorated with seasonal sprinkles and white chocolate ghosts. Isn't it delightful? My daughter made it to take to work today for Halloween...out of bits and pieces saved from other cakes she made on Saturday. It's a hobby that gives pleasure to others...quite a gift.
Our daughter has always been artistic. When she was in middle school she and a friend created a line of t-shirts decorated with puffy paints and sold them at a Christmas Boutique at the fairgrounds. Later, as a hobby, she painted mandala rocks with tiny dots of paint in mandala designs...so detailed and with amazing color combinations. Her latest artistic creations are even edible...gorgeous small-scale cakes.
These creations are about 6-inches in diameter, so they are about 1/4 smaller than regular layer cakes. Other than the size, they are just as complicated as the larger versions. She has perfected a buttercream recipe, figured out a combination of chocolate-espresso cake with chocolate icing that is the fan favorite combo, and learned all sorts of techniques and tricks.
She almost always makes them as gifts...to friends or for the birthday celebrant (who might be a friend or a friend of a friend). A few times she made them at a request from a friend. Since it's a hobby, she won't accept any payment for the requested ones except to cover the cost of supplies. The rest are gifts.
As you may guess, I am very proud of her skills and talents in this area. You might think that I taught her, but in reality all I gave her was (probably) good genetics...the rest is all her!
Here are some examples of her cakes.

This is one that she did in the early spring as a birthday gift. Almost all of the succulents were piped onto small pieces of parchment paper, then put on a sheet pan and frozen. As you can see, she really knows how to mix color. Once the cake was iced, she used a palette knife to place the frozen shapes on the cake, then tied it all together with the green icing 'vines'.

This beautiful cake is decorated with icing dahlias and glittery sprinkles The same technique that she used for the succulents was used for the flowers.


She made this lovely strawberry cake for her fiance' for Father's Day. The drips are white chocolate and I think she used some freeze-dried strawberry powder for the outer icing.

This one is a bit easier to do than some of them. The 'ice cream' is actually a cake pop made by mixing cake removed to flatten the cake top, mixed with some of the icing. It certainly looks like a birthday!

This one was made for a friend to take to a baby shower with a jungle theme. The cute animals were purchased and so were the round balls. Pretty cute!

Another strawberry cake, this time with three layers and a more opaque white chocolate drip.

This is a more classic design but the ombre' color effect is a challenge and roses are not easy to pipe.

This is probably my favorite cake...I just love the impressionist sky and the tiny stars on the sides, plus the black chocolate trees. It's like a painting.


This one is fun...an 'earthquake' cake with multi-color and multi-shape sprinkles and gold edging. Inside is the favorite cake...chocolate espresso with chocolate icing.

Another birthday cake and a pretty elegant one at that. This cake is apple with salted caramel buttercream...sounds delicious. Some of the batter that was left over from this small cake was baked in larger pans to create the beauty at the top of the post.
By the way, this is not a business. This is her hobby and a way to be creative and to de-stress from a fulfilling but high-energy job. Can't wait to see what she creates next!


