Showing posts with label orange. Show all posts

Thursday, November 23, 2023

Happy Thanksgiving!


 Wishing you, dear reader, a magnificent turkey day...and lots of turkey with all the trimmings.

One of the trimmings is often cranberry sauce. The tart and sweet condiment offsets the mild comfort food flavors of turkey, dressing, mashed and/or sweet potatoes and even the creaminess of the green bean casserole...all fairly traditional Thanksgiving foods.

I grew up with the jellied kind in the can and I still love that version, but this year I had a bag of fresh cranberries, an orange, a cinnamon stick and enough time to make my own sauce.


Because cranberries carry a lot of natural pectin, making a sauce that thickens up without additional gelatin is easy and fairly quick...about 15-20 minutes total. I looked at a number of recipes online, then crafted this one to suit myself. Besides the fresh cranberries and the orange, I used water, brown sugar, and bourbon. It's a great mixture!


Fresh Cranberry Sauce with Cinnamon, Brown Sugar and Bourbon
Serves 4-6

1 12-oz bag fresh cranberries, rinsed and drained
3/4 cup brown sugar, packed
1/2 cup water
2 tablespoons bourbon
1 cinnamon stick
zest of about 1/4 of an orange, zest cut into long strips
additional water as needed

In a saucepan, place the cranberries, brown sugar, water, bourbon, cinnamon stick, and orange zest strips. Bring to a boil, stirring occasionally, then reduce heat so that mixture simmers. Continue to cook, stirring every minute or so, until the berries begin to pop. Use a wooden spoon or similar tool to both stir the mixture and to push the berries up against the side of the pan to mash them a bit. Continue until most of the berries are mashed, stirring all the while. Reduce the heat to the lowest setting and continue to stir and let the berries cook for about 8-10 minutes, until the mixture starts to get thick. Remove the cinnamon stick and the orange zest strips and discard them. Remove the sauce from the heat and let sit for 10 minutes. If the sauce is too thick, add water, a tablespoon at a time until desired thickness. Put into a bowl or storage container, cover and refrigerate until ready to use.

Below is a photo of the sauce with our Thanksgiving meal. Not the best photo because it was taken with an overhead light, not sunlight, but it gives a sense of the meal...which was delicious!


Thursday, December 01, 2022

Walnut Cranberry Tart for the Festive Season


Welcome December! We had lots of rain last night and this morning!! With the prolonged drought we have been in here in California, this is cause for celebration. Of course the coming holidays are also cause for joy...and lots of baking and making. Here is the first recipe I recommend to you, dear reader, for you holiday baking. It's a keeper. Do read through the full post before making it...there are tips for you.

I bought a bag of fresh cranberries sometime in early November. I do this almost every year because I know that before they get too old I'll come across a recipe or recipe idea where you need fresh cranberries...and there they will be in the bottom crisper drawer in the fridge.

That happened last week. There was no time to make the tart for Thanksgiving, but that weekend I had the time, so I made this delicious tart which combines walnuts, fresh cranberries, orange, and some brandy.

Instead of making a tart dough, I just used a refrigerated, rolled out pie dough circle. Once I fit it into my 9" tart base and pushed the dough up the sides, there was just enough to fold the rest of the dough down along the sides and push it into the sides...so I had double thick sides but a single thickness on the bottom. Of course a home made pie dough is delicious, so if you prefer to do that, the recipe is below the recipe for the tart.

Because I didn't have the size tart pan called for in the recipe (10-inch is called for but I had a 9-inch one), I knew that there would be extra filling. My solution was to let the fruit and nuts settle a bit after I mixed them into the filling, and then I poured out about a third of the filling into a spare bowl. I poured the rest into the tart shell and then topped it up with the filling in the spare bowl. It worked just fine, but I had leftover filling...without many bits of cranberry or nuts. My solution was to spray a pie dish with baking spray and then I added about a half cup of walnuts to the spare bowl and the filling still left in it. That mixture went into the prepared pie dish and it was baked at the same temperature...but for only about 15-20 minutes until the mixture was set. Sweetie had some after it cooled and he liked the mostly nuts version...without any crust!...better than the tart. I liked the tart better. I think that the cranberry added a freshness that the 'mainly nuts' filling didn't have. Still, if you would like to put in more walnuts and fewer cranberries (or none), feel free. I think you'll find that the orange-brandy-brown sugar filling works well with both.

Bakers tip: Zest the orange before you juice it.


Cranberry Walnut Tart

by Michele Anna Jordan, as published in the Nov. 23,2022 Press Democrat newspaper
Makes 6-8 servings

Pastry dough (recipe follows) (or do as I did and use ready made pie dough circles)

3 eggs
1/2 cup brown sugar, packed
1 cup agave nectar or maple syrup (I used 1/2 cup pure maple syrup and 1/2 cup dark brown Karo syrup)
1/2 cup (1 stick) butter, melted and cooled
1 teaspoon vanilla
1 tablespoon brandy
1 tablespoon fresh orange juice
2 teaspoons grated orange zest
3/4 teaspoon salt
3/4 cup fresh cranberries, minced
1 cup walnuts, toasted and coarsely chopped

First, make the pastry dough and chill it according to the instructions in the recipe.  Then, on a well-floured surface, roll out the dough into a 12-inch circle. Carefully lift the dough and put it into a 10-inch tart pan with a removable bottom, pressing it gentle at the inner edge and crimping it all around. Cover and refrigerate until ready to fill. (Alternately, use a refrigerated pre-rolled pie dough round, folding the extra dough down the inside circumference and pressing gently into the indentations to make a double sided crust. Chill as described above.) 

Preheat the oven to 350 degrees.

Put the eggs into a medium bowl and whisk until they are thick and frothy, about 3 minutes. Add the brown sugar and agave nectar or maple syrup and stir well. Add the melted butter, vanilla, brandy, orange juice, orange zest, and salt. Fold in the cranberries and walnuts, pour the mixture into the tart shell and set on a baking sheet. Set the baking sheet on the middle rack of the preheated oven and bake until the edges of the crust are golden brown and the filling is set, about 40 minutes. (Check at about 20 minutes and thereafter; if the top is getting too brown, tent loosely with foil.)

Remove from the oven and let rest at room temperature for at least 1 hour before cutting into wedges and serving.

Pastry Dough for Pies

1 cup all-purpose flour
1/2 teaspoon salt
1/2 cup unsalted butter, chilled and cut into 4 pieces , or 4 ounces of lard, chilled
3-4 tablespoons ice water

Combine the flour and salt in a medium mixing bowl. With your fingers or a pastry cutter, cut in the butter or lard until the mixture resembles coarse cornmeal; work very quickly so that the mixture doesn't get too warm.

Make a well in the center and pour in 3 tablespoons of water. Use your fingers to mix the dough together quickly; add more water if needed for the dough to come together.

Press the dough into a ball, wrap it in wax paper and refrigerate it for at least 30 minutes and as long as 2 hours.


Saturday, August 21, 2021

Sweet Potatoes and Orange


A number of years ago I published a cookbook of family favorite recipes, mostly from midcentury, as a way to remember my Dad and to keep the recipes in the family. It's been long enough that it's time to update the book. Part of the update includes getting more picture of the finished recipe into the book, so I've started making some of the recipes for just that purpose.


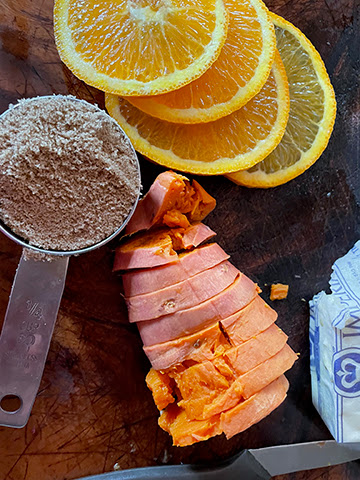
Tonight we had Sweet Potatoes Margherita, a lovely casserole that has boiled and peeled sweet potatoes (yams actually), a bit of brown sugar and butter, and very thinly sliced oranges. If you can find seedless navel oranges, use them. 


All these elements get layered in a buttered casserole dish and baked. During baking you baste the dish with some of the collected juices/syrup. I made about half the recipe since there are only two of us eating the dish, not a family of eight, nine, or ten people. I also reduced the sugar and butter a bit and removed the pith from the orange slices that were in the lower layer. It helps reduce the bitterness that comes with orange pith, but isn't really necessary to do. What I ended up with was a very fresh tasting dish where you could really taste and appreciate the sweet potato flavor and the oranges. If you make it exactly as the recipe suggests, it will be a bit sweeter and richer and more bitter but still tasty. A lot of people prefer candied sweet potatoes and the given sugar, butter and water will give you a true syrup with lots of orange flavor to complement the sweet potatoes.

Although the recipe was popular before microwave ovens, I suspect that you could substitute sweet potatoes that are washed, poked with the point of a knife to prevent bursting, wrapped in a paper towel to keep moistness, and microwaved until tender in place of the boiled sweet potatoes. Then cool, peel, and continue with the recipe as written.

This is a great Thanksgiving dish, which is when we usually had it, but it goes well anytime with pork chops or roast turkey breast. Add a green salad and you have a meal that can take you back to 1950. Here is how the casserole looked right before baking.


Sweet Potatoes Margherita

Boil 6 sweet potatoes in water to cover until tender. Slice the peeled potatoes and arrange in layers in a buttered or greased baking dish, alternating with brown sugar, dots of butter or non-dairy butter and slices of orange with peel left on. Add enough water to make a thick syrup. Bake for 1 hour in a 350 degree oven, basting occasionally with the syrup in the dish.


Saturday, April 20, 2019

So Long For Now Cake Slice Bakers


I've really enjoyed baking with the Cake Slice Bakers each month for the past few years. Some of the recipes have become favorites, others have led to new skills or knowledge and it's always fun to see what the other bakers have baked.

The time seems to have come to take a break, both because I'm being supportive of Sweetie's new way of eating, and because I can stand to lose a few pounds myself. I'm sure that I'll still bake something delicious now and then, but not on a regular basis, and that regular basis is crucial for belonging to a baking group.

This month I baked one of the selections from The European Cake Book by Tatyana Nesteruk. The Marbled Chocolate Orange Bundt Cake takes advantage of the citrus season that is coming to a close and it was a delicious treat that I shared with others at a memorial service for a friend who had died. The combination of chocolate and orange is delicious. I did go off recipe a bit by rubbing the orange zest into the sugar before creaming the sugar with the butter, plus I substituted non-dairy butter and soy creamer for the butter and milk, changed how I put the batter into the pan, but otherwise I mostly followed the recipe. I did add some chocolate chips (not melted) to the chocolate batter for a little extra chocolate flavor. This recipe made a delicious, tender cake with lots of flavor, even without the glaze, which I skipped since it wouldn't keep for the memorial service. This is a lovely cake! Do try this for yourself.


Not sure how long I'll not be baking with the CSB group, but I want to commend Felice for her leadership and grace. She has picked some awesome recipes over time and has made every effort to have this be a delightful group to be a part of. Au revoir.


Marbled Chocolate Orange Bundt Cake
 From The European Cake Cookbook by Tatyana Nesteruk

Zest from 1 orange
1 cup sugar
1 cup butter, softened (I used non-dairy margarine)
4 large eggs,
1 teaspoon vanilla extract
1/4 teaspoon orange oil
1 cup milk (I used almond milk)
2 cups all-purpose flour
4 teaspoons baking powder
1/4 teaspoon salt
1/2 cup white chocolate chips, melted and cooled
1/2 cup semi-sweet chocolate chips, melted and cooled

Preheat the oven to 335 degrees F. Spray a 9-inch Bundt pan with baking spray, or butter and flour the pan.

In a large mixing bowl, use your fingers to rub the orange zest and sugar together until sugar is moistened and looks like damp sand. Add the butter to the bowl and cream until mixture is light and fluffy. Add the eggs, one at a time, thoroughly combining before adding the next egg. Scrape bowls and beaters as necessary.

Add the vanilla, orange oil, and milk, then mix until combined.

In a separate bowl, combine the dry ingredients: flour, baking powder and salt. Add to the batter and mix just until they are combined.

Divide the batter in half; remove half to a separate bowl. Add the melted and cooled white chocolate to one of the bowls and stir to combine.

Add the melted and cooled dark chocolate to the other bowl of batter and stir until combined.

Spoon alternating scoops of dark and light batter into the prepared pan. once all the batter is in place, use a knife in a zig-zag pattern to swirl the batters together. Don't over swirl.

Bake in a preheated oven for 55 to 60 minutes. Cake is done when a toothpick inserted into the thickest part comes out clean. Remove the cake from the oven and cool in pan for 30 minutes. Invert onto serving plate and cool completely.

Glaze:
1/4 cup heavy cream or milk
1 cup confectioners' sugar
Zest from 1 orange

Whisk together the cream, confectioners' sugar, and orange zest. Adjust the amount of cream to make a thinner or thicker glaze. Pour over the cake. Let set for at least 10 minutes before serving.

Wednesday, April 20, 2016

Cake Slice Bakers Orange Cake with Cranberries


I love it when we get to the third week of the month and it's time for the Cake Slice Bakers.We usually have four recipes to choose from and it's fun to imagine baking one, then another, and often all four of them. Still, Sweetie continues to drop the pounds from his frame and has asked me to keep the baking down to just a few, so I do have to choose.

This month I chose the Blueberry-Nut Loaf Cake, but the blueberries at the market were going for $5 a basket, so I decided to substitute dried cranberries and to soak them for a while in the fresh orange juice to soften them up. I love the flavor combo of orange and cranberry, so why not?

This is a fairly light cake with a delicate crumb and I enjoyed it a lot. The pecans added both crunch and flavor and the cranberries and assertive orange flavor played well together.


I baked the batter in a combo Bundt pan so I got two smaller Bundt cakes in two different designs. We each had a piece after dinner while the cake was still a little warm. Delicious! There is a lot of orange zest in the batter, so large parts of the finished cake are a pretty orange color, which looks nice with the cranberries.

Because I didn't use fresh blueberries, my directions are different than the original recipe, but this is really an easy cake, so just follow along and you, too, can have a nice little cake to enjoy in the afternoon with tea or coffee or as a dessert later in the day.


Cranberry - Nut Bundt Cake

1 1/4 cup pecans
2 large, deep colored oranges
1 cup dried cranberries (Craisins)
grease and fine dry bread crumbs for pan
2 tablespoons unsalted butter, melted (I used a butter substitute with no dairy)
2/3 cup granulated sugar
2 cups all-purpose flour
1/2 teaspoon salt
1 1/2 teaspoons baking powder
1/2 teaspoon baking soda
1 egg at room temperature

Coarsely chop the pecans. Set aside.

Grate the rind, zest only, from the oranges. Reserve the zest and cut the oranges in half, then juice them. Measure 3/4 cup orange juice. Place the dried cranberries in a narrow container ( a Pyrex measuring cup that holds two cups works well) and pour the orange juice over the dried cranberries. Let sit for 1 hour.

Preheat the oven to 350 degrees F. Grease a 10 1/2 x 4 x 3-inch loaf pan or a Bundt pan that has two smaller cake pans in it, or a small Bundt pan. Dust with fine dry breadcrumbs and knock out excess crumbs. Set pan aside.

Melt the butter and let cool.

Sift together the sugar, flour, salt, baking powder and baking soda. Set aside.

In the large bowl of an electric mixer, beat the egg just to mix. Add the butter and mix. Drain the cranberries and add just the orange juice to the egg mixture and beat to mix. Set the cranberries aside.
On low speed add the sifted dry ingredients to the egg mixture and beat only to mix. Remove from the mixer and stir in the drained cranberries, the grated rinds and the nuts. If you use a spatula, you can make sure that all is well combined with just a few strokes.

Pour the batter into the prepared pan((s), smoothing the top and knocking the pan against the counter a couple of times to dislodge air bubbles. Bake in the preheated oven for about 30 minutes, or until a cake tester gently inserted into the middle comes out clean and dry. If the cake cracks on the top, it's OK.

Cool the cake on a rack for 10 minutes, then cover the cake with a rack and turn out onto the rack. If using a bread pan, turn cake right side up. If using a Bundt pan, keep it upside down. Move to a cake plate and let cool completely.

To serve, if desired, sift some powdered sugar lightly over the cake.

Tuesday, November 03, 2015

Fresh Cranberries Are Here


There is nothing quite like the taste of a fresh, crisp, very tart cranberry. I hear they grow in bogs in New England, but I find them every fall, like clockwork, in the produce section in one pound bags. There are lots of fine things to do with them from sweet to savory but today I wanted to make cookies, so I found a recipe for fresh cranberry cookies that also have the essence of an orange via freshly grated orange zest and also the mellow counterpoint of white chocolate. Since these are made with butter and regular flour I let Sweetie be the taste tester and he pronounced them to be very good.

The cookie dough itself is similar to what you would find with a chocolate chip cookie, with butter, brown and white sugars, egg and vanilla. When you add the orange zest it changes everything because you get both the fragrance and the taste from that fresh orange oil contained in the zest.

I cut the fresh cranberries with a sharp knife, but I suspect you could also put them into a food processor and pulse a few times and get the same results. But then you have to clean the food processor pieces...a knife and cutting board clean up super fast. I was getting ready to make dinner when I was making these, so quick clean up was more important than ease of cutting.

The white chocolate could be chunks, but I had the chips I buy from the market, so in they went. I used a disher to scoop up the dough...like a small ice cream scoop with a curved blade that pushes the dough off the tool so it falls on the cookie sheet. I used parchment paper on one sheet and a silicone mat on the other. It didn't seem to make much difference, so use what you have. Greasing the sheet works fine, too.

These charming cookies are tart from the cranberries, sweet from the chocolate and sugars, crunchy on the edges and soft in the middle. They are an altogether fine autumn cookie for you to enjoy, so make a batch, OK?


Fresh Cranberry White Chocolate Cookies - about 36 cookies
from Betty Crocker's website
Ingredients
1/4    cup butter, softened
1/2    cup sugar
1/2    cup packed brown sugar
Grated zest of 1 orange 
1        egg
2       teaspoons vanilla
1 1/2  cups Gold Medal™ all-purpose flour
1/2    teaspoon baking powder
1/2    teaspoon baking soda
1/4    teaspoon salt
1        cup fresh or frozen (unthawed) cranberries, coarsely chopped or left whole
1/2    cup white chocolate chunks or chips

Directions
·         1 Heat oven to 350°F. Spray cookie sheets with nonstick cooking spray or line with parchment paper. In a large bowl, beat butter, sugar, brown sugar and orange zest on medium speed of the electric mixer until well blended. (The mixture will have the consistency of wet sand.) Add the egg and vanilla and beat until smooth.
·         2 In a small bowl, stir together the flour, baking powder, baking soda and salt. Add to the sugar mixture and stir by hand until almost combined; add the cranberries and white chocolate and stir just until blended.

·         3 Drop spoonfuls of dough about 1 inch apart on a cookie sheets. Bake 12 to 14 minutes, until light golden and set around the edges but still soft in the middle. Let set on cookie sheet 1 to 2 minutes. Transfer to a wire rack to cool.

Monday, November 02, 2015

Fall Walnut Honey Cake


We are finally getting some autumn rain, which is a true blessing considering that we have been short on rain for at least four years now. I love autumn and the cooler weather it brings. It has been late coming this year, with lots of days in the mid-80s recently.

While the sun was still shining a week or so ago I gathered walnuts on our back deck. Although I do want the limb of the walnut tree that hangs over the deck to be pruned back, it really is handy that so many walnuts collect on the deck and get properly dried out by the sun, then are easy to collect. After gathering the nuts I just sweep the leaves and husks and broken shells (from the ones that our silly dog cracks with his teeth and somehow gets the nutmeats from) off the deck, ready for the next batch of nuts to drop.

Yesterday I watched some back episodes of Fixer Upper (HGTV) while shelling the nuts. I ended up with about three cups of fresh walnuts!


Since I also had a nice bottle of honey, I decided to make a honey walnut cake and serve it with apple slices that had been cooked in a little more honey. I'm glad that the apples released some juice as they simmered because then I had a little honey-apple juice mixture to drizzle over the top of each serving. The cake is delicious, with just a hint of orange, but it is dry. I just made up a honey syrup with a little orange liqueur in and brushed it on the cake to add some moisture. Will try it this evening and see if it improves the cake.

This is an easy cake to make if you have a food processor. The nuts get toasted, then rubbed in a clean towel to loosen some of the skin. I didn't find that much skin was loosened, so may skip the rubbing part next time, but the toasting add a depth of flavor, so don't skip that part.

I used non-dairy butter instead of the real thing and added a bit of the flour mixture (yes, gluten free flour) to the creaming butter, sugar, and honey so that it would whip better. I also put a tablespoon of the granulated sugar into the food processor, with the rest going into the butter mixture. That extra grit with the nuts helps in getting the nuts to be finely ground but not walnut butter.

This makes a single layer but you could probably double the recipe to make a stunning layer cake, maybe frosted with some maple or caramel frosting. You could also make the syrup (I think it would still be a good idea to brush some on, even for a layer cake) honey-orange and then use an orange buttercream. If you stick with one layer like I did, a side of cooked fruit is nice, but so is a dollop of whipped cream or scoop of ice cream. The recipe called for honey coated walnuts to decorate the top, but I skipped that. It would be a nice garnish if you like.


Honey Walnut Cake
from The Vineyard Kitchen by Maria Helm Sinskey
Serves 8-10

1 1/2 cups walnut pieces
1 cup all-purpose flour (I used King Arthur Flour's gluten-free mixture)
1 1/2 teaspoons baking powder
1/4 teaspoon salt
12 tablespoons (1 1/2 sticks) unsalted butter, at room temperature
1/2 cup honey
1/4 cup sugar
3 large eggs
1 teaspoon freshly grated orange zest
1/2 teaspoon pure vanilla extract
Optional: 10 nice walnut halves and 2 tablespoons honey for garnish

Preheat the oven to 350 degrees F.

Butter and flour a 9-inch cake pan.

Spread the walnuts on a sheet pan and toast in the preheated oven for 6 minutes. Cool and rub the nuts in a towel to remove the loose skins.

Grind the nuts in a food process with 1/2 cup of the flour (and 1 tablespoon of the sugar if doing it my way) until very fine. In a medium bowl, combine the ground nuts, remaining flour, baking powder, and salt. Reserve.

In a standing mixer bowl, with a paddle attachment (or with an electric hand mixer) beat the room temperature butter with the honey and the sugar (remaining sugar if doing it my way) until light and fluffy, about 3 minutes. Scrape down the sides of the bowl.

In a small bowl, beat the eggs lightly with the orange zest and vanilla. Add it in thirds to the butter mixture, beating well to incorporate egg mixture after each addition. Scrape down the sides of the bowl. Add the dry ingredients and mix until fully incorporated.

Spread the batter evenly in the prepared cake pan. Bake in the preheated oven for 35 - 40 minutes, until a toothpick inserted into the center comes out clean.

For the optional walnut topping: while the cake is baking, toast ten walnut halves on a sheet pan for 8 minutes . While they are still warm, rub the nuts in a towel to remove the excess skin and place them in a small bowl. Add the 2 tablespoons of honey and stir until the walnuts are coated. Reserve the walnut halves at room temperature to garnish the cake when it is finished.

Cool the cake in the pan for 5 minutes, and then run a knife around the edges and turn the cake out on to a cooling rack, then carefully turn over so that the top side is up. Cool completely. Garnish the edges of the cake with the walnut halves. This cake is nice served with a dollop of whipped cream.

Honey Orange Syrup: If desired, place 1/4 cup sugar and 1/4 cup water in a small saucepan. Heat over medium-high heat until mixture boils and sugar dissolves completely. Add 1/4 cup honey. Heat another 2 minutes, stirring often. Remove from heat and add 2 tablespoons orange liqueur (I used Cointreau) and stir to combine. Pour slowly over the cake or brush on with a pastry brush until all the syrup is absorbed. Cover with plastic wrap and let sit at least an hour to allow syrup to moisten the cake.

Saturday, June 06, 2015

Black Rice Salad With Cherries And Snow Peas


At first there is something a bit forbidding about a bowl of black rice salad. It is so dark and mysterious looking and if you are not familiar with black rice it doesn't even look that tasty. Add to that the legend that it used to be forbidden rice...available in China only to the elite. It's a wonder anyone eats it.

If you do, you will know that this is a first rate dish. The rice is nutty tasting and it goes so well with the bright citrus notes of the lime and orange, with the sweet cherries, the delicate snow peas and the crunch of sliced almonds. It's an unusual combination, but delicious.  I added grilled chicken, cut into bite sized pieces, to the salad to make it even more of a main dish. Sweetie at two portions and not just to get more chicken.


Surprise your family with this dish or take it to a pot luck or picnic. If you leave out the chicken it can sit at room temperature for quite a while. Black rice can be found at Costco according to a friend, or I/m pretty sure you can buy it at Trader Joe's. I've had my bag of rice a few years and I got it there, so it's likely they still have it. You can absolutely buy it on Amazon. This recipe makes enough for a crowd, but it keeps well, too, so it can make a couple of meals if your numbers are smaller.

So whats with the photo at the top? Well, I forgot to take any photos of the rice dish, so you get to see my photo from last week's trip to the redwoods. The photo below is from my 2012 post of a similar rice dish. Pretend that you see cucumber moons, snow peas and sliced almonds instead of celery, OK?


Black Forbidden Rice with Cherries
based on a recipe of Giada De Laurentiis'

Serves 6 - 8

Rice:
3 1/2 cups water
2 cups black forbidden rice 
1/4 teaspoon ground ginger
1/8 teaspoon dried orange zest or fresh orange zest
a few drops orange oil (skip if you use fresh orange zest)
2 teaspoons kosher salt
1 tablespoon olive oil
2 tablespoons finely chopped Italian parsley
1 green onion, sliced, white part only
1 small cucumber, peeled if peel is tough, cut into thin half moons
6 oz fresh cherries, pitted and halved
2-3 oz. fresh snow peas, ends trimmed and cut into 1-inch pieces
2 chicken breasts, grilled and cut into bite sized pieces (optional)
1/3 cup sliced almonds

Dressing:
1/4 cup Champagne vinegar 
1/4 cup olive oil 
3 tablespoons honey
2 tablespoons fresh lime juice
1 tablespoon soy sauce 
1 teaspoon grated lime zest
Directions
For the rice: In a medium saucepan, bring the water, rice, ground ginger, orange zest (and orange oil if using) and salt to a boil over medium heat. Reduce the heat to a simmer , cover the pan, and cook until the rice is tender, about 30 minutes. Remove the pan from the heat and set aside for 5 minutes. Fluff with a fork and place in a large serving bowl. Let cool to barely warm.
Add Italian parsley, green onion, cucumber, cherries, snow peas and chicken breast pieces (if using)  to the serving bowl with the cooked rice. Stir to combine.

For the dressing : In a medium bowl, whisk together the champagne vinegar, oil, honey, lime juice, soy sauce and lime zest until smooth.

Pour the dressing over the rice and cherry mixture and toss gently to combine.  When ready to serve, stir in the sliced almonds. Serve warm or at room temperature. 

Tuesday, July 23, 2013

Assertive Citrus Chicken


I grew up to be a shy person, up until I went to college. No one would have called me assertive. It came as quite a revelation to me, when I finally shed my shy behaviors and blossomed, that being assertive could be fun. Understand, I'm still shy inside, I just don't behave that way. I suspect that there are a lot of people who do the same.

Ducks and geese are very assertive, but chickens seem to mostly be silly. Recently Sweetie and I took care of our neighbor's flock of chickens, all 30 strong, and had the devil of a time getting them to go into the hen house at night, not because they were being assertive but because they were being distracted by the goat who wanted to play with all of us. One of us would chase them toward the door and the other would try to keep the goat away and wave the chickens into the doorway at the same time. I'm sure it would have been a hit on YouTube if anyone had filmed it.

A good time for a chicken to be assertive is when it is cooked. In this recipe the fairly forward flavors of cilantro, garlic, scallions, citrus and soy join up in a marinade for chicken thighs that is full of zestiness but not heat. I served it with steamed rice and steamed broccoli. The marinade went pretty well with those, too. There is an Asian sensibility to the marinade that I really enjoyed. The flavorful crispy skin was a nice bite of luxury, too.

As with many recipes I made a few changes. For one thing it has been a warm day. Sweetie offered to grill the chicken, instead of broiling it, to keep the kitchen cooler. Had my vote! I also found that I only had half a lime, so I added extra orange juice and zest for plenty of citrusness. I used a sharp knife to cut strips of the citrus zest and let the food processor chop them up instead of zesting the skin.  The finished chicken was pretty salty, so next time I'll cut back on the salt some. I also marinated it for about 4 hours, but it was absolutely delicious (other than salty), so that is not a problem.

I think that this recipe could easily be doubled if you are going to have  a larger group than 4. With those assertive flavors, the piece we have left over will probably taste even better tomorrow.

 
Citrus Marinated Chicken Thighs
from Bon Appetit magazine, Aug. 2013
"An aggressively seasoned marinade delivers big flavor"

1 bunch scallions, thinly sliced
1/2 bunch cilantro, leaves and tender stems only, chopped
2 garlic cloves, chopped
1 teaspoon finely grated lime zest
1 teaspoon finely grated orange zest
1/4 cup fresh lime juice
1/4 cup fresh orange juice
1/4 cup reduced-sodium soy sauce
1 tablespoons olive oil
1 tablespoon kosher salt
2 lb. bone-in chicken thighs with skin left on

Set aside 1/4 cup of the sliced scallions for garnish.
Pulse cilantro, garlic, zests, juices, soy sauce, oil and salt and remaining scallions (green onions)in a food processor or blender until a coarse puree forms. Set aside 1/4 cup of the marinade. Place the remaining marinade in a large reseal able plastic bag. Add chicken, seal bag, and turn to coat. Chill at least 20 minutes. If chilling longer (up to 2 hours ahead), occasionally turn bag over to redistribute the marinade. Keep chilled.

Preheat broiler or prepare grill. Remove chicken from marinade and dispose of used marinade. To broil, place chicken, skin side down,  on a foil-lined broiler-proof baking sheet. Broil chicken until lightly browned, about 5 minutes. Turn pieces over and continue to broil until cooked through. An instant read thermometer inserted in the thickest part registers 165 degrees F. - 12 - 15 minutes longer. To cook on grill, place chicken pieces, skin side down on prepared grill and grill 5 minutes. Turn and grill until cooked through, about 12 - 15 minutes longer. Use same technique as above to test for doneness.
Serve chicken with reserved marinade and sprinkle on the scallions. Serves 4.

Wednesday, June 13, 2012

Forbidden

There is a sense of mystery about something forbidden...and a challenge, too. I felt that way upon discovering black forbidden rice, a gorgeous black rice with a nutty flavor similar to wild rice. The mystery is how to use this lovely grain to best advantage...and that was the challenge, too.

A salad or room temperature dish seemed like a good idea so I trolled the Internet and found something close to what I wanted with a Black Forbidden Rice with Sugar Snap Peas and Nectarine dish by Giada De Laurentiis. It can be served warm or at room temperature, it has a slightly Asian feeling with fresh ginger and soy sauce and the combination of fruits and vegetables is interesting, too. As usual I had some ideas on how to change the recipe to make it my own.

My version keeps the ginger and the soy sauce, but I add a strong orange note with both orange zest and juice in the dressing. I find that citrus adds a sparkle to both rice and bean dishes. I was out of nectarines, but had just purchased fresh red cherries so I used them.
Cherries and oranges are also a great combination. For a bit of crunch I added celery and some green onions for their fresh green taste.

I had thought that such a good dose of fresh ginger would leave a strong ginger taste in the rice but during the cooking process the ginger is muted and the flavor of the rice shines with just a hint of ginger in the background. I didn't use any hot sauce or other additional heat but after tasting this rice dish I think that you could add a little fresh minced ginger to the dressing or a dash of cayenne if you like your food a bit spicier than I do and it would be a great addition.

By the time I served this dish, the rice was lukewarm. The warm cherry mixture was perfect with the slightly cooler rice and the dressing added just the right mixture of salty and sweet. Sweetie took two helping, so I suspect that this will be a hit with your family, too. If you wish to dress this beautiful rice dish up, you could sprinkle some toasted sliced almonds over it when you are ready to serve it.
Black Forbidden Rice with Cherries

based on a recipe of Giada De Laurentiis'

Serves 4-6

Rice:
3 1/2 cups water
2 cups black forbidden rice
1 (1 1/2-inch) piece fresh ginger, peeled and finely chopped
2 teaspoons kosher salt
1 tablespoon olive or grapeseed oil
2 stalks celery, sliced
1 green onion, sliced, white part only
6 oz fresh cherries, pitted and halved

Dressing:
1/4 cup unseasoned rice vinegar
1/4 cup grapeseed oil
3 tablespoons honey
2 tablespoons fresh orange juice
1 tablespoon soy sauce
1 teaspoon grated orange zest

Directions:
For the rice: In a medium saucepan, bring the water, rice, ginger, and salt to a boil over medium heat. Reduce the heat to a simmer, cover the pan, and cook until the rice is tender, about 30 minutes. Remove the pan from the heat and set aside for 5 minutes. Fluff with a fork and place in a large serving bowl.

Heat the oil in a large skillet. Add the celery and green onion and sauté for 3-5 minutes, or until onion is translucent. Add the cherry halves and sauté for 2 minutes. Transfer the mixture to the serving bowl with the cooked rice.

For the dressing: In a medium bowl, whisk together the rice vinegar, oil, honey, orange juice, soy sauce and orange zest until smooth.

Pour the dressing over the rice and cherry mixture and toss gently to combine. Serve warm or at room temperature.

Friday, March 16, 2012

A Northern Rye Bread from the Babes


The fragrance was irresistible! I know that you are supposed to let bread rest and cool before slicing it but this time we could barely wait for the bread to finish baking.

The braw Bread Baking Babes of March baked a lovely Swedish Rye bread as we gathered around the kitchen table of our hostess of the month, the lovely Astrid of Paulchen's Food Blog. Sweetie can attest that she chose a wonderful recipe for Swedish Rye Bread adapted from the Tassajara Bread Book by Edward Espe Brown. Tassajara Bread Book. It is described in the Tassajara Bread Book as "sweet-smelling and scented, a light bread suitable for sandwiches." This one is a keeper.

The bread that came out of the oven was moist and light and thrilled the taste buds with the flavors of orange, rye and caraway. (I left out the anise seed since it is not a flavor I enjoy.) There was a wonderful crust and just the right amount of chewiness. At Astrid's recommendation I baked it in a bread pan. I've never been a huge fan of rye bread but this may be the rye bread that changes that. It's wonderful!

I used a dark rye flour and expected a strong rye flavor, but it was just right, a sort of medium rye flavor. We had those first slices topped with some butter. I look forward to enjoying the rest of the loaf with some cheese, as toast, and maybe with pastrami because it goes so well with rye.

I know you are going to want to be a Buddy this month and bake this great and easy rye bread. Instead of using a mixer we get to play with wooden spoons and our hands. To be a Bread Baking Buddy just go over to Astrid's post for the recipe (including great step by step photos), bake it, take at least one photo to share with her via e-mail and tell her about your experience baking this great rye bread. She even has a fill-in form on her blog to make it super easy.

Do check out the beautiful loaves baked by many of the Babes this month. The links are to the right.

Other than not adding the anise seed and only making half the recipe, I followed the recipe as written. That may be why it turned out so well! Since the recipe is over at Astrid's I won't post it here.

Last but not least in any way, I'm sending this to Susan at Wild Yeast for the weekly Yeastspotting event. A treasure trove of great bread recipes awaits you when you visit and there just might be some variations on the Swedish Rye Bread...next Friday probably.

XO Elle

Swedish Rye Bread

adapted from Tassajara Bread Book by Edward Espe Brown

1.
3 cups lukewarm water
1 1/2 tablespoons dry yeast (2 packets)
1/3 cups honey
1 cup dry milk
grated peel of 2 oranges
2 teaspoons anise seeds
2 teaspoons caraway seeds
4 cups unbleached white flour

2.
4 teaspoons salt
1/4 cup oil
4 cups rye flour
1 cup whole wheat flour (for kneading)

Method:

1. Dissolve the yeast in water. Add the honey and dry milk plus the oranges and seeds

2. Add the flour to get a thick batter.

Add one cup of flour at a time, stirring good after each addition. The more flour you add the more you knead to go into a beating mode with your spoon. Best way is to stir up and down in a circular mode from the bottom of the bowl to the surface of the dough. Don't forget to scrape the sides of the bowl from time to time. After the 4 cups of flour you should have a thick mud-like dough.

3. Beat well with a spoon (100 strokes).

Continue to beat until you have a smooth dough. Again pull your spoon under the dough and bring it up to the surface again in a circular mode. The batter will be more elastic while you are doing this as more and more air gets incorporated.

4. Let rise for 45 minutes.

Cover the bowl with a damp towel and let rise in a warm place.

5. Folding in the remaining ingredients. Do not stir! Do not cut through the dough, this will improve the elasticity and strength of the dough.

6. Sprinkle on the salt and pour on the oil. Stir around the side of the bowl working carefully your way towards the center. Rotate your bowl a little with every stroke you do. Repeat until all of the salt and oil is incorporated.

7. Sprinkle the flour 1/2 a cup at a time onto the dough. Again fold it in while rotating your bowl.

8. Continue until the dough comes away from the sides of your bowl. Now the dough is ready to give it a good knead!

9. Plop your dough on your kneading board and scrap all remainings from the bowl onto the dough. Keep in mind that your surface should be floured enough to prevent the dough from sticking to much on the board.

10. Flour your hands and the top of the dough. From the middle of your down stretch it away from you and then fold it back onto the remaining part of the dough. Continue to push down and forward.

11. Turn the dough a quarter turn. Again continue with the pushing and folding.

12. Turn, fold, push. Rock forward. Twist and fold as you rock back. Be careful not to stretch the dough too much and tear it. Add flour to the boards as needed.

13. While you continue with the kneading the dough will become more and more elastic, smooth and shiny.

14. When you are finished, place the dough in your lightly oiled bowl smooth side down, then turn it over so the dough ball is covered lightly with oil. This will prevent the dough from forming a crust on the top while rising.

15. Cover the bowl with a damp towel again and set aside to rise in a warm place. (50.60 minutes until doubled in size)

16. Punch down your dough with your fists steadily and firmly about 15-20 times.

17. Let rise again 40-50 minutes until doubled in size again.

18. Preheat your oven at 350°F.

19. Turn your dough onto the board again.

20. Form the dough into a ball. Cut the dough into two even pieces and form smaller balls again. Let rest for 5 minutes.

21. Knead the dough and fold it about 5 times, this gives the dough added spring. After the final push turn the dough a quarter turn.

22. Roll up the dough into a log shape. Seam at the bottom, flatten the top of the dough. Square the sides and ends. Turn the dough over and pinch the seams all the way.

23. Put the dough seam side down into your pan. Press it down into the pan with your fingers.

24. Cover and let rise again. This will take 20-25 minutes.

25. Cut the top with 1/2 inch deep slits to allow the steam to escape.

26. You and brush with eggwash and sprinkle with poppy seeds or sesame if you want!

27. Bake for about 50-60 minutes.

28. Remove from pan to cool down completely.

Saturday, December 24, 2011

A Vegan Cake for Christmas


I'm not a vegan, although I probably should be. If you know how to combine your foods to make a complete protein it's a very healthy way to eat. The good news is that there are absolutley delicious recipes I make that happen to be vegan, too.

Wishing each of you, dear readers, a happy holiday season and joy and prosperity in the New Year.

Counting my blessings this year takes some time because I've been very blessed. Loving friends and family are some of the biggest blessings one can have.

The day after Christmas we'll have a gathering of friends and family, with food and drink and conversation. One of the things being served will be this vegan spice cake, a variation on a Spanish Bar Cake I used to enjoy when I was a girl. It's based on a recipe in the Joy of Cooking but there are so many recipes in that cookbook that you may not have run across this one. Even though there will also be handmade cookies and Costco mousse cake as desserts, this one may be finished up first, it is so good. And yes Lynn, I did make some changes. But of course.

The texture is light for a fruit cake and the flavors are deep, dark and spicy due to the cinnamon, allspice, nutmeg and lots of raisins. Let it cool before slicing it. Sweetie couldn't wait and so it crumbled on him a bit.

Do try this at home. It contains no eggs, butter, or milk but you do need a non-dairy butter substitute or butter flavored shortening. It's not diet food, but is also less rich than a lot of the desserts that will be served this holiday season.

Vegan Spice Cake with Citron, Candied Orange Peel and Dates
Based on Eggless Milkless Spice Cake in the Joy of Cooking


1 1/2 cups water
3 cups raisins
1 1/2 cups brown sugar
1/2 cup (one stick) non-dairy margarine or butter-flavored shortening, melted
3/4 teaspoon cinnamon
3/4 teaspoon allspice
3/4 teaspoon salt
1/4 teaspoon nutmeg, freshly grated if possible
3 cups cake flour, sifted
1 1/2 teaspoons baking powder
1 1/2 teaspoons baking soda
1 cup chopped almonds
1/2 cup chopped dates
1/4 cup chopped candied citron
1/4 cup chopped candied orange peel

Preheat oven to 325 degrees F. Grease well and flour a 9 - 10 cup Bundt pan. Set aside.

In a medium saucepan stir together the water, raisins, brown sugar, margarine/shortening, cinnamon, allspice, salt and nutmeg. Bring to a boil and boil for 3 minutes, stirring occasionally.

Sift together the cake flour, baking powder and baking soda. Stir gradually into the boiled ingredients until the batter is smooth (I transferred the boiled ingredients into a stand mixer bowl and used the mixer to mix in the dry ingredients.

Stir in the almonds, dates, citron and orange peel to distribute evenly in the batter.

Transfer the batter, which will be somewhat thick, into the prepared pan and even the top. Tap the pan a few times on the worktop to settle the batter. Bake in the preheated oven for an hour. Check to see if it is done by pushing a toothpick into the middle of the baked batter. If it comes out clean or with a few crumbs sticking to the toothpick it's done.

Remove from the oven and cool for 10 minutes on a rack. Turn out onto a serving plate and cool completely before serving. Can be decorated with a drizzle of melted white chocolate or with a drift of confectioner's sugar put through a fine screened strainer.

Serves about 16

Sunday, July 24, 2011

Late But A Zebra Anyway


Good intentions are great but sometimes even with the best of intentions I neglect to do something I want to do. This month it was baking the wonderful Zebra Cake so that I could post with the Cake Slice Bakers on the 20th. Maybe it's because its summer, maybe its because of CS visiting, maybe its because I've been trying to eat foods that are better for my bod...for whatever reason the recipe sat in the kitchen unused until yesterday.

Never at a loss for ideas, once I did decide to bake the cake I also made a change and an addition. When the two batters get separated, I did whisk cocoa powder into the smaller amount, but I also added dried orange peel and some orange oil to the plain batter. Once the cake was baked and cooled, I gilded the lily with a ganache icing. Unfortunately I over heated the ganache and didn't start until 7:30 in the evening, so it was fully dark by the time we enjoyed the Zebra Cake, hence the not-so-great photos.

This was a fun cake to make and delicious, but the texture was not as tender as I would have liked. The chocolate/orange combination was lovely and it made an impressively tall slice...I'm glad I baked it in my 2 inch tall cake pan. The chocolate batter was thicker than the orange batter which might be why my zebra stripes ended up looking more like marble cake. Glad I made this one, even if it was late.


If you haven't already done so, do check out the other Cake Slice Bakers' versions of the Zebra Cake. They are mostly better than mine.


July’s Cake: Zebra Cake
Makes one 9 inch round cake

Zebra Cake
(Recipe from Cake Keeper Cakes by Lauren Chattman)

Ingredients
2 cups unbleached all purpose flour
1 tbsp baking powder
¼ tsp salt
4 eggs
1 cup sugar
1 cup whole or 2% milk
½ cup (1 stick) butter, melted and cooled
½ cup vegetable oil
2 tsp vanilla extract
2 tbsp unsweetened Dutch cocoa powder

Method
Preheat the oven to 350F. Grease a 9 inch pan, line with a circle of parchment paper, grease the parchment and dust with flour. Combine the flour, baking powder and salt in a medium bowl.

Combine the eggs and sugar in a large mixing bowl and beat with an electric mixer on high speed until thick and pale, about 5 minutes. With the mixer on low speed, stir in the milk, butter, oil and vanilla, scraping down the sides of the bowl once or twice as necessary. Stir in the flour mixture, ½ cup at a time.

Transfer a third of the batter into another bowl and whisk in the cocoa powder.
Place a quarter cup of the vanilla batter into the centre of the pan and let it stand for a few seconds so it spreads out slightly. Place 2 tablespoons of the chocolate batter right on top of the vanilla and wait another few seconds until it spreads. Continue alternating vanilla and chocolate until you have used up all the batter and it has spread to the edges of the pan.

Bake until the cake is set and a toothpick comes out clean, about 40 minutes. Cool in the pan for 10 minutes. Run a sharp knife around the edge of the pan and invert the cake onto a cutting board. Peel away the parchment paper. Re-invert onto a wire rack and cool completely. Slice and serve.

Store uneaten cake in a cake keeper or wrap in plastic and store at room temperature for 3 days.

Sunday, December 19, 2010

Christmas Strong Bread

Most of my adult life I've been an explorer of sorts, almost always ready to try something new, to learn a new skill, read a new book, look at something in a new way. Success has not always followed, but I learn from my mistakes, too, so they are valuable in their own way.

For the last half year or so the impetus to try new things has hibernated while I worked on getting a handle on what I really want...probably easy for some people but lately a struggle for me. Not too surprisingly to those who know us, top of the list of what I really want is to be with Sweetie. Since I turned into a bit of a shrew during the bathroom project it's good to know that he still feels the same way and he is happy that I've returned to being the loving and mostly reasonable woman who was hard to find during the summer and fall. The optimistic office worker has also resurfaced perhaps because there are new tasks to master and a change of venue coming up.

So 'what does all this have to do with food blogging?' you ask...it means I'm back to looking for the enjoyment of challenges in the kitchen...and my first High Five entry in quite a while. As you may or may not remember, Lynn, known in the blogosphere as Cookie Baker Lynn, challenged us last winter to stretch ourselves in the kitchen, blog about it and then let her know our High Five accomplishment. The idea was to do one a month. Hahahahahaha. Great idea, but hasn't happened.


My High Five this time is for baking Pan Forte di Siena, a sort of Tuscan fruitcake with a honey base. I've seen it at the specialty stores for an absurd amount of money for a small wedge and was sure that I could make it myself. Still, there is an awful lot of costly ingredients in this 'strong bread' so I was a little nervous about making it...it IS very different from anything I've made before.


For starters I scoured the Internet for recipes, looked at suggested techniques and proportions, then put together my own recipe with what I like and had on hand. The basic unit of measurement for my version is 3/4 cup. The toasted nuts add up to a double of 3/4 cup. The dried fruit is the same. The dry ingredients combined equals 3/4 cup and you use 3/4 cup each of sugar and honey for the syrup that binds it all together.

This cake/bread uses no oil other than to butter the pan and parchment and it has no eggs either. The syrup is boiled to a soft ball stage in all the recipes I looked at and almost all baked it in a low oven for about 30 minutes. There is far more fruit and nuts than 'cake' in pan forte (and it has no resemblance to Aunt Hattie's fruitcake brick).


This pan forte is a thin cake filled with fruit, nuts and spices with a lovely honey-citrus note. A little goes a long way, so you can see why this was historically considered the Crusaders Power Bar. There are versions with figs and walnuts, too. If you have made candied orange peel you will probably want to increase the amount of orange peel and decrease the citron. Dates would work in this, too, and pine nuts would be great for some of the nuts. Just keep the 3/4 cup and 1 1/2 cup proportions.

Pan Forte is available year round now but used to be one of the treats of the Yuletide in Italy, especially in Sienna. This is not a difficult recipe, although prepping the dried fruit and roasting the nuts takes some time. Sweetie and Straight Shooter assure me that it was well worth the time. Try it yourself and you, too, can have a High Five from Lynn!


Pan Forte di Siena

1 ½ cups toasted nut…mix of whole almonds and slivered almonds and chopped hazelnuts
½ cup diced citron
½ cup diced apricots & ½ cup diced dried cherries
2 tablespoons diced candied orange peel
zest of 1 lemon and zest of 1 orange
1 teaspoon cinnamon
¼ teaspoon each: cloves, nutmeg, cardamom
pinch of pepper
½ cup flour
¼ cup unsweetened cocoa
¾ cup granulated sugar
¾ cup honey
2-3 tablespoons almond meal or ground almonds
parchment paper

Preheat oven to 300 degrees F. Butter a 9” springform pan, line bottom with parchment paper, butter that, sprinkle on the almond meal or ground almonds evenly & set pan aside.

In a bowl mix together the nuts, citron, apricots, candied peel, citrus zest, spices, flour and cocoa.

In a heavy pot stir together the sugar and honey. Over low heat, stirring constantly, melt the honey and sugar together. Increase heat to medium high. Stop stirring and let cook until mixture reaches 245 degrees F (soft ball stage), using a wet pastry brush to wash down the sides of the pot to keep crystals from forming. When soft ball stage is reached remove pan from heat and pour mixture into dry ingredients, stir it all together quickly to combine all ingredients. Pour mixture into the prepared pan and using slightly wet hands smooth the top. Work quickly as mixture hardens fast.

Bake in preheated oven for ½ hour - 35 minutes with pan set on rimmed cookie sheet.

Set on a rack to cool. When cool remove from pan, invert and remove the parchment paper. Invert again and sift liberally with confectioners’ sugar. Serve in small slices. To store wrap twice in plastic wrap and then in foil and store at room temperature.