Showing posts with label dried cherries. Show all posts

Saturday, September 04, 2021

Morning Glory

It's fun to know that you can have a muffin and a flower with the same name...morning glory. At this time of year, the morning glories in my garden are going a little wild, having made their upward climb, some are twining on themselves for support so they can keep going, other are swooping down to attach lower down so they can climb again. I love the flowers...trumpets of pink, magenta, deep purple, pale blue and more. The truth is that they self-seed if not constantly dead-headed and become a weed sometimes, but I love them anyway.


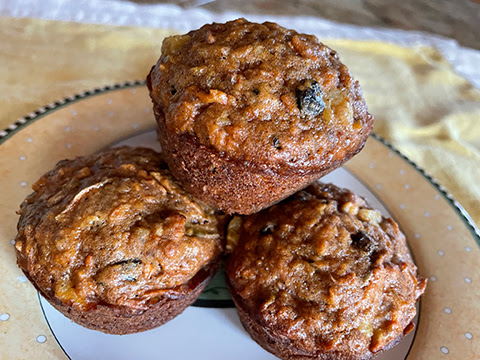
The morning glory muffins are also prolific. One recipe makes a full two dozen muffins...that's a lot! They are filled with all sorts of deliciousness...apples, carrots, pecans, crushed pineapple, coconut, raisins and dried cherries as well as vanilla and spice. The wet ingredients includes apple butter but I found a jar of pumpkin apple butter and decided to use that to welcome in fall now that school is back in session. Since I did that, I also used a bit of pumpkin pie spice along with the cinnamon the recipe calls for. Since my supply of dried cherries was running low, I used some dried currants in their place and that worked well. Seems to me the recipe as written is a takeoff on Hummingbird Cake. 


Between the large quantities (you need two cups shredded carrots and a cup of shredded apple for example) and long list of ingredients, the prep takes a bit of time, but you end up with fragrant, delicious, moist and fairly healthy muffins...and lots of them. Do yourself a favor and make sure you set each and every ingredient on the counter before you start making these because it's easy to miss an ingredient. Better yet, prep and measure everything in advance. That way it will all go together quickly and you'll get the best rise out of the baking soda that is the only rising agent used. 

I removed these from the muffin tins in about 3 minutes after taking them out of the oven and I did have to run a butter knife around the edges on some of them to loosen them. If you stand them on their sides in the muffin cup to finish cooling it saves space and they are sturdy enough to hold their shape, too. 

Do try these delightful muffins. They are great for breakfast but also good for afternoon tea and would be a treat in a school lunch. The recipe came from my family but I suspect that it's been around for a long time. 


Morning Glory Muffins
Makes 2 dozen

2 1/2 cups all purpose flour
1 cup brown sugar, packed
2 teaspoons baking soda
2 teaspoons ground cinnamon
1/2 teaspoon salt
2 cups shredded carrot
1 cup shredded apple
3/4 cups raisins
1/2 cup dried cherries
1/3 cup chopped pecans
1/4 cup flaked coconut (sweet)
one 8-oz. can crushed pineapple, in juice, drained
1/3 cup vegetable oil
1/3 cup apple butter
2 teaspoons vanilla
2 large eggs
2 large egg whites

Preheat the oven to 350 degrees F.

Coat 24 (2 dozen) muffin cups with cooking spray or vegetable oil.
Combine flour, brown sugar, baking soda, cinnamon, and salt in a large mixing bowl.
Stir in carrot, apple, raisins, cherries, pecans, coconut and pineapple and make a well in the center of the mixture when combined.

In another bowl combine the oil, apple butter, vanilla, eggs and egg whites. Stir with a whisk. 
Add oil mixture to flour mixture, stirring with a wooden spoon or silicon spatula until just moist/barely combined.

Spoon the batter evenly in prepared pans, filling about 2/3 full.

Bake at 350 degrees F. for 25 minutes or until muffins spring back when touched lightly in center.

Remove from pan at once and cool on a wire rack. Yields 2 dozen.

NOTE: Can be stored, airtight, in freezer for 1  month. Wrap in foil and reheat at 300 degrees F.

Sunday, February 08, 2015

Cherries


Every year at Christmas time one of the gifts we look forward to are the cherries from Michigan. One of my sisters lives near Traverse City, Michigan, which is cherry country with a capital C. She often sends us dried cherries and they usually are eaten before the tree gets taken down. Last year I hid some for baking because they are excellent in baked goods. Yesterday I had to use some from the store since the Michigan cherries are all gone, but I was thinking of her as I baked this slab pie and wishing she was here to have a slice. I also wished I had Michigan cherries, but had to settle for Montmorency cherries canned in a jar (from Wisconsin I think).


This pie is a variation of one I found in XX. The original recipe was for apple pie, but Sweetie isn't a huge fan of apples, plus I had a yen for cherries. This would make an excellent Valentine's Day dessert. It looks like it feeds a crowd, but is really about six slices long. I'm pretty sure that you could cut it into 4 huge slices if you needed to. We shared it with our dinner partners last night and it served the four of us with medium slices, plus a couple left over for their breakfast. We were treated to an excellent Middle Eastern feast by the KitchenThink kitchen designer whom we love, so it was great that she loved this slab cherry pie, too.


The challenge for me with this recipe was to make a filling to replace the apple filling. I used another recipe in the book, for regular cherry pie, but added extra thickener and used fewer cherries. Because I was using canned cherries, I also included some dried tart cherries which I marinated in Amaretto liquor since almonds and cherries are a great combo. I also added about a teaspoon grated Meyer lemon zest to the Meyer lemon juice for some zing since canned cherries can be a bit bland. It all worked out well. The filling was thick enough for a slab pie, it was flavorful and had just a bit of tang. I know I'll make it again soon.


The crust was the one called for in the book, a all-butter pie crust that you can make in the food processor. It is very similar to the Martha Stewart one, but was even better and very flaky. I did increase the ice water to 1/4 cup. The mixture still looked like crumbs at that point, but it did hold together when squeezed. When I wrapped it up in plastic, I kneaded it together just a bit, then shaped it into a rectangle. Not sure if it is important, but I chilled the flour in the freezer and put the small cubes of butter there, too. The water was very cold. I think that having such cold ingredients and not overworking the dough helped with making it flaky.

Another change was that I painted the edges that became sealed together with the egg wash before folding the dough over. The recipe called for water, but I had the egg wash ready to go, so I used it. The filling that came out did so from a vet not the edges, so it worked to keep those edges really sealed. I also left the salt out of the egg wash. There was so much sparkling sugar on top that it really wasn't missed.


Cherry Slab Pie
a variation of Apple Slab Pie in The Culinary Institute of America's Pies and Tarts book

Makes on 5 x 15 inch slab pie
(about 6 servings)

One All-Butter Pie Dough (recipe below) formed into in rectangular disc
3-4 cups canned or frozen tart cherries, drained...reserve 1/4 cup juice
1/2 cup dried tart cherries in a small bowl with enough Amaretto to cover tehm
1/3 cup cornstarch (I used 1/2 cup tapioca starch, which worked well)
2 teaspoons fresh lemon juice (I used Meyer lemons)
1 teaspoon fresh lemon zest, grated fine
1 1/4 cup granulated sugar
1/4 teaspoon salt
Egg Wash of 1 egg whisked with 1 teaspoon water
Sanding sugar (or granulated sugar) for the top of the pie

Preheat the oven to 375 degrees F. Make sure the pie dough is chilling in the fridge. Line a baking sheet with parchment paper. Set aside.

In a small bowl, combine the reserved 1/4 cup cherry juice, the cornstarch or tapioca starch and whisk together with a small whisk or a fork. Set aside.

Drain the dried cherries. The liquid can be used for other purposes (like sipping)

In a medium saucepan, combine the drained cherries, lemon juice and zest, sugar, salt and drained dried cherries. Bring to a gentle simmer over medium heat, and simmer, stirring, for 10 minutes to reduce some of the liquid. Remove the pan from the heat and stir in the cornstarch mixture. Return the pan to the stove top and bring to a simmer over medium heat. Stirring constantly, cook for 3-5 minutes, until clear and thickened. Mixture will thicken more as it cools. That is fine. Remove the pan from the heat and allow to cool for 30 - 45 minutes, or until cooled to room temperature.

Dust a 13" x 18" sheet of parchment paper lightly with flour. On it roll out the chilled dough to 1/8 inch thick. Using a pastry wheel, trim the dough to 10 inches by 15 inches. If dough is at all soft refrigerate by placing the parchment on a baking sheet and putting the whole thing in the fridge.
On chilled rectangle of dough, spread the cherry filling on one half, along the long side, leaving a 1/2 inch border on three sides. If needed, press gently on filling with a spatula to eliminate any air gaps.

Use the egg wash and a pastry brush to brush the wash on all edges of the pastry, about 1/2 inch in. Using the parchment paper to help, fold half the dough over the other half. Press down on the edges to seal and further seal and crimp by pressing down with the tines of a fork.

Carefully turn the pie over onto the parchment lined baking sheet. Brush the top with egg wash. Sprinkle liberally with sanding sugar or granulated sugar. Use a paring knife to cut 6 or 7 vents in the top at 2 - 3 inch intervals.

Bake in the preheated oven until the filling is bubbly and top is golden, about 45 - 50 minutes. Remove the baking sheet from the oven and place it on a cooling rack. Let cool for 2 - 3 hours. The filling will continue to thicken and set as the pie cools.

To serve, cut wedges down the pie, with the point of the wedge facing in one direction for one slice and in the opposite direction for the next slice.

Refrigerate any leftovers.

All-Butter Pie Dough
from same book as above

1 1/2 cups all-purpose flour, put into the freezer for 1 hour
1/2 teaspoon salt
1/2 teaspoon sugar
4 oz - 1 stick, unsalted butter, cut into 1/2-inch cubes and frozen
1/4 cup ice cold water, more if needed

In the bowl of a food processor fitted with steel blade, combine the cold flour, salt and sugar. Process for a few seconds to combine.

With the processor off, add half the frozen butter. Pulse for 3 - 5 seconds, or until the butter looks like small peas. With the processor off, add the remaining butter and pulse for 4 - 5 seconds, or until the mixture is well mixed and butter pieces are various sizes from small to pea sized or larger.

With the processor off, sprinkle half of the ice-cold water over the mixture. Pulse for 3 - 5 seconds, or until just combined. With processor off, add half of the remaining water. Again pulse for 3-5 seconds. Check the dough by pressing it to the side of the work bowl. If it does not hold together, add the rest of the water and pulse for 3 - 5 seconds, and check again. The dough should just hold together when pressed to the side of the bowl. It will be very dry looking and should not form a ball or mass of dough in the bowl.

Turn the dough out onto a lightly floured work surface. Shape the dough into a disc, kneading gently just a bit if needed to make the dough cohesive. Shape disc into a rectangle and wrap tightly in plastic wrap. Chill in the refrigerator for at least 1 hour or, preferably, overnight.

Use straight from the fridge to roll out.

Thursday, January 16, 2014

Chocolate Prune Bread a Babes Delight


Last month the Bread Baking Babes had a cake that was actually a bread (Lardy Cake) and this month we have a bread that has many of the flavors of a cake. If you love chocolate and bread combined, you'll love this loaf. I made mine with chopped pecans in the dough and with chunks of bittersweet chocolate and dried cherries (instead of prunes) kneaded in before shaping. It is full of flavor from the cocoa in the dough, too. I only made half the recipe, which makes one loaf...plenty for two people. In the recipe below the amounts in parentheses and italics are the amounts of ingredients I used for the half recipe.


Although I had expected some rise in the dough when I first set it out to expand, it was pretty inactive for a couple of hours. Then it was bedtime, so I covered the bowl (same one I made it in, unwashed, un-oiled Elizabeth!) and put it into the fridge. The next day I was too busy to deal with it, but the next day, after the dough had warmed up some, it rose just fine. Back into the fridge it went. The next day I kneaded in the cherries and chocolate and shaped it into a loaf shape. Working with fairly cold dough is helpful. I had already buttered the pan and sprinkled it with sanding sugar, so in went the shaped loaf. It rose by about 1/3 in the pan while the oven preheated. After an egg wash and more sanding sugar on top, I slashed the top to allow for oven spring. Glad I did that because the oven spring was awesome! The bottom of the loaf was a little more browned than I would have like...chocolate can burn easily, but overall it was a delicious, decadent bread. Although many flavors were cake like, you could still see the bread texture and still taste the yeast, so not cake...BREAD!

Thank you Jaime, our Kitchen of the Month, blogging at Life's a Feast, for choosing this interesting recipe.


Thank you Elizabeth for lending me your Battle Apron, which I felt I needed when the dough refused to rise the first day. That and some patience seem to be what was needed to be successful with this lovely loaf.

Do try it for yourself! You can be a Buddy by making it, taking a photo or two and sending Jaime an e-mail (please include your name and your blog’s name) by January 26th to jamieannschler AT gmail DOT com with January Bread Baking Buddy in the subject line. Do visit all the Bread Baking Babes to see their bountiful versions, too.  OOPS! Buddy deadline is actually Jan. 29th! Still time....

Karen - Bake My Day 
Elizabeth - Blog from OUR Kitchen 
Heather - Girlichef 
Lien - Notitie van Lien   


Chocolate Prune Bread:
Makes one 1 ½ pound loaf if half recipe used

1 ½ pounds (about 680 g – the size of a small cantaloupe) (full amount if half recipe was made) of the Chocolate Chocolate Chip Bread dough {SEE BELOW}
Softened unsalted butter for greasing the pan

2 ounces (55 g) high-quality bittersweet chocolate - * use 6 ounces (170 g) if you did not add chocolate chips to the original Chocolate Bread Dough

¾ cup chopped pitted prunes (or dried cherries...like I used)

Egg wash (1 egg beaten with 1 Tbs water)
¼ cup (50 g) sugar for sprinkling over the top of the bread and preparing the pan

On baking day, generously grease an 8 ½ x 4 ½ - inch (22 x 11 ½ cm approx) nonstick loaf pan with butter, sprinkle some sugar evenly over the butter and shake the pan to distribute.

Dust the surface of the refrigerated dough with flour and cut off a 1 ½ pound piece. Dust the piece with more flour and quickly shape it into a ball by stretching the surface of the dough around to the bottom on all sides, rotating the ball a quarter turn as you go. Using a rolling pin, roll out the dough into a ½ - inch-thick (scant 1 ½ cm) rectangle. As you roll out the dough, use enough flour to prevent it from sticking to the work surface but not so much as to make the dough dry.

Sprinkle the chocolate and chopped prunes over the dough and roll up the dough jelly-roll style to enclose them. Fold the dough over itself several times, turning and pressing it down with the heel of your hand after each turn. This will work the chocolate and prunes (or cherries) into the dough; some may poke through.

With very wet hands, form the dough into a loaf shape and place it into the prepared pan. Allow to rest and rise for 90 minutes, loosely covered with plastic wrap.

Preheat the oven to 350°F (180°C). A baking stone is not required and omitting it shortens the preheat.

Using a pastry brush, paint the top of the loaf with egg wash and sprinkle with sugar. Bake the loaf in the center of the oven for 50 to 60 minutes until firm. Smaller or larger loaves with require adjustments to baking time.

Remove the bread from the pan and allow to cool on a rack before slicing and eating.

**************************************************************************
CHOCOLATE BREAD DOUGH RECIPE (Chocolate Chocolate Chip Bread)

Makes two 2-pound loaves. This recipe is easily doubled or halved. Amounts in parentheses and in italics are for the half recipe.

2 ½ cups (565 ml) (282.5 ml) lukewarm water (100°F or below)
¾ cup (170 ml) (85 ml) vegetable oil
1 Tbs (0.35 oz / 10 g) (5 g) granulated yeast
1 to 1 ½ Tbs (17 to 25 g) (6 to 12 g) kosher salt – * use less if using fine table salt, more if using coarse salt
1 cup (7 ounces / 200 g) (100 g) sugar
5 ½ cups (1 pound, 11 ½ ounces / 780 g) (390 g) all-purpose flour
¾ cup (3 ounces / 85 g) (1.5 oz/ 42.5 g) dark, unsweetened cocoa powder
1 ½ cups (6 ounces / 170 g) (3 oz/ 85 g) bittersweet or semisweet chocolate chips (or finely chopped pecans) - * can omit (for the chocolate prune bread you will be adding chocolate, the amount changes depending upon whether or not you added chocolate chips to the dough at this point)

Mixing and storing the dough:

Mix the oil, yeast, salt and sugar with the water in a 6-quart bowl or a lidded (not airtight) food container.

Mix in the flour, cocoa powder and the chocolate chips without kneading, using a spoon or heavy-duty stand mixer (with paddle). If you are not using the machine, you may need to use wet hands to incorporate the last bit of flour.

Cover (not airtight) and allow to rest at room temperature until the dough rises and collapses (or flattens on top), approximately 2 hours.


The dough can be used immediately after the initial rise, though it is easier to handle with cold. Refrigerate the container of dough and use over the next 5 days. Beyond the 5 days, freeze the dough in 1-pound (about 450 g) portions in airtight containers for up to 4 weeks. When using frozen dough, thaw in the refrigerator for 24 hours before using, then allow the usual rest and rise time.       

Friday, October 18, 2013

Michigan Cherries in Soda Bread


On a recent visit, Big Sis brought a bag of wonderful, tangy, chewy, dark red dried cherries from Michigan. One of our sisters lives near Traverse City and they are famous for their cherries. It was an excellent hostess gift!

With such a bounty in hand, I had fun thinking about how to use those cherries. What I finally decided on was to use them in one of my favorite quick breads...Irish Soda Bread. Now my ancestors did use dried fruit in baking, but I think it was often raisins, currants, and prunes. Beautiful dried cherries like these would be pure luxury...and they were in this bread. I also added some golden raisins (more traditional) and the two went very well together.

Soda bread goes together quickly, especially because it does best with minimal handling. The craggy top is nice and crunchy while the interior is buttery and soft with bits of the fruit here and there. I was out of buttermilk, so I put some freshly squeezed lime juice in some milk to 'sour' it. Worked beautifully. In very little time I had some nice warm soda bread to go with a cup of Irish Breakfast tea. Now I'm going to think about what else I want to make with the rest of the cherries. Hmmm.


Irish Soda Bread with Golden Raisins and Dried Cherries
makes one medium loaf

1 cup (about) whole milk
1 tablespoon fresh lime juice
2 cups all-purpose flour
½ teaspoon baking soda
¼ teaspoon baking powder
½ teaspoon salt
3 tablespoons sugar
4 oz. (½ stick) cold butter, in thin slices
¼ cup golden raisins or currants
¼ cup roughly chopped dried cherries
 
In a small bowl combine the milk and the fresh lime juice. Let sit to 'sour' the milk, at least 5 minutes.
Sift the dry ingredients over the butter and cut in well with a fork or pastry blender. Add the raisins and dried cherry pieces; mix well.

Add the soured milk and mix just until moist - don’t over handle. You may need to add 2 - 4 more tablespoons of milk.  Some dry stuff is OK but the dough should be sticky.

Pat into a round on a parchment-lined cookie sheet. Cut a cross on top. Bake 45 minutes at 3500 F. Cool a bit before slicing.

By the way, today we painted the door for the front entry and installed it and the handle and lock set, so now the entry itself is finished!


Friday, July 20, 2012

Not Quite Health Food

Yes, you CAN eat your vegetables and get a chocolate fix at the same time. It still isn't exactly health food but with the right recipe it can be close (as long as you don't add icing like I did). A few days ago King Arthur Flour added its recipe to the many out there for Chocolate Zucchini Bread. It isn't often that I believe I have a better recipe than King Arthur Flour's kitchens have, but this time it's true. Thanks to amazing YA writer Tanita Davis and her friends, I have a super special chocolate zucchini bread that also has double chocolate due to the chocolate chips and is easy to jazz up with ingredients like dried or fresh cherries, dried cranberries, etc. It even makes a spectacular 'cake' to celebrate a round number birthday, which is how I used it this week. Trust me, that added fruit makes it an extra-special recipe as does the fact that it uses plain yogurt which adds tang, helps reduce the amount of oil needed and helps the bread stay moist. Recipe is below, along with an icing recipe.


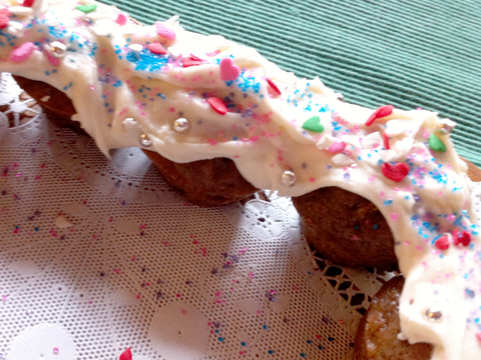
The owner of Cool Fitness in Santa Rosa, an inspirational and delightful personal trainer, coach, athlete and businesswoman, reached a round number birthday a few days ago. To celebrate I brought in a 'cake' made out of chocolate zucchini bread mini-muffins which were arranged in the shape of the birthday being celebrated, then frosted and decorated. It was almost as sparkly as she is. The idea of making a 'cake' this way was borrowed. I'm pretty sure I first saw it in a book about cupcakes, but since I do surf the web, it really could have been anyplace. You can make almost any shape that way, although this was the first time I tried it. I used the version of the chocolate zucchini bread with the dried cherries. Thanks to second sister down and her family for the great Michigan dried cherries!

One of the nice things about this week was that I also had some time to do some things that had been on my list for a while. One was making a new cover for the seat of a chair in the living room. Turned out that the base had broken down, so Sweetie fashioned another from some plywood. I covered that with multiple layers of batting and then the fashion fabric cover. I found the fabric in Monterey...it is sort of a batik style. It has always been a chair with a stiff seat and straight back, but sometimes that is the perfect chair. Grandma L loves sitting in it. Here is how it looks:


The other thing I've been meaning to do is to play around with a borrowed SLR camera, a Canon Rebel. Very cool camera! Here is the second photo I took with it:

Not bad for a beginner, right? Pi was, as usual, right by my side keeping me company. He really is a lovely dog, even if he STILL is chasing cats.


PHENOMENAL CHOCOLATE CHERRY ZUCCHINI BREAD or MINI-CAKES
based on a recipe by Tanita Davis & Robin Brande & Jama Rattigan

3 cups flour
1/4 cup unsweetened cocoa powder
1 tsp baking soda
1/2 tsp baking powder
1 tsp salt
1 ½ cups sugar
3 eggs or equivalent egg substitute
1/3 cup vegetable oil
½ cup plus 2 tablespoons plain yogurt
1 tsp vanilla
2 cups shredded zucchini (about 2-3 medium zucchini)
½ cup chopped nuts ( I used walnuts)
½ cup chocolate chips
½ cup sweet dried cherries (preferably from Michigan), chopped into about ¼ inch dice

Preheat oven to 350 degrees. Lightly grease two 9x5" loaf pans with canola spray. Alternatively, lightly grease 24 mini-muffin pans.

In a large bowl, combine flour, cocoa, soda, baking powder, and salt. Mix well. In a separate bowl, beat eggs (or egg substitute and water) with the sugar until well combined. Add oil, yogurt and vanilla. Beat to combine, then stir in zucchini. Add wet bowl to dry bowl and stir until just moistened. Stir in nuts and chocolate chips and cherries.

Spoon evenly into pans. Bake 55-60 minutes or until toothpick comes out clean if baking in loaf pans. If baking in mini-muffin pans, bake 15. Cool 10 minutes in pans, then turn onto racks. This bread is yummy when eaten still warm...the chips are melty and the fragrance is full chocolate!

To make a 'cake' out of the mini-cakes, line a flat serving plate or board with foil. Group the mini-cakes into a shape, then swirl on icing to join the cakes into the shape. Decorate as desired. I used the following buttercream icing:

Vanilla Easy Buttercream Icing

1/2 pound confectioners' sugar
4 tablespoons butter, softened
3 tablespoons hot milk
1/2 teaspoon pure vanilla extract

Sieve the sugar into a bowl. In another bowl beat the butter until soft and fluffy. Beat in the sugar.

In another, small, bowl mix together the hot milk and the vanilla. Add to the sugar mixture and beat until smooth. If mixture is too stiff, add a bit of hot milk. If too thin, add a bit more sugar.

Enough for 12 cupcakes or 24 mini-cupcakes.

Sunday, February 06, 2011

Edge of Winter Bread

I still read the daily newspaper. That does, indeed, make me something of a dinosaur, but I enjoy reading the paper during breakfast and I have difficulty mixing food and drink and computer use...guess it's because I'm prone to spilling things and I would hate to have scrambled eggs all over my keyboard or coffee splashes on my screen.

One of the things that has been really brought to the front time and again this past week or so are all of the extremes of weather around the globe, from flooding followed by a cyclone in Australia to cold so extreme in Taos where my sister and brother-in-law live that the natural gas from Texas is unavailable...most likely it turned to a liquid and is just sitting in the pipes.

Snow continues to confound New York city with it's persistence and depth, snow sliding off the Superbowl stadium slid onto an unlucky bypasser, and we are having a long dry warm spell. Now this might sound like boasting, but they tell us that we should worry because February is supposed to be wet...we don't usually get much rain during the summer and early fall, so we need it now.

Being an optimistic sort of person I'm not going to worry about the lack of rain. Instead I made bread and since it IS still winter I added lemon zest and some Meyer Lemon flavored olive oil, plus dried fruit. I even used the last of my Michigan dried cherries! Maybe I'll get some for Christmas.

This bread is fine grained and moist, just slightly sweet, and makes excellent toast. I divided the dough in half and used one half to make 6 mini-breads, baked in custard cups and ramekins. The other half was shaped into a ball and baked in a pie pan. That loaf will work for sandwiches or some great French Toast.You can shape your as you like. This dough is easy to work with.

If you want to use it as a sweet bread for breakfast, you could add another 1/3 cup brown sugar when you mix the liquid ingredients. Shape one piece of dough in a braid...and you could even top it with the second piece, braided. When baked and cooled a milk and powdered sugar icing drizzled on top and a scattering of sliced almonds will make it quite impressive.

This bread is going to Susan at Wild Yeast for the Yeastspotting weekly event, one of the most inspiring and fun weekly collections of bread you've ever seen.

Lemon Winter Sourdough Mini-Breads and Round Loaf
Recipe created by me

Pre-Ferment
1 cup sourdough starter
1 cup flour
1 cup water

Dough
1/2 cup water at room temperature
1/2 teaspoon instant yeast
1/2 cup milk at room temperature
all of Pre-Ferment
1 egg
5 tablespoons Meyer Lemon or regular olive oil
grated zest of 1 medium lemon
1/3 cup brown sugar
1 cup all-purpose flour
1 cup whole-wheat flour
2 1/2 - 3 cups bread flour
1 teaspoon salt

Fruit Mix
1/2 cup dried cherries, chopped
1/2 cup golden raisins
1/2 cup chopped dates
1/2 cup shredded coconut

Pre-Ferment
Whisk the flour and water together in a medium bowl, then whisk in the sourdough starter until well combined. Let sit uncovered on the counter 2 hours. Cover with plastic wrap and keep in the refrigerator for at least 1 day or up to 1 week.

Dough
Add the instant yeast to the water and let proof. In the bowl of an electric mixer with dough hook, or in a large mixing bowl, combine the water-yeast mixture, milk and pre-ferment. Add the egg, olive oil, and brown sugar, lemon zest and combine well.

In another bowl combine the all-purpose and whole-wheat flours, 1 cup of the bread flour and the salt with a whisk until well mixed. With the mixer on low speed, add the flour about a cup at a time, for the first 2/3 of the flour mixture. The dough should come together and start climbing the dough hook. Add the remaining 1 cup flour mixture in 1/3 cup increments then continue to add the rest of the bread flour in small amounts until the dough fully climbs the dough hook and cleans the side of the bowl. Let dough knead for 3 - 5 minutes, or until soft and supple.

Turn dough into an oiled bowl or container for rising, cover loosely with an oiled piece of plastic wrap, then a tea towel and let rise until doubled, about 2 hours.

While dough rises, combine the Fruit Mix ingredients in a small bowl. Set aside.

Turn risen dough out onto lightly floured surface and press down to release gases. Divide into 2 pieces of dough. Set one aside.

Knead 1/2 of fruit mix into one piece of dough. Knead the other 1/2 of the fruit mix into the other piece of dough. Shape dough as desired. Cover loosely with oiled plastic wrap and a tea towel and let rise until nearly doubled in bulk, about 2 hours for a loaf or 1 hour for rolls.

Bake in preheated 375 degree oven until golden brown and loaf sounds hollow when bottom is tapped.

Let cool completely. Makes great toast!

Friday, January 21, 2011

Cheery Cherry Cookies

During the holidays we were delighted to indulge in gastronomic excess...all those rich foods and sweets were welcome treats for celebrations. Now they are all (hopefully) gone and many people are looking to keep the junk out of the house and find something to nosh on that is somewhat healthy.

I also had the added incentive that I wanted to make something for my Mom that she could enjoy with her morning coffee or afternoon tea which is high in protein and fiber and low in fat. The challenge in creating such a goodie is to also make sure that it tastes delicious, not just OK.

By starting with a recipe from the American Heart Association book Lo-fat and Luscious Desserts, I was able to make some substitutions to an already good recipe. Although I did use some barley flour because I had it on hand, you could just you that amount of whole wheat flour in place of the barley flour.

Something to note is that I used butter in place of 4 tablespoons of the tub margarine because I don't like all of the chemicals in the margarines. I used some applesauce instead of some of the fat called for. The mixture before you add the flours is pretty curdled looking...that's OK...once the flour gets added it all look just fine.

One of the nice thing about this recipe is that it uses lots of dried cherries and those cherries really add flavor and natural to the cookies. I added some slivered almonds for crunch but you could substitute chopped natural almonds or sliced almonds for a bit more fiber.

Don't overbake these or they can become too dry. Store them in an airtight container but keep them handy for a healthy snack. Bet they will be gone before you know it. Maybe that's not so healthy, but it's still gotta be better for us than holiday sweets.

Cherry Breakfast and Tea Cookies
a variation of a recipe in Low-fat and Luscious Desserts by the American Heart Assn.

2 1/4 cups dried cherries (or use dried cranberries or blueberries or a combination)
1 1/2 cups water
1/2 cup all-purpose flour
1/2 cup whole wheat flour
1/2 cup soy flour
1/2 cup barley flour
3/4 cup uncooked wheat or oat bran
1/2 teaspoon freshly grated nutmeg
3/4 teaspoon baking soda
6 tablespoons butter at room temperature
4 oz. applesauce (unsweetened if possible)
3/4 cup dark brown sugar
1 1/2 teaspoon vanilla
3 egg whites
1 1/2 cups rolled oats
1/2 cups slivered almonds

Preheat 375 degrees F.

In a small, heavy saucepan, bring cherries and water to a boil over medium-high heat; boil for 4-6 minutes, or until cherries are plump, stirring occasionally. Drain cherries, reserving 5 tablespoons liquid; set both aside.

In a medium bowl, sift together flours, nutmeg,and baking soda. Set aside.

In a large mixing bowl, with an electric mixer, cream butter, then add applesauce. Add brown sugar and vanilla, bearing until light in color, about 1 minutes. Mixture may stay curdled.

Add egg whites and beat until smooth, occasionally scraping bowl with a rubber scraper. Mixture may stay a bit curdled looking.

Add reserved cherry liquid and mix well.

Reduce speed to low and gradually add flour mixture with mixture running.

Add rolled oats, wheat or oat bran, and plumped drained cherries, stirring just until incorporated. Using a small-portion scoop or tablespoon, drop cookie dough onto heavy ungreased baking sheets or regular baking sheets lined with cooking parchment, leaving about 1 inch between cookies.

Bake for 15 minutes. Transfer cookies from baking sheets to cooling racks and let cool completely, about 20 minutes.

Sunday, December 19, 2010

Christmas Strong Bread

Most of my adult life I've been an explorer of sorts, almost always ready to try something new, to learn a new skill, read a new book, look at something in a new way. Success has not always followed, but I learn from my mistakes, too, so they are valuable in their own way.

For the last half year or so the impetus to try new things has hibernated while I worked on getting a handle on what I really want...probably easy for some people but lately a struggle for me. Not too surprisingly to those who know us, top of the list of what I really want is to be with Sweetie. Since I turned into a bit of a shrew during the bathroom project it's good to know that he still feels the same way and he is happy that I've returned to being the loving and mostly reasonable woman who was hard to find during the summer and fall. The optimistic office worker has also resurfaced perhaps because there are new tasks to master and a change of venue coming up.

So 'what does all this have to do with food blogging?' you ask...it means I'm back to looking for the enjoyment of challenges in the kitchen...and my first High Five entry in quite a while. As you may or may not remember, Lynn, known in the blogosphere as Cookie Baker Lynn, challenged us last winter to stretch ourselves in the kitchen, blog about it and then let her know our High Five accomplishment. The idea was to do one a month. Hahahahahaha. Great idea, but hasn't happened.


My High Five this time is for baking Pan Forte di Siena, a sort of Tuscan fruitcake with a honey base. I've seen it at the specialty stores for an absurd amount of money for a small wedge and was sure that I could make it myself. Still, there is an awful lot of costly ingredients in this 'strong bread' so I was a little nervous about making it...it IS very different from anything I've made before.


For starters I scoured the Internet for recipes, looked at suggested techniques and proportions, then put together my own recipe with what I like and had on hand. The basic unit of measurement for my version is 3/4 cup. The toasted nuts add up to a double of 3/4 cup. The dried fruit is the same. The dry ingredients combined equals 3/4 cup and you use 3/4 cup each of sugar and honey for the syrup that binds it all together.

This cake/bread uses no oil other than to butter the pan and parchment and it has no eggs either. The syrup is boiled to a soft ball stage in all the recipes I looked at and almost all baked it in a low oven for about 30 minutes. There is far more fruit and nuts than 'cake' in pan forte (and it has no resemblance to Aunt Hattie's fruitcake brick).


This pan forte is a thin cake filled with fruit, nuts and spices with a lovely honey-citrus note. A little goes a long way, so you can see why this was historically considered the Crusaders Power Bar. There are versions with figs and walnuts, too. If you have made candied orange peel you will probably want to increase the amount of orange peel and decrease the citron. Dates would work in this, too, and pine nuts would be great for some of the nuts. Just keep the 3/4 cup and 1 1/2 cup proportions.

Pan Forte is available year round now but used to be one of the treats of the Yuletide in Italy, especially in Sienna. This is not a difficult recipe, although prepping the dried fruit and roasting the nuts takes some time. Sweetie and Straight Shooter assure me that it was well worth the time. Try it yourself and you, too, can have a High Five from Lynn!


Pan Forte di Siena

1 ½ cups toasted nut…mix of whole almonds and slivered almonds and chopped hazelnuts
½ cup diced citron
½ cup diced apricots & ½ cup diced dried cherries
2 tablespoons diced candied orange peel
zest of 1 lemon and zest of 1 orange
1 teaspoon cinnamon
¼ teaspoon each: cloves, nutmeg, cardamom
pinch of pepper
½ cup flour
¼ cup unsweetened cocoa
¾ cup granulated sugar
¾ cup honey
2-3 tablespoons almond meal or ground almonds
parchment paper

Preheat oven to 300 degrees F. Butter a 9” springform pan, line bottom with parchment paper, butter that, sprinkle on the almond meal or ground almonds evenly & set pan aside.

In a bowl mix together the nuts, citron, apricots, candied peel, citrus zest, spices, flour and cocoa.

In a heavy pot stir together the sugar and honey. Over low heat, stirring constantly, melt the honey and sugar together. Increase heat to medium high. Stop stirring and let cook until mixture reaches 245 degrees F (soft ball stage), using a wet pastry brush to wash down the sides of the pot to keep crystals from forming. When soft ball stage is reached remove pan from heat and pour mixture into dry ingredients, stir it all together quickly to combine all ingredients. Pour mixture into the prepared pan and using slightly wet hands smooth the top. Work quickly as mixture hardens fast.

Bake in preheated oven for ½ hour - 35 minutes with pan set on rimmed cookie sheet.

Set on a rack to cool. When cool remove from pan, invert and remove the parchment paper. Invert again and sift liberally with confectioners’ sugar. Serve in small slices. To store wrap twice in plastic wrap and then in foil and store at room temperature.

Friday, January 29, 2010

Bread in Any Other Form Smells as Great

When I hear the word BREAD, I immediately have a mental image of a loaf of bread, shaped in a bread pan and with a rounded, crusty, golden top. That’s probably because my Dad used to bake bread from scratch and that’s how his bread looked.

For Bread Baking Day #26 Jamie of Life's a Feast asked us to bake a birthday party bread.

Instead of baking my iconic bread, I decided to bring what would be needed if I showed up early to help get ready for the party…waffles. They have a totally different shape, being somewhat flat and indented with those lovely squares that hold the syrup, but they smell just a great as any loaf of freshly baked bread. Sweetie and I enjoyed one plain, then I partied them up with chopped dried Michigan cherries (thanks W-Gs!).


To make them dual purpose and good enough for the Monthly Mingle hosted by the same lovely blogger, Jaime at Life's a Feast, I included the cherries and added a sprinkle of chocolate chips


…chocolate and cherries are always wonderful together and they were this time, too. The Monthly Mingle theme is Bread and Chocolate, so this fits it perfectly.

The waffles themselves are started the night before and the batter is finished off in the morning. Because all you are adding is melted butter and some egg, you can finish the batter while the waffle iron is heating. Since you add butter to the batter, you don’t really need any added at the table. We poured on a bit of real maple syrup.

If I had taken the time, a cherry compote would have been even better.

For those of you who can’t imagine having a single purpose item like a waffle iron, perhaps it helps that this one was from a garage sale and is eons old. It’s smallish and round and fits inside of a stew pot. If it is still working when I die, my survivors will probably discard it, but for now it does the trick and produces nice circles of yummy waffles.


I'm sending this over to Susan at Wild Yeast for her wonderful weekly event Yeastspotting. If you love bread, you should check it out...she has lots of lovely breads and rolls and other yeasted goodies featured each week.


Amazing Overnight Waffles with Chocolate Chips and Dried Cherries
from Mollie Katzen's Sunlight Cafe' Cookbook

2 cups unbleached all-purpose flour
1 teaspoon yeast
1 tablespoon sugar
½ teaspoon salt
2 cups milk
6 tablespoons unsalted butter, melted
1 large egg (I used ¼ cup egg substitute)
Nonstick spray
Butter for the waffle iron
!/3 cup dried cherries, chopped
1/3 cup semi-sweet chocolate chips
Pure maple syrup – hard to resist on waffles

Combine the flour, yeast, sugar, and salt in a medium bowl Add the milk and whisk until blended. Cover the bowl tightly with plastic wrap and let stand overnight at room temperature (or put in the fridge if room temp. is over 70 degrees F.) I figured out a sourdough version since my starter needed feeding and I hate to actually toss out the 'toss-off'.

The next morning, preheat the waffle iron. Melt the 6 tablespoons butter and let cool a bit. Beat the egg is a small bowl (unnecessary if using egg substitute) then beat it into the batter along with the melted butter. The batter may be a bit thin.

Lightly spray the hot waffle iron with non stick spray, top and bottom plates, and then butter a piece of bread and use that to rub some butter on top and bottom plates.

Add just enough batter to cover the cooking surface…this varies by waffle iron…about 2/3 cup. Sprinkle about a tablespoon of the cherry bits and similar amount of chocolate chips over the batter. If you like and can be fast, use the bottom of the scoop (which has batter on it) to dab a bit of batter over the tops of the chocolate chips. That keeps them from melting all over the iron.


Lower the top and cook until golden brown…it’s OK to check now and then. It takes about 2-3 minutes. You want it golden brown, but not dark brown.
Serve hot, right away, with maple syrup, or toppings of your choice.

Note; If you have too many waffles for the number of people you are feeding, bake the leftover batter a little less than the ones you are eating, let cool on a baking rack, then freeze and store in the freezer tightly wrapped. Re-heat in the toaster.


Sourdough Version
1 cup sourdough starter
1 1/2 cups unbleached all-purpose flour
1 tablespoon sugar
½ teaspoon salt
1 ½ cups milk
6 tablespoons unsalted butter, melted
1 large egg (I used ¼ cup egg substitute)
Nonstick spray
Butter for the waffle iron
!/3 cup dried cherries, chopped
1/3 cup semi-sweet chocolate chips

Combine the sourdough starter, flour, yeast, sugar, and salt in a medium bowl Add the milk and whisk until blended. Cover the bowl tightly with plastic wrap and let stand overnight at room temperature (or put in the fridge if room temp. is over 70 degrees F.)

The next morning, preheat the waffle iron. Melt the 6 tablespoons butter and let cool a bit. Beat the egg is a small bowl (unnecessary if using egg substitute) then beat it into the batter along with the melted butter. The batter may be a bit thin.

Lightly spray the hot waffle iron with non stick spray, top and bottom plates, and then butter a piece of bread and use that to rub some butter on top and bottom plates.

Add just enough batter to cover the cooking surface…this varies by waffle iron…about 2/3 cup. Sprinkle about a tablespoon of the cherry bits and similar amount of chocolate chips over the batter. If you like and can be fast, use the bottom of the scoop (which has batter on it) to dab a bit of batter over the tops of the chocolate chips. That keeps them from melting all over the iron. Lower the top and cook until golden brown…it’s OK to check now and then. It takes about 2-3 minutes. You want it golden brown, but not dark brown.
Serve hot, right away, with maple syrup, or toppings of your choice.