Showing posts with label coconut. Show all posts

Saturday, September 04, 2021

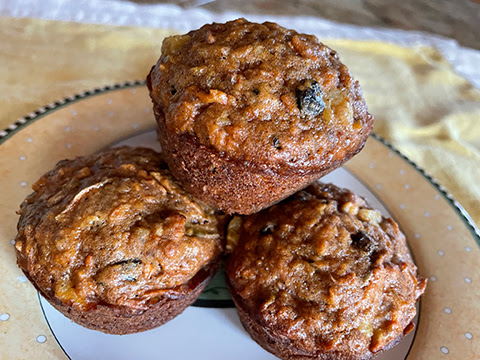
Morning Glory

It's fun to know that you can have a muffin and a flower with the same name...morning glory. At this time of year, the morning glories in my garden are going a little wild, having made their upward climb, some are twining on themselves for support so they can keep going, other are swooping down to attach lower down so they can climb again. I love the flowers...trumpets of pink, magenta, deep purple, pale blue and more. The truth is that they self-seed if not constantly dead-headed and become a weed sometimes, but I love them anyway.


The morning glory muffins are also prolific. One recipe makes a full two dozen muffins...that's a lot! They are filled with all sorts of deliciousness...apples, carrots, pecans, crushed pineapple, coconut, raisins and dried cherries as well as vanilla and spice. The wet ingredients includes apple butter but I found a jar of pumpkin apple butter and decided to use that to welcome in fall now that school is back in session. Since I did that, I also used a bit of pumpkin pie spice along with the cinnamon the recipe calls for. Since my supply of dried cherries was running low, I used some dried currants in their place and that worked well. Seems to me the recipe as written is a takeoff on Hummingbird Cake. 


Between the large quantities (you need two cups shredded carrots and a cup of shredded apple for example) and long list of ingredients, the prep takes a bit of time, but you end up with fragrant, delicious, moist and fairly healthy muffins...and lots of them. Do yourself a favor and make sure you set each and every ingredient on the counter before you start making these because it's easy to miss an ingredient. Better yet, prep and measure everything in advance. That way it will all go together quickly and you'll get the best rise out of the baking soda that is the only rising agent used. 

I removed these from the muffin tins in about 3 minutes after taking them out of the oven and I did have to run a butter knife around the edges on some of them to loosen them. If you stand them on their sides in the muffin cup to finish cooling it saves space and they are sturdy enough to hold their shape, too. 

Do try these delightful muffins. They are great for breakfast but also good for afternoon tea and would be a treat in a school lunch. The recipe came from my family but I suspect that it's been around for a long time. 


Morning Glory Muffins
Makes 2 dozen

2 1/2 cups all purpose flour
1 cup brown sugar, packed
2 teaspoons baking soda
2 teaspoons ground cinnamon
1/2 teaspoon salt
2 cups shredded carrot
1 cup shredded apple
3/4 cups raisins
1/2 cup dried cherries
1/3 cup chopped pecans
1/4 cup flaked coconut (sweet)
one 8-oz. can crushed pineapple, in juice, drained
1/3 cup vegetable oil
1/3 cup apple butter
2 teaspoons vanilla
2 large eggs
2 large egg whites

Preheat the oven to 350 degrees F.

Coat 24 (2 dozen) muffin cups with cooking spray or vegetable oil.
Combine flour, brown sugar, baking soda, cinnamon, and salt in a large mixing bowl.
Stir in carrot, apple, raisins, cherries, pecans, coconut and pineapple and make a well in the center of the mixture when combined.

In another bowl combine the oil, apple butter, vanilla, eggs and egg whites. Stir with a whisk. 
Add oil mixture to flour mixture, stirring with a wooden spoon or silicon spatula until just moist/barely combined.

Spoon the batter evenly in prepared pans, filling about 2/3 full.

Bake at 350 degrees F. for 25 minutes or until muffins spring back when touched lightly in center.

Remove from pan at once and cool on a wire rack. Yields 2 dozen.

NOTE: Can be stored, airtight, in freezer for 1  month. Wrap in foil and reheat at 300 degrees F.

Thursday, January 04, 2018

Here's to Mixed Up Blondies


Over the years I've tried a number of different combinations when I bake blondies, the brownie like bar cookie that has butterscotch instead of chocolate as the dominate flavor. I've done Big Blondes, Irish Blondes, Dumpy Blondes and California Blondes. This time I decided to go with Mixed-up Blondes. Mixed-up because I combined the basic blondie recipe with some of the aspects of the Dumpy Blondes, particular the sweet-salty combo you get by adding in potato chips and pretzels, with the Irish wholemeal flour that I used for the Irish Blondes, the fruit I added made them almost like California Blondes.  I added a few macadamia nuts, but not very many since I was almost out of them, some pecans, some dried cranberries, toasted coconut, and, of course, chocolate chips. At the end I added about 2 tablespoons golden raisins, to. Truly a mixed-up bowl of add-ins.


The resulting cookie is moist, sweet, and has some salty elements, some fruity elements and some nutty elements. I'll be taking them to a party tomorrow to honor a friend, Jean Anderson, who died last year. We're celebrating her birthday and I know she would have enjoyed these cookies.

Mixed-up Blondes
A variation of a recipe by Jill O’Connor in Sticky, Chewy, Messy, Gooey, Desserts for the Serious Sweet Tooth.

1 cup (2 sticks) non-dairy margarine
3 cups firmly packed dark brown sugar
4 large eggs
1 tablespoon pure vanilla extract
1 teaspoon salt
1 cup unbleached all-purpose flour
1 cup Irish wholemeal flour (or whole-wheat flour)

¾ teaspoon baking powder

Add-ins: 
1 cup pecan halves
1/4 cup macadamia nuts
1/2 cup sweetened toasted coconut
1/2 cup sweetened dried cranberries
1 cup pretzel pieces (I used small ones and broke them up)
1/2 cup sea salt potato chips, lightly crushed
1 cup semisweet chocolate chips
2 tablespoons golden raisins

Use cooking spray to lightly coat a 9 x 13 inch baking pan.

Melt the butter and brown sugar together in a large heavy-bottomed saucepan over medium heat. Cook, stirring constantly, until the butter and sugar are blended and completely melted and starting to bubble gently. Remove the pan from heat and let the mixture cool slightly. Mixture should be room temperature before you proceed.

Preheat to 350 degrees F. Position oven rack in the middle of the oven.

In a bowl, whisk together the eggs, vanilla and salt. Slowly whisk the cooled butter and sugar mixture into the eggs just until combined. Whisk in the flours and baking powder to form a loose batter. (Make sure the batter is cool before stirring in the remaining ingredients, otherwise the chocolate will start to melt before the bars are baked.)

Stir the nuts, coconut, dried cranberries, pretzel pieces, potato chip pieces, chocolate chips and golden raisins into the cooled batter. (I usually mix together all the Add-ins in a bowl before adding to the batter...it prevents a clump of one ingredient here, another ingredient there...you get a better distribution by mixing before adding.) Pour the batter into the prepared pan and smooth the top with a spatula.
Bake until the top is shiny and slightly crackled and feels firm to the touch, 30 – 35 minutes. A wooden skewer inserting into the batter should come out with moist crumbs clinging to it. Let cool on a wire rack to room temperature, then turn out onto a board and cut into bars and serve.
Makes 15 large or 30 small bars.

Sunday, May 07, 2017

Raspberry Blondes


One of the joys of living not too far from San Francisco is that family and friends find it no hardship to visit there. We also have family who live in the city, so we are there a number of times a year.

There was a family gathering in San Francisco yesterday, with all four members of the Michigan branch there, all three members of the Sacramento area branch there, Sweetie and I and Coffee Man, the sweetie of T-Rose who lives in SF.

Food is always an important part of any gathering in my family. Mark was in charge of most of the food, so we knew it would be creative, top-notch, perfectly cooked with fresh ingredients, and delicious. In order to work up an appetite, we decided to visit Golden Gate Park, a few blocks away. It was a beautiful day, breezy and bright and not too hot. After a meandering walk in the park, and went up in the De Young museum tower, which gives a 360 degree view.


The entrance to the bay was sort of foggy, but you could see the tops of the Golden Gate Bridge. Then we walked back. There were so many flowers blooming and tiny wild strawberries lined some of the paths. Lots of people, too, but that's part of the fun.

After the walk (which was almost too long for Sweetie as he has been mostly resting the last two weeks), we had mint juleps in honor of Derby Day, watched the running of the race in the terrible muck that the track was, and enjoyed the onion tart which I baked earlier in the day at home. I'll post the tart recipe tomorrow or the next day. It is a variation of this tart. As we caught up on family news, Mark finished off the feast.


The feast was a truly delicious slow cooked pork shoulder with Asian seasonings, served with rice and lettuce cups (well, lettuce and radicchio). Mark had created sauces to go with it which included one with cilantro, lemongrass and ginger, plus a hot one, and some kimchi. There was a delicious salad of roasted corn kernels, avocado, and various kinds of peppers. We almost didn't have room for dessert...almost.

Natasha from Sac area had shared with me that she would be bringing something from Freeport Bakery,


so I knew I should bring something non-dairy for myself. The bakery goody was their famous Princess Cake,


a wonderful creation of sponge cake, chocolate, custard, raspberry jam, much whipped cream and marzipan over it all.

My raspberry blonde bar with fresh raspberries, plenty of aromatic white chocolate, slivered almonds, macadamia nuts and coconut (but no brown sugar) was equally delicious and went really well with a cup of peppermint tea. The bars are moist, very almondy, have lots of mellow but crunchy nuts and the raspberries go so well with the almond and coconut top notes.

Sweetie was fading fast by then, so we headed home. Happy Derby Day! Try some of these Raspberry Blondes yourself the next time you have some fresh raspberries on hand. If you love white chocolate you will love these bars!


Raspberry Blondes 
makes 24

1 cup (2 sticks) butter or non-dairy butter, at room temperature
3 cups granulated sugar
4 large eggs
2 teaspoons almond extract
1 teaspoon salt
2 cups unbleached all-purpose flour
¾ teaspoon baking powder
1/2 cup macadamia nuts
1 1/2 cups blanched slivered almonds
1 cup sweetened shredded coconut
1 cup white chocolate chips and chunks (I used about half chips and half hand broken white chocolate chunks)
1/2 pint fresh raspberries, rinsed and dried lightly with a paper towel (don't crush)

Position oven rack in the middle of the oven and preheat to 350 degrees F. Use cooking spray to lightly coat a 9 x 13 inch baking pan.

Melt the butter and sugar together in a large heavy-bottomed saucepan over medium heat. Cook, stirring constantly, until the butter and sugar are blended and completely melted and starting to bubble gently. Remove the pan from heat and let the mixture cool slightly.

In a bowl, whisk together the eggs, vanilla and salt. Slowly whisk the cooled butter and sugar mixture into the eggs just until combined. Whisk in the flour and baking powder to form a loose batter. (Make sure the batter is cool before stirring in the remaining ingredients, otherwise the chocolate will start to melt before the bars are baked.)

Stir the nuts, coconut, and white chocolate chips and chunks into the cooled batter. Pour half the batter into the prepared pan and smooth with a spatula. Distribute the raspberries over the batter as evenly as possible. Pour the remaining batter over the berries and smooth with a spatula.

Bake until the top is shiny and slightly crackled and feels firm to the touch, 30 – 35 minutes. A wooden skewer inserting into the batter should come out with moist crumbs clinging to it. Let cool on a wire rack to room temperature, then cut into bars and serve.

Friday, September 16, 2016

Sweet Little Breads With Coconut Delight the Babes


First off, a huge 'Thank you!!' to the lovely Lien  of Notitie van Lien for stepping up and being the Kitchen of the Month even though she was hostess not that long ago. Secondly, another huge 'Thank you!!' to her for choosing this recipe. I had trouble letting these sweet little rolls cool enough to not burn my tongue before I bit in and enjoyed the great coconut filling. I subtracted about 1/4 cup of flour and replaced it with cocoa powder because I know that chocolate and coconut go well together. Even Straight Shooter, who is not a big fan of coconut, ate two of them.


This is an easy to work with dough. It rolled out smoothly and I added raspberry jam...a think smear...


to half the rolls and finely chopped pecans to the other half. I think I prefer the nutty ones. Probably should have done a fancy glaze, too, but they smelled so good that we couldn't wait to try them. Big goof...didn't take photos the evening I made them & gave away the last three today...without taking any photos of the filling!   The rolls are sure plain looking, but then you bite into them and experience that wonderful filling.....

I made a double recipe of the filling just to make sure that I had enough and there was a lot left. Thinking of using it as a filling in brownies. The chocolate-coconut flavor combo is rather like German Chocolate Cake and really delicious. You are going to want to try these. I'll be you can come up with even better variations. If you do make these, send Lien an email with a photo and a few words about your experience and she will send you a Buddy Badge.

Be sure to check out their blogs to see what the other Bread Baking Babes have done this month, too.

A Messy Kitchen – Kelly
Bake My Day – Karen
Blog from OUR kitchen – Elizabeth
Bread Experience – Cathy
Judy’s Gross Eats – Judy
Karen’s Kitchen Stories – Karen
My Kitchen In Half Cups – Tanna
Notitie Van Lien – Lien
And our awesome round-up queen…. Thyme for Cooking – Katie 


Coconut rolls
(makes 12)

dough
2 TBsp sugar
160 ml lukewarm water (1/2 cup plus 3 tablespoons)
2 tsp dry instant yeast
300 g bread flour (1 1/4 cup - for chocolate use 1 cup flour & 1/4 cup cocoa powder & increase sugar by 1 tablespoon)
50 ml vegetable oil (a little less than 3.5 tablespoons)
3/4 tsp salt

filling
80 g + 2 TBsp dried, unsweetened, grated coconut (1/3 cup + 2 tablespoons)
(or sweetened coconut, reducing the light brown sugar with 4 TBsp)
120 ml boiling water (1/2 cup)
150 g light brown sugar (generous 1/2 cup)
4 TBsp corn starch
2 TBsp butter (or non-dairy margarine)

Combine all the dough ingredients and stir them together. Knead the dough until smooth and supple. At first it’s very sticky, but after kneading it shouldn’t be very sticky anymore. Place the dough in a lightly greased bowl, cover and leave to rise for about 1½ hours or doubled in volume.

Now make the filling. When using dried coconut (80 g), it needs to soak in a bowl with boiling water. Leave soaking for 10-15 minutes.

Mix the cornstarch and sugar in a separate little bowl before adding it to the coconut.

Melt the butter in a saucepan, add the coconut-sugar mixture and keep it on a low heat until it thickens, a few minutes. Keep stirring to avoid it burning.

Take it off the heat and leave to cool. When cooled, place in the fridge.

^^^^^^^^^^^^^^^^^^^^^^^^^^^^^^^^^^^^^^^^^^^^^^^^^^^^^^^^^^^^^^^^^^^^^^^^^^^^^^^^^^^^
About 30 minutes before assembling the roll, take the filling out of the fridge.

Stir in the remaining 2 Tablespoon of coconut in. At first the filling might be a bit stiff, but a little stir will soften it enough. Set aside. (Next time I'm going to stir in some finely chopped pecans.)

Divide the dough in two parts. Start with one piece, and roll it out into a rectangle of 30 x 16 cm (12 inches x 6 inches). Now cut it length wise in two equal parts, so you have two long thin strips.

Place a quarter of the filling evenly over the middle of the strip. The filling should be fairly dry, don’t place wet filling on the dough.

Flip over one long side of the dough over the filling, then flip over the other side. The two sides should slightly overlap. Close the seam by pinching the dough together.

Turn the roll seam side down. Cut the roll in three equal parts. Push the filling back a little, so you can close the cut sides, so the filling is no longer to be seen and can’t leak out.

Repeat with the other three strips (the one that you have rolled out and the two strips you make of the remaining dough).

Place the rolls, 4 cm (and inch and a half) apart, on parchment paper placed on two baking sheets. Cover them with lightly greased plastic and leave to rise for 35-45 minutes. They are ready when a light indentation, you make with a finger, stays visible.

While the dough proofs you should preheat the oven to 190ºC. (375 degrees F)

Bake the rolls for about 15-18 minutes until they are golden brown.(If you bake on two sheets, exchange them after 8 minutes, so they bake evenly).

Let the rolls cool on a wire rack. Eat them lukewarm or at room temperature.


(Adapted from: “De kunst van het bakken” – J. Alfort & N. Duguid)

Wednesday, March 02, 2016

Crazy Good Cookies


When I was in the LA area my hostess gave me a photocopy of her favorite cookie recipe, grandly called The Best Cookie in the compilation book where it is found. I baked some up this morning for a contest prize at our scholarship meeting and they sure did smell wonderful and they looked delicious, too.


The batter is similar to toll house cookie, but enriched with coconut, oats and walnuts...but no chocolate chips. There is also the 'mystery' ingredient or maybe crazy ingredient...crushed corn flakes. I had to go out and buy those since they are not a usual item in my pantry. The only box I could find was huge, so now I need to find some other recipes that use corn flake cereal!

These are tasty cookies. They are crisp at the edges, a bit chewy if you cook them the shorter time, and delicious if you like coconut, oats and walnuts, plus brown sugar and vanilla. Who knows if they are the best, but they sure are darn good cookies!


The Best Cookies
P.E.O. California Chapter MH

1 cup butter (I used vegan butter substitute)
1 cup brown sugar
1 cup granulated sugar
1 cup vegetable oil
1 cup crushed corn flakes
1 cup rolled oats
1/2 cup shredded coconut
1/2 cup chopped walnuts (you could use pecans instead)
1 teaspoon vanilla
3  1/2 cups sifted all-purpose flour
1 teaspoon baking soda
1 teaspoon salt

Cream together butter and sugars. Add egg and mix well. Add next 6 ingredients (oil, corn flakes, rolled oats, coconut, walnuts, vanilla); mix well. Add the flour, baking soda and salt. Mix until combined.
Shape into small balls, place on ungreased cookie sheet and flatten with a wet fork. Bake 12 to 14 minutes at 325 degrees F.
Makes about 100 small cookies.
The recipe is from Edith Norton, Sebastopol, CA

Tuesday, October 20, 2015

Leaving Southern Cakes


The Cake Slice Bakers have been baking for the last 12 months from The Southern Cake Book by Southern Living. Think lots of pecans, brown sugar and dairy products and you get the general idea. Since I grew up in the South I've enjoyed baking from this book. For the final recipe we got to choose any recipe in the book. I chose Hawaiian Sheet Cake and frosted it with the same easy 7-Minute type frosting I used last month. To tell the truth, I made the sheet cake last month, too, and served it up for the birthday party where I served the chocolate cupcakes, also frosted with that sticky, gooey, sugary frosting.

This cake is really moist and delicious and filled with good things. One of the reasons I chose it was because it was in the 'feed a crowd' section, but I also love the combination of bananas, pineapple and coconut, plus spices. It was a big hit with the crowd and with the birthday girl. I didn't get any photos beforehand and so I only have this one photo after most of the cake had been served. Trust me, it was good cake. I used a gluten free flour mixture and it has no dairy, so I was able to have a piece. The cake is fairly sweet and the soft icing was pretty sweet, so small pieces were enough. I used crushed pineapple packed in juice, not syrup, to cut down a bit on the sweetness and only used 1/2 cup of granulated sugar instead of 1 cup, but kept the full amount of brown sugar, because enough sugar is important to the chemistry of a recipe and I like the mellow flavor of brown sugar.

Next month we start a new book, so be sure to come back November 20th to see which book, OK?

Hawaiian Sheet Cake
Serves 15

3 cups all-purpose flour (I used King Arthur gluten free flour blend)
1 tsp baking soda
1 tsp salt
1 tsp ground cinnamon
1/4 tsp ground allspice
1 cup granulated sugar
1 cup packed brown sugar
1 cup vegetable oil
2 very ripe bananas, mashed (to equal one cup)
3 large eggs, beaten
1 cup flaked coconut
1 (8 oz.) can crushed pineapple, undrained
1/2 recipe 7-Minute frosting
various sprinkles and dragees and candies for decoration

Preheat the oven to 350 degrees F. Use shortening to grease and lightly flour a 9 X 13-inch baking pan.

Mix flour, baking soda, salt, cinnamon, and allspice in a large bowl. Set aside

Mix granulated sugar, brown sugar, oil, bananas, and eggs in a medium bowl. A whisk works well. Stir in the flour mixture, whisking until blended. Stir in the coconut and pineapple (including pineapple juice from the can) just until blended. Pour batter into the prepared pan.

Bake at 350 degrees F for 40-45 minutes, or until a wooden pick inserted in center comes out clean. Cool completely in the pan on a wire rack. Run a knife around the sides of the pan and carefully invert the cake onto a serving platter. Frost with the 7-Minute frosting and decorate as desired.

Wednesday, January 28, 2015

What's An ANZAC?


If you're from New Zealand or Australia, you probably know the answer. Those two countries combined armies for a time during the First World War. The Australian and New Zealand Army Corps (ANZAC) was a First World War army corps of the Mediterranean Expeditionary Force that was formed in Egypt in 1915 and operated during the Battle of Gallipoli. They were disbanded after that battle. In Greece in 1941 during the Second World War they also fought together under that name and again in the Vietnam conflict.

They are also a delicious biscuit (cookie in America) which was sent to soldiers and also sold to raise money for the troops and later the veterans. (Recipe at the bottom.) At the website anzacday.org.au they give this info:

"During World War 1, the wives, mothers and girlfriends of the Australian soldiers were concerned for the nutritional value of the food being supplied to their men. Here was a problem. Any food they sent to the fighting men had to be carried in the ships of the Merchant Navy. Most of these were lucky to maintain a speed of ten knots (18.5 kilometers per hour). Most had no refrigerated facilities, so any food sent had to be able to remain edible after periods in excess of two months. A body of women came up with the answer - a biscuit with all the nutritional value possible. The basis was a Scottish recipe using rolled oats. These oats were used extensively in Scotland, especially for a heavy porridge that helped counteract the extremely cold climate.

The ingredients they used were: rolled oats, sugar, plain flour, coconut, butter, golden syrup or treacle, bi-carbonate of soda and boiling water. All these items did not readily spoil. At first the biscuits were called Soldiers’ Biscuits, but after the landing on Gallipoli, they were renamed ANZAC Biscuits.

A point of interest is the lack of eggs to bind the ANZAC biscuit mixture together. Because of the war, many of the poultry farmers had joined the services, thus, eggs were scarce. The binding agent for the biscuits was golden syrup or treacle. Eggs that were sent long distances were coated with a product called ke peg (like Vaseline) then packed in air tight containers filled with sand to cushion the eggs and keep out the air.

As the war drew on, many groups like the CWA (Country Women’s Association), church groups, schools and other women’s organisations devoted a great deal of time to the making of ANZAC biscuits. To ensure that the biscuits remained crisp, they were packed in used tins, such as Billy Tea tins. The tins were airtight, thus no moisture in the air was able to soak into the biscuits and make them soft. Most people would agree there is nothing worse than a soft biscuit.

During World War II, with refrigeration in so many Merchant Navy Ships, the biscuits were not made to any great extent. It was now possible to send a greater variety of food, like fruit cake.
ANZAC biscuits are still made today. They can also be purchased from supermarkets and specialty biscuit shops. Around ANZAC Day, these biscuits are also often used by veterans’ organisations to raise funds for the care and welfare of aged war veterans."

We had a visit from an Australian friend and his sister today, so I made some anzac biscuits using his wife's recipe to go with our tea. I have fond memories of watching her make them in their kitchen in Perth. This is a really easy, quick recipe as long as you have all the ingredients on hand. Your house will also smell wonderful with the butter, sugar, coconut, nuts and oats fragrances. Best of all they are irresistible. Hard to only eat one.

Anzac Cookies
makes about 2 dozen

1 stick (1/2 cup) butter, melted
2 tablespoons hot water
2 tablespoons golden syrup
3/4 cup brown sugar
1 cup rolled oats
1/2 cup flour
1/2 cup self-rising flour
1/4 teaspoon salt
1/2 teaspoon baking soda
3/4 cup dry coconut
3/4 cup walnuts, chopped
1) Preheat the oven to 350 degrees F.

2) Combine the melted butter, hot water, golden syrup and brown sugar in a mixing bowl (or the pot you melted the butter in if it large enough to hold the batter). Stir to blend well.

3) On a sheet of waxed paper combine the oats, flours, salt and soda. You could also combine them in a mixing bowl.

4) Add the nuts, coconut, dry ingredients and dried fruit to the butter mixture. Stir to blend well.

5) Pack dough into greased small tart pans or make into drop cookies on a cookie sheet. Bake in preheated oven for 15 minute until golden brown. (New note: Check cookies at 10 and 13 minutes :)

6) Cool cookies on wire rack. Store in airtight container. These cookies ship well. Enjoy!


Tuesday, February 11, 2014

Rain and Gooey Cookies


We have been having a severe drought. Really bad. Winter is the time when Mother Nature usually gives our area of the country lots of water since once spring comes we usually don't see rain again until October.This year there has been virtually no rain, until this past weekend. Oh, there may have been a drizzle here and a brief shower there, but no rain to soak into the ground and replenish the water table and give the plants and trees and shrubs a drink. Then we had about 9 inches from Friday through Sunday. Yay!

Sweetie and I went for a walk yesterday to see the changes. At the Laguna the frogs were singing loudly, the red wing blackbirds were calling to each other, and the lumpy birds that we think are a kind of heron were back in the trees. They are usually here all December and January, but this is the first we have seen them. The Laguna itself was well past its banks, flooding the path we usually take


 and the nearby fields, too.

 Yay!

Today I made an early Valentine's gift for some friends. I used to call these seven-layer bars, but an even older name is Hello Dolly or Hey There Doll Face bars, an easy and quick layering of buttery graham cracker crumb crust, sweetened condensed milk, nuts, chocolate chips and coconut. I think that for seven layers there were also white chocolate chips and butterscotch chips, but I like this version better. It is still pretty ooey gooey and sweet, so your really only need small portions.

I got this version from a cookbook that Sweetie gave me for Christmas, Butter Baked Goods, by Rosie Daykin. She owns and operates a bake shop. By the looks of her recipes, I wish she had one near by. Recipes for lovely cakes, cookies, treats and breakfast goodies can be found in the book. Yay!


"Hey There, Doll Face" Bars
from Butter Baked Goods by Rosie Daykin

These quick to put together bar cookies are ooey, gooey, and a classic, combining graham crackers, pecans, chocolate chips and sweetened condensed milk.

3/4 cup pecans
1/2 cup butter
1 1/4 cups graham cracker crumbs
3/4 cup condensed milk
1 cup dark chocolate chips
3/4 cup sweetened fancy long shred coconut

Makes 16 bars

Preheat oven to 350 degrees F. Prepare a 9 x 9-inch baking pan by buttering it and lining it with parchment paper. Set aside.

Place the pecans on a cookie sheet and bake in the preheated oven for about 10 minutes, or until lightly toasted. Stir the nuts after about 5 minutes to ensure even toasting. Remove from the oven and cool. Chop lightly and set aside.

In a small saucepan over low heat, melt the butter. Place the graham cracker crumbs in a bowl and pour the melted butter over the crumbs. Mix well to combine. Press the crumb mixture in the prepared 9 x 9-inch pan and press down firmly and evenly to make a crust. Spread the condensed milk over the crumb crust with the back of a spoon.

In another bowl, mix together the toasted pecans, chocolate chips and coconut. Sprinkle the mixture over the condensed milk in the pan.

Bake in the preheated oven for 15 - 17 minutes, or until the coconut is just lightly browned.
Removed from the oven and allow to cool completely in the pan.

Run a small knife along the edges of the pan. Carefully remove the slab from the pan and cut into approximately 2 x 2-inch bars. Make sure to use at least a 10-inch knife to avoid cutting and dragging the knife across the bars (instead press the sharp, long knife down through the bars to cut them).


Bars will keep in an airtight container for up to a week, or in the freezer for up to 3 months.

Friday, December 28, 2012

Yuletide Treat

When my Mom was a child the family would gather at one of the aunt's homes and the dessert highlight at Christmas was plum pudding with hard sauce. When I was little we always had lots of cookies, but the highlight of Christmas dinner was the Lane Cake. Lane Cake is a layer cake with a plain white cake for the layers and a rich, fruity, bourbon-laced filling and frosting between the layers and on the top and sides.

We used to start making the Lane Cake the day after Thanksgiving to give the concoction time for the bourbon to mellow and mingle with all those dried and candied fruits. Coconut was fresh and grated by hand. The raisins were put through the meat grinder and came out in long black snakes. The candied cherries were bright red and green and had to be cut up by hand...a sticky business. Pecans were chopped, too. It was a good thing that we had lots of willing hands to help out with all the prep. Mom baked the cake layers and I think Dad assigned us the different prep tasks. The most difficult part was getting the filling just right. Cook it for too short a time and it would slide down the sides and cook it for too long and it turned grainy. You served it in thin slices since it was so rich.

When I had children of my own I made Lane Cake once to carry on the tradition, but found that I was the only one who enjoyed it, so it really wasn't worth all the work. I found that gingerbread, both as cookies and as houses, was what my family wanted for Christmas...and cookies, too.

Last spring when I was working on the Classic Comfort Foods Cookbook I found out that my niece Mandy had become the family Lane Cake maker and that she had changed the recipe a bit, especially by using dried natural cherries instead of the candied ones. The family had also discovered that the cake was fine if you only made it a week ahead of Christmas and also that you could just put the filling between the layers and on the top (but not the sides) which made the consistency of the filling less of an issue.

This year we were thrilled to have Mandy's sister T with us for Christmas. I was thrilled that she made and brought a Lane Cake. I even had the pleasure of being consulted by phone on baking tips the day she made it. It was perfect...moist and flavorful and just a bit boozy. Gorgeous to look at, too, like T herself. We took our portion home and had it with some hot cocoa. It brought back sweet childhood memories for me. Thank you T!  Maybe next year we can bake the cake together?

XO Elle


Lane Cake
from Classic Comfort Foods


Prepare 4 cake pans by greasing them and lining them with waxed paper. Preheat oven to 375 degrees F.

Ingredients
1 cup butter at room temperature
2 cups sugar
1 teaspoon vanilla
3¼ cups flour, sifted
3½ teaspoons baking powder
¾ teaspoon salt
1 cup milk
8 egg whites

Cream butter; add sugar and vanilla. Sift together dry ingredients. Alternately add dry ingredients and milk to butter mixture. In separate bowl, beat egg whites to soft, glossy points, but not dry. Fold egg whites into batter until incorporated. Divide into the 4 prepared pans. Bake 2 pans to each rack, for 15-20 minutes in preheated oven. Cool 3-5 minutes, loosen edges, and turn out to cool. Remove waxed paper and turn right side up carefully. Set aside while preparing the filling/frosting.

Filling/Frosting
1½ cups seedless raisins
12 egg yolks
1¾ cups sugar
½ teaspoon salt
¾ cup butter
½ cup bourbon whisky
½ cup pecans, coarsely chopped
½ cup red and green candied cherries, quartered - or try modern version (Mandy’s) below
1½ cups coconut, shredded (fresh or frozen)

Cover raisins with hot water, let stand to plump. Drain and dry. Chop or grind (Note: Dad used to grind the raisins in a meat grinder, but they can be chopped with a knife, too.) Put egg yolks in top of double boiler; beat slightly. Add sugar, salt and butter. Put over simmering water. Cook, stirring constantly, until sugar is dissolved, butter melts, and mixture thickens. Do not overcook. Mixture should be almost translucent and should mound when small amount is dropped on waxed paper. Remove from heat; add bourbon. Beat 1 minute with a beater. At this point, mixture can be transferred to a bowl. Fold in nuts, cherries, coconut and raisins. Cool. Spread between layers and on top of cake. (Sides optional) Wrap cake in plastic wrap and mellow one month (or less, about one week, for less stale cake). Serve in thin slices. Serves 20-24.

Niece Mandy’s Modern Lane Cake: “I made the cake the same as the recipe directs; I just did the cakes in 2 batches of 2 pans. 8” this year and 9” last year.

For the filling/frosting, I did a few things differently:

Rather than using 1½ cups raisins and ½ cup candied cherries, I did about 1 ¼ cups dried Traverse City cherries (I’m biased) and ¾ cup other dried fruits (this year was just raisins, but last year I also used currents). I also soak all of these in a combination of freshly-boiled water and a few splashes of bourbon. Just enough liquid to cover the fruit. I then ground about half the fruit and very coarsely chopped the rest, leaving a few whole.

When at the step of combining the eggs, sugar, salt, and butter on top of the double boiler (or bowl over boiling water, like what I used), note that it will take about 30-45 minutes to thicken.”

Friday, November 30, 2012

Creamy - Coconutty - Bliss!


I've rarely thought of myself as competitive but sometimes it creeps up on me. Sweetie tried a small single-person size coconut cream pie at a cafe' near here and went on and on about it. I tried a bite and was not convinced. I told him I could make a much better one (which is about as competitive as you can get!) and yesterday and today I did. This pie...actually a tart in the final version...was going to be part of a late Thanksgiving dinner at dear Natasha's near Sacramento. That never happened since Sweetie wasn't thrilled with the idea of driving for about three hours each way in heavy rain. Rain is wonderful if you don't have to drive a lot in it, right? So I had all the ingredients for the pie/tart and some of them don't keep well. I also have a dear friend with a birthday coming up, so we invited her, and her hubby, to join us for coffee and pie/tart today to celebrate her birthday a little early. Good thing, too, because otherwise Sweetie and I may have eaten a half tart each. It really was that good.

There are various ways to make the cream filling for coconut cream, banana cream, ginger cream or similar flavors. Basically you are making pastry cream. I decided to make a variation on the pastry cream that we put into cream puffs when the Daring Bakers made Gateau St. Honore' in 2007.

It uses both egg yolks and flour, both whole milk and whipping cream. Some gelatin is added, too, which helps stabilize the filling. The recipe calls for whipping egg whites and folding them in but I skipped that step since I wanted the filling to be denser than that. I also added some vanilla. To make it coconut cream I also folded in fresh coconut that had been hand grated a few days before, then stored in the 'fridge.

For the tart shell I used a recipe in Dorie Greenspan's book Baking, from my home to yours. It makes a nice shortbread type crust. This would have been perfect for surviving a trip past Sacramento since it is pretty sturdy, but it is also perfect because the buttery crispness makes a wonderful contrast to the creamy, coconutty bliss of the filling. Once the filling had chilled after being spooned into the tart shell, I topped it with dollops of whipped cream and a sprinkle of toasted coconut for garnish...and flavor. This really is a special occasion dessert, but worth the effort. Sweetie agreed that it was far better than the one at the cafe'. The good news is that I'll be making another for the trip to Sacramento area in early December. The bad news (for my waistline if nothing else) is that now I know I can make a killer coconut cream tart and will want to prove that again and again. Ah, competition.


Coconut Cream Tart

1 envelope unflavored gelatin (7 gr.)
¼ cup cold water (60 ml)
½ cup + 2 Tablespoons sugar (130 gr)
½ cup all-purpose flour (70 gr)
¼ teaspoon salt
5 egg yolks
2 cups whole milk (500ml)
1 tablespoon rum
1 teaspoon pure vanilla extract
¼ cup whipping cream (57 gr)
1 3/4 cups lightly toasted fresh coconut, divided
1 9-inch blind baked tart crust, cooled to room temperature

Soak the gelatin in the 1/4 cup of cold water.

Put the sugar, flour, and salt into a saucepan and stir together with a whisk. Add the yolks and enough milk to make a paste. Whisk in the remainder of the milk.

Place over low heat and stirring constantly, cook until thick. Remove from heat and stir in the vanilla and the gelatin. Stir until the gelatin is completely dissolved.

Stir in the whipping cream (and rum if using). Set the mixing bowl in cold water and stir until the cream is cool. Fold in 1 1/2 cups of the coconut. Pour into tart or pie crust and spread evenly. Chill until set. Garnish with whipped cream rosettes and rest of coconut. Serve at or close to room temperature for the best flavor.

Monday, May 10, 2010

Too many Bananas

These started out as Raisin Bran Muffins, but I had no bran, nor old-fashioned oats and I did have ripe bananas and walnuts and coconut…and raisins. Being playful, I changed quite a few things around and made some lovely muffins that have full banana fragrance and flavor and are joined sweetly by playmates walnuts, coconut and raisins.

Since I played around so much with the recipe, it ended up making more than 12 muffins. You could probably get 18 muffins from this recipe, but I chose to put the additional batter in a mini-loaf pan instead.

Playful Banana Muffins
Based loosely on Raisin Bran muffins in The King Arthur Flour Bakers Companion

3 ripe bananas
1 cup buttermilk at room temperature
1 stick of butter, melted (1/2 cup) and cooled a bit
2 large eggs, at room temperature
½ cup brown sugar, packed
2 tablespoons molasses
1 ½ cups all-purpose flour
1 cup whole wheat flour
½ teaspoons salt
1 tablespoon baking powder
1 teaspoon baking soda
½ cup rolled oats (oats for oatmeal)
¼ cup dried coconut
½ cup golden raisins
½ cup roughly chopped walnuts

Preheat the oven to 425 degrees F. Prepare a 12 cup muffin tin and a mini-loaf pan by spraying with baking spray or by greasing and flouring them. Set aside.

Peel and mash the bananas in a bowl. Set aside.

In a large mixing bowl, mix together the buttermilk, butter, eggs, brown sugar and molasses. Add the bananas and mix to combine.

In another bowl mix together the flours, salt, baking powder and baking soda, oats, coconut, raisins and nuts.

Quickly, with as few strokes as possible, mix the dry ingredients into the wet ingredients, just until combined.

Fill prepared muffin cups with the mixture, filling each cup almost to the top. Pour the rest of the batter into the prepared mini loaf pan.

Bake in preheated oven for 14 to 18 minutes for the muffins, or until they spring back when pressed lightly in the middle and about 25 minutes for the mini loaf pan banana bread, until a cake tester inserted in the center comes out clean.

Removed when ready from the oven and cool on a wire rack 5 minutes, then turn out of the pans and let cool until ready to serve.

Wednesday, February 17, 2010

Jems

These gems are not the sparkly kind...they are the eating kind, and sweet eating at that. There is something very appealing about a small treat. That is one of the reasons why cupcakes are so popular as well as scones, donuts, and muffins.

Recently I made a batter specifically to make a small cake called a gem. In old cookbooks I've seen recipes for jems and they are usually for muffins but with creamed butter instead of melted butter or oil. Sometimes they were just made with a regular cake batter. I don't think that modern books even recognize gems as a different little cake, but they are so cute that they should be.

Last fall we had a grand birthday celebration in the small town of Benecia near Vallejo. While wandering in a shop that had antiques combined with newer items, I found a genuine gem pan! The storekeeper said it had been her grandmothers pan. Not sure if that was something she said to sell it or not, but it was well used (and had to be cleaned quite a bit before I could use it) and there is an inscription that says Ekco Chicago Patent Pend. I got pretty excited when I saw the pan because I had read about gems but had never seen a gem pan! I love the little ribs up the sides and the small round indentation at the top. I think the cups hold a little less than a muffin cup does (although I haven't measured it).

Since I only have the one pan with six gems, I baked the rest of the batter in 4 small loaf pans. One was enjoyed by Sweetie and Straight Shooter and the other three traveled to Seattle with me as gifts for my friends and daughter.

It's been a while since I've baked a Dorie Greenspan recipe, but, as usual, it is perfect and worked really well for the gems and little loaves. This is a hot milk cake recipe which has been enriched with coconut and lime for a tropical flavor.

I added an extra dollop of fun by doing a warm coconut glaze which went on the gems and loaves while they were still warm and after I had poked them well with a toothpick to allow the glaze to seep into the cakes. You really taste the coconut that way and the cakes stay moist and delicious!


Coconut Gems
Based on Coconut Tea Cake in Dorie Greenspan's Baking:from my home to yours

2 cups all-purpose flour
1 teaspoon baking powder
pinch of salt
1 cup canned unsweetened coconut milk, stirred well before measuring
4 tablespoons (1/2 stick) butter at room temperature
the juice of one lime
4 large eggs
1 3/4 cups sugar
the zest from one lime
1 teaspoon pure vanilla extract
2 teaspoons dark rum
3/4 cup shredded coconut

For Glaze:
1/3 cup canned unsweetened coconut milk, stirred well before measuring
2 tablespoons rum
1 tablespoon light corn syrup

Preheat oven to 350 degrees F. Butter and flour the gem pan and four small loaf pans (or use a 10 - 12 cup Bundt pan instead).

Sift the flour, baking powder and salt together.

Pour the coconut milk into a small saucepan, add the butter and heat over gentle heat until the milk is hot and the butter is melted. Remove from the heat, let cool a few minutes and add the lime juice and stir to combine. Keep the mixture warm.
Put the sugar into a large mixing bowl and, using your clean fingers, rub the lime zest into the sugar until well combined. Using a whisk attachment on an electric mixer (or muscle power and a hand whisk) beat the eggs and sugar and medium-high speed until pale, thick and almost doubled in volume, about 3 minutes. Beat in the vanilla and the rum. Reduce the mixer speed to low and add the dry ingredients, scraping down the sides of the bowl as needed and stopping just when the flour disappears.

Keeping the mixer on low, add the coconut, mixing only until it is blended, then steadily add the hot milk and butter. When the mixture is smooth, stop mixing and give the batter a couple of turns with a rubber spatula, just to make certain that all ingredients are incorporated. Pour the batter into the pans, filling them about 3/4 full.

Bake in the preheated oven about 20-25 minutes for the gems and about 1/2 hour for the small loaves. Test by pressing center with a finger...if cake springs back it is done. For full size Bundt pan bake for about an hour or until cake is golden brown and tests done.

Transfer cakes to a rack and cool five minutes. While cakes are cooling prepare the glaze:
In a small saucepan warm the coconut milk over low heat. When warm, add the rum and the corn syrup and whisk to combine.

Once cakes have cooled about five minutes, place pan with gems in it on a rack with a pan under it to catch drips. Place the small loaves, still in their pans, on the rack, too. Use a toothpick or small skewer to poke holes into the cakes about every inch. Slowly pour the glaze over each, using more of the glaze for the loaves than the gems. I used a 1/3 cup measuring cup for pouring so that I could pour a small amount at a time. Use all the glaze and let cakes sit for 10 minutes.

Unmold the gems and loaves. Leave gems with the small indentation side up and take the small loaves and turn them upright. Let all the cakes cool completely, then serve. Leftovers can be stored airtight for four days at room temperature. Otherwise freeze leftovers...although it is unlikely you will have any!
No photos of the small loaves...guess I was so excited about giving them away that I neglected to take photos...baaaad blogger :) These were baked at night, too, so the lighting is terrible, hence poor photos, but good enough to see that these are yummy little treats.

Sunday, February 07, 2010

Sweets for Your Valentine

My birthday comes near Valentines Day, so I have a special fondness for the holiday. I love heart shaped cakes and cookies, red and pink and lilac...although mostly not together. Romantic movies like Sleepless in Seattle and Notting Hill where, despite the odds, the girl gets the guy in the end are never too sappy for me to watch again. Fluffy romance novels provide reading without any effort at all...and sometimes that's exactly the kind I need...hearts and flowers and an inevitable happy ending.

Life is a bit more messy. There is no inevitable happiness...you get lucky if you find relationship happiness and then you put effort into keeping it. Even with effort sometimes the happiness slips away like water down the drain.

I wish I had words of wisdom that would give the secrets to keeping it, but I don't. I am still often mystified when my Sweetie bears the brunt of my temper and yet still loves me even though cross words really hurt him. He is still amazed when I laugh at his jokes...sometimes jokes I've heard a few times before, but they still bring true laughter...how fun is that? When you have the benefit of over 30 years with the same partner and have weathered the ups and downs that all relationships seem to bring, it's time to be grateful...and I am.

If you are thinking about Valentine's Day and want to surprise your sweetie with an unusual bread then you have come to the right place.

This may not lead to wild monkey love…or it may…but rest assured, this coffee cake is a winner, especially if you like coconut and raspberry flavors.

Traditionally Monkey Bread is made with small balls or pieces of dough dipped in butter and rolled in cinnamon sugar, with some nuts sometimes thrown in. It is delicious but can be super sweet if a lot of the cinnamon sugar is used. But you can monkey around with the flavors and ingredients if you want to.


I gave sweetie the option of the traditional flavors or of this version. He chose the coconut raspberry combo. It is a little more complicated (not much) and is more subtle…doesn’t hit you over the head with a blast of spice or sugar…but it is charming. The tint of pink that the coating takes on makes it just right for Valentine’s Day.

I made the dough and held it overnight but you could make it the same day if you plan on serving it in the late afternoon or in the evening. Getting all those chunks of dough dipped and then dipped in the coconut takes some time. My dough also took longer than average to rise because it is stormy here and chilly…and perhaps because I used all sour dough starter and it sometimes is slower than if I beefed it up with a little dry yeast.

If you used quick rise yeast and if your kitchen was warm and if you started at 8 am, this could be ready by lunch time.

Unlike the traditional version, this kind doesn’t have as much gooeyness to it, but it is a great flavor combo with the coconut, raspberry and almond flavors playing off the sweet yeast bread. Some people like to ice their Monkey Bread once it has cooled slightly, but I served it the way it came from the oven and everyone wanted seconds, so I think icing is delightful, but optional. If you use icing, you may want to tint it pink with some food coloring to make it even more of a Valentine delight.


Coconut Raspberry Monkey Bread
Makes 1 Bundt or coffee cake Variation on recipe from Marcy Goldman of BetterBaking.com
Dough:
1 1/3 cups warm water
4 1/2 tsp instant yeast
3 tbsp sugar
2 tsp salt
5 tbsp butter, melted
2 1/4 cups all-purpose flour
1-2 cups bread flour

Note: I used 1 cup sourdough starter and 1 cup warm water instead of the amount of water and instant yeast given above. I added less than 2 cups bread flour, trying to keep the dough soft and with not too much flour.

Filling:
1/2 cup melted butter
¼ cup coconut milk (I used the canned Thai style, unsweetened)
½ cup seedless raspberry jam, melted and cooled a little
2 tablespoons light corn syrup
1 cup grated coconut (I used ½ cup fresh grated and ½ cup sweetened shredded coconut)
1/2 cup whole almonds, chopped

Optional Icing:
2 cups confectioners' sugar
2-3 tbsp milk
1 tsp vanilla

1. Dissolve yeast in warm water with 1 tbsp of sugar for 2-3 minutes. Add in melted butter, remaining sugar, salt and the all purpose flour. Mix it in by hand or using a dough hook until it forms a soft mass, adding bread flour as needed to form a soft dough, not too much flour! Let rise, covered, in a warm place for 30-45 minutes until almost doubled.

2. Make coating: Put melted butter in a bowl and stir in the coconut milk. In another bowl, mix melted raspberry jam and the corn syrup. Sprinkle 2 tablespoons raspberry mixture and half the almonds into a well greased and floured Bundt pan or Monkey Bread pan. On the counter, gently deflate dough and divide into 1/2" pieces. Roll into balls. Mix the melted butter mixture with the raspberry mixture and stir well to combine. Place the coconut in a shallow bowl. Dip balls in raspberry butter mixture, then roll in coconut. Layer them in the prepared Bundt pan. Sprinkle remaining chopped almonds over the dough balls halfway through the layering. My Monkey Bread pan from King Arthur only needed two layers to use all of the dough. Cover with plastic wrap; let rise about 1 hour or until doubled in size.

3. Bake at 350 degrees F for 30-35 minutes until golden brown. Cool 15 minutes in pan then invert. Cool 20 minutes. If desired, while bread is cooling make the icing: In small bowl, combine icing ingredients until smooth. Drizzle over slightly cooled bread. Serve at once.
Verdict: I like the contrast between the tang of the sourdough bread and the sweetness and richness of the butter/raspberry/coconut/almond combination. If I did it again I might make the dough balls smaller and use more raspberry jam, pouring some straight melted raspberry jam directly over the first layer of dough balls. That would mean setting aside some raspberry jam and not adding it to the butter mixture. This might give it a bit more of the ooey-gooey factor that was missing with this recipe. Adding some mini chocolate chips could be fun, too…I mean, when is it a bad thing to add chocolate?

I’m sending this over to Susan at Wild Yeast for this weeks’ Yeastspotting event. Check it out! You might get lots of Valentines ideas.