Friday, June 30, 2023

Apricot Frangipane Pie and Finding Mistakes


 Do you ever have one of those days when the recipe you are making keeps having issues...and then you correct them in time but end up losing so much time? I had that kind of day making this pie.

I wanted to bring this pie with us to a dinner party the same evening. Since I'd already made this pie once before as a tart, I didn't think it would be difficult and so I started at about 3 pm, thinking it would be ready by about 4:30 with plenty of time to cool before we left at 5:15.

The first mistake I made was in choosing a pie plate. I should have gone with something pretty flat...maybe 1 1/2 inches high. Instead I went with a beautiful white ceramic plate that was about 2 1/2 inches high. I used the already made pie dough circle which I had remembered to take out of the fridge a while before...so that part was fine. Then I made my first mistake by putting it into the freezer. I often do that with single crust pies before blind baking because it helps to keep the dough from shrinking during baking. The part I forgot was that you don't do that with ceramic or glass pie plates. Going from freezer to hot oven works fine with metal plates, but not glass and ceramic! Fortunately I remembered after I took it from the freezer and before I put it in the oven! Let it sit awhile to warm up a bit, added parchment and my baking lentils (pie weights) and blind baked it. So far so good!


The next mistake was in not adjusting the recipe for a thicker filling. I needed twice as much filling for a pie 2 1/2 inches high. That includes having more room temperature eggs and butter, more ground almonds, and all the filling ingredients really. Fortunately I had an extra egg at room temperature and I used all the butter in the two butter dishes because that butter was at room temperature. The ground almonds almost ran out before the measuring cup was filled, but there was just enough! Another disaster averted. As you can see from the slice above, I really needed all that filling. The recipe below has been adjusted so the filling is what you see in the photo above.

The final mistake was not realizing that a thicker filling would require a longer baking time. Again, I was fortunate because I had the time I'd allowed for cooling...and I used it all! The pie went from the oven to the carrier. Once we got to our destination I asked the hostess to put the pie in the fridge to cool while we visited and ate. Even so, the very center was a bit warm.

Was it worth it? Yes! It was an awesome pie, everyone loved it and offers to leave some for the hosts were accepted (which is not always the case). Sweetie and I enjoyed a slice last night to finish it off.


I made this with fresh apricots which I blanched and peeled. You can also use canned apricot halves and still have a delicious pie. The fresh apricot season is pretty short so it's nice to know that there is another option. Of course you can also use another fruit with the frangipane filling...anything that goes well with almonds will work well...fresh pitted cherries, especially sour cherries would be awesome a would most berries.

The apricot jam on the bottom crust and on the tops of the apricots after baking (for shine) really is optional, but you do get a bit more apricot flavor that way.


Apricot Frangipane Pie

Serves 8

Prepare the crust:
Make your own favorite pie dough recipe for a single crust or use
Pillsbury Readycrust or similar packaged pie dough circles, as I did

Let the dough come to room temperature, then roll to a 12-inch diameter circle. Carefully transfer dough circle to a pie plate and shape dough to the sides of the pan. Turn under the edges and flute. If using a metal pan, place in the freezer for 20-30 minutes. If using glass or ceramic skip that step.

Preheat the oven to 375 degrees F. Put the rack in the center of the oven.

Remove tart shell from freezer.  Line the prepared pan with parchment and fill with pie weights. I use lentils or dry beans and they work great!

Bake for 25 minutes. Let cool 5 minutes on a rack. Remove the parchment and pie weights carefully and use the back of a spoon to gently press down any puffed crust, then bake another few minutes to let the bottom fully bake. Let crust cool. When cool, if desired, brush bottom of crust with apricot jam, using a pastry brush.

Prepare the frangipane filling:

6 tablespoons soft butter or margarine
1/2 teaspoon salt
1 1/3 cup sugar
3 tablespoons 
1/2 teaspoon almond extract
4 large eggs, at room temperature
1 1/2 cups almond flour or mixed nut flour

10 apricot halves, peeled, pitted, and patted dry
1/4 cup apricot jam, warmed (optional)

Directions:
Preheat the oven to 350°F.

To make the filling:  Beat together the butter, salt, sugar, flour, and almond extract.
Beat in the eggs, then add the almond flour, stirring just to combine.

To assemble the tart: Spread the filling in the bottom of the crust.

Place the apricot halves in a pattern on top of the filling, pressing them down gently so the bottom of the fruit is covered.

Bake the tart in the preheated 350 degree F oven for 45 to 40 minutes, until the top is lightly browned. Filling will puff up around the apricots.  Cool slightly or completely before serving. If desired, brush the tops of the apricots with apricot jam, using a pastry brush.

Wednesday, June 28, 2023

Fun New Pans and Pound Cake with Lemon...and Berries


I know that I have enough baking pans...but how many are really enough? When I saw these pans at the King Arthur Baking site I knew that I had to have them. Normally I would only get one, but each pan holds about 4 cups of batter, so with two I can make a normal recipe for a large pound cake or Bundt, but instead bake the batter in two pans. This means that small-ish slices will still look generous per serving, AND I can have a variation in one of the pans.

I did this by making a lemon pound cake batter and then putting a cup of fresh berries in one pan with about half the batter. The second pan was just lemon batter. Next time I think that I would put batter in one pan and them the berries mixed in with the remaining batter put into the second pan. You could also make this as the recipe does with orange zest and juice.


The results were delicious! The plain lemon cake was great with a cup of tea, but I did try slicing my portion in half, adding some raspberry jam, and some lemon curd on the side. That was an awesome treat! The berry slices were served today with sliced fresh, juicy strawberries. Even better than the lemon cake either way. The berries in the cake kept it moist and those strawberries went so well with the cooked berries in the cake. Do give it a try! You can just do the berries mixed into the batter and bake it all in one large loaf pan. You will have to bake it longer...about an hour to an hour 15 minutes. A toothpick inserted in the middle should come out clean when done.


Fresh Fruit Pound Cake

from Great Cakes by Carole Walter 

1 cup fresh fruit (I used half strawberries, half marionberries, but you can also use raspberries, blueberries, cherries, peaches, nectarines [pitted], or orange sections)
2 cups sifted unbleached all-purpose flour
2 teaspoons baking powder
1 cup (2 sticks/ 8 oz.) unsalted butter, at room temperature
1 tablespoon freshly grated navel orange rind (I used lemon zest)
1 1/2 cups strained confectioners' sugar
4 large eggs, at room temperature
2 teaspoons vanilla extract
2 tablespoons lemon juice (or orange juice is using orange rind)

Wash the fruit, if necessary, and dry it well on paper toweling. Cut large pieces into 1/2-inch chunks to measure only 1 cup.

Preheat the oven to 350 degrees F. Butter a 9 x 5 x 2 3/4-inch loaf pan well and dust with flour. Invert over the kitchen sink and give pan a tap to remove excess flour.

Sift together the flour and baking powder. Set aside.

Cut the butter into 1-inch pieces and put in the large bowl of an electric mixer fitted with the beater or paddle attachment. Add the orange rind (or lemon zest) and soften on low speed. Increase speed to medium-high. Cream until smooth and light in color, 1 1/2 to 2 minutes more...it is important to cream for the full time to add air.

Add the sugar, 1/3 at a time, scraping sides of bowl as necessary. Then beat until well blended, approximately 2 minutes more.

Add the eggs, 1 at a time, at 1-minutes intervals, scraping the sides of the bowl occasionally. Reduce speed to low. Blend in the vanilla and orange (or lemon) juice. The batter will look curdled. That's OK.

Add the dry ingredients all at once, scraping the sides of the bowl again. (I used quick On-Off bursts of my mixer for the first few seconds until the flour started to blend in...that way I avoided flour all over the place!). Increase speed to medium-low and beat approximately 30 seconds longer.

Spread 1/3 of the batter evenly on the bottom of the baking pan. Scatter half of the fruit on top. Spread on the second third of the batter and cover with the remaining fruit. Spread the remaining batter on top, smoothing the surface with the bottom of a spoon.

Bake in preheated 350 degree F oven for 60-65 minutes, or until cake is golden brown on top, and begins to come away from the sides of the pan. Try the toothpick test if unsure that it is done.


Remove the pan from the oven and set on a cake rack to cool for 10-13 minutes. Inver cake onto rack, remove pan, then turn cake top side up to finish cooling. When ready to serve, dust top lightly with confectioners' sugar.

Since I made my cakes in the new pan, they are served with the bottom side up. I made a quick glaze with lemon juice and confectioners' sugar and dripped it across the 'ribs' of cake and let it set...about 2 teaspoon lemon juice to 1 cup confectioners' sugar.

Storage: Store at room temperature under a class cover or in an airtight container for up to 4 days.


Tuesday, June 20, 2023

Another Galette For Summer


 With so many kinds of fruit available now that stone fruit are coming in and strawberries and other berries are beginning to be available in lavish amounts, it was time for Sweetie to have one of his favorite desserts...the freeform pie I call galette...although that might not be the correct spelling.

The great thing about these pies is that they are easy, go together quickly, and are a great way to showcase whatever is ripe now.


For this one I combined strawberries and apricots from the farm stand on Hwy. 12, just east of Sebastopol, and some raspberries from Costco. I did toss the prepared fruit with a mixture of cornstarch and sugar, but I guess I should have used more cornstarch. When it first came out of the oven this freeform pie had juice all around it. Of course Sweetie just waited until the juices cooled and then scooped them up and ate them, but it did make the bottom a bit...oohhh nooooo...soggy. Next time, more cornstarch when the berries are this juicy.

On the health front, my back is finally better and I again have some energy, so I've been pruning a bit, deadheading the roses, and cleaning the fridge...plus doing plenty of reading of trashy summer vacation books. Fun!

For those of you who keep up with our homemaking and projects, we had tree trimmers come and cut back a few trees, mostly for safety and fire prevention issues and we have a new window on order to replace a single pane one that is original to the house. With the current cost of windows, it will be a while before we replace any more of them!


Apricot-Berry Galette

2 apricots, cut into slices, then halved
2 pints fresh strawberries, hulled and sliced
1 cup fresh raspberries, washed and patted dry
1 prepared pie dough round (I use Pillsbury ReadyCrust)
1/4 cup sugar (less if fruit is very sweet)
zest from 1 lemon
1 tablespoon cornstarch (this was too little...try at least 2 tablespoons, maybe even three)
sparkling sugar/sanding sugar (optional)

Put the fruit together in a large bowl. 

 Roll out the pie dough to a 12-inch diameter circle and place on a parchment lined rimmed baking sheet. I used a pizza pan and parchment. 

Preheat the oven to 450 degrees.

In a smaller bowl put the sugar, add the lemon zest and rub together with your fingers to soak the sugar in the lemon oils from the zest. Mix in the cornstarch. Add the cornstarch mixture to the fruit and toss gently with your clean hands until coated and no more cornstarch is visible. Total amount of filling is about 4.5 - 5 cups. 

Mound the fruit mixture in the center of the dough and pat it down, then fold the edges of the pie dough over the berry mixture (about 4 for my galette), brush dough with some water (about 1 tablespoon) and sprinkle on some sanding sugar (optional) and you have the makings of a delicious dessert that is almost a pie, but easier and rustic looking. Gently pat the folds to keep them together, which holds in the filling.

Bake at 450 degrees for 10 minutes, then reduce heat to 350 and bake until golden brown and cooked through.

Let cool on a rack 10 minutes so you don't burn your tongue. Serve in wedges on plates. Softly whipped cream or vanilla ice cream is optional but nice.

Friday, June 16, 2023

Crunchy Babes


The Bread Baking Babes have a Kitchen of the Month each month and this month our awesome Babe is Karen of Karen's Kitchen Stories and she chose a fascinating recipe for Tiger Rolls/Dutch Crunch Rolls. I've never made them but I've had sandwiches with the crunchy topping and the tender rolls.


Speaking of crunch, I've been in a time crunch the last few days with medical appointments and other things that I had put on hold during the time my back was out. As a result, I'm posting pretty late. The recipe seemed simple until I started to notice the hour there, fifteen minutes here, 45 minutes more in the instructions. I tried to follow them and still have rolls baked for dinner. I also changed a few things. My dairy allergy is mostly gone, but I'm limiting the amount of dairy I consume each week. These rolls had milk in the preferment, milk in the main dough, and butter in the main dough, too. That was too much dairy, so I used hot milk for the preferment as called for, water for the main dough and skipped the butter. My dough was very loose, so instead of making rolls, I used a greased super-muffin pan with space for six and put dough into each using a cup measure. Once they rose, I applied the cooled crunch batter and let them rise again, then baked. I don't think that the crunch batter had enough time to really dry out, so the buns are not as speckled as some, but the crunchy part is really there...so delicious!

Karen says, "This recipe is from my Netherlands-based friend Ralph Nieboer, with whom I and others co-administer the Artisan Bread Bakers Facebook group. He is amazing. He teaches bread baking classes across Europe (it's his side job I think). 

Here is a link to his page so you can give him credit for the recipe.  https://www.facebook.com/Breadworks.nl

*******He also would love it if you mentioned and linked to his Instagram page. https://www.instagram.com/breadworkscourses/

Here is his version of the recipe, which also includes photos: https://www.facebook.com/groups/ArtisanBakers/posts/10161595683818009/  " Thank you Ralph and Karen for a great recipe!


To be a Bread Baking Buddy, send Karen an email with a photo and description of your bake...you know you want to bake this one! Thank you Elizabeth for another outstanding Badge. Buddies get a version of this Badge!!


Be sure to visit the other Bread Baking Babes to see their bakes, too.


Tiger Rolls/Dutch Crunch Rolls 

For the preferment:

75 grams bread flour 

75 grams milk heated to 113 degrees F (45 degrees F)

.3 grams instant yeast

For the Final Dough:

500 grams bread flour

350 grams milk, about 75 degrees F

All of the preferment

1.5 grams of instant yeast

37.5 grams softened butter, cut into small pieces

8 grams salt

For the Tiger Porridge:

20 grams rice flour (not glutinous rice flour)

20 grams ground bread crumbs or panko bread crumbs

137 grams boiling water

1.5 grams salt

2.5 grams granulated sugar

2.5 grams vegetable oil

1.75 grams instant yeast

To Make the Preferment:

Stir together all of the ingredients in a small bowl. Cover and let ferment for 12 to 16 hours. 

To Make the Final Dough:

Mix the flour and milk together by hand in the bowl of a stand mixer. Cover and let sit for 1 1/2 hours. 

Add the rest of the ingredients and mix on low for 8 minutes, and then medium high for 3 minutes. The dough should be tacky but not sticky. I added one teaspoon of extra flour to bring it together. 

Form the dough into a ball and place it into an oiled bowl or dough rising bucket. Cover and let rise until doubled, about 60 to 90 minutes. 

To Make the Porridge:

While the dough is rising, in a smallish bowl, mix the rice flour and bread crumbs. Add the boiling water, stir, and let the mixture rest until it reaches about 77 degrees F. Stir in the rest of the ingredients, cover, and let rest for an hour. 

To Shape the Rolls:

Begin heating your oven to 425 degrees F. with a rack in the middle. 

Deflate the dough and cut it into 10 equal size pieces, about 100 grams each. Shape each into roll and place them, seam side down, onto a parchment lined half-sheet pan. Cover with oiled plastic wrap and let rise for 15 minutes. 

Divide and dollop the porridge among the the 10 rolls and then spread gently over the rolls with the back of a spoon. It's about a tablespoon per rolls. You can smooth the porridge with and offset spatula. 

Let rise for an additional 45 minutes, uncovered. 

Bake the rolls for 20 to 25 minutes, until the topping has browned as pictured. I switched to convection for the last 5 minutes. The interior temperature of the rolls was about 205 degrees F. 


Tuesday, June 13, 2023

BLT and an Opera Cake


 BLT - Nope, not the sandwich. The B stands for bend, the L for lift and the T for turn. It's a great combination for sandwiches (bacon, lettuce, tomato), and even a good one for salads, but a terrible combination for backs. Unfortunately that's what I did shortly after my last post. I was in the garden pulling weeds. Everything was fine ...bending, lifting (pulling up) the weeds, until I added the turn or twist, reaching around the potting table leg and combined the three...and I threw my back out. So, for about a week and a half there wasn't much going on to post about but there was lots of resting, reading, a whole lot of sleeping, and I even discovered that I had the British version of Antiques Roadshow on my tablet computer, so I've learned a lot about all sorts of interesting antiques.

Unfortunately I also missed my niece's wedding in Michigan and the time to hang out with siblings and other relatives, which is truly sad. Still, they had a lovely day and a lovely wedding by all reports and I wish Milly-Molly-Mandy and her new husband every happiness. She baked with me one day a number of years back, helping me make an Opera Cake for the Daring Bakers. In her honor I'm going to repeat the post...I hope you enjoy it and might even try making it. It was delicious, even if the non-chocolate version was unusual. I realize that it is a long and time consuming recipe, but it's perfect for things like bridal showers, fancy receptions and parties that seem to populate June like roses. Oh, and the first part is one of my Land of St. Honore' tales. Enjoy!


Daring Bakers in May - Opera in the Land of St. Honore'

Spring had come to the Land of St. Honore’ and the duchess was expecting a special guest for coffee the next day. Arrayed on her kitchen counter were eggs and butter and sugar and flour…and a few secret ingredients…all the things that a Daring Baker like the duchess loved to work with.

She smiled at her niece Mm. Mandy who was a kindred spirit in the kitchen and had come to bake with her. First they read the long and complicated recipe, then divided up the tasks. Broken down that way, it didn’t seem too difficult.

As they worked together, eggs were separated and whipped,
 nuts ground, butter melted, sugar and flour sifted, and white chocolate melted. A syrup that included coconut milk and rum was made and cooled.


Mandy took a turn with the whisk for the buttercream and later the mixer worked it’s magic, too.

The thick buttercream was silken and spreadable.


The kitchen ruler came into play to make perfect thirds of the baked and cooled jaconde for this was to be an elegant, formal sort of dessert.


As the women wove their way around the kitchen, laughing and chatting, the creation took shape. Mm. Mandy showed her skill with the piping bag making the light yellow decorations for the top.


Layers were brushed with the syrup,


then spread with the buttercream.


After buttercream was smoothed on the top layer,


the rectangle spent some time in the fridge. The white chocolate glaze, flavored with rum was finally spread on the top and the dessert set to chill overnight.


The next afternoon, to the strains of Mozart, lovely slices of Opera Cake were served on fine china plates to Prince Albert, along with some strong coffee in bone china cups.


This was not your usual Opera Cake which is often chocolate or coffee flavored, but a light version, with layers of macadamia nut sponge cake which had soaked up rum and coconut flavored syrup. Between the layers there was rich rum buttercream. The top was glazed with white chocolate that had been flavored with more rum and the sweet, pale yellow treble clef note design, piped from tinted white chocolate, with one placed on each slice, enhanced the musical theme perfectly.


The afternoon passed with light opera and delightful conversation. Since this Light Opera Cake, buttery and just sweet enough, with the coconut, macadamia nut and rum flavors giving it a feel of the tropics, was very rich, only small slices were needed.

When her niece left the next day to visit relatives to the east, she took the rest with her, to the delight of her Capitol aunt and uncle. They had no trouble finishing off the remaining slices.


If you would like to create an Opera Cake for yourself, here is the recipe the duchess used:


A Taste of Light: Opéra Cake

This recipe is based on Opéra Cake recipes in Dorie Greenspan’s Paris Sweets and Tish Boyle and Timothy Moriarty’s Chocolate Passion.


The Elements of an Opéra Cake:

Joconde: The base of an Opéra Cake is a thin sponge cake that is made using nut meal, traditionally almond meal (finely ground blanched almonds).

Syrup: The joconde is flavored with a sugar syrup that can be flavored to suit your tastes.

Buttercream: The first two layers of the joconde are covered in a rich buttercream.

Ganache/Mousse (optional): In some recipes, the final layer of the joconde is covered in a ganache or mousse. While not hard to make, this makes the recipe quite involved.


Glaze: The final step to an Opéra Cake is the glaze that gives the cake a very finished and elegant appearance.


Elle’s NOTE: I made half the recipe and baked the jaconde in one jelly roll pan, then cut it into thirds. I substituted ground macadamia nuts for the ground almonds in the cake, used ¼ cup coconut milk and ¼ cup water for the syrup, then used rum for the flavoring. For the buttercream, I used the recipe from the Yule Log from the December Daring Bakers challenge, flavoring it with rum. This yielded a buttery cake, with a tropical flavor of rum and coconut, which went very well with the white chocolate and macadamia nut flavors.


For the joconde (sponge cake)
(Note: The joconde can be made up to 1 day in advance and kept wrapped at room temperate)

What you’ll need:

•2 12½ x 15½-inch (31 x 39-cm) jelly-roll pans (Note: If you do not have jelly-roll pans this size, do not fear! You can use different-sized jelly-roll pans like 10 x 15-inches.)
•a few tablespoons of melted butter (in addition to what’s called for in the ingredients’ list) and a brush (to grease the pans)
•parchment paper
•a whisk and a paddle attachment for a stand mixer or for a handheld mixer
•two mixing bowls (you can make do with one but it’s better to have two)

Ingredients:
(CAN BE HALVED)

6 large egg whites, at room temperature
2 tbsp. (30 grams) granulated sugar
2 cups (225 grams) ground blanched almonds (Note: If you do not want to use almond meal, you can use another nut meal like hazelnut. You can buy almond meal in bulk food stores or health food stores, or you can make it at home by grinding almonds in the food processor with a tablespoon or two of the flour that you would use in the cake. The reason you need the flour is to prevent the almonds from turning oily or pasty in the processor. You will need about 2 cups of blanched almonds to create enough almond meal for this cake.)


(Elle’s NOTE: We ground the macadamia nuts in a hand nut grinder for a fine, even nut flour)


2 cups icing sugar, sifted
6 large eggs
½ cup (70 grams) all-purpose flour
3 tbsp. (1½ ounces; 45 grams) unsalted butter, melted and cooled

1.Divide the oven into thirds by positioning a rack in the upper third of the oven and the lower third of the oven.

2.Preheat the oven to 425◦F. (220◦C).

3.Line two 12½ x 15½- inch (31 x 39-cm) jelly-roll pans with parchment paper and brush with melted butter.

4.In the bowl of a stand mixer fitted with the whisk attachment (or using a handheld mixer), beat the egg whites until they form soft peaks. Add the granulated sugar and beat until the peaks are stiff and glossy. If you do not have another mixer bowl, gently scrape the meringue into another bowl and set aside.

5.If you only have one bowl, wash it after removing the egg whites or if you have a second bowl, use that one. Attach the paddle attachment to the stand mixer (or using a handheld mixer again) and beat the almonds, icing sugar and eggs on medium speed until light and voluminous, about 3 minutes.

6.Add the flour and beat on low speed until the flour is just combined (be very careful not to overmix here!!!).

7.Using a rubber spatula, gently fold the meringue into the almond mixture and then fold in the melted butter. Divide the batter between the pans and spread it evenly to cover the entire surface of each pan.

8.Bake the cake layers until they are lightly browned and just springy to the touch. This could take anywhere from 5 to 9 minutes depending on your oven. Place one jelly-roll pan in the middle of the oven and the second jelly-roll pan in the bottom third of the oven.

9.Put the pans on a heatproof counter and run a sharp knife along the edges of the cake to loosen it from the pan. Cover each with a sheet of parchment or wax paper, turn the pans over, and unmold.

10.Carefully peel away the parchment, then turn the parchment over and use it to cover the cakes. Let the cakes cool to room temperature.

For the syrup

(Note: The syrup can be made up to 1 week in advance and kept covered in the refrigerator.)

What you’ll need:

•a small saucepan

Ingredients:
(CAN BE HALVED)


½ cup (125 grams) water (or ¼ cup coconut milk and ¼ cup water)
⅓ cup (65 grams) granulated sugar
1 to 2 tbsp. of the flavouring of your choice (i.e., vanilla extract, almond extract, cognac, limoncello, coconut cream, honey etc.) (RUM!)

1.Stir all the syrup ingredients together in the saucepan and bring to a boil.

2.Remove from the heat and let cool to room temperature.

For the Rum Buttercream:

4 large egg whites
1 cup sugar
24 tablespoons (3 sticks or 1-1/2 cups) unsalted butter, softened
2 tablespoons rum

1.Whisk the egg whites and sugar together in the bowl of an electric mixer. Set the bowl over simmering water and whisk gently until the sugar is dissolved and the egg whites are hot.

2.Attach the bowl to the mixer and whip with the whisk on medium speed until cooled. Switch to the paddle and beat in the softened butter and continue beating until the buttercream is smooth. Beat the rum into the buttercream. Chill, if needed, to a consistency that will be firm enough for two layers of cake to be placed.

For the glaze
(Note: It’s best to make the glaze right when you’re ready to finish the cake.)
( CAN BE HALVED)


What you’ll need:

•a small saucepan or double boiler

Ingredients:

14 ounces white chocolate, coarsely chopped
½ cup heavy cream (35% cream)

1.Melt the white chocolate with the heavy cream. Whisk the mixture gently until smooth.
2.Let cool for 10 minutes and then pour over the chilled cake. Using a long metal cake spatula, smooth out into an even layer.
3.Place the cake into the refrigerator for 30 minutes to set.

Assembling the Opéra Cake

(Note: The finished cake should be served slightly chilled. It can be kept in the refrigerator for up to 1 day).

Line a baking sheet with parchment or wax paper.

Working with one sheet of cake at a time, cut and trim each sheet so that you have two pieces (from each cake so you’ll have four pieces in total): one 10-inch (25-cm) square and one 10 x 5-inch (25 x 12½-cm) rectangle.

Step A (if using buttercream only and not making the ganache/mousse):

Place one square of cake on the baking sheet and moisten it gently with the flavoured syrup.

Spread about one-third of the buttercream over this layer.

Top with the two rectangular pieces of cake, placing them side by side to form a square. Moisten these pieces with the flavoured syrup.

Spread another third of the buttercream on the cake and then top with the third square of joconde. Use the remaining syrup to wet the joconde. Spread the remaining buttercream on top of the final layer of joconde and then refrigerate until very firm (at least half an hour).

Make the glaze and after it has cooled, pour/spread it over the top of the chilled cake. Refrigerate the cake again to set the glaze.
Decorate if desired.

Serve the cake slightly chilled. This recipe will yield approximately 20 servings. (The half recipe was decorated so that there were 10 slices.)


Monday, June 05, 2023

Strawberry and Rhubarb


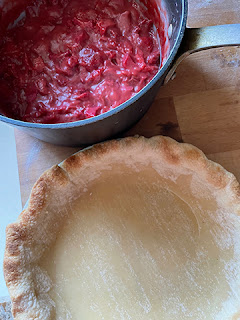
Continuing the strawberry theme, I have to tell you about this strawberry-rhubarb pie! 

I've always loved the tang of fresh rhubarb and it goes really well with sweet strawberries. We are finally getting the fresh local strawberries from our local farm stand. It's been an unusually cool spring, so many things are slower in ripening than usual. So glad to be able to enjoy the superior strawberries that are grown at this Laguna farm.


One of the fun things about this pie is that the parts that make it up can be made in advance and then the pie assembled the day you plan to serve it...even right before you serve it (almost). This makes it a great dessert for a dinner party or just for a busy day. The filling can be made up to three days in advance, the crumb topping can be made two or three days ahead, and the blind baked pie crust can be made a day or two before. The filling can be kept in the fridge and the other two components can be saved in an air-tight container at room temperature.


The other great thing about this is that everyone seems to love it...even people who don't particularly love rhubarb. The sweet strawberries and the cooking mellow out the rhubarb just enough that everyone can enjoy it. It also looks pretty and special with the bright filling and the alluring crumb topping. Add to the fun by whipping some cream so that you can add a scoop when serving. Of course if this is a pie meant to impress, you can pipe whipped cream starts along the edge of the filling, too. If you do that for 4th of July in the U.S., add some fresh blueberries on each whipped cream star and you have the national colors.

Do try this delicious pie! It makes me smile when I think of it...and eat it.


Strawberry Rhubarb Pie with Streusel Topping

Serves 8

Strawberry Rhubarb Pie Filling 
Makes enough for one shallow 8-inch pie

Ingredients:
3 cups rhubarb, sliced into 1/2-inch pieces
 2 3/4 cups strawberries, hulled and chopped or sliced
1/3 cup sugar
1/3 cup brown sugar, packed
1/4 cup cornstarch
1/4 teaspoon salt
1 teaspoon vanilla extract
2 tablespoons lemon juice
1 tablespoon butter or margarine

Directions:
Combine all of the ingredients in a heavy bottomed pot.
Cook over medium heat for 5-10 minutes, stirring constantly so that it doesn't scorch on the bottom of the pot.
Simmer for another 5-10 minutes until rhubarb is soft and filling has thickened.
Cool and use right away, or put into a covered container and store in the fridge for up to 3 days. Bring slowly to room temperature before using in the pie.

Blind Baked Pie Crust

Use your favorite recipe for a single crust pie, or do as I do and use a single crust from a refrigerated pie crust. I like Pillsbury ReadyCrust.

On a floured surface roll the pie out (if needed) to fit an 8-inch pie tin. Transfer the crust to the tin by draping it over your rolling pin. Fit the crust into the pie tin and crimp the edges, trimming excess crust as needed. Cut a piece of parchment paper or foil to fit the inside of the pie tin and place it loosely over the prepared crust. Fill with pie weights, or do as I do and fill it with dried lentils. Save the lentils to use the next time you need pie weights. They are very inexpensive and sit close enough to each other to do a great job of keeping the crust from getting over bubbly. Bake in a preheated 435 degree F oven for 8-10 minutes, until light golden brown. Remove from the oven and let the lentils cool before removing them carefully and either discarding them or saving them for next time. If the crust still seems a bit raw, put it back in the oven for another minute, then cool crust in pie tin on a wire rack.


Streusel

1/4 pound, 1 stick, 4 oz, 8 tablespoons butter or margarine, very cold
1 cup flour
1/2 cup brown sugar
1/4 cup old fashioned oats

Preheat the oven to 400 degrees F.  Line a baking sheet with parchment,

In a large bowl mix together the flour and brown sugar. Cut in the butter until mixture forms clumps.

Put streusel on the baking sheet and break up the clumps a bit so none are bigger than bite sized. Bake in the preheated oven for about 10 minutes. Streusel should be medium to dark brown but not burnt. Remove baking sheet to a wire rack and let streusel cool .

Making the Pie

Preheat the oven to 350 degrees F. 
Put the pie filling, at room temperature, in the blind baked, cooled, pie shell. Level with an offset spatula. Liberally sprinkle the streusel over the filling. Bake the pie in the preheated oven for about 10 minutes, or until the filling is bubbling. Remove from the oven and cool on a wire rack.

Serve at room temperature or cold. Store leftovers, if any, at room temperature or in the fridge.