Tuesday, July 26, 2022

Zucchini Bread For Chocolate Lovers


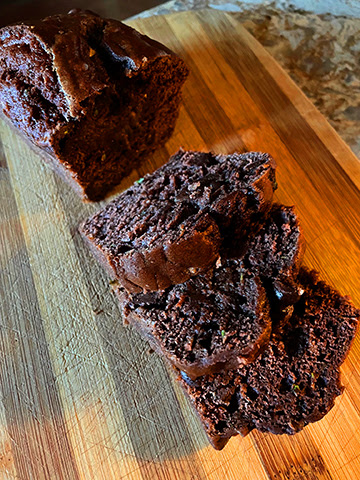
We have reached the point in the summer where the zucchini are showing up in the garden every day. With the warm weather a small one only takes a few days to become a baseball bat size squash...so regular harvests, daily or every other day, are essential to have useable veg. My two four-inch growers pots ended up have three plants in each, so I have six plants. The yellow ones were more prolific at first, but now I'm getting green ones every day. It helps to have some recipes that use a squash or two and one of my favorites is this Chocolate Zucchini Bread...a sweet tea loaf that stays moist from the zucchini. Zucchini, especially small, young zucchini, really don't have much flavor, so often the recipients of my mini-loaves have no idea that part of the loaf is grated zucchini! Every once in a while you can see a bit of the green from the outer skin, but that's about it. This is a quick tea bread. If your overfill your pan as I did, you might get an uneven top (as in photo above) but it will still taste great.


I've made some changes to the original recipe, which is standard for me. I've added espresso powder to deepen the chocolate flavor. I sometimes use melted margarine instead of plain vegetable oil, for a slightly more buttery taste. The biggest change is that I have cut the sugar by 1/3. This bread has chocolate chips in it!...it doesn't need a big dose of sugar. Of course, I like semi-sweet chocolate, so a super sweet chocolate flavor isn't what I yearn for. If you like your chocolate sweeter, by all mean increase the sugar to 1 1/2 cups.


Another change is minor...When it's time to add the moist mixture to the dry mixture, I don't mix the zucchini into the moist mixture...I just dump it right into the dry mixture in the big bowl, pour the wet mixture on top, then use my Kitchen Aid mixer to combine them...mixing just until combined, no longer, then I add the chocolate chips and mix with the Kitchen Aid for only a few seconds to distribute them.

The original recipe also added 1/2 cup chopped nuts and 1/2 cup dried cherries. You can add either or both at the same time as the chocolate chips and enhance the loaf. Dried cranberries work well in place of the dried cherries. I've used both walnuts and pecans successfully but I suspect that hazelnuts or macadamia nuts would work well, too. I think almonds might be too crunchy, but you could try them, well chopped.

This recipe only uses 2 cups of shredded zucchini, so you may need to make it multiple times while those plants are producing zucchini like mad!

I'm fortunate to have found a four-pan mini-loaf baking pan at a thrift store, but disposable mini-pans are sold at many grocery stores and can be ordered online. The nice thing about mini-pans is that the breads bake more quickly and the small loaf makes a great gift for a neighbor, friend, or your local librarian.  If you use the mini-muffin pans, you can arrange them to make letters or numbers, frost with buttercream, and you have a unique 'cake' to celebrate a friend, a birthday or anniversary, or just to celebrate summer if you arrange them to spell sun!


CHOCOLATE  ZUCCHINI BREAD or MINI-CAKES with Chocolate Chips

based on a recipe by Tanita Davis & Robin Brande & Jama Rattigan

3 cups flour
1/4 cup unsweetened cocoa powder
1 tsp baking soda
1/2 tsp baking powder
1 tsp salt
1 ½ cups sugar
3 eggs or equivalent egg substitute
1/3 cup vegetable oil
½ cup plus 2 tablespoons plain yogurt
1 tsp vanilla
2 cups shredded zucchini (about 2-3 medium zucchini)
½ cup chocolate chips
½ cup chopped nuts  if using
½ cup chopped dried fruit  if using

Preheat oven to 350 degrees. Lightly grease two 9x5" loaf pans with canola spray. Alternatively, lightly grease 24 mini-muffin pans or 4 mini-loaf pans.

In a large bowl, combine flour, cocoa, soda, baking powder, and salt. Mix well. In a separate bowl, beat eggs (or egg substitute and water) with the sugar until well combined. Add oil, yogurt and vanilla. Beat to combine, then stir in zucchini. Add wet bowl to dry bowl and stir until just moistened. Stir in chocolate chips (and nuts and/or dried fruit if using).

Spoon evenly into pans. Bake 55-60 minutes or until toothpick comes out clean if baking in loaf pans. If baking in mini-muffin pans, bake 15.  If baking in mini loaf pans, bake 25-30.Cool 10 minutes in pans, then turn onto racks. This bread is yummy when eaten still warm...the chips are melty and the fragrance is full chocolate!

Wednesday, July 20, 2022

Early Tomatoes


The baby tomatoes on the tomato plant in my garden are still pretty small; about golf ball size. It's going to be weeks before we enjoy any of them.


Fortunately the farm stand near town had some lovely, large, ripe tomatoes this week. They had good flavor, even if they were a bit pale towards the center, and so we could enjoy them the way we like tomatoes best. Slices of tomatoes are arranged on a plate, sprinkled with garlic salt and pepper, drizzled with olive oil and balsamic vinegar, and showered with thin slices of fresh basil. 

I served them with fresh corn from the same farm stand, and with some grilled zucchini which were from our garden. Nice and summery and so delicious!

Sunday, July 17, 2022

Bread Baking Babes Create Croissants


This month I had some help with baking the challenge. Raine was interested in laminated dough, so he helped me make the dough, then later roll out the dough and spread the butter and make the first folds, then later roll out the dough and do more folds. I finished things up but it was sure nice to have his company for the first part of the baking. Too bad I missed the usual posting day, but a day late is OK.


Kelly of A Messy Kitchen has challenged the Babes this month to make easier crescent rolls using a recipe from Half Baked Harvest. If you like croissants but are not so sure you can make the classic recipe, give this one a try. It has lovely layers when baked and some shards of crisp-baked dough on the outside...perfect when you take a bite. It isn't as layered as the classic, nor as delicate, but it is certainly easier, faster (but not fast), and the croissants are delicious ! Use the best butter that you can find because this has a simple flavor profile, with the butter being the stand-out flavor. We used Mykonos plant-based cultured 'butter' and it was tasty, but I'm sure that a high-quality real butter would have had more flavor. If you don't eat them all in one sitting, you can refresh the crescents by baking them on a baking sheet briefly (1-5 minutes) in a hot oven right before serving them again.

Remember that laminated dough takes time...and cold. Make room in your freezer in advance for a baking sheet with your dough block on it. You may need to adjust the amount of time it sits in the freezer, or even have it in the fridge towards the end...it depends on if your butter is escaping or not.

If you follow this recipe you should be successful. I recommend using a scale to weigh your ingredients. You will likely get better results. Happy baking!

To be a Buddy, bake the croissants and then send Kelly an email with your URL and a photo of your bake by July 29th to be included in the round-up. She will send you a Badge. You can also post on our Facebook page so we can all congratulate you for joining us.

Also, be sure to visit the other Bread Baking Babes to see their take on this classic baked treat.


Easier Flaky Crescent Rolls

¼ cup warm water ~105-110ºF [60 grams]
2 ¼ tsp active dry yeast one packet [7 grams]
2 tsp sugar [8 grams]
¾ cup warm milk (not boiling) [183 grams]
1 egg
1 tbsp unsalted butter, melted or softened [14 grams]
1 tsp salt [6 grams]
3 cups all-purpose flour plus more for rolling [375 grams + more for rolling]
8 tbsp (1 stick/½ cup) salted butter, softened [113 grams]
1 egg beaten and or melted butter, for brushing

Instructions

In a large glass bowl or stand mixer, combine the warm water, yeast and sugar to dissolve the sugar and yeast.  Let the mixture sit for about five minutes until it is puffed up and foamy.

Add the warm milk, egg, 1 tbsp butter, salt and flour. Using the dough hook, a dough whisk, or your hands, knead the dough until it is smooth and elastic.  The dough will seem sticky at first, but it will eventually become smooth and springy.

Turn out the dough onto a floured work surface.  Lightly knead into a smooth ball.  Put the dough back in the bowl, cover and place in the fridge for 30 minutes.

After 30 minutes, turn out the dough onto a lightly floured surface.  Roll out a large rectangle that is about ¼-inch thick. Gently spread the 8 tbsp softened butter all over dough, leaving about an inch around the sides of the rectangle.

Fold the dough in thirds by folding one side of the rectangle towards the center and folding the other side over as well on top of the first layer so that there are three dough layers.  Carefully move the dough to a baking sheet, cover with plastic wrap and place in freezer for 7-10 minutes.  (If you find the butter getting too hard, chill for less time, especially on subsequent roll outs, and allow to warm up until butter is pliable.)

Roll the dough again into a long rectangle (being careful of the butter - if it is breaking, let it warm up for a while longer) and fold dough again into thirds like a book. Place back in freezer for 5-7 more minutes. Repeat this process two more times for a total of three folds (and 30 minutes in the freezer.)  (I ended up just going to the refrigerator for my last chill, the butter was hardening too fast.)

After the three folds, you can either go ahead and shape for baking or you can wrap your dough tightly with plastic wrap and place in the fridge overnight or up to three days.

To shape, roll the dough out on a lightly floured surface into a rectangle about ¼-inch thick. Using a pizza cutter or sharp knife, cut the dough in half lengthwise, cut the strips into triangles. Roll each crescent up using both hands.  Place on a lined baking sheet about 2-3 inches apart.  Cover with a tea towel and set in a room temperature place to rise for 30 minutes to 1 hour.  (Not too warm or the butter will melt and there will be fewer layers.)

While the rolls rise, position a rack in the middle of the oven and preheat to 400ºF.  Before baking, brush each crescent with the beaten egg wash. Bake rolls for 10-14 minutes or until lightly golden brown.  If desired brush with melted butter.  Serve warm with butter and honey or jam.


Remembering


Since the remembering and missing never quite goes away, this remembrance is to mark 23 years of it.

We were very lucky to have such a fine person as a son and to have the time with him that we did. Hard to believe that he would have been turning 40 in a few weeks. He brought joy to family and friends, had a loving personality and curiosity that wouldn't quit. Being in on the first surge of computers in everyday life, for the popularization of the Internet, and being able to go to college for computer classes while in high school are all things that you enjoyed. Soccer, Magic Cards, Rifts, and music were other loves.

Thanks for all your love, Max.

Friday, July 08, 2022

The Current Project


Sweetie likes to be busy. He has an incredible array of building skills...and of tools, both hand and power. We weren't sure what would be the next project to build, but finally decided on a shed for the refuse containers. First we were going to build a shed where they currently live, but Sweetie examined our old barn and determined that putting the shed on the south facing side would not only work well for the refuse containers, but would help hold up the barn if we experience an earthquake. The barn is probably over 100 years old. 


When we first moved in Sweetie rebuilt the woodshed on the west side (on the left in the photo above). Recently he built a shed on the east side for storage of electrical stuff, so this one on the south side means that the barn will have good support on three sides! Sweetie builds strong...to last.


In many ways these structures are Sweetie's art. He builds them with only a certain amount of planning and then takes a linear approach which allows for variations as needed as we move along in the project. I say 'we' because the last few days I have been the helper...holding the ladder, finding tools, holding the drill and screws while Sweetie readies the beam for fastening, going into the barn to retrieve the level...that sort of thing.  Raine did some of the hard stuff...removing the metal siding, lots of the digging and some rock moving.

I also helped dig out the trench for the drainage rocks and added sand and helped put down the weed block.

The base took quite a bit of time and is all covered up, but we know that it won't shift and will drain. Now we are making the frame (top photo). I think after that will come the roof and then the doors, but we'll see. There is talk of adding some shelving at the ends and an internal light...probably battery powered but maybe wired in. Since we are recycling some metal for the roof, it should fit right in and look like it belongs. And you won't see these containers:


I'll try to remember to post the finished shed when we get done.

Be sure to visit here on July 16th to see this month's Bread Baking Babes bread...it's a winner. 

German Pancake with Raine


It's fun to share recipe making with Raine. He seems to enjoy trying out new things and he really enjoys the results. Saturday morning we used up the rest of the berries in the house by putting them into a Dutch Baby or German Pancake...I suspect what you call it may depend on your first exposure to it.

This pancake is kin to clafouti, the French dessert with cherries. It puffs up dramatically in the oven, but then sinks down, so it is fairly dense, but tender. This version, made in a 9X13-inch pan, uses 6 eggs and a cup of both milk and flour, plus the fruit, a bit of sugar, a bit of vanilla, and some optional lemon oil.

You mix everything but the fruit and some butter in a blender. The butter goes into the pan and heats up in the oven while you blend the batter. The fruit gets scattered over the batter once it goes in the pan. The magic happens in the oven where the fruit and batter cook, the batter puffs up, and it all flavored by the butter, which has browned a bit while waiting for the batter.

Once your have your ingredients together, it all goes fairly quickly, with the pancake taking about 18-24 minutes, depending on your oven. I like it served with more fruit but maple syrup and whipped cream are always great accompaniments, too. Some people swear by lemon juice and a sprinkle of confectioners sugar instead. Try each and find your favorite!


German Pancakes with Berries

Serves 5-6

5 tablespoons butter (or non-dairy margarine or 'butter')
6 large eggs
1 cup milk (or nut milk)
1 cup all-purpose flour
dash salt
1 teaspoon vanilla extract
a few drops lemon oil (optional)
1 cup fresh mixed berries, washed, dried, and hulls or stems removed. Larger berries can be diced
1 tablespoon granulated sugar (optional)

Preheat oven to 425 degrees F.

As oven preheats, put the butter in an ungreased 9x13-inch baking pan and place in the oven, just until the butter is melted. (Mine started to brown slightly at the edges)

Place the eggs, milk, flour, salt and vanilla, (and lemon oil, if using) in a blender and process until smooth. Scrape down the sides, if needed, and process again for a few seconds.

Pour the batter into the hot baking pan, over the melted butter. Sprinkle with the berries and with the sugar (if using).

Bake, for 20-27 minutes or until edges are golden brown. Pancake will puff up, but will sink down again as it cools once removed from the oven.

Serve at once. Can sprinkle with powdered sugar, with lemon juice, or serve with maple syrup and/or more berries.

Note: you can make this without berries, too, and it will still puff up gloriously and taste wonderful.

Sunday, July 03, 2022

On Safari


No, I didn't actually go to Africa, but this past week I did go with Sweetie and our grandson to a local nature preserve, Safari West.

The experience is so different than going to a zoo. The animals have acres to roam in but are safe as well due to many fences. The staff tend to them at least twice a day, which is especially needed now. We are in the third year of a severe drought so their natural food supply is constantly supplemented as needed.


We got around, veeerrryyy sloooowly, in a old vehicle that had been outfitted with three long seats behind the driver, plus another one on top of the canvas roof...supported by sturdy metal pipes. The seats are stair-stepped up so everyone has a good view. We were in the last seat so we were in the shade and as high up as you could be without being on the roof seat. It was 93 degrees, but there was a nice breeze, so it wasn't too hot. I think that part of the reason that we went so slowly was to not disturb the animals more than necessary...plus the vehicles were old.


Turns out that many of the animals have babies in May, so we were able to see the parents and their young. For up close viewing, the giraffe enclosure was probably the best, but Sweetie enjoyed the Cape buffaloes. I enjoyed the antics of the female emus (or ostritches...it was hot)...they just wanted to flirt and be admired. 


Below are some photos of the animals. I confess that I didn't take notes, so I'm not going to identify them. I would probably get it wrong!


I think the last two are an African White Rhino and a zebra that has both black and beige stripes...never seen either of those before.

If you are going to be in the Santa Rosa, CA area (an hour north of San Francisco), do consider visiting this safari park. Their animals and birds are primarily from Africa so that saves you a trip there, in a way. If you want to hear the animal sounds at night, they also rent out tent cabins, plus they offer meals and specials. Their Safari West website has all the deets. 


I have to say that our guide was amazingly informative and probably had volumes more information in her head if we had asked other questions. This place is a class act and well worth a visit!


There were also birds and fish. Below are a black swan, flamingoes, and koi. There were others, but we skipped the final part where we would have seen more birds and some other small animals...I was overheated by then. If you can go in the morning.