Monday, June 27, 2016

Visiting Cake


When you have a really, really good cookbook, like any wonderful work of art you return to it over and over throughout the years and discover new things. For me Dorie Greenspan's 2006 Baking: From My Home To Yours is such a cookbook. Well written, flawless recipes, beautiful photographs, and the 'Playing Around' feature with suggestions for how to give the recipe a new twist are all so appealing. Best of all these are baked goods that you just want to eat!

This past weekend we went visiting and stayed overnight at Natashya's home  near Sacramento. Saturday morning I woke up early and baked a Swedish Visiting Cake from Dorie's book. I baked it in a pie pan and, truthfully, it almost didn't make the trip because it smelled so wonderful that Sweetie and I wanted to eat it as soon as it came out of the oven!

This is a simple cake, one layer and not a tall layer either. The top is golden with a darker crispy edge and a scattering of sliced almonds and sprinkle of sugar to dress it as much as it's dressed. It's the combined fragrance of lemon, vanilla and almond that make it so irresistible. We had some with tea and coffee in the afternoon and it was enjoyed by all.

You can make this cake pretty quickly. By the time your oven has preheated, you can have warmed the eggs in a bowl of water, melted the butter (or margarine in my case) in the microwave, zested the lemon and mixed it with the sugar, whisked the batter ingredients together and folded in the flour and butter. It only takes about 20-25 minutes to bake and is ready 5 minutes later. Remember this one when you get a hankering for a quick cake that tastes divine. Remember it, too, when you are going visiting. I can assure you that it would be a hard hearted hostess who could turn this cake away.


Swedish Visiting Cake
from Dorie Greenspan's Baking: From My Home to Yours
Serves 8 - 10

1 cup sugar, plus a little more (1-2 teaspoons) for sprinkling
Grated zest of 1 lemon
2 large eggs
1/4 teaspoon salt
1 teaspoon pure vanilla extract
1/2 teaspoon pure almond extract
1 cup all-purpose flour
1 stick (8 tablespoons, 4 oz.) margarine, melted and cooled
About 1/4 cup sliced almonds

Preheat the oven to 350 degrees F. Butter a seasoned 9-inch cast-iron skillet or other heavy ovenproof skillet, a 9-inch round cake pan or pie pan.

Pour the sugar into a  medium bowl. Add the lemon zest and blend the zest into the sugar with our fingers until the sugar is moist and aromatic. Whisk in the eggs, one at a time, until well blended. Whisk in the salt, vanilla and almond extracts.

Switch to a rubber spatula and stir in the flour. Then fold in the melted butter. Scrape the batter into the prepared pan and smooth the top with the rubber spatula. Scatter the top with the sliced almonds and the extra sugar. I also used about a 1/2 teaspoon of sparkling sugar for extra crunch.

Bake the cake for 20 - 30 minutes, or until it is golden and a little crisp on the edges. The inside will remain moist, even slightly damp. That is OK.

Remove the pan from the oven and let the cake cool for 5 minutes. It will be a fairly flat cake. After the five minutes have passed, run a thin knife around the side and bottom of the cake to loosen it. I used a small offset spatula to loosen the bottom since I was transporting the cake in the pan.

You can serve the cake warm or cooled, directly from the pan or turned out onto a serving plate.


Well wrapped, this cake will keep for about 5 days at room temperature or for up to 2 months in the freezer. Good luck on getting it to last that long. Hard not to eat the whole thing at one go after the first 5 minutes of cooling...it smells that good.

Sunday, June 26, 2016

Garden In Late June


Today when we got home from an overnight visit to Wilton, near Sacramento, the squash plants had produced another 7 very large zucchini squash.


The garden is looking so great right now. I also harvested another handful of snow peas and noticed that some of the pumpkins are getting bigger. The photo above is of both pumpkin and zucchini plants plus the very energetic morning glories I planted from seed I gathered last year.


The pumpkin plants by the climbing rose and lemon tree will probably need to come out because they are taking over the area and spilling well on to the sidewalk to the barn. I'm going to see if a neighbor wants them. I think some of them might transplant OK even though they are getting big.


The poppies are giving lots of color to the bed by the front porch. I love seeing what blooms each morning.


Just wanted to share some of the photos I took on Saturday morning. Quite a change from a month ago. back by the red rose are the snow pea plants. We'll be getting beans in a week or so from plants just to the left of the snow peas, and the cucumbers are finally growing strongly, so maybe mid-July for the first cukes from the garden.


Happy Summer!

Monday, June 20, 2016

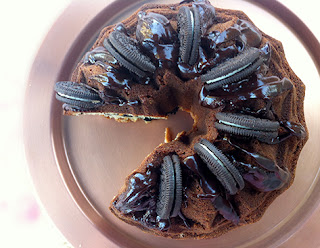
Gilded With Oreos


Perhaps you have heard the phrase, 'gild the lily' which seems to me to mean taking something beautiful and either making it more beautiful or trying to. This month the Cake Slice Bakers had our usual four cakes to choose from and I chose one that seemed to be a case of gilding the lily.

When I saw the choices for the June cake for the Cake Slice Bakers I was pretty sure that I would go with the Oreo Cookie Cake. Once I knew that there would be at least three of us to eat it for Father's Day, it was just what I want to make and to eat. Best laid plans and all that. I made it but didn't eat any because I completely had a brain fart and made it with unsalted butter, instead of the dairy-free margarine I had planned on. This was not easy to do since the two sticks of butter had to sit out on the counter for a while to soften. Not sure why I thought about it after I had beaten the batter together, but at least that kept me from trying the batter out as I often do before putting it in the pan. It smelled so good as it finished baking that I almost gave in and had some anyway...but didn't.


The good news is that since we had so much and one less person to eat it, we persuaded our friends from the farm to help us out. Such a difficult task helping us consume some of this rich, sour cream pound cake laced with chunks of Oreo cookies! To doll it up I made some ganache with a touch of bourbon added and used it as a topping and to hold halved Oreo cookies for garnish. Then we added some whipped cream as slices were served, since Sweetie said it was a little dry (and because as long as you are gilding the lily, might as well go all-out!) Everyone finished every crumb, so you know this is a keeper recipe. Next time I'll make it with margarine!

 Thanks dear friends from Spoiled Rotten Farm for helping us with the cake, and glad to hear that it is even better with morning coffee! I knew that giving you some to take home was the right thing to do.

Happy day after Father's Day , a day late, to all you Dads who enjoy cake!


Oreo Cookie Cake
from Maida Heatter's Cakes
Serves 16

14-15 Oreo sandwich cookies
2 3/4 cups sifted all-purpose flour
1/2 teaspoon salt
1 teaspoon baking soda
8 oz. (2 sticks) unsalted butter at room temperature
1 teaspoon vanilla extract
1/4 teaspoon almond extract
1 1/2 cups granulated sugar
3 eggs
1 cup sour cream
Optional - ganache and more Oreo cookies, cut in half, for garnish

Preheat oven to 350 degrees F. Butter a tube pan and dust all over with fine, dry breadcrumbs. A fancy tube pan or Bundt pan with a pattern, which holds 10 to 12 cups is best. Invert pan over paper and tap out excess crumbs. Set pan aside.

Place the cookies on a cutting board and carefully cut them into quarters with a sharp knife. Some will crumble. That's OK. Set aside.

Sift together the flour, salt, and baking soda and set aside.

In a large bowl of a stand mixer, beat the butter until soft. Add the vanilla and the almond extracts and the granulated sugar and beat to mix well. Add the eggs, one at a time, making sure that each egg is fully incorporated before adding the next one. Scrape bowl and beaters as needed now and throughout the batter making process.

On low speed add the dry ingredients in three additions alternately with the sour cream in two additions. Beat only until incorporated after each addition.

Place about 1 1/2 cups of the mixture by heaping teaspoonfuls in the bottom of the prepared pan. Smooth with the bottom of a teaspoon. Using the same spoon bottom, form a trench in the batter.

Add the cut up Oreo cookies to the batter remaining in the mixing bowl. Fold them in very gently, folding as little as possible just until mixed with the batter.

Place heaping spoonfuls of the Oreo batter into the pan over the plain batter. Smooth the top and smooth some of the batter up the sides of the pan.

Bake for 1 hour, until a cake tester inserted gently into the cake comes out clean and dry. Don't worry about any cracks in the top of the cake. It's OK.

Cool in the pan for 15 minutes, then cover the pan with a cooling rack and turn the cake over. Remove the pan and let cake cool on the rack.

Serve as is, with a dusting of confectioners' sugar, or drizzle with a nice ganache (see recipe below). Decorate with more Oreo cookies cut in half.

Ganache
4 ounces bittersweet or semisweet chocolate, finely chopped
3 ounces heavy cream

1 tablespoon bourbon

Set the chopped chocolate in a mixing bowl.

Pour on the cream and mix well.

At half power in the microwave, heat the mixture for a minute. Stir well. Repeat until the chocolate is melted and the mixture is smooth. Stir in the bourbon. Let the ganache stand and firm up to thick pouring consistency before using.

Thursday, June 16, 2016

Babes Bodacious Bran Bread


Yes, the 16th of the month has rolled around again...it sure seems to go fast...and today our kitchen of the month, Lien of Notitie van Lien has gathered us around the kitchen table and encouraged the Babes to bake a loaf or two with quite a bit of bran in it.


I used wheat bran and whole wheat flour, as well as unbleached bread flour. Not only did I add golden raisins, but I put in chopped walnuts. If the bread has a pink tinge, you can blame the walnuts. There is some chemical reaction that causes it. It doesn't affect the taste any, but the first time I baked yeast bread that included walnuts I was pretty surprised to cut into it and find that pinky-purple tint.

The amount of water in this recipe is pretty variable. I used 100 grams to soak the bran and another 100 in the first part of the dough, plus some more for proofing the yeast. It was too much, so I ended up adding quite a bit of bread flour while doing the kneading. It was still a pretty slack dough, so I decided to make one large round loaf instead of two regular loaves. It worked out fine except for the fact that the weather heated up at a rapid rate and I didn't realize it. I was at the computer in my bedroom, which is on the north side of the house and stays cooler. When I went to check on the dough in the pan at the correct time, it had overproofed. I put it into the preheated oven right away and it was still a wonderful, moist, tasty loaf, but it didn't have any oven spring and had a flat top, so not as pretty as some. Sweetie really enjoyed this one and it stayed fresh tasting for a week! With just the two of us to enjoy this bodacious bran bread, it take a while to eat it. I enjoyed it toasted the most and Sweetie really like the French Toast I made using it.


Please consider baking this great bread and becoming a Buddy by e-mailing Lien with a photo and a short description of your baking experience with this recipe. She will send you a Buddy badge and include you in the round-up.

Be sure to check out the other Bread Baking Babes, too, with links below. You will see loaves much nicer looking than mine and more inspiration for becoming a Buddy.
A Messy Kitchen - Kelly
Bake My Day - Karen
Blog From Our Kitchen - Elizabeth
Bread Experience - Cathy
Judy's Gross Eats - Judy
Karen's Kitchen Stories - Karen
My Kitchen in Half Cups - Tanna
Notitie van Lien - Lien


Bran Bread
(makes 2 small loaves or 1 large)

500 g whole wheat flour (I used half whole wheat and half unbleached bread flour)
300-380 g water
50-100 g (organic) wheat bran (1 used 75 g)
+ Extra water for the bran (± 2 g water per 1 g bran)
7 g instant dry yeast
1 TBsp honey
30 g margarine (or butter)
1.5 tsp fine salt
50 g water
100 g walnuts (or other nuts), coarsely chopped
100 g golden raisins

Mix the yeast with 3/4 of the water,  honey, margarine, additional 50 g water. Let sit 10 minutes. Mix the bran with the additional water in a small microwave safe bowl. Microwave on high for 45 seconds. Let mixture sit until cool. Take the cooled bran and put into the bowl of a stand mixer, add some of the WW flour, salt and start mixing it adding the rest of the WW flour and if needed the rest of the water. Don't put everything in at once, you can always put more in later when the dough is almost ready. The dough has to be moist and sticky

As the bran in the flour and the added bran take time to absorb the water, leave the mixture to rest for about 10 minutes. Now check the consistency and decide if there is more water needed. Start kneading the dough, the dough should not be very sticky after a minute or 6 Add additional flour if necessary
.

Put the dough in a lightly greased bowl, cover and leave to rise for about 1 hour.

While the dough is rising: Soak the raisins for about 20 minutes in lukewarm water, pat dry with a kitchen towel and leave them on a dry tea towel to dry a little further. If you use nuts you can do the same, the soaking time will be longer about 40 minutes.

Turn the dough out on a lightly floured surface and press or roll it out flat in a big oval. (Mine was so sticky that I used floured hands to flatten it and a dough scraper to mix in the nuts and raisins as they were added. Divide 1/2 of the nuts and/or raisins over the dough, fold the dough in two, press or roll out again and sprinkle on the remaining nuts/raisins. Roll the dough (jelly roll style) and divide in two. Or make one whole mass of dough as I did.

Take one half and place it on the counter and press the escaped nuts/raisins back in the dough, press it down a little and shape it to a round, without working the dough, but by rolling it between your cupped hands on the surface. Repeat with the second half of the dough and place the dough balls on parchment paper. You can also shape the dough into a log and place it in a greased baking tin. My dough was so slack that I patted it down with floured hands to help the gas escape, then used a dough scraper to mound it and two dough scrapers to transfer the mass of dough to a greased round 9"x3" cake pan.

Now cover with lightly greased plastic plastic. Let it rise for about 45 minutes in a warm and draft free spot. Check if it's ready to bake by pressing a floured finger in the dough, it the dent springs back, leave it to rise longer, if the dent doesn't disappear, it's ready to bake.

Preheat your oven (preferably with an oven stone and a metal tin on the bottom of the oven) to 200ºC (400ºF).
Make slashes in the dough and put them in the oven (on the stone if you have it), pour some water in the metal tin to create steam and quickly close the oven door. Bake for about 30-40 minutes. Check the temperature of the bread (95ºC/200ºF) to be sure it is cooked.If the top gets too dark before the bread is done, cover with tin foil. Take the loaves out and leave to cool completely on a wire rack.

Sunday, June 12, 2016

The Big Berries That Come In First


Every year the berries down the driveway, near the road, are the first to flower and the first to bear ripe fruit. They are also the biggest berries of the season.


 Since they were here when we moved in I really don't know the variety, but I suspect that they are boysenberries. What I do know is that they are juice and sweet and have an intoxicating fragrance. This year since we had enough rain over the fall and winter they are also prolific. I have already picked a half dozen pints and have barely made a tiny dent in the number available right now, ripe and soft and full of juice. There are also many hundreds that have just begun to get red, and some still green. I may even make jelly this year there are so many!


One of the easiest ways to bake with these berries is to make a cobbler. The fruit gets mixed with a bit of sugar, if needed, and some lemon zest or orange zest and then cooked in the oven until hot. A cobbler mixture, which is just biscuit dough and sugar with a little extra milk or water, is spooned over the hot berries, then the whole thing is baked until the topping is golden brown and the berries' juices are bubbly. If you like you can sprinkle on some sparkling sugar for a bit of shine and crunch on the topping. Be sure to let the whole pan cool down just a bit before serving because those juices can burn your tongue! Been there and done that.

I like to serve my cobbler with a scoop of ice cream. This time I used a nice soy based, non-dairy vanilla from Double Rainbow. The cold ice cream makes a nice contrast to the hot cobbler.


Boysenberry Cobbler
Serves 4-6

1 1/2 to 2 pints boysenberries, washed and drained (or you can use blackberries)
sugar to taste
1/2 teaspoon lemon or orange zest
Your favorite biscuit recipe, with 2 tablespoons brown sugar added and an extra 2 tablespoons milk
(I used soy creamer instead of milk)

Preheat oven to 400 degrees F. Grease a small baking pan. (I use a ceramic one that holds 4 cups)
Place the berries in the prepared pan and sprinkle with the sugar (if needed). Cover pan with foil and bake 10-15 minutes. Fruit should be hot and have release some of the juices.

While fruit is baking, mix together your biscuit recipe, adding the brown sugar to the dry ingredients and the extra milk to the we ingredients. The end result should be drop biscuits with dough that falls off a spoon.

Remove fruit from oven and uncover. Drop mounds of the dough evenly over the hot fruit, leaving some space where the fruit peeks through. If desired sprinkle 1-2 teaspoons sparkling sugar over the dough. Uncovered, return the baking pan to the oven and bake about 20 minutes until the topping is golden brown and the juices are bubbly.

Let cool 5 minutes, then serve. Garnish with a scoop of ice cream or whipped cream if desired.


Last, but not least, here is a photo of an intense red poppy in my garden:


Sunday, June 05, 2016

Apricots and Berries


We have reached one of the great times of year for a baker. The first of the stone fruits are coming into the markets. Ripe, fragrant apricots, tender and juicy white nectarines, regular nectarines, peaches - both regular and white, are all ready to be turned into pies, crisps, buckles, muffins, and tarts, to name a few. Cherries are ripe, too. Here is a photo from our local farm stand. Don't they make your mouth water?


We are also beginning to have wonderful berries. Our local strawberries started late this year and my boysenberry shrubs are just now producing ripe king berries.

The garden has been growing like crazy. The only produce we have harvested is the zucchini, but today we found all three kinds ready to pick...dark green, light green and yellow. Will probably have them grilled tonight! My lovely poppies have started to bloom, too. At the top of the post are two that just opened yesterday. Aren't they lovely?


Recently I surprised Sweetie with an apricot and strawberry gallette, which is a free form pie. I used store-bought pie crust and just rolled the round out a little more so that some of the dough could be folded up over the fruit filling. At the bottom I sprinkled a layer of ground almonds and sprinkled that with about a tablespoon of flour. I knew that the strawberries in particular would produce a lot of juice and hoped that the nuts and flour would soak them up some. Well, good plan, but I needed more because the juice broke through cracks in the dough and created a pool to either side of the gallette. Not a problem. I put the gallette on parchment so we just scraped up the cooked juice when we served up our portions.

This was really tasty and, perhaps, the essence of late spring.


Apricot Strawberry Gallette
Serves 4-6

1 pie crust round, either home made or store-bought
about 1/3 cup ground almonds (or whirl some almonds in the food processor with 1 tablespoon sugar until finely ground. The sugar keeps it from turning to paste.)
1-2 tablespoons flour
4 ripe apricots, washed, dried, seed removed and cut into 1/8ths
1/2 pint strawberries, washed, dried, hulled and sliced
2 tablespoons sugar
a few drops almond extract
water
Sparkling sugar (optional)

Preheat oven to 425 degrees F. Line a baking sheet with parchment paper. Set aside.

On a lightly floured surface, roll the pie crust 2-3 inches wider than needed for a 9" pie. Transfer dough to parchment paper on baking sheet. Draping dough over rolling pin works well for moving it to the baking sheet. Put an even layer of the ground almonds in the center of the dough, leaving about three inches around the edges with no almonds. Sprinkle the flour evenly over the almonds. Set aside.

In a medium bowl mix the prepared apricots and strawberries, the sugar and the almond extract. Pour this mixture into the middle of the prepared dough disk. Make sure that fruit goes over all the ground almonds, but not into the plain dough. Mound fruit in center. Gently pull plain dough up over the fruit, pleating as needed as you go around the disc. Use water on your fingertip to seal the pleats if necessary. Use a little more water (or some milk) brushed over the top of the gallette to help it brown and to hold a sprinkling of sparkling sugar, if desired.


Bake in preheated oven for 20 minutes, or until pastry top is golden brown and juices are bubbly.
Serve after cooling 5 minutes or cool completely, then serve.