Saturday, September 28, 2024

Tomato and Zucchini Tart


Because we had a late spring and the soil didn't warm up until weeks after I usually plant, we are also having a late harvest. Finally I'm getting ripe tomatoes! To celebrate I made a fresh tomato and zucchini tart. Although I was inspired by a recipe I found in the newspaper, I made so many changes that it really is a new recipe.

First I started with a pre-made pie crust found in the refrigerator case in many grocery stores...Pillsbury ReadyCrust. It comes two to the box, but I only used one. That single round of pie dough was placed in a 9-inch tart pan with a removable bottom. The dough came up higher than the sides, so I folded that down to make a double thickness side for the tart. I pricked the bottom with a fork, all over, and then pre-baked at 425 degrees F for 10 minutes.

While the tart crust was cooling, I sliced the tomatoes into 1/4-inch thick slices, cutting off a bit of the top and bottom, then slicing through horizontally, not stem end to bottom.  The zucchini was sliced at the same thickness on the diagonal. The slices were spread on a double layer of paper towels and sprinkled with salt. Another layer of towels went on top and I let them sit for at least an hour to get rid of the excess moisture in the veggies.

For the filling I used Boursin cheese and some egg white. The cheese comes with herbs and garlic already blended in and the egg white makes the consistency just right.

If you have large tomatoes, you may only need one slice from the middle of the tomato, and then smaller zucchini slices or half slices can go around nearer to the tart edge. Just see how your veggies are. My tomatoes were pretty small, although very flavorful, so I put multiple slices all around the outside edge, then filled in the middle with the zucchini. A sprinkle of black pepper is optional.

The final piece is the topping, which is a combination of olive oil and dry bread crumbs and pine nuts.

The finished tart doesn't get baked very long...just long enough to cook the egg white and soften the zucchini a bit. It's a thin, savory tart, but with very intense flavor and quite delicious. Do try it!


Summer Harvest Veggie Tart
Servings: 6-8 

Ingredients
2-3 small tomatoes. If using large heirloom tomatoes, you only need one

      1 small zucchini (about 6-inches)

·      Fine salt

·      about 2.5 oz. (half the package, 75 grams) Boursin cheese herbs and garlic flavor

·      1 egg white from a medium or large egg (reserve yolk for another use)

·      One circle pie dough - I used half a package of Pillsbury ReadyCrust, at room temperature

·      2 tablespoons extra-virgin olive oil, divided           

3     3 tablespoons dry breadcrumbs

       3 tablespoons pine nuts

Directions

 Using  a very sharp knife, cut the tomatoes, and zucchini into thin slices, about 1/4-inch thick. (Cut the tomatoes parallel to the equator and the zucchini slightly on the diagonal.)

 Line a large sheet pans with double thickness paper towels;  Place the sliced tomato slices and zucchini slices on top, and lightly sprinkle with salt on both sides to draw out moisture. Cover with more paper towels to absorb the released juices.  Let the vegetables sit for about 30 minutes to draw out the maximum moisture.

 Prepare the cheese filling by mixing the Boursin cheese with the egg white in a small bowl. Set aside.

 While the vegetables rest, position a rack in the middle of the oven and preheat to 425 degrees F. Line a 9-inch tart pan with a removable bottom with the circle of pie dough. Double the thickness of the sides by folding the excess pastry down on the inside and press the pastry against the sides of the tart pan. Prick the bottom with a fork, then put the pan in the freezer for 30 minutes to chill and firm up.

7.    Remove the pastry-lined tart pan from the freezer and bake in the preheated oven for 10 minutes. Cool on a rack for 15 minutes. Reduce oven temperature to 350 degrees F.

       Spread the prepared cheese mixture over the bottom of the pastry. Use a small offset spatula or the back of a spoon to level the cheese mixture.
    

       Arrange the tomato and zucchini slices in a pattern on top of the cheese filling. If you have a large heirloom tomato slice, that might go in the middle, surrounded by zucchini slices. I did a circle of small tomato slices, with zucchini slices in the middle. Sprinkle with ground black pepper, optional.

       Bake the tart at 350 degrees F. for 10 minutes. While the tart is baking, stir together 1 tablespoon of the olive oil, the breadcrumbs, and the pine nuts.

       Remove the tart from the oven after 10 minutes. Use a pastry brush to brush remaining 1 tablespoon olive oil over the pastry, the vegetables and filling. Use the breadcrumb mixture to fill in any spaces not covered by vegetables, plus scatter any leftover over the vegetables. Return tart to the oven and bake another 10 minutes or until the crumbs are a bit crispy and the pine nuts are golden browned.

1     Let tart cool ten minutes on a rack, then unmold by pushing the bottom up. Slide the tart off the pan bottom onto a serving plate and serve, either still warm, or at room temperature, in wedges.


Monday, September 16, 2024

Bruschetta


It may be past the height of tomato season where you live, but if you can still find vine ripened tomatoes with true tomato flavor, do try these s. So what are bruschetta? You take slices of bread...baguette is good, a well made hearth bread or sourdough loaf is also great...and you toast them. If you're slicing the bread yourself, slice it fairly thinly to make it easier to bite. About an hour or two before you want to eat these, mix together the tomato mixture to allow the flavors to mingle. Right before you are ready to serve, put the toasted bread slices on a plate or platter, spoon the tomato mixture on top, garnish, if desired, with a small basil leaf and serve right away. Doing the topping part at the last minute ensures that the bread will be crunchy, a nice contrast to the softer  tomatoes.

You get the most delicious appetizer or small plate food...toasty, olive oil enhanced bread topped with a tangy, tantalizing tomato mixture that brings the tastes of summer and harvest home. You might make a few extra. It's hard to stop with just one or two.


Bruschetta for Two

4-6 1/2-inch slices baguette or other flavorful, firm bread
1 medium to large fresh, ripe tomato, preferably heirloom
1 tablespoon best quality olive oil
1 clove garlic or roasted garlic
3-4 leaves fresh basil
salt and pepper to taste

Brush the bread with olive oil. Toast the bread slices to a golden brown color. If possible, use a grill to toast them.

Chop the tomato into very small dice and place in a medium bowl, keeping as much tomato juice as possible with the tomatoes. Add the olive oil, mince the garlic and add, finely chop the basil and add it to the bowl.

Stir the tomato, oil, garlic and basil together. If possible, cover and let sit in the fridge for 2 to 24 hours. 

When you are ready to serve the bruschetta, warm the toasts, place them on the serving platter and top each with about a tablespoon of the tomato mixture, including some of the juices. If you have a few tiny basil leaves you can garnish the bruschetta with them. Add salt and pepper to taste...although you may not need any. Serve at once.

Saturday, September 14, 2024

Raspberry Cream Pie with Lemon


 If you have followed this blog for any length of time you know that I like to make special baked goods for Sweetie, my husband. His favorite is pie. A number of years ago I baked a Banana Cream Pie that he really loved. The hardest part is making the pastry cream because it takes a while and you have to stir the whole time.


This week I decided to make a variation of that recipe but to use fresh raspberries, since I still have quite a few. I found a container in the freezer that had about a cup of this lemon filling, so I thawed that out and beat it with a small whisk until it was smooth, then put that in the bottom of the blind-baked pie shell. Instead of bananas, I put a layer of fresh raspberries that had been rinsed and patted dry with paper towels. (photo above)


Next the barely warm pastry cream was poured in (although there was about a cup left due to the use of the lemon cream filling on the bottom) and then I placed, one by one, raspberries around the outer part of the pie for three rows, then two rows in the very center. This left the middle strip plain, but I like that contrast.


Because this pastry cream has gelatin for thickening, the pie rested in the fridge for three hours. Firmed up enough to be cut, all that was left was to glaze the berries on top with a little raspberry jam which I had strained and then heated up. I had wanted to have whipped cream on the side, but ran out of energy since by now it was late in the evening. It was still an amazing dessert!


You can also make this pie without the lemon filling. Just put about a cup of the pastry cream on the bottom, scatter about a cup to a cup and a half berries over in one layer, then put the rest of the pastry cream over the berries and add the decorative rows to the top, plus glaze. It will be easier and still delicious.


Raspberry Cream Pie

1 envelope unflavored gelatin (7 grams)
1/4 cup cold water (60 ml)
1/2 cup + 2 tablespoons sugar (130 grams)
1/2 cup all-purpose flour (70 grams)
1/4 teaspoon salt
5 egg yolks
2 1/4 cups full fat milk or 1/2 & 1/2 (I used soy creamer)(562 ml)
1 teaspoon vanilla
1 tablespoon almond liquor

1 cup lemon pie filling
2 pints fresh raspberries, rinsed and patted dry with paper towels
1 9-inch blind baked tart or pie crust, cooled to room temperature (I used 9-inch pie pan and Pillsbury ReadyCrust pre-made pastry dough rounds)
Glaze: 3 tablespoons raspberry jam
whipped cream for garnish, if desired

To make the cream filling:

Soak the gelatin in the 1/4 cup cold water

Put the sugar, flour and salt into a saucepan and stir together with a whisk. Add the yolks and enough milk to make a paste. Whisk in the remainder of the milk.

Place the pan over low heat and, stirring constantly, cook until thick. Remove from the heat and stir in the  gelatin and stir until thoroughly combined and gelatin is dissolved. Pour into a mixing bowl.

Stir in the vanilla and almond liquor. Set the mixing bowl in cold water and stir until the cream mixture is cool.


To make the pie:
Place a layer of lemon pie filling over the bottom of the blind baked tart or pie crust. Scatter 3/4 pint fresh raspberries over the filling. Pour in the cream filling to cover the berries and fill the pie shell. Refrigerate any remaining filling and save for another use.

Smooth the filling with an offset spatula, then put another layer of fresh raspberries over the filling in a nice pattern, using the rest of the berries.


Chill 2 3/4 hours. Heat 3 tablespoons raspberry jam in a small pot or in the microwave in a microwave safe small bowl. Pour into a small bowl through a fine mesh strainer. Use a small pastry brush to glaze the berries with the heated and strained jam. Return to the refrigerator and let the glaze set, about another 15 minutes.

Garnish with whipped cream, if desired.

Serves 8


Wednesday, September 11, 2024

So Many Raspberries


A friend of mine invited me to pick raspberries from her garden last weekend. We picked for a little over an hour and I ended up with six pints of beautiful ripe red raspberries. They smell heavenly if you love raspberries like I do. The first pint was eaten fresh that day, first in a lunch fruit bowl with peaches and then in a kale and broccoli and Brussel sprout slaw salad for dinner. That left me with five pints  to play with...and then I came down with a summer cold or flu or something and was out of action for a couple of days.

The raspberries weren't getting any better for the wait, so I made a bar cookie with them, a variation of an old favorite recipe that you make in a saucepan. They turned out really well, with a moist, almost cake-like texture and just a hint of almond flavor in the batter, plus the rich flavor and fragrance of raspberries, and the delight of sliced almonds. The sparkling sugar gave the tops a bit of crunch and sweetness. If you prefer, you could give them a glaze of lemon juice and confectioners sugar. Since you bake these in a 9" x 13" pan you get quite a few cookie bars.


Fresh Raspberry Saucepan Fruit Bars

1 cup butter, melted
1 1/2 cup sugar
2 eggs
2 cups all-purpose flour, sifted
½ teaspoon baking soda
½ teaspoon salt
1 teaspoon almond extract
¼ cup buttermilk
1 pint fresh raspberries, rinsed and blotted with paper towel, divided
1 tablespoon sliced almonds (optional)

1 tablespoon sparkling sugar (optional)

Melt butter in saucepan. Add sugar and stir to combine. Cool mixture, then add the eggs; beat well. Add sifted dry ingredients, almond extract, and buttermilk and mix well. 

Take 12 - 18 of the berries and reserve. Stir rest of fruit into the batter, gently. Spread batter in greased 9” x 13” pan, making top as level as possible. Fruit may break up a bit when you spread the batter...that's O.K. Distribute the reserved raspberries over the top of the batter. Scatter almonds and sugar evenly over batter, if using.

Bake in a 350 degree F. oven for 25 minutes or until tester inserted in center comes out with a few moist crumbs. Cool in pan. Cut into 2” x 1” bars or into squares. If desired, omit the sparkling sugar. When the bars are cool, drizzle with a glaze made from 1/4 cup confectioner's sugar and as much fresh lemon juice as needed to make a drippy glaze. Let glaze harden before serving.

Tuesday, September 10, 2024

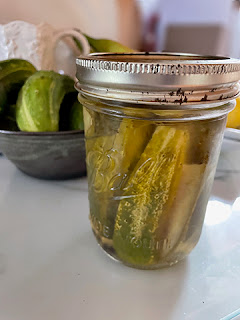
Dill Pickles


I'm not a big fan of dill in general, but I do love dill pickles. Go figure.


This year I planted some cucumber seeds and found that the cukes were perfect for making pickles. They are between three and five inches long and about an inch and a half in girth. Their skin is thin but bumpy. I'd planted enough so that we were getting a couple or three cucumbers a day during the spells when it wasn't blazing hot, then it would ease off a bit while very hot, then more would set when it cooled a bit. What that meant was that I didn't want to can pickles because the whole thing with a boiling water bath, etc. doesn't make sense for one jar of pickle.

Refrigerator pickles, on the other hand, work well. I searched recipes and finally figured out one that worked for me. Most had white vinegar and some mustard or mustard seed, but I wanted to use apple cider vinegar and skip the mustard.

My final recipe is below. It made enough brine for a quart jar full of raw pickle quarters, plus dill weed and a few peppercorns. After a week in the fridge I tried one and was delighted that it was a true dill pickle spear; sour and crunchy and fully dill flavored. That it was also easy meant that I was able to do it a couple more times when we have an abundance of cukes. These pickles are only meant to last about three months or less. My first batch, which I finished today, lasted about three weeks!


Dill Pickle Spears

Fresh pickling cucumbers, washed under cold water and drained
fresh dill
a few black peppercorns, whole
brine

For the brine:
1/2 cup apple cider vinegar
1/2 cup water
1 tablespoon sea salt
1 teaspoon granulated sugar 

Trim the ends off the cucumbers and cut into spears by cutting in half lengthwise, then cutting each half in half lengthwise.

In a clean quart jar place the quartered cucumbers, standing on a cut end, packing them in tight. I used three fairly long cucumbers. Push pieces of the fresh dill down among the quarters and add a few black whole peppercorns to the jar. They will end up at the bottom. That's OK.

In a small pot bring the apple cider vinegar, water, sea salt and sugar to a boil and stir until mixture is boiling and the salt and sugar are dissolved. Pour over the cucumbers in the jar. If liquid doesn't come up to cover the tops of the cucumbers, add enough boiling water to do so.

Let mixture cool. Tap the jar lightly on the counter to dislodge any air bubbles. Once almost room temperature, Seal jar with a tight lid and put into the refrigerator. Every day shake the jar. Keep in the fridge for six or seven days, then open the jar and taste to see if it's pickled enough for you. Jar can be kept in the fridge, tightly closed, for up to three months.

Sunday, September 01, 2024

Peach Season Coffee Cake


 I love peaches! There is something about the juicy, tangy fruit and just says 'summer' to me. Right now we are getting some lovely peaches at the farm stand that also sells strawberries. I decided to make a coffee cake using some, plus some blueberries. I looked at a number of recipes online but couldn't find what I wanted...a single layer cake made with self-rising flour and moistened with buttermilk. I decided to make my own recipe and hope that I got the proportions right.

It turned our really well, with a tender, moist cake that had a slight buttermilk tang, soft and sweet peaches and blueberries, and an oatmeal based streusel flavored with a bit of nutmeg that brought it together as a coffee cake. Hope you enjoy my recipe.  Give it a try and you'll see that it's fairly simple and very delicious.


Elle's Peach Blueberry Coffee Cake with Streusel

For the cake:

1/2 cup butter, at room temperature
1/2 cup brown sugar
2 eggs, at room temperature
1/4 teaspoon vanilla
1/4 teaspoon almond extract
1 3/4 cups self-rising flour
1 teaspoon baking soda
pinch of salt
1 cup buttermilk, at room temperature
1 very large or two smaller peaches, peeled, pitted, and sliced into  16 or 18 slices
1 cup fresh blueberries, rinsed and dried with paper towels

Prepare a 9-inch cake pan with at least 2" tall sides, or a 9-inch springform pan by spraying with baking spray. Put a 9-inch round of parchment paper in the bottom and spray the bottom. Set aside. Preheat the oven to 350 degrees F. after centering a rack in the oven

In a large bowl, beat the butter until fluffy, about 1 minute. Add the brown sugar and beat another minute. Add the eggs, one at a time, beating until incorporated, being sure the scrape bowl and beaters after each is incorporated. Add the vanilla and almond extract and beat another few seconds to incorporate.

Add the flour, baking soda and the pinch of salt and beat on low speed for about 20 seconds, just to get some of the flour incorporated, but there will still be lots of flour not mixed in. With mixer running on low, slowly add the buttermilk and then beat 2 minutes until batter is fully mixed and thick. Scrape bowl and beaters, then mix a few more seconds just to fully mix.

Scrape half the batter into the prepared pan and use a spatula to make the batter as even as you can. Evenly sprinkle the blueberries over the batter. Scrape the rest of the batter into the pan and spread it over the blueberries. Take the peaches and place them around the cake, pressing the sharper edge into the batter. The center probably won't have any peaches. Bake for 15 minutes. The peaches will sink a bit into the batter, but that's OK.

While the cake is beginning to bake, prepare the Streusel:

For the streusel:

3/4 cup oatmeal
1/2 cup brown sugar
3/4 cup all-purpose flour
1/8 teaspoon ground nutmeg
pinch of salt
1/2 cup cold butter (I used right out of the fridge)

In a medium bowl combine the first 5 (five) ingredients. Cut the butter into small pieces and add to the bowl. Use your clean fingers to rub the butter into the dry ingredients. When you are done the mixture will be fairly cohesive with some dry bits.

After the cake has baked for 15 minutes, removed from the oven. Place on a baking sheet and, using your clean hands, sprinkle the streusel mixture evenly over the top of the cake. Return the cake on the baking sheet to the oven and bake another 20 -25 minutes. Test for doneness by pressing lightly in the middle of the cake. If it feels at all soft or jiggly, bake longer. If it springs back against your pressure, it's done. Top should be golden brown. Cake might be pulling slightly away from the sides of the pan when baked.

Take the cake off the baking sheet and put the cake pan on a wire rack. Cool for 10 minutes. Run a knife around the sides of the pan, then invert the cake onto a plate. Remove the pan and parchment circle from the bottom of the cake. Put your serving plate, good side down, over the cake and grasp the serving plate and the wire rack. Turn the cake right side up onto the serving plate. Remove the wire rack and extra plate.  Let cake cool completely before serving.