Thursday, November 30, 2006

Once Upon a Dream Dinner


It's always nice when someone else cooks. It's a treat to sit down at the table and taste something where your hand and your tastebuds weren't involved. This time it was even more interesting because I first heard about this dish first thing the other morning. It turns out that my Sweetie had a dream that he made this exact chicken dish for dinner. Once he described it to me, I knew it would be delicious. And it was.
The main ingredients are boneless, skinless chicken breasts, onions, mushrooms, spinach and teeny tiny pasta. He used chicken broth for the liquid and put some Parmesan cheese on top of the chicken, too. The perfect warm meal for an evening where the temperature is dropping down toward freezing. We've been warned to wrap our pipes and protect tender plants. The same cold front that has been dumping snow on my daughter in Seattle is bringing us Arctic cold.

In the photo below Sweetie pours the tiny pasta stars into the spinach broth mixture.


Once Upon a Dream Chicken
1-2 tablespoons olive oil
1 medium onion, chopped
8 oz. mushrooms, wiped clean and sliced
3 whole chicken breasts, boneless & skinless, about 1 1/2 lbs.
1/2 lb frozen chopped spinach, thawed (or use a 10 oz. package)
1 can (about 2 cups) chicken broth
2/3 cups pastina (very small pasta)
1-2 oz. Parmesan cheese in thin slices or long shards

Preheat oven to 350 degrees F.
In a skillet, heat 1 tablespoon of olive oil over medium high heat. Add the onions and mushrooms and saute' until onion is translucent and mushrooms are golden, about 5 minutes. Remove from pan and reserve for later.
In the same pan brown the chicken breasts, adding the rest of the olive oil if needed. Remove from pan and if breast are really thick, slice in half to make thinner or butterfly.
Add spinach to the pan, pour in the broth and bring to a simmer. Add the pastina, stirring to distribute evenly. Add the mushroom-onion mixture and stir. Place the chicken breasts on top of the vegetables and top each with cheese to cover. Cover the pan with a lid or foil. Place in the oven and cook for 20 minutes. Check to make sure the chicken is not pink in the center.
Serve and enjoy.
Serves 4-6.


(For history purposes, this is being edited in 2008. This is about the time that the first challenge took place by the founders of the Daring Bakers. Wouldn't want to forget such a great beginning)

It all started with Lis and Ivonne baking this identical recipe at the same time and posting it on the same day.

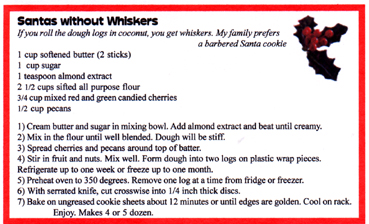
Hot Buttered Pretzels
Adapted from The King Arthur Flour Baker's Companion.

For the dough:
• 2-1/2 cups all-purpose flour
• 1/2 tsp. salt
• 1 tsp. sugar
• 1 package (2-1/4 tsp.) instant yeast
• 1 cup warm water (you may need a little more)

For the pretzel topping:
• 1/2 cup warm water
• 1 tsp. sugar
• kosher salt
• 3 tbsp. unsalted butter, melted

1. Combine all the dough ingredients in a large bowl with your hands. Work the ingredients together until you can form a ball. If the dough is very dry, add a bit more warm water until it comes together. The dough will look messy, but don't worry about it.

2. Turn the dough out onto a floured surface and begin kneading by pushing the dough away with the heel of your hand, and then folding it back in onto itself. Push the dough away again and then fold back in. Continue this motion, working the dough until it's smooth. This should take anywhere from 8 to 10 minutes. (Alternatively, you can knead the dough in a mixer with your dough hook for 5 to 6 minutes).

3. Once the dough is done, sprinkle some flour on the dough and put it in a large, oiled bowl. Cover loosely with plastic wrap and let the dough rest for 30 minutes to an hour. It will rise considerably.

4. Preheat the oven to 500 degrees F. and line two baking sheets with parchment paper.

5. Dissolve the sugar in the warm water and set aside.

6. Divide your dough into 8 equal pieces. Roll each piece out into a long rope that's roughly 24 inches in length. (Don't make it too long or your pretzels will be too thin.)

7. Taking hold of the ends of the rope, cross the rope over itself to form a circle with about 4 to 5 inches on each end that are sticking out. Twist the ends over themselves and secure each end on either side of the pretzel.

8. Carefully dip the pretzel in the water and then place on a parchment-lined baking sheet. Repeat with the other pieces of dough.

9. Sprinkle the pretzels with the kosher salt and let them rest for about 15 minutes.

10. Put the pretzels in the oven for 6 minutes, then rotate the trays and bake for an additional 6 minutes. Keep an eye on the pretzels so that they don't burn.

11. Remove the pretzels from the oven and immediately brush them with the butter. Keep brushing them with butter until you've used it all.

12. Serve the pretzels warm with plenty of mustard or another condiment of your choice.

13. Enjoy!

Monday, November 27, 2006

Inner Elf 2 - Barbered Santas

Barbered Santa cookies are Santa's Whiskers without the coconut edging. These are buttery, tender and sweet with the taste and color of the cherries and nuts.
As you can see, the dough is really stiff once the cherries and pecans have been mixed in.


The dough is formed into two logs, wrapped in plastic wrap and either refrigerated or frozen before slicing. Look at those Christmas colors.

Now that the big Turkey Day has come and gone, it really is time to get the holiday baking going. My Inner Elf is very, very happy.
My daughter's favorite Christmas cookie is Santas without Whiskers. It also is a great cookie to make ahead because the dough can be refrigerated for a week or frozen for a month after the dough is made and before the cookies are baked. They make a great addition to a cookie tray and are also a hit as part of a gift of cookies to friends and family.


Santas without Whiskers

1 cup softened butter (2 sticks)
1 cup sugar
1 teaspoon almond extract
2 1/2 cups sifted all-purpose flour
3/4 cup mixed red and green candied cherries
1/2 cup pecans

Cream butter and sugar in a mixing bowl. Add almond extract and beat until creamy.

Mix in the flour until well blended. Dough will be stiff.

Spread cherries and pecans around top of batter.

Stir in fruit and nuts. Mix well. Form dough into two logs on pieces of plastic wrap.
Wrap well and refrigerate up to one week or freeze up to one month.

Preheat oven to 350 degrees. Remove dough logs from fridge or freezer. If frozen let thaw a bit.

With a serrated knife, cut crosswise into 1/4 inch thick discs.

Bake on ungreased cookie sheets about 12 minutes or until edges are golden. Cool on rack.

Makes 4 or 5 dozen. Note: To make as Santa's Whiskers roll logs in coconut before wrapping to refrigerate or freeze. Proceed as written with rest of recipe. Make sure not to burn coconut when baking.


Friday, November 24, 2006

Truffle Me with Cognac


Intense smooth dark chocolate combined with aromatic cognac and chewy bits of prunes.
Time for SHF#25 and the theme is truffles…the chocolate kind. This time it’s being kindly hosted by Johanna at The Passionate Cook. Great theme choice. Wonderful time of year to make candy. And chocolate is wonderful any time of year in my opinion.

Originally I was going to go with Rum Raisin Truffles because it sounded like a wonderful set of flavors to go with chocolate. But I changed my mind. I was inspired by Dorie Greenspan’s tale of her first dessert chef’s job where she grew bored with baking raisin whiskey cake day after day and decided one day to make it prunes with Armagnac instead. It’s a great story in her new book, Baking: From My Home to Yours.

So these truffles are a combination of silky chocolate ganache flavored with Cognac and tiny bits of Cognac soaked prunes. They are intense and the little bumps of prune add to the rustic truffle…the mushroom…look of the candies. The Cognac sort of blooms in the warmth of your mouth when you savor each bite. It takes a lot for any food to impress the day after Thanksgiving and all of the feasting that goes with it. These truffles meet the challenge. If they last that long, keep them refrigerated. Don’t worry if you don’t like prunes. Once they have bathed in the Cognac for a while, the prunes take on a whole new sophisticated personality.


Cognac Prune Truffles

2/3 cup finely minced dried prune plums – about 4 or 5 – I used Newman’s Own organic prunes because they have a dried texture which allows the prunes to soak up even more of the Cognac
Cognac to cover the prunes – about ¾ cup
14 oz. best quality semi-sweet chocolate, coarsely chopped – I like Scharfen Berger
¾ cup heavy cream
cocoa – Dutch process is best

Put the finely minced prunes in a custard cup or other small bowl. Add Cognac to cover. Cover with plastic wrap and marinate at room temperature at least 24 hours and up to 3 days.
Drain prunes, catching the marinade liquid in a bowl and reserving it.
In a microwave safe bowl stir together the chocolate, heavy cream and 2 tablespoons of the marinade liquid. Microwave 1 minute at half power. Remove from microwave and whisk to mix. Return to microwave and heat another minute at half power. Remove from microwave and whisk again. Continue at one half minute intervals until chocolate ganache is smooth. Stir in drained prunes until well mixed. Cover with plastic wrap and refrigerate until firm, about 1 hour.

Put cocoa in a shallow bowl. Using a melon ball tool or teaspoon, scoop walnut sized or smaller rounds (about 1”) of the firm truffle mixture and drop into the cocoa. Roll around in the cocoa to coat, remove with a slotted spoon and tap off excess cocoa. Place on cookie sheet that holds a sheet of waxed paper. Chill truffles until you are ready to eat them. Enjoy.

Another option:
Don’t coat truffles with cocoa. Drop uncoated truffle rounds onto the cookie sheet with the waxed paper on it. Place cookie sheet with truffles in freezer and freeze for one hour.
Place a cup of chocolate chips or chopped semi-sweet chocolate in a heatproof bowl. Add 1 tablespoon of butter. Microwave one minute at a time at half power, stirring after each minute, until chocolate is smooth. While chocolate coating is still warm, place one frozen truffle at a time in the chocolate. Remove with a fork, shaking off drops of extra chocolate. Either keep the truffle as chocolate coated as I did, or, while chocolate coating is still warm, drop coated truffle into cocoa and roll as above. Place finished truffle on fresh waxed paper and allow to cool, then chill in refrigerator until you are ready to eat them.

This is a variation of a truffle recipe that I’ve had since 1980.


Thursday, November 23, 2006

Soup Shared with Friends


Second Act, First Scene: We return to the celebration of Thanksgiving, but this time it is on the actual Turkey Day.

We are joined by friends from Healdsburg who love a good bowl of soup. Knowing this, I've been looking at soup recipes for weeks, looking on the net, especially on blogs, looking at countless magazines and newspapers for the best recipe for Thanksgiving dinner. I'd actually decided on a Red Pepper Soup from one of my ancient Bon Appetit magazines, but then I spotted a delectable sounding Artichoke Soup by Nic at Bakingsheet.

Everything was fine until I went shopping for the artichokes. I never made it to where they sold artichokes. I passed a sale on winter squash in the bins in front of the store. The cutest butternut squash called my name so now I had to find a good recipe for butternut squash soup. A good soup would please my guests and my Sweetie and also could be part of the Souper Challenge Blog Event which will have lots of soup recipes.

A number of years ago I cooked a winter squash soup and despite liberal additions of hot sauce and herbs, it fell flat in the flavor department. When I found the recipe at
The Domestic Goddess for a butternut squash soup that also included sweet potatoes, ginger, red pepper flakes and apples, I knew that lack of flavor would not be an issue. It's really hard for me to leave a recipe unaltered, even when this is my first go round with it and even if I'm making it for guests. So I made a few changes.

I started by using a Granny Smith apple and a golden one, substituted dried thyme for the cumin, used dried ginger because I didn't have fresh ginger, added some cardamom to balance things and, after the soup was finished and had simmered 15 minutes, I added a dollop of pure maple syrup for depth and to bring out the apple. Chilled overnight and readied for the first course, this soup was full of flavor, smooth but substantial, and a real hit with our friends. In addition to the sour cream garnish suggested, I added red bell pepper in a fine dice. The only downside is that the rest of the meal seemed pedestrian by comparison.

Suave Butternut Squash Soup

1 medium yellow onion
1 average-sized Butternut Squash
1 medium to large sweet potato
1 large Golden Delicious Apple
1 large Granny Smith Apple
2 cloves garlic (crushed/minced)
3 cups low-sodium chicken stock
½ cup skim milk
½ cup fat-free buttermilk
½ teaspoon dried ginger powder
½ teaspoon dried thyme
¼ teaspoon ground cardamom
¼ teaspoon crushed red chili flakes
fresh ground pepper to taste (I used a LOT - gave it a nice kick)
1 tablespoon vegetable oil
Sour cream and small dice of red bell pepper for garnish


1. Peel onion and cut into ¼" chunks. Set aside. Peel squash, potato and apples and cut into ¼ inch chunks. Re: Squash - I found it easier to first cut it into large pieces and then cut the skin from the pieces, then chop into chunks.

2. Over medium heat in a large saucepan/stock pot, heat 1 tablespoon oil and stir onion and garlic until tender.

3. Add stock, wine, potato, apple, squash and seasoning. Give it a good stir, reduce heat to medium-low and let simmer for about 20 minutes until the vegetables are fork tender. Remove from heat.

4. In a blender (or with an immersion blender), scoop about 1/3 of the mixture into blender. On low speed, blend until nicely pureed. While doing this, add about ¼ cup of milk and ¼ cup of buttermilk until creamy. Transfer this to a bowl or a 2nd pot.

5. Repeat step 4, adding another ¼ cup of milk and ¼ cup buttermilk and transfer to bowl or pot; continue until all soup has been creamed.

6. Put soup back on low heat, stirring to blend, and adding lots of black pepper...yum! Simmer for 15 minutes and taste soup. Adjust seasonings and, if desired, add maple syrup. Simmer another 5 minutes.

7. To serve immediately, heat to serving temp, spoon into bowls and add a dollop of sour cream or yogurt if so desired then sprinkle with about a teaspoon of red pepper dice. Otherwise, you can chill it to serve cold or to reheat later. Can also be frozen, probably up to six months. If you have time to cook this ahead, the flavors really combine well when the soup is chilled overnight and reheated just before serving.

recipe origin: A recipe inspired by an original recipe by Andrea and
The Domestic Goddess


Tuesday, November 21, 2006

Early Bird


As I mentioned a few days ago, my daughter came home from Seattle for a long weekend. Since she had to go back today, we all agreed to celebrate Thanksgiving a little early.

She was pretty specific about what foods to include. Last year she wasn't home for the holiday, so the longing for mashed potatoes with the skins left on them and pecan pie the way Mom makes it was pretty strong. I was happy to do it her way.

Our party included Grandma L and nephew W, up from the city. The five of us began the feast on our back deck with an assortment of cheeses, crackers, almonds, dried cranberries, and a few prunes, all lovingly arranged by our daughter. Almost too pretty to eat...almost. I made up a veggie tray and blue cheese dip, but the cheese platter was far more popular. Some DeLoach 2001 Zinfandel sparkled in the November sunshine. Down the hill by the walnut tree we watched a flock of eight turkeys eating blackberries. There was spirited discussion about the merits of really fresh turkey versus the prep required, Fortunately for those birds we already had a turkey in the oven. Unfortunately we were enjoying the nice day so much that the poor bird in the oven stayed in a bit too long. Thanks to brown in bag technology the turkey was still moist.


For the Early Bird we had a 20 pound turkey brown and juicy and full of cornbread stuffing. Those requested mashed potatoes, turkey gravy, jellied cranberry sauce (I know, I know. It's the canned stuff. But tradition sometimes wins out), and a simple mixed lettuce salad with the last of my Early Girl tomatoes filled the plates. Grandma L brought her Green Beans with Bacon which is a secret family recipe and very, very good. Lots of savory bacon and fresh green beans. I'm hoping to inherit the recipe one day.


After a decent pause we had strong coffee, and a little later plates of freshly baked pumpkin AND pecan pies with freshly whipped cream which we enjoyed while watching Mission Impossible III. If you need a recipe for anything other than the green bean dish, leave a comment and I'll get it to you.

May your Thanksgiving be full of great food, family, fun and blessings. We're doing mostly the same menu on Thanksgiving with more family, but only four of us this time. Good thing I love turkey!


Monday, November 20, 2006

Barley Casserole for the Cattle?!


My Sweetie brought home a really big bag of barley from the health food store. These cute nubbins were a lovely tan color and promised to be chewy and nutty. He was supposed to bring home rolled quick cooking barley, but this is what he found. What he didn’t realize is that one cup of barley cooks up into a big casserole of barley and the bag must have about 12 cups. We’ll be eating barley all winter and then some. We had ours with some pork chops, but this dish would go well with Thanksgiving turkey or most cold weather meat, game, fish or poultry dishes.

Browsing through some cookbooks turned up a baked barley casserole that sounds good. It’s from The Frugal Gourmet Celebrates Christmas from 1991. Its title is ‘Barley Casserole for the Cattle’. He admits that cattle don’t eat cooked barley, but since I don’t digest uncooked barley very well (actually never tried it) I guess that cooking is in order. He also has other dishes for the innkeeper, shepherds, and so on for the Nativity cast of characters. I changed the recipe a bit by adding mushrooms and thyme. That would make it too fancy for cattle, but quite nice for you and me.

Baked Barley Casserole with Mushrooms
inspired by a recipe in The Frugal Gourmet Celebrates Christmas, 1991

1 cup barley

1 cup sliced mushrooms
Butter

1/2 teaspoon dried thyme
3 tablespoons olive oil

6 cups chicken or beef broth
2or 3 medium yellow onions, peeled & chopped

Salt and Pepper to taste

1) Preheat oven to 350 degrees.
2) Melt the butter in a sauté pan and brown the barley. Place in a casserole. Sauté’ the yellow onions in butter and the oil for 2 minutes then add the mushrooms and cook until onions are translucent. Add this mixture to the casserole. Sprinkle with thyme. Salt and pepper to taste. (Note: Go easy on the salted unless you are using unsalted broth. The broth concentrates as the barley cooks, including the saltiness.)
3) Add 3 cups of the chicken or beef broth, cover, and place in a 350 degree oven for about 1 hour, or until the moisture is almost absorbed. Add another 3 cups of broth, and cook, covered, until absorbed. (Yes, that is right: 1 cup of barley to 6 cups of broth.)

Serve warm.


Friday, November 17, 2006

My Inner Elf


With Thanksgiving less than a week away it’s surely time to connect with my inner elf. I love the holidays and for many years baked dozens and dozens of cookies for gifts and to ear during the Christmas season. This year I plan to give lots of gifts of cookies, so I’ve decided to bake, photograph and blog about each one. But, if I can make it work, I’m also going to provide an index card sized recipe. My plan is to gather the card for each kind of cookie in the gift tin and put them together with a bit of ribbon, then include them with the gift. Feel free to do the same if the cookie seems like one you’d like for yourself or a gift.

I’m starting with a recipe from my mother. A friend says that they are called Dundee Cookies in England, but we grew up knowing them as Saucepan Fruit Bars. My daughter is coming home for her first trip since moving to Seattle and she wants to have tea with her Mom. These cookies are perfect with a cup of tea. They are mixed in a saucepan, so very few things to clean up, plus they are really easy to put together. The currants and raisins and spice are set off by the lemon glaze.


Wednesday, November 15, 2006

Retro Challenge 4 Pineapple Pinwheels Cake


Almost missed the deadline. Can't believe it. I've been hunting through lots of old cookbooks to find a great fall dish for this challenge for weeks.
RRC4 is a good one. Thanks Laura! I'm totally new to this, so hope this isn't too late and meets what is needed.

This cake from The Settlement Cook Book smelled really wonderful when I unmolded it from the big black iron skillet. Brown sugar and warm pineapple scents mixed with the walnut and cake smell...heavenly. I gave the first piece, still warm, to my Sweetie. He said it tasted like a walnut pound cake we have at a local coffee house, only better. It was even tastier the next day. The pineapple juices kept it nice and moist. Try it.

Without further ado:

Pineapple Wheel Cake
From The Settlement Cook Book, 1944 edition
1 large can sliced pineapple, drained
¼ cup butter
2 cups brown sugar
4 eggs, separated
1 cup sugar
1 cup flour
1 teaspoon baking powder
candied red cherries
walnut meats
1 cup whipping cream

Melt butter in iron skillet; cover with brown sugar, spreading it evenly. Place 1 slice of the cored pineapple in center on top of sugar; cut rest of the slices in half, crosswise; arrange these in a circle around the center slice like the spokes of a wheel, rounded edges facing one way. Fill spaces with walnut meats and candied cherries. Make sponge cake batter, using 4 eggs, 1 cup sugar, 1 cup flour, and 1 teaspoon baking powder, pour over pineapple wheel, place in moderate over and bake until firm. Turn upside down. Serve cold with whipped cream. (Note: original recipe did not have cherries or walnuts in list of ingredients. It also said ‘sponge bake’ and ‘cake until firm’, obviously typos. I used halved cherries and chopped nuts. I found 2 cups of brown sugar to be far too much. I would recommend 1 cup. I looked up the sponge cake directions on p. 434 for how to make a sponge cake:
Sponge Cakes contain no butter and are made rich with eggs. Beat yolks until thick and lemon colored, the whites until stiff enough to hold up in peaks, but still shiny. Use cake flour. Sift once, measure, sift four or more times. Ingredients should be at room temperature.
With Electric Beater: Beat egg whites at high speed until stiff enough to form peaks but are still shiny. Add sugar in small amounts, slowly, at medium speed and when blended remove beater. Fold in flour gently, sifting ¼ cup at a time over top. To make a light, tender cake, avoid over beating.)


Take Out Transformation

Joining the Blog Party # 16 at Dispensing Happiness (thank you Stephanie), the challenge wasn’t really how to turn take out into party food, but how to decide what was take out. We don’t really do take out. We are too far out of town for pizza or Chinese delivery and my Sweetie doesn’t like tepid food, so we usually eat in or eat out. One of the few items I’ve done as takeout is a sandwich from our favorite café’, Redwood Café’ in Cotati. It can be reheated in the microwave without the sandwich becoming too yucky and has really good flavors and colors. It’s called Pesto Chicken Sandwich and we get it served on focaccia bread. These appetizers are a great combination of warm, melty cheese and juicy chicken combined with a jolt of pesto smoothed out with the sweetness of the roasted red pepper. The salty, olive oil infused focaccia ties it all together (and makes it possible to hold in one hand with a beer in the other).

The challenge for making the sandwich into appetizers was to find a good recipe for focaccia bread. The King Arthur Flour website had one for the bread machine that looked promising. I followed it fairly closely, but added a little more salt and did not add the Italian seasoning. I sprinkled garlic salt on the top after drizzling the olive oil. I also used the shorter rising time so that it wouldn’t be too high. That worked really well.

Once the focaccia was baked, it was a simple matter to sauté’ a chicken breast, pull my purchased pesto out of the fridge, along with some jack cheese. A jar of roasted peppers from the pantry added the final ingredient. If you were in a hurry, you could purchase pre-cooked chicken and already baked focaccia and it would be a snap to make these savory bites.

Basic Focaccia
King Arthur Flour website
Large or Small* Machine

1 cup water, warm
3 tablespoons olive oil
3 cups King Arthur Unbleached All-Purpose OR Unbleached Special Bread Flour
2 teaspoons salt
5 teaspoons Italian seasoning, heaping
2 teaspoons active dry yeast
Place all of the ingredients into the pan of your bread machine. Program for Dough or Manual, and press Start.

*If you're using a small (1-pound) bread machine, remove the dough from the machine at the end of the second kneading cycle, and transfer it to a lightly greased bowl to rise for 1 to 1 1/2 hours.

At the end of the cycle, remove the dough from the machine and punch it down. Roll it out to form a rectangle, and transfer it to a cookie sheet, 10 x 15-inch to 12 x 18-inch. Pat the dough into the pan. Make indentations in the dough with your fingertips, about an inch apart, and drizzle sparingly with olive oil.A plain focaccia can be topped with a light sprinkling of salt and pepper.
Other toppings may include browned onions, fresh garlic, goat cheese, pesto, fresh sage and bacon, potatoes and rosemary, sun-dried tomatoes, Gorgonzola cheese, olives, or any combination of those or other ingredients of your choice.
Let the focaccia rise for half an hour to an hour. This will make a lighter bread.
Bake the focaccia in the preheated 450°F oven for 15 to 20 minutes, or until lightly browned. Drizzle with extra-virgin olive oil, and serve. Serves 6 to 10.
Nutrition information per serving (1 plain piece, 1/10 of loaf, 68g): 159 cal, 4g fat, 4g protein, 26g complex carbohydrates, 1g dietary fiber, 427mg sodium, 76mg potassium, 1mg vitamin C, 2mg iron, 79mg calcium, 40mg phosphorus.


Pesto Chicken Savory Triangles

Cut two inch strips of focaccia bread, and then cut those into triangles. If the focaccia is very thick, split in half and use each half for one appetizer.
Place the triangles on a baking sheet and place a thin slice of jack cheese on each one. The piece should be about 1 inch square. Place the baking sheet under the broiler just long enough to melt the cheese.
Pan fry a chicken breast in a little olive oil. When cooked, transfer to a cutting board. Slice pieces of chicken large enough to just fit on the bread triangles. Place on top of the cheese. Add a dab of pesto on top of the warm chicken, then cross two small, thin strips of roasted red pepper over the pesto. Return to the oven if desired to keep them warm. Serve warm.

These appetizers would go well with a cold beer, like Sierra Nevada Pale Ale.


Saturday, November 11, 2006

Fall Apples Appeal


At a local farm stand I pass on the way to work the apples were fresh off the tree and it was self-service, too. These winesaps and some lovely green Granny Smiths were so beautiful.
I've been recovering from a minor surgery and finally felt like I could do some cooking today.

My sweetie decided to broil some pork chops. My contributions were mashed potatoes with the skins still on which were earthy and delicious, plus apple slices cooked with a little brown sugar and cinnamon. These were both easy to prepare, and went really well with the chops.


Having two colors of apples added to the appeal (sorry, but I grew up in a household of punsters) and these particular varieties have a good tartness that was actually highlighted by the small amount of brown sugar. I left on the peel both for the added color and for more fiber. When all you have to do before slicing them is remove the seeds and trim out the stem and blossom end, it goes pretty quickly. Peel them if you prefer.


My method is to slice the apple in half, use a melon ball tool to remove the area with the seeds in each half, then use a small knife to cut out the stem and blossom end in each half. Slice each half, throw them in a pot with about 1/4 cup water (for 3 apples), 1-2 tablespoons brown sugar and 1/4 teaspoon cinnamon. Cover, bring to a boil, reduce heat and simmer, stirring now and then, until apples are just tender. Serve warm or cold.


Sunday, November 05, 2006

Elixir of the Gods


Sundays are a great day for coffee. For a number of years we have joined some neighbors at our local cafe' on Sunday mornings for breakfast, helped down by numerous cups of coffee. One of our neighbors has already had at least one cup at home as well. Somehow the coffee fix on Sunday is a more mellow experience than on weekdays, helped along by spending relaxed time with our friends. Weekdays the newspaper goes with the coffee. Not mellow.

My favorite brand is Peets. I first became a 'Peetnik' many years ago in Berkeley where I joined the throngs of coffee lovers at Walnut and Vine for fresh brewed strong coffee. This was in the '70's, before Starbucks became ubiquitous, at a time when the coffee available in most of the U.S. was weak, watery and mild flavored. What a treat to have a cup of freshly brewed dark French Roast instead. When I traveled I would bring a half pound of my favorite Peets coffee and a filter cone so that I could brew my addiction no matter where I was. Guess that was the mark of a nascent foodie. And then there was bread, but that'll have to be another post.


Friday, November 03, 2006

Getting Technical

Technorati Profile
script type="text/javascript"
to tag with

Learning about Technorati tags

Spaghetti and Peppers and Squash - It's Pie


Cleared the old squash plants out of the garden on Tuesday just before the rains came on Tuesday night. Harvested the last of the summer squash, even baby ones. Since it was cold and damp, a savory pie with red pepper and those squash and mushrooms, onion and garlic sounded good. I used up some left over spaghetti, too. The kitchen smelled so good, especially when I added the dried basil and fresh parsley to the hot vegetable mixture. The colors were jewel like, peeking out of the pasta here and there. It looked so tempting right out of the oven that Sweetie served it up before I could get a photo. Have to work on that. So the finished dish was photographed in the pan before it was all consumed.
It may sound like there is a lot of chopping, but it really goes fast.
Chop everything up at the beginning and it all goes together quickly and into the oven.


Elle's Savory Spaghetti Pie with Peppers and Squash

1 tablespoon olive oil
1/2 medium onion, chopped
2 cloves garlic, minced
1/2 medium red bell pepper, diced
1/2 cup diced mushrooms (at this time of year exotic ones are sometimes available)
1 1/2 cups summer squash - I used a combination of yellow crookneck and zucchini
2 teaspoons dried basil
1 tablespoon minced parsley, Italian if you have it
3 cups cooked, drained, cooled spaghetti
1 cup low fat ricotta cheese
1 large egg
1/4 cup egg substitute (or use another egg)
1/4 teaspoon pepper
1/2 teaspoon salt
1/4 cup (or more) grated Parmesan Reggiano cheese


In large cast iron skillet, over medium high heat, heat the olive oil. Saute the onions and garlic until onion is translucent, but don't burn garlic, about 4 minutes. Add the red pepper and cook 1 minute. Add the mushrooms and squash and continue cooking until some of the edges of the squash brown a bit, about 4 minutes. Add the basil and parsley, stir and remove from heat.

Stir the spaghetti into the vegetables in the skillet

.
In a medium bowl, combine the ricotta cheese and egg, and egg substitute. Sir until well blended. Add pepper and salt and stir to blend.


Pour cheese mixture over vegetable mixture and gently stir to blend. Top with grated cheese and place in preheated 350 degree oven for 20 minutes. Serve hot in wedges.