Showing posts with label buttermilk. Show all posts

Sunday, October 22, 2023

Muffins with Quince and Pecans


When I realized that I still had poached quince in the fridge and that it needed to be used, I went to various cookbooks and then to the index for this blog. It's easy to access the Index...just click on the photo of the table set with a rust tablecloth. It's on the right in the web view of the blog.

In the section with the oldest recipes I found Playful Banana Muffins and, after reading the recipe, I decided that this recipe, which had already had a big makeover, would get another makeover...this time with quince!

This is a lovely muffin. It's moist from the fruit, laced with chopped pecans and small pieces of quince, fragrant with the quince and orange zest and vanilla, and it has a nice crumb. I'm so glad that I made this recipe. It makes a full 12 muffins, plus a small loaf pan's worth of deliciousness. One of these muffins and a cup of tea go really well together.

No quince? You can substitute ripe pear and it will work just fine. Peel and core the pear, making sure to also remove the stem parts. Dice the fruit and make sure you have 2 cups worth. Pears range in size so much that you will probably need about 6. The same is true for the quince...about 5-6 will work. I boiled mine for about 10 minutes to soften the skin, peeled and cored them, then poached at a simmer in water which also had 1/2 cup sugar, 1 cinnamon stick and two whole cloves. Be sure to drain and then chill the poached quince.

I do hope you make these muffins with either quince or pears for a celebration of fall bounty!


Quince Pecan Muffins
Based very loosely on Raisin Bran muffins in the King Arthur Flour Bakers Companion

2 cups poached quince, diced small (about 1/2-inch)
1 cup buttermilk at room temperature
1/2 cup vegetable oil
2 large eggs, at room temperature
3/4 cup brown sugar
2 tablespoons molasses
1/2 teaspoon vanilla
1/4 teaspoon freshly grated orange zest
2 1/2 cups all-purpose flour
1/2 teaspoon salt
1 tablespoon baking powder
1 teaspoon baking soda
1/2 cup rolled oats
1/2 cup roughly chopped pecans

Preheat the oven to 425 degrees F. Prepare a 12-cup muffin tin and a mini-loaf pan by spraying with baking spray or by greasing and flouring them. Set aside.

Check the quince for liquid. If necessary, dry with paper towels. Set aside.

In a large mixing owl, whisk together the buttermilk, oil, eggs, brown sugar, molasses, vanilla and orange zest. Add the quince and pecans and stir to combine.

In another bowl, mix together the flour, salt, baking powder, baking soda, and oats.

Quickly, with as few strokes as possible, us a large spoon, wooden spoon, or large flexible spatula to mix the dry ingredients into the wet ingredients, just until combined.

Fill prepared muffin cups with the mixture, filling each cup almost to the top. Pour the rest of the batter into the prepared mini-loaf pan, using a spatula to clean the bowl of batter.

Bake in preheated oven for 14-18 minutes for the muffins, or until they spring back when pressed lightly in the middle, and for about 25 minutes for the mini-loaf pan quince bread, until a cake tester inserted in the center comes out clean.

Remove when ready from the oven. Cool on a wire rack 5 minutes, then turn out of the pans and let cool until ready to serve, or serve at once. If desired, serve with butter, cream cheese, or apricot jam.


Saturday, January 24, 2015

The Comfort of Buttermilk Biscuits


It's true that I get revved up thinking about making new recipes, especially the ones that the Bread Baking Babes and Cake Slice Bakers make each month. New ideas and techniques really get my creative juices flowing and it's fun to discover foods that can become favorites.

Sometimes, though, it's so nice to make a recipe that I've made over and over again. The process is usually faster and calmer and somehow comforting. I've made these biscuits since I was a young girl. My Dad loved his biscuits for breakfast and he loved them with stew. He loved them with ham and they make a great topping for chicken pot pie. Best of all they are great with some butter and honey, just out of the oven, with nothing but a cup of coffee. Well, I like them that way.


I haven't made biscuits for a long time, but this morning I was in the mood and I had all the ingredients ready to go. It's a short list, just self-rising flour, shortening and buttermilk. I keep my Crisco in the back of the fridge because I use it so rarely that it goes rancid in my cupboard between uses. That also makes it nice and cold for cutting into the biscuit flour. The essential thing with these biscuits is to avoid over handling the dough. You don't want a lot of gluten for these, just tender flakiness. I only knead the dough a few times; just enough to make sure the ingredients are evenly distributed. I do roll out the dough to about half the thickness I plan on having, then fold half of it over the other half. This makes it easy to split the biscuits when baked. Pushing straight down on the biscuit cutter is another tip. These really are easy as child's play, so try them soon. I bet you'll enjoy them as much as my Dad did. Don't forget the honey. I'm thankful to my newest neighbors who gave us a jar of local honey with comb in it for Christmas. They made these biscuits just perfect!


Classic Self-Rising Flour Buttermilk Biscuits

3 cups sifted self-rising flour
 ½ cup shortening
1 cup buttermilk ( you can also use plain milk)

Cut shortening into the flour until consistency of coarse meal. Add enough milk to make a soft dough (may be slightly more or less than one cup).

Turn dough out onto a lightly floured surface; knead gently about ten strokes. Roll 1/4 the thickness desired for finished biscuit height. Fold half of the rolled out dough over the other half. Cut with a floured biscuit cutter (or drinking glass rim) pushing straight down. Don’t twist the cutter.

Place biscuits on a baking sheet. Bake in a preheated 4000 F oven for 12-15 minutes. Makes about 14 two-inch biscuits.

Thursday, November 06, 2014

Mini Cranberry Walnut Soda Bread Loaf


There they sat on the counter, reminding me that I had left them out of the scones; a half recipe of bourbon soaked cranberries and a similar amount of chopped walnuts. What to do with them? I'm out of pumpkin at the moment, although I do have some sugar pumpkins ready to be cooked with, just no pumpkin puree, so no pumpkin recipe this time.

A check of the fridge showed that I have buttermilk and butter, so an obvious and delicious choice was Irish soda bread enhanced with cranberries and walnuts instead of currants and caraway. The lovely thing about soda bread is how quickly it goes together. I grated a little clementine zest into the sugar and rubbed it in a la Dorie Greenspan, then added that to the mixture of all-purpose and white whole wheat flour, plus baking soda, baking powder and salt. The butter was sliced and worked into the dry mixture, the buttermilk added and mixed in about half way, then I dumped in the cranberries and walnuts and mixed the rest of the way, with just a bit of the dry mixture staying dry...don't want to overwork the gluten on this quick bread. Onto the silpat lined baking sheet with the dough, a quick shape with floured hands, then I cut a cross into the center with a bench scraper. A sprinkle of sanding sugar and into the oven it went.


This is a delightful version of my Aunt May's soda bread. I only made half the recipe because that was the right proportion for the cranberries, but just double it to make a big loaf. The cranberries, walnuts and clementines are all fall flavors and great with the tang the buttermilk gives. This makes a lovely afternoon snack with a cup of tea. Sweetie enjoyed a slice with some fresh persimmons and he said that the bread went perfectly with that autumn fruit. I just love autumn afternoons!


Mini Cranberry Walnut Soda Bread Loaf
Makes on mini loaf

1 cups all-purpose flour
1 cup white whole wheat flour
½ teaspoon baking soda
1/4 teaspoon baking powder
½ teaspoon salt
1/4 cup tablespoons sugar
zest from half an orange or a whole clementine or tangerine
4 oz. (½ stick) cold butter, in thin slices
1 cup buttermilk
1/3 cup dried cranberries, plumped with hot water or bourbon, then drained
1/3 cup chopped walnuts

Mix the dry ingredients, except sugar, in a bowl. Put the sugar into a small bowl and rub the citrus zest into it with your clean fingers. Mix sugar into the dry ingredients. Add the butter slices  and cut in well with a fork or pastry blender. Add the buttermilk and mix just until partly moist - don’t over-
handle. Add the cranberries and walnuts; mix well. Some dry stuff is OK but the dough should be sticky. Pat into a round on a parchment-lined or silpat lined cookie sheet. Cut a cross on top. Bake 30-35 minutes at 350 degree F. Tap bottom to make sure bread is cooked through. It will sound hollow. Cool a bit before slicing.

Sunday, May 25, 2014

Birthday Cake On A Hot Evening


When you know that the birthday party for a dear friend will include his two grandsons, it makes sense to plan for a birthday cake. I don't know about you, but I feel almost as much joy now as I did when I was a kid when a beautiful cake topped with lit candles is brought to the table and placed in front of the person having the birthday. The traditional birthday song is sung with whatever success can be expected, depending on the singing talents of the group.  What was sweet this time is that the eldest grandson, a second grader, was asked to step over and help blow out the candles after the song. I'm not sure that the birthday 'boy' blew at all. Fortunately there were only three candles, each representing a significant chunk of his life.

The cake requested was chocolate with vanilla icing. It has been a couple of years since I've baked a frosted layer cake...sad, isn't it? I do remember that chocolate cake crumbs just love to lodge in the vanilla icing, so I decided to do chocolate whipped cream on the sides and vanilla whipped cream between the layers and on top. What I didn't count on was a heat wave that had my kitchen hot enough to melt whipped cream.

Fortunately we had a new refrigerator delivered the day before, so the old one was virtually empty, although cold. I got my workout going up and down the new front steps numerous times carting baked layers to the old freezer section to firm up, whipped cream to the fridge section, to keep the whipped cream thick, frozen layers back into the kitchen, partially frosted cake to the freezer and then back in again later for the final topping of snowy whipped cream, a sprinkle of mixed sugar decorations, and a last trip to the freezer to get that cake as cold as we could for the drive to the birthday boy's home. I carried it on my lap during the drive and watched the frosting thaw on the way. It stayed on the cake, so back into the freezer it went while we ate dinner, then onto the counter to thaw a bit as we kept talking after dinner. Worked like a charm. The icing was firm enough that it didn't slide off the cake and the cake was thawed enough to enjoy its lovely texture and great chocolate flavor.

The cake was one I had been wanting to try from Maida Heatter's Book of Great Chocolate Desserts, a collection of amazingly wonderful chocolate desserts, including my favorite chocolate bundt cake, a silky chocolate pie and so much more. If you love chocolate, track down this book! I have at least a half a dozen places bookmarked to make in the future. This cake was one of them. It uses melted chocolate chips and buttermilk and is a moist, fine-grained, fairly light cake with a good chocolate flavor, but not one so intense that it would put off kids or people who don't adore chocolate. For those who adore chocolate I turn to the Sin City Cake, but I wasn't sure if it would be too intense for the kids.

The Chocolate Buttermilk Layer Cake recipe makes not two, but three nice layers, so it becomes a pretty impressive cake once you put it together. It is not a quick recipe, so allow time to prepare the pans, to cool the melted chocolate and the chill the baked, cooled cake layers for easier handling. Putting on icing can take some time, too. If you use whipped cream, be sure to ice with the whipped cream the same day you will serve the cake, and keep it chilled between icing the cake and serving it.

This tall, beautiful cake was a big hit and the hostess made sure to move it to her own plate after those who wanted them had seconds, so that there would be cake for breakfast! Since I have to make sure to not eat too much chocolate, that was just fine with me.

I'm not going to give a recipe for the whipped cream frosting since I was unhappy with the chocolate version and the vanilla version was just heavy cream whipped with a little sugar and 1 teaspoon of vanilla added once the cream started to hold its shape.

If you are keeping up with our kitchen spruce up, I painted the ceiling a flat, bright white in the old front hall and hallway on Friday and have picked out a nice gold color for the accent walls facing the barn. And there is the new Frigidaire side by side refrigerator, too...and cake! Life is good.


Chocolate Buttermilk Layer Cake

6 oz. (1 cup) semisweet chocolate morsels
1/4 cup water or prepared, cooled, coffee
2 1/3 cups sifted, unbleached all-purpose flour, divided
3 tablespoons unsweetened cocoa powder
1 teaspoon baking soda
1/4 teaspoon salt
6 oz. (1 1/2 sticks) sweet butter, at room temperature
1 teaspoon vanilla extract
1 3/4 cups granulated sugar
3 eggs (graded large or extra-large) at room temperature
1 cup buttermilk, at room temperature

Adjust two racks to divide the oven into thirds and preheat oven to 375 degrees F. Butter (or use pan spray) three 9-inch round layer-cake pans. Line the bottoms with wax paper cut to fit. Butter (or use pan spray) the wax paper. Mix together 1/3 cup flour and the cocoa in a small bowl. Use a fine-mesh strainer to dust the mixture over the bottom of each pan and then tilt the pan to make sure all inner surfaces are coated with the flour mixture. Shake out excess. (Working over the sink makes for easy clean up because this is messy work.) Set the prepared pans aside.

Place the chocolate morsels and water or coffee n the top of a small double boiled over hot water on moderate heat and cover until the chocolate is partially melted. Then uncover and stir until completely melted and smooth. Remove the top of the double boiler and set aside uncovered to cool.

Sift together the flour, baking soda, and salt and set aside.

In the large bowl of an electric mixer, cream the butter. Add the vanilla and then the sugar and beat to mix well. Add the eggs one at a time, scraping the bowl with a rubber or silicone spatula and beating until well mixed before adding the next egg. (The mixture might look curdled...that's O.K.) Add the melted, cooled chocolate and stir until smooth. On low speed gradually add the sifted dry ingredients in three additions, alternating with the buttermilk in two additions. Scrape the bowl with the spatula and beat only until smooth after each addition.

Divide the batter evenly between the prepared pans and smooth the tops.

Place one pan on one rack and the other two on the other rack. Do not place one directly above another one.

Bake for about 25 minutes, or until a toothpick gently inserted in the middle of the cake comes out clean and dry. (I switched two of the pans about half way through the baking and turned all the pans 180 degrees to help them bake evenly.) Check each pan carefully...don't overbake. I checked 5 minutes earlier, just in case.

Let the layers stand in the pans on a cooling rack for 10 - 15 minutes. Then, with a small sharp knife carefully cut around the sides to release. Cover each pan with a rack, invert pan and rack, remove the pan and the wax paper lining, cover with another rack and invert again, leaving the layers right side up. Let stand until completely cool. I put a sheet of baking parchment under each layer before I did the second inversion...that way each layer sat of parchment as it cooled and that made it easy to move the rack and layer to the freezer when they had cooled. These are somewhat delicate layers, so freezing makes them easier to handle when icing them.

Prepare a flat cake plate by placing four strips of wax paper around the outer edges. Place one layer upside down on the plate, checking to be sure that the wax papers touch the cake all around. Ice the first layer with about 1/2 cup of your favorite icing, then put the second layer on right side up. Ice the second layer with another 1/2 cup or so of icing, then place the final layer, right side up, on top. I like to ice the sides and then the top, but many people ice the top and then the sides. Choose which ever you like. Using an offset spatula makes it easier to apply the icing. Decorate as you choose. Chill for a while if your icing needs to set, then let the cake come to room temperature before serving. Cut yourself a piece and enjoy!


Wednesday, January 22, 2014

Buttermilk and Cherries


We are in that season where much of the fruit available in the markets are imported, except for apples and pears. Pears are often not ripe and I made apple crisp last time this friend was over for dinner, so yesterday I decided to make a dessert with things on hand. I had some buttermilk, eggs, and butter in the fridge and a jar of pitted sweet dark cherries in the pantry.

 A short amount of time on the internet led me to a lovely recipe for a moist, fluffy, tender single layer cake with cherries. Well, the recipe actually used raspberries, but I knew cherries would work well with the cake. I also used almond extract instead of vanilla because almond flavor brings out the cherry flavor so well and these were not fresh fruit, so could use that bit of help. Otherwise I mostly followed the recipe and we enjoyed the cake after dinner. It was not too much, and not too little...just right.


Cherry Buttermilk Cake
based on Raspberry Buttermilk Cake in
Gourmet, June 2009, by Melissa Roberts

Simple, tender buttermilk cake topped with a nice, sugary crunch and enriched with cherries

Ingredients
1 cup all-purpose flour
1/2 teaspoon baking powder
1/2 teaspoon baking soda
1/4 teaspoon salt
1/4 teaspoon ground cardamom
1/2 stick unsalted butter, room temperature
2/3 cup sugar
1/2 teaspoon almond extract
1 large egg, room temperature
1/2 cup well-shaken buttermilk, room temperature
1 cup pitted cherries (I used some that had been canned in a jar and drained off the juice used to pack them, but fresh cherries would be even better), drained
1 tablespoon soft butter and 3 tablespoons sugar for the pan
1 1/2 tablespoons sugar, preferably sanding sugar, for the topping

Preheat oven to 400 degrees F, with rack in the middle. Butter the bottom and sides of a 9-inch cake pan, then coat with the sugar, shaking out any excess into the sink. Set aside.

Whisk together the flour, baking powder, baking soda, salt and cardamom.
Beat butter and sugar together with an electric mixer until pale and fluffy, about 2 minutes, then beat in the almond extract. Add egg and beat well.

At low speed, beat in 1/2 of the flour mixture, the buttermilk, then the rest of the flour mixture, beating only until combined each time.

Spoon batter into prepared pan, smoothing top. Scatter the drained cherries evenly over the top. Sprinkle top with the sanding sugar. Bake in preheated oven for 25 - 30 minutes, or until cake is golden and a wooden pick inserted in the center comes out clean.

Cool in the pan 10 minutes, then run a knife blade around the sides of the pan to loosen the cake and turn it out onto a rack. Invert onto a serving plate and let cool 10 - 15 minutes more. Cherries will have sunk to the bottom of the cake, and the top will be crunchy with sugar.


Serves 8

Thursday, August 29, 2013

Going Bananas in the Land of St. Honore'


She woke with a start. It had been a horrible dream. The twins, her granddaughters who live on the other side of the country, were grown up in the dream. One was a dental tech and the other was a personal trainer at a gym...and neither one of them knew what to do with the ingredients on the kitchen counter in her dream; the softened butter, the sugar, flour, molasses, eggs, nuts, chocolate chips. They had a birth right, as anyone in our land has, to bake, yet they had no idea how to measure flour, soften butter, or even how to crack an egg. This was terrible! No child in the Land of St. Honore' should be flummoxed about baking something.

Eva decided she would do something so that this dream never became a reality. Well, maybe they would become a personal trainer and a dental tech, but she would make sure that they knew how to bake. Not only would they not be mystified at the sight of an egg, they would know how to separate eggs and whisk whites and bake a lovely, light, luscious, delectable cake.


First she waited until a decent hour, then called her daughter, their mom. She had to time the call just right because Grace would be leaving home soon to go to work. She was a CPA high up in her firm. Although she had been taught, she never baked. 'No time' was her excuse.

"Grace, I would love to have the girls visit me at Christmas, or even Thanksgiving, if that's possible. I know that they are always busy with volleyball and chess club and the debate team, but could you find a few days when they could spend a little time with me?" Eva was tempted to add "before its too late" but didn't think her daughter would be so easily led.

Grace had a particularly difficult client at the moment, so she agreed. Better that her girls have some fun instead of being saddled with a babysitter when she had to work extra. At eleven years old they were getting a bit beyond babysitters anyway.


Eva was thrilled. They were coming the day before Thanksgiving. They could bake pies for Thanksgiving, perhaps make dinner rolls, and surely they could make a cake, too. She could hardly wait!

Plans changed and they arrived the day after Thanksgiving. No one wanted pies or dinner rolls and a cake seemed too rich after all the holiday food. Still, there were some ripe bananas to use up. Time to bake a classic banana bread...with a twist. She wanted to use molasses and to add chocolate chips, just for fun.


The girls were a bit hesitant at first, but soon got into the swing of things, measuring flour and sugar, mashing bananas, and, yes, cracking some eggs and finding out that bits of shells could be removed from the eggs in the bowl, with care.

They giggled at the slow movement of the molasses and had fun getting their fingers greasy while using the butter wrapper to grease the bread pan.


Their faces beamed with big smiles when they brought the first piece of baked banana bread to their Granddad. They were even happier when he exclaimed over the texture, flavor and deliciousness. They were hooked! Eva knew that on their next visit that they would bake that cake with her. Their heritage was intact.

You, too, can keep the arts of baking alive. This banana bread is easy, uses up very ripe bananas, and can be packed in a lunchbox or used as an afternoon pickup or quick bite in the morning. If you make it with half regular flour and half whole wheat flour it is almost healthy...after all, it has fruit.

Banana Bread with Walnuts and Chocolate
makes one loaf

1/2 cup butter, softened
1/4 cup molasses, dark is best
1/2 cup granulated sugar
2 eggs, beaten
3 ripe bananas (or 2 large), mashed
1 cup whole wheat flour
1 cup all purpose flour
1 teaspoon baking soda
1/2 teaspoon baking powder
1/2 teaspoon salt
1 teaspoon vanilla extract
1/4 cup buttermilk
1/2 cup chopped walnuts
1 cup chocolate chips

Preheat oven to 350 degrees F. Grease and flour a 9 x 5 x 3 inch loaf pan (you can use the butter wrapper if you've already put the soft butter into the mixing bowl. That is what the twins did).

Beat butter, molasses and sugar together until fluffy. It's OK if it looks curdled.

Add eggs and banana pulp and beat well.

Add sifted dry ingredient's, vanilla, and buttermilk. Mix just until dry ingredients are incorporated. Stir in nuts, and chocolate chips.

Pour into prepared loaf pan. Bake about 1 hour. Test for doneness with a toothpick in center. When done, toothpick comes out clean or with a few crumbs on it. Cool well.

Store overnight before cutting...if you can wait that long. A serrated knife makes cutting easier.

Thursday, February 21, 2013

A Twist on Irish Soda Bread


It was rainy day before yesterday, the perfect weather for winter in Northern California. It's also good weather for baking. I have been trying to bake less because I'm reducing my caloric intake and Sweetie finds that when I bake less he weighs less, too. Tuesday all those thoughts went out the window because it was the perfect afternoon for tea and something baked. The questions was, what to bake? I have some new baking related cookbooks with recipes begging to be made...and I will. But sometimes the best thing to do is just to put a twist on an old familiar recipe. I discovered a few strips of bacon in the fridge, some pecans in the depths of the bottom shelf of the fridge and a nice jug of maple syrup from Costco that isn't getting any younger. Best of all I had a quart of buttermilk...more than enough for a nice loaf of Irish Soda Bread.

I love making Irish Soda Bread. It doesn't need any eggs, it goes together quickly, it is free form and looks very artisanal without trying, and it is delicious warm or cold. Fresh out of the oven (and cooled only slightly), it is heavenly.

So the twist this time was to make Pecan Bacon Maple Irish Soda Bread. Perhaps that makes it more Southern than Irish, but the original recipe is from my very Irish Aunt May, so I'm calling it that even with the additions.

The bacon was the star here, followed by the pecans. Who can hate bacon combined with pecans? The maple flavor was a harmonious background flavor, less assertive than I had thought it would be given that I used a full 1/2 cup! The buttermilk gave it moistness and a bit of a tang. I had to hide 3/4 of the loaf so that Sweetie wouldn't gobble it all up, it was that good! You don't need any additional butter, but it is hard to resist slathering on some. If you made up some maple butter that would be a grand addition.

The key to success with this recipe is to handle things gently, especially the dough once the liquid has been added. The mass of dough going into the oven looks like it barely holds together, but it bakes up as a nice craggy loaf with a tender interior. Too much or too firm handling will give you something more akin to a brick, so resist making a nice, neat loaf, OK?


Maple Pecan Bacon Soda Bread
Makes one large loaf

4 1/4 cups all-purpose flour
1 teaspoon baking soda
½ teaspoon baking powder
½ teaspoon salt
8 oz. (2 sticks) cold butter, in thin slices
½ cup chopped pecans
1/4 cup cooked, crumbled bacon
½ cup maple syrup
2 cups buttermilk

Sift the dry ingredients over the butter and cut in well with a fork or pastry blender. Add nuts and bacon; mix in gently but well. Add the maple syrup to the buttermilk and make a well in the dry ingredients. Pour in the buttermilk mixture, then mix just until moist - don’t over handle.

Some dry stuff is OK but the dough should be sticky.

Pat into a round on a parchment-lined cookie sheet. Cut a cross on top. Bake 45 minutes at 350 F. Cool a bit before slicing.

Good with a spread made of softened butter and maple syrup, whipped together.
 

Saturday, January 05, 2013

Soup for the New Year


Happy New Year dear reader! I hope that your holidays were wonderful. With all of the rich foods I ate for the last month I'm ready for soup. It's usually fairly healthy, and perfect when the weather is chilly...which it is now here. Soup is one of my favorite foods...along with chocolate. I rarely write down recipes for the soups I make because my favorite ones are mixtures of onions, often garlic, sometimes carrots and celery, usually various veggies and broth, plus appropriate herbs and some pepper. I use what is in the pantry, in the fridge, in the garden and adjust the amounts both to what is on hand and what I feel like highlighting that day. Often the soup is a wonderful way to use up leftovers so I don't find little containers with exotic decomposed bits of this and that when I clean the fridge.

 Day before yesterday I finally found the time to make soup with my last garden grown butternut squash. The peeled chunks of squash were the most gorgeous golden color, even after being roasted in a very hot oven until soft. The pot also contained my usual chopped onions and some garlic, chunks of peeled garnet yam, chunks of a half a Granny Smith apple, peels left on, and chicken broth. After everything was nice and soft from simmering, I added cayenne pepper to contrast with the sweetness of the squash, apple and yams. I also added some ground ginger and some thyme, rosemary and mint for herbs plus lots of freshly ground black pepper.

I used an immersion blender to smooth it out a bit, but there was still plenty of texture. I also added a half cup of buttermilk and a half cup regular milk, plus some more broth until I had just the right consistency.

A few days before I had made a meatloaf with some ground pork, similar herbs to those used in the soup, onion, garlic, cooked bulgher wheat, feta cheese and Parmesan cheese. Once it was baked we had it for dinner with a nice salad, but there was still some left.

At dinnertime yesterday I had one of those 'light bulb' moments when I realized that the flavors of the meatloaf would go really well with those of the soup. I also decided that the soup needed some greens. Just before I was ready to serve, I reheated the meatloaf and cut it into bite sized chunks. In two soup bowls I placed handfuls of washed baby spinach, then microwaved the bowls on high for 2 minutes to wilt the greens. The soup was ladled on top and the chunks of meatloaf topped it all. The photo only shows the soup, with no spinach or meatloaf chunks...seems I forgot to take a photo at dinnertime and was able to do a quick snapshot yesterday at lunchtime when Sweetie was just about ready to polish off the last of the soup in this unadorned state.

The dinnertime soup looked lovely with that golden colored soup and some green from the spinach when I stirred it up. It also smelled wonderful! Best of all the flavors all came together. Sweetie is convinced that this is the best soup I've ever made. I'll let him think that until the next time that inspiration strikes!

Butternut Squash Soup with Spinach

1 tablespoon vegetable oil
1 average-sized Butternut Squash
1 tablespoon vegetable oil
1 medium yellow onion
1 clove garlic, minced
1 medium to large sweet potato or yam
½ large Granny Smith Apple
2 ½ - 3 cups low-sodium chicken stock
½ cup milk
½ cup fat-free buttermilk
½ teaspoon dried ginger powder
½ teaspoon dried thyme
¼ teaspoon dried mint
¼ teaspoon dried rosemary, crushed
¼ teaspoon cayenne pepper
fresh ground pepper to taste (I used a LOT - gave it a nice kick)
a large handfuls washed baby spinach for each serving
meatloaf chunks (optional)

1. Peel and seed the squash. Cut into 1/2 inch chunks. In a large food safe bag (I use recycled plastic bags from the produce section of the grocery store), combine the squash chunks, 1 tablespoon olive or vegetable oil, salt and pepper. Spread the squash chunks on a parchment lined baking sheet and roast in a preheated 400 degree F oven for 20 minutes. Remove from oven and set aside.

2. Peel onion and chop. Set aside. Peel potato and apples and cut into ¼ inch chunks.

3. Over medium heat in a large saucepan/stock pot, heat 1 tablespoon oil and stir onion and garlic until tender.

4. Add stock, yam chunks, apple chunks, and seasonings. Give it a good stir, reduce heat to medium-low and let simmer for about 20 minutes until the yam and apple chunks are fork tender. Add the reserved roasted squash chunks and stir. Heat another 2-3 minutes to heat the squash. Remove from heat.

5. In a blender or food processor scoop about ½ of the mixture into blender. On low speed, blend until nicely pureed. While doing this, add about ¼ cup of milk and ¼ cup of buttermilk until creamy. Transfer this to a bowl or a 2nd pot. Alternately, use an immersion blender to puree the whole pot of soup in the pot, being sure to add the milk and buttermilk (a total of ½ cup each milk and buttermilk) .

6. Repeat step 5, adding another ¼ cup of milk and ¼ cup buttermilk and transfer to bowl or pot; continue until all soup has been creamed.

7. Put soup back on very low heat, stirring to blend, and adding lots of black pepper...yum! Simmer for 15 minutes and taste soup. Adjust seasonings and, if needed, more broth, to get the consistency you like. Simmer another 2 minutes at very low heat.

8. To serve, place a handful of washed baby spinach leaves in the bottom of each microwavable bowl for the number you are serving. Microwave on high for 2 minutes. Top each portion of wilted spinach with a serving of the soup. Garnish as desired. For a hearty soup, top with chunks of warm meatloaf as I did.

Sunday, September 30, 2012

September Zipped By


Some months seem to drag...like August does for me. Some just fly by. September did that this year. Between being careful of the arm, doing the InDesign class and homework,  and having a couple of weeks at the end which were full of social occasions, it just blew through, with not enough time to blog much. I noticed that there was nothing posted this month in the way of sweets, so let's end with an update on an old cookie.

Saucepan Fruit Bars has been a family favorite for many, many years. It is easy, mixed in a saucepan, uses buttermilk, has dried fruit, a dense crumb, and a zingy lemon glaze to wake up the fairly plain cookie.

Spicy Updated Saucepan Fruit Bars keeps all of the above but subs out some all-purpose flour for whole wheat flour, adds finely chopped walnuts and a dose of chocolate chips and increases the spice a bit. The texture is still dense and a bit dry and it still needs the lemon glaze but it is much more complex in flavor and quite delicious with a cup of tea or coffee.

Remember this one when you need a quick pan of bar cookies, need to ship cookies to servicemen or students or your favorite friend who lives far away. These cookies are speedy to put together and travel well, too. I think they are really yummy, too, so you just might want to invite a neaby friend or neighbor over for an afternoon cuppa and these cookies.

Spicy Updated Saucepan Fruit Bars

1 cup butter, melted

3/4 cup brown sugar
3/4 cup sugar
2 eggs
2 cups all-purpose flour, sifted
1 cup whole wheat flour
½ teaspoon baking soda
½ teaspoon salt
1 teaspoon each nutmeg, cinnamon, and cloves
¼ cup buttermilk
½ cup golden or brown raisins
½ cup dried currants
½ cup finely chopped walnuts
½ cup chocolate chips

Melt butter in saucepan. Add sugars and stir to combine. Cool mixture, then add the eggs; beat well. Add sifted dry ingredients, spices, and buttermilk and mix well. Stir in fruit, walnuts and chocolate chips. Spread in greased 15” x 1O” x 1” pan. Bake in a 350 degree F. oven for 25 minutes. Brush with glaze (see below) while hot; cool in pan. Cut into 2” x 1” bars. Makes 45 cookies.

Glaze: Mix 1 cup confectioners sugar and 4 teaspoons fresh lemon juice.

Wednesday, May 30, 2012

End of May


What a amazingly full month May has been! Not only did I finish the first version of the Comfort Food cookbook of old family recipes, but I had it published and took it back to my Mom for Mothers' Day. Once I saw how it turned out I started thinking of ways to improve it. You can see that not only can I not leave recipes the way they were written, I have to tweak the cookbook that I wrote. The good news is that this next version is better in a number of ways, including the addition of more family stories about food. This time I'm going to get 20 copies printed up, so one of them might show up in a give away here and I might also have a few for sale. More on that later.

The month also included the final trim on the animal door so we are now ready to look for our newest dog. The actual selection will have to wait for a couple of weeks since we are blessed with a visit from my older sister and a trip to Monterey is also planned. That's it! Once we are back from Monterey we will find our doggie. More on that later, too.

The garden is looking good. Flowers are blooming, zucchini are coming in, chard leaves get large in just a few days, some of the herbs like cilantro are even going to seed. The tomatoes are getting bigger but cooler weather has slowed them a bit. Should be hot for a couple of days so I expect a growth spurt.

Have been doing some healthier eating. Made the lentil salad from a few years ago, and tonight had some of Next Sister Down's Barley Casserole for dinner. Have made sure to have a salad a day for something like two weeks. I do love salads!

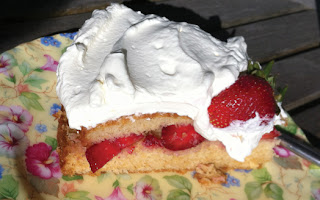
Have not been baking as much. I did make some Cocoa Drops for photos for the cookbook and a Warm Buttermilk Vanilla Cake to use for the strawberry shortcake photo. This might be a good time to post that since strawberries are at their seasonal best.

This is based on a recipe that I found online...AllRecipes I think...but I changed it so much that it would be barely recognizable to the person who created the original. I'd never made a warm milk cake before. It makes a great spongy type cake but moister than the classic genoise...no need for moistening syrups. The juices from the sliced strawberries soaked into the cake nicely and the finished shortcake kept well, too.Somehow we managed to hide it behind pints of fresh strawberries and they were eaten as is before we finished off the cake. It wasn't due to anything being wrong with the cake...look at all that whipped cream and tell me how it could be...but plain freshly picked local sweet juicy strawberries are even better.

Warm Buttermilk Vanilla Cake
2 eggs
1/2 cup sugar
1/2 cup brown sugar
1 teaspoon pure vanilla extract
1 cup cake flour
1/2 teaspoon baking powder
1/2 teaspoon baking soda
1/4 teaspoon salt
2 tablespoons butter
1/2 cup plus 2 tablespoons buttermilk

In a large mixing bowl, beat eggs, sugar and vanilla on high until thick and lemon-colored, about 4 minutes. Combine flour, baking powder, baking soda and salt; add to egg mixture. Beat on low just until combined. Melt butter in a small saucepan until butter melts. Remove from heat and stir in the buttermilk. Add to batter; beat thoroughly (the batter will be thin). Pour into a greased 9-in. square baking pan. Bake in a preheated 350 degrees F oven for 20-25 minutes or until cake tests done. Cool 5 minutes in the pan, then turn out on a wire rack to cool completely.

To make a Strawberry Shortcake with this cake, slice the cooled cake in half horizontally. Lay the top layer aside. Spread sliced strawberries (hull and slice them in advance if possible so that the juice can be drawn out. Add a little sugar if they are not sweet enough) over the bottom layer.Top with the top layer of cake and frost the top with whipped cream. Garnish with a few fresh strawberries. Serve at once. If there is some left to store, store, tightly wrapped in plastic wrap, in the refrigerator.

Monday, May 10, 2010

Too many Bananas

These started out as Raisin Bran Muffins, but I had no bran, nor old-fashioned oats and I did have ripe bananas and walnuts and coconut…and raisins. Being playful, I changed quite a few things around and made some lovely muffins that have full banana fragrance and flavor and are joined sweetly by playmates walnuts, coconut and raisins.

Since I played around so much with the recipe, it ended up making more than 12 muffins. You could probably get 18 muffins from this recipe, but I chose to put the additional batter in a mini-loaf pan instead.

Playful Banana Muffins
Based loosely on Raisin Bran muffins in The King Arthur Flour Bakers Companion

3 ripe bananas
1 cup buttermilk at room temperature
1 stick of butter, melted (1/2 cup) and cooled a bit
2 large eggs, at room temperature
½ cup brown sugar, packed
2 tablespoons molasses
1 ½ cups all-purpose flour
1 cup whole wheat flour
½ teaspoons salt
1 tablespoon baking powder
1 teaspoon baking soda
½ cup rolled oats (oats for oatmeal)
¼ cup dried coconut
½ cup golden raisins
½ cup roughly chopped walnuts

Preheat the oven to 425 degrees F. Prepare a 12 cup muffin tin and a mini-loaf pan by spraying with baking spray or by greasing and flouring them. Set aside.

Peel and mash the bananas in a bowl. Set aside.

In a large mixing bowl, mix together the buttermilk, butter, eggs, brown sugar and molasses. Add the bananas and mix to combine.

In another bowl mix together the flours, salt, baking powder and baking soda, oats, coconut, raisins and nuts.

Quickly, with as few strokes as possible, mix the dry ingredients into the wet ingredients, just until combined.

Fill prepared muffin cups with the mixture, filling each cup almost to the top. Pour the rest of the batter into the prepared mini loaf pan.

Bake in preheated oven for 14 to 18 minutes for the muffins, or until they spring back when pressed lightly in the middle and about 25 minutes for the mini loaf pan banana bread, until a cake tester inserted in the center comes out clean.

Removed when ready from the oven and cool on a wire rack 5 minutes, then turn out of the pans and let cool until ready to serve.

Saturday, August 16, 2008

Summer Morning with Fog

Summer hearabouts often means waking up to a gray day. It bothers some folks, but I love the fog. A foggy morning means the day won't get too hot, usually. It also means that I can bake something lovely for breakfast and the house will stay cool. Since ours is a solar home, with not central heat or airconditioning, we take that into consideration. A few days ago when the day broke with the sun heating things up right away, not only did I not bake, but we also shut the windows and kept what cool there was trapped in the downstairs. We have a concrete floor and that cools down overnight if we leave the windows open and the night cools down. We've been "green" that way for years, but it does take some getting used to and a little extra thought.

This morning seemed like the perfect time to make some fresh blueberry muffins. The blueberries were on sale at the store, I had bought buttermilk and my brother and a friend were visiting. It was likely that they would appreciate some home cooking since hotel food (and conference hotel food at that) had been their fare for days.

These muffins are so good and very simple. They go together quickly. Melt the butter first, so that it can cool a bit as you measure the dry ingredients and zest the lemon and prepare the blueberries. Blueberries do need to be picked over to remove any mushy ones and any little stems still attached, but even that is faster and easier than peeling and dicing peaches, which was my other choice.

Once baked, these muffins have a soft, tangy interior with juicy hot blueberries, a nice crust on the sides and top and just enough sweetness. Butter was on the table, but these didn't need any. Not a muffin was left by the time breakfast (which also included a fruit compote with lots of fresh melon, berries, and bannanas) was over. Having freshly made blueberry muffins is a great way to start the morning off. Now, where is that second cup of coffee?


Blueberry Buttermilk Muffins

1 ¾ cups all purpose flour
½ teaspoon salt
½ teaspoon baking soda
1 teaspoon baking powder
¼ cup sugar
Zest of ½ a lemon
1 cup buttermilk, at room temperature
1 egg, at room temperature
4 tablespoons unsalted butter, melted and cooled
1 cup blueberries, washed, drained, and picked over

Preheat oven to 400 degrees F. Butter a 12 cup muffin tin. Set aside

On a piece of waxed paper, or in a mixing bowl, sift together the flour, salt, baking soda and baking powder.

Rub together the sugar and the lemon zest and add the mixture to the flour mixture and stir with a fork to combine.

In a mixing bowl, stir together the buttermilk, egg, and butter. Add to the bowl of dry ingredients and mix with a few swift strokes, just until combined. Don’t over mix. Fold in the blueberries and immediately scoop the muffin batter into the prepared pan, dividing evenly among the cups.

Bake in the preheated oven 20 – 25 minutes, until tops are golden brown and a gentle push on the top has the top springing back.

Let cool 2 – 5 minute, then put into a basket lined with a kitchen towel, folding the towel over the muffins to keep them warm. Serve warm.

Makes 12 muffins

Tuesday, April 03, 2007

Spring Tonic the Sweet Way


There is a tradition that in the spring you take a tonic to give yourself a boost after winter deprivation. Since we now have oodles of things in the market all winter, there really is no deprivation. Still, a blast of tonic of some sort is great. One old fashioned one is rhubarb. It certainly has a robust taste, but if you cook it, it becomes more civilized.

Rhubarb looks a lot like red celery stalks when you buy it at the market. They have usually trimmed off the chard-like leaves, which is good because you shouldn't eat the leaves. The perfect companion for rhubarb is strawberries, another spring favorite.

I already had some strawberries when I saw the rhubarb at the store. When I got home I couldn't decide how to use them together. Jam is always wonderful. Strawberry-rhubarb pie is a favorite of mine, but I was feeling more like muffins or cake.

In The Fannie Farmer Baking Book by Marion Cunningham I found Buttemilk Lemon Pound Cake.

That provided the perfect base for a lovely Strawberry Rhubarb Pound Cake. It is light but rich, with a golden crust and sweet-tart tang from the buttermilk as well as the rhubarb and strawberries. A slice is the perfect thing with a cup of tea on a spring afternoon.

Strawberry Rhubarb Pound Cake

4 eggs at room temperature
3 1/4 cups all-purpose flour, divided
1/2 teaspoon baking soda
1/2 teaspoon baking powder
1 teaspoon salt
2 sticks (1 cup) butter, softened
2 cups sugar
1 teaspoon lemon extract
1 tablespoon grated lemon zest
1 cup buttermilk
1 cup strawberried, diced in roughly 1/2 inch dice (about 1/2 pint)
1 cup rhubarb, diced in roughly 1/2 inch dice (about 2 stalks)

Preheat oven to 350 degrees F. Grease and flour two 8 1/2 x 4 1/2 x 2 1/2 inch loaf pans.

Combine 3 cups of the flour, baking soda, baking powder, and salt; sift them together onto a large piece of waxed paper. Reserve the last 1/4 cup of flour for the berries and rhubarb.

Put the butter in a large mixing bowl and beat until it is smooth and creamy. Slowly add the sugar, beating constantly. Continue beating until smooth and well blended. Add the eggs all at once, and beat until the mixture is light and fluffy.

Combine the berries, diced, and the rhubarb, diced, in a bowl. Sprinkle with the flour and toss to coat. Add the lemon zest and toss to distribute the zest. Set aside.

Sprinkle the butter and egg mixture with about half of the flour-leavening-salt combination and beat until well blended. Stir the lemon extract into the buttermilk. Beat half the buttermilk mixture into the batter. Add the remaining flour and buttermilk mixtures and beat until the batter is smooth and well blended. Fold in the strawberry-rhubarb-zest mixture gently but thoroughly to distribute the fruit throughout the batter.

Pour the batter into the prepared pans. Bake for 40 - 45 minutes, or until they test done. Remove from the oven and let cool on a rack for 5 minutes, then turn out onto the rack, turn them right side up and allow to cool completely on the rack before serving. Makes two loaves.