Showing posts with label butternut squash. Show all posts

Thursday, January 29, 2026

The Last of the Honeybear Butternut Squash - In a Crostata


 I had fun growing butternut squash this summer knowing that these Honeybear squash, a smaller variant or the usual squash, would be easy to roast and enjoy. A few days ago I took the last one, which measured about 7-inches tall by 4-inches in diameter, cut off the stem, cut the rest of it in half, scooped out the seeds with a melon baller, put some foil on a baking sheet and oiled it, then put the two squash halves, cut side down onto the baking sheet and the sheet into a preheated 400 degree F oven. I baked it until tender when pierced with a knife (about 20-25 minutes? - I forgot to write it down but it was about that amount of time). After the squash had cooled enough to be handled, I peeled it and stored it in the fridge in a sealed container until I could bake with it.

Today was the day and the recipe changed from my planned calzone to an even better crostata - a freeform savory pie. I was inspired by a ravioli that I had once in a restaurant that had butternut squash stuffed ravioli swimming in a sage butter sauce. This is a little more complicated, but still pretty easy.

It's fine to use premade pie dough circles. I like the refrigerated ones and I usually roll them out a bit more so the crostata has a larger diameter. It still isn't much wider than 8" in diameter because you fold some of the dough up and over the filling before baking.


Over the rolled out dough I spread some ricotta cheese that has been mixed with herbs and spices. This is when you decide how much dough to leave for folding. I left a bit over 2-inches to fold.


Next you sprinkle on some grated Parmesan. For best results, use real Italian Parmesan cheese. It has the full flavor you want.


Next you add the butternut squash. Slice or mash it, just make sure you have a fairly even layer covering the cheese layer.


Next you add leeks that you have already washed, sliced, and cooked in a combo of butter and olive oil until soft and translucent and with a few bits lightly browned. Again, cover the prior layer as evenly as you can.


Over this goes a layer of shredded mozzarella cheese, then more grated Parmesan. The last bit is to sprinkle on some chopped Italian parsley.


Now you're ready to fold over the dough that you have left uncovered. With a small bowl of egg wash and a pastry brush handy, you fold and sort of pleat the dough. There will be a center section of about 5-6 inches uncovered where you'll see mozzarella cheese, Parmesan, and parsley bits. The egg wash will both give you a lovely golden crust and it can help the pleats and folds of dough stay folded while the crostata bakes.


Now the crostata gets transferred to an oiled baking pan (I used a pizza pan) and baked in a preheated 400 degree F oven until  golden brown, about 25 minutes. Not only will the crust bake to a golden brown, but the cheese will brown a bit too. Photo at top shows the baked crostata, ready to serve.

Now you can serve it after it cools 10-15 minutes, or you can serve it slightly warm or at room temperature. I like it slightly warm. The combination of the three cheeses, the leeks and that wonderful winter squash with a flaky crust is delectable. Enjoy the fruits of your labors!


Butternut Squash Crostata with Three Cheeses and Leeks
An Elle the Baker Recipe
Serves 6-8

1 pre-rolled refrigerated pie dough round, such as Pillsbury Readycrust
1 cup ricotta cheese - if very moist, drain for 1/2 hour in cheese cloth over a sieve
1/2 teaspoon dry rubbed sage
1/4 teaspoon dry thyme
1/8 teaspoon paprika
salt and pepper to taste
1 large or two small leeks, washed well, quartered, and sliced in thin slices
1 tablespoon butter
2 tablespoons olive oil
2 cups freshly grated Parmesan cheese, divided
1 small baked and peeled butternut squash, about 2 cups
1 cup grated mozzarella cheese
salt and pepper to taste
1 teaspoon fresh Italian parsley, finely chopped
1 egg whisked with 1 teaspoon water

Preheat the oven to 400 degrees F. Spray a pizza pan with olive oil or baking spray. If you have one, put a baking stone in the oven on a low rack before turning on the oven.

If cold, bring the refrigerated pie dough round to room temperature.

In a small bowl, mix the ricotta cheese, sage, Italian parsley, thyme and paprika, along with salt and pepper to taste. Set aside. 

In a medium skillet, over low heat put the olive oil and butter and heat enough to melt the butter. Cook the leeks in the olive oil / butter over low heat until translucent with a few parts starting to brown, about 15 minutes, stirring occasionally.  Set aside.


To assemble the crostata, roll out the pie dough on a lightly floured clean work surface to 10 or 11 inches in diameter. (If you don't have a cake lifter or similar tool to move an 8-inch wide pastry, cut a piece of parchment or foil and place the pie dough on it. If it's foil, lightly grease it with baking spray.

Spread about 1 cup of the ricotta mixture over  the dough circle, leaving a 2-inch edge with no ricotta. This dough will be folded up and over the finished topping later. Sprinkle on 1/2 the Parmesan evenly over the ricotta. Top with the butternut squash as evenly as you can. Top with the leeks, distributing the leeks over the squash. 

Sprinkle on the mozzarella cheese and then the rest of the grated Parmesan. Sprinkle the parsley over it all.

Fold the plain outer edge of the dough over the filling, pleating and folding as needed. Use a pastry brush to coat the egg wash over the dough, including at the back of the pleats and folds. Gently push the egg-washed pleats and folds towards the rest of the dough to adhere.

Once the crostata has been filled, pleated and egg washed, check to make sure that the pre-heated oven is hot. Move the crostata to the pizza pan, either using a cake lifter or using the parchment of foil as a sling.

If you are using a baking stone, slide the pizza pan onto the stone and bake until the dough is golden brown. If you're not using a baking stone, slide the pizza pan onto the lowest oven rack and bake until the dough is golden brown.

Bake for about 20-25 minutes, until the crust is golden brown and the cheese of the filling is beginning to brown, too.

Let cool a couple of minutes, then serve or let cool to warm or room temperature. Serve in wedges.

Sunday, October 30, 2022

Butternut Squash For Fall - Zucchini For Summer


By now we have usually taken in our front porch wicker furniture because of rain, but this year we continue to have weather more like June than October...including some fog, which I love. No rain.

This recipe reflects the two seasons in a way. I'm just beginning my use of winter squash...in this case butternut and have almost finished using the zucchini from my garden because we are not getting very much any more and mostly little ones at that. This recipe has both, plus some mushrooms and two kinds of rice, plus pecans and orange juice and zest. What ties it together is olive oil and balsamic vinegar, plus a bit of maple syrup on the roast veggies.

I saw a recipe on my phone for something similar to this a week or so ago, but couldn't find it when it was time to make this dish, so I sort of put things together that sounded right in proportions that seemed right and it worked out pretty well. Sweetie raved and had two servings.

 Although I often peel, de-seed and cut up fresh butternut squash, today I used a container from the grocery store that had already prepared chunks in it. I did cut a few of the larger chunks in half, but other wise just threw them into the mixing bag. The zucchini were small so I used two, cutting off the ends and cutting them in half, then slicing them. The mushrooms were already cleaned and sliced. You can use any kind of mushroom you like...these are plain white ones but cremini or one of the fancy ones would be delicious, too.

Do use a fresh orange for this. The zest and fresh juice are a background note, but make a big difference and that won't happen without the fresh oils in the zest and the unmistakable taste of fresh OJ.

I used a rice cooker for the rice but just prepare it in your favorite way. You can skip the wild rice if you want this to be less costly and it will still take great, but the wild rice really adds to the taste. This would make a great stuffing for duck if the butternut squash were chopped in smaller cubes. The flavors would be excellent with duck...or turkey. We had it with grilled chicken thighs and it was lovely.

Need to prep ahead? You can roast the veggie mixture in advance, keep in fridge, then warm in the microwave before mixing into the rice mixture. Both kinds of rice can be made ahead and rewarmed with about a teaspoon of water in the microwave with waxed paper over the container to keep the moisture in. Do mix up the 'dressing' at the time you are going to serve because fresh orange juice will taste fresher that way...and it matters. Pecans can be toasted ahead and kept in a airtight container.

Two Kinds of Rice with Butternut Squash and Maple
Serves 4-6

3-4 cups butternut squash, peeled, de-seeded, and cut into cubes of about an inch
2 tablespoons olive oil
2 tablespoons maple syrup
2 tablespoons balsamic vinegar
1/4 teaspoon dry thyme
1/8 teaspoon (or more if you like it spicier) cayenne pepper, ground
1/4 teaspoon freshly ground black pepper
1 tablespoon fresh orange zest
1/2 cup sliced mushrooms
2 small or 1 medium-large zucchini, ends trimmed, halved lengthwise and sliced in1/4-inch thick slices
1/4 cup chicken broth
1/4 cup fresh orange juice
1 tablespoon balsamic vinegar
2 tablespoons olive oil
salt and pepper to taste
1 cup cooked wild rice
1 1/2 cups cooked brown rice
1/4 cup toasted pecans, broken in large pieces
1 tablespoon parsley, minced

Preheat the oven to 450 degrees F.

Place the butternut squash, olive oil, maple syrup, balsamic vinegar, thyme, cayenne pepper, ground black pepper, and orange zest into a large plastic bag (I use a clean produce bag) and shake vigorously to coat the squash in the other ingredients. Line a sheet pan with heavy duty foil and spray with spray oil (I used spray olive oil). Pour the squash mixture onto the prepared sheet pan. Let as much of the mixture as you can drip from the bag. Use the outside of the bag to pat the squash into a single layer, with the cubes separated from each other. Roast in the preheated oven for 10 minutes.

Add the sliced mushrooms and sliced zucchini to the sheet pan and use tongs or a wooden spatula to carefully mix them into the squash mixture while also turning the squash to another side. Try not to tear the foil since the coating mixture is sticky and could burn if it leaks underneath. Make sure that the mushrooms and zucchini are laying on a flat side on the surface of the sheet pan foil, then return the pan to the oven and roast another 10-15 minutes, or until butternut squash is tender.

While the squash is roasting, in a small bowl mix together the chicken broth, balsamic vinegar, olive oil, salt and pepper.

In a large bowl place the two kinds of rice, warmed, the roasted veggies and any sauce, and the fresh orange juice dressing. Gently stir to combine. Add the toasted pecans and the minced parsley and gently stir to combine. Serve at once for warm dish, or serve at room temperature later.

Thursday, January 27, 2022

Butternut Squash in a Quiche

I'm a firm believer that you can put almost anything savory in a quiche. If you look at the index of recipes, you'll see that I've made quite a few variations. The first quiche I ever made was quiche lorraine, a classic for a reason. Now that I only have one kind of cheese that I cook or bake with (almond milk ricotta), the frequency of making quiche has gone down. Still, every once in a while I feel the need, and this time it was joined by the need to use up some recently roasted butternut squash.

In case you don't have any roasted butternut squash in your fridge, let me remind you how easy it is to make. You take a butternut squash, any size really, and carefully cut it in half from stem to blossom end. You scoop out the seeds and stringy bits in the seed cavity, line a baking sheet with foil, spray the foil with cooking spray, then put both squash halves on the foil, cut side down. Roast at 450 degrees F until the squash is tender. I check by poking a sharp knife into the squash...it should slide in easily. Let the squash cool, peel it, and you are ready to use it. 

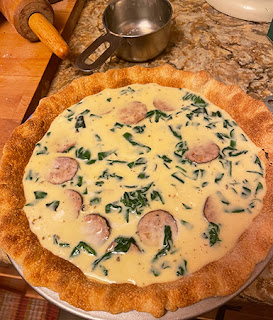
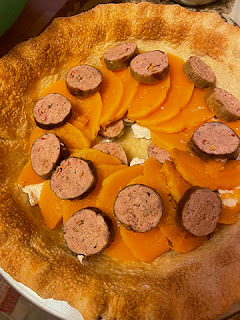
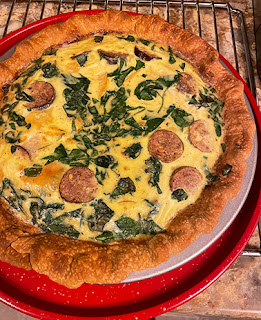
This quiche is a nice combination of slices of the butternut squash, slices of cooked Italian sausage, some lightly steamed miners lettuce (or spinach), chopped, and a custard flavored with Italian seasoning and thyme, salt and pepper. You layer the ingredients into a blind-baked pie crust, then pour in the custard and bake. Pretty easy and quite good. You could even use a frozen pie crust. I actually use the pre-made pie dough circles found in the market (Pillsbury ReadyCrusts in my case). Using pre-made pie dough makes this go together very quickly and this kind of quiche is always a hit.


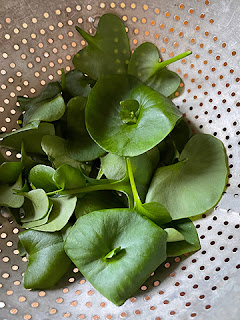
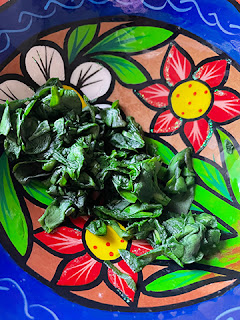
So this is the first time that I've picked and used miners lettuce. It grows wild on our property and this is the perfect time of year to use it, before it flowers. I have a planter that's high enough so the lettuce is pristine and it's also easier to pick being a little higher. My knees have been bothering me lately, so kneeling down to pick greens isn't happening! Still, it's nice to be able to use farm fresh greens in the quiche. Miner's lettuce is pretty mild in flavor, but you can tell it's there. I mixed it into the custard, so a lot of it floated to the top. As you can see from the bottom photo, it cooks down quite a bit...I may have less than 1/2 cup here, but close to that amount.

Tip: If you use a pound of dried beans as pie weights as I do, save them once they have cooled off and you can use them again and again as pie weights...just don't plan on cooking them to eat. At about a dollar and a half for a bag of dried beans, it sure beats the almost $9 you would pay for Pie Weights from King Arthur or a similar amount at Sur la Table.


Quiche with Miner's Lettuce, Butternut Squash and Bacon

1 9inch pie shell, blind baked at 425 degrees F for 10-12 minutes (recipe follows)

½ cup cooked, chopped and drained miner's lettuce or baby spinach, leaves only
½ cup ricotta cheese, crumbled
½ small butternut squash, roasted, skinned, and sliced thinly
1 cooked Italian sausage, sliced
3 eggs (or equivalent egg substitute)
1 ½ cups evaporated milk, or light cream, or soy creamer
¼ teaspoon salt
dash pepper
¼ teaspoon Italian seasoning
¼ teaspoon dried thyme

Preheat oven to 350 degrees F.


Sprinkle the bottom of the pie shell with the ricotta cheese, distributing evenly. Place the butternut quash slices evenly over the other ingredients. Distribute the sliced sausage evenly over the ingredients in the pie shell.  Set aside.

In a bowl, beat the eggs lightly, then add the milk and beat with a fork to combine, add the salt, pepper, Italian seasoning, thyme, and steamed and chopped miner's lettuce, and beat with a fork to combine.

Pour the egg/milk mixture over the ingredients in the pie shell. Place in the preheated oven and bake 30-45 minutes, or until set and lightly browned. Cool for 10 minutes before cutting to serve.
Serves 6-8

Pastry Pie Shell

1 cup all-purpose flour
¼ teaspoon salt
1/3 cup chilled butter
1 egg, lightly beaten
2 tablespoons ice water
1 teaspoon lemon juice (optional)

Mix the flour and salt in a bowl. Cut in the butter with a pastry blender, or two knives, until particles the size of dried peas are formed.

In a small bowl mix together the egg, ice water and lemon juice (if using). Sprinkle over the flour mixture and toss with a fork lightly. Do not over mix. Gather the particles together in a ball. Wrap airtight and chill in the freezer for 10 minutes. Roll out with a rolling pin on a floured surface until large enough to fill a 9 inch pie pan with some overlap.

Fit into a 9 inch pie pan, smooth to fit, trip excess , tuck edges under and crimp as for any pie crust. Prick lightly all over the surface with a fork. Freeze 10 minutes. Remove from freezer and cover with a circle of parchment paper. Fill the paper with beans or pie weights (blind baking the crust).

Bake at 425 degrees F for 10 – 12 minutes. Cool slightly. Remove and save the beans or pie weights. Fill with filling as called for in recipes needing a pie shell.

Thursday, November 28, 2019

Butternut Tenderloin for Thanksgiving


It's something of a challenge to come up with a festive meal for Thanksgiving when you are limited to soft foods. My oral surgery of last week came with instructions to take in only liquids the first few days and then soft, mushy foods to finish out the week. A friend hoped that my mashed potato milkshake was delicious but I actually had a nice meal that included mashed potatoes and jellied cranberry sauce. The star of the plate was from a recipe that one of my sisters sent me...Butternut Squash Tenderloin. Now we all know that squash don't have loins, so why that moniker? It's because the neck of the squash, if cooked and peeled, has the shape of a tenderloin and if you season it, brown it and roast it so that the outside has a nice seasoned and browned crust, it can be sliced like a tenderloin of meat.


It was really delicious and filling, but there was no getting away from the fact that it was butternut squash. If you enjoy squash like I do, that's a good thing. It went well with the sides on the plate and was a lovely deep golden color. Sweetie had some too and liked it (although he had steak and salad with it). Tomorrow the rest of the squash will morph into butternut squash soup.

We also had a delightful dessert...tipsy parson...but I'll post about that later.

To make the 'tenderloin', choose a butternut squash with a long neck part. Mine was almost all neck, with very little in the small rounded bottom part but seeds. Since that neck part is dense, it took a little longer for the initial baking. I put the whole squash in the fridge overnight Wednesday night and finished the dish about forty-five minutes before dinner time on Thursday. The skin was easy to remove, the seasonings were easy, too, and it browned fairly quickly in my cast iron skillet. I roasted it for 30 minutes, which heated it through just right and allowed the crust/skin with the seasonings to brown a bit more.
Here is the neck peeled and ready to season, with the top inch and lower seedy part in the background.

The originator of the recipe served their squash with peas on the side and what looked like a mushroom gravy. I just dressed my slices with some plain yogurt and that worked well. Would have done the mushroom thing, but I made mushroom gravy last night for some pasts, so didn't want it again.

Do give this recipe a try if you enjoy butternut squash. You'll be glad you did.


Butternut Squash Tenderloin
by 100% Esselstyn Nutrition Forum

A whole butternut squash (preferably with a long neck), weights vary
4 tablespoons water
1 tablespoon ground sage
1 tablespoon onion powder (I omitted this as I had none)
2 tablespoons black peppercorns, ground (I used less)
1/2 teaspoon smoked paprika (I used cayenne pepper for some pep)

Preheat over to 200 degrees c/180 degrees c fan (or 400 degrees F/350 degrees F convection)

Place the whole squash, skin and all, on a baking sheet. Roast until the squash is 95% cooked (approximately 45-60 minutes, depending on size). (I used foil under my squash on the baking sheet.)

Check the squash is cooked by inserting a skewer about three inches from the stem. When it can penetrate in and out through the width easily, it is done.

Remove from the oven and let it cool for 30-45 minutes, to finish carry over cooking. (Doing this the day before saves time.)

With a sharp knife, cut off the top and tail of the squash, including the bottom section wher the seeds are. you want to leave the long neck (tenderloin) whole for roasting.

Stand the squash on one end and carefully peel/cut away the skin.

Place the peeled squash in a large bowl or baking sheet, then evenly apply the seasonings to the entire squash.

Heat a large, heavy frying pan over medium-high heat. Add water carefully and add the squash and pan fry, turning to ensure that all sides are browned.

In the same pan (or transfer to a baking sheet) roast for an additional 20 minutes. Serve with green veggies for contrast.


Remove from the oven and let cool for a couple minutes before planting, slicing and enjoying.

Sunday, January 28, 2018

Spiral Butternut Squash


For Christmas Sweetie gave me a fancy spiralizer attachment set for the Kitchen Aid stand mixer. I finally had time to play with it yesterday and used it to make a loooooong spiral of butternut squash. It was pretty fast and a lot of fun. One thing I found out, though, is that it leaves a fair amount of the squash untouched, so I used a sharp knife and turned the rest into smaller pieces of squash, mostly matchsticks about the same thickness as the squash spirals.


Then I had to figure out what to do with it. One idea was to boil it like pasta and make a pasta sauce with chunks of chicken and some mushrooms. Another was to coat the strands with oil, sprinkle on some salt and pepper and air fry it like french fries. What I finally decided to do was to put it into a baking pan after mixing it with sliced mushrooms and then pour on a mixture of soy creamer, egg, pepper, and vegan pesto to make a baked casserole.

That worked out pretty well. I did find that the squash had done some releasing of juices, so the casserole was soggy at the bottom. I also discovered that the sauce was prone to curdling, probably because I baked it at 350 degrees F. Next time I'll cook the squash in a frying pan first to make it less soggy, then bake it at a lower temperature so the sauce stays nice and smooth.

The taste was outstanding! The pesto sauce was a counterpoint to the slightly sweet squash and the mushrooms added an earthy component. Sweetie had two helpings, so I know that it was a hit.


Butternut Squash Spirals Casserole

About 4 cups spiralized butternut squash (skin and any seeds removed before turning squash into spirals)
1 tablespoon olive oil
1/2 cup sliced mushrooms (or more, to taste)
1 cup unsweetened soy creamer or milk or half and half
1 egg
1/2 cup prepared pesto
salt and pepper to taste (I didn't use any salt but should have)

Line a 9-inch by 9-inch baking pan with foil. Set aside. Preheat the oven to 325 degrees F.

In a large clean produce bag or gallon ziploc bag combine the squash spirals, oil and mushrooms. Pour out of bag into prepared pan.

In a medium bowl whisk together the soy creamer, egg, pesto, salt and pepper. When fully combined, pour evenly over the squash. Use kitchen shears to snip any very long spirals of the squash.

Cover the baking pan with foil to seal and bake in the preheated oven for 20 minutes. Uncover and return to the oven and bake another 15 - 20 minutes, or until squash is tender and ends sticking up start to brown a bit.

Serve at once.

Optional: Shake together the squash spirals and the oil and then cook the squash over medium-high heat for 5-10 minutes, or until juices have been released and cooked off. Cool slightly, then combine with the mushrooms, put into the pan, and proceed as directed in the recipe.

Sunday, September 17, 2017

Squash and Maple Syrup - A Match Made for Roasting


Went to a wonderful birthday party yesterday. The birthday girl combines kindness, consideration, imagination, artistic talent, literary talent, high intelligence, beauty inside and out, with gratitude, love and grace in amounts unusual in an 18 year old. She is a winner in so many ways.

A nice aspect of the party was that Sweetie and I got to meet her neighbors and friends and adults who have been a wonderful part of her journey to adulthood. Thank you Natasha. Lots of fun discussions took place, including one about this blog. I mentioned a recipe I first made a few years ago, which has become a favorite. It includes Delicata squash, olive oil, spices and maple syrup. Often I make it with those and some yams. Today I used butternut squash, so it was very squashy and good. I like using Moroccan spices with it but today used Zatar, which includes sumac, thyme, white sesame seed and salt. It was delicious with the squash.


The seeds are easily removed from the halved squash with a melon ball tool.


Sometimes I leave the skin on the delicata squash as I did today, but that is usually when I grew it myself as I did this one. When I get it from the market, or just want all the squash to be soft (because the skin does get chewy and a bit crackly), I peel the thin skin off with a paring tool. I used that tool for peeling the butternut squash, which works very well.

This is a sweet/savory dish and is great when the weather starts to cool off enough to roast things in the oven. We served it with grilled chicken and a tomato/cucumber salad with a red wine vinaigrette.
The squash is soft and delicious, with bits that are browned and a little chewy and totally wonderful. Give it a try. You might become a squash convert.


Delicata and Butternut Squash with Olive Oil and Maple
Serve 4-6

2-3 cups peeled, cubed butternut squash, seeds, if any, removed
1 Delicata squash, seeds removed, peel removed if desired, cut in half and sliced
3 tablespoons olive oil
salt and pepper to taste
3 tablespoons real maple syrup
1/4 teaspoon zatar spice mix, or your favorite mix of spices that are warm (cardamom, curry, coriander, etc)

Preheat the oven to 450 degrees F.

Line a sheet pan with parchment paper.

In a large plastic bag (I used clean produce bags from the market), combine the squash, olive oil, salt and pepper, maple syrup and zatar spices. Close bag tightly and shake to completely coat the squash with the wet ingredients and spices.


Pour coated mixture on the parchment lined sheet pan and use the bag to spread the squash out in the pan into a single layer.

Bake in preheated oven for 15 minutes. Use a spatula to turn the squash pieces over, then roast an additional 10 - 15 minutes until edges are browned and squash is softened.

Serve while hot.


Thursday, October 23, 2014

Winter Squash Season Side Dish


Time just seems to be flying these days! Found something I think that you will want to try yourself. About a month ago Sweetie and I were at Costco and they had tastings of some new products, all Afghan recipes. I sometimes think that a raft of people only go to Costco on the weekends for the samples, not to actually buy anything. Is that possible?

Anyhoo, we fell in love with a butternut squash side dish that was savory, with a hint of sweetness and a touch of heat. Sweetie decided that we should try making it ourselves, so I researched online and found about six different ways to make it. One of the constants was onion puree. I usually chop or mince my onions for most dishes, but for this one I put the peeled and quartered yellow onion into the food processor and let it run until it was a puree. I found that the cooked puree not only flavored the squash, but it seemed to thicken the sauce a bit, or at least provide body to the sauce.

I ended up combining a few of the recipes. Most had a goodly amount of peppers for heat, but since I was going for the very mild heat that I prefer, I used a small amount of cayenne pepper. If you like your food hotter, you can add jalapenos or increase the cayenne. They often had more turmeric, too. I know that turmeric is good for you , but it is not my favorite flavor, so I used only a teaspoon, while some recipes used as much as a tablespoon. Try it with a smaller amount unless you know that you love turmeric. You can always add more.

One of the most time consuming parts of this kind of recipe is preparing the butternut squash. Sweetie got past that by buying already peeled and cubes fresh squash. Beyond that the part that requires some time is that during the cooking you need to turn the squash over in the sauce every 10 minutes and to keep an eye on it so that the sauce cooks down, but doesn't burn.

This makes a lovely side dish. Traditionally it is served with naan flatbread and yogurt, usually garlic yogurt, but I served it with grilled chicken and the yogurt topping was plain yogurt. The chunks of butternut squash were tender, but not falling apart. They had an aroma of turmeric and onion and tomato. Now that it is winter squash season, give this a try, either as part of a traditional meal, with some eggplant, too, or as a side dish. It would go well with pork or heaped over a serving of couscous with pine nuts. You can substitute another kind of squash, like kabocha, or pumpkin, too.


Afghan Squash

1 large yellow onion
1/4 olive oil
1 clove minced garlic
1 tablespoon tomato paste
1 teaspoon turmeric
1 tablespoon minced fresh ginger
1/4 cup sugar
1/2 salt
1 1/2 - 2 cups chicken broth
4 cups peeled, de-seeded, and cubed butternut squash or pumpkin

Peel the onion and remove the stem end and the tip. Cut onion into four pieces. Place in the work bowl of a food processor fitted with the steel blade. Process until pureed, scraping down the sides as needed so that all the onion is a puree. In a large skillet cook the onion puree in the olive oil for 10 minutes, stirring often. All of the squash will need to go into the skillet, preferably in a single layer, so make sure the skillet is large enough.

To the cooked onion add the garlic, tomato paste, turmeric (you can add more if you like...I've seen as much as a tablespoon used), minced fresh ginger, sugar and salt. Stir to combine, then add the chicken broth and stir to completely combine all the ingredients in the mixture. Bring mixture to a boil, then reduce heat so mixture simmers. Add the prepared squash and stir to coat the squash with the mixture. As mush as possible, keep the squash in a single layer. Simmer for 10 minutes. Turn squash over so that top surface goes toward the bottom and is immersed in the sauce. Simmer another 10 minutes. Check squash for tenderness. You want the squash completely tender, but still holding together. Simmer another 5 or 10 minutes (or longer) if needed until squash is tender. Sauce will have thickens a bit. If squash is very tender, but sauce is too thin, remove squash with a slotted spoon, cover to keep warm, then simmer sauce some more until it is desired thickness. Put squash back into sauce and stir to coat with sauce. Serve at once, garnished with yogurt, or cover and refrigerate, then reheat the next day.


Speaking of time passing, we are just about a month away from Thanksgiving. Our neighbors have invited us for dinner and I think this year we will be enjoying a heritage turkey. It might be one of these blue faced toms. I snapped these shots as they tried to intimidate the dog. She is a sheep dog, but was having fun herding the chickens and turkeys, too.

Friday, October 25, 2013

Soup's On!


With the coming of cooler weather, leaves are turning bright and muted shades of red, gold, bronze and orange. The summer crops are finishing up in the garden, with just a few cherry tomatoes still on the vines. I've harvested the butternut squash and have put them in storage, ready for winter cooking and baking, their sunflower color serving as a reminder that summer will come again.

Time, also, to make soup. A few days ago I made a quick soup with canned beef broth, celery, carrots, onions, corn, zucchini and some frozen meatballs and cheese-filled tortellini, plus herbs and spices. Four days ago I started some butternut squash soup based on a recipe from the Press Democrat October 9th newspaper. The recipe follows much of the one from Kay Baumhefner of Come Home to Cooking. I used half the amounts since it would take a week for us to finish 8 servings worth of this hearty soup. I used dried thyme instead of fresh, no bay leaf, Scotch whiskey instead of Grand Marnier and left out the spinach. For the onions I used some that I had cooked in the crockpot so there was no butter used, either, only a bit of olive oil. I'm going to post that crockpot caramelized onion recipe next because it is a keeper if you like your onions slow cooked, mellow, and brown.


This is a think ahead recipe; it takes two days before it's ready to eat. For this recipe you'll need either an immersion blender (preferred) or a food processor or blender, because part of the joy of this soup is the thick texture and creaminess. You make it over a couple of days, as I did. I roasted the squash and garnet yam first, then peeled and cut them into chunks (I cut the squash in half before roasting and used that opportunity to remove the seeds and stringy bits). They were stored overnight. The next morning I started the crockpot onions. That afternoon I used some of those onions, added them in a pot to the squash and yam pieces, added the herb and spices and stirred it all up with a cup of chicken broth. This sat in the fridge for a couple of hours until I had time to finish off the soup and fix the rest of the meal. I like to think that the passage of time helped meld the flavors, too.

The finished soup was fairly smooth, creamy, thick, beautifully flavored, hot and filling. I garnished each bowl with a dribble of heavy cream and a sprinkle of freshly chopped Italian parsley. Served up with a salad and grilled cheese sandwiches, it was a wonderful meal for a chilly evening in fall.


Butternut and Yam Soup with Crockpot OnionsBased on a recipe by Kay Baumhefner of Come Home to Cooking
Serves 4
2 1/2 pounds butternut squash
1 large garnet yam
1 tablespoon oil (I used only oil, no butter)
1 tablespoon butter
2 cups thinly sliced onions (1 large)
1 bay leaf (I didn't use this)
1/2 teaspoon dried thyme
1/2 teaspoon ground ginger
1/4 teaspoon freshly ground nutmeg
1 teaspoon salt
pepper to taste
1 tablespoon Grand Marnier (I used Scotch whiskey)
3-4 cups hot chicken stock, homemade if possible
1 can evaporated milk
drizzle heavy cream
garnish: finely chopped Italian parsley


Cut squash in half and remove seeds and stringy bits. Place cut side down on lightly oiled foil or parchment lined baking sheet with rim. Wash and pierce yam in a few places and place on baking sheet.

Bake in preheated 400 degree F. oven until tender (time will vary with size of squash). Remove from oven, let cool, peel both squash and yam, then cut each into small pieces. Set aside until onions are cooked.

Meanwhile, peel the onions, slice in half, then slice thinly. Spray the insides of a crockpot crock and add the onions. Drizzle with the oil (OK to use 2 tablespoons), cover tightly and cook on high for 6-8 hours. Onions will be light gold.

In a large, heavy bottomed pot, place the squash and yam pieces, the onions, one cup of stock, the dried thyme, ground ginger, and ground nutmeg. Stir, cover and let sit in fridge overnight. You can also cook the onions the following day and add them then, instead, but be sure to allow a few hours for the soup, including onions, to sit.

The next day, about 1/2 hour before serving time, add the salt, pepper and Scotch, then add 1 cup more of stock and the can of evaporated milk. Use an immersion blender to blend to a smooth consistency. If you don't have an immersion blender, process small batches in a food processor or regular blender.

When mixture is smooth, add additional stock until mixture is a little thinner than desired thickness. Set over low heat with a pot lid askew and heat gently, stirring often, until soup is heated through and thickens a little, about 15 - 30 minutes. Taste and adjust seasonings.

Ladle soup into soup bowls, drizzle with about a teaspoon heavy cream, swirl with a spoon, then sprinkle with parsley. Serve at once.

Saturday, January 05, 2013

Soup for the New Year


Happy New Year dear reader! I hope that your holidays were wonderful. With all of the rich foods I ate for the last month I'm ready for soup. It's usually fairly healthy, and perfect when the weather is chilly...which it is now here. Soup is one of my favorite foods...along with chocolate. I rarely write down recipes for the soups I make because my favorite ones are mixtures of onions, often garlic, sometimes carrots and celery, usually various veggies and broth, plus appropriate herbs and some pepper. I use what is in the pantry, in the fridge, in the garden and adjust the amounts both to what is on hand and what I feel like highlighting that day. Often the soup is a wonderful way to use up leftovers so I don't find little containers with exotic decomposed bits of this and that when I clean the fridge.

 Day before yesterday I finally found the time to make soup with my last garden grown butternut squash. The peeled chunks of squash were the most gorgeous golden color, even after being roasted in a very hot oven until soft. The pot also contained my usual chopped onions and some garlic, chunks of peeled garnet yam, chunks of a half a Granny Smith apple, peels left on, and chicken broth. After everything was nice and soft from simmering, I added cayenne pepper to contrast with the sweetness of the squash, apple and yams. I also added some ground ginger and some thyme, rosemary and mint for herbs plus lots of freshly ground black pepper.

I used an immersion blender to smooth it out a bit, but there was still plenty of texture. I also added a half cup of buttermilk and a half cup regular milk, plus some more broth until I had just the right consistency.

A few days before I had made a meatloaf with some ground pork, similar herbs to those used in the soup, onion, garlic, cooked bulgher wheat, feta cheese and Parmesan cheese. Once it was baked we had it for dinner with a nice salad, but there was still some left.

At dinnertime yesterday I had one of those 'light bulb' moments when I realized that the flavors of the meatloaf would go really well with those of the soup. I also decided that the soup needed some greens. Just before I was ready to serve, I reheated the meatloaf and cut it into bite sized chunks. In two soup bowls I placed handfuls of washed baby spinach, then microwaved the bowls on high for 2 minutes to wilt the greens. The soup was ladled on top and the chunks of meatloaf topped it all. The photo only shows the soup, with no spinach or meatloaf chunks...seems I forgot to take a photo at dinnertime and was able to do a quick snapshot yesterday at lunchtime when Sweetie was just about ready to polish off the last of the soup in this unadorned state.

The dinnertime soup looked lovely with that golden colored soup and some green from the spinach when I stirred it up. It also smelled wonderful! Best of all the flavors all came together. Sweetie is convinced that this is the best soup I've ever made. I'll let him think that until the next time that inspiration strikes!

Butternut Squash Soup with Spinach

1 tablespoon vegetable oil
1 average-sized Butternut Squash
1 tablespoon vegetable oil
1 medium yellow onion
1 clove garlic, minced
1 medium to large sweet potato or yam
½ large Granny Smith Apple
2 ½ - 3 cups low-sodium chicken stock
½ cup milk
½ cup fat-free buttermilk
½ teaspoon dried ginger powder
½ teaspoon dried thyme
¼ teaspoon dried mint
¼ teaspoon dried rosemary, crushed
¼ teaspoon cayenne pepper
fresh ground pepper to taste (I used a LOT - gave it a nice kick)
a large handfuls washed baby spinach for each serving
meatloaf chunks (optional)

1. Peel and seed the squash. Cut into 1/2 inch chunks. In a large food safe bag (I use recycled plastic bags from the produce section of the grocery store), combine the squash chunks, 1 tablespoon olive or vegetable oil, salt and pepper. Spread the squash chunks on a parchment lined baking sheet and roast in a preheated 400 degree F oven for 20 minutes. Remove from oven and set aside.

2. Peel onion and chop. Set aside. Peel potato and apples and cut into ¼ inch chunks.

3. Over medium heat in a large saucepan/stock pot, heat 1 tablespoon oil and stir onion and garlic until tender.

4. Add stock, yam chunks, apple chunks, and seasonings. Give it a good stir, reduce heat to medium-low and let simmer for about 20 minutes until the yam and apple chunks are fork tender. Add the reserved roasted squash chunks and stir. Heat another 2-3 minutes to heat the squash. Remove from heat.

5. In a blender or food processor scoop about ½ of the mixture into blender. On low speed, blend until nicely pureed. While doing this, add about ¼ cup of milk and ¼ cup of buttermilk until creamy. Transfer this to a bowl or a 2nd pot. Alternately, use an immersion blender to puree the whole pot of soup in the pot, being sure to add the milk and buttermilk (a total of ½ cup each milk and buttermilk) .

6. Repeat step 5, adding another ¼ cup of milk and ¼ cup buttermilk and transfer to bowl or pot; continue until all soup has been creamed.

7. Put soup back on very low heat, stirring to blend, and adding lots of black pepper...yum! Simmer for 15 minutes and taste soup. Adjust seasonings and, if needed, more broth, to get the consistency you like. Simmer another 2 minutes at very low heat.

8. To serve, place a handful of washed baby spinach leaves in the bottom of each microwavable bowl for the number you are serving. Microwave on high for 2 minutes. Top each portion of wilted spinach with a serving of the soup. Garnish as desired. For a hearty soup, top with chunks of warm meatloaf as I did.

Monday, November 26, 2012

Buttery Ravioli

I'm not a big fan of standard time, having decided years ago that daylight savings time is far better and should just be the time we use year 'round. It makes no sense to me that as the days grow shorter we switch to  standard time where an extra hour at the beginning and end of the day is in darkness or nearly so. Sweetie has been playing tennis with his friends after they finish work for most of the spring, summer and fall. Once the time was moved to standard they had to quit playing an hour earlier. If that meant that in the morning it would be light maybe I could understand but the days are so short by the time that daylight savings time ends that it is still pretty dark at 7 am, which became 6 am. Does that mean that there is more light at 8 am, which became 7 am? A little but hardly enough to warrant switching.

For me the worst part is that my photos of food suffer. I mostly use natural daylight for my shots and so that means middle of the day photos. When I'm trying to get a good photo of breakfast or dinner food I turn on all the lights I can, but everything takes on a golden tone. Sometimes that is pretty, sometimes not.

Tonight I cooked a lucious dish for dinner. It closely resembled one I had for lunch at a Santa Rosa restaurant a week before. The photo makes it look more orange than it really was, but those round butternut squash ravioli were a bit orange to begin with. You can't see it, but underneath there is a bed of fresh baby spinach. On top of that there is a warm mixture of fresh white corn, cut off the cob, mixed with diced red and yellow bell pepper and just a hint of finely chopped red onion. Next come the just cooked ravioli and a sprinkle of cubed fresh butternut squash which had been roasted until very soft and tender inside and a bit crusty on the outside. A drizzle of melted butter to which a lot of fresh, minced, sage was added and you have the dish. It was a wonder of contrasts...crisp chilled spinach, warm, soft, buttery ravioli, crunch but warm corn, zesty red bell pepper, zingy red onion, very herby sage. Sweetie loved it and ate every last bit. I served it with some sliced heirloom tomatoes and corn muffins. It was almost comfort food and seemed very much a harvest meal.Totally delicious!

The key for this dish is planning. The squash needs to be roasted first. The spinach has to be washed and dried and put in the fridge to crisp up. It doesn't take lond to cut the corn from the cob or dice the peppers or chop the onion and sage, but those are good things to do while the water comes to a boil for the ravioli. While they cook you can melt the butter and add the sage, slice and arrange and dress the tomato slices and heat the corn mixture. Just before the pasta is done is the best time to layer the spinach in the bowls. While the cooked pasta drains you can add the warm corn mixture on top of the spinach, then the pasta, the roasted squash and the butter drizzle. It's a good idea to serve it right away while the pasta is still warm and the spinach hasn't wilted from the warm elements in the dish.

Butternut Squash Ravioli with Warm Corn Salad, Spinach, Butternut Squash and Sage Butter

2 cups peeled and cubed butternut squash, seeds and stringy parts removed
1 tablespoon olive oil
salt and pepper to taste
4-5 cups fresh baby spinach
2 ears fresh corn, husks and silks removed
1/2 medium red bell pepper, seeds and ribs removed
1/4 medium yellow bell pepper, seeds and ribs removed
1 tablespoon finely chopped red onion
4 tablespoons salted butter, melted
2 teaspoons finely chopped fresh sage
1 5-oz. package fresh butternut squash and cheese ravioli, uncooked

Toss the butternut squash cubes in a plastic bag with the oil, salt and pepper. Spread on a parchment lined baking sheet and roast in a preheated 450 degree oven for 10 minutes. Stir and roast another 10 minutes. Remove from oven and keep warm.

Wash and drain and dry the baby spinach. Wrap in a tea towel and refrigerate until ready to serve.

Using a sharp knife, cut the corn from the cobs. Dice the red and yellow peppers into 1/4 inch dice. In a microwave safe bowl combine the corn kernels, all the peppers, the red onion. Set aside.

Heat 4 quarts water in a large pot over high heat until it comes to a boil. About 10 minutes before you plan to serve the dish, slide the ravioli into the water and stir. Continue to stir and/or turn the ravioli over as the pasta cooks, with the heat on medium-high, for 5-6 minutes or until pasta is tender.

While pasta cooks, mix the melted butter and fresh sage and keep warm.

Heat the corn mixture in the microwave on HALF power for 2-3 minutes, until just barely warm.

In a large bowl, like a soup bowl, layer the fresh spinach, topped by the corn mixture. Gently remove the pasta from the simmering water when it is cooked and drain in a collander. When drained, place about 5 ravioli for each serving on top of the corn mixture in the bowl. Scatter the warm squash cubes over and drizzle with the sage butter. Serve at once. Serves 2.

Saturday, November 12, 2011

Butternut Squash Ravioli and Spinach


My recent trip to Seattle not only included a visit to the University of Washington Arboretum where the photo above was taken (I just LOVE autumn colors so had to post one more!) but also a wonderful dinner at Smash, a small restaurant which focuses on small plates and nice wines. I was particularly taken with an entree which had a bed of spinach topped with luscious tender ravioli filled with ginger enhanced butternut squash. A silky browned butter cream sauce with a hint of Marsala pulled it all together. I decided to see if I could make something similar at home.


The first thing I did was to purchase some fresh pasta ravioli made with butternut squash and sage. The filling had more cheese than the restaurant made ones, but they looked like they would work just fine. Then I made sure I had fresh baby spinach, more butternut squash that I could prepare to go on the side and the ingredients for the sauce. Although the extra squash might seem like too much, ravioli doesn't really have a lot of squash in that filling so additional veggies seemed like a good idea. I used to have Marsala, but couldn't find it and the sauce really needs it. Marsala must not be too popular...the bottle I purchased at the Safeway was dusty on the shoulders.

The real challenge was replicating the sauce because it really does bring all the other flavors together. I started with the ingredients for a basic white sauce: butter, flour, milk & cream, and salt and pepper. In addition I added some ginger because the ravioli I purchased lacked the ginger in the filling that the restaurant used. I also added some Parmesan cheese, a dash of sage and the all-important Marsala. To capture the nuttiness found in the restaurant sauce, I browned the butter gently until it was a medium golden brown and then added the flour/ginger combination. When it came time to add the Marsala I added one teaspoon, tasted, then added a second teaspoon. That was all it needed, but it added just the right hint in both flavor and fragrance to let you know it was there.


The butternut squash on the side wasn't part of the restaurant meal, but Sweetie is used to big plates, not the minimal ones found at trendy restaurants. He really liked the contrast of the delicate ravioli and creamy sauce with the squash which had been pan roasted and was still slightly al dente. It was a slight bit sweeter, too, which was a nice counterpoint to the spinach. Although I could have seasoned the spinach I remembered that the restaurant seemed to use plain spinach, wilted, under the ravioli, trusting no doubt that the seasonings in the sauce and pasta would suffice. I used about 5 cups baby spinach, but would use more if I made this again.

Timing is important when making this dish. Plan on having everyone ready to be at the table once the pasta is done. Parsley can be minced ahead of time. The pasta water needed to be fully boiling and then the pasta only takes 5 minutes to cook, so the sauce should be made ahead a bit and kept warm while the pasta cooks. If the spinach has been rinsed and put into a microwave safe bowl, the wilting takes only a minute or two after starting the pasta. Of all the elements, the pan roasted squash takes the most time but it can be made ahead and reheated in the microwave once the spinach is wilted and the pasta is in to boil. Once the pasta is just cooked, it can be drained and the plate put together quickly. Serve at once while everything is still hot.

I hope you try this one. None of the elements are difficult as long as you can find ready-made butternut squash raviolis. It makes an impressive and delicious plate of pasta and vegetables and somehow seems very luxurious as you eat it. The sauce makes enough for 4 but I only had pasta enough for two, so the recipe is for two. You could increase the ingredients to use the whole squash and buy a couple bags of baby spinach (10 oz each) and double the amount of pasta to serve four and there should be enough sauce.


Butternut Squash Ravioli
with Wilted Baby Spinach, Pan-Roasted Butternut Squash and Browned Butter Sauce


1 medium butternut squash
1 tablespoon olive oil
1/2 teaspoon salt
1/8 teaspoon sage
1 tablespoon grated onion
1 tablespoon pure maple syrup
4 tablespoons unsalted butter, cut into small cubes
4 tablespoons all-purpose flour
1/8 teaspoon ground ginger
2 cups milk or a combination of milk and cream (I used 1 1/2 cups evaporated non-fat milk and 1/2 cup "1/2 and 1/2" light cream)
salt and pepper to taste
2 tablespoons Parmesan cheese
2 teaspoons Marsala
dash ground sage
1 package butternut squash ravioli (about 8 oz. for two)
1 bag (10 oz) baby spinach, well rinsed but not dried
1 tablespoon Italian parsley, minced

To make the Pan-Roasted Squash:Cut the butternut squash in half. Reserve the other half for another use and peel one half. Cut to reveal any seeds and remove seeds and stringy materials from the inside if there. Cut the squash into 1/2 inch dice. Set aside.


Heat a skillet (cast iron works best for this) over high heat. While skillet is heating, place the squash cubes, olive oil, salt, sage, and grated onion into a gallon zipper bag or large plastic bag. Close and shake vigorously to coat the squash pieces with the other ingredients.

When a drop of water dropped on the skillet sizzles, add the seasoned squash cubes. Use a spatula to flatten the mixture and compact it a bit. Let it sit undisturbed for 30 seconds, then reduce the heat to medium-high and cook for another 30 seconds.

Turn the squash with a wide spatula to bring the browned side up and get the unbrowned side in touch with the pan. Cook another minutes. Repeat. Add the maple syrup and stir to combine it with the squash mixture. Flatten the squash mixture again and let cook 30 seconds. Turn the mixture a few more times, letting the squash brown a bit before turning. Check for how done the squash is by tasting a piece. It should be softened but still have a little resistance, like al dente pasta. Correct seasonings if needed. Remove from the heat and reheat in the microwave just before serving.

To make the Browned Butter Sauce:In a medium saucepan with a heavy bottom, melt the butter over medium-high heat. As the butter melts, swirl the pan to mix the butter solids in with the clarified butter. Continue to cook and swirl until the butter is colored a medium golden brown. Remove from the heat. Combine the flour and ginger in a small bowl. Whisk the flour mixture into the browned butter. The residual heat will cook the flour enough so there is no need to return the mixture to the heat. Whisk the milk in, all at once, and continue whisking to thoroughly combine the milk mixture and flour mixture. Return to medium heat and, whisking constantly, cook until the mixture thickens, about 8-10 minutes. Remove from the heat and whisk in the Parmesan, Marsala, and sage. Taste for seasonings and add salt and pepper as desired. Place a piece of plastic wrap directly on the top of the sauce to keep it from forming a skin. Set aside until needed for plating the pasta. When that time comes, remove the plastic wrap and gently heat the sauce again, whisking as needed.

Start a large pot half filled with water to boil. Add 2 teaspoons salt if you like your pasta salted.


To make the spinach:Take the washed spinach and place in a microwave safe bowl.Cover with waxed paper or a plain paper towel. Set aside.

The pasta:Once the water comes to a full boil and you know that you can serve in about7-10 minutes, reduce the heat to medium (so that water is barely boiling) and gently place the ravioli, one by one, into the pot. Start your timer for 5 minutes. About half way through that time you may want to flip the ravioli over but don't if they start to break up or lose filling.

Now, once the pasta is in the boiling water, you can reheat the butternut squash for 2-3 minutes in the microwave. Next wilt the spinach by cooking on high 1-2 minutes in the microwave. Remove the plastic from the sauce and gently reheat. Get your plates ready.

At 5 minutes (or at whatever time is recommended for cooking the pasta by the manufacturer), drain the pasta gently. Place half the spinach on each plate, spoon on a little of the sauce, place half the pasta on each plate (leaving some space on the side for the pan-roasted squash) and spoon a generous amount of sauce over the pasta. Sprinkle some minced parsley on top. Spoon some of the squash on the side and repeat with the other plate. Serve at once.

A dry red wine goes well with this dish. Toast the cook. He or she will deserve it after putting this meal together.

Tuesday, February 22, 2011

A Cozy Casserole for a Chilly Evening


We may get snow!

I know this is not something to get excited about in most of the United States, but we so rarely get snow that I'm kinda hoping that some sticks and stays, at least for a few hours. It won't happen until Friday night or Saturday and might not happen at all, but it gives you some idea of the nice chilly (for No. CA) weather we are having.

Sweetie has the fire going to heat the house...well only the living room actually, the bedrooms and bathroom are frigid...and I baked a nice rice gratin for our dinner using winter squash I grew myself. How fun is that?

There is always something yummy cooking at Katie's blog. Last night when I stopped by to see what she was up to I saw that she had posted a wonderful dish with butternut squash, leeks and rice. It looked great and sounded even better. I was pretty sure I had most of the ingredients on hand so I made it for dinner tonight.

Probably doesn't sound that earthshattering, but I so often bookmark or save recipes from other blogs and so rarely actually make them. This one was a must-make! And here you thought I only get buzzed about baked sweets and bread.

I used the smaller of the two butternut squash left from the ones I grew in my garden this summer. The great thing about winter squash is that they keep so well. This one was still moist inside and sweet, too. The skin was thin and peeled off easily and there weren't very many seeds, so there was lots of usable squash. It's likely that I had more squash than the recipe called for but it turned out just fine!

I was missing leeks, so used a cup of chopped onion instead. Since thyme was a dominant herb in the recipe I couldn't resist adding a cup of chopped mushrooms...I love the way mushrooms and thyme just go so well together.

I already had left over cooked rice so that made the dish come together faster. A couple of strips of bacon from the freezer went in the pan first with a lid on to sweat some of the bacon fat out. That meant I didn't need to add much olive oil when it came time to saute' the onions, mushrooms and butternut squash. The only other change I made was that I added an egg at the end when I mixed in the yogurt and Parmesan cheese. It was meant to help the gratin hold together when served and that worked very well.

Do try this dish. The flavors go so well together, it is filling without being heavy, and it tastes wonderful! Next time I'm going to make it with brown rice and I bet it will be even better!

Butternut Squash, Mushroom and Rice Gratin
adapted from Thyme for Cooking by Katie

8oz (250gr) butternut squash
1 cup chopped onion (about 1/2 large yellow onion)
1 cup roughly chopped mushrooms
1 1/2oz (45gr) bacon
2 tsp olive oil
1/2 tsp paprika
1/2 tsp thyme
1 cup cooked rice
1/2 cups chicken stock
1/3 cup Greek yogurt
1/3 cup freshly grated Parmesan cheese
1 egg, lightly beaten

Peel the butternut squash and remove any seeds or stringiness. Cut butternut squash into small cubes. Peel and roughly chop the onion. Roughly chop bacon. Roughly chop the mushrooms.

Heat oil and paprika in a large skillet. Add bacon, squash, leeks and sauté until vegetables are tender bacon is done, about 10 minutes. Add chicken stock, thyme, rice, yogurt, Parmesan cheese and egg. Add salt and pepper as desired to taste.

To finish: Spoon into an oiled baking dish and bake, 400F (200C), for 15 minutes, until top starts to brown.


Serve hot (although I bet this tastes great cold, too).

Sunday, November 21, 2010

Ideas for YOUR Feast

The most common complaint, or at least comment, that I hear after Thanksgiving or other food related family gatherings is "I'm so full I can't eat another thing", and then we bring out the dessert and everyone finds rooms for just a little more. Why do we do this? Well the essence of hospitality in many cultures is to provide far more than enough food when you entertain.

Now that we have clearly entered the time of year when the groaning board is expected, anticipated with delight, and set up proudly by hosts and hostesses, here are some ideas from past posts to help you exceed expectations and create an even more festive holiday meal.

Some of these are simple but satisfying, like the pear-cranberry crisp. Some are quite traditional, like the Stuffing recipe from my Family Food cookbook. Some are over the top like the Pumpkin Pie Spectacular...your family and friends will be very impressed...and grateful...if you make it.

No matter what you serve, here's wishing you and yours very happy holidays!
XO Elle

Holiday Recipes from Soup to Nuts:

Soups -Butternut Squash Soup http://feedingmyenthusiasms.blogspot.com/2006/11/soup-shared-with-friends.html - Very seasonal, smooth and delicious!- Pumpkin Spinach and Rice Soup http://feedingmyenthusiasms.blogspot.com/2010/10/frost-is-on-pumpkin.html - Simple to make and very warming, plus the flavor combination is great!

Salad - This one is perfect for this time of year - Paula's Winter Salad has greens and oranges and raisins and it's a composed salad so you can make it ahead.

http://feedingmyenthusiasms.blogspot.com/2008/01/orange-you-glad-you-heard-about-this.html

I'm not going to do a roast turkey recipe because Butter Ball does such a great job with that. I will, however, give you my favorite STUFFING recipe! Click HERE.

Side Dishes - The all time favorite, and one which is requested often, is a savory combination of wild and brown rice with the tang of cranberries. It goes REALLY well with roast turkey, but is great with pork roast, roasted chicken and roasted duck. Click HERE for a great seasonal side dish.

Still in the cranberry frame of mind? Try Cranberry Pear Sauce with your meal. It uses fresh cranberries which are plentiful most places this time of year. It's a bit like a chutney since it has some vinegar to offset the brown sugar.

It makes a great condiment with left over turkey, too. Click HERE for the recipe.


Looking for a healthy veggie side dish? Try Chard and Spinach with Onions, Currants and Lemon Zest. The flavors are clean and lively which is a nice counterpoint to the richness of other dishes on the groaning board. Find the recipe by clicking HERE.

Now it's time for my favorite part of the meal...dessert!

Desserts:
If you really want to WOW everyone, make Pumpkin Pie Spectacular with Gingersnap Crust. It takes pumpkin pie to the next level and really isn't too much more difficult than regular pumpkin pie. Click HERE to find the recipe.

Maybe you want to go with something seasonal but a little less rich? Try Pear Cranberry Crisp, maybe with a scoop of frozen yogurt added to each bowl when served. The crisp recipe is HERE.


With pomegranates all the rage, you might want to try a tart that uses pomegranate juice to make a fruit curd for the filling and is also used to poach pears for the topping. It's unusual and delicious. Click HERE for the Pomegranate Lemon Tart with Poached Pears.


Last, but not least, HERE is a recipe for a Mosaic Nut Tart (see, nuts came at the end as promised and the photo is at the top of the post) that is similar to pecan pie, but just a little different. Dollop on some whipped cream and enjoy a sweet slice...maybe as you watch the last Bowl game of the day?

If you enjoy any of these recipes and have the time, come back and let me know, OK? Always fun to share and rewarding to know that others liked 'em.