Showing posts with label mushrooms. Show all posts

Tuesday, July 14, 2026

Do You Like Mushrooms?


Sweetie loves mushrooms! It isn't really mushroom season, but we have a local place that grows them year-round. Like many foods, mushrooms aren't truly seasonal anymore when they are in the market and at a reasonable price every month of the year.

This casserole takes a bit of time because you're making the sauce from scratch, but it's not difficult. You end up with a deeply savory dish that goes well with almost anything grilled, so it's great this time of year. Everything is done on the top of the stove, too, so no oven necessary. That's a real issue since it is truly hot in many places around the world right now.

The starting place is a home-made mushroom sauce, plus boiled pasta. You can use any pasta you like, but these rotelli hold up to a lot of stirring, they tend to capture the sauce well, and you can find them in the multi-colored version I used. The pasta is plain, orange (probably has a bit of carrot juice in it) and green (maybe from spinach juice). This type of pasta takes longer to cook than noodles like spaghetti, but it's also bite sized, so easier to eat.

I confess that I made this casserole over a week ago. I found the photos in my photo group and realized that I never posted it. Since the recipe was made-up, I hope I can recapture all the ingredients!

If you make this, I'm betting you will enjoy the richness, full mushroom flavor, cheesiness from the two kinds of cheese, and the excellent sauce. It reheats well, too, should you have any leftovers.


Mushroom-Pasta Casserole

my own recipe
serves 4-6

1/2 pound (half a package) multi-colored dry rotelli pasta
boiling salted water to cook the pasta according to package directions

2 tablespoons olive oil
2 tablespoons butter (salted or unsalted)
4 oz. crimini (brown) small mushrooms
2 tablespoons finely chopped yellow or white onion
4 tablespoons all-purpose flour
1/4 teaspoon dry thyme
1 cup broth, mushroom if you have it, but chicken, beef and vegetable are OK, too
1/2 cup milk - any level of fat OK
salt and pepper to taste

1/2 cup shredded Swiss cheese
1/4 cup shredded Parmesan - best quality available

Cook the pasta until al dente in the salted boiling water. Drain and keep warm.

While the pasta is cooking, in a large pot or Dutch oven, heat the olive oil and melt the butter, then sauté the mushrooms and onions in the olive oil and melted butter until the onion is translucent. Add the flour and dry thyme and stir, over low heat, for a minute. Raise heat to medium-high. Combine the broth and milk and pour, all at once, to the skillet, stirring constantly, until the sauce begins to thicken. Taste and add salt and pepper to taste.

Add the drained warm pasta to the mushroom sauce and stir well to combine. There may be some 'extra' sauce in the bottom of the pot. That's OK. Stir in the Swiss cheese, smooth the top to create a casserole, then sprinkle the Parmesan evenly over the casserole.

Cover and let sit over the lowest heat available, for five minutes. This will allow the flavors to meld a bit and for the extra sauce to be absorbed into the pasta.

Serve hot...and enjoy!

Saturday, September 27, 2025

Pork and Mushroom Ragout Over Polenta


A few days ago Sweetie cooked a pork shoulder low and slow in the BBQ grill, all wrapped up in heavy duty foil. He browns the shoulder on each side before wrapping it up, then lowers the grill temperature so that it can cook for hours and get soft and delicious. In the process some of the fat and juices make their way into the bottom of the foil. When he takes the packet off the grill, he carefully saves those juices in heatproof glass jars, then opens the foil all the way and removes the pork to cut and serve. If we're having pulled pork bbq sandwiches, I ask him to just cut a chunk off for me so that I can pull the pork with two forks instead of slicing mine.

If the pork shoulder is a large one, as the one he cooked a few days ago was, I get to be creative with ways to use some or all of the leftover pork.

Today I made a sort of pork stew or ragout with some of the leftover pork, some onion, garlic, mushrooms and spinach, plus seasonings. It was yummy and went well over some soft cooked polenta. I didn't really have a recipe to follow  but I've cooked similar things before so I was pretty sure that I could figure out the recipe as I went along. I did have a recipe for the polenta and it was a delicious mix of stone-ground polenta, some chicken broth and some of those pork juices Sweetie saved then refrigerated, some salt and pepper, some butter and some Parmesan. Don't skip the Parmesan...it makes all the difference. Also, use good Parmesan, either the real deal, grated, or something pretty good like the already grated stuff from Costco. Skip the Kraft Parmesan in the green tube. Not worth adding.

Pork and Mushroom Ragout Over Polenta with Spinach
serves 4

For the Pork and Mushroom Ragout:
1/2 large onion, peeled and chopped
1-2 tablespoons olive oil
135 grams mushrooms, sliced (about 4-6 depending on size). I used cremini.
2 cloves garlic, peeled and minced
salt  and pepper - about 1/4 teaspoon 
1/4 teaspoon dried thyme
170 grams or 6 oz. already cooked pork roast. I used the shoulder cut, slow cooked
1 tablespoon balsamic vinegar
1 cup broth/reserved pork juices/water
1 tablespoon cornstarch
1/2 cup chopped cooked spinach

For the Polenta: 
3 cups water
1 teaspoon salt
1 cup stone-ground (if possible) polenta  grind corn meal
2 tablespoons butter
1/2 cup grated Parmesan cheese - best quality

Instructions: 

Heat 1 tablespoon olive oil in a heavy-bottomed saucepan or small Dutch oven over medium-high heat. Add the onions and stir, then cook, stirring occasionally, until translucent, about 4-5 minutes. Add the sliced mushrooms and stir. Cover the pot, reduce the heat to low and cook for 3 minutes to allow the mushrooms to release moisture. Uncover the pot and return the heat to medium-high then cook, stirring often until the mushrooms have some browned areas on the slices, about 4-5 minutes. If necessary, add the rest of the olive oil to cook the mushrooms or garlic. Add the garlic, and reduce the heat to medium. Cook for 1 minute, then stir in the salt and pepper and the thyme. Cover the pot, reduce heat to low and cook another minute to allow flavors to meld.

Add the pork, cut into 1-inch or smaller cubes, to the pot, and stir to combine. Cover the pot and cook, still on low, for 3 minutes, to heat the pork.

In a small bowl combine the balsamic vinegar, cornstarch and 1/4 cup of the broth/pork juices/water, being sure to stir until there are no lumps of cornstarch left. Add this mixture and the rest of the broth/pork juices/water to the pot. Increase the heat to medium-high and stir until the broth thickens. Add the cooked spinach, stir, and cover until ready to serve, leaving over the lowest heat possible on your stove. The mixture needs to stay warm while you prepare the polenta, but you don't want it to burn.

For the polenta, add the water to a large pot and bring to a boil. Add the salt and stir to combine. (Note: Taste your pork mixture before adding the salt. If the pork mixture is fairly salty, as it might be if you use the pork juices or your broth is salty, then reduce the salt you add to the polenta water. I only used 1/2 teaspoon because my pork ragout was fairly salty.)

Once the salted water is boiling, slowly whisk in the polenta. Switch to a wooden spoon and stir until the polenta mixture is thickened and the grains are cooked to your liking. I like mine with just a bit of chew still in it. Once desired thickness is reached, add the butter and the grated Parmesan and stir vigorously until it is well combined. Mixture thickens slightly as it cools, so if it's too thin for you. let it sit 4-5 minutes before serving.

To serve, spoon the polenta into shallow soup bowls and top with the pork mixture. Serve additional grated Parmesan on the side, if desired, to be sprinkled at the table over the ragout. 


Tuesday, April 22, 2025

Pesto in a Quiche


I love making quiche for dinner and Sweetie loves eating it. The great thing about quiche is that you can put lots of different things in it and so it's a creative kind of pie.

This time I had some grilled chicken leftovers to use up, plus a few spears of fresh asparagus. I decided to do a flavor combination that has worked well for me in the past for a sandwich...chicken and pesto with roasted red pepper and Swiss cheese. I put all of those things in, plus some caramelized onion, the asparagus, and a couple large bella mushrooms, sliced. It was delicious, so I want to share with you! 

Pesto Quiche with Grilled Chicken and Roasted Red Pepper Serves 4 - 6

1 9-inch pie shell, blind baked at 425 degrees F for 10-12 minutes (use favorite pie dough recipe or pre-made)
1/3 cup caramelized yellow onion
1 cup Swiss cheese, cut into ¼ inch dice
1 cup grilled chicken thighs, cut into 1-inch cubes
4 stalks fresh asparagus, ends snapped off, spears cut into 1-inch pieces
2 large mushrooms, sliced

3 eggs (or equivalent egg substitute)
1 ½ cups evaporated milk  or light cream
1/3 cup prepared pesto
¼ teaspoon salt
dash pepper
5 or 6 strips prepared roasted red peppers
2 tablespoons pine nuts

Blind bake the pie shell in a preheated 400 degree oven, then set aside to cool.

Reduce heat setting on oven to 350 degrees F.

Caramelize the onion with a light coating of olive oil in a small crock pot or in a skillet and let cool .

Sprinkle the bottom of the pie shell with the onions and half the Swiss cheese, distributing evenly. Top with the chicken and the asparagus, then the rest of the Swiss cheese. Place mushroom slices around the outer edges of the quiche fillings. Set crust with fillings aside.

In a bowl, beat the eggs lightly with the pesto, then add the milk and beat with a fork to combine, add the salt and pepper and beat with a fork or whisk to combine.

Pour the egg/milk mixture over the ingredients in the pie shell.  There may be too much milk mixture if pie pan is shallow - don't overfill, to avoid filling running over.  Add the red pepper strips in a nice pattern on the top. Sprinkle with the pine nuts.

Put the quiche on a baking sheet. Place in the preheated oven and bake 30-45 minutes, or until set and lightly browned. (I find that setting on a parchment-lined small baking sheet is a good idea in case some of the filling spills over.) Cool for 10 minutes before cutting to serve.

Saturday, March 16, 2024

Sweetie's Pi Day Pie


Sweetie really enjoys pies and this year on Pi Day we were also remembering our beloved black lab Pi who left us in the fall. We still miss him, a lot, as you might expect since he was the best dog we've ever had...and that's difficult because we've been blessed with a number of great dogs. Here is a photo of our Pi dog when he was young:


Usually I would bake a sweet pie, but this year I went for a quiche...basically a savory cheese, veg and custard pie. We had it for dinner on March 14th and Sweetie had more today for lunch.

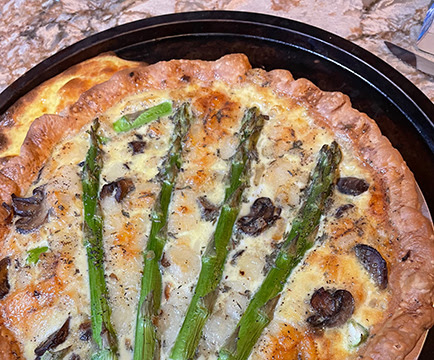
If you use pre-made pie crust dough for this, it all comes together fairly quickly. You can go with the filling ingredients I chose, or use your own mixture. This one had sweet breakfast sausage as the meat, and not a lot of that, so mostly the vegetables were the stars. Onions, mushrooms, potato and asparagus were also my fillings but I think if I made this again I would skip the potato. It made the pie so dense that it took longer to bake and there was less of the delicate creamy egg custard, too. There was too much custard because of all the filling, so some dripped off and cooked on the baking sheet I had under the pie and some drips got between the pie dough and the pie tin, so the crust stuck a bit. Note to self: use less solid filling to allow room for more custard filling.

If you are planning this for dinner, do remember to start a little early since you need to blind bake the crust and let it cool a bit before putting in the fillings.

Spring Quiche with Asparagus and Swiss Cheese  and Mushrooms and Onion
Serves 4 - 6

1 9-inch pie shell, blind baked at 425 degrees F for 10-12 minutes (see notes)
1/3 cup finely chopped yellow onion
1 tablespoon olive oil
1 cup Swiss cheese, cut into ¼ inch dice
1/2 baked potato, peeled, thinly sliced
2 small, cooked Breakfast Sausage patties, each cut into 6-8 pieces 
3 eggs (or equivalent egg substitute)
1 ½ cups evaporated milk or light cream or 1 1/4 cup whole milk
¼ teaspoon salt
1/4 teaspoon dried thyme
dash pepper
Dash nutmeg
3-4 spears asparagus, tough bottoms trimmed off and sliced in half through the length of the spear
4 oz. crimini mushrooms, sliced thinly

Preheat oven to 350 degrees F.

In a small skillet, sauté the onion  in the olive oil until translucent, about 5 minutes, stirring often. Add the sliced mushrooms, stir and cover. Turn heat to low and cook another 5 minutes, stirring occasionally.

Sprinkle the bottom of the pie shell with the sautéed onion-mushroom mixture and Swiss cheese, distributing evenly. Top with the sliced potato. Sprinkle sausage pieces evenly over that. Set aside.

In a bowl, beat the eggs lightly, then add the milk and beat with a fork to combine, add the salt, thyme, pepper and nutmeg and beat with a fork or whisk to combine.

Arrange the half asparagus spears in a nice pattern on top of the onions, mushrooms, potatoes, sausage and cheese in the pie shell. 

Pour the egg/milk mixture over the ingredients in the pie shell. Place in the preheated oven and bake 30-45 minutes, or until set and lightly browned. I find that setting on a parchment-lined small baking sheet is a good idea in case some of the filling spills over. Cool for 10 minutes before cutting to serve.

Note: Use your favorite one crust pie dough, rolled for a 9-inch pie pan, or a package of pre-made dough like Pillsbury ReadyCrust (you'll have one pack of dough ready for another pie) at room temperature. Fit the dough into a 9-inch pie pan, crimp the edge, put in baking parchment and weigh with pie weights or beans, then bake for 10-12 minutes in a preheated 425 degree oven. Remove from oven, cool 5 minutes, remove the pie weights/beans and let pie shell, now blind baked, cool for another 10 minutes before adding the filling ingredients.

Friday, December 29, 2023

A Family Favorite From Scratch - Salmon Loaf


 As the Friday cook in a Catholic family while I was growing up, I learned to cook a lot of fish dishes. Salmon Loaf Supreme was one of them. I loved to make this because once it was put together and into the oven, it took about an hour to bake. Baked potatoes could be put in the oven at the same time and, a little later, a chocolate pudding cake could join all these items so that there was a yummy dessert, too. A green salad or some steamed veggies added to the dinner plate was all that was needed, so I had some time to enjoy myself while all the dinner items baked.

We had some lovely salmon during the week before Christmas, but there were leftovers, so I thought of ways to use them up. My first thought was salmon chowder, but then I remembered salmon loaf. Sweetie loves it and the warm oven warms the house, too, a consideration when it is cold and rainy out. The only problem was that I didn't have the condensed cream of mushroom soup the recipe calls for. Guess I get to make my own!


The Joy of Cooking cookbook has a cream sauce recipe that sounded like it would make a thick cream sauce that would work. I used leftover bacon grease for the fat, chopped fresh mushrooms, celery, and onion to cook in the bacon grease for the appropriate flavor and veggies, and used slightly more flour than for a regular cream sauce. Now that I can use regular milk, the sauce didn't have sweetness that sometimes comes with using nut or soy or coconut milk, so the sauce was savory and delicious. I added some chopped parsley, too, plus salt and pepper. No red pepper on hand, so I skipped that. Bread crumbs add stability, as do the egg. Lemon zest and juice add zing. The salmon had the skin removed and I then shredded it with my hands to flakes. All this took far longer than just using canned soup, canned salmon, and some bread crumbs and lemon, which is what the recipe I used as a child had. Helps me understand why housewives in the 50s were so taken with using commercial canned goods - much less work!


This salmon loaf was head and shoulders above my childhood loaves! The salmon flavor was fresh and robust, the texture was more tender and overall it was more enjoyable. Sometimes it's easier to do it the hard way, as Max used to say.

Below is the original recipe and then the variation I did this time. Feel free to make either one. Sometimes it just depends on if you have the ingredients on hand or more time to play in the kitchen.


Salmon Loaf Supreme

½ Cup salad dressing
1 Cup  diluted condensed cream of celery soup
1 egg, beaten
½ Cup chopped onion
¼ Cup chopped green or red pepper
1 Tablespoon lemon juice
1 teaspoon salt
2 Cup flaked salmon (pink or red)
1 Cup fine bread crumbs

 Combine first seven ingredients and mix well. Add the salmon and bread crumbs and combine well. Pack into a greased 4” x 8” x 2” loaf pan; bake 1 hour in a 350 degree oven. Turn out of pan into platter. Garnish with lemon wedges and serve. Serves 6-8


From Scratch Salmon Loaf Supreme

½ Cup salad dressing or mayonnaise
Cream Sauce with mushrooms, celery and onion (see below)
1 egg, beaten
¼ Cup chopped green or red pepper (optional)
1 Tablespoon lemon juice
zest from 1 lemon
1 teaspoon salt
¼ teaspoon pepper
2 Cup flaked cooked fresh salmon (pink or red), skin removed (ours was grilled)
1 Cup fine bread crumbs or stale baguette crumbs, ground fine in food processor

 Combine first eight ingredients and mix well. Add the salmon and bread crumbs and combine well. Pack into a greased 4” x 8” x 2” loaf pan; bake 1 hour in a 350 degree oven. Turn out of pan into platter. Garnish with lemon wedges and serve. Serves 6-8

Cream Sauce with Mushrooms, Celery, and Onion

3 Tablespoons bacon grease or butter
1/2 pint fresh mushrooms, wiped clean and diced
1 stalk celery, diced fine
1/2 Cup chopped onion
3 Tablespoons all-purpose flour
1 Cup milk (I used whole but reduced fat is fine)
2 Tablespoons chopped parsley

 Saute' mushrooms, celery and onion in the hot bacon grease in a medium pot. Add the flour and cook, stirring constantly, 1 minute. Add the milk all at once and stir vigorously to combine with the slurry in the pot until well combined and any part sticking to the bottom of the pan has been incorporated. Continue stirring until mixture thickens. Should be about the consistency of condensed soup. Use in Salmon Loaf Supreme recipe.

Friday, May 19, 2023

A Delicious Way To Get Your Veggies


Sweetie really liked this dish and said if we had this all the time that he would eat more vegetables...that sounds like a vote for this veggie pasta dish that is roughly a pasta primavera. The primavera part is Italian (I think) for Spring. The zucchini is certainly not a spring vegetable, but most of the rest are.

This is sort of a three-ring circus pasta. You are boiling pasta water, and then pasta, prepping and steaming or boiling some veggies and also sautéing others. Then you are also making a cheese sauce!

It takes a bit of time to prep the veggies but it can be done while the pasta water comes to a boil. I used the microwave to steam the broccoli, zucchini and snap peas, but you could also use the pasta water to blanch each in turn. Once blanched immediately submerge the veggie in an ice water bath to stop the cooking and to keep the bright colors. I would blanch them long enough that they are tender but still have some bite to them. In the microwave the broccoli (being in small florets) took about 45 seconds and the other two took a minute. I used a steamer pot with perforated lid and a tiny amount of water.

The second thing to do while the pasta cooks is to make the cheese sauce. This is a white cheese sauce and you can either use all ricotta, or part ricotta and part fresh farmer's cheese as I did. I've done it with all ricotta and that is lovely, too. Boiling water, added in small amounts followed by stirring with a mini-whisk, turns the cheeses into a silky sauce and a bit of grated Parmesan, salt and pepper, plus some nutmeg, gives it flavor. You can use the pasta water as the pasta is boiling and heat the sauce over very low heat until all the other elements are done.

Before I started the pasta water I prepared the truly savory part of this dish. I sautéed chopped onion, minced garlic, chopped carrot and chopped red pepper. Once the onion started to brown at the edges in the mixture of olive oil and melted butter, I turned the heat down and kept it at low heat, stirring once in a while, so that the carrots had a chance to soften and the onions to brown a bit more without burning the garlic.

A large, wide bowl is the best for mixing the elements of this dish together and for serving. Once the pasta is cooked, the steamed veggies, sautéed veggies and the cheese sauce all get tossed together. The final touch is a sprinkle of grated Parmesan. Enjoy!

Sort of Pasta Primavera
Serves 3-4

1/2 onion, peeled and chopped
1/2 red pepper, chopped, no seeds or stem
1 teaspoon minced garlic
1 medium carrot, peeled and chopped into small dice
1/2 cup sliced mushrooms (I like cremini mushrooms)
2 tablespoons olive oil
2 tablespoons butter or non-dairy 'butter'

1/2 pound rotini pasta
salt
1 medium zucchini, quartered lengthwise and sliced
1 1/2 cups sugar snap peas that have been cut diagonally into thirds
1/2 - 1 cup broccoli, cut into small florets

1/4 cup ricotta cheese
1/4 cup fresh farmers cheese (or 1/2 cup ricotta and no farmer's cheese)
1 tablespoon grated Parmesan cheese
dash salt
1/4 teaspoon pepper
1/8 teaspoon nutmeg

3 tablespoons grated Parmesan cheese

In a large skillet put the olive oil and the butter and set over medium heat until the butter melts. Stir.
Add the onions, increase the heat to medium-high and sauté for about 5 minutes, stirring often, until the onion is translucent. Add the red pepper, garlic, carrots and mushrooms, and stir. Continue cooking and stirring every minute or so until edges begin to brown on the onions. Cover and reduce heat to very low. Continue cooking, stirring frequently to prevent burning.

While sautéed veggies continue to cook, put a very large pot of water on to boil. While it is coming to a boil, prepare the zucchini, snap peas and broccoli.

Once the water comes to a boil, add the amount of salt you like in your pasta water (I use 1/4 teaspoon...some people like more!) Add the pasta, stir, and return to a boil.

While the pasta cooks, prepare the cheese sauce. In a small pot combine the  two cheeses and 1 tablespoon of the boiling pasta water (but no pasta). Stir to combine. I use a mini-whisk but have done it with a small flexible silicon spatula or a teaspoon. Once combined, add another tablespoon of pasta water and stir again until smooth.  Add the seasoning and stir. If the sauce looks too thick, continue to add water, a tablespoon at a time until desired thickness. Sauce should coat the pasta in the finished dish. Keep warm over a very low heat. Stir every minute or so.

Prepare the broccoli, zucchini and snap peas: steam in the microwave or cook is a separate pot of boiling water.  If boiling, remove and put into an ice bath, then remove from ice bath and drain, then add to sautéed veggies. Do this one ingredient at a time. Length of time should be to just barely make them tender. When you are done, all three will be on top of the sautéed veggies, with the lid on to keep hot.

When pasta is cooked to your desired doneness, drain and put into a large, wide bowl. Top with the veggies and then with the sauce. Toss to combine. Sprinkle combined pasta & veggies with the Parmesan cheese and serve at once.

Monday, January 09, 2023

Italian Sausage Meat Loaf


I grew up eating a meat loaf made with ground beef, enhanced with tomato juice and oatmeal and an egg. It fed the whole family until the next to the last kid was old enough for it but by then the older kids were often gone at dinner time babysitting, so I think that the recipe worked just fine my whole childhood, even though there were ten of us at dinner some of the time. Since it takes about the same amount of time to bake potatoes as to bake the meatloaf, the next oven rack down usually had the potatoes baking to be served with the meat loaf. 

I got the recipe from my Mom when I moved to California and made it myself but these days I can't eat beef, so I have to be creative. 

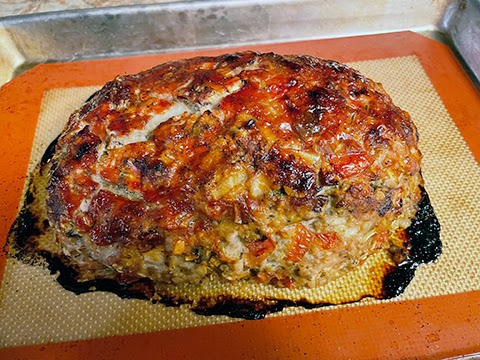
Tonight's version is made with Italian sausage and ground pork. Because the Italian sausage comes already seasoned, I didn't add salt and did add some extra mixed Italian seasonings to make it even more Italian in flavor. Beyond that I only sprinkled some black pepper over the ketchup to tone down the sweetness. Because I love mushrooms, I added finely chopped mushrooms to the mix, plus the usual onion and oatmeal. I added chopped parsley and tomato and skipped the tomato juice. I  forgot to put in the egg...but I did coat the top with the ketchup and a sprinkle of black pepper right before putting it into the oven to cook. 


Italian Meatloaf 

Serves 8

1 1/2 pounds ground meat - I used 3/4 ground pork and 3/4 Italian sausage
1/2 cup onion, chopped
1 cup finely chopped cremini mushrooms
1 diced tomato
2 teaspoons chopped parsley
1/2 teaspoon Italian seasonings
3/4 cup oatmeal (rolled oats), uncooked
2 tablespoons ketchup
a dash of ground black pepper

Preheat the oven to 350 degrees F. Line a small sheet pan with a silicone liner or foil or parchment paper.

In a large bowl place the ground meat, chopped onion, chopped mushrooms, diced tomatoes, parsley, Italian seasonings and the uncooked rolled oats (oatmeal). Use your hands to gently mix thoroughly. Form into a rough ball in the bowl, pour out onto the prepared pan, then use your hands to shape in an oval loaf. Spread the ketchup thinly over the top of the loaf and sprinkle with the black pepper. 

Bake in the preheated oven for 45 minutes. Check for doneness - thermometer should read at least 175 degrees. If lower, return to oven. Can take up to 1 hr 10 minutes.

Let stand for 5 minutes before slicing. Serve hot. 


Thursday, November 10, 2022

Mushrooms After the Rain


If you have ever been in the woods after the fall rains begin you may have been lucky enough to see mushrooms growing there. I'm not sure why there seems to be a co-relation, but the few times that I have seen mushrooms growing in the wild it was after rain.

We have been blessed with well over an inch of rain this past week. Considering our years of drought, that is a lot! I do hope that it's the beginning of a rainy winter and not just a tease.

The part that sucks about all that rain is that our older lab dog, Pi, came home just about when the rains were setting in. We still had to get him outside to do his business, so we set up an EZ-UP tent just past the end of the ramp that Sweetie built for the express purpose of getting him outside. The first day and a half we pretty much had to carry him, but then he started being able to walk with some weight on his legs and now can sometimes bear his full weight as he climbs up and down (although we still have to hold on to his harness for helping with balance). Once on solid ground he is able to walk on his own and today walked an area about 20 feet in diameter a couple of the times we took him out. Progress!

But back to mushrooms! For dinner I made a mushroom soup using a recipe I found in the paper. The recipe is by Ellie Krieger from the Washington Post.


The interesting things about this recipe are that the mushrooms and shallots are roasted first, and the soup is thickened with cannellini beans. Once the soup is cooked, you use an immersion blender or regular blender to liquify all the soup ingredients and it becomes fairly smooth and truly delicious. Ellie Krieger writes, "Along with all that flavor, this soup also has considerable nutritional bragging rights. Besides the wealth of B vitamins, potassium, and health-protective compounds in mushrooms, the soup gets it's creaminess not from cream, but from being pureed with a can of canellini beans, which - in additions to essential minerals, fiber and more - deliver enough protein to make it a meal in a bowl." We served it with soda crackers and a yummy green salad that Sweetie made. A great dinner for our first day after the rains.


By the way, I use a plastic produce bag to coat the mushrooms and shallots. If it is a clean bag, you can also use the outside of it to spread out the oiled veggies in the pans once you dump them out of the bag...keeping you hands clean...and then toss it. Since Sweetie insists on putting produce in the bags, I keep finding ways to re-use them, including using them to collect our compostable fruit and veggie scraps, tea bags and egg shells, etc.


Creamy Roasted Mushroom Soup

Makes 4 servings (about 6 cups)
by Ellie Krieger, Washington Post newspaper

1 1/2 pounds mixed mushrooms, such as oyster, baby bella, shiitake and/or maitake, sliced
3 large shallots (9 oz. total), cut into 3/4-inch wedges
5 tablespoons olive oil, divided
3/4 teaspoon fine salt, divided, plus more to taste
2 cloves garlic, minced or finely grated
2 teaspoons chopped fresh thyme leaves
4 cups n-salt-added or low-sodium beef or vegetable broth, plus more broth or water as needed (I used low-sodium chicken broth)
1 (15-oz.) can no-salt-added cannellini beans, drained and rinsed
1/2 teaspoon freshly ground black pepper, plus more as needed
1/4 cup dry sherry (or use 1/4 cup broth and 1 tablespoons sherry or white wine vinegar)
   Chopped fresh flat-leaf (Italian) parsley, for garnish

Position racks in the top and bottom thirds of the oven and preheat to 425 degrees F.

In a large bowl (or plastic produce bag in my case) toss the mushrooms, shallots and 3 tablespoons of the oil and 1/2 teaspoon of the salt. Spread the coated mushroom mixture across 2 large, rimmed baking sheets and roast for 10 minutes in the preheated oven.

After 10 minutes, stir veggie in each pan, then return to the oven, switching the pans top and bottom and back to front. Roast another 10-15 minutes, or until the mushrooms release their water and brown, and the shallots soften. Remove from the oven and set aside.

In a large pot over medium heat, heat the remaining 2 tablespoons of oil until shimmering. Add the garlic and thyme and cook, stirring, until aromatic, 30 seconds. Reserve 1/4 cup of the mushrooms for garnish (I forgot to do this!). Add the remaining mushrooms and the shallots to the pot, along with the broth, beans, pepper and the remaining 1/4 teaspoon salt.

Increase the heat to high and bring to a boil, Reduce the heat to low and simmer, uncovered, for 10 minutes. Stir in the sherry and cook until the flavors meld, 3 minutes more.

Using an immersion blender, puree the soup in the pot until smooth. (Alternatively, let cool until not scalding and puree in batches in a regular blender.) Stir additional broth or water if needed to thin to get your desired consistency.

Rewarm the soup if needed. Taste, and season with additional salt, if desired.

Ladle soup into bowls and garnish with mushrooms (if you remembered to set some aside) and chopped parsley. Serve at once.


Sunday, October 30, 2022

Butternut Squash For Fall - Zucchini For Summer


By now we have usually taken in our front porch wicker furniture because of rain, but this year we continue to have weather more like June than October...including some fog, which I love. No rain.

This recipe reflects the two seasons in a way. I'm just beginning my use of winter squash...in this case butternut and have almost finished using the zucchini from my garden because we are not getting very much any more and mostly little ones at that. This recipe has both, plus some mushrooms and two kinds of rice, plus pecans and orange juice and zest. What ties it together is olive oil and balsamic vinegar, plus a bit of maple syrup on the roast veggies.

I saw a recipe on my phone for something similar to this a week or so ago, but couldn't find it when it was time to make this dish, so I sort of put things together that sounded right in proportions that seemed right and it worked out pretty well. Sweetie raved and had two servings.

 Although I often peel, de-seed and cut up fresh butternut squash, today I used a container from the grocery store that had already prepared chunks in it. I did cut a few of the larger chunks in half, but other wise just threw them into the mixing bag. The zucchini were small so I used two, cutting off the ends and cutting them in half, then slicing them. The mushrooms were already cleaned and sliced. You can use any kind of mushroom you like...these are plain white ones but cremini or one of the fancy ones would be delicious, too.

Do use a fresh orange for this. The zest and fresh juice are a background note, but make a big difference and that won't happen without the fresh oils in the zest and the unmistakable taste of fresh OJ.

I used a rice cooker for the rice but just prepare it in your favorite way. You can skip the wild rice if you want this to be less costly and it will still take great, but the wild rice really adds to the taste. This would make a great stuffing for duck if the butternut squash were chopped in smaller cubes. The flavors would be excellent with duck...or turkey. We had it with grilled chicken thighs and it was lovely.

Need to prep ahead? You can roast the veggie mixture in advance, keep in fridge, then warm in the microwave before mixing into the rice mixture. Both kinds of rice can be made ahead and rewarmed with about a teaspoon of water in the microwave with waxed paper over the container to keep the moisture in. Do mix up the 'dressing' at the time you are going to serve because fresh orange juice will taste fresher that way...and it matters. Pecans can be toasted ahead and kept in a airtight container.

Two Kinds of Rice with Butternut Squash and Maple
Serves 4-6

3-4 cups butternut squash, peeled, de-seeded, and cut into cubes of about an inch
2 tablespoons olive oil
2 tablespoons maple syrup
2 tablespoons balsamic vinegar
1/4 teaspoon dry thyme
1/8 teaspoon (or more if you like it spicier) cayenne pepper, ground
1/4 teaspoon freshly ground black pepper
1 tablespoon fresh orange zest
1/2 cup sliced mushrooms
2 small or 1 medium-large zucchini, ends trimmed, halved lengthwise and sliced in1/4-inch thick slices
1/4 cup chicken broth
1/4 cup fresh orange juice
1 tablespoon balsamic vinegar
2 tablespoons olive oil
salt and pepper to taste
1 cup cooked wild rice
1 1/2 cups cooked brown rice
1/4 cup toasted pecans, broken in large pieces
1 tablespoon parsley, minced

Preheat the oven to 450 degrees F.

Place the butternut squash, olive oil, maple syrup, balsamic vinegar, thyme, cayenne pepper, ground black pepper, and orange zest into a large plastic bag (I use a clean produce bag) and shake vigorously to coat the squash in the other ingredients. Line a sheet pan with heavy duty foil and spray with spray oil (I used spray olive oil). Pour the squash mixture onto the prepared sheet pan. Let as much of the mixture as you can drip from the bag. Use the outside of the bag to pat the squash into a single layer, with the cubes separated from each other. Roast in the preheated oven for 10 minutes.

Add the sliced mushrooms and sliced zucchini to the sheet pan and use tongs or a wooden spatula to carefully mix them into the squash mixture while also turning the squash to another side. Try not to tear the foil since the coating mixture is sticky and could burn if it leaks underneath. Make sure that the mushrooms and zucchini are laying on a flat side on the surface of the sheet pan foil, then return the pan to the oven and roast another 10-15 minutes, or until butternut squash is tender.

While the squash is roasting, in a small bowl mix together the chicken broth, balsamic vinegar, olive oil, salt and pepper.

In a large bowl place the two kinds of rice, warmed, the roasted veggies and any sauce, and the fresh orange juice dressing. Gently stir to combine. Add the toasted pecans and the minced parsley and gently stir to combine. Serve at once for warm dish, or serve at room temperature later.

Monday, January 10, 2022

Awesome Mushroom Tart on an Almond Freeform Crust


I love getting cookbooks for Christmas! This year I received quite a few of them, so it was challenging to pick the first recipe to make out of a new cookbook. Dorie won out...which is not surprising since her recipes are always top notch. Who is Dorie? Dorie Greenspan , one of my favorite cookbook authors, especially for baked goods. The book, received from my darling daughter and her amazing beau, is called Baking with Dorie. It has lots of sweets that I'll get to later, but the recipe that spoke to me was for a freeform tart topped with mushrooms. It's official title is Free-Style Mushroom, Herb, and Ricotta Tart. You start with a thin, crumbly crust made with almond flour and all-purpose flour, so not gluten free. This crust has lots of herbs in it. As a matter of fact, the whole tart has lots of herbs in it. The crust is topped with a ricotta-rich filling which also has herbs in it, and that is topped with cooked mushrooms...with more herbs. Then to 'gild the lily', you top the whole thing with dressed micro-greens and a drizzle of oil. I added a small amount of chopped walnuts since I used walnut oil for the drizzle and I think they added some needed crunch. Sweetie liked his tart warmed up and it really did taste better that way than at room temperature as called for in the recipe.

As with many Dorie Greenspan recipes, you can play around a bit with this recipe...use whatever herbs appeal to you or that you have on hand, mix up the mushrooms that you use, and so on. It's also a great recipe for entertaining since each of the components can be made in advance. It might seem like a long recipe, but you can make each component on a different day if you like; the spread one day, the mushroom topping another day and the crust the day you will serve it, so it's really quite manageable. You can also do it all on the same day as I did and serve it that day. 

Once it's all together I would recommend putting it on a sheet pan or cookie sheet and heating it for about 10-15 minutes at 325 degrees F. The cheese filling becomes more savory and the mushroom flavor takes over. When it's at room temperature the mushrooms are more subdued in flavor, which is a shame if you have bought the more expensive wild mushrooms.

That said, we loved, loved, loved this tart. It will go into my regular rotation and will be even better in the warmer months of the year when fresh herbs are so easy to get.


Free-Style Mushroom, Herb and Ricotta Tart
from Baking with Dorie, Sweet, Salty and Simple
Six servings

Raggedy Edged Almond-Herb Crust
1 1/2 cups (204 grams) all-purpose flour
1/2 cup (50 grams) almond flour (or an additional 1/3 cup (45 grams) all-purpose flour)
1/2 teaspoon fine sea salt
1 stick (8 tablespoons, 4 oz. 113 grams) cold unsalted butter, cut into bits (I used non-dairy margarine)
2-3 tablespoons minced fresh herbs (a mix is good - parsley, thyme, chives, dill, rosemary, scallion greens or any of them by themselves)
1 cold, large egg, lightly beaten

Put both flours and the salt in a food processor and pulse to blend. Add pieces of butter and do long pulses about 15 times until it looks like crumbs, not sand. Scrape work bowl and under blade as needed.

Drop in the herbs and pulse only to blend. Add the egg in three additions, pulsing after each addition until dough forms clumps and curds. Pinch and it should hold together. If not, add a splash of water and pulse again.

Turn the dough out and gather into a ball. Knead a few time to make dough cohesive, then gather and flatten into a disc. (I substituted the working dough with heel of your hand for the kneading and the results were good.)

Place the dough between two sheets of parchment and roll to a thickness of 1/8 inch, rolling into a rough circle of dough with ragged edges. As you roll, now and then lift of and replace the parchment...both sides in turn...to make sure to not crease dough. Remove top sheet, prick dough all over with a fork, replace parchment and slide parchment/dough/parchment sandwich onto a baking sheet. Refrigerate for at least 2 hours or freeze for at least one hour.

When ready to bake, center a rack in the oven and preheat to 400 degrees F. Peel top sheet of parchment, place it on a baking sheet, place the dough on it and cover with the other sheet of parchment, loosely, to keep tart from browning too much. Bake for 18-20 minutes, or until crust is golden around the edges. Remove the top sheet of parchment and bake for and additional 2-3 minutes to firm up the crust and give it more color. Transfer baking sheet to a cooling rack and let crust cook to room temperature. Can be made ahead but best to use within 8 hours.


The Tart

1 Raggedy Edged Almond-Herb Crust
1 recipe Ricotta Spread
1 recipe Mushroom Topping
Extra-virgin olive oil or walnut oil or toasted sesame oil
A handful of micro-greens tossed with oil, lemon juice, salt and pepper
A couple tablespoons toasted walnuts, chopped roughly


Ricotta Spread

1 cup (212 grams) ricotta
1/4 cup (60 ml) plain yogurt, preferable Greek
1/2 shallot, finely chopped, rinsed in cold water and patted dry
2 scallions, trimmed and finely sliced
1-2 tablespoons minced fresh herbs (see description in Raggedy Edged Crust above)
Fine sea salt and freshly grounds black pepper to taste

Drain the ricotta and yogurt if needed. Put into a bowl and whisk until smooth. Add the rest of the ingredients and whisk to combine. Add more salt and pepper if needed. Cover and refrigerate until ready to serve the tart. If liquid has accumulated, drain it off before using on the tart. Spread can be refrigerated up to two days.


Mushroom Topping

1 tablespoon unsalted butter (I used non-dairy margarine)
1 tablespoon olive oil
1 1/2 pounds (680 grams) mushrooms - a mix is good - ordinary ones from the market are fine, too - cleaned, trimmed and sliced
1-2 garlic cloves, minced (to taste)
3 tablespoons white wine
fine sea salt and freshly ground black pepper
3 scallions, trimmed and finely sliced (I only used one)
2 tablespoons minced fresh herbs (see description in Raggedy Edged Crust above)

Warm the butter and oil in a large skillet over medium-high heat. When the bubbles have subsided, toss in the mushrooms and garlic and cook, stirring, until the mushrooms are brown and tender and the pan is almost dry. Pour in the wine, stir and cook until it's almost evaporated. Season with salt and pepper to taste and remove the pan from the heat. Leave the topping at room temperature for up to 3 hours or pack into a covered container and refrigerate for up to 2 days; reheat in a skillet with a little water before using.


To Assemble and Serve the Tart:
Place the crust on a baking sheet and cover with the ricotta-yogurt spread.


 Stir the scallions and herbs into the mushroom topping and spoon it over the spread. 


Scatter on the walnuts and drizzle with the oil.


Reheat the tart in 325 degree F oven for 10-15 minutes, just enough to warm the tart. Remove from the oven, slide onto a cutting board or plate, and top with dressed the micro-greens. Cut the tart at the table using a pizza wheel or a long chef's knife. Serve at once while still warm.


Monday, May 18, 2020

Country Comforts - Polenta and Balsamic Mushrooms


With time on my hands, I've been going through bookshelves and throwing out what needs to be thrown out. One of the things I discovered were some old Bon Appetit magazines going back as far as 1991! Most of them are newer, with quite a few from around late 1999 and early 2000 when I was distracted by grief and probably never even read them. Perhaps that's why I saved them. Things have changed over the decades. Many of the recipes from the early 90s are very rich, with lots of sauces, including many with a lot of whipping cream. These were served with desserts with lots of chocolate and whipping cream. I'm glad that we have not gotten rid of the chocolate but moved a bit past so much whipping cream.

One of the recipes sounded really great, especially because we had a lot of mushrooms. Sweetie and I have been blessed with wonderful neighbors who ask what they can get us when they shop. That led to a double amount of fresh mushrooms through our miscommunication. Fortunately, we both love mushrooms! In making the Cottage Loaf, I had re-discovered the polenta in the extra fridge, so I knew that I could make the polenta.

In the recipe, from the October, 1991 Bon Appetit issue titled Country Comforts on the cover, the polenta was baked. It had a lot more dairy, including full fat sour cream (I substituted low fat yogurt and reduced the amount), lots of Parmesan cheese (I had none and Sweetie had a reduced amount) and lots of butter (again replaced with non-dairy and reduced in amount). I made it stove-top so that the mushrooms could take up the oven and it was just perfect. I re-wrote the direction for stove-top. If you make this with water, skip the yogurt and use plant-based butter and no Parmesan, it is a vegan meal.

The polenta is OK just a little salty since the mushrooms get a bit sweet with the roasting and the balsamic. It's a great combination! If at all possible, use fresh herbs. It makes a difference.

The recipe was found in an article on the Lark Creek Inn in Larkspur, CA, a pioneering restaurant, founded in 1989, which closed sometime in 2015. Who knows what magazine gems I'll find next.

Do try this delicious dish yourself. Except for prepping the mushrooms and stirring the polenta, it doesn't take much effort and the results are worthy of company...once we can have joint dinners again. In the meantime, make it for yourself...you are worth it!

Low-Dairy Polenta with  Thyme and Roasted Balsamic Mushrooms
A variation of a recipe from the Lark Creek Inn, Larkspur, CA

Polenta
1 3/4 cups water or chicken broth (I used broth)
1 teaspoon minced garlic
3/4 cup polenta (coarse cornmeal)
1/2 teaspoon salt
1/3 cup plain yogurt
4 tablespoons non-dairy butter
1/4 cup grated Parmesan (optional)
fresh thyme for garnish

Roasted Balsamic Mushrooms
6 garlic cloves, minced or thinly sliced (I used minced because that's what I had)
3 tablespoons olive oil
3 tablespoons balsamic vinegar or red wine vinegar
3 fresh rosemary sprigs or 1 teaspoon dried, crumbled
3 fresh thyme sprigs, or 1 teaspoon dried, crumbled
4 cups large fresh mushrooms, cleaned, dried, and quartered

Method:
Polenta -  Bring the water or broth and minced garlic to a boil in a large, heavy pot over medium-high heat. Pot will need a tight-fitting lid.

Gradually stir polenta into boiling liquid. Reduce heat to medium and cook 5 minutes, stirring constantly. Add 1/2 teaspoon salt and stir in. Reduce heat to simmer and cover. If needed, stir in hot water, a 1/4 cup at a time, to loosen mixture if it gets too thick to allow the grains to cook...up to a full cup extra water. Cook another 15-20 minutes , stirring frequently, until polenta is thickened and grains are tender (take a taste). Remove from heat and stir in yogurt and butter. If using, stir in Parmesan cheese and stir until melted. Season with salt and pepper as needed, to taste.

Spoon polenta onto plates or into shallow bowls. Garnish with thyme. Top with Roasted Balsamic Mushrooms. Serve at once.

Mushrooms - Preheat oven to 425 degrees F. Line 2 baking sheets with foil.

In a large bowl combine garlic, olive oil, balsamic vinegar and herbs. Add mushrooms and toss to coat. Season lightly with pepper. Toss again.

Arrange in single layer on prepared baking sheets. Roast until mushrooms are tender and slightly crisp on edges, 20 minutes or so. Serve over cooked Polenta.

Thursday, April 16, 2020

No Bread Today But Plenty Of Veggies


Normally on the 16th of the month this post would be about which ever bread recipe the Bread Baking Babes are baking this month. I'm sure that I will bake this bread eventually because the delightful Aparna of My Diverse Kitchen asked us to bake Kürtőskalács or Chimney Cakes and they sound delicious. The difficulty is that you need a cone shaped support for the dough strips that can go into the oven and support the bread as it bakes. I haven't been able to figure out anything to use and can't go looking due to everything being shut down for the pandemic. I've also been fighting off a non-Corona-19 infection and have very little energy. Do visit Aparna's blog and those of the other Bread Baking Babes to see how they did with this challenge. Here are some links: Judy of Judy's Gross Eats, Kelly of A Messy Kitchen, Cathy of Bread Experience, Karen of Karen's Kitchen Stories.

That doesn't change the fact that we still need to eat and I've had this recipe ready to make for almost a week. Each day I wasn't up for cooking, but finally yesterday afternoon I had enough energy to cook up this delicious concoction which has lot of veggies and some white beans. As usual I only used the recipe as a jumping off place so there were lots of changes...I added mushrooms and onions and ham and substituted spinach for kale and changed seasonings...in short it's a new recipe.

This is a hearty veggie stew with ham added because it goes with beans and we had some left over from Easter, but it would be just fine without the ham and would then be vegan and still delicious (I know because I tasted it before I added the ham). Although the original recipe was written so that you quickly cooked it and served it at once, I decided that it would improve if cooked earlier in the day. I reheated it at dinner time. This gave the ingredients time to meld. I suspect that it improved the flavor. I served it with some cornbread, which went well with it. Sorry about lack of photos, but it smelled so good, and tasted better, that I forgot to take photos!

Veggie Concoction - White Bean Stew
Based on Tuscan Cannellini Bean Skillet on the baking fairy blog
Serves 3-4

2 tablespoons olive oil
1/4 cup yellow or white onion, peeled and chopped
6-8 crimini mushrooms, cleaned and sliced
3-4 cloves garlic, minced
2-3 zucchini, cut in half and sliced
1/2 teaspoon sage
1/4 teaspoon dried thyme
1/2 teaspoon mural of flavor or other dried herb mixture
1/4 teaspoon pepper
1 cup frozen chopped spinach
1- 15 oz. can cannellini beans, drained and rinsed
1/2 cup diced ham (optional)

In a large skillet, heat the olive oil, then saute' the onion over medium-high heat until almost translucent, about 4 minutes. Add the mushrooms, stir, cover and cook over low heat 10 minutes, stirring occasionally. The mushrooms will release moisture. That is fine. Add the garlic and return the heat to medium-high and saute', uncovered, 3 minutes, stirring frequently. Add the zucchini, the sage, thyme, dried herb mixture, and pepper. Stir well to coat the contents of the pan with the herbs and spice. Cover and cook over low heat 10 minutes, stirring occasionally. Add the spinach, stir well, and continue cooking 4 minutes, stirring occasionally. Add the beans and ham (if using) and stir to combine, then simmer, covered, for 10 minutes, stirring occasionally. Remove from heat and let sit until serving time, then reheat, covered, for about 10 minutes over low heat, stirring occasionally. Serve hot.

Monday, March 23, 2020

Spring Quiche


Keeping busy during the shelter in place time. Did some house painting yesterday on the farmhouse and did yard work today - weedeating, seed planting, regular weeding and watering. I even took a photo of the first California poppy on our property. It bloomed today and it's one of the ones with multi-colored petals in shades of dark orange and terra cotta.


There should be more blooming soon, including the regular gold ones. The nasturtium just started blooming and we've had a slow progression of daffodils and tulips. I'm just glad that spring is here, even though our night time temperatures are staying low in the 30s and 40s, so no putting out seedlings like tomato and squash until the nights warm up a bit.

Have been having fun in the kitchen, too. Baked porridge bread twice and shared with our across the road neighbor. Today I baked my favorite quiche for dinner, using a recipe that was easily found using the new and better index! For the carrot part I used carrots from the garden of the same neighbor who was given the bread. She brought them over, freshly pulled, and the flavor is wonderful! I used the last of the asparagus. It made a very spring themed quiche I think. Sweetie loved it. The last time I made this I was getting farm boxes delivered, but the produce section of the market has improved since then and we have the added benefit of neighbors who grow veggies!

You can find the recipe here. A few variations: I used Kite Hill non-dairy ricotta on the bottom of the quiche and no cheese, chopped the mushrooms small and sauteed them with the carrot, but not the onion since I had cooked onions the day before and used them on top, plus diced ham between the asparagus spears for the meat instead of smoked salmon. Used oat milk with eggs for the custard. As you can see, as long as you keep the proportions the same, you can use a wide variety of variations for ingredients and still get a delicious quiche.


Stay safe and healthy!

Wednesday, February 27, 2019

Lemon Mushroom Caper Sauce


Still cooking a lot with lemons. Sometimes you need a nice sauce to boost the flavor of your entree, especially if you just picked up a rotisserie chicken on your way home. Make sure the chicken is hot, spoon some of this sauce over each portion and you will impress your family and friends. They'll never know that it's easy.

I posted this recipe soon after I started blogging, a good long time ago, and it's still a great sauce to put over chicken, fish, or just a plate of cauliflower rice. Do use a fresh lemon so that the zest has lots of lemon oil. I ran through the rain and grabbed one from my Meyer Lemon shrub, but one recently  purchased from the market or farmer's market - Eureka or Meyer are both great - is fine.

The key thing to remember is to add the liquid all at once, then stir vigorously until it thickens, which doesn't take long. You might think that this way there will be lots of lumps, but if you cook the flour mixture a minute and then stir, stir, stir once the liquid goes in, the flour will mix with the liquid and you'll get a great sauce. If you have more lemon zest than called for, just throw it in...just gets you a more lemony flavor which is delicious. You can skip the capers if you don't care for capers, but I think they add more zing. I used brown mushrooms because they have more flavor, but regular white mushrooms are fine. Fresh parsley is a very good idea.


Lemon Mushroom Caper Sauce
an Elle crafted recipe

2 tablespoon olive or grapeseed oil
1 cup prepared mushrooms (wiped clean, sliced)
1 clove minced garlic
2 tablespoons wheat flour or potato flour
1 cup chicken or vegetable broth
juice of one lemon (zest the lemon first)
Pepper to taste
zest of one lemon
1 tablespoon capers, drained
2 tablespoons chopped Italian parsley

In a medium saucepan heat the oil over medium-high heat. Add the prepared mushrooms, stir to coat with the oil, and saute' 5 minutes, stirring frequently. Add the garlic, stir, and saute' 1 minute, stirring frequently. Add the wheat flour or potato flour, stir to combine with mushrooms and garlic, and continue to cook for another minute, stirring frequently.

In a measuring cup mix together the broth and lemon juice. Add to the mushroom mixture all at once, stirring constantly, and continue to stir until mixture thickens. You can save about 2 tablespoons of the broth mixture and add some at the end to adjust the thickness to what you prefer. Add pepper to taste.

Add the lemon zest, capers, and Italian parsley. Stir to combine. Taste and add salt and/or pepper if needed. (I avoid adding salt and often by now you will see that it isn't needed, but now is the time to add it if you find you do need to.)

If holding the sauce while you cook what it will garnish, cover sauce with plastic wrap laid right on top of and touching the sauce. Cover the pot. Re-heat (removing the plastic wrap first), if needed, using low heat.

Makes enough to sauce 4 servings.

Saturday, May 07, 2016

Using Up Roasted Turkey


This should probably be a post for November, but the truth is that I love turkey and eat it year 'round. With the easy availability now of turkey parts at my local market, it's easy to pick up a pack of turkey thighs and cook them in the toaster oven until roasted. Since my toaster oven is located in my studio, away from the house, this works well when the temperature is in the upper 80s as it was earlier in the week.

Once the initial dinner of roast, sliced turkey, mashed potatoes and peas passed, I still had plenty of turkey to use and it was more easily cut into chunks than sliced. Perfect for putting into a pasta sauce. In the past I've made a cream based pasta sauce with herbs and mushrooms, so I decided to try that but to use rice milk and soy creamer instead of milk, creating my own recipe as I went along.

It worked really well and since I included fresh rosemary along with dried thyme and sage, plus a large amount of green garlic (a gift from a neighbor), it was pungent in fragrance as well as delightful in flavor. Because this kind of sauce can be a bit staid, even with all of those ingredients, I used two strips of local bacon for added depth of flavor. I cooked the bacon first and used the drippings (after removing the bacon itself) to saute the mushrooms, celery and green garlic.

This made a wonderful pasta sauce and went well with a fresh green salad embellished with orange segments, avocado and a balsamic dressing. Although I did use gluten free pasta, I used regular flour for the sauce. I've figured out that I need to keep my gluten down to a low level but don't have to eliminate it altogether. If you do, just substitute a GF flour mix in the sauce and cut back the milk by a couple of tablespoons. Then, once the liquid has thickened, add more if needed to make the sauce the consistency you like.


Turkey Mushroom Pasta Sauce with Green Garlic

2 strips of bacon, cut into roughly 1-inch pieces
1 cup celery, diced
1 cup sliced mushrooms (I used baby bellas)
1/2 cup finely chopped tender green garlic bulb (no roots or skin or tough parts)
(if green garlic not available, used 1/2 cup finely chopped onion, plus 2-3 minced garlic cloves)
2 cups diced (bite sized) cooked turkey
1/2 teaspoon dried thyme
1/4 tespoon dried sage
1 tablespoon fresh, chopped rosemary or 1/2 teaspoon dried rosemary
1/4 cup all-purpose flour
1 cup rice milk or other non-dairy milk
2 tablespoons soy creamer, unsweetened and unflavored
salt and pepper to taste

In a large, heavy bottomed pot cook the bacon over medium-low heat until browned and fat rendered. Remove bacon from pot with a slotted spoon to a piece of paper towel to drain.

Increase heat to medium-high and add the celery. Stir to coat with oil. Cook, uncovered 1 minute, stirring as needed. Add the mushrooms, stir to combine with the celery, cover, and cook 3 minutes. Remove cover, stir well, cover and cook 1 more minute. Uncover, stir in the green garlic, cover, lower heat to medium-low and cook 2 minutes. Uncover and stir in the turkey, thyme, sage and rosemary. Cover and cook 5 minutes, stirring occasionally to keep from burning or sticking.

In a large measuring cup, whisk the milk into the flour slowly to avoid clumping. Uncover the pot, raise heat to medium, and pour the milk mixture in all at once. Immediately stir vigorously to combine all the ingredients in the pot with the milk mixture and continue stirring until the liquid thickens. Taste and add salt and pepper to taste. Cover, reduce heat to lowest setting and cook 1 minute to combine flavors. Uncover, add the soy creamer if needed to make the sauce the consistency you like.

Serve over cooked pasta or rice. Sprinkle each serving with chopped Italian parsley if desired.

Serves 4.