Showing posts with label asparagus. Show all posts

Tuesday, April 22, 2025

Pesto in a Quiche


I love making quiche for dinner and Sweetie loves eating it. The great thing about quiche is that you can put lots of different things in it and so it's a creative kind of pie.

This time I had some grilled chicken leftovers to use up, plus a few spears of fresh asparagus. I decided to do a flavor combination that has worked well for me in the past for a sandwich...chicken and pesto with roasted red pepper and Swiss cheese. I put all of those things in, plus some caramelized onion, the asparagus, and a couple large bella mushrooms, sliced. It was delicious, so I want to share with you! 

Pesto Quiche with Grilled Chicken and Roasted Red Pepper Serves 4 - 6

1 9-inch pie shell, blind baked at 425 degrees F for 10-12 minutes (use favorite pie dough recipe or pre-made)
1/3 cup caramelized yellow onion
1 cup Swiss cheese, cut into ¼ inch dice
1 cup grilled chicken thighs, cut into 1-inch cubes
4 stalks fresh asparagus, ends snapped off, spears cut into 1-inch pieces
2 large mushrooms, sliced

3 eggs (or equivalent egg substitute)
1 ½ cups evaporated milk  or light cream
1/3 cup prepared pesto
¼ teaspoon salt
dash pepper
5 or 6 strips prepared roasted red peppers
2 tablespoons pine nuts

Blind bake the pie shell in a preheated 400 degree oven, then set aside to cool.

Reduce heat setting on oven to 350 degrees F.

Caramelize the onion with a light coating of olive oil in a small crock pot or in a skillet and let cool .

Sprinkle the bottom of the pie shell with the onions and half the Swiss cheese, distributing evenly. Top with the chicken and the asparagus, then the rest of the Swiss cheese. Place mushroom slices around the outer edges of the quiche fillings. Set crust with fillings aside.

In a bowl, beat the eggs lightly with the pesto, then add the milk and beat with a fork to combine, add the salt and pepper and beat with a fork or whisk to combine.

Pour the egg/milk mixture over the ingredients in the pie shell.  There may be too much milk mixture if pie pan is shallow - don't overfill, to avoid filling running over.  Add the red pepper strips in a nice pattern on the top. Sprinkle with the pine nuts.

Put the quiche on a baking sheet. Place in the preheated oven and bake 30-45 minutes, or until set and lightly browned. (I find that setting on a parchment-lined small baking sheet is a good idea in case some of the filling spills over.) Cool for 10 minutes before cutting to serve.

Saturday, March 16, 2024

Sweetie's Pi Day Pie


Sweetie really enjoys pies and this year on Pi Day we were also remembering our beloved black lab Pi who left us in the fall. We still miss him, a lot, as you might expect since he was the best dog we've ever had...and that's difficult because we've been blessed with a number of great dogs. Here is a photo of our Pi dog when he was young:


Usually I would bake a sweet pie, but this year I went for a quiche...basically a savory cheese, veg and custard pie. We had it for dinner on March 14th and Sweetie had more today for lunch.

If you use pre-made pie crust dough for this, it all comes together fairly quickly. You can go with the filling ingredients I chose, or use your own mixture. This one had sweet breakfast sausage as the meat, and not a lot of that, so mostly the vegetables were the stars. Onions, mushrooms, potato and asparagus were also my fillings but I think if I made this again I would skip the potato. It made the pie so dense that it took longer to bake and there was less of the delicate creamy egg custard, too. There was too much custard because of all the filling, so some dripped off and cooked on the baking sheet I had under the pie and some drips got between the pie dough and the pie tin, so the crust stuck a bit. Note to self: use less solid filling to allow room for more custard filling.

If you are planning this for dinner, do remember to start a little early since you need to blind bake the crust and let it cool a bit before putting in the fillings.

Spring Quiche with Asparagus and Swiss Cheese  and Mushrooms and Onion
Serves 4 - 6

1 9-inch pie shell, blind baked at 425 degrees F for 10-12 minutes (see notes)
1/3 cup finely chopped yellow onion
1 tablespoon olive oil
1 cup Swiss cheese, cut into ¼ inch dice
1/2 baked potato, peeled, thinly sliced
2 small, cooked Breakfast Sausage patties, each cut into 6-8 pieces 
3 eggs (or equivalent egg substitute)
1 ½ cups evaporated milk or light cream or 1 1/4 cup whole milk
¼ teaspoon salt
1/4 teaspoon dried thyme
dash pepper
Dash nutmeg
3-4 spears asparagus, tough bottoms trimmed off and sliced in half through the length of the spear
4 oz. crimini mushrooms, sliced thinly

Preheat oven to 350 degrees F.

In a small skillet, sauté the onion  in the olive oil until translucent, about 5 minutes, stirring often. Add the sliced mushrooms, stir and cover. Turn heat to low and cook another 5 minutes, stirring occasionally.

Sprinkle the bottom of the pie shell with the sautéed onion-mushroom mixture and Swiss cheese, distributing evenly. Top with the sliced potato. Sprinkle sausage pieces evenly over that. Set aside.

In a bowl, beat the eggs lightly, then add the milk and beat with a fork to combine, add the salt, thyme, pepper and nutmeg and beat with a fork or whisk to combine.

Arrange the half asparagus spears in a nice pattern on top of the onions, mushrooms, potatoes, sausage and cheese in the pie shell. 

Pour the egg/milk mixture over the ingredients in the pie shell. Place in the preheated oven and bake 30-45 minutes, or until set and lightly browned. I find that setting on a parchment-lined small baking sheet is a good idea in case some of the filling spills over. Cool for 10 minutes before cutting to serve.

Note: Use your favorite one crust pie dough, rolled for a 9-inch pie pan, or a package of pre-made dough like Pillsbury ReadyCrust (you'll have one pack of dough ready for another pie) at room temperature. Fit the dough into a 9-inch pie pan, crimp the edge, put in baking parchment and weigh with pie weights or beans, then bake for 10-12 minutes in a preheated 425 degree oven. Remove from oven, cool 5 minutes, remove the pie weights/beans and let pie shell, now blind baked, cool for another 10 minutes before adding the filling ingredients.

Tuesday, March 07, 2023

A Saucy Pasta Dish for Asparagus Season


I hope that you love asparagus as much as I do. We have been getting some for a few weeks, but the asparagus coming into the market now are thicker and really fresh. I like them just steamed al dente, but tonight I updated a dish that Sweetie and I enjoyed first in 2013, so ten years ago at asparagus time.

By the way, Sweetie has been going through a tough time for the past three weeks or so. His back has bothered him on and off over the years, but a bout this long and this painful hasn't happened for about 20 years. He finally agreed last Friday to go the his primary care doctor...but saw the Physician's Assistant, who is quite good...and ended up with some muscle relaxants, pain pills, and a referral to a back doctor.

Those meds knocked him out, so he has been sleeping a lot, even during the day (which is unusual for him), but it has done the trick. Along with frequent chiropractor visits, the rest and meds have finally worked so that he didn't need any strong meds today at all...just an ibuprofen.

This dish was sort of a celebration for a better back because I remembered that every time I made the old version that Sweetie loved it. To update it I've added butternut squash 'zoodles', fairly thin strands of the squash that I found in Whole Foods today, already prepared although still raw.

In the original recipe you stew pieces of asparagus and broccoli in garlic and oil. These veggies go on top of pasta that has been dressed with an almost cream sauce made with ricotta cheese and some of the hot water used to cook the pasta. Today I used some fresh linguine and some Kite Hill almond milk 'ricotta'. Don't forget to use freshly grated nutmeg, if possible, in the sauce...makes all the difference!

The updated recipe calls for tossing the asparagus and broccoli pieces in the garlic and oil, then removing them. The butternut squash noodles are then tossed with the remaining oil and garlic and spread over the bottom of the pan. Because they take a little longer to cook than the asparagus pieces and broccoli florets, having the squash on the bottom of the pan allows it to have more heat.  Since it's all cooked covered over low heat, all the veggies cook slowly and become flavored with the garlic.

Of course while the veggies are cooking you boil the pasta and make the sauce with the ricotta. Once everything is done it gets tossed together and makes a really delicious side dish or meal. I would imagine that you could make it with just the squash noodles and broccoli when asparagus isn't in season, but I do love asparagus and it shines in this recipe.


Fettuccine with Ricotta and Asparagus, Broccoli and Butternut Squash

from the Mediterranean Diet Cookbook
serves 4 - 6

3/4 lb tender young asparagus ( or 1/2 lb asparagus and 1/4 lb broccoli crown)
1/2 lb butternut squash 'noodles'
2 cloves garlic, finely chopped
3 -4 tablespoons olive oil
1 lb fettuccine
6 quarts water
1/2 lb fresh creamy ricotta 
dash nutmeg
salt and freshly ground black pepper, to taste
1/2 cup freshly grated Parmesan cheese

Trim touch ends off asparagus after rinsing them. Cut tender parts into 2-inch lengths. Cut broccoli crown into small florets. If needed, cut the butternut squash 'noodles' into 6-8-inch lengths.

In a sauté pan place 3 tablespoon olive oil and the garlic; stir to blend. Add the asparagus pieces and toss to coat, then remove and reserve. Repeat with the broccoli florets. Finally, add the additional tablespoon of oil if needed and add the squash 'noodles'; toss to coat and then spread over the bottom of the pan. Arrange the coated asparagus pieces and broccoli florets over the squash (do not stir) and, over low heat and covered, gently stew the garlic, squash, asparagus and broccoli in the oil until the vegetables are tender but not brown, about 15 minutes, stirring occasionally the last 5 minutes. Set aside.

Meanwhile, cook pasta in boiling water until tender. While pasta cooks, extract 1/2 cup of the cooking liquid and mix it in a small saucepan with the ricotta. Set saucepan over low heat and gently cream the ricotta and cooking water. When the ricotta is warm, taste and add salt and pepper to taste. Add the nutmeg and 1 tablespoon of the Parmesan cheese and stir to combine.

Drain the cooked pasta and combine immediately with the cheese sauce, tossing to mix well. Add the veggie mixture and toss with tongs to lightly coat the vegies and mix them with the pasta. If desired, plate or a warm platter. Sprinkle with the rest of the grated cheese and serve at once.

Wednesday, April 13, 2022

Asparagus Time


Not sure if it's true where you live, but here asparagus are in season. The spears coming into the markets are just the right size...not too thin and not to fat, with nice tight buds and beautiful green color.

One of my favorite ways to enjoy asparagus is to just steam them and eat them plain, but occasionally I like to do a fancier rendition. This pasta and asparagus dish is my go-to for those times. The only down side is I use three pots before I'm finished, but the final dish is so good, with tender pasta, garlic infused bite sized pieces of asparagus, and a delicious cheese sauce with the added zing of lemon zest. A large portion would make a fine vegetarian (or vegan the way I do it) meal by itself, or you can pair it with simple grilled fish or chicken as we did. Sweetie makes the best grilled salmon and steelhead.

You start by putting some water on to boil. Then you prepare the asparagus by snapping the ends off , then cutting them into bite sized pieces. They go into a small pot with minced garlic and some olive oil and then cook over low heat which allows the asparagus to become infused with the garlic while still retaining firmness and their green color. Don't forget to stir them occasionally so that all the pieces become soaked in the garlic oil.

While the asparagus are stewing you add  pasta to the boiling water. The pasta cooks while the veg and garlic do their magic. (If you use fresh pasta, you'll need to do this when the asparagus are almost finished cooking and after you've made the cheese sauce so that the pasta doesn't overcook. The asparagus take about 15 minutes.)

The cheese sauce is made in the third pot, using ricotta cheese, hot pasta water, salt, pepper, a dash of nutmeg, and the zest of one lemon. Over low heat the water is stirred into the cheese to make a creamy sauce. With most ricotta it will still be a little bit grainy, but that's fine. If you are going for vegetarian, you can add a few tablespoons of grated Parmesan, too. For my vegan version I skipped the parmesan and used an almond milk based 'ricotta'. My favorite brand is Kite Hill.

Now you have all of the parts. Once the asparagus are tender and the pasta is al dente tender, you drain the pasta, immediately mix it with the cheese sauce, and plate the sauced pasta, then top it with the garlicy asparagus pieces. For those using Parmesan, you can sprinkle another tablespoon of parmesan on top and serve it up!


Pasta with Ricotta  and Asparagus


a variation of a recipe in the Mediterranean Diet Cookbook
serves 4 - 6

3/4 lb tender young asparagus ( or 1/2 lb asparagus and 1/4 lb broccoli crown)
2 cloves garlic, finely chopped
3 tablespoons olive oil
2 tablespoons fresh mint, minced - optional
1 lb pasta of your choice - I used fusilli  (For vegan version use pasta made without animal products)
6 quarts water
1/2 lb fresh creamy ricotta (For a vegan version, I used Kite Hill almond milk ricotta)
salt and freshly ground black pepper, to taste 
dash nutmeg
zest of 1 lemon
1/2 cup freshly grated Parmesan cheese (Omit for vegan version)


Bring a large pot of water to a rolling boil and add 2 teaspoons salt.

Trim tough ends off asparagus after rinsing them. Cut tender parts into 2-inch lengths. Cut broccoli crown into small florets, if using.

In a sauté pan, over low heat and covered, gently stew the garlic, asparagus (and broccoli) in the oil until the vegetables are tender but not brown, about 15 minutes, stirring occasionally. Stir in mint if using. Set aside.

Meanwhile, cook pasta in boiling water until tender. While pasta cooks, extract 1/2 - 3/4 cup of the cooking liquid and mix it in a small saucepan with the ricotta. Set saucepan over low heat and gently cream the ricotta and cooking water. When the ricotta is warm, taste and add salt and pepper to taste. Add the nutmeg, lemon zest, and 1 tablespoon of the Parmesan cheese, if using, and stir to combine.

Drain the cooked pasta and combine immediately with the cheese sauce, tossing to mix well. Arrange over a warm platter and pour asparagus mixture over the top, being sure to scrape all of the cooked garlic onto the pasta and veggies. Sprinkle with the rest of the grated cheese (optional) and serve at once.

Wednesday, March 31, 2021

Asparagus Tart For Spring


One of my favorite early spring foods is asparagus. Those bright green spears not only taste delicious, but their green color welcomes the season. Right now where we live they are also fairly inexpensive. If that is true for you, too, then you might want to make this tart for a meal, even for Easter. The only part that takes any real time is caramelizing the onion. The rest is quick and easy if you use store-bought puff pastry.

We had our tart for dinner along with some lamb chops that our neighbor gifted us with. Both of those foods are spring time treats for me. Now we only need our strawberry stand on Hwy 12 to open and I'll be a happy camper.


Asparagus Tart with Caramelized Onions and Bacon

Serves 4-6    An original Elle recipe

1 large yellow onion, peeled, ends removed, halved and thinly sliced
2 tablespoons olive oil
1/3 cup ricotta cheese (I used Kite Hill almond milk ricotta)
1 medium to large egg
grated zest from half a lemon
salt and pepper to taste
1 sheet frozen puff pastry, thawed (I used Pepperidge Farm)
2 slices bacon, cooked until crisp (can be done in the microwave using scrunched paper towels above and below)
6-8 fresh asparagus stalks, washed, dried and trimmed
egg wash (1 egg combined with 1 tablespoon water)

In a large skillet caramelize the onions in the olive oil by cooking them slowly, stirring often, over medium-low heat, until the onions are golden brown or a been deeper brown. There will be leftovers for another use. Once cooked, remove from pan, spread out on a plate, and cool to room temperature.

In a small bowl, combine the ricotta cheese, egg, lemon zest and salt and pepper. Set aside.

On a baking sheet place a piece of parchment paper or foil or a Silpat silicone mat. Set aside.

Preheat the oven to 425 degrees F.

Sprinkle a clean work surface lightly with flour and spread it to a thin layer. Open the thawed puff pastry to one layer on that prepared surface. Use a sharp knife to cut a one-inch strip off the puff pastry on two facing sides. Dampen that edge in for an inch with water, then place the cut strip on top. You will have a rectangle with facing ends that have an extra layer one-inch wide and the opposite facing ends without.


Spread the ricotta cheese mixture in an even layer between the two built up ends. Using a small offset spatula works well. Leave about an inch without cheese at the un-built up ends, too. Place about 1/3 cup cooled caramelized onion on top of the cheese mixture, spreading it as evenly as possible. Crumble the bacon and sprinkle evenly over the onion. Place the asparagus in a row, starting at one of the raised ends and finishing at the other raised edge. Brush some egg wash, using a pastry brush, on top of the raised edges and at the exposed ends of the other sides, being careful to not let the egg run down the sides.

Bake in a preheated 425 degree F. oven until the pastry is golden brown. Serve warm.


Monday, March 23, 2020

Spring Quiche


Keeping busy during the shelter in place time. Did some house painting yesterday on the farmhouse and did yard work today - weedeating, seed planting, regular weeding and watering. I even took a photo of the first California poppy on our property. It bloomed today and it's one of the ones with multi-colored petals in shades of dark orange and terra cotta.


There should be more blooming soon, including the regular gold ones. The nasturtium just started blooming and we've had a slow progression of daffodils and tulips. I'm just glad that spring is here, even though our night time temperatures are staying low in the 30s and 40s, so no putting out seedlings like tomato and squash until the nights warm up a bit.

Have been having fun in the kitchen, too. Baked porridge bread twice and shared with our across the road neighbor. Today I baked my favorite quiche for dinner, using a recipe that was easily found using the new and better index! For the carrot part I used carrots from the garden of the same neighbor who was given the bread. She brought them over, freshly pulled, and the flavor is wonderful! I used the last of the asparagus. It made a very spring themed quiche I think. Sweetie loved it. The last time I made this I was getting farm boxes delivered, but the produce section of the market has improved since then and we have the added benefit of neighbors who grow veggies!

You can find the recipe here. A few variations: I used Kite Hill non-dairy ricotta on the bottom of the quiche and no cheese, chopped the mushrooms small and sauteed them with the carrot, but not the onion since I had cooked onions the day before and used them on top, plus diced ham between the asparagus spears for the meat instead of smoked salmon. Used oat milk with eggs for the custard. As you can see, as long as you keep the proportions the same, you can use a wide variety of variations for ingredients and still get a delicious quiche.


Stay safe and healthy!

Thursday, March 23, 2017

Asparagus Season


We have gone to daylight savings time and the calendar said that this past Monday was the first day of spring, but many days have still been chilly and last night the temperature was in the upper 30s, so winter is having trouble letting go. Friday is supposed to bring a big storm with a lot of rain and maybe some thunder and lightning. Even so, things keep blooming. The plum trees are finished with their flowers and are sending out lots of lovely light green leaves. The pear trees are in bloom right now and the apples are in the bud stage, ready to bust out all over this weekend if it warms up a bit. This afternoon I re-potted some of the squash seedlings into larger pots since they were getting too big for the tiny cells of the seed starting trays. The tomatoes will need to be re-potted soon. Spring is all around.

One of the joys of spring are the fresh asparagus that show up in every market, often at a reasonable price. I love them just steamed lightly, but they are great grilled with just a mist of olive oil to keep them from sticking, in an omelet, added to a stir fry, as part of a pasta dish, with Parmesan cheese and ricotta, and even as the star of a yummy bread.


Today I made a flatbread with halved asparagus spears that I cut into 2-inch long pieces. First down on the parchment was a sourdough pizza dough made with Italian 00 flour instead of all-purpose flour. It is very easy to work with, stretches thin for a nice crust, and tastes great, too. On top of that I put some almond milk ricotta cheese (thank you T-Rose for helping me find it at Community Market), very thin slivers of red onion, and the prepared asparagus. A drizzle of olive oil finished it up, ready for baking in a hot oven. Since Sweetie and I prefer different amounts of salt and pepper, we added it at the table. I used my baking stone, well pre-heated, and slid the parchment paper holding the flatbread right onto the stone. You get a really nice bottom crust that way.


The asparagus flatbread went really well with a green salad that had fresh orange segments and avocado, dressed with a balsamic vinaigrette. What did you have tonight?

Monday, May 02, 2016

Custard Without Milk...In A Quiche


I enjoy making quiche and have made a few which have been posted on this blog, but now I decided that rather than forgo quiche due to the use of milk in the custard that I would try making it using soy creamer. Soy milk, or any rice or nut milk would probably work, but I like the thickness of Silk brand original (unflavored) soy creamer, so I went with that. I also used to put cheese in my quiches but still haven't found a non-dairy cheese worth bothering with, so this is a custard pie with ham, mushrooms and asparagus. It's different, but worth making.

It was well over 80 today when I was making this pie, so I decided to use my toaster oven, which is out in my studio. Since I wasn't going to be in there except to put the quiche in and out of the oven it didn't matter if it got heated up, but I didn't want to do that to my regular kitchen. The unfortunate thing is that since I wasn't there to check on it, the blind bake went on too long and so the final crust was pretty dark brown in a lot of spots...almost burnt.


Other than that, it was a lovely quiche. I lowered the heat for baking it after my experience with the crust and also baked it for a shorter time than the recipe called for. Since I had browned the mushrooms before I put them in the crust, they went on the bottom. Over that I put the blanched asparagus, then I scattered the diced ham on top. This is truly asparagus season around here, so it made a very seasonal and delicious dish. The custard was not quite as tender as one made with milk but we didn't miss the cheese with all that yummy ham, asparagus and mushroom flavors going on.


Quiche with Asparagus and Mushrooms and Ham

1 9-inch pie shell, blind baked at 425 degrees F for 10-12 minutes (recipe follows)
1½ cup sliced fresh mushrooms, sauteed for 5 minutes in an oil slicked frying pan, then set aside
1 cup blanched asparagus pieces
1 cup diced cooked ham
3 eggs (or equivalent egg substitute)
1 ½ cups soy creamer or evaporated milk or light cream
¼ teaspoon salt
dash pepper
Dash nutmeg
dash dried thyme

Preheat oven to 350 degrees F.

Sprinkle the bottom of the pie shell with the mushrooms, asparagus, and ham, distributing evenly. Set aside

In a bowl, beat the eggs lightly, then add the soy creamer and beat with a fork to combine, add the salt, pepper, nutmeg and thyme and beat with a fork to combine.

Pour the egg/milk mixture over the ingredients in the blind baked pie shell. Place in the preheated oven and bake 30-45 minutes, or until set and lightly browned. Cool for 10 minutes before cutting to serve.
Serves 6-8

Pastry Pie Shell

1 cup all-purpose flour
¼ teaspoon salt
1/3 cup chilled butter
1 egg, lightly beaten
2 tablespoons ice water
1 teaspoon lemon juice (optional)

Mix the flour and salt in a bowl. Cut in the butter with a pastry blender, or two knives, until particles the size of dried peas are formed.

In a small bowl mix together the egg, ice water and lemon juice (if using). Sprinkle over the flour mixture and toss with a fork lightly. Do not over mix. Gather the particles together in a ball. Wrap airtight and chill in the freezer for 10 minutes. Roll out with a rolling pin on a floured surface until large enough to fill a 9 inch pie pan with some overlap.

Fit into a 9 inch pie pan, smooth to fit, trip excess, tuck edges under and crimp as for any pie crust. Prick lightly all over the surface with a fork. Freeze 10 minutes. Remove from freezer and cover with a circle of parchment paper. Fill the paper with beans or pie weights (blind baking the crust).
Bake at 425 degrees F for 10 – 12 minutes. Cool slightly. Remove and save the beans or pie weights. 

Fill the blind baked crust with filling as called for in recipes needing a pie shell. If the crust has browned too much, use a piece or two pieces of foil to create a shield for the part of the crust that is over browned after filling the crust.


Wednesday, April 10, 2013

Farm Box Fun


At the home show about a month ago I signed up for delivery every other week of a box of fruits and veggies. The company is called Farm Fresh to You and they deliver from the Sacramento area. I will probably cancel once my own veggies start coming in, but for now it is encouraging me to eat more whole foods. The produce is wonderfully fresh, organic, abundant and delicious. Over the weekend I made both a veggie quiche and some chicken soup chock full of vegetables. Yesterday's lunch included a handful of small Nantes carrots. They were crisp and sweet and so good. Yesterday we enjoyed the broccoli from the box and tonight we are having stir-fry which will include some red peppers, onions, and asparagus, the latter two from the box. I've also been eating some very juicy tangerines from the box as well as navel oranges. We still are shopping at the market for our melons and garlic and potatoes, but it really is nice to have really fresh produce right on hand to inspire me.


Sweetie continues to heal and he and I have become very expert at doing the dressing changes. He still has about another 4 weeks before he can play tennis but we are grateful that he did no long-term damage.

Still playing with kitchen designs and researching appliances. Do any of you dear readers have experience with Samsung gas ranges or with their refrigerators or dishwashers? How about Bertazonni?

For now I'm having fun with my current kitchen and appliances. This baking spree over the weekend was the first time since mid-January that I really wanted to cook and bake. There will be a new bread showing up here on the 16th. I'm looking forward to playing with yeast dough again!

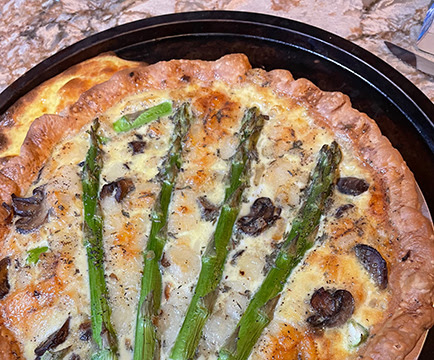
Here is the quiche recipe. It is just a variation of my usual one. If you use evaporated milk as I do, be sure to shake it well before opening. I forgot to do that this time and it took some doing to get it all mixed up in the bowl (which also had the eggs in it). I think this is the perfect quiche for the spring...savory, flaky, full of asparagus and onions and cheese. Now I want another slice...and it's all gone. It went so fast that I didn't really get great photos...but if you make one yourself you can see how beautiful it looks with the green asparagus spears on top.


Spring Quiche with Asparagus and Swiss Cheese and OnionServes 4 - 6

1 9-inch pie shell, blind baked at 425 degrees F for 10-12 minutes (recipe follows)
1/3 cup finely chopped yellow onion
1/4 cup celery, chopped
1 tablespoon olive oil
1 cup Swiss cheese, cut into ¼ inch dice
3 eggs (or equivalent egg substitute)
1 ½ cups evaporated milk (I used non-fat) or light cream
¼ teaspoon salt
1/4 teaspoon dried thyme
dash pepper
Dash nutmeg
2-3 spears asparagus, tough bottoms trimmed off and sliced in half through the length of the spear
1 - 2 large mushrooms, sliced thinly

Preheat oven to 350 degrees F.

In a small skillet, saute the onion and celery in the olive oil until translucent, about 5 minutes, stirring often.

Sprinkle the bottom of the pie shell with the sauteed onion/celery mixture and Swiss cheese, distributing evenly. Set aside.

In a bowl, beat the eggs lightly, then add the milk and beat with a fork to combine, add the salt, thyme, pepper and nutmeg and beat with a fork or whisk to combine.

Arrange the half asparagus spears in a nice pattern on top of the onions and cheese in the pie shell. Place the mushroom slices near them where space permits between the spears.

Pour the egg/milk mixture over the ingredients in the pie shell. Place in the preheated oven and bake 30-45 minutes, or until set and lightly browned. I find that setting on a parchment-lined small baking sheet is a good idea in case some of the filling spills over. Cool for 10 minutes before cutting to serve.


Pastry Pie Shell

1 cup all-purpose flour
¼ teaspoon salt
1/3 cup chilled butter
1 egg, lightly beaten
2 tablespoons ice water
1 teaspoon lemon juice (optional)

Mix the flour and salt in a bowl. Cut in the butter with a pastry blender, or two knives, until particles the size of dried peas are formed.

In a small bowl mix together the egg, ice water and lemon juice (if using). Sprinkle over the flour mixture and toss with a fork lightly. Do not over mix. Gather the particles together in a ball. Wrap airtight and chill in the freezer for 10 minutes. Roll out with a rolling pin on a floured surface until large enough to fill a 9 inch pie pan with some overlap.

Fit into a 9 inch pie pan, smooth to fit, trip excess , tuck edges under and crimp as for any pie crust. Prick lightly all over the surface with a fork. Freeze 10 minutes. Remove from freezer and cover with a circle of parchment paper or foil. Fill the paper with beans or pie weights (blind baking the crust).

Bake at 425 degrees F for 10 – 12 minutes. Cool slightly. Remove and save the beans or pie weights. Fill with filling as called for in recipes needing a pie shell.

Tip: If you use a pound of dried beans as pie weights as I do, save them once they have cooled off and you can use them again and again as pie weights...just don't plan on cooking them to eat. At about a dollar and a half for a bag of dried beans, it sure beats the almost $9 you would pay for Pie Weights from King Arthur or a similar amount at Sur la Table.


Wednesday, March 20, 2013

The Gifts of Spring


Spring shows her face in different ways around the world. In the Northern hemisphere it can be cold, windy, rainy, snowy, warm, foggy, or even hot. We started out this spring with duck weather; a good half inch fell today and is greatly appreciated since our weather since January has been drier than normal. I love it that I can go out tomorrow and have an easier time weeding. Since I keep talking about it you probably think that I've weeded acres by now, but the truth is I can only do about an hour of weeding a day (still getting my strength back) so it is ongoing.

One of the gifts of spring is asparagus. We have been eating it almost daily now that the price is reasonable. Usually we just steam it or put the spears on the grill for quick cooking. Today I used two other gifts of spring to make a stunning composed salad. Our across-the-street neighbors gifted us with fresh, pale blue shelled chicken eggs from their own chicken coop. Sweetie could tell you a tale about herding chickens for them and low hanging eaves in the coop, but since he survived to tell the tale, you'll have to ask him what happened. The same neighbors gave us a bag of freshly picked mixed salad greens. All of these combined to make a lovely salad.


A couple of years ago I read a recipe by our excellent local food writer, Michele Anna Jordan, where she used softly cooked eggs to top lightly dressed salad greens. She also combined asparagus and scrambled eggs. I sort of took those and mixed them together and cooked the eggs as over-easy ones. You still get the runny yolks like the soft cooked eggs, but now it is running over both the greens and the cooked and warm asparagus. I threw in some roasted golden beets that were waiting in the fridge and made a very simple vinaigrette. I kept the shaved Parmesan and really liked the interplay of soft with crunchy, warm with cold and the variety of flavors, too. I plated the salad into big, red soup bowls and it make quite an impressive presentation.


I think the trick to making this recipe work is timing...and excellent ingredients. If possible, use farm fresh eggs, high quality salad greens, and fresh asparagus that still have tightly closed tips. Have the asparagus ready to steam or microwave, the salad greens washed and dried, the chunk of Parmesan ready to shave, and the beet slices and dressing ready to go. Have the pan, butter, and eggs ready at the stove. It all goes together quickly after that, so have everyone ready to sit down to this dish as soon as possible after it is plated. I only made two servings. I think one could make four and still get it all plated quickly. Beyond that things that should be warm might get cold.


Spring Salad with Asparagus, Beets and Fried Egg
serves 2

6-8 spears asparagus, ends trimmed
3-4 cups fresh mixed salad greens, washed, dried and torn into bite-size pieces
one beet, roasted until tender, skin removed, sliced into at least 6 slices and chilled
2 eggs, farm fresh if possible
a chunk of Parmesan cheese to shave about 1 tablespoon from
vinaigrette - recipe below

Place prepared asparagus in a steamer or microwave steamer. Set aside.

In a medium bowl toss the mixed greens with 2/3 of the vinaigrette to lightly coat. Add the beet slices and toss to coat them with the vinaigrette. Portion half of the dressed greens in each of two large salad plates or bowls. Top with the dressed beet slices, at least 3 per portion.

Fry the two eggs in a skillet or cast iron frying pan, using a bit of melted butter to keep them from sticking. While the eggs are cooking, steam the asparagus until barely tender.

Flip the eggs to cook the tops of the yolk briefly. Place the steamed asparagus on top of the dressed greens in the middle of the plate or bowl, dividing them between the servings. Top the asparagus with the eggs, one egg per serving. Use the tip of the spatula to break the yolk so it runs over the asparagus. Shave some Parmesan over each salad (about 1/2 tablespoon each). Serve at once.

Simple Vinaigrette
1/4 cup olive oil
1 tablespoon red wine vinegar
1 tablespoon lemon juice
1/2 teaspoon Dijon type mustard
salt and pepper to taste

Place all the ingredients in a jar with a tight fitting lid. Shake to emulsify and combine completely. Taste and adjust to your taste (you might want more lemon juice for instance, or more pepper).

Wednesday, March 06, 2013

Green for March


March in Northern California is a season of green. The grass has taken advantage of the winter rains and longer days. It is lush and long. Our neighbor has sheep. Recently, at our invitation, she brought them over to our pasture. They have been avidly cropping the long grass and soon she'll move them into a movable enclosure and they will lunch on the grass on the hillside, too. Pi wants to go play with them and sometimes just heads out to the pasture and looks at them longingly. One of them is pregnant, too, so soon we might have a little lamb or two frolicking down the hill.

The willows are showing the first tender green leaves, the daffodils are peeking out of their strappy green leaves, and (while not green) the plum blossoms, both white and pink, are decorating the neighborhood. My squash and tomato and beet seedlings are becoming larger and stronger. The weeds are burgeoning, too, so tomorrow I hope to get out and pull some of them out in preparation for spring planting.

Tonight I made a very green side dish. It works well as a main dish, too. Just be sure to allow plenty per person because it is hard to stop with one serving. This is a dish I have been making since the mid-90s when the Mediterranean Diet was quite popular. Today's paper talked about recent studies that showed that it is still an excellent way to eat, since it uses season ingredients, plenty of veggies, olive oil and things like fish and cheese. I just like it because it tastes so good.

Along with some spinach fettuccine, this dish uses both the winter staple broccoli and the spring vegetable that is just now on special in all the stores, asparagus. Add a little garlic, olive oil, ricotta cheese and Parmesan cheese and you have a wonderful, warm spring dish. If you prefer, this can also be made with goat cheese. I rarely remember to make sure I have mint or fennel on hand when I make this dish, but those flavors would certainly go well. Don't forget the dash of nutmeg. Somehow it ties all of the other flavors together in a subtle but distinctive way. It may not look like much, but it is a plate of pleasure.


Fettuccine with Ricotta or Chèvre and Asparagus

from the Mediterranean Diet Cookbook
serves 4 - 6

3/4 lb tender young asparagus ( or 1/2 lb asparagus and 1/4 lb broccoli crown)
2 cloves garlic, finely chopped
3 tablespoons olive oil
2 tablespoons fresh mint, minced - optional
2 tablespoons fresh green wild fennel, minced
1 lb fettuccine
6 quarts water
1/2 lb fresh creamy ricotta or mild goat cheese
dash nutmeg
salt and freshly ground black pepper, to taste
1/2 cup freshly grated Parmesan cheese

Trim touch ends off asparagus after rinsing them. Cut tender parts into 2-inch lengths. Cut broccoli crown into small florets.

In a sauté pan, over low heat and covered, gently stew the garlic, asparagus and broccoli in the oil until the vegetables are tender but not brown, about 15 minutes, stirring occasionally. Stir in mint and fennel if using. Set aside.

Meanwhile, cook pasta in boiling water until tender. While pasta cooks, extract 1/2 cup of the cooking liquid and mix it in a small saucepan with the ricotta or chèvre. Set saucepan over low heat and gently cream the ricotta and cooking water. When the ricotta is warm, taste and add salt and pepper to taste. Add the nutmeg and 1 tablespoon of the Parmesan cheese and stir to combine.

Drain the cooked pasta and combine immediately with the cheese sauce, tossing to mix well. Arrange over a warm platter and pour asparagus mixture over the top, being sure to scrape all of the cooked garlic onto the pasta and veggies. Sprinkle with the rest of the grated cheese and serve at once.

Friday, March 02, 2012

Pizza Inspiration


Inspiration comes from lots of places. I like to see what is going on in Kitchen Stadium on the Food Channel, what other food bloggers are up to, I read lots of cookbooks and sometimes magazines like Bon Appétit that focus on food.

This month's issue had a gorgeous pizza on the cover and a suggestion inside that a pizza party is fun to have, with enough dough for everyone to top their pizza their way.

Since I'm just starting to feel like I'm not breathing underwater, the energy required to host a party is way beyond me, but I did like the idea of freshly baked pizza with my own toppings. The dough recipe in the mag was for no-knead dough but I really like the sourdough pizza dough I've made in the past and I did have some toss-off from feeding my sourdough starter. I fed it, allowed it to sit out for a few hours, then covered it and let it sit overnight.

Yesterday I turned it into pizza dough. Because I had the time I let it rise once, punched it down and let it rise again. I also used bread flour in the dough instead of all-purpose flour. The result was a dough with good gluten strands


and one that baked up crisp where the dough was thin and chewy where it was thicker, just the way I like it. It didn't flop like it sometimes has in the past but was nice and firm so I could pick up a piece and eat it out of hand.

For toppings I made two veggie and two with pepperoni and mushrooms.

The veggie one had plain Greek yogurt, shredded mozzarella cheese, asparagus coated with olive oil and a little garlic salt, and baby spinach which had been pre-wilted to release some of the excess moisture. Fresh chopped Italian parsley and some fresh thyme leaves added just enough herbal zing. Parmesan cheese sprinkled over the top was the perfect finishing touch.

For the meat ones I started with a very small amount of pasta sauce, some of the Greek yogurt, the same herbs, very thin slices of pepperoni and thinly sliced mushrooms. Parmesan on top here, too. For the second meat one I also added some shredded mozzarella over the pasta sauce and I liked that additional melty cheese a lot.

These were excellent pizzas even if, because each was baked separately on the baking stone, I was up and down a lot while they baked. I liked the veggie ones the best but Sweetie liked the meat ones best. If you make these you can top them with whatever toppings you enjoy, just be sure to go lightly on the toppings if you want your pizza to have a good crust. Too many toppings overwhelms the best dough. If you don't have sourdough starter, there are lots of good pizza dough recipes online.


Homemade Pizza

Sourdough Pizza Dough
Sponge:
1 cup all-purpose flour
1 cup barely warm water
1 cup sourdough starter

Dough:
½ teaspoon sugar
2 tablespoons olive oil
1 teaspoon salt
1 ½ – 2 ½ cups bread flour
Make a slurry of the flour and water. Mix the sourdough starter with the slurry and whisk to combine thoroughly. Let this mixture sit at room temperature for two hours. If you will be making the rest of the dough another day, cover with plastic wrap and refrigerate this starter mix.

When you are ready to make the dough and make pizza, put the starter mix into a stand mixer bowl and stir the sugar, olive oil and salt into the starter mix.

Using the dough hook, gradually add the flour until a dough forms. Knead with the mixer for 4-5 minutes, adding more flour a tablespoon at a time as needed.

(If not using a stand mixer, put two cups of the flour in a bowl. Make a well in the center and add the mixture of starter, sugar, olive oil and salt that you’ve whisked together in another bowl. Stir to mix the wet mix into the flour until a dough forms. Turn out onto a lightly floured surface and knead in enough flour to make a smooth and elastic dough which can still be a little sticky.)

Once dough is smooth and elastic, turn it out onto a lightly floured surface and knead by hand for another minute, adding flour if necessary to fully blend the dough.

Form dough into a ball. Place in a lightly oiled bowl or other container good for dough to rise in. Cover with oiled plastic wrap and a tea towel and let rise in a warm place until doubled in bulk, about 1 hour.

When it is about 45 minutes before you plan to bake the pizza, preheat the oven to 500 degrees F and if you have one place a baking stone in the oven to preheat, too.
On a lightly floured surface place one quarter of the dough. Using floured hands, stretch the dough into a rough circle, keeping a rim of thicker dough around the edges. Some people like to toss the dough to do this, but mine always ends up on the floor if I do, so I just push the dough or hold it by the edge and work my way around.

Sometimes I let the stretched dough sit for a couple of minutes, then stretch it some more. Place the stretched dough (about 9-10 inches in diameter) on a piece of baking parchment.

My Toppings:
1/4 - 1/2 cup pasta sauce - if too watery boil until thickened
1/2 cup plain Greek yogurt
2-3 oz shredded mozzarella
1 oz thinly sliced pepperoni
1 oz thinly sliced fresh mushrooms
2 tablespoons finely chopped Italian Parsley
1 teaspoon fresh thyme leaves (or use oregano)
1 cup shredded Parmesan cheese
6 stalks fresh asparagus - washed, dried, thinly sliced
1 teaspoon olive oil
sprinkle garlic salt or salt
1/2 cup fresh baby spinach, steamed for 1 minute, then drained

Top the dough as desired, leaving the outer rim untopped except for when sprinkling the final Parmesan cheese. I used a tomato based sauce that included canned tomato sauce, canned diced tomatoes, zucchini, mushrooms, onions, basil, oregano and garlic, all cooked together over low heat for an hour until most of the liquid had evaporated. The topping over the sauce for the meat version was dollops of plain Greek yogurt, thinly sliced pepperoni, mozzarella cheese, chopped fresh Italian parsley and fresh thyme leaves and Parmesan cheese.

For the veggie version plain Greek yogurt was thinly spread over the dough and a few dollops of thicker yogurt added here and there. Shredded mozzarella cheese was sprinkled over that. Previously I had washed, dried and thinly sliced on an angle about 1 cup of fresh asparagus spears. I put these in a bag and doused them with 1 teaspoon olive oil, sprinkled on a bit of garlic salt, then shook the bag to coat the asparagus pieces with oil and seasoning. This allows them to stay moist in the high heat needed to cook the dough. The asparagus were distributed evenly over the mozzarella, some lightly steamed baby spinach leaves were added, then a sprinkle of freshly chopped Italian parsley and fresh thyme leaves (just like the meat pizzas) was added. A final snow of grated Parmesan cheese left them ready for the oven.

Baking notes: The high heat and baking stone really combine to make a nice crust. I left each pizza on its piece of parchment and slid it onto the baking stone with a pizza peel. After 5 minutes I used the parchment to turn the pizza 180 degrees and baked it for 4 minutes more. I baked one of the veggie ones first, then kept it warm in my toaster oven while I baked the meat one. We dined on those two while the other two were baking.

If no stone is available, turn a jelly roll pan upside down on an oven rack in the preheated oven and immediately slide on the parchment paper holding the pizza.

Bake pizzas until golden brown. Your timing may be different as ovens differ. Remove from oven to cutting board, cut and serve. If you are making more than one pizza (recipe makes 4 crusts) prepare it on another piece of parchment and once you remove one pizza, put the next one in the oven.

Friday, March 26, 2010

Seasonal Sensations - Eggs Benedict

Eggs benedict isn't just for fancy restaurants. You can make them at home. This classic dish is perfect for spring. Farm fresh eggs can be found at farmers markets and roadside stands.

Asparagus are sweet and green and bursting with flavor. Egg yolks and asparagus are a great pairing. This is a truly decadent dish, especially since it has Hollandaise sauce…all those egg yolks and that melted butter makes a heavenly, rich sauce! If you can find Meyer lemons, they work beautifully in this sauce. If not, use a fresh lemon in any variety available to you. Don’t use bottled or frozen juice…the fresh juice helps the egg yolks accept the butter in the sauce and adds a sprightly flavor, too. This would be impressive for a springtime brunch with a select, small guest list.

I think I’ve only had Eggs Benedict about 5 times in my life, and never with asparagus. I’ve wanted to try making it for a long time but was put off by all of the parts seeming so complicated and not sure that I could pull it off. Well, dear readers, I did it! I'm going to make this my first entry in the High Five Un-group hosted by the lovely Lynn at Cookie Baker Lynn blog. If you want to participate, check it out here.


I made this for Sweetie for breakfast on a morning when we were not in a hurry. He enjoyed his coffee while I put together the various parts. I had made the English muffins ahead and had them ready to toast. This recipe did create quite a few dishes to wash up, and it does take some concentration to get all of the parts ready at the same time, but none of it is difficult.

The sauce is ready in minutes – I read the classic way to do it and blessed the invention of the food processor and blender...so much faster and fairly foolproof unlike the old way. The eggs take less than one minute to put into cups and four minutes to poach. The asparagus only take three or four minutes total. I suspect that toasting the muffins takes the longest.

TIMING is Everything
Plan the order in which you will do the different parts and everything will turn out fine. Read through the various recipes. You may want to make your own list. This is the order I used:
Split the muffins and set by toaster.


Fill the pot to 2 ½ inches and bring to boil, add the vinegar, then set to simmer
Prepare the asparagus for steaming
Juice the Meyer lemon and strain the juice
Separate the egg yolks for the hollandaise and put into the food processor
Crack an egg into four custard cups
Set out the plates, the pitcher for the sauce, and two bowls for hot water
Melt the butter for the hollandaise
Toast the first English muffin
While muffin is toasting, begin the hollandaise, through adding the hot melted butter…leave it running
Slip the eggs into the simmering water. Set timer
Pour the finished sauce into pitcher and fill bowl with enough hot water to come half way up pitcher
Put second English muffin in toaster
Steam the asparagus
Put hot water into second bowl
When timer goes off, use slotted spoon to remove poached eggs to bowl of hot water
Remove asparagus from microwave
Plate toasted muffins, add asparagus
Use slotted spoon to removed rinsed eggs from hot water, let drip, put over asparagus and muffins
Pour on hollandaise

Grind on pepper
(Take photos if you are a blogger) and prepare other plate the same way
Serve!


If you like you can do the following the day before:

- Juice the lemon, strain the juice, store in a small container in fridge. Let come to room temperature.
- Split the muffins. Store in airtight container
- Prepare the asparagus but don’ t steam. Store in fridge. If still cold when steamed, you may have to steam a little longer
- Separate the eggs for the sauce. Reserve the whites for another use. Store, covered, in the fridge. Bring to room temperature to use for the sauce
- Crack an egg into individual cups or containers. Store, covered, in the fridge. Bring to room temperature before poaching

Here are the parts of the recipe:

Eggs Benedicts with Asparagus and Meyer Lemon Hollandaise Sauce

The Asparagus
For each serving: 3 – 4 spears of very fresh asparagus, ends snapped off. Steam your favorite way, and keep warm until ready to assemble.( I put mine on a microwave safe plate, added a teaspoon of water, covered and microwaved two minutes on high power. I did this after the eggs had started poaching, while the second English muffin was toasting, and after the hollandaise sauce was done and keeping warm.)

The English Muffins
Prepare English muffins using your favorite recipe, or purchase some.

Split with a fork to keep the craggy interior to trap the egg yolks and hollandaise. Toast while the hollandaise is being prepared and eggs are poaching. Keep warm until ready to assemble the dish. (I covered mine with a folded dishtowel.) Plan on an English muffin per person, plus a few extras for swabbing up the copious egg yolk.

The Blender Hollandaise (I used a food processor and it worked fine)
from All Recipes:http://allrecipes.com/Recipe/Blender-Hollandaise-Sauce/Detail.aspx
Ingredients – enough for 3-4 people

3 egg yolks
1 tablespoon lemon juice
1/2 cup butter
Directions

In the container of a blender (or food processor), combine the egg yolks, and lemon juice. Cover, and blend for about 5 seconds.

Place the butter in a glass measuring cup. Heat butter in the microwave for about 1 minute, or until completely melted and hot. Set the blender on high speed, and pour the butter into the egg yolk mixture in a thin stream. It should thicken almost immediately. (If doing in a food processor, keep it running for another minute or two while you get the eggs into the poaching water. The extra time helps with the thickening process). Keep the sauce warm until serving by placing the blender container in a pan of hot tap water. (If using a food processor, pour the hollandaise into a heat proof small pitcher and put that into a pan or bowl of hot water.)


The Poached Eggs – enough for 2-3 people

You will need:
4 to 6 fresh, cold, eggs
2 quarts boiling water in a saucepan about 8 inches in diameter
(depth of water should be about 2 1/2 inches)
1/3 cup, white vinegar (2 1/2 tablespoons per quart)

Equipment: a perforated spoon; a kitchen timer; a bowl of very warm water (120 degrees).

Preparing the poaching water: Pour the vinegar into the boiling water, and reduce the heat so that the water is just at the simmer – quietly bubbling. Vinegar quickly coagulates the white when the naked egg enters the water, and this in turn helps preserve its oval shape – again, if the egg is reasonably fresh. If you can find fresh eggs from the farm, do use them. You really taste the eggs in this dish.

Getting the eggs into the water: Being a wuss about boiling water, I took the low road and cracked an egg each into four custard cups. Once I was ready, with the English muffins toasting, the asparagus ready to steam, and the hollandaise sauce almost finished in the food processor, I made sure that the water was simmering, then put the lip of the custard cup as close to the top of the water as possible and gently let the egg slide with one movement into the simmering water. Set timer for 4 minutes. Rapidly continued with the 3 other eggs, adding them clockwise around edge of pan. Because I didn’t do the version where you prick the end of the egg and give it a quick bath in the shell in boiling water, bits of the white did trail away from the poaching eggs, but it was fine in the end.

Finishing the eggs: Regulate the heat so that the poaching water remains at hardly a bubble, and when 4 minutes are up, carefully remove first egg with a perforated spoon and slide it into the bowl of very warm water, to wash off the vinegar. Estimating how much time you took for each additional egg - it will be 15 seconds at most when you are used to the movements - remove the other eggs in turn.

Keeping eggs warm after cooking them: The eggs will keep warm as long as the water remains warm, and they cannot overcook if water is not hotter than 120 degrees; if your wait is a bit long, pour a little boiling water into the bowl from time to time. (I also added a bit of boiling water to the bowl holding the hollandaise pitcher, just to make sure it stayed warm.) If you will be serving more than three people, I would have another pan of water to poach additional eggs, but keeping the timing right is tricky for 4-6 eggs and more difficult with more eggs and toasted English muffins to keep warm. You could serve one muffin half, one egg and some asparagus alongside to double the number served, but be prepared for requests for seconds!


Putting It All Together
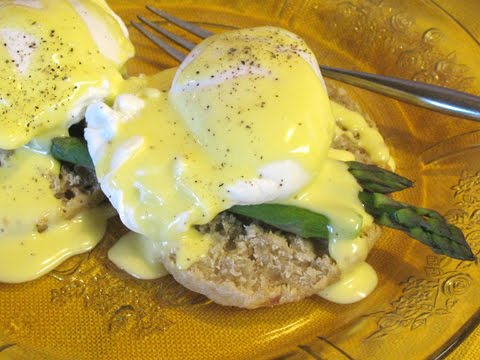
Have the table set and plates ready. Once the eggs are in the warm water to rinse off the vinegar, put an English muffin, toasted, both top and bottom if you are having two eggs per person, onto each plate. Top each plated muffin set with 3 spears of the steamed asparagus, laid crosswise over the muffin pieces, top each muffin piece with a poached egg (the classic method is to dry the egg in a clean towel…I just used the slotted spoon and let the water drip for a couple of seconds) placing over any part of the asparagus that is on the muffin, and immediately pour on some hollandaise sauce over all. If desired, grind some fresh pepper on top of each egg. Serve at once while everything is hot. Repeat for each plate of Eggs Benedict. Enjoy the compliments of your family and/or guests.