Showing posts with label eggs. Show all posts

Sunday, September 09, 2018

Lentils and Eggs


When I was visiting Los Angeles in the summer (yes, it's still summer but it's beginning to feel like fall and school has started again, so summer seems like it's in the past) we went for brunch to a place called Playa Provisions in Playa Vista (I think). They had an eclectic menu but not a lot of items that were non-dairy. One dish that sounded good was lentils with tomatoes and egg and kale. It was outstanding! A touch of vinegar when served added just the right note against the beany flavor of the lentils and the richness of the soft boiled egg. I came home and decided to see if I could replicate the dish, or at least come close.

After searching the Internet I found a recipe by Bon Appetit that was close so I made a few tweaks and served it for dinner a few nights ago. It was delicious and filling and Sweetie enjoyed it, too. One of the key elements is a soffritto of onion, carrot, celery and garlic (the Bon Appetit recipe had fennel and not celery but I don't like fennel flavor) which is cooked almost into a paste. This plus the tomato sauce really flavor the lentils in a great way!

This is a vegetarian dish but could be vegan if you skip the egg. The Bon Appetit recipe called for serving it with bread that had been fried in olive oil, but I just toasted some seeded sourdough and put on some non-dairy margarine for me and butter for Sweetie. I also sprinkled on a bit of Parmesan cheese on his serving and he said that made it even better.


You could probably serve this the day it is cooked, but I like to 'age' dishes with onions, so I put it in the fridge in the pot it was cooked in for a couple of days. That made reheating it easy. The already cooked spinach was reheated in the microwave and spooned on top of the lentil mixture before I added the egg. I actually forgot to add the red wine vinegar, but plan to do it next time (there were leftovers) since the sharpness is a great foil for the relatively bland legumes. The bread is nice for sopping up any juices. I served it in a shallow, wide soup bowl and that works really well because there are some juices.


Lentils and Tomato Stew with Egg and Spinach
serves 4

1 large onion, chopped
2 stalks celery, chopped
2 medium carrots, chopped
5 cloves garlic, finely chopped
1/4 cup olive oil
sea salt to taste (I used about 1/2 teaspoon)
1/2 cup tomato sauce
2 cups lentils (preferably French green), picked over and rinsed
water
1 cup baby spinach, rinsed
4 large eggs
4 sliced crusty bread
red wine vinegar and grated Parmesan cheese (for serving)

Pulse onion, celery, carrots and garlic in a food processor until soffritto is finely chopped.

In a heavy bottomed pot over medium heat, heat the olive oil and add the soffritto, stirring to coat the vegetables with the oil. Season with salt and cook, stirring occasionally for 10-12 minutes, until soft.

Stir in the tomato sauce and cook, stirring occasionally until golden brown and very soft, about 10-12 minutes. Add a splash of water if it is browning too quickly. You want to caramelize the vegetables.

Add the lentils and 6 cups of water. Bring to a boil, reduce heat, cover and simmer until lentils are almost tender, 30-35 minutes. Uncover and simmer for another 10 minutes to reduce the liquid.

Skim about a cup of the liquid at the top of the pot and place it in a microwave safe dish. Add the spinach and cover with foil. Let sit to wilt the spinach. Refrigerate this spinach mixture.

Taste the lentil mixture and adjust for salt, if needed.

Refrigerate the pot of lentils at least 24 hours and no more than 48 hours. You can also just make the rest of the recipe from this point without refrigerating the stew, but the flavor is better with a rest.

On serving day, reheat the lentil stew over low heat, stirring as needed to keep it from sticking to the bottom of the pot.

Bring a small pot of water to a boil. Add the eggs and cook at a simmer for 9 minutes. Removed from the pot and run under cold water until just cool enough to handle. Carefully remove shell while keeping egg whole. Place on a cutting board.

Reheat the spinach mixture while the eggs are boiling. Toast and butter the crusty bread.

Put about a quarter of the lentils in a bowl. Top with a quarter of the spinach mixture. Slice the hot eggs in half lengthwise and place, yolk side up on top of the veggies in the bowl. Add a splash of vinegar and sprinkle with Parmesan, as desired. Serve with the toasted bread. Serve at once.


Friday, November 14, 2014

Pecan Pie


The first pie is the classic Pecan Pie, made with dark cane sugar syrup, eggs, sugar, butter, vanilla and pecans. It is a translucent custard type of pie and is very sweet. The pecans float to the top of the filling so they get toasted along with the crust. It is Natasha's favorite thing to have for her birthday and a great addition to a Thanksgiving dessert array.


Pecan Pie
recipe originally from the Karo Syrup label
but this one is directly from my cookbook, Classic Comfort Food

3 eggs, beaten lightly
1 cup sugar
1 teaspoon vanilla
1 cup dark Karo corn syrup
2 tablespoons butter, melted
1½ cups pecans, shelled
one 9” unbaked pie shell

Preheat oven to 3500 F. Stir together the eggs, sugar, vanilla, corn syrup, and butter until well blended.


Stir in pecans.


Pour into unbaked pie shell.


Bake on a cookie sheet for 50 minutes or until a knife inserted into the center comes out clean. Do NOT overbake. Cool pie before serving.    

Very rich! To “gild the lily,” serve with whipped cream or vanilla ice cream.

Friday, September 12, 2014

Gluten Free Baked Lamb Meatballs


It's been great being back in the kitchen cooking. I had no idea that finding new homes for all my cooking and baking equipment and supplies would be so challenging. It isn't that there isn't room, nor that I hadn't planned where to put most of it, the problem is that I find that where I thought things should go is not truly where they fit best when actually using the kitchen. That means rethinking a lot of my original plan.

I look pretty crazy sometimes as I open and close drawer after drawer and door after door of the cabinets, looking for a whisk or grater, a citrus juicer or colander. Some things have been moved four or five times since the project started and my memory just isn't what it used to be.


Still, I wouldn't go back to the old kitchen and I love all of the work space. I even used the little table this week while I was preparing pounds of home grown, just picked cherry tomatoes for roasting. Sitting instead of standing to remove all of those little tomato tops before I prepared them for roasting was a treat. After the tomatoes were roasted I decided that as long as the oven was hot, I could make meatballs for dinner.

I had thawed some frozen ground lamb from the freezer and somewhere recently I read a recipe where they used almond meal instead of bread crumbs for making meatballs, so I decided to see what I could come up with using items already in the pantry and fridge. I'm not eating gluten free myself, in general, but it's always nice to have a dish to make that is when I might have guests who need to eat gluten free. This dish is not vegan or vegetarian however, but it is dairy free. Because Sweetie is not a big fan of mint, it is a mint free dish, too. Mostly I would make these again because they were awesomely yummy.

There was just over a pound of ground lamb. The fridge had a wonderful caramelized red onion and fig conserve, some Dijon mustard, an egg yolk left over from another recipe, eggs, fresh basil, and the almond meal. The pantry had salt and pepper. That was all I needed. Because the onion and fig conserve was ready to go and very full flavored, the meatballs went together very quickly.


I scooped them on to a foil lined baking sheet and baked them in a 400 degree F oven for about 18 minutes. I was going for 20 minutes, but they seemed to be done at 18 and I hate overcooked lamb.


A key thing to remember if you decide to make these is to handle the mixture lightly. That keeps 'em tender and juicy. The other thing to know is that they may flatten just a bit, so don't expect tight, round meatballs. Instead look forward to light, juicy, delicious meatballs with some crispy bits where they sat on the pan. The lamb flavor shines and is enhanced by the slightly sweet onions and figs. The mustard and basil are background flavors and I didn't really taste the egg or almond meal at all. You can serve them with some more of the conserve or a bit of tomato sauce, or some yogurt...all three would be good. I served them with a neighbor's gift of fresh from the garden broccoli, which I roasted with garlic, and corn on the cob, and that was wonderful, too.


Elle's Gluten Free Baked No Mint Lamb Meatballs

1 pound ground lamb
1 egg yolk
1 medium or large egg
1/4 cup caramelized red onion and fig conserve (any kind of onion-fig jam or conserve will work)
1 tablespoon Dijon mustard
1/2 cup almond meal (ground blanched almonds)
2 - 3 tablespoons minced fresh basil
salt and pepper to taste (I used 1/2 teaspoon salt and 1/4 teaspoon freshly ground pepper)

In a mixing bowl, using a fork, lightly stir together the above ingredients. Scoop balls about the size of a walnut on to a foil lined baking sheet, leaving about an inch to two inches between balls. (You can make the meatballs any size you like, but the smaller size bakes more quickly than larger ones.)

Bake in a preheated 400 degree F oven for 12-20 minutes. Check after 12 minutes to see how done they are - they should be browned around the edges and spring back a bit when prodded - turn the pan 180 degrees and continue baking until done.

Serve at once and enjoy! Serves 3-4.

Monday, January 13, 2014

Breakfast Buns


Bread baking has been on the back burner lately, but I noticed that some mornings I would love to have just a little something to go with the morning cup of coffee and fresh fruit. I decided to put together a breakfast bun that would work, and to put in some healthy ingredients, too. Most of all, it has to be yummy because when you can only have a small amount of bread, it should be delicious bread, right?

For starters I cooked up some oatmeal...1/2 cup rolled oats and twice that amount of water...and set it to cool. I also mixed some yeast, water, a tiny bit of sugar and some flour to make a poolish. It all sat out on the counter while I went to the gym, collecting wild yeast if I was lucky.

Later in the day I mixed the cooked oatmeal, the poolish, some milk, and egg and some more water together. In a bowl I mixed all-purpose flour, whole wheat flour, salt, a little more yeast (in case no wild yeast were around that were strong enough), and a touch of cinnamon and added those to the liquid mix to make a nice dough.

After the dough had time to rise, I turned it out onto a flour board and kneaded in dried cranberries, chopped pecans and golden raisins. Those were stretched into a large rectangle, most of the rectangle was given a light coat of butter, a sprinkle with brown sugar, and also with cinnamon. I rolled it up, jelly-roll fashion, and cut it into buns.

The buns went into a 9 x 13 pan and lightly covered. They rose over time and then were baked in a 350 degree F oven until golden brown.


So now I had a dozen breakfast buns. There is about 1/6 of the usual amount of oatmeal one might eat at breakfast, whole grain, cinnamon for antioxidant and flavor value, dried fruits and nuts, milk and egg and only about 1/3 tablespoon of butter per bun, with even less sugar. Fairly healthy as buns go and very tasty. For one of the buns I added a small amount of an icing of confectioners sugar mixed with hot water. That made it a little too sweet, so I think in the future I'll stick with the 'plain' buns. Each bun went into it's own bag, then into the freezer for future enjoyment on those days when they will be the perfect thing to go with coffee and fruit.

You might think that I would want one every day, but today I had coffee, fruit and some plain yogurt and it was just enough breakfast. Normally I'd give you the recipe, but I didn't really measure a lot of the ingredients, so I'll have to see if I can figure it out and post it later.


Thursday, August 29, 2013

Going Bananas in the Land of St. Honore'


She woke with a start. It had been a horrible dream. The twins, her granddaughters who live on the other side of the country, were grown up in the dream. One was a dental tech and the other was a personal trainer at a gym...and neither one of them knew what to do with the ingredients on the kitchen counter in her dream; the softened butter, the sugar, flour, molasses, eggs, nuts, chocolate chips. They had a birth right, as anyone in our land has, to bake, yet they had no idea how to measure flour, soften butter, or even how to crack an egg. This was terrible! No child in the Land of St. Honore' should be flummoxed about baking something.

Eva decided she would do something so that this dream never became a reality. Well, maybe they would become a personal trainer and a dental tech, but she would make sure that they knew how to bake. Not only would they not be mystified at the sight of an egg, they would know how to separate eggs and whisk whites and bake a lovely, light, luscious, delectable cake.


First she waited until a decent hour, then called her daughter, their mom. She had to time the call just right because Grace would be leaving home soon to go to work. She was a CPA high up in her firm. Although she had been taught, she never baked. 'No time' was her excuse.

"Grace, I would love to have the girls visit me at Christmas, or even Thanksgiving, if that's possible. I know that they are always busy with volleyball and chess club and the debate team, but could you find a few days when they could spend a little time with me?" Eva was tempted to add "before its too late" but didn't think her daughter would be so easily led.

Grace had a particularly difficult client at the moment, so she agreed. Better that her girls have some fun instead of being saddled with a babysitter when she had to work extra. At eleven years old they were getting a bit beyond babysitters anyway.


Eva was thrilled. They were coming the day before Thanksgiving. They could bake pies for Thanksgiving, perhaps make dinner rolls, and surely they could make a cake, too. She could hardly wait!

Plans changed and they arrived the day after Thanksgiving. No one wanted pies or dinner rolls and a cake seemed too rich after all the holiday food. Still, there were some ripe bananas to use up. Time to bake a classic banana bread...with a twist. She wanted to use molasses and to add chocolate chips, just for fun.


The girls were a bit hesitant at first, but soon got into the swing of things, measuring flour and sugar, mashing bananas, and, yes, cracking some eggs and finding out that bits of shells could be removed from the eggs in the bowl, with care.

They giggled at the slow movement of the molasses and had fun getting their fingers greasy while using the butter wrapper to grease the bread pan.


Their faces beamed with big smiles when they brought the first piece of baked banana bread to their Granddad. They were even happier when he exclaimed over the texture, flavor and deliciousness. They were hooked! Eva knew that on their next visit that they would bake that cake with her. Their heritage was intact.

You, too, can keep the arts of baking alive. This banana bread is easy, uses up very ripe bananas, and can be packed in a lunchbox or used as an afternoon pickup or quick bite in the morning. If you make it with half regular flour and half whole wheat flour it is almost healthy...after all, it has fruit.

Banana Bread with Walnuts and Chocolate
makes one loaf

1/2 cup butter, softened
1/4 cup molasses, dark is best
1/2 cup granulated sugar
2 eggs, beaten
3 ripe bananas (or 2 large), mashed
1 cup whole wheat flour
1 cup all purpose flour
1 teaspoon baking soda
1/2 teaspoon baking powder
1/2 teaspoon salt
1 teaspoon vanilla extract
1/4 cup buttermilk
1/2 cup chopped walnuts
1 cup chocolate chips

Preheat oven to 350 degrees F. Grease and flour a 9 x 5 x 3 inch loaf pan (you can use the butter wrapper if you've already put the soft butter into the mixing bowl. That is what the twins did).

Beat butter, molasses and sugar together until fluffy. It's OK if it looks curdled.

Add eggs and banana pulp and beat well.

Add sifted dry ingredient's, vanilla, and buttermilk. Mix just until dry ingredients are incorporated. Stir in nuts, and chocolate chips.

Pour into prepared loaf pan. Bake about 1 hour. Test for doneness with a toothpick in center. When done, toothpick comes out clean or with a few crumbs on it. Cool well.

Store overnight before cutting...if you can wait that long. A serrated knife makes cutting easier.

Wednesday, March 20, 2013

The Gifts of Spring


Spring shows her face in different ways around the world. In the Northern hemisphere it can be cold, windy, rainy, snowy, warm, foggy, or even hot. We started out this spring with duck weather; a good half inch fell today and is greatly appreciated since our weather since January has been drier than normal. I love it that I can go out tomorrow and have an easier time weeding. Since I keep talking about it you probably think that I've weeded acres by now, but the truth is I can only do about an hour of weeding a day (still getting my strength back) so it is ongoing.

One of the gifts of spring is asparagus. We have been eating it almost daily now that the price is reasonable. Usually we just steam it or put the spears on the grill for quick cooking. Today I used two other gifts of spring to make a stunning composed salad. Our across-the-street neighbors gifted us with fresh, pale blue shelled chicken eggs from their own chicken coop. Sweetie could tell you a tale about herding chickens for them and low hanging eaves in the coop, but since he survived to tell the tale, you'll have to ask him what happened. The same neighbors gave us a bag of freshly picked mixed salad greens. All of these combined to make a lovely salad.


A couple of years ago I read a recipe by our excellent local food writer, Michele Anna Jordan, where she used softly cooked eggs to top lightly dressed salad greens. She also combined asparagus and scrambled eggs. I sort of took those and mixed them together and cooked the eggs as over-easy ones. You still get the runny yolks like the soft cooked eggs, but now it is running over both the greens and the cooked and warm asparagus. I threw in some roasted golden beets that were waiting in the fridge and made a very simple vinaigrette. I kept the shaved Parmesan and really liked the interplay of soft with crunchy, warm with cold and the variety of flavors, too. I plated the salad into big, red soup bowls and it make quite an impressive presentation.


I think the trick to making this recipe work is timing...and excellent ingredients. If possible, use farm fresh eggs, high quality salad greens, and fresh asparagus that still have tightly closed tips. Have the asparagus ready to steam or microwave, the salad greens washed and dried, the chunk of Parmesan ready to shave, and the beet slices and dressing ready to go. Have the pan, butter, and eggs ready at the stove. It all goes together quickly after that, so have everyone ready to sit down to this dish as soon as possible after it is plated. I only made two servings. I think one could make four and still get it all plated quickly. Beyond that things that should be warm might get cold.


Spring Salad with Asparagus, Beets and Fried Egg
serves 2

6-8 spears asparagus, ends trimmed
3-4 cups fresh mixed salad greens, washed, dried and torn into bite-size pieces
one beet, roasted until tender, skin removed, sliced into at least 6 slices and chilled
2 eggs, farm fresh if possible
a chunk of Parmesan cheese to shave about 1 tablespoon from
vinaigrette - recipe below

Place prepared asparagus in a steamer or microwave steamer. Set aside.

In a medium bowl toss the mixed greens with 2/3 of the vinaigrette to lightly coat. Add the beet slices and toss to coat them with the vinaigrette. Portion half of the dressed greens in each of two large salad plates or bowls. Top with the dressed beet slices, at least 3 per portion.

Fry the two eggs in a skillet or cast iron frying pan, using a bit of melted butter to keep them from sticking. While the eggs are cooking, steam the asparagus until barely tender.

Flip the eggs to cook the tops of the yolk briefly. Place the steamed asparagus on top of the dressed greens in the middle of the plate or bowl, dividing them between the servings. Top the asparagus with the eggs, one egg per serving. Use the tip of the spatula to break the yolk so it runs over the asparagus. Shave some Parmesan over each salad (about 1/2 tablespoon each). Serve at once.

Simple Vinaigrette
1/4 cup olive oil
1 tablespoon red wine vinegar
1 tablespoon lemon juice
1/2 teaspoon Dijon type mustard
salt and pepper to taste

Place all the ingredients in a jar with a tight fitting lid. Shake to emulsify and combine completely. Taste and adjust to your taste (you might want more lemon juice for instance, or more pepper).

Sunday, April 15, 2012

Classic Devilled Eggs

It's been a social week for me and one of the fun events was a party for the Giants opener. I'm not a huge baseball fan but I enjoy the women who were coming to the party and as it turned out I had a good time watching our 'local' team win their first game of the season. While our group in the north bay was experiencing periods of sun followed by showers followed by clouds and more rain, the Giants fans were bathed in sunlight and a cool breeze.

A party like this deserves hot dogs, which we had, but also a nice pot luck array of dishes. I brought devilled eggs and discovered in the morning that I didn't have a recipe, nor had I blogged about this egg dish in all the years I've been blogging. Who knew? Fortunately I was able to adapt my Mom's recipe. She uses a dressing called Durkee's but I've never seen it in the stores here. I substituted in mustard, salt and pepper and a touch of cider vinegar for it. A dash of cayenne give a hint of heat (but add more if you are feeling really devilish) and paprika on top is traditional and pretty.


Devilled Eggs - Classic

Makes 12 halves, but can be doubled easily

6 hard-cooked eggs, peeled and cut lengthwise
2 tablespoons Light Mayonnaise
2 tablespoons plain yogurt
2 teaspoons Dijon prepared mustard
¼ teaspoon cider vinegar
¼ teaspoon salt
¼ teaspoon ground black pepper
dash ground cayenne pepper or more to taste
Paprika for garnish, and/or chopped parsley to garnish

Hard boil the eggs and cool. Remove eggshells.

Cut each egg in half. Pop out (remove) the egg yolks to a small bowl and mash with a fork. Add mayonnaise, yogurt, mustard, vinegar, salt and pepper, cayenne and mix thoroughly. Fill the empty egg white shells with the mixture and sprinkle lightly with paprika.


Friday, March 30, 2012

Eggs for the Easter Basket

I'm putting together a family recipe book and one of the recipes I've included is how to hard boil and color eggs for the Easter basket.

My Dad was a kid at heart and loved holidays like Easter and Christmas. He was a religious man, too, so we went to church before having the fun of hunting for Easter eggs or opening Christmas presents but I like to think that his ability to embrace the things a child loves was partly due to his faith which stressed love as well as duty.I think he loved marshmallow chicks just as much as any of his children!

 This recipe is an easy one to do if you have food colors in your pantry. I used the liquid food colors, so I'm not sure if gel or paste or powdered ones would work for this recipe. I like the fact that you are using traditional food dyes that have been used for a long time rather than some fizzy tablets with who-knows-what chemicals in them. You can also boil onion skins and/or red onion skins, strain the liquid and add that to some vinegar for an even more natural dye.


Dad's Easter Eggs Bring to a boil in cold water as many dozens of eggs as you wish to color.

Once water has come to a boil, simmer for ten minutes. Turn off heat and cool, or turn into a colander and run cold water over until eggs are cool. (Dad used to add a little Borax -- ½ t. probably -- to the water before boiling. It takes some coating off the eggs for better coloring.)

Bring a tea kettle full of water to a boil. Set out one custard cup for each dye color. Place 1 T. cider vinegar into each custard cup. Add 3-4 drops food color to a cup for each color. Fill custard cups half way up with boiling water, and dye eggs. Spoon can be used to lift eggs out of dye bath. We used to write and draw on dry eggs with crayons or plain wax right before we put them into the dye bath.

Store in refrigerator in the cartons the eggs came in. Figure out how to use so-o-o-o many hard boiled eggs!

MOM’S NOTES: Dad loved to do the Easter eggs, just as he loved to prepare for Christmas. Sometimes he would use the fizzy tablets instead of food colors. Even when the children grew up, he would make colored hard boiled eggs with names on them for those who would be visiting at Easter.

If you prefer to have scrambled eggs and egg shells to dye, you can pierce a hole at either end of fresh eggs, blow the contents into a bowl, run some water through the empty shells to rinse them, then dye them in the dye bath like the eggs below. The eggs in the bowl can be turned into fine scrambled eggs.

Friday, March 23, 2012

Springtime Breads


There are few things more satisfying than sharing a skill or talent with people you really like. It's also true that teaching someone so they can acquire the skill and exercise their own talent is better than just doing your thing for them.

Last week I had the fun of sharing my baking skills with some women friends and showing them how to make some springtime breads.

Because for yeast breads it is sometimes easier to start with the dough already made, I showed them how to work a little magic on plain, ordinary frozen bread dough from the supermarket. I used Bridgeford brand and so I had three one-pound parcels of dough. I thawed them out overnight which worked very well.

The first recipe was perfect for Easter morning (if you make it the night before as I did) because you end up with totally cute nests surrounding a colored egg which cooks while the bread bakes. This time the egg was barely hard boiled. The last time I made thee the eggs were soft boiled on the way to hard boiled, so there was some runny yolk but no runny whites. It all depends on how long you bake the bread. This time I used plain white bread dough and then sprinkled sesame seeds on the nests before baking. That worked better than the sweet dough I used in THIS post in the spring of 2009 in the Bread Baker's Dog blog.

1) Egg nests: When I made this a few years ago the eggs came out of the oven soft boiled and you should remove the dyed egg from the nest within the first 10 minutes after you serve them because otherwise the shell tends to stick to the dough a bit.

I dyed the uncooked eggs the day before, created the nests, then put it all in the fridge overnight, baking them in the morning. Use the illustrations from THIS post if you want to see how to put them together.


Egg Nests

1 pound thawed frozen bread dough
8 eggs in the shell, uncooked, dyed or plain
1 egg, mixed with 2 tablespoons water, for egg wash
sesame seeds, or finely chopped nuts

Divide dough into 15 equal portions, about 1 oz each. Set three (3) portions aside. Cover half of the remaining twelve(12) portions with plastic wrap (six portions), but leave on the counter. You can unwrap them when you've made the first 3 nests from the six (6) portions you will now work with.

Take a portion. Roll it into a rope about 12 inches long. Repeat with another portion. Twist the ropes together. I find that if you start in the middle, twist one side to the end, then twist the other side to the end, it works very well.

Form the twisted rope into an oval and trim off any excess and make a continuous twist rope oval.

Take one of the three portions that were set aside and divide it into 2. Take one of those pieces and form an oval…you can add any dough you trimmed off, too. Place the oval on a Silpat mat, parchment lined baking sheet, or greased baking sheet. Place one of the uncooked eggs in the middle.

Put the rope oval in the palm of your hand, turn it over and lightly pat it with a wet hand.I also patted the inside rim of the rope.

Set the rope oval over the egg and let the wet dough seal with the flat oval already on the pan.

Repeat with the rest of the dough. You should finish with 6 nests.

NOTE: I used uncooked eggs and dyed them in a water bath that had been made from about 6 drops food coloring, 1 tablespoon cider vinegar, and boiling water. The eggs should be close to room temperature so they don’t get shocked and break when put in boiling water. The eggs dye very quickly and can be removed to a paper towel lined glass baking pan or pie pan to drain and dry. They are in the dye bath only about 5 – 10 seconds. I dyed them right before I rolled out the ropes and then refrigerated the pans of rolls overnight.The photos are from right after I shaped them. I added the seeds the next morning before baking, but forgot to take any photos! They sat out for about 1/2 hour before I baked them. If the house or kitchen were very warm, you could probably pre-heat the oven and bake them about 15 minutes after removing from the fridge.

If shaping and baking on the same day, cover nests and let rise in a warm, draft-free place 30 – 45 minutes if baking right away, or until nearly doubled.

Bake in a preheated 350 degree F oven. Brush the dough, but not the eggs, with egg wash; sprinkle dough with sesame seeds, or finely chopped nuts. (The sweet dough and coconut from an earlier version didn't go well with the soft boiled eggs, but savory would so I made savory with sesame seeds.)

Bake 20 – 25 minutes, or until golden brown. Remove from pan and let cool on racks about 5 minutes then serve while hot.

I'm submitting this to fellow Bread Baking Babe Astrid of Paulchen's Food Blog since she is the hostess of the current Bread Baking Day with the theme of bread with eggs - it's #48. You can send her an entry too and I bet you will find a different way to combine eggs and bread dough...maybe with eggs IN the dough? Go to her post HERE to learn all about it.

I'm also sending this over to fellow Bread Baking Babe Susan at Wild Yeast for her weekly Yeastspotting event. If you ever bake with yeast, do visit Yeastspotting for lots of yummy bread inspiration.

Next post will continue the talent sharing baking...with a Raspberry Almond Braid. It's fun, it's easy and one of my friends saw me make it and made one herself that was a big hit with her family. You could do that too. Coming soon.....

Saturday, January 14, 2012

Cooking Influences


Many times the people who really like to cook have a special person, often a relative, who taught them the ways of the kitchen. In my case the influences were from both my Mom and Dad, although mostly from Mom. She didn't share her kitchen well, but I don't either. I remember that before she would show me how to make pie crust that I had to read about it. I think it was 3-4 pages in the Fannie Farmer cookbook. Then we talked about what I had read so she knew that I had actually read it and understood at least some of it. Finally we went into the kitchen and made the pie crust right down to measuring out the iced water in tablespoons. I can still make a pretty good pie crust from scratch, although I rarely do. Thanks Mom for all the cooking advice and instruction over the years. Do you, dear reader, have anyone who inspired you in the kitchen?

When my Dad died in 1994 one of the ways that I mourned was by putting together a cookbook with favorite family recipes. By then all of the children had learned to cook (some were more enthused than others) and often had collected recipes from friends and elsewhere that had little in common with the foods we grew up with. I wasn't sure that a collection of those old standards would be of much interest but went ahead anyway because I wanted to have them for myself.

Letters were exchanged with my Mom and interested siblings so that I included the most desired recipes and could include comments from Mom, too. Many hours were spent typing them up and organizing them by season. There was an index but it somehow was left out of the final booklets. When I was finished I made copies and took them to a printer who made up enough copies for Mom and me and the 7 others and they had a black plastic binding so that the book could be laid flat for use. The illustrations were copies from an old cookbook and all the illustrations were of children doing things like finding eggs on nests, tossing salad and eating birthday party ice cream.

Everyone received their copy at our family reunion the summer after Dad died.

Over the years since I've used my copy often and I'm pretty sure that the others have, too. Some of the recipes have shown up on this blog from time to time. When I visited my Mom last spring I found that her copy was in tatters from much use! Unable to find the originals (or the computer files) for the cookbook so that I could just have new copies made, I decided to create a new, updated version. That is one of the reasons that I took the InDesign class last semester. Now I know enough to do a good job with type and layout.

Yesterday I said I was going to have custard for dinner. Actually I had some leftover casserole, but then had custard, of a sort, for dessert...rice pudding. One of the recipes from the original Family Food cookbook is Rice Pudding. The recipe comes from The Boston Cooking School Cook Book and here is what my Mom said about it:
"When we were stationed in Boston during World War II, I bought my first cook book - The Boston Cooking School Cook Book by Fanny Farmer. It was my cooking bible for many years and provided the following 2 pudding recipes, Rice Pudding and Bread Pudding."

This rice pudding is the kind made with rice that has already been cooked. It also uses raw egg whites, folded in at the end. With eggs these days sometimes not being as bacteria free as we might like you may want to use a product like Best of the Egg - Whites instead of fresh egg whites. If the pudding were baked at the end there would be no problem to just use the whites from the separated eggs. Will have to try that sometime. In the meantime, here is the recipe for your enjoyment.


Rice Pudding

1 C cooked rice
2 C milk
1/4 t salt
1 or 2 eggs, separated
1/2 C sugar
1/2 t vanilla

Scald the milk with rice. Beat egg yolks with the sugar in the top of a double boiler.


Add the hot mixture slowly to the yolk mixture while stirring. Cook in top part of double boiler over simmering water until thick. Flavor with 1/2 t vanilla. Fold in the egg whites which have been beaten stiff with the salt. Chill.

(Notes: I folded the cooked mixture into the whipped egg whites instead of the other way around because my double boiler top couldn't hold both mixtures...it worked fine since I added the cooked mixture by the cupful and then folded. I also managed to overcook the rice slightly which gave the pudding a bit of a toasted rice flavor. I added three drops of orange oil which worked nicely in tandem with the toasted rice and vanilla flavors.) Serves 4 - 6.

Tuesday, December 28, 2010


Hoping to post a pretty special pie that we had over the holidays, but waiting for photos from my daughter for that. In the meantime this photo reminds me that sometimes to make a cake...or other nice thing...you have to break some eggs. This has been a year with a lot of egg shells but many nice things afterwards, so I guess it was worth not being sure if the yolk would run, too, or if pieces of shell would get in with the eggs or if the whites wouldn't whip up as they should.

Sweetie says I need to cut back on worrying, so that is a good goal for 2011 for me.

Do YOU have any goals for the New Year? Want to share?

Thursday, December 23, 2010

Savory Rice Pie

Growing up I remember that my Mom often referred to herself as frugal...and sometime as a frugal French housewife (although she is pure Irish as far as I know) probably because she rarely let anything go to waste. Dry bread ends were cut into cubes and frozen, to be resurrected later as part of stuffing or bread pudding. The drippings of bacon grease in the pan after the bacon was cooked were saved and used later to flavor steamed green beans or grits. Similar economies were practiced daily. It's a fine quality to have as long as it doesn't go too far. Fortunately she never made head cheese.

For Thanksgiving I purchase an assortment of small, colorful squash and sugar pumpkins for decorations. Once fall turned into the Christmas season I decided to emulate my Mom and use the squash for eating now that it had done its thing as decor. This actually happened over a week ago...but it has been busy people!

The squash were each cut in half, seeds and goop scooped out, laid cut side down on an oiled piece of foil which was placed in a large baking sheet. The lot were roasted in a 425 degree F oven until tender. Once cool, I peeled the skin off each and then cut the squash meat into a small dice.

Great...very thrifty...but now what? Well, the prepared squash sat in the fridge a few days waiting for me to be inspired. Fortunately inspiration came before the squash got tired of waiting.

Rice pie...similar to Easter time savory rice pie eaten in Italy...or at least that was the inspiration.

So this totally yummy way to make good use of cooked winter squash combines rice, meatballs, milk and eggs, cheese, onions, garlic and a pie shell...and the squash. It is hearty, savory, and delicious. I served it with steamed spinach and a bowl of seasonal fruit the first time, then with a large green salad the second time...both worked really well.

You can actually make this with winter squash that you have just purchased, too. It might even be better...but not as frugal. *grin*

Savory Rice Pie with Winter Squash

½ onion, chopped
1 tablespoon olive or grapeseed oil
1 clove garlic, chopped
3 eggs
1 cup cooked rice (I cooked mine in chicken broth, but plain is fine)
1 cup evaporated milk, undiluted
½ teaspoon salt
½ teaspoon dried basil
¼ teaspoon freshly ground pepper
¼ teaspoon nutmeg
½ cup grated Parmesan cheese
2 cups roasted squash, seeds and skin removed, diced
8 oz. meatballs – I used chicken pesto meatballs, but any kind
of prepared meatballs…or your own…are fine. They do not need to
be cooked meatballs…they cook in the pie
1 cup shredded mozzarella cheese
1 unbaked pie shell

Heat oil in a skillet and cook onions over medium-high heat, stirring often, until translucent, about 5 minutes. About one minute before the onions are done, add the garlic and stir to combine with the onions. After onions are translucent, remove from heat and cool. Once mixture is just warm, spread it in the bottom of the unbaked pie shell. Set aside.

In a medium bowl whisk together the eggs. Add the rice, milk, salt, basil, pepper, nutmeg and Parmesan cheese. Stir to combine. Gently stir in the squash until just combined. Set aside.

Place the meatballs on top of the onion mixture in the bottom of the pie shell, distributing evenly. Cover with the rice mixture. Use a spatula to even out the mixture. Sprinkle liberally with the cheese.

Bake in preheated 425 degree oven for 10 minutes, then reduce heat and bake at 350 degrees F for about 30 minutes, or until set. Cool on a rack for 5 minutes, then serve.

Makes 6-8 servings.

For a vegetarian version, cook the rice in water and omit the meatballs. Add a ½ lb chopped mushrooms and another ½ tablespoon oil to the onions after the onions have cooked 2 minutes and stir well. Continue to cook the onion mixture as described. Otherwise continue to cook the recipe as written.

Friday, March 26, 2010

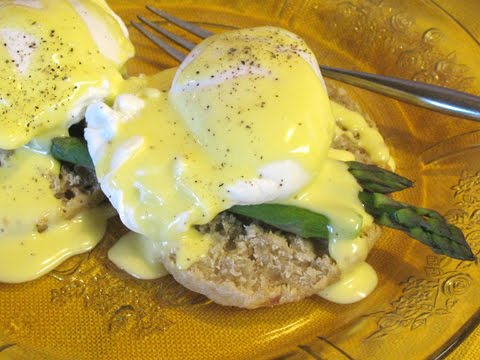
Seasonal Sensations - Eggs Benedict

Eggs benedict isn't just for fancy restaurants. You can make them at home. This classic dish is perfect for spring. Farm fresh eggs can be found at farmers markets and roadside stands.

Asparagus are sweet and green and bursting with flavor. Egg yolks and asparagus are a great pairing. This is a truly decadent dish, especially since it has Hollandaise sauce…all those egg yolks and that melted butter makes a heavenly, rich sauce! If you can find Meyer lemons, they work beautifully in this sauce. If not, use a fresh lemon in any variety available to you. Don’t use bottled or frozen juice…the fresh juice helps the egg yolks accept the butter in the sauce and adds a sprightly flavor, too. This would be impressive for a springtime brunch with a select, small guest list.

I think I’ve only had Eggs Benedict about 5 times in my life, and never with asparagus. I’ve wanted to try making it for a long time but was put off by all of the parts seeming so complicated and not sure that I could pull it off. Well, dear readers, I did it! I'm going to make this my first entry in the High Five Un-group hosted by the lovely Lynn at Cookie Baker Lynn blog. If you want to participate, check it out here.


I made this for Sweetie for breakfast on a morning when we were not in a hurry. He enjoyed his coffee while I put together the various parts. I had made the English muffins ahead and had them ready to toast. This recipe did create quite a few dishes to wash up, and it does take some concentration to get all of the parts ready at the same time, but none of it is difficult.

The sauce is ready in minutes – I read the classic way to do it and blessed the invention of the food processor and blender...so much faster and fairly foolproof unlike the old way. The eggs take less than one minute to put into cups and four minutes to poach. The asparagus only take three or four minutes total. I suspect that toasting the muffins takes the longest.

TIMING is Everything
Plan the order in which you will do the different parts and everything will turn out fine. Read through the various recipes. You may want to make your own list. This is the order I used:
Split the muffins and set by toaster.


Fill the pot to 2 ½ inches and bring to boil, add the vinegar, then set to simmer
Prepare the asparagus for steaming
Juice the Meyer lemon and strain the juice
Separate the egg yolks for the hollandaise and put into the food processor
Crack an egg into four custard cups
Set out the plates, the pitcher for the sauce, and two bowls for hot water
Melt the butter for the hollandaise
Toast the first English muffin
While muffin is toasting, begin the hollandaise, through adding the hot melted butter…leave it running
Slip the eggs into the simmering water. Set timer
Pour the finished sauce into pitcher and fill bowl with enough hot water to come half way up pitcher
Put second English muffin in toaster
Steam the asparagus
Put hot water into second bowl
When timer goes off, use slotted spoon to remove poached eggs to bowl of hot water
Remove asparagus from microwave
Plate toasted muffins, add asparagus
Use slotted spoon to removed rinsed eggs from hot water, let drip, put over asparagus and muffins
Pour on hollandaise

Grind on pepper
(Take photos if you are a blogger) and prepare other plate the same way
Serve!


If you like you can do the following the day before:

- Juice the lemon, strain the juice, store in a small container in fridge. Let come to room temperature.
- Split the muffins. Store in airtight container
- Prepare the asparagus but don’ t steam. Store in fridge. If still cold when steamed, you may have to steam a little longer
- Separate the eggs for the sauce. Reserve the whites for another use. Store, covered, in the fridge. Bring to room temperature to use for the sauce
- Crack an egg into individual cups or containers. Store, covered, in the fridge. Bring to room temperature before poaching

Here are the parts of the recipe:

Eggs Benedicts with Asparagus and Meyer Lemon Hollandaise Sauce

The Asparagus
For each serving: 3 – 4 spears of very fresh asparagus, ends snapped off. Steam your favorite way, and keep warm until ready to assemble.( I put mine on a microwave safe plate, added a teaspoon of water, covered and microwaved two minutes on high power. I did this after the eggs had started poaching, while the second English muffin was toasting, and after the hollandaise sauce was done and keeping warm.)

The English Muffins
Prepare English muffins using your favorite recipe, or purchase some.

Split with a fork to keep the craggy interior to trap the egg yolks and hollandaise. Toast while the hollandaise is being prepared and eggs are poaching. Keep warm until ready to assemble the dish. (I covered mine with a folded dishtowel.) Plan on an English muffin per person, plus a few extras for swabbing up the copious egg yolk.

The Blender Hollandaise (I used a food processor and it worked fine)
from All Recipes:http://allrecipes.com/Recipe/Blender-Hollandaise-Sauce/Detail.aspx
Ingredients – enough for 3-4 people

3 egg yolks
1 tablespoon lemon juice
1/2 cup butter
Directions

In the container of a blender (or food processor), combine the egg yolks, and lemon juice. Cover, and blend for about 5 seconds.

Place the butter in a glass measuring cup. Heat butter in the microwave for about 1 minute, or until completely melted and hot. Set the blender on high speed, and pour the butter into the egg yolk mixture in a thin stream. It should thicken almost immediately. (If doing in a food processor, keep it running for another minute or two while you get the eggs into the poaching water. The extra time helps with the thickening process). Keep the sauce warm until serving by placing the blender container in a pan of hot tap water. (If using a food processor, pour the hollandaise into a heat proof small pitcher and put that into a pan or bowl of hot water.)


The Poached Eggs – enough for 2-3 people

You will need:
4 to 6 fresh, cold, eggs
2 quarts boiling water in a saucepan about 8 inches in diameter
(depth of water should be about 2 1/2 inches)
1/3 cup, white vinegar (2 1/2 tablespoons per quart)

Equipment: a perforated spoon; a kitchen timer; a bowl of very warm water (120 degrees).

Preparing the poaching water: Pour the vinegar into the boiling water, and reduce the heat so that the water is just at the simmer – quietly bubbling. Vinegar quickly coagulates the white when the naked egg enters the water, and this in turn helps preserve its oval shape – again, if the egg is reasonably fresh. If you can find fresh eggs from the farm, do use them. You really taste the eggs in this dish.

Getting the eggs into the water: Being a wuss about boiling water, I took the low road and cracked an egg each into four custard cups. Once I was ready, with the English muffins toasting, the asparagus ready to steam, and the hollandaise sauce almost finished in the food processor, I made sure that the water was simmering, then put the lip of the custard cup as close to the top of the water as possible and gently let the egg slide with one movement into the simmering water. Set timer for 4 minutes. Rapidly continued with the 3 other eggs, adding them clockwise around edge of pan. Because I didn’t do the version where you prick the end of the egg and give it a quick bath in the shell in boiling water, bits of the white did trail away from the poaching eggs, but it was fine in the end.

Finishing the eggs: Regulate the heat so that the poaching water remains at hardly a bubble, and when 4 minutes are up, carefully remove first egg with a perforated spoon and slide it into the bowl of very warm water, to wash off the vinegar. Estimating how much time you took for each additional egg - it will be 15 seconds at most when you are used to the movements - remove the other eggs in turn.

Keeping eggs warm after cooking them: The eggs will keep warm as long as the water remains warm, and they cannot overcook if water is not hotter than 120 degrees; if your wait is a bit long, pour a little boiling water into the bowl from time to time. (I also added a bit of boiling water to the bowl holding the hollandaise pitcher, just to make sure it stayed warm.) If you will be serving more than three people, I would have another pan of water to poach additional eggs, but keeping the timing right is tricky for 4-6 eggs and more difficult with more eggs and toasted English muffins to keep warm. You could serve one muffin half, one egg and some asparagus alongside to double the number served, but be prepared for requests for seconds!


Putting It All Together
Have the table set and plates ready. Once the eggs are in the warm water to rinse off the vinegar, put an English muffin, toasted, both top and bottom if you are having two eggs per person, onto each plate. Top each plated muffin set with 3 spears of the steamed asparagus, laid crosswise over the muffin pieces, top each muffin piece with a poached egg (the classic method is to dry the egg in a clean towel…I just used the slotted spoon and let the water drip for a couple of seconds) placing over any part of the asparagus that is on the muffin, and immediately pour on some hollandaise sauce over all. If desired, grind some fresh pepper on top of each egg. Serve at once while everything is hot. Repeat for each plate of Eggs Benedict. Enjoy the compliments of your family and/or guests.

Tuesday, March 23, 2010

Seasonal Sensations - Eggs

Spring has arrived in Northern California with warm breezes, tulips and plum blossoms, and roadside signs that say 'Fresh Eggs for Sale". The perfect time for another guest blogger. This time my dear friend Hildegard delights with musings on eggs, breakfasts, and family traditions:

Eggs

December of 2010, when we in the Shenandoah Valley of Virginia were hit much harder than those in New England (because we’re that much farther south, apparently), we watched with some amusement as local shoppers tore around the supermarkets in preparation for the first flakes. The 2% milk, white bread, batteries, and flashlights disappeared from the shelves within hours of the forecast. Having grown up in New England, this seemed like overkill. Our house is high above a long, steep driveway with three hairpin curves. We have a very deep well (515 feet) with an electric pump. The three things we get anxious about in situations like this are toilet paper, water (for flushing the toilets), and eggs.

We try to keep about three dozen eggs in the refrigerator (usually six of them hard boiled) even in fair weather. We regularly buy our eggs at a gas station, the egg station we call it. It is run by two permanently bed-headed, extremely personable brothers who also raise the egg-producing chickens on their farm and rent out U-hauls from their gas station, which has the cheapest gas in town. This makes it a busy place, with only four gas pumps (one of which has not been working), and if you come in the afternoon, it’s usually too late for eggs. Their eggs have the most orange yolks you’ve ever seen, and the eggs themselves are often so large that they come with large rubber bands wrapped around the cardboard containers; otherwise they wouldn’t stay closed.

J fixes eggs for our breakfast every other day, and we eat them sitting at a low, collapsible table in front of a west-facing window in our library that looks out for miles across hills and cow-covered fields to peaks of Allegheny Mountains in the distance. The weather always comes from the west, and the light changes constantly the way it does over the sea. The eggs keep changing as well, a condition that J promised when—as we agreed to begin living together—I voiced some concern about the possibility of growing bored over time. I meant with one another of course, but he heard it as a thoroughgoing concern. Hence the enormous variety in the ingredients of our alternate-day eggs.

There was no breakfast as I was growing up. My mother was manic/depressive (nowadays she’d be bipolar, but without meds that doesn’t improve the conditions for anyone in the family) and, as I look back on it, I feel there must be a causal connection between those two things: her mental health and the absence of breakfast. Neither we nor anyone else I knew discussed mental health in personal terms as I was growing up in the 1950s; my mother simply didn’t have a breakfast function. My father and maternal grandmother constantly reminded us children never to upset her, because “she is so sensitive” and “don’t forget she is a Barnard graduate.”

Indeed her IQ was incredibly high and remained so throughout a very long life, despite frequent psychotic episodes, infrequent hospitalizations and occasional electroshock therapies. Each time she was hospitalized—the last time she was well into her eighties—she would be part of some statistical study about the long-term effects of mental illness upon intelligence, and each time the studiers would be amazed at the fact that her IQ remained so high. Lately it occurs to me that whenever life became stressful, my mother would simply duck out of reality, thereby avoiding wear and tear on her brain.

We did have lunch. Grade school (K-8, no such thing as middle school then) was about two miles away, and there were no school buses at the time where we lived, so we all walked, roller skated, or biked to and from, and we all went home for lunch the same way. Even my father came home for lunch. He taught at the local junior college (they weren’t known as community colleges at the time, but that’s what they really were) and went back and forth via a quiet little motor scooter that he kept stocked with small round stones to ward off the many barking dogs that followed him. Lunch was often bologna sandwiches on sliced white bread and didn’t take long.

So when did we have eggs at all? On Saturdays my father would make a huge production, attired in pajamas, bathrobe either knotted or not, and soft brown leather slippers. It was always piles of bacon and scrambled eggs and might be ready around noon. Again, more like lunch.

From the first I was consistently an “A” student at school. There were hardly any rules at home, but lots of confusion. Rules at school were clear and simple. I never had a course I didn’t love and school was smooth sailing. I quickly added chorus, orchestra, drama, and all the possible activities that kept me at school and away from home most of the time. In high school I took the public bus to a friend’s house (very early, since there was no breakfast and no one was up at my house) where I joined Marcy and her mother for cigarettes & coffee before walking the few remaining blocks to school. I became a thespian, had the lead in all the plays (rehearsing until midnight last weeks before the show) directed by a single woman named Ruth with wild curly graying red hair who walked around with her playbook drinking coffee, coffee, coffee, out of a huge thermos. By that time I began to believe that it was rather chic to forego breakfast (and sometimes lunch as well) in favor of coffee.

By the time of college it had become positively déclassé among my friends to go to breakfast at all: better to study all night, take a quick wink and a shower at dawn and drag yourself to class stretching and yawning.

All was to change dramatically when I married into a large non-religious but culturally consistent Jewish family. My mother-in-law had devoted her life to her children’s health and welfare and was a somewhat begrudging slave to her husband’s schedule. She had no pretenses about enjoying or excelling at cooking but regularly provided ample meals (often from nearby good Jewish delis) three times daily. For the better part of her married life, her husband the doctor had his office in a part of their Sheepshead Bay house, so he was very much “under foot” and at home for the three meals. Whether serving her own family or the extended family (twenty-five or thirty), she would forever admonish all present to eat—more and more—but was rarely persuaded to seat herself at the table where everyone else was eating.

Clearly I needed to fix a daily breakfast, all the more so when our first child was born before our first anniversary. Now we were three people who needed to start the day with a healthy breakfast; and in another seventeen months, four. I had always enjoyed cooking, experimenting with new cuisines and ingredient, but no experience with breakfast. This was also the time of cookbook writers such as Beatrice Moore Lappé, who urged us to eat lower on the food chain, and Ewell Gibbons told us how to eat foods that we foraged. I made oat cakes from scratch, cottage cheese with walnuts and raisins, brown bread, even home-made bagels. My kids were adventurous eaters from the first, and they never ate baby food. My daughter scarfed down caviar at the traditional extended family Thanksgiving feast when she was barely a year old, and they both ate fresh caught and cooked frogs’ legs when they were still toddlers.

As life got busier and more scheduled for all of us, I thought to make my breakfast life easier. I had always been fairly unconscious during my first waking hour. Whether I rose early or late, it was always the same—my brain and body didn’t play out their inherent interconnection well for about an hour. At some point I remembered my father’s eggs, and it turned out everyone loved eggs: eggs fried over lightly, poached (with ketchup for the other three, much to my horror), shirred and scrambled, and even boiled, soft but better hard. All things considered, this turn of events worked well, though my now grown offspring love to remind me of a few mishaps I had with the eggs. Once or twice I apparently cracked a raw egg and instead of dropping it into the frying pan tossed it over my shoulder. And the kids were standing there watching. It was first thing in the morning.

Hard-boiled eggs turned out to be more dangerous. We had all discovered that we liked them cold as well as fresh cooked. We kept half a dozen in the refrigerator, marked “HB” on the blunt end to avoid messy mistakes or assumptions. What was even better from the cook’s point of view was that they could be made in advance and didn’t have to be stirred, added to, or watched. I could do something else simultaneously, like read a book or have a conversation somewhere else in the apartment or on the telephone. Or so I thought. It was usually someone other than myself, someone coming home from school, opening the door who yelled, “What stinks?” Then we would all rush to the kitchen, where we would see the eggs exploding high in the air, bits of white but mostly yolk adhering to the high ceiling. And it wasn’t even early in the day when it happened.


Thank you Hildegard for a wonderful foray into your memorable times with (and without) eggs!


Dear readers, do share egg related stories, if you will, in the comments. XOXO Elle