Showing posts with label Meyer Lemons. Show all posts

Friday, January 26, 2018

Lemon Curd for January


In this day and age where imports allow U.S.A. consumers to have fruits and veggies of all sorts all year long, it's good to remember that most things are at their best when eaten during the season when they ripen locally. A perfect example would be the Meyer lemon. Although it can be found at the market, in California in January you are just as likely to find it for free at the gym, the club meeting, or church because the lemon trees often grow to such a size that dozens and dozens of lemons ripen at once and the lucky homeowner finds that there are plenty to share. It is a little like the zucchini in summer - an embarrassment of riches.

I've recently been gifted with quite a few Meyer lemons by friends and friends of friends, plus I had egg yolks left over from making the Pretzel Peanut Butter Cake, so I decided to try making one of my favorite lemon recipes, lemon curd, but with non-dairy margarine instead of butter. The curd is delicious and in flavor very hard to tell apart from the butter based curd, but it is interesting that the curd itself is just a bit more opaque that curd made with butter. Both are very rich...you only need a small amount on your toast, English muffin or biscuit or scone. (Worth making scones so that you can lavish them with this curd and maybe some raspberry jam and a little whipped cream if you can do dairy...)


You can also use the curd to fill thumbprint cookies, to fill layers of cake if you are making a layer cake, as a pie or tart filling as so on. Some people find that their favorite way to enjoy lemon curd is spooned directly from the jar.


I've had this recipe a long time and I don't remember where it came from. I know there are other ways to make lemon curd, but this one produces a curd that has body, a nice zesty lemon flavor, and a richness but it isn't overly sweet. It takes a little time to zest the fruit, then juice it, to beat the eggs and sugar long enough that it is truly fluffy, and then to whisk the mixture constantly for about 15 minutes, but you are worth the effort!


Zesty Lemon Curd Yields 3 Cups  - Stores up to 3 months in fridge

3-4 fragrant, bright-skinned lemons
1/2 Cup (1 stick) plus 2 Tablespoons butter (or margarine), cut up
Pinch of salt
4 egg yolks
1 whole egg
1 1/4 Cups sugar

1) Run 2 inches of water into the base pan of a double boiler and set over medium heat to come to a brisk simmer.


2) Boil water in a large pot and use it to sterilize three half-pint canning jars and lids and screw-on bands. Remove from water bath and drain on a tea towel. When cool, turn right-side up, ready for the curd.


3) Grate or shred enough lemon zest from washed & dried lemons to make 1 1/2 tablespoons, packed, lemon zest. Place the zest in the top pan of the double boiler. Juice the lemons and strain juice to make 1/2 Cup; add to the zest. Add the cut up butter & salt to the pan. Set aside.


4) Beat the egg yolks and whole egg together at high speed in the large bowl of an electric mixer until they are foamy; gradually add the sugar, continuing to beat the mixture until it is pale, fluffy, & very thick, about 5 minutes.


5) Scrape the egg mixture into the double-boiler top and set the top into the base containing simmering water. At once begin whisking the mixture; cook it, whisking constantly, until it has thickened smoothly and is steaming hot, about 15 minutes. Be careful not to overcook the curd; it is done when it will coat a metal or wooden spoon heavily. Remove the upper pan from the hot water.


6) Pour the curd into a fine-mesh sieve set over a bowl and press it through with a rubber spatula, leaving the shreds of zest behind (discard shreds). (It is o.k. to leave the zest in the curd, but the texture is different.) Scrape the curd into sterilized jars. Let it cool uncovered. Cap jars of cooled curd with sterilized lids. Refrigerate the curd.

Note: This can be made with lime zest & juice. Use 1 Tablespoon lime zest and 1/2 Cup lime juice and follow the recipe the same way for everything else.

Sunday, February 08, 2015

Cherries


Every year at Christmas time one of the gifts we look forward to are the cherries from Michigan. One of my sisters lives near Traverse City, Michigan, which is cherry country with a capital C. She often sends us dried cherries and they usually are eaten before the tree gets taken down. Last year I hid some for baking because they are excellent in baked goods. Yesterday I had to use some from the store since the Michigan cherries are all gone, but I was thinking of her as I baked this slab pie and wishing she was here to have a slice. I also wished I had Michigan cherries, but had to settle for Montmorency cherries canned in a jar (from Wisconsin I think).


This pie is a variation of one I found in XX. The original recipe was for apple pie, but Sweetie isn't a huge fan of apples, plus I had a yen for cherries. This would make an excellent Valentine's Day dessert. It looks like it feeds a crowd, but is really about six slices long. I'm pretty sure that you could cut it into 4 huge slices if you needed to. We shared it with our dinner partners last night and it served the four of us with medium slices, plus a couple left over for their breakfast. We were treated to an excellent Middle Eastern feast by the KitchenThink kitchen designer whom we love, so it was great that she loved this slab cherry pie, too.


The challenge for me with this recipe was to make a filling to replace the apple filling. I used another recipe in the book, for regular cherry pie, but added extra thickener and used fewer cherries. Because I was using canned cherries, I also included some dried tart cherries which I marinated in Amaretto liquor since almonds and cherries are a great combo. I also added about a teaspoon grated Meyer lemon zest to the Meyer lemon juice for some zing since canned cherries can be a bit bland. It all worked out well. The filling was thick enough for a slab pie, it was flavorful and had just a bit of tang. I know I'll make it again soon.


The crust was the one called for in the book, a all-butter pie crust that you can make in the food processor. It is very similar to the Martha Stewart one, but was even better and very flaky. I did increase the ice water to 1/4 cup. The mixture still looked like crumbs at that point, but it did hold together when squeezed. When I wrapped it up in plastic, I kneaded it together just a bit, then shaped it into a rectangle. Not sure if it is important, but I chilled the flour in the freezer and put the small cubes of butter there, too. The water was very cold. I think that having such cold ingredients and not overworking the dough helped with making it flaky.

Another change was that I painted the edges that became sealed together with the egg wash before folding the dough over. The recipe called for water, but I had the egg wash ready to go, so I used it. The filling that came out did so from a vet not the edges, so it worked to keep those edges really sealed. I also left the salt out of the egg wash. There was so much sparkling sugar on top that it really wasn't missed.


Cherry Slab Pie
a variation of Apple Slab Pie in The Culinary Institute of America's Pies and Tarts book

Makes on 5 x 15 inch slab pie
(about 6 servings)

One All-Butter Pie Dough (recipe below) formed into in rectangular disc
3-4 cups canned or frozen tart cherries, drained...reserve 1/4 cup juice
1/2 cup dried tart cherries in a small bowl with enough Amaretto to cover tehm
1/3 cup cornstarch (I used 1/2 cup tapioca starch, which worked well)
2 teaspoons fresh lemon juice (I used Meyer lemons)
1 teaspoon fresh lemon zest, grated fine
1 1/4 cup granulated sugar
1/4 teaspoon salt
Egg Wash of 1 egg whisked with 1 teaspoon water
Sanding sugar (or granulated sugar) for the top of the pie

Preheat the oven to 375 degrees F. Make sure the pie dough is chilling in the fridge. Line a baking sheet with parchment paper. Set aside.

In a small bowl, combine the reserved 1/4 cup cherry juice, the cornstarch or tapioca starch and whisk together with a small whisk or a fork. Set aside.

Drain the dried cherries. The liquid can be used for other purposes (like sipping)

In a medium saucepan, combine the drained cherries, lemon juice and zest, sugar, salt and drained dried cherries. Bring to a gentle simmer over medium heat, and simmer, stirring, for 10 minutes to reduce some of the liquid. Remove the pan from the heat and stir in the cornstarch mixture. Return the pan to the stove top and bring to a simmer over medium heat. Stirring constantly, cook for 3-5 minutes, until clear and thickened. Mixture will thicken more as it cools. That is fine. Remove the pan from the heat and allow to cool for 30 - 45 minutes, or until cooled to room temperature.

Dust a 13" x 18" sheet of parchment paper lightly with flour. On it roll out the chilled dough to 1/8 inch thick. Using a pastry wheel, trim the dough to 10 inches by 15 inches. If dough is at all soft refrigerate by placing the parchment on a baking sheet and putting the whole thing in the fridge.
On chilled rectangle of dough, spread the cherry filling on one half, along the long side, leaving a 1/2 inch border on three sides. If needed, press gently on filling with a spatula to eliminate any air gaps.

Use the egg wash and a pastry brush to brush the wash on all edges of the pastry, about 1/2 inch in. Using the parchment paper to help, fold half the dough over the other half. Press down on the edges to seal and further seal and crimp by pressing down with the tines of a fork.

Carefully turn the pie over onto the parchment lined baking sheet. Brush the top with egg wash. Sprinkle liberally with sanding sugar or granulated sugar. Use a paring knife to cut 6 or 7 vents in the top at 2 - 3 inch intervals.

Bake in the preheated oven until the filling is bubbly and top is golden, about 45 - 50 minutes. Remove the baking sheet from the oven and place it on a cooling rack. Let cool for 2 - 3 hours. The filling will continue to thicken and set as the pie cools.

To serve, cut wedges down the pie, with the point of the wedge facing in one direction for one slice and in the opposite direction for the next slice.

Refrigerate any leftovers.

All-Butter Pie Dough
from same book as above

1 1/2 cups all-purpose flour, put into the freezer for 1 hour
1/2 teaspoon salt
1/2 teaspoon sugar
4 oz - 1 stick, unsalted butter, cut into 1/2-inch cubes and frozen
1/4 cup ice cold water, more if needed

In the bowl of a food processor fitted with steel blade, combine the cold flour, salt and sugar. Process for a few seconds to combine.

With the processor off, add half the frozen butter. Pulse for 3 - 5 seconds, or until the butter looks like small peas. With the processor off, add the remaining butter and pulse for 4 - 5 seconds, or until the mixture is well mixed and butter pieces are various sizes from small to pea sized or larger.

With the processor off, sprinkle half of the ice-cold water over the mixture. Pulse for 3 - 5 seconds, or until just combined. With processor off, add half of the remaining water. Again pulse for 3-5 seconds. Check the dough by pressing it to the side of the work bowl. If it does not hold together, add the rest of the water and pulse for 3 - 5 seconds, and check again. The dough should just hold together when pressed to the side of the bowl. It will be very dry looking and should not form a ball or mass of dough in the bowl.

Turn the dough out onto a lightly floured work surface. Shape the dough into a disc, kneading gently just a bit if needed to make the dough cohesive. Shape disc into a rectangle and wrap tightly in plastic wrap. Chill in the refrigerator for at least 1 hour or, preferably, overnight.

Use straight from the fridge to roll out.

Saturday, January 10, 2015

Sweet Cookie Fingers with Raspberry Jam and Meyer Lemon Glaze


Christmas cookies never happened this year and I had two appointments that prevented me from baking cookies for the funeral of a friend on Friday. Thought we might bake cookies when my daughter came on Friday, but I was too tired. Finally felt up to it late this afternoon.

It was good to be baking again. These sweet cookie fingers have a butter base and some raspberry jam sweetness, plus a little crunch from the almond slices and the tang of Meyer lemon (or any lemon, really) in the glaze. The dough was crisper than I had expected, but that might have been because I forgot to add the 2 tablespoons of milk that went in before the flour mixture. I also only made a half recipe because even though I was wanting to eat some cookies, I really don't want to eat 40 of them. You can easily double the recipe if you do want to make 40. That's how the recipe was actually written.

On the good news front, my nephew in Colorado and his wife are the proud parents of a beautiful baby boy. Congrats to grandpa NoName!


Raspberry Ribbons
from The Fannie Farmer Baking Book
makes about 20 slices

5 tablespoons (about 1/3 cup) butter, softened
1/3 cup sugar
1 egg yolk
1/2 teaspoon vanilla extract
1/4 teaspoon almond extract
1 cup flour
1/2 teaspoon baking powder
1/8 teaspoon salt
about 1/2 cup raspberry jam
1/4 cup sliced almonds
Lemon Glaze (see below)

Combine the butter and sugar in a mixing bowl, and beat until well blended. Add the egg yolk and the vanilla and almond extracts. Beat until light in color.

Combine the flour, baking powder and salt (I used a sheet of waxed paper and a whisk), then add to the butter mixture. Beat well until mixed. Mixture will be firm. Divide into two pieces as close to the same size as possible. Wrap each and refrigerate for at least 30 minutes. (I chilled them for about an hour and a half and that was still fine.)

Preheat the oven to 375 degrees F. Grease a large cookie sheet. (I used a half sheet pan.)

Work with one piece of dough at a time, keeping the other refrigerated.

On a lightly floured work surface, roll one of the pieces of dough into a rectangle about 11 x 3 inches.
Transfer the dough to the cookie sheet...you may need to use a spatula, but I didn't.

Using your fingers, press a 1-inch wide trench down the center of the rectangle. Spoon about 1/4 cup raspberry jam in the trench, smoothing with a wet finger.


Repeat with the second piece of dough. The cookie sheet should hold both rectangles of dough.

Bake for about 10 minutes or until the edges just start to take on color. Scatter half of the almonds on each rectangle, sprinkling them over the hot jam. Return to the oven and bake another 1-2 minutes, or until the edges are light golden brown.

Remove the pan from the oven and brush or drizzle the Lemon Glaze over the rectangles. Slice each rectangle into about 10 slices.

Store in an airtight container with waxed paper between the layers, or carefully place in a plastic bag, tie snugly, and freeze.

Lemon Glaze
1 tablespoon freshly squeezed lemon juice (I used Meyer lemons)
1/2 teaspoon grated lemon zest (Meyer lemon here, too)
1/3 cup sifted confectioners' sugar

Mix the lemon juice and zest. Put the sugar in a small bowl. Add the juice mixture and stir or use a small whisk to combine until smooth and well blended.

Wednesday, January 18, 2012

Meyer Lemon Cheesecake with Coconut Crust

Oohhhh this is so good! I know it is a terrible choice for healthy eating, but every now and then a treat like this is essential. When I realized that our daughter had arrived a day early and that she was going to be with us for dinner, I decided that the cheesecake would become the only birthday cake we were likely to have with her, even though it is a bit early. She and her fellow loved it and I sent a huge piece along with them for the journey, too. Then Sweetie and I had another piece for breakfast...decadent.

You don't really need Meyer lemons to make this cheesecake. Regular lemons or limes or Key limes all would work just fine. With limes I would use a graham cracker crust and a little cinnamon in the crust instead of vanilla wafers and coconut, but for lemon cheesecake the coconut is sublime. This cake is actually a version of one I made a while back HERE.

I only have the one photo, but hope to add another one tomorrow. Happy Birthday a little early K!

Meyer Lemon Cheesecake with Coconut Crust

Crust:
1 1/2 tablespoons butter, softened
1 ½ cups vanilla wafer crumbs
1 cup flaked coconut
1/3 cup melted butter

Rub a little of the butter in the bottom of a 9” spring form pan. Use the rest of the butter to butter the sides of the pan. Line the bottom with a circle cut out of baking parchment paper.

Mix the wafer crumbs, coconut and melted butter together until well mixed. Pour the crumb mixture into the bottom of the pan. Spread out with clean fingers, making the layer as even as possible, with some of the mixture pushed up the sides about a half inch to an inch. Using the bottom of a flat bottomed glass, press the mixture down and press the mixture up against the sides. Sides will be uneven in height. Refrigerate the pan 5 minutes.

Bake in a preheated 350 degree F. oven for 7 minutes. Remove from oven and cool on a wire rack. When cool, wrap the whole pan, on the outside, in heavy duty foil. Turn oven temperature down to 325.

Filling:
Have everything at room temperature.
1 ½ lbs cream cheese
1 cup sugar
3 tablespoons all-purpose flour
1/8 teaspoon salt
¼ teaspoon vanilla
2 teaspoons grated peel of Meyer lemon zest, colored part only
1 (14 oz.) can sweetened condensed milk
1 cup sour cream
½ cup Meyer lemon juice (about 4-6 lemons), seeds removed
4 large eggs

Using an electric mixer, on low speed, beat the cream cheese just to soften. Scrape bowl and beaters often throughout the rest of the recipe. Add the sugar in a slow stream, beating on low just until mixed. Add the flour, salt, vanilla, zest and beat on low just to mix. Add the sweetened condensed milk and sour cream. Beat on low just until mixed. With mixer running on low speed, add the lemon juice in a slow stream, beating just until mixed. Add the eggs, one at a time, mixing each in before adding the next egg. Beat last egg in just until mixed.

Pour the filling into the prepared crust. Place the foil-wrapped pan into a large roasting pan. Place pans in oven and fill roasting pan with hot water until water is half way up the cheesecake pan. Bake for 1 hour, or until filling is set, but center is still a bit jiggly.

Remove roasting pan from oven carefully. Remove cheesecake pan from roaster water bath and place on wire rack. Run a sharp small knife around the sides of the pan to loosen and keep the cheesecake from cracking as it cools. Cool at room temperature. When cool, remove foil wrapping, wrap in plastic and refrigerate 4 hours or overnight.

To serve, remove from refrigerator. Run a sharp knife around the pan sides to loosen the cheesecake. Remove the pan sides. Slide the cheesecake onto a serving plate and bring to room temperature.

If desired, frost the sides of the cake with whipped cream and pat on some toasted coconut. Garnish with whipped cream and thin lemon slices. (No time for this decoration last night.) Serve thin slices of the cheesecake, using a knife which has been run under (or dipped into) hot water, then wiped dry.

Tuesday, January 17, 2012

Bright and Sunshiny Lemon


For years I've loved the sweet lemon flavor of Meyer lemons and how nice they look, too, with their bright yellow skin almost the color of egg yolks. In its native China it was a decorative houseplant. In the early 1900s Frank N. Meyer brought it back to the U.S. as part of his job with the U.S. Department of Agriculture.

I've been fortunate now and again to have friends with too many Meyer lemons to use themselves who knew that I would gladly accept any they didn't need. I love to make lemon curd with them because they have just a bit of mandarin orange flavor, too and are not as acidic as regular Eureka lemons. Of course the regular lemons have a nice thick skin which means they can be shipped easily, so Meyer lemons which have a thin skin were until recently a treat for locals near where they grew, often being sold at farmers markets.


This year I have my own Meyer lemons! In the spring I purchased a dwarf Meyer lemon tree and planted it in a pot. The good news is that has allowed me to bring the tree under the shelter of our porch for most of the past month when we have had frosty nights. Lemon trees are not big fans of frost. The bad news is that the tree didn't grow as much as it might have if planted in the ground, so fewer lemons. They are also far from picture perfect lemons...I'm still learning how to protect them from their kind of pests.


I decided to use about 1/3 of the lemons the tree produced to make a coconut crusted Meyer lemon cheesecake. It took 6 of the lemons to make enough juice for the recipe and I was also able to use the zest from about half of them.


The cheesecake is in the fridge chilling, so no photo of it yet, but I can show you my lemons!

Do you have a favorite citrus recipe to use when it's citrus season? I'm always on the lookout for recipes using citrus, especially Meyer lemon.

Hopefully I'll add a photo of the cheesecake tomorrow. If I also add the recipe it will be in it's own post. In the meantime, here's some sunny yellow lemons.

Tuesday, March 29, 2011

Meyer Lemon Spiked Salmon Spread and Giveaway Results


It's still Meyer lemon time around here.

Today I decided to use up some leftover cooked salmon and the juice and zest of a Meyer lemon to make a spread for bread or crackers or cucumber slices...I guess you could put it on top of baked potatoes, too, or use it as a filling for baked hand pies...lots of ways to use this one...or just eat it with a spoon! Just remember to be kind to your heart and go easy on the quantity eaten. The goodness of the fish oil can only offset the badness of the cream cheese just so much.

While I'm posting about the spread I'm happy to report that the three copies of Bless Your Heart, the great cookbook with a Southern sensibility, go to....tada...Tanna of My Kitchen in Half Cups the first commenter, Ammy Belle of The Crooked Bookshelf the fourth commenter, and Claire of Cooking is Medicine the fifth commenter. The were chosen in a random drawing and need to get me their e-mail addresses, if I don't already have them (Ammy Belle was smart and included hers with the comment) so that I can get their mailing address for the kind folks at Thomas Nelson Publishers so that they can mail out the books. My e-mail to use is elle(dot)lachman(at)gmail(dot)com.

Again, a huge thank you to Thomas Nelson Publishers for making these free copies available with no strings attached.


Meyer Lemon Spiked Salmon Spread
an original Elle recipe

one 8 oz. block cream cheese, softened
1/2 cup plain yogurt
Juice and zest of 1/2 Meyer (or other type) lemon
1/8 teaspoon cayenne pepper
1/8 teaspoon black pepper, preferably freshly ground
1 cup cooked salmon, flaked
2 tablespoons finely chopped Italian parsley
salt to taste if needed

In the bowl of an electric stand mixer or in a food processor bowl, place the cream cheese, yogurt , lemon juice and zest, cayenne pepper, and black pepper. Beat to blend and to soften the mixture. Fold in the salmon flakes and parsley with a spatula and taste for seasoning. I like my spread to be pretty loose and creamy.

If you like a thick spread, try using half the yogurt and add additional a little at a time until it is the consistency you like before folding in the salmon and parsley.

Let the spread sit in the 'fridge for at least 1/2 hour to allow the flavors to blend. Taste again for seasoning. You may want to add more lemon juice or more cayenne pepper or even more parsley. Serve with thin slices of baguette or cucumber or with crackers or breadsticks.

Refrigerate, covered, if there are any leftovers.

Friday, April 02, 2010

Second Time's the Charm

It was fun making the Hot Cross Buns that I posted a few days ago, but it was even better today. A dear friend, J of the Green Thumb, invited me to bake with her, so we made another batch of hot cross buns with some variations.

These had all bread flour and no whole wheat flour, citron and candied pineapple instead of the marmalade, and a proper cross with Meyer lemon juice using a lemon she picked right before we made the icing! so they were truly different, although still a bit spicy and fruity. I liked these better. They were more tender, the citron and pineapple were somehow more to my taste, and the lemon juice in the icing really brought out the spices. Best of all, they were not overbaked as the earlier ones were! This is surprising since we were talking up a storm and not being diligent about keeping track of the time :)

We had fun with the currants, too. Since we didn't use raisins this time, we used more currants and they made little faces when we turned them into buns after weighing the dough pieces. Keeping them close to the same weight is supposed to keep them pretty much the same size, but maybe more had fruit than others because the sizes were markedly different. Once you started eating them that didn't really make any difference. Yummy hot cross buns! One other difference was that the dough was dry when we hadn't even added all the flour, so we added about 1/4 cup fresh orange juice and removed the dough from the dough hook, mixed some of the juice into the dough with a spatula, then started up the machine with the dough hook again and let it mix in the rest of the juice. Then we could add the additional flour and let the machine knead it a little while.

We started them about 10 am and they were baked by 2 pm. After cooling for a half hour we iced them. You might be able to shave a half hour off, but still, four to four and a half hours isn't bad for fresh, soft yeast rolls that make your kitchen smell wonderful. There were even two pans of buns, so we each had some. Thanks J! It sure was fun!!


I'm sending this version over to Yeastspotting since it is a new week. Do check out Wild Yeast and the great bread showcased there.
Hot Cross Buns - April version
Makes 16 buns

3/4 cup warm (100° to 110°) whole milk
4 1/2 teaspoons (2 packages) active dry yeast
1 large egg
1/4 cup brown sugar
1/4 cup butter, melted and cooled
3/4 teaspoon salt
1/2 teaspoon nutmeg, preferably freshly grated
1/2 teaspoon cinnamon
1/4 teaspoon cloves
Finely shredded zest of 1/2 large orange
About 3 cups bread flour
½ cup candied citron, chopped
¼ cup candied pineapple, chopped
1/2 cup dried currants
¼ cup triple sec (or rum)
1 tablespoon fresh Meyer lemon juice
1 cup powdered sugar – or enough to make a thick icing

1. In a bowl of a stand mixer, combine milk and yeast; let stand until yeast softens, 5 to 10 minutes. In another bowl, whisk together the whole egg, brown sugar, cooled melted butter, salt, nutmeg, cinnamon, cloves, and orange zest. Add to the milk/yeast mixture and beat on medium speed with dough hook until blended.

2. Blend most of the flour into the batter. Beat on medium speed until dough is smooth and stretchy, 10 to 12 minutes, using dough hook. Add just enough additional flour, a tablespoon at a time, (about 1/4 cup) so dough is only slightly tacky or add fresh orange juice if batter is too dry.

3. Soak currants in the triple sec for 10 minutes, then drain off the triple sec and use for another purpose or discard. Add candied citron, pineapple and the currants to the dough, pick up dough, and mix with your hands to distribute fruit.(I turned the dough out onto a lightly floured board and kneaded the dough in...that way I was sure that I had the dough well kneaded before adding the fruit and that the fruit was well distributed.)
Return dough to bowl, cover, and let rise in a warm place until doubled, about 1 1/4 hours.

4. Punch down dough. Turn out onto a lightly floured surface. Use a bench scraper or knife to divide dough into 16 pieces.With floured hands, shape into 16 smooth rounds. Evenly space rounds in two buttered 8- or 9-in. round pans.

5. Cover loosely and let rise in a warm place until doubled and puffy, about 40 minutes. Meanwhile, preheat oven to 400°. Brush buns with beaten egg. Bake until deep golden, 13 to 15 minutes. Let cool in pans at least 30 minutes.

6. In a small bowl, stir together lemon juice and powdered sugar until smooth. Spoon into a small, heavy-gauge plastic bag, snip a hole in a corner, and squeeze icing onto buns to form large Xs.

Friday, March 26, 2010

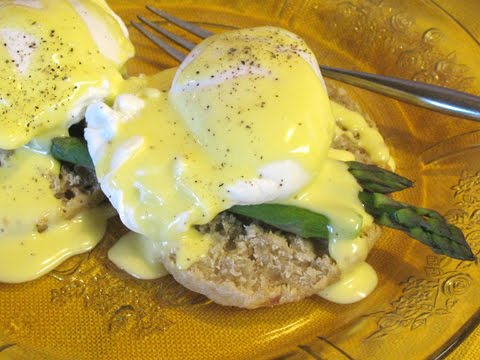
Seasonal Sensations - Eggs Benedict

Eggs benedict isn't just for fancy restaurants. You can make them at home. This classic dish is perfect for spring. Farm fresh eggs can be found at farmers markets and roadside stands.

Asparagus are sweet and green and bursting with flavor. Egg yolks and asparagus are a great pairing. This is a truly decadent dish, especially since it has Hollandaise sauce…all those egg yolks and that melted butter makes a heavenly, rich sauce! If you can find Meyer lemons, they work beautifully in this sauce. If not, use a fresh lemon in any variety available to you. Don’t use bottled or frozen juice…the fresh juice helps the egg yolks accept the butter in the sauce and adds a sprightly flavor, too. This would be impressive for a springtime brunch with a select, small guest list.

I think I’ve only had Eggs Benedict about 5 times in my life, and never with asparagus. I’ve wanted to try making it for a long time but was put off by all of the parts seeming so complicated and not sure that I could pull it off. Well, dear readers, I did it! I'm going to make this my first entry in the High Five Un-group hosted by the lovely Lynn at Cookie Baker Lynn blog. If you want to participate, check it out here.


I made this for Sweetie for breakfast on a morning when we were not in a hurry. He enjoyed his coffee while I put together the various parts. I had made the English muffins ahead and had them ready to toast. This recipe did create quite a few dishes to wash up, and it does take some concentration to get all of the parts ready at the same time, but none of it is difficult.

The sauce is ready in minutes – I read the classic way to do it and blessed the invention of the food processor and blender...so much faster and fairly foolproof unlike the old way. The eggs take less than one minute to put into cups and four minutes to poach. The asparagus only take three or four minutes total. I suspect that toasting the muffins takes the longest.

TIMING is Everything
Plan the order in which you will do the different parts and everything will turn out fine. Read through the various recipes. You may want to make your own list. This is the order I used:
Split the muffins and set by toaster.


Fill the pot to 2 ½ inches and bring to boil, add the vinegar, then set to simmer
Prepare the asparagus for steaming
Juice the Meyer lemon and strain the juice
Separate the egg yolks for the hollandaise and put into the food processor
Crack an egg into four custard cups
Set out the plates, the pitcher for the sauce, and two bowls for hot water
Melt the butter for the hollandaise
Toast the first English muffin
While muffin is toasting, begin the hollandaise, through adding the hot melted butter…leave it running
Slip the eggs into the simmering water. Set timer
Pour the finished sauce into pitcher and fill bowl with enough hot water to come half way up pitcher
Put second English muffin in toaster
Steam the asparagus
Put hot water into second bowl
When timer goes off, use slotted spoon to remove poached eggs to bowl of hot water
Remove asparagus from microwave
Plate toasted muffins, add asparagus
Use slotted spoon to removed rinsed eggs from hot water, let drip, put over asparagus and muffins
Pour on hollandaise

Grind on pepper
(Take photos if you are a blogger) and prepare other plate the same way
Serve!


If you like you can do the following the day before:

- Juice the lemon, strain the juice, store in a small container in fridge. Let come to room temperature.
- Split the muffins. Store in airtight container
- Prepare the asparagus but don’ t steam. Store in fridge. If still cold when steamed, you may have to steam a little longer
- Separate the eggs for the sauce. Reserve the whites for another use. Store, covered, in the fridge. Bring to room temperature to use for the sauce
- Crack an egg into individual cups or containers. Store, covered, in the fridge. Bring to room temperature before poaching

Here are the parts of the recipe:

Eggs Benedicts with Asparagus and Meyer Lemon Hollandaise Sauce

The Asparagus
For each serving: 3 – 4 spears of very fresh asparagus, ends snapped off. Steam your favorite way, and keep warm until ready to assemble.( I put mine on a microwave safe plate, added a teaspoon of water, covered and microwaved two minutes on high power. I did this after the eggs had started poaching, while the second English muffin was toasting, and after the hollandaise sauce was done and keeping warm.)

The English Muffins
Prepare English muffins using your favorite recipe, or purchase some.

Split with a fork to keep the craggy interior to trap the egg yolks and hollandaise. Toast while the hollandaise is being prepared and eggs are poaching. Keep warm until ready to assemble the dish. (I covered mine with a folded dishtowel.) Plan on an English muffin per person, plus a few extras for swabbing up the copious egg yolk.

The Blender Hollandaise (I used a food processor and it worked fine)
from All Recipes:http://allrecipes.com/Recipe/Blender-Hollandaise-Sauce/Detail.aspx
Ingredients – enough for 3-4 people

3 egg yolks
1 tablespoon lemon juice
1/2 cup butter
Directions

In the container of a blender (or food processor), combine the egg yolks, and lemon juice. Cover, and blend for about 5 seconds.

Place the butter in a glass measuring cup. Heat butter in the microwave for about 1 minute, or until completely melted and hot. Set the blender on high speed, and pour the butter into the egg yolk mixture in a thin stream. It should thicken almost immediately. (If doing in a food processor, keep it running for another minute or two while you get the eggs into the poaching water. The extra time helps with the thickening process). Keep the sauce warm until serving by placing the blender container in a pan of hot tap water. (If using a food processor, pour the hollandaise into a heat proof small pitcher and put that into a pan or bowl of hot water.)


The Poached Eggs – enough for 2-3 people

You will need:
4 to 6 fresh, cold, eggs
2 quarts boiling water in a saucepan about 8 inches in diameter
(depth of water should be about 2 1/2 inches)
1/3 cup, white vinegar (2 1/2 tablespoons per quart)

Equipment: a perforated spoon; a kitchen timer; a bowl of very warm water (120 degrees).

Preparing the poaching water: Pour the vinegar into the boiling water, and reduce the heat so that the water is just at the simmer – quietly bubbling. Vinegar quickly coagulates the white when the naked egg enters the water, and this in turn helps preserve its oval shape – again, if the egg is reasonably fresh. If you can find fresh eggs from the farm, do use them. You really taste the eggs in this dish.

Getting the eggs into the water: Being a wuss about boiling water, I took the low road and cracked an egg each into four custard cups. Once I was ready, with the English muffins toasting, the asparagus ready to steam, and the hollandaise sauce almost finished in the food processor, I made sure that the water was simmering, then put the lip of the custard cup as close to the top of the water as possible and gently let the egg slide with one movement into the simmering water. Set timer for 4 minutes. Rapidly continued with the 3 other eggs, adding them clockwise around edge of pan. Because I didn’t do the version where you prick the end of the egg and give it a quick bath in the shell in boiling water, bits of the white did trail away from the poaching eggs, but it was fine in the end.

Finishing the eggs: Regulate the heat so that the poaching water remains at hardly a bubble, and when 4 minutes are up, carefully remove first egg with a perforated spoon and slide it into the bowl of very warm water, to wash off the vinegar. Estimating how much time you took for each additional egg - it will be 15 seconds at most when you are used to the movements - remove the other eggs in turn.

Keeping eggs warm after cooking them: The eggs will keep warm as long as the water remains warm, and they cannot overcook if water is not hotter than 120 degrees; if your wait is a bit long, pour a little boiling water into the bowl from time to time. (I also added a bit of boiling water to the bowl holding the hollandaise pitcher, just to make sure it stayed warm.) If you will be serving more than three people, I would have another pan of water to poach additional eggs, but keeping the timing right is tricky for 4-6 eggs and more difficult with more eggs and toasted English muffins to keep warm. You could serve one muffin half, one egg and some asparagus alongside to double the number served, but be prepared for requests for seconds!


Putting It All Together
Have the table set and plates ready. Once the eggs are in the warm water to rinse off the vinegar, put an English muffin, toasted, both top and bottom if you are having two eggs per person, onto each plate. Top each plated muffin set with 3 spears of the steamed asparagus, laid crosswise over the muffin pieces, top each muffin piece with a poached egg (the classic method is to dry the egg in a clean towel…I just used the slotted spoon and let the water drip for a couple of seconds) placing over any part of the asparagus that is on the muffin, and immediately pour on some hollandaise sauce over all. If desired, grind some fresh pepper on top of each egg. Serve at once while everything is hot. Repeat for each plate of Eggs Benedict. Enjoy the compliments of your family and/or guests.

Saturday, February 20, 2010

Lemon-Pomegranate Tango

Convergence is a wonderful thing. Just yesterday I was looking at a number of the Bread Baking Babes sites to see what bread they had baked this month. Since Karen of Bake My Day is hostess this month, if you want to see what she chose, go here. While on another Babe's site I saw that Gretchen had gathered a list of upcoming food blogger events. One that had immediate appeal for me was the one celebrating lemons, particularly Meyer lemons. Since a friend recently gave me some Meyer lemons I knew I wanted to participate. Now the convergence part...a box of bottles of POM Wonderful Pomegranate juice arrived yesterday, too. If I couldn't figure out a way to combine Meyer lemons and pomegranate juice then I shouldn't call myself a food blogger!

Today for lunch the lemon and pomegranate flavors did a tango with each other resulting in a flavorful sweet-tart dressing which went really well with fresh salad greens, chunks of cooked chicken, Braeburn apple slices, and chopped walnuts.

Since I used not only the Meyer lemon juice but also the Meyer lemon zest, the dressing was bursting with crisp citrus flavor which played up the delightful fruitiness of the POM Wonderful pomegranate juice. The dressing also had freshly ground black pepper for bite, and some olive oil, plus a small amount of dried thyme. It went together quickly. Why even consider using a bottled dressing when you can put this delightful dressing together in a flash, and enjoy the goodness of pomegranate juice and the zing of fresh lemon. If you don't have Meyer lemons, use whatever lemons you have available. Be sure to include some zest and make sure to use only the colored part. After you taste the shaken dressing, you may want to adjust the amount of any of the ingredients to suit your own taste buds. I threw this together without a recipe, but it is quite likely that there are other similar recipes elsewhere.

For a further convergence, not only will I send this along to Wine Imbiber for the Lemon Lovefest event, but I'll also send it to Annie for the Grow Your Own event created by Andrea of Andrea's Recipes and hosted this month by House of Annie. The round up for Grow Your Own can be found here. I think of it as cross pollination and a way to introduce bloggers to each other...something very appropriate for this time of year. Check out these events and their participants and you may find some new wonderful blogs to visit as winter turns to spring. For the Lemon Lovefest event, you can see the round up at the Lemon Lovefest Library here.

Lemon-POM Tango Dressing
1/2 cup POM Wonderful pomegranate juice
1/4 cup olive oil
zest and juice of 1 medium Meyer lemon (or regular lemon)
1/8 teaspoon dried thyme
freshly ground black pepper to taste

In a jar or other container with a sealed lid, place all of the ingredients. Seal with lid and shake vigorously to emulsify the oil in the rest of the ingredients. Check for taste and add more pepper if needed.

Use to dress any salad that will taste good with a slightly sweet dressing. I used mixed salad greens, sliced Braeburn apples, chunks of cooked chicken and chopped walnuts.


Friday, March 20, 2009

Flavors of Spring

The first wild iris are blooming at work in the woods, the birds are singing up a storm most mornings and the forsythia bush is beginning to have branches with bright yellow flowers dancing up and down. Driving around and about lots of daffodils are seen and our ancient cherry tree is putting on it's short annual floral show. Spring...official starting today.

One of my favorite flavors of spring is asparagus. Those green spears which turn brighter green when cooked are crisp and somehow taste green to me. Grandma L brought us some Meyer lemons, too. Although I think of winter as the citrus season, there are lots of Meyer lemons around when spring arrives.


A great dinner using these two ingredients and a few others was a hit this week with Sweetie. Chicken breasts can be pretty bland on their own, but perk up a lot when covered with a layer of thinly sliced lemons, splashed with some chicken broth, then set to cook over low heat until cooked through and browned a bit as the broth evaporates. We don't usually eat the lemon slices, but they look pretty on the plate with the chicken and a wonderful pasta and asparagus dish.

The asparagus dish is a little more complex. Pasta, usually linguine but this time angel hair style, is cooked and some of the cooking water is mixed with ricotta cheese to make a sauce. While that is happening, asparagus pieces are cooked until al dente and bright green. It all gets mixed together, seasoned, and topped with fluffy drifts of grated real Parmesan Reggiano.

Enjoy the flavors of spring in any way you can, even if there is still a nip in the air and snow on the ground in places. Spring is partly a way of relating to the world as much as a true season. Happy spring to each and every one of you.

Pasta with Ricotta and Asparagus
from the Mediterranean Diet Cookbook

3/4 lb tender young asparagus
1 garlic clove, crushed
3 tablespoons olive oil
(optional - 2 tablespoons fresh mint, minced)
1 pound long pasta - fettuccine, linguine, spaghetti, angel hair are all good
6 quarts water
1/2 pound fresh creamy ricotta (or mild goat cheese)
dash nutmeg
freshly ground black pepper to taste (I like a lot)
1/2 cup freshly grated Parmesan cheese

Trim tough ends off asparagus. Cut tender parts into 2 inch lengths. In a saute pan, gently stew the garlic and asparagus in the oil until the vegetables are tender, but not brown (about 15 minutes). Stir in mint if using. Set aside.

Meanwhile, cook pasta in lightly salted water. While pasta cooks, extract 1/2 cup of the cooking liquid and mix it in a small saucepan with the ricotta. Set saucepan over low heat and gently cream the ricotta and cooking water. When the ricotta is warm, taste and add salt and pepper to taste. Add nutmeg and1 tablespoon grated cheese. Stir to combine.

Drain the pasta and combine immediately with the cheese sauce, tossing to mix well. Arrange on a warm platter and pour asparagus and oil mixture over the top. Sprinkle with the grated cheese and serve at once.

Serves 6

Sunday, March 15, 2009

Zesty Lemon Sugar Cookies

This recipe is one that my mother got from an old friend of the family, Irene Johnston. The cookies are simple and not too sweet. With the addition of Meyer lemon zest and juice they have some zing. Irene’s recipe didn’t have the salt and had nutmeg instead of the vanilla extract. Adding the lemon was my idea. These would also be delicious with regular lemon zest and juice. In a pinch lemon extract would be OK to give them lemon flavor if you find yourself without real lemons.

The star shape is to show off a recent gift of three star shaped cookie cutters. Just like the three bears, they are three sizes. I used the papa


and the baby sized ones.


You can use any cutters you like.


This dough is really easy to work with, unlike some rolled cookie doughs I’ve tried in the past. I added about 2 tablespoons milk at the end when the dough seemed too dry. Worked like a charm.

These taste best when the tips of the stars are just starting to turn golden brown. They are fine without the lemon glaze, but it does add another kick of lemon flavor.


Meyer Lemon Sugar Cookies
by Irene Johnston

1 cup butter or margarine
1 cup sugar
1 egg
1 teaspoon real vanilla extract
Mix the above ingredients together until creamy.
3 cups all-purpose flour
1 teaspoon baking soda
½ teaspoon salt
zest from ½ a medium Meyer lemon (or use regular lemon…it’s delish, too)

Mix the flour, baking soda, salt and zest together. Combine with the butter mixture. If too dry, add mile, one tablespoon at a time until dough forms.

Roll the dough to 1/8 inch thickness. Cut with cookie cutters. Place unbaked cookies on a greased cookie sheet. Bake at 400 degrees F. until lightly browned, about 6-7 minutes. (If dough sticks while rolling, refrigerate briefly). Remove from oven when done, cool on baking sheet a minute, then cool on cake rack until fully cooled.

After cookies have cooled, can be frosted and decorated as desired.

Meyer Lemon Glaze
Zest from ½ a lemon
1 cup confectioners’ sugar, sifted
juice from Meyer lemon, heated for one minute in the microwave

Place zest and confectioners’ sugar in a bowl. Whisk in a little of the lemon juice. Add dribbles of the juice until a glaze is formed. If too thin, add a little more sugar; if too thick whisk in more lemon juice. Reserve left over juice for another use.

Using small offset spatula, ice tops of each cookie. Set on cake rack to dry.

Saturday, January 31, 2009

A Late Taste of Terroir - Gingerbread & Lemon Sauce

Couldn’t let January end without one more recipe.

I baked this to take to a friend recovering from surgery. Served with the Lemon Sauce recipe from my Mom, it is pure comfort food.

The problem was that it smelled so good that Sweetie and I had to have a piece. That was so successful that we shared one more piece. It’s a wonder that any of the gingerbread made it to my friend’s house. I used 2% milk that I soured with some apple cider vinegar for that batch, but then decided to make another batch for the weekend using buttermilk as in the original recipe. Both work just fine. I also added some minced candied ginger for little zaps of pure ginger flavor here and there and took out the vanilla extract. With all of these heavy duty spices, the poor vanilla just gets lost.

Try this warm with warm lemon sauce. You can also make it as orange or vanilla sauce, but I think lemon is the perfect match for the gingerbread.

It is a couple of days late for the event, but the lemon sauce qualifies this post for A Taste of Terroir 2009 event that Anna of Anna’s Cool Finds is doing to highlight local and regional flavors. So sorry I’m too late, Anna.

I made my sauce with the lovely Meyer lemon from a friend’s tree in Healdsburg on the Russian River. It has a milder flavor than Eureka lemons (the ones you usually find in the grocery store) and is slightly less acidic, too. It makes a truly awesome Lemon Sauce.

Doesn't this look yummy?


Spicy Gingerbread
Based on a recipe from Williams-Sonoma Muffins

1 ½ cups all-purpose flour (7 ½ oz/235 g)
½ teaspoon bakind soda (bicarbonate of soda)
¼ teaspoon salt
4 teaspoons ground ginger (freshly ground is recommended)
1 ¼ teaspoons grounds cinnamon
¼ teaspoon ground allspice
¼ teaspoon ground cloves
1 teaspoon candied ginger, finely minced
½ cup unsalted butter, at room temperature (4 oz/125 g)
½ cup firmly packed brown sugar, light or dark (3 ½ oz/105 g)
2 large eggs
2/3 cup molasses, light or dark (4 oz/125 g)
2/3 cup buttermilk (5 fl oz/160 ml)

Preheat the oven to 350 degrees F. (180 degrees C.) Grease and flour an 8 or 9 inch (20 or 23 cm) square baking pan or dish. If using a glass baking dish, use 325 degrees F (165 C) for oven temperature.

On a sheet of waxed paper, combine the flour, baking soda, salt, ginger, cinnamon, allspice and cloves.

In a large bowl, using an electric mixer on medium speed, cream together the butter and brown sugar until fluffy. Add the eggs, one at a time, beating thoroughly after each addition. Beat in the molasses. Add the dry ingredients in 2 increments, alternating with the buttermilk and vanilla. Beat well until fluffy and smooth yet thick.

Spoon the batter into the prepared pan and spread evenly.

Bake until the top is dry to the touch and the cake pulls away from the sides of the pan, 35-40 minutes. A toothpick inserted into the center of the cake should come out clean. Transfer the pan to a wire rack and let cool for 30 minutes.

Serve the gingerbread warm or at room temperature, cut into squares. Can be garnished with whipped cream or lemon sauce or lemon curd.

To make as small cakes, spoon the batter into the cups (or used greased muffin tins) to 2/3 full. Bake for 15 – 20 minutes or until the toothpick test (above) works. Let cool briefly, then turn out onto a rack to cool. (I flipped mine on a plate so that the top was up.) Once cool, cut into squares.

For a treat, serve with Lemon Sauce.
Nancy’s Lemon Sauce

½ cup granulated sugar
1 tablespoon cornstarch
1 cup boiling water
2 tablespoons butter, softened
1 ½ tablespoons lemon juice (I used Meyer, but any lemon juice and zest is fine.
Zest from 1 lemon

In a saucepan, mix the sugar and cornstarch thoroughly. Gradually add the boiling water, stirring constantly. Bring to a boil and boil at full boil for 1 minute. Remove from the heat. Add butter, lemon juice, lemon zest, salt and stir until well blended.

Variations: Vanilla Sauce – use 1 teaspoon vanilla extract in place of lemon juice and zest.
Orange Sauce – Use 1 cup orange juice in place of the water. Add zest of 1 orange in place of lemon zest. Omit lemon juice.