Showing posts with label olive oil. Show all posts

Sunday, September 11, 2022

Pesto with My Garden's Basil


Pesto made with pine nuts and basil is a classic sauce for a good reason. For one thing, it smells heavenly! The bright green is enticing, too. Best of all are the robust flavors. Since I'm still not eating cheeses, I made my sauce without Parmesan cheese, but I did add nutritional yeast, plus lemon juice and zested lemon peel. Those added some complexity and the lemon added zing. 


My basil started to flower, so it was time to harvest...perhaps past time. Once rinsed, I stripped the leaves off the stem (even tiny ones) and didn't use the flowers. You need a cup, packed, so that's a lot of basil.


One of the keys to this recipe is to use a food processor and to scrape down the sides frequently so that all of the ingredients are incorporated.

This is an intensely flavored sauce, so use sparingly at first until you are familiar with the intensity.

I lightly coated cooked tortellini with this pesto and it was soooo delicious!


No Cheese Pesto


1 cup, packed, fresh basil leaves...stems discarded
2/3 cup toasted pine nuts
1teaspoon nutritional yeast
1 teaspoon lemon zest
juice from a lemon
1/3 cup olive oil, or to taste
salt and pepper to taste

In a food processor bowl fitted with the steel blade place the basil, pine nuts, nutritional yeast, lemon zest and lemon juice. Process until fairly smooth, scraping down sides as needed. With machine running, use the feed tube and add the olive oil in a thin stream until pesto is to your liking. Add salt and pepper to taste. Serve at once.

Leftover can be stored in a small glass jar. Pour a little additional olive oil gently to create a thin layer of oil on top of the pesto. This keep air out and prevents the pesto from turning brown.

Wednesday, September 23, 2020

Garlic and Butter and Lemon and Shrimp


Shrimp Scampi is a dish I first had when I was just out of college. It used to be the kind of menu item that white tablecloth restaurants of the time almost always had on the menu. I really loved eating it but thought that it would be difficult to make well and then I moved and had little income, so shrimp, which tends to be expensive where I live, was not on my menu. Eventually I just forgot about it.

A few days ago I was in an Oliver's market in Santa Rosa. They are a local chain of markets with the best of Whole Foods but at a slightly lower price point and far less pretentious. At their meat and seafood counter I discovered that they had large shrimp that had been frozen in bags of about 1 pound. I bought one and for some reason the idea of shrimp scampi popped into my head. Still thinking that it was a difficult recipe, I looked it up on Google and found that it's actually easy. There is prep work that needs to be done before you start cooking the shrimp because it goes together very quickly (except for cooking the pasta), but the recipe itself is simple. As with any recipe that seems simple, using quality ingredients is crucial. I started with some very nice shrimp. When thawed they smelled of the sea (but not 'fishy')which is a good indicator that they were handled well before being frozen. I made sure I had good linguine, a juicy and firm lemon or two, some excellent dry white wine, good olive oil, fresh parsley and a good, firm head of garlic. The last ingredient wasn't butter, which is the best thing to use, but an excellent non-dairy butter that I usually use only as a finishing ingredient. Since this dish depends on good butter, I really needed all four tablespoons to be as close to the best butter that I could find. Having a dairy allergy is no fun sometimes.

So, timing is important for shrimp scampi. Get the water boiling for the pasta. Gather all the ingredient together and prep the shrimp (I had to peel and devein them but it was OK to leave the tail on), zest and juice the lemon, mince the garlic, mince the parsley.

First you heat up a mixture of that good butter and quality olive oil. Then you saute' the garlic in that combination of oils. Once the garlic has cooked a few minutes, you add the wine and a pinch of red pepper flakes and cook that for a few minutes, then you salt and pepper the shrimp and add them to the wine mixture, making sure they are in a single layer. After a couple of minutes, you flip them over to cook the other side. After another couple of minutes you add the lemon zest, lemon juice and parsley and stir it all together. By that time your pasta is cooked and you drain it, then add it to the shrimp mixture and toss it all with some tongs until all the pasta is coated with the butter/olive oil/garlic/ lemon/wine/parsley mixture. Quickly you put the pasta on a plate or in a shallow bowl, top with the shrimp and it's ready to serve! I think it's between 8 and 10 minutes start to finish. No wonder it used to be a popular restaurant item. Done in no time and you can charge a lot for it.

So did it live up to my memories? Yes! In fact it was better. I didn't overcook the pasta. Most restaurants in my youth did. Ditto the shrimp. I used more garlic and it was fresher. I think I should have added a touch more salt, but otherwise it was perfect and perfectly delicious. Sweetie loves shrimp and I suspect he would like me to make this every night for a week. Do try it yourself if you can get good shrimp. The recipe is a combination of about four I found online, plus the lemon zest I added on my own. Lemon zest always ups the lemon flavor, so why not?

Shrimp Scampi
Serves 2-4

1/2 lb. linguine
1 lb. large raw shrimp, rinsed, peeled and deveined (OK to leave the tail on)
4 tablespoons olive oil
4 tablespoons soft salted butter or non-dairy butter substitute
4 large cloves garlic, peeled and minced
1/4 cup dry white wine
pinch red pepper flakes
salt and pepper
juice and zest of 1 lemon
1/4 cup parsley, finely chopped

Have all the ingredient gathered and prepared. The cooking takes about 10 minutes, start to finish.

Bring a very large pot of water to a boil for the pasta. While it's coming to a boil, prepare the shrimp and the garlic, lemon and parsley. 

Once the water is boiling, add 1 teaspoon salt and the linguine and stir to separate the pasta. Leave uncovered and boil until al dente, about 8 - 10 minutes. Have a colander ready to drain the pasta.

Wait until the pasta water returns to a boil, then begin the shrimp part of the dish.

In a large skillet, melt the butter and oil together over medium-high heat. Add the garlic and saute' about 3 minutes, stirring a few times. Don't let garlic burn.

Add the white wine and the red pepper flakes. cook another two minutes, stirring often. 

Salt and pepper the shrimp to taste. Add the shrimp and make sure it is in one layer in the pan. After two minutes when the cooked side is pink insteado f gray, use tongs to turn each shrimp over. Cook on the second side for another two minutes, just until it is pink. Do not overcook the shrimp.

Add the lemon juice, lemon zest and the parsley. Stir to combine all the ingredients. Taste for salt and pepper and adjust seasonings if needed.

Drain the pasta (check first to make sure it is cooked al dente), then add it to the pan with the shrimp mixture. Use the tongs to gently turn the pasta over until all strands are coated with the garlic sauce.

Serve at once on large plates or in shallow bowls, placing the shrimp on top of the pasta. If desired, garnish with a drizzle of olive oil. Pass good bread to sop up the extra sauce.

Friday, January 24, 2020

A Tart With Meyer Lemon and Olive Oil


Cook's Illustrated magazine for March/April of 2019 has a wonderful recipe for a lemon tart using olive oil instead of butter.

Of course what you'll get here isn't their recipe since I rarely do a recipe as written, even the first time. This tart looks like sunshine, mostly because there are lots of egg yolks in the filling. It tastes like springtime because of the lemon. Although the original recipe uses an olive oil crust, I just used a sheet of pie pastry from the fridge, folding the excess pastry down along the sides inside the tart. I blind baked it at 400 degrees F for 10 minutes and then removed the lentils I used for the blind baking (and the parchment) and let it sit another 5 minutes in the hot oven. Not sure if it still qualifies as a tart or becomes a pie, but I did use a tart pan with removable bottom and wavy sides, so I think it is still a tart.


The rest of the recipe follows the one given pretty closely. I did skip the straining of the filling through a fine-mesh strainer because I like having the lemon zest in the filling for texture and the residual flavor. If you prefer a silky smooth filling, then strain the filling into a bowl after the olive oil has been incorporated and then put the filling into the tart shell for the short bake required to firm up the filling.

Do allow the full two hours for the tart to cool at room temperature. It firms up as it cools and you'll get nice slices if you wait the full time. If you don't have access to Meyer lemons, the ones you find at the market are just fine for this recipe.


Lemon-Olive Oil Tart - "An Easy and Modern Lemon Tart"
From Cook's Illustrated magazine, March-April 2019

Crust   (I used a Pillsbury ReadyCrust round sheet of pie pastry instead and baked at 400 degrees F)
1 1/2 cups (7 1/2 oz.) all-purpose flour
5 tablespoons (2 1/4 oz.) granulated sugar
1/2 teaspoon table salt
1/2 cup extra-virgin olive oil
2 tablespoons water

Adjust the oven rack to middle position and heat oven to 350 degrees F.
Whish flour, sugar, and salt together in a bowl. Add oil and water and stir until uniform dough forms.
Using your hands, crumble three-quarters of dough over bottom of 9-inch tart pan with removable bottom. Press dough to even the thickness in bottom of pan. Crumble remaining dough and scatter evenly around edge of pan. Press crumbled dough into fluted sided of pan. Press dough to even thickness. Place pan on rimmed baking sheet and bake until crust is deep golden brown and firm to touch, 30 to 35 minutes, rotating pan halfway through baking.

Filling
1 cup (7 oz.) granulated sugar
2 tablespoons all-purpose flour
1/4 teaspoon table salt
3 large eggs
3 large egg yolks (save whites for another use)
1 tablespoon grated lemon zest
1/2 cup fresh lemon juice (3 lemons) (I used two Meyer lemons and one Eureka lemon)
1/4 cup extra virgin olive oil

Have all the ingredients ready and at room temperature. About 5 minutes before crust is finished baking, whisk sugar, flour, and salt in medium saucepan until combined. Whisk in eggs and egg yolks until no streaks of egg remain. Whisk in lemon zest and juice. Cook over medium-low heat, whisking constantly and scraping corners of saucepan, until mixture thickens slightly and registers 160 degrees F, in 5-8 minutes.
Off heat, whisk in oil slowly, until incorporated. Strain curd through fine-mesh strainer set over bowl. Pour curd into warm tart shell.
Bake at 350 degrees F until filling is set and barely jiggles when pan is shaken, 8 - 12 minutes.
Let tart cool completely on wire rack, at least 2 hours.
Remove metal outer rim of tart pan. Slide thin metal spatula between tart and pan bottom to release the tart, then carefully slide tart onto serving platter.
Cut tart into wedges, wiping knife clean between cuts if necessary, and serve.
Leftover can be wrapped loosely in plastic wrap and refrigerated for up to 3 days.


Thursday, August 09, 2018

Fresh Basil in Pesto


Most years I plant basil seeds in a wide and somewhat shallow planter. Some years the basil does well and fills up the planter. Some years I get a few spindly plants. This year the basil is happy and the planter is packed and the plants are getting tall. Time to use them and a great way to use basil is in pesto. Normally I'd make a mixture of basil, pine nuts,olive oil and parmesan cheese, with some salt and pepper added to taste.

Now that cheese is in my past, I decided to try making it without parmesan. I used fresh lemon juice and lemon zest to add some zing and some almond flour for body. Of course the star is the basil, which is as it should be. We had it mixed with some potato gnocchi that were a bit unstable so that half turned to mashed potatoes when heated in simmering water. It was a new brand of gnocchi. Wonderful in taste but I think I'll go back to the more stable kind.

The pesto was just right...lots of basil flavor heightened by the lemon and mellowed by the nuts. I toasted the pine nuts a little too much but with all that basil you would never know. The olive oil wasn't the real fancy kind used for finishing...it would be wasted for the same reason...it's all about the basil. You could taste the lemon, mostly as an afternote. A touch of salt was necessary. There is still enough in the fridge for another pasta or gnocchi dish...YAY!

No Cheese Pesto

1 cup, packed, fresh basil leaves...stems discarded
1/3 cup toasted pine nuts
1/3 cup almond flour
1 teaspoon lemon zest
juice from a lemon
1/3 cup olive oil, or to taste
salt and pepper to taste

In a food processor bowl fitted with the steel blade place the basil, pine nuts, almond flour, lemon zest and lemon juice. Process until fairly smooth, scraping down sides as needed. With machine running, use the feed tube and add the olive oil in a thin stream until pesto is to your liking. Add salt and pepper to taste. Serve at once.

Leftover can be stored in a small glass jar. Pour a little additional olive oil gently to create a thin layer of oil on top of the pesto. This keep air out and prevents the pesto from turning brown.

Thursday, May 17, 2018

Roasted Rainbow Carrots


Sweetie has recently discovered that he just loves roasted veggies. Tonight I made roasted rainbow organic carrots and a half an onion. Gone in a flash!


Roasted Carrots and Onions

1 bunch carrots with greens on top (or use clip top carrots if that's all you have.) I used organic rainbow carrots...about 7 of them.
1/2 yellow onion, peeled and cut into wedges
1-2 tablespoons olive oil
1/2 teaspoon dried herbs ( or 1 tablespoon chopped fresh herbs) I used Penzey's Greek seasoning and Zatar which are both dried
salt and pepper to taste

Preheat the oven to 450 degrees F.

Prepare the carrots by either peeling or rubbing with a clean scrubbie. Cut off the pointed end and just below the green tops. Use the tops for carrot top pesto if desired. Slice the carrots in half lengthwise. Place in a large plastic bag...I use the one from the produce section.

Add the onion wedges, oil, herbs and salt/pepper if using. Shake bag to distribute ingredients all over the carrots and onion wedges.

Line a baking sheet with heavy duty foil. Pour the carrots and onions out onto the sheet and use the bag to distribute the veggies into a single layer.

Roast in the preheated oven for about 15 minutes or until veggies are tender and edges of the onions are browned. Stir about half way through roasting.

Serve at once or at room temperature.

Serves 2-4

Heading off to visit my daughter and friends tomorrow, but Sweetie and Straight Shooter will keep Pi company until I get back.

Monday, August 21, 2017

Love That Garlic


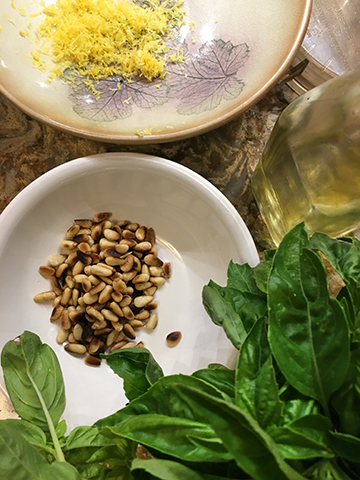
My focus the last few days has been the garden. The flowers are blooming like mad and the veggie are finally harvestable...at least some of them. We get about one good sized zucchini per day, a handful of firm, slender tiny green beans, another handful of pear shaped cherry tomatoes, and a small cucumber every other day. Should be baking a cake for the Cake Slice Bakers, or bread for the Bread Baking Babes, but I'm in the garden now that the bath project is done.


In order to really enjoy the beginning of the harvest season, I decided to do a meal that is perfect for this kind of collection of veggies. With the addition of some boiled red potatoes, one hard boiled egg, and two kinds of mains (grilled salmon for me, tri-tip for Sweetie), we had a feast with the addition of a drizzle of home made aioli. You can dip, but the drizzle (see photo at top) looks pretty.

One of the most visited posts over the 10+ years I've been blogging is the one for Spinach-Rice Casserole, a comfort food and economical vegetarian dish from Mollie Katzen's Moosewood Cookbook. I'm showing how ancient I am with this, but I bought the book when it was new and when the idea of a vegetarian restaurant was pretty new, too.The recipes are from the Moosewood Restaurant in Ithaca, New York and the book is unusual because it is hand-lettered instead of being typed. Mollie did very cool illustrations, too, some helpful, some fanciful, but all lovely. If you don't have a copy, you can go online to places like Powell's and try to find a used copy. Worth the search.

My Sweetie has always been a meat and meat kinda guy, so the idea of vegetarian meals was never a hit with him. He did, however, enjoy trying new things. That casserole became a side dish and was enjoyed partly because the only other thing needed (by Sweetie) was his meat or poultry or fish entree.

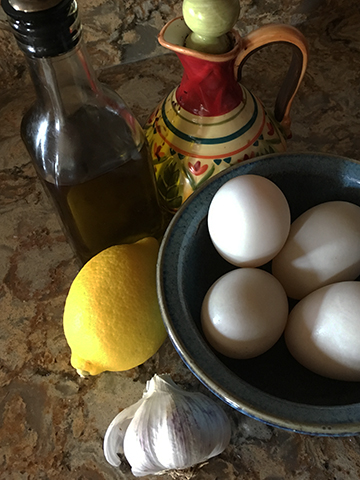
Another loved recipe from this cookbook was for Aioli, a delicious garlic mayonnaise, which is served as a sauce for fish or, even better, as the dipping sauce that ties together a meal of steamed veggies, potatoes, hard boiled egg and whatever protein of the meat/poultry/fish variety that Sweetie wanted to make that day. You better love garlic if you make and serve aioli the way that Mollie makes it. It makes an assertive mayo, so was mostly made when the kids were off at camp or something similar. The garlic goes raw into the blender and there is a fair amount of it too. Be sure to use a good olive oil, too (not a finishing olive oil, but one that tastes good since you really taste the olive oil in this, along with the garlic). This makes enough for a generous serving for 4, but it keeps in the fridge for days. This afternoon I made a tuna sandwich filling using a little of it. Wonderful!

If you have your ingredients gathered, this only takes about 10 minutes in your blender. I suspect you could use a food processor, too, but I've only ever used a blender. For variations, you can add hot sauce or herbs like basil, mint, oregano, chives, etc. If you like roasted red peppers, adding some to the blender can make this sauce perfect for putting with grilled sausage. Bet you figure out your own variations.


Aioli
from Mollie Katzen's Moosewood Cookbook

1/2 cup fresh-squeezed lemon juice (don't use anything else...you need the hit of lemon)
1/2 teaspoon salt
1 teaspoon tamari (I used soy sauce)
3 medium cloves garlic, crushed...or use more if you really love garlic
2 whole eggs
2 egg yolks
2 1/2 cups oil (I used all olive oil, but you can combine it with other oils for a milder taste)

Combine the lemon juice, salt, tamari, garlic, eggs and egg yolks in a blender and blend well at high speed.

Turn the blender speed down to medium. Gradually drizzle in the oil in a thin stream. Keep the blender running at medium until all the oil has been absorbed. The mixture should be thick. Turn the blender off because overbeating will cause the mayonnaise to thin out again.

Refrigerate until ready to use, or use right away. Refrigerated aioli will be a bit thicker than freshly made. Store leftovers in the refrigerator...I like to store in glass because the garlic really is strong.

Serve as a dipping sauce with a plate full of steamed veggies like green beans, potatoes, broccoli, cauliflower, mushrooms, carrot sticks, zucchini, etc. Include some good bread for mopping up the sauce. Nice additions include hard boiled egg halves or quarters, fresh tomatoes, cooked fish, chicken, pork or beef, the latter three cut into bite sized pieces.


Saturday, March 12, 2016

The Orange Cake with Almonds First Version


At my nephew's birthday last month in LA, our talented and beautiful and smart hostess served a cake for dessert that was so wonderful I immediately asked for the recipe. Turns out it was a recipe from Molly's blog Orangette, and she calls it a Marmalade Cake. I thought that it would use marmalade, that wonderful tart jam made with citrus fruit. Instead she makes a fresh citrus paste with a boiled and cooled lemon and orange, ground up in a food processor.

Today I tried making the cake and followed it almost to the letter, with only two changes (which is unusual for me...I often change half a dozen things). I used Trader Joe's almond meal instead of toasting and grinding my own almonds. The only other difference was that I folded in the flour mixture at the very end.


It made a delicious, moist cake with an interesting texture that combined a bit of chew from the almond meal and a wonderful, moist quality from the fruit.  The only part that I didn't really enjoy was the bitterness from the citrus pith. I think that next time I may cut back significantly on that part of the fruit, while still keeping the peel and the orange pulp. I plan on making this cake for Sweetie's birthday bash as a vegan version, which is easy because the only thing needing replacement is the egg and I have vegan egg replacer which will work fine. When I do, I'll post it so that you can see what difference, if any, the eggs make.


In the meantime, if you have a lemon and an orange, some almonds, some olive oil, some eggs, and the usual cake staples of flour, sugar, salt and baking powder, you can make this delicious cake for yourself. Just click on the link above to go to Molly's blog (Marmalade Cake) for the recipe. I'll bet you end up bookmarking it. It's that good.

Saturday, May 30, 2015

Fruit Tart Season Is Here


I'm not a huge fan of summer, but one of the things that warmer weather brings are tarts with all sorts of fruit toppings. 


It's been more than a week since I made one that had fresh apricots and cherries on top, but the memory of how delicious it was lingers. The crust uses olive oil and it was nicely crisp and flavorful. The fruit was wonderful and both had softened to tenderness. The topping was too sweet, so next time I"ll reduce the sugar quite a bit. I may lose a bit of the sugary crust that makes a nice textural contrast to the soft fruit, but the fruit flavors will shine more without the extra sugar making them taste more like candy than fruit.

We are just starting to get ripe ollaliberries  down by the road, so I think the next time will be apricots and ollaliberries, with maybe some strawberries thrown in. It won't be too long before we have plums and other stone fruit that would be wonderful with this tart. The recipe was one I found online at Food52 via Facebook. The recipe is by Amanda Hesser and I think the topping (as a concept) is brilliant.


Peach (or Apricot-Cherry) Tart
from Food52 blog, Amanda Hesser

Makes one 11-inch tart; serves 8
·         1 1/2 cups plus 2 tablespoons all-purpose flour
·         3/4 teaspoon kosher salt
·         3/4 cup plus 1 teaspoon sugar (or less)
·         1/4 cup vegetable or canola oil (I used Meyer lemon olive oil instead)
·         1/4 cup mild olive oil
·         2 tablespoons whole milk
·         1/2 teaspoon almond extract
·         2 tablespoons cold, unsalted butter
·         3 to 5 small ripe peaches, pitted and thickly sliced (about 1/2-inch wide) (I used apricots and cherries)

1.      Heat the oven to 425 degrees. In a mixing bowl, stir together 1 1/2 cups flour, 1/2 teaspoon salt and 1 teaspoon sugar. Stirring enables the salt and sugar to sift the flour, so you don’t need to sift it in advance. In a small bowl, whisk together the oils, milk and almond extract. Pour this mixture into the flour mixture and mix gently with a fork, just enough to dampen; do not over work it. Then, transfer the dough to an 11-inch tart pan (you can use a smaller one if needed), and use your hands to pat out the dough so it covers the bottom of the pan, pushing it up the sides to meet the edge. This will work if you pat firmly and confidently, but not if you curl your fingertips into the dough. It should be about 1/ 8-inch thick all around; trim and discard excess dough.
2.      In a bowl, combine 3/4 cup sugar (I would only use 1/2 cup and if the fruit is very sweet, 1/3 cup), 2 tablespoons flour, 1/4 teaspoon salt and the butter. (If your peaches are especially juicy, add 1 tablespoon additional flour.) Using your fingers, pinch the butter into the dry ingredients until crumbly, with a mixture of fine granules and tiny pebbles.

3.      Starting on the outside, arrange the peaches overlapping in a concentric circle over the pastry; fill in the center in whatever pattern makes sense. The peaches should fit snugly. Sprinkle the pebbly butter mixture over top (it will seem like a lot). Bake for 35 to 45 minutes, until shiny, thick bubbles begin enveloping the fruit and the crust is slightly brown. Cool on a rack. Serve warm or room temperature, preferably with generous dollops of whipped cream.

Friday, March 06, 2015

Italian With A Touch of Lemon


I've made focaccia bread before and shared it with you, too. I love that it is the kind of bread that is easy, delicious, and can be made ahead. This time I kept the beloved Italian features of olive oil and Parmesan cheese, but instead of herbs or grapes or other adornments, I celebrated citrus season with fresh Meyer lemon zest on top.

Because I needed to keep this bread for a number of days before I would be serving it, I froze it and then defrosted the loaf in the microwave on low power, then heated it at 225 degrees F. right before serving.  It makes a deeply flavored, moist bread and doesn't need any additional oil or butter. The recipe actually makes two loaves, so you can keep one in your freezer for when you need a bit of Italian delight.

Fast Focaccia with Lemon Zest

1 (1/4 ounce) packet active dry yeast
1 teaspoon sugar
1 1/2 cups warm water (105-115 degrees)
2 3/4 cups bread flour
1 teaspoon salt
2 tablespoons olive oil
Toppings: olive oil, zest of 1-2 Meyer (or other) lemons, colored part only; Parmesan cheese, grated; sea salt (optional)

Directions:
Mix the yeast, sugar and water in a small bowl. Let proof for 10 minutes (until bubbles begin to form).

In large bowl, stir together flour and salt.

Add the yeast mix and olive oil to the dry ingredients and combine.

When dough has pulled together, turn out onto lightly floured surface and knead until smooth and elastic. Gather into a ball. With hands coated with olive oil, oil the surface of the dough ball. Turn the bowl over the dough ball. Let dough rise in a warm place for 25 minutes.

Preheat oven to 425 degrees. Put 2 tablespoons olive oil into bottom of 9 or 10 inch diameter cake pan. Swirl to coat bottom and sides with the oil. Repeat with another 2 tablespoons olive oil in another pan.

Punch dough down. Divide dough in half.  Place one piece of dough in each in oiled cake pan. Spread dough toward sides with your fingers, pushing fingers down into dough to create dimples or pockets.
Drizzle top of each pan with 1 tablespoons olive oil, then sprinkle with lemon zest and some Parmesan cheese or sea salt, if desired.


Bake for 13-15 minutes until golden brown.

Monday, September 22, 2014

Smashed!


A few nights ago I wanted a tasty side dish for some grilled pork chops. Fortunately I had small red potatoes in the pantry and it was cool enough to fire up the oven to a nice high temperature. Smashed potatoes with nice crispy brown bits on the edges and bottom were the hit of the evening.

These are easy to make and just a bit different from French fries. For one thing they aren't fried, although a generous hand with the olive oil makes 'em extra delicious. For another thing, you can jazz them up with herbs and/or spices, or keep them simple with salt and/or pepper.

Since the potatoes I used were small - about golf ball sized - I boiled them in unsalted water until tender, then cut them in half. If you have to use larger sized potatoes, you might want to cut them into chunks before boiling them. They will cook faster that way. You can make this using small Yukon gold or similar waxy potatoes, too.

The halved potatoes were put on a baking sheet that I had lined with heavy foil and then glazed with olive oil. I've done this recipe using a silicon baking mat to line the pan, but the clean up was really messy. With the foil all of the excess oil gets tossed along with the foil after you serve up the smashed potatoes, which is much easier.


Once the potatoes are on the foil, spread them out. You want about two inches between potatoes. Then use a potato masher or strong metal spatula (pancake turner) to smash the potatoes. You want to partially flatten them, but not smash them into tiny chunks. Take a look at the photo to get an idea of how much to bear down.

At this point you can do as I did and just sprinkle on salt and pepper, and/or you can sprinkle on chopped fresh herb or dried herbs or spices like cumin, paprika or cayenne pepper. I used some dried rosemary. Then drizzle with some more olive oil. Be generous if you want crispy results. You can use flavored oil, too, like garlic olive oil or truffled olive oil if you are feeling decadent.


Place the smashed and seasoned and drizzled pan(s) of potatoes into a preheated 500 degree F oven. Bake for 6 minutes, then check them to see if they are done enough for you. Some folks like the skin to still be a little soft and lightly golden, but others, like Sweetie, like a lot of crispy skin and for it to be nice and brown. If it's not done enough, bake for another minute or two and check again. Keep doing that until done to perfection!

I found that about 5 of the smashed half potatoes was a nice portion, but hearty appetites will require more. These are so good that you may want to start with a minimum of 6 small potatoes and go from there.

I usually start these about a half hour before we eat. That gives you enough time to boil and halve the potatoes, preheat the oven, arrange and smash and season the spuds, and then time to cook them to the best crispy, crunchy, delectable potatoes you can imagine.

Friday, September 06, 2013

Tomato Love Summer Soup


Given my absurdly successful experiences with starting tomato plants from seed, I am never able to complain of too many tomatoes, but, wow!, there are a lot of them coming ripe at once.

With three pounds of blanched and peeled tomatoes on hand, a take on the classic gazpacho cold tomato soup was easy to accomplish. I still had another two pounds for making pasta sauce, and that's not even counting the endless cherry tomatoes.

This is a refreshing soup with a little crunch. If you prefer really smooth, just keep the blender running longer. If you make a lot of this, you can keep it in a pitcher in the fridge and just pour out some when you need a quick, cool hit of yummy tomato bliss. The addition of red pepper, classic cucumber, and tangy celery gives it a more complex flavor, as does the onion and garlic. Since I'm not a big fan of raw onion or garlic, I sautéed and cooled mine before I adding them to the soup (absolutely not classic!), but you can go with uncooked if you prefer...and it will be faster.


Almost Classic Gazpacho
Serves 4-6

1/2 yellow or white onion, chopped
2-3 cloves garlic, sliced
1 tablespoon olive oil (if cooking the onion and garlic)
3 pounds fresh tomatoes, peeled
1 cup diced cucumber, peeled if skin is thick
1 cup diced celery
1/2 cup diced red pepper
1/4 cup red wine vinegar
1/4 cup olive oil
salt and pepper to taste

Sauté onion and garlic in olive oil, if cooking, until onion is translucent and garlic light brown. Set aside to cool. If not cooking onion and garlic mix them and set aside.


In a blender, combine cooked or uncooked onion mixture, tomatoes, cucumber, celery, red pepper, red wine vinegar and olive oil. Pulse until mixture is of the desired consistency. I like mine a bit chunky, but it can be smooth. If necessary, process in one or two batches. Taste and add salt and pepper to taste.

Turn into a non-reactive bowl or pitcher and chill thoroughly, at least one hour.

To serve, put portions in either glasses or bowls. If desired, garnish with red pepper and/or cucumber cut into a fine dice. Crisp croutons are also a nice garnish. Serve at once while fully chilled.

Thursday, July 25, 2013

Cherry Tomato Is One Of Five Ingredients


Some days it is so wonderful to have something easy to serve for dinner. After a good portion of a day spent installing flashing and siding, Sweetie and I were certainly hungry, but not full of energy. As the sun set behind the trees


it was time to create a fast feast. I started with tomatoes, already picked. So far the only tomatoes I've gotten from the many I planted are the cherry type. The most numerous are orange, a few are red, and a few are yellow.


 I based this recipe on one in the latest Bon Appetit magazine (August 2013) because I had the tomatoes and olive oil and sea salt and last time I was at the appropriate store, I had made sure to purchase the burrata and fresh basil once I saw the recipe, knowing that I would make it pretty soon.

This is one of those recipes that you won't make often if you value your health since the cheese is very rich, but it is the perfect indulgence when the tomatoes finally ripen. It also goes together fast and is impressive, so keep it in mind for your next dinner party or on a day when the kids have worn you out. You can use mozzarella di bufala (made with buffalo milk I think) instead of the burrata...Bon Appetit did. You can also add a few chunks of seedless watermelon for some crunch and another flavor and have six ingredients. Don't be tempted to use dried basil...fresh basil, fresh tomatoes, good quality olive oil and sea salt, plus a lovely, rich, runny cheese are important components.

It looks pretty, too. Since we eat with our eyes first, that counts!


Five Ingredient Cherry Tomato Salad

1 ball of mozzarella di bufala or burrata
1 pint cherry tomatoes, sliced in half
about 2 tablespoons fresh basil, in chiffonade or chopped
2-3 tablespoons best quality olive oil
a sprinkle of sea salt to taste

Shred or spread the cheese on a serving plate. Top with the tomatoes, basil, olive oil and salt. Let sit 10 minutes so the flavors can mingle. Serve. It's that easy!
Serves 4 - 6.

Friday, June 21, 2013

Veggie Skewers and Pluot Appetizers


This has been a great week for the farm box. There were ears of fresh, sweet, juicy white corn. There were multicolored Gypsy pepper, sort of like bell peppers, but with a thinner wall. There were amazing ripe apricots and pluots, plus two kinds of squash, fingerling sweet potatoes...I know...who knew sweet potatoes could be tiny and super sweet, plus a lovely honeydew melon, and Nantes carrots. Probably the perfect farm box for late spring...and very inspiring, too.


We used the Gypsy peppers and the squash for veggie skewers to go with the yummy Persian flatbread that I made as part of the Bread Baking Babes challenge for June. I used some Meyer lemons that a friend had just given me in the dressing for the veggies and it added just the right bright note. Sweetie cooked them on the grill just long enough to char them here and there, but not so much that they had a soggy texture (a problem sometimes with squash).


A few days later I sliced that same flatbread very thin, brushed each slice on both sides with olive oil, and Sweetie grilled them so that they crisped up. I used them as the base for an unusual appetizer inspired by something similar I had at the Camilla Tea Room in Benicia. Fresh, ripe, juicy pluots ( a cross between an apricot and a plum, but you could use plums instead) are cut into a small dice and doused with balsamic vinegar. I added a touch of cardamom as a counterpoint to the sweetness. Once the mixture marinates for at least 1/2 an hour you spoon some onto the toasts. Chopped, toasted walnuts are sprinkled on, lending a toasty crunch. Blue cheese bits are crumbled on as a nice contrasting zing to the pluots. It has it all...crunchy, sweet, sour, salty, toasty, nutty and zingy from the cheese. Quite a mouthful of delight.


Who knows what recipes the next farm box will inspire. The recipes below are written so that you can size them for the number of people you are serving. Have fun and, if at all possible, use fresh, local produce.


Pluot or Plum Bruchetta

Very thin slices of flatbread or focaccia (about 3 per person)
olive oil
1 pluot or small plum per person
2 teaspoons balsamic vinegar per pluot or plum
dash of cardamom per pluot or plum
1 teaspoon chopped toasted walnuts per pluot or plum
about 1 tablespoon blue cheese crumbles per pluot or plum

Brush the thin slices of bread with the olive oil on both sides. Grill or toast each slice until toasted and crispy. Let cool.

Finely dice the pluot(s) or plum(s). Place in a non-reactive dish and add the balsamic vinegar and the cardamom. Stir to combine. Let sit for at least 1/2 hour or up to 4 hours.

When ready to serve the bruchetta, place a slice on work surface. Spoon on the plums with a slotted spoon, leaving some space on the bread slice for the walnuts and cheese. Sprinkle with the walnuts, then the cheese.

 Serve at once. There will be about three slices per person.

Veggie Skewers

wooden skewers - two per person
veggies cut into chunks...I used zucchini squash, pattypan squash and Gypsy peppers, but you could also use fresh corn on the cob, cut into chunks, cherry tomatoes, or any other veggie that will thread onto a skewer.
Marinade for two people:
Juice of 1 lemon
3 tablespoons olive oil
salt and pepper to taste

Soak wooden skewers in water for at least 1/2 hour.

While skewers are soaking, mix together the marinade in a non-reactive bowl and add the veggie chunks. Stir to coat the veggies. Let veggies marinate, stirring occasionally, until you are ready to grill them.

Thread the veggies on skewers, leaving room at the bottom (for holding) and top (so veggies won't fall off the top). Brush with the marinade and grill on one side until charred. Turn to other side, brush with marinade, and cook until desired doneness.

Serve at once.

Saturday, January 26, 2013

Three Kinds of Bread


For the third time in as many years I gathered a few weeks ago with women friends and baked bread. The friends gathered around the table have shifted slightly each time, but there has been a core group.

At first there was a fair amount of trepidation. That 'fear of yeast' is not uncommon. The first year we used a stand mixer since I thought that would help - just let the machine do all that kneading! Not as successful as I had hoped, so last year we went with breads created using thawed frozen bread dough. That worked for getting past the fear and some lovely breads were made after, all on their own.

This year I decided that we should get our hands covered with dough as we made focaccia. In case you haven't guessed, I'm teaching during these sessions. Seemed to me that we were ready to start from scratch and really get the feel of silky, supple kneaded dough. It worked! Everyone created great focaccia (in teams) and I think they all feel confident now to make it on their own.

The other two breads which I demonstrated were Aunt May's Irish Soda Bread (no yeast) and the shaping technique for the Pesto Rose that the Bread Baking Babes made in October. We did a cinnamon and sugar version of it, too. Next time? Already have requests for Sticky Buns and scones. Just wish I could do a Bread Baking Day like this with the Bread Baking Babes one day. I'll post Aunt May's Irish Soda Bread another day with more how-to photos.

I'm sending this over to Susan at Wild Yeast for her fabulous Yeastspotting weekly event. Stop by there as often as you can for yeast bread inspiration!

Your Guide to Making FocacciaIn general: Start with ingredients at room temperature. Gather together the items (including pans) needed for the recipe to make sure you have them, and enough of them. This is called mis en place, or gathering in place. Read the recipe all the way through at least once before starting. Feel free to contact me if you find yourself stuck at any point when you make this yourself. Sometimes it takes a few trials to feel comfortable with the process.

Focaccia:
Ever since ancient times women have mixed flour, yeast and water together to make bread, working and kneading the dough with their hands until it becomes smooth and supple. This bread is a good one because it only has to rise a little and it has the lovely fragrance and taste of olive oil and salt. I like to add fresh rosemary, too. We are going to do a rapid rise version, but if you have lots of time, you can use less yeast and let it rise a few times before baking. For even more flavor, you can put the dough in the fridge overnight and then let it rise a few times.


Fast Focaccia

1 (1/4 ounce) packet active dry yeast
1 teaspoon sugar
1 1/2 cups warm water (105-115 degrees)
2 3/4 cups bread flour
1 teaspoon salt
2 tablespoons olive oil

Toppings: olive oil, fresh rosemary, minced; Parmesan cheese, grated; sea salt, olives

Directions:

1. Mix the yeast, sugar & water in a small bowl. Let proof for 10 minutes (bubbles begin to form)

2. In large bowl, stir together flour and salt. Make a well in the center for the yeast mix and oil.


3. Add the yeast mix and olive oil to the dry ingredients and combine. Dough will be shaggy.


4. When dough has pulled together, turn out onto lightly floured surface and knead until smooth and elastic, 5 - 10 minutes.


5. Gather into a ball. With hands coated with olive oil, oil the surface of the dough ball. Turn the bowl over the dough ball. Let dough rise in a warm place for 25 minutes.


6. Preheat oven to 425 degrees. Put 2 tablespoons olive oil into bottom of 9 or 10 inch diameter cake pan. Swirl to coat bottom and sides with the oil. Repeat with another 2 tablespoons olive oil in another pan.


7. Punch risen dough down.


8. Divide dough in half. Place one piece of dough in each in oiled cake pan. Spread dough toward sides with your fingers, pushing fingers down into dough to create dimples or pockets.


9. Drizzle top of each pan with 1 tablespoons olive oil, then sprinkle with fresh rosemary and some Parmesan cheese or sea salt, if desired. Cover and let rise 15 minutes. Uncover.

10. Bake for 13-15 minutes until golden brown. Turn out of pan and turn right side up.