Showing posts with label lemon. Show all posts

Thursday, February 22, 2024

Lemon-Lime Tart for Sweetie


 Valentine's Day is always a bit of a challenge, coming as it does the day after my birthday. This year Sweetie requested a pie or tart for Valentine's Day and I had already decided to make the Queen Mother Cake for my birthday.

I bought a bag of good-sized limes, thinking that I would make a lime tart, but then we received a gift of a bag of beautiful lemons from a neighbor, so I decided to go for a lemon-lime tart for Valentine's Day.


My favorite lemon tart filling is Dorie Greenspan's, so I began with that recipe and added lime zest and juice to the lemon zest and juice, with a decoration, after the tart was finished, of strands of zest from both fruits. The tart case is fairly simple and comes out cookie-like so that the filling doesn't make it too gooey after a day. We had the last slice, shared, two days after I filled the tart shell and the base was still crisp.

As it turned out, we had the Queen Mother cake on Valentine's Day, right after Sweetie's fire board meeting. Then we had the Lemon-Lime Tart the next day and were able to share it with our daughter and her fiancé'. I was worth the wait and well worth your time to make. It would be perfect for St. Patrick's Day, which is coming up soon. It would also be delightful for Easter...or anytime, really.


The Most Extraordinary French Lemon - Lime Cream Tart 

Based on a recipe by Dorie Greenspan in Baking, From My Home To Yours

1 cup sugar
Grated zest of 2 lemons
Grated zest of 2 limes, (or 3 if smaller limes)
4 large eggs at room temperature

3/4 cup fresh lemon juice mixed with lime juice (from 3-4 large lemons or up to 6 smaller ones, plus2-4 limes)
2 sticks plus 5 tablespoons (10 1/2 ounces) unsalted butter, cut into tablespoon-sized pieces, at room temperature 
1 9-inch tart shell made with Sweet Tart Dough (recipe follows), fully baked and cooled

Have an instant-read thermometer, a strainer (if straining out the zest), and a blender (first choice) or food processor at hand.

Directions:
Bring a few inches of water to simmer in a saucepan or the bottom of a double boiler.

Put the sugar and zest in a large heatproof bowl that can be set over the pan of simmering water, or in the top pan of a double boiler. Off the heat, rub the sugar and zest together between your fingers until the sugar is moist, grainy and very aromatic. Whisk in the eggs, followed by the lemon-lime juice.

Set the bowl over the pan, or set the top into the bottom of the double boiler, and start stirring with the whisk as soon as the mixture feels tepid to the touch. Cook the lemon cream until it reaches 180 degrees F. As you whisk and you must whisk constantly to keep the eggs from scrambling, you'll see that the cream will start out light and foamy, then the bubbles will get bigger, and then as it gets closer to 180 degrees F, it will start to thicken and the whisk will leave tracks, which means that the cream is almost ready. Don't stop whisking! Continue to check the temperature. It might take a while. so be patient. Usually it's done in about 10 minutes.

As soon as the cream reaches 180 degrees F, remove from the heat and, if removing the zest, strain it into the container of the blender (or food processor); discard the zest. (If not removing the zest, just scrape the cream right into the blender or food processor). Let the cream stand, stirring occasionally, until it cools to 140 degrees F, about 10 minutes.

Turn the blender to high (or turn on the food processor) and, with the machine going, add the butter, about 5 pieces at a time. Scrape down the sided as needed as you incorporate the butter. Once all the butter is in, keep blending/processing for another 3 minutes.

Pour the cream into a container (I used a large Pyrex bowl), press a piece of plastic wrap against the surface to create an airtight seal and refrigerate at least 4 hours or overnight.

When you are ready to assemble the tart, just whisk the cream to loosen it and spoon it into the tart shell. I like to swirl the top with the back of a spoon. If desired, decorate the top with strands of lemon and lime zest for additional lemons and limes. Serve the tart, or refrigerate until needed.

Note: The filling will keep in the fridge for 4 days, or tightly sealed, in the freezer for up to 2 months. Thaw it overnight in the refrigerator and whisk before putting into the tart shell.

Sweet Tart Dough
From Dorie Greenspan

1 1/2 cups all-purpose flour
1/2 cup confectioners' sugar
1/4 teaspoon salt
1 stick plus 1 tablespoon (9 tablespoons) very cold (Frozen) unsalted butter, cut into small pieces
1 large egg yolk

Put the flour, confectioners' sugar and salt into a food processor and pulse a couple of times to combine. Scatter the pieces of butter over the dry ingredients and pulse until the butter is coarsely cut in- there will be some tiny pieces and some the size of peas.

Stir the yolk to break it up, then add it a little at a time, pulsing afer each addition. When the egg is in, process in long pulses - about 10 seconds each - until the dough forms clumps and curds. Turn the dough out onto a work surface and, knead lightly just to incorporate any dry ingredients that might have escaped mixing. In all of this, don't overwork the dough.

Butter a 9-inch tart pan with a removable bottom. Press clumps of the dough evenly over the bottom and up the sides of the pan, using all but one little piece (about a teaspoon worth), which you should save in the fridge wrapped in plastic wrap to patch any cracks after the crust is baked. Freeze the crust for at least 30 minutes, preferably longer, before baking.

Center a rack in the oven and preheat to 375 degrees F.

Butter the shiny side of a piece of aluminum foil and fit the foil, buttered side down, tightly against the crust. Put the tart pan on a baking sheet and bake the crust for 25 minutes. Carefully remove the foil. If the crust ahs puffed, press it down gently with the back of a spoon. Patch the cruse if necessary, then bake for another 8 minutes or so, until it is firm and golden brown. Keep an eye on it the last few minutes and pull it out if it gets darker than golden. Transfer the pan to a cooling rack and cool to room temperature before filling. 


Wednesday, April 13, 2022

Asparagus Time


Not sure if it's true where you live, but here asparagus are in season. The spears coming into the markets are just the right size...not too thin and not to fat, with nice tight buds and beautiful green color.

One of my favorite ways to enjoy asparagus is to just steam them and eat them plain, but occasionally I like to do a fancier rendition. This pasta and asparagus dish is my go-to for those times. The only down side is I use three pots before I'm finished, but the final dish is so good, with tender pasta, garlic infused bite sized pieces of asparagus, and a delicious cheese sauce with the added zing of lemon zest. A large portion would make a fine vegetarian (or vegan the way I do it) meal by itself, or you can pair it with simple grilled fish or chicken as we did. Sweetie makes the best grilled salmon and steelhead.

You start by putting some water on to boil. Then you prepare the asparagus by snapping the ends off , then cutting them into bite sized pieces. They go into a small pot with minced garlic and some olive oil and then cook over low heat which allows the asparagus to become infused with the garlic while still retaining firmness and their green color. Don't forget to stir them occasionally so that all the pieces become soaked in the garlic oil.

While the asparagus are stewing you add  pasta to the boiling water. The pasta cooks while the veg and garlic do their magic. (If you use fresh pasta, you'll need to do this when the asparagus are almost finished cooking and after you've made the cheese sauce so that the pasta doesn't overcook. The asparagus take about 15 minutes.)

The cheese sauce is made in the third pot, using ricotta cheese, hot pasta water, salt, pepper, a dash of nutmeg, and the zest of one lemon. Over low heat the water is stirred into the cheese to make a creamy sauce. With most ricotta it will still be a little bit grainy, but that's fine. If you are going for vegetarian, you can add a few tablespoons of grated Parmesan, too. For my vegan version I skipped the parmesan and used an almond milk based 'ricotta'. My favorite brand is Kite Hill.

Now you have all of the parts. Once the asparagus are tender and the pasta is al dente tender, you drain the pasta, immediately mix it with the cheese sauce, and plate the sauced pasta, then top it with the garlicy asparagus pieces. For those using Parmesan, you can sprinkle another tablespoon of parmesan on top and serve it up!


Pasta with Ricotta  and Asparagus


a variation of a recipe in the Mediterranean Diet Cookbook
serves 4 - 6

3/4 lb tender young asparagus ( or 1/2 lb asparagus and 1/4 lb broccoli crown)
2 cloves garlic, finely chopped
3 tablespoons olive oil
2 tablespoons fresh mint, minced - optional
1 lb pasta of your choice - I used fusilli  (For vegan version use pasta made without animal products)
6 quarts water
1/2 lb fresh creamy ricotta (For a vegan version, I used Kite Hill almond milk ricotta)
salt and freshly ground black pepper, to taste 
dash nutmeg
zest of 1 lemon
1/2 cup freshly grated Parmesan cheese (Omit for vegan version)


Bring a large pot of water to a rolling boil and add 2 teaspoons salt.

Trim tough ends off asparagus after rinsing them. Cut tender parts into 2-inch lengths. Cut broccoli crown into small florets, if using.

In a sauté pan, over low heat and covered, gently stew the garlic, asparagus (and broccoli) in the oil until the vegetables are tender but not brown, about 15 minutes, stirring occasionally. Stir in mint if using. Set aside.

Meanwhile, cook pasta in boiling water until tender. While pasta cooks, extract 1/2 - 3/4 cup of the cooking liquid and mix it in a small saucepan with the ricotta. Set saucepan over low heat and gently cream the ricotta and cooking water. When the ricotta is warm, taste and add salt and pepper to taste. Add the nutmeg, lemon zest, and 1 tablespoon of the Parmesan cheese, if using, and stir to combine.

Drain the cooked pasta and combine immediately with the cheese sauce, tossing to mix well. Arrange over a warm platter and pour asparagus mixture over the top, being sure to scrape all of the cooked garlic onto the pasta and veggies. Sprinkle with the rest of the grated cheese (optional) and serve at once.

Thursday, November 11, 2021

Raspberry Bread Pudding

When the days grow shorter and the evenings dark sooner, comfort food calls my name more often. The last few days the call was for some reason for bread pudding. I like mine served both warm and cold, so I made enough so that Sweetie and I could enjoy it warm one evening and then again another day served cold. The star of the pudding was the fresh, zesty raspberries. They were a great counterpoint to the mild and milky flavors from the bread, milk, eggs and almond extract. Some lemon zest added another layer of flavor. It's a great way to use up stale bread, too.

My usual way to make bread pudding is with raisins and lemon zest and some vanilla as the flavorings, but I have made it with other enhancements and I've made it savory, too. It really is a versatile treat. You can bake it in a wide casserole, for more crispy pieces, or in a narrow dish for more soft custardy bites.

This is an easy dish to make and truly worth the minimal time. The recipe is over 50 years old and given by a friend, then updated with the raspberries and switching to almond extract. It might not look like much, but everyone loves this pudding.


Bread Pudding with Raspberries      

A variation on a recipe from 1971, from a Fredricksburg, Maryland friend, Gale 


5 cups dry bread cubes            1/4 teaspoon salt           
3 cups milk, scalded                 1 teaspoon almond extract            
1 tablespoon butter                  1 1/2 cups fresh raspberries                  
4 slightly beaten eggs              1/4 cup golden raisins             
3/4 cup sugar                         
½ teaspoon lemon zest                                 
                       
1) Preheat oven to 350 degrees.

2) Melt the butter in the milk. Add a little of the milk to the beaten eggs, then add eggs to rest of milk. Stir in the sugar, lemon zest, salt, and almond extract.

3) Put the bread cubes in a large bowl. Pour the egg/milk mixture over, stir gently, and let sit 15 minutes.

4) Butter a large baking pan. A deep one will give a softer center, a shallower one will give more crispy crust. Gently stir raspberries and raisins into bread mixture and pour into baking pan.

5) Bake in a pan of hot water until firm, about 1 hour. Serve warm.

Monday, January 04, 2021

A Muffin To Welcome 2021


Happy New Year! 

I try to bake with seasonal foods, I really do. But sometimes there will be an item at the market that just calls out to me. That happened when I passed the produce section of Whole Foods on my way to get some non-dairy ricotta filled tortellini (they are the only local store that carries this item as far as I know). The fresh raspberries were so beautiful and red and juicy looking that I couldn't resist.

To make up for failing to use seasonal, I did use lots of Meyer lemon zest and juice, along with the raspberries and  non-dairy ricotta cheese (Kite Hill makes a delicious ricotta), to make these light and bright muffins. You can, of course, use regular lemons and regular ricotta cheese. That dollop of sweet lemony creaminess hidden toward the bottom is such a joy to discover as you eat the muffin! The fragrance is amazing, too. The raspberries are a bright color note and provide natural sweetness, too. By putting them into the top batter, it helps them not sink to the bottom. Try them yourself and see if you don't agree that straying from seasonal now and then is delicious.


Raspberry and Meyer Lemon Muffins
Makes 12

2 cups all-purpose flour
1 teaspoon baking powder
1 teaspoon baking soda
1/2 teaspoon salt
1/4 cup granulated sugar
finely grated zest of one Meyer lemon (or regular lemon if Meyer unavailable), divided

2 eggs, beaten 
1/4 cup unsalted butter or margarine, melted and cooled
juice of 1 Meyer lemon, seeds removed
1 cup soy creamer or whole milk or buttermilk

1/4 cup ricotta cheese
1 teaspoon milk or soy creamer
2 teaspoons powdered sugar

1 heaping cup fresh raspberries, washed and drained
about 1 tablespoon clear sparkling or sanding sugar (optional)

Preheat the oven to 400 degrees F. Spray a 12 cup muffin pan with baking spray (I used a six pan oversized muffin pan). Set aside.

In a bowl, sift the dry ingredients together. Add half the lemon zest and stir to distribute.

In a second bowl, whisk together the egg, butter, lemon juice and milk or buttermilk.

Prepare the filling by stirring together the ricotta cheese, milk, powdered sugar and the remaining half the lemon zest in a small bowl until completely combined. Set aside.

Add the wet ingredient mixture all at once to the flour mixture and stir together with a fork, just until all the dry ingredients have been moistened. Don't overmix.

Scoop enough of the batter into the prepared muffin tins to cover the bottom. Dollop about a teaspoon of the ricotta mixture on top. Stir the raspberries gently into the remaining batter, then top the ricotta mixture in the pans with the berry-rich batter, distributing evenly. Sprinkle with sanding sugar, if desired, distributing evenly.

 Bake in preheated oven for 17 - 25 minutes until tops are golden brown and the center springs back when pressed down with a clean finger. Remove from the oven and cool on a rack 3-5 minutes, then removed carefully from the muffin tin and serve.


Wednesday, December 16, 2020

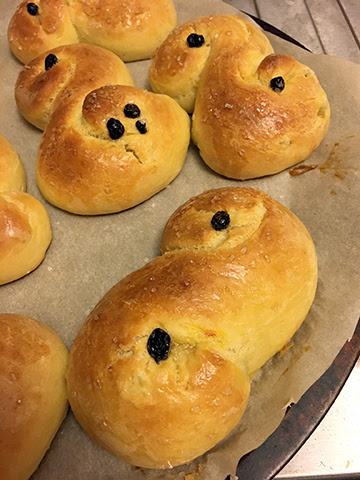
Bread Baking Babes Bake St. Lucia Cats or Luskatter


The description of a young girl with a wreath lit by candles perched on her head walking through her home serving coffee and saffron buns has often intrigued me. How does the family decide when the youngest is old enough to handle lit candles? Is the long white robe with red sash passed on to the next daughter when it's her turn or does she get a new one? Most of all I wondered how those buns would taste. Now I know! For December our Kitchen of the Month is Judy of Judy's Gross Eats and she has asked us to make Luskatter, those swirly saffron buns made for St. Lucia's Day, December 13th.

I used a recipe from The Festive Bread Book by Kathy Cutler as my starting point because the recipe made fewer buns, used saffron plus citron and lemon zest for flavor and fragrance, and because I've made recipes from that book before and they always work out. I did change things around a bit since I decided to use my stand mixer instead of kneading by hand, but the basic recipe proportions and amounts are the same and the ingredients are only changed if they are dairy.


These buns are really delicious in a subtle way. They don't have the nuts and mixed fruits, nor the icing that seasonal breads often have. The saffron gives a lovely golden color and flavor to the buns and citron and lemon have a nice citrus tang. Even the currants are subtle. They look like eyes but don't really add much in the way of flavor, even with the brandy that I soaked them in (which wasn't in the recipe). I do like the shape, where the ends are curled in the same direction, giving them an 'S' shape. The buns themselves are fairly tight crumbed and rich with egg and butter and milk. They are not very sweet, except for the sugar on top. I'll probably skip that if I make them again since I like the faint sweetness.


As usual, we are hoping that you would like to be a Bread Baking Buddy. To do so just bake the buns, take a photo and email Judy the details of your bake by Dec. 29th. She'll send you a Buddy Badge and include you in the round-up. Her email can be found on her blog.


Do visit the other Bread Baking Babes sites to see their Luskatters! We have some very creative bakers in our group, so it is sure to be interesting.

Wishing you, dear reader, a most happy holiday season, and a safe, healthy one, too. May 2021 be better for all of us!


St. Lucia's Cats

A variation of a recipe in A Festive Bread Book by Kathy Cutler
Makes 8 buns

 1 teaspoon active dry yeast
1/4 cup warm water (105-110 degrees F)
two pinches saffron
1/4 cup warm milk (105-110 degrees F) (I used soy creamer)
2 - 2 1/2 cups all-purpose flour
1/4 cup sugar
1/2 teaspoon salt
1 egg
2 tablespoons butter, softened (I used non-dairy margarine)
3 tablespoons chopped candied citron
1/2 tablespoon grated lemon zest (1 lemon usually)
2 teaspoons currants
brandy to cover

 Glaze: 1 egg beaten with 1 tablespoon water.

 DIRECTIONS: Dissolve yeast in warm water. Set aside for 5 minutes. Stir saffron into warm milk. Set aside.

 In a bowl combine the flour, sugar and salt. Whisk to combine.

 In a stand mixer bowl, place the saffron milk, egg and yeast mixture. Mix to combine. Add 1 cup of the flour mixture and mix to combine. Add the butter, a bit at a time, then mix to combine. Add the citron and lemon zest. Mix to combine.

 Switch to the dough hook and add the remaining flour mixture, 1/2 cup at a time until a soft dough forms. Knead with the machine or on a floured surface until smooth - about 10 minutes.

 Place dough in a greased bowl, turning to coat top. Cover with a clean shower cap or plastic wrap/cling film. Let rise in a warm place until double  - about 1 hour.

 Punch down dough. Divide into 8 equal pieces. Roll each into a snake about 8 or 9 -inches long, then curl the ends in the same direction, resulting in an S shape. Place on greased baking sheet. Cover with oiled plastic wrap/cling film. Let rise in a warm place until double - about 20 minutes. While that is happening, soak the currants in the brandy. Once rolls have doubles, place a currant in each curl. Brush with the glaze and sprinkle with sanding sugar, if desired.

 Bake in preheated 350 degree F oven for about 25 minutes, or until done. Cool on wire rack.


Monday, October 12, 2020

Pears and Gingerbread


On the face of it, pears and gingerbread is an odd combination. Pears are fresh, light, juicy with a distinctive taste, but a mild one. Gingerbread, on the other hand, is best when it's assertive, bold and full of strong ginger flavor. You would think that the gingerbread would overpower the pear.

But, in this recipe at least, it doesn't. The slices of pear are visually lovely, sitting pale and perfect on top of the dark gingerbread. They are a fine counterpoint and hold their own in the flavor department if the pears are ripe and juicy. I was lucky enough to be given some local pears a few weeks ago. I made the cake when they had ripened to perfection. The gingerbread has a lot of molasses and both fresh and ground ginger. I also goofed and left out the vegetable oil, but Sweetie and I agreed that it really didn't need the additional fat.


Although the recipe was for one cake baked in a large skillet, I made two small cakes in springform pans, plus a slightly larger cake in a 6-inch skillet. That way I was able to give the two small cakes to neighbors, including the neighbor who gave us the pears. A nice full circle! I'm going to give you the recipe for the single cake in the large skillet.

This is a really, really delicious cake, moist, strongly flavored with ginger and molasses and a hint of lemon. I served Sweetie his first piece when it was still warm. I added more pear slices to the plate and a scoop of vanilla soy ice cream. He was delighted!


Pear Gingerbread Cake for a 10.5-inch skillet
by Lodge (the cast iron people)

3 medium-sized firm, ripe pears, cored, peeled and sliced into eighths 
4 tablespoons butter
1/3 cup brown sugar
1/2 cup boiling water
1/2 cup molasses
1/3 cup vegetable oil (optional)
1 teaspoon grated fresh ginger (peel first)
1/2 teaspoon ground ginger
1 teaspoon lemon zest
1 1/2 cups all-purpose flour
1 teaspoon baking soda
1 teaspoon cinnamon
1/2 teaspoon ground loves
1/2 teaspoon salt

Preheat oven to 350 degrees F.

Melt butter in skillet on the stovetop over medium-low heat. When butter has fully melted, turn skillet to coat the sides up to the rim. Sprinkle brown sugar over the surface. Wait 3-4 minutes until sugar has partially melted, then stir with a silicon spatula to combine the butter and partially melted brown sugar. Spread evenly over the pan bottom. Arrange sliced pears on top of the butter/sugar mixture in a nice pattern. Set aside.

In a medium bowl, combine  boiling water and molasses, stirring until well blended. Add oil (if using), ginger, ground ginger, and lemon zest.

In a separate bowl, combing flour, baking soda, cinnamon, cloves and salt. Mix half the dry ingredients into the molasses mixture, then add the remaining dry ingredients and stir until completely combined.

Carefully pour or scoop the batter over the pears, being careful not to dislodge the pattern. If needed, use and offset spatula to smooth the batter over the fruit to the edges of the pan. Bake in preheated 350 degree F oven for 30 minutes, or until a tester in the middle of the cake comes out clean (test at 25 minutes).

Let the cake sit on a cooling rack for 5 minutes, then loosen the cake by running a knife around the edge of the skillet. Place a large plate or serving platter over the pan and, using potholders, carefully invert the skillet so that the cake falls onto the plate. Serve warm or at room temperature.


Wednesday, September 23, 2020

Garlic and Butter and Lemon and Shrimp


Shrimp Scampi is a dish I first had when I was just out of college. It used to be the kind of menu item that white tablecloth restaurants of the time almost always had on the menu. I really loved eating it but thought that it would be difficult to make well and then I moved and had little income, so shrimp, which tends to be expensive where I live, was not on my menu. Eventually I just forgot about it.

A few days ago I was in an Oliver's market in Santa Rosa. They are a local chain of markets with the best of Whole Foods but at a slightly lower price point and far less pretentious. At their meat and seafood counter I discovered that they had large shrimp that had been frozen in bags of about 1 pound. I bought one and for some reason the idea of shrimp scampi popped into my head. Still thinking that it was a difficult recipe, I looked it up on Google and found that it's actually easy. There is prep work that needs to be done before you start cooking the shrimp because it goes together very quickly (except for cooking the pasta), but the recipe itself is simple. As with any recipe that seems simple, using quality ingredients is crucial. I started with some very nice shrimp. When thawed they smelled of the sea (but not 'fishy')which is a good indicator that they were handled well before being frozen. I made sure I had good linguine, a juicy and firm lemon or two, some excellent dry white wine, good olive oil, fresh parsley and a good, firm head of garlic. The last ingredient wasn't butter, which is the best thing to use, but an excellent non-dairy butter that I usually use only as a finishing ingredient. Since this dish depends on good butter, I really needed all four tablespoons to be as close to the best butter that I could find. Having a dairy allergy is no fun sometimes.

So, timing is important for shrimp scampi. Get the water boiling for the pasta. Gather all the ingredient together and prep the shrimp (I had to peel and devein them but it was OK to leave the tail on), zest and juice the lemon, mince the garlic, mince the parsley.

First you heat up a mixture of that good butter and quality olive oil. Then you saute' the garlic in that combination of oils. Once the garlic has cooked a few minutes, you add the wine and a pinch of red pepper flakes and cook that for a few minutes, then you salt and pepper the shrimp and add them to the wine mixture, making sure they are in a single layer. After a couple of minutes, you flip them over to cook the other side. After another couple of minutes you add the lemon zest, lemon juice and parsley and stir it all together. By that time your pasta is cooked and you drain it, then add it to the shrimp mixture and toss it all with some tongs until all the pasta is coated with the butter/olive oil/garlic/ lemon/wine/parsley mixture. Quickly you put the pasta on a plate or in a shallow bowl, top with the shrimp and it's ready to serve! I think it's between 8 and 10 minutes start to finish. No wonder it used to be a popular restaurant item. Done in no time and you can charge a lot for it.

So did it live up to my memories? Yes! In fact it was better. I didn't overcook the pasta. Most restaurants in my youth did. Ditto the shrimp. I used more garlic and it was fresher. I think I should have added a touch more salt, but otherwise it was perfect and perfectly delicious. Sweetie loves shrimp and I suspect he would like me to make this every night for a week. Do try it yourself if you can get good shrimp. The recipe is a combination of about four I found online, plus the lemon zest I added on my own. Lemon zest always ups the lemon flavor, so why not?

Shrimp Scampi
Serves 2-4

1/2 lb. linguine
1 lb. large raw shrimp, rinsed, peeled and deveined (OK to leave the tail on)
4 tablespoons olive oil
4 tablespoons soft salted butter or non-dairy butter substitute
4 large cloves garlic, peeled and minced
1/4 cup dry white wine
pinch red pepper flakes
salt and pepper
juice and zest of 1 lemon
1/4 cup parsley, finely chopped

Have all the ingredient gathered and prepared. The cooking takes about 10 minutes, start to finish.

Bring a very large pot of water to a boil for the pasta. While it's coming to a boil, prepare the shrimp and the garlic, lemon and parsley. 

Once the water is boiling, add 1 teaspoon salt and the linguine and stir to separate the pasta. Leave uncovered and boil until al dente, about 8 - 10 minutes. Have a colander ready to drain the pasta.

Wait until the pasta water returns to a boil, then begin the shrimp part of the dish.

In a large skillet, melt the butter and oil together over medium-high heat. Add the garlic and saute' about 3 minutes, stirring a few times. Don't let garlic burn.

Add the white wine and the red pepper flakes. cook another two minutes, stirring often. 

Salt and pepper the shrimp to taste. Add the shrimp and make sure it is in one layer in the pan. After two minutes when the cooked side is pink insteado f gray, use tongs to turn each shrimp over. Cook on the second side for another two minutes, just until it is pink. Do not overcook the shrimp.

Add the lemon juice, lemon zest and the parsley. Stir to combine all the ingredients. Taste for salt and pepper and adjust seasonings if needed.

Drain the pasta (check first to make sure it is cooked al dente), then add it to the pan with the shrimp mixture. Use the tongs to gently turn the pasta over until all strands are coated with the garlic sauce.

Serve at once on large plates or in shallow bowls, placing the shrimp on top of the pasta. If desired, garnish with a drizzle of olive oil. Pass good bread to sop up the extra sauce.

Wednesday, February 27, 2019

Lemon Mushroom Caper Sauce


Still cooking a lot with lemons. Sometimes you need a nice sauce to boost the flavor of your entree, especially if you just picked up a rotisserie chicken on your way home. Make sure the chicken is hot, spoon some of this sauce over each portion and you will impress your family and friends. They'll never know that it's easy.

I posted this recipe soon after I started blogging, a good long time ago, and it's still a great sauce to put over chicken, fish, or just a plate of cauliflower rice. Do use a fresh lemon so that the zest has lots of lemon oil. I ran through the rain and grabbed one from my Meyer Lemon shrub, but one recently  purchased from the market or farmer's market - Eureka or Meyer are both great - is fine.

The key thing to remember is to add the liquid all at once, then stir vigorously until it thickens, which doesn't take long. You might think that this way there will be lots of lumps, but if you cook the flour mixture a minute and then stir, stir, stir once the liquid goes in, the flour will mix with the liquid and you'll get a great sauce. If you have more lemon zest than called for, just throw it in...just gets you a more lemony flavor which is delicious. You can skip the capers if you don't care for capers, but I think they add more zing. I used brown mushrooms because they have more flavor, but regular white mushrooms are fine. Fresh parsley is a very good idea.


Lemon Mushroom Caper Sauce
an Elle crafted recipe

2 tablespoon olive or grapeseed oil
1 cup prepared mushrooms (wiped clean, sliced)
1 clove minced garlic
2 tablespoons wheat flour or potato flour
1 cup chicken or vegetable broth
juice of one lemon (zest the lemon first)
Pepper to taste
zest of one lemon
1 tablespoon capers, drained
2 tablespoons chopped Italian parsley

In a medium saucepan heat the oil over medium-high heat. Add the prepared mushrooms, stir to coat with the oil, and saute' 5 minutes, stirring frequently. Add the garlic, stir, and saute' 1 minute, stirring frequently. Add the wheat flour or potato flour, stir to combine with mushrooms and garlic, and continue to cook for another minute, stirring frequently.

In a measuring cup mix together the broth and lemon juice. Add to the mushroom mixture all at once, stirring constantly, and continue to stir until mixture thickens. You can save about 2 tablespoons of the broth mixture and add some at the end to adjust the thickness to what you prefer. Add pepper to taste.

Add the lemon zest, capers, and Italian parsley. Stir to combine. Taste and add salt and/or pepper if needed. (I avoid adding salt and often by now you will see that it isn't needed, but now is the time to add it if you find you do need to.)

If holding the sauce while you cook what it will garnish, cover sauce with plastic wrap laid right on top of and touching the sauce. Cover the pot. Re-heat (removing the plastic wrap first), if needed, using low heat.

Makes enough to sauce 4 servings.

Thursday, February 21, 2019

Shadow Cake Baking


I've loved being a part of the Cake Slice Bakers for the last few years. We've baked from some great cookbooks and I could always find something to bake that was fairly easily convertible to dairy-free. Our latest cookbook, The European Cake Cookbook, is much more difficult because it uses quite a lot of whipping cream, cream cheese and mascarpone, none of which I've yet to find a good substitute for.

It isn't quite within the rules of the group, but hopefully within the spirit, for me to bake similar recipes and post them around the 20th on the month. For February there was a cake that looked pretty good, the Lemon Meringue Cake. Because I had to bake a birthday sheet cake ahead of time for my scholarship group (served on Feb. 20th), I did part of it, but baked it as a sheet cake and finished it with canned frosting instead of meringue. Meringue just wouldn't hold up for the two to three hours that the cake sat there waiting for its turn.

The cake was lovely and delicious and lemon curd is always delicious. This is the perfect time of year to make it, too. The recipe we were given is very close to the one I always use, but since I had already made lemon curd for my birthday and still had some, I used that.


Of interest, perhaps, is part of the decoration I did on the top. The writing of Happy Birthday AJ and the piping around the edges of the star was done with plain Royal Icing, but the fun, and new for me part, was that I wrote on a gold toned Wilton Sugar Sheet star shaped cutout and then removed the backing and put that on the cake. The moisture in the canned vanilla icing (could have done "Buttercream" like I did on my birthday cake, but ran out of time) held down the sugar sheet star and moistened it enough that when the cake was cut it cut easily and since it's edible I could serve bits and pieces of it with the center servings and it was fine. I recommend it - easy to use and you can cut any shape or even make ribbons or layered flowers, etc.

Didn't get good photos once the cake was cut because I was doing the cutting and got distracted.

Hope that is is OK for me to sort of do the recipes like this.


Each month The Cake Slice Bakers are offered a selection of cakes from the current book we are baking through. This year it is The European Cake Cookbook by Tatyana Nesteruk. We each choose one cake to bake, and then on the 20th - never before - we all post about our cake on our blogs. There are a few rules that we follow, but the most important ones are to have fun and enjoy baking & eating cakes!

Follow our FacebookInstagram, and Pinterest pages where you can find all of our cakes, as well as inspiration for many other cakes. You can visit our blog where the links are updated each month. If you are interested in joining The Cake Slice Bakers and baking along with us, please send an email to thecakeslicebakers at gmail dot com for more details. The Cake Slice Bakers also have a new Facebook group called The Cake Slice Bakers and Friends. This group is perfect for those who do not have a blog but want to join in the fun and bake through this book.

Saturday, January 19, 2019

Madeira Cake with the Cake Slice Bakers


It's a new month and a new year, so we are now baking from a new book, The European Cake Cookbook by Tatyana Nesteruk. If you can bake with butter and mascarpone cheese and cream cheese then you will be in heaven with this book. There are fairly simple cakes and cakes with nuts, cakes with fresh fruit, fancy cakes...you get the idea. Unfortunately I didn't have any idea that out of 65 recipes there are only 14 that I think I can bake...and some of those 14 use cream cheese which I might be able to find a very expensive non-dairy version of...so I am left feeling sad knowing that I might have a month when none of the choices (we have four a month) are ones I can bake. This is particularly humorous because I was one of the bakers who advocated for this book choice!


The good news is that this month there was one recipe that I could make and it is a delightful, delicious madeira cake with lemon. It is a bit of a drizzle cake, too, since the syrup used to cook the candied lemon slices or peel is also used to drizzle over the cake to give it extra moisture and flavor. The texture of this cake is very tender, delicate and moist with a very tight crumb, similar to a pound cake. The addition of lemon zest and lemon juice, plus the candied lemon ensures that there is a good, bright lemon flavor.


The recipe called for two eight-inch layers, the drizzle, a glaze, and the candied lemon slices. Since I knew that I wanted to give away most of the cake (Sweetie continues to lose weight and I'm still doing OK, too, although at a much slower pace), I decided to bake the batter in small Bundt pans. I still used the drizzle, just 1/3 the amount, and I candied some lemon peel using a method of removing the peels that I saw on a Great British Baking Show masterclass. The lemon peel went on the top of the cakes, using the moist glaze (also about 1/3 the amount in the recipe) to 'glue the pieces' to the cake.


This is sure to be a recipe I bake often, especially at this time of year when lemons are fresh and wonderful. Next time I'll try it with Meyer lemons since they are in season now. Do consider baking this yourself. It makes a great after dinner dessert or tea time treat. The first give-away has already happened since I gave one of the small cakes to a friend yesterday afternoon. She was delighted. You'll be delighted if you try this recipe yourself!


Each month The Cake Slice Bakers are offered a selection of cakes from the current book we are baking through.  This year it is The European Cake Cookbook by Tatyana Nesteruk.  We each choose one cake to bake, and then on the 20th - never before - we all post about our cake on our blogs. There are a few rules that we follow, but the most important ones are to have fun and enjoy baking & eating cakes!

Follow our FacebookInstagram, and Pinterest pages where you can find all of our cakes, as well as inspiration for many other cakes. You can also click on the thumbnail pictures below to take you to each of our cakes, or visit our blog where the links are updated each month. If you are interested in joining The Cake Slice Bakers and baking along with us, please send an email to thecakeslicebakers at gmail dot com for more details.

This month our choices included Bird's Milk Torte, Chocolate St. Honore' Cake, Madeira Cake and Torte Birne' Helene.


Madeira Cake
from The European Cake Cookbook

1 cup unsalted butter, softened (I used non-dairy margarine)
1 cup sugar
zest from 1 lemon
4 large eggs
1/4 teaspoon lemon oil
1 cup sour cream (I used plain yogurt)
1 3/4 cups (219 g) all-purpose flour
1/2 cup (48 g) almond flour
4 teaspoons baking powder (I used 3 teaspoons)
1/4 teaspoon salt

Preheat the oven to 335 degrees F (168 degrees C). Line two 8-inch (20 cm) round cake pans with parchment paper and grease the sides. (I used four small Bundt pans, spray oil that includes flour.)

In a large mixing bowl cream the butter. In a small bowl rub the sugar and lemon zest together (this is not how the recipe was written, but it works well). Add sugar mixture to the butter and cream until light. Add the eggs, one at a time, mixing well after each addition. Add the lemon oil and the sour cream. Mix until well combined.

In a separate bowl combine the flour, almond flour, baking powder and salt. (This works well with a scale that has a tare feature so that you can return to zero. Each ingredient just gets put in when zeroed.) Whisk together. Add to the butter batter and mix until just combined. Use a rubber or silicone spatula to scrape down the sides and bottom of the bow and the beaters and then use the spatula to combine everything with a few more strokes.

Divide the batter between the pans. Level the tops and rap pan on counter a couple of times to get rid of air bubbles. Bake in the preheated oven for 35 to 40 minutes (less for the small Bundt pans...about 25-30 minutes), until a toothpick inserted into the center comes out clean. Cool the layers completely on a wire rack.

Meanwhile prepare the candied lemon peel (or slices in the regular recipe - just increase sugar and water by 2/3, add thinly sliced lemons and cook 7-8 minutes. Remove and cool). Peel the lemon skin into thin strips. In a saucepan place 1/2 cup sugar and 3 tablespoons water. Heat over medium heat until sugar dissolves, then add the peel and cook over low heat 7-8 minutes. Peel will be limp. Remove peel to a piece of waxed paper or parchment paper and immediately sprinkle with granulated sugar. Let dry for 1/2 hour, then roll peel in the sugar to coat and set aside on a clean piece of paper to dry. Add the juice of 1 lemon to the sugar water. Keep the sugar water for drizzling over the cake.

While the cake cools and the peel dries, measure 2 cups confectioners' sugar into a bowl. Juice a lemon - you should have 1/4 cup, so juice another if needed.

When the cakes are cool, make sure the syrup is thin and sugar is dissolved. (If not, heat it again to dissolve sugar). Drizzle half syrup over each layer. For Bundt cakes drizzle 1/4 syrup over each small cake.

Put layer on serving plate. Mix some of the lemon juice into the confectioners' sugar and stir vigorously. Add juice, a very small amount at a time, mixing well after each addition, until glaze is desired thinness. Pour half over first layer, add second layer and pour rest over it, then arrange candied slices around the edge of cake. For Bundt cakes, drizzle glaze over each small cake, then decorate with small pieces of the candied peel.

Monday, August 20, 2018

Lemon Blackberry Cake with #TheCakeSliceBakers


Unfortunately my back has been acting up for the last few days, so no blogging for a while. Even the making of this cake was affected because I needed a cake for a birthday party but needed to simplify it. I know it looks fancy, but the blackberries were picked and the jam was made before my back went out and the cute piped icing at the bottom and for the candles was done on Sunday when I was feeling better.


We are baking from The Perfect Cake from America's Test Kitchen and in that cookbook this was a four layer cake (four full layers, not two cut in halves horizontally) which means a longer baking time since two are baked at a time, not four. It also used mascarpone cheese in the icing, which is not something that I can eat due to severe dairy allergies. It's also something that I haven't found a substitute for, so I made a 'buttercream' icing using non-dairy margarine and a different recipe entirely. Because the margarine doesn't whip as light as butter and because it also has more moisture in it than real butter, the icing isn't as stable, so a two layer cake made more sense as well as being faster.


I did make the fresh blackberry jam from the recipe in The Perfect Cake, although I strained it to remove the seeds and most of the skins. Blackberry seeds just seem wrong for a fancy cake. Because I only had two layers, I was able to put some of the jam directly on a cake layer and then put the blackberry flavored buttercream on top,


plus on the top and the sides. The sides looked much better with plenty of icing instead of the veil look recommended by the Perfect Cake recipe. Since there were only two layers I felt that the extra icing was needed to balance out the cake. I got raves for the icing because it was delicious, using some lemon juice and the blackberry jam and not a lot of sugar, so it wasn't overly sweet. I used a circle of fresh blackberries on top for decoration.


The cake has both lemon zest and lemon juice. Because the extra step of whipping the whites and folding them in was too much time on my feet, I used the Perfect Party Cake recipe from Dorie Greenspan's Baking; from my home to yours book for the cake. It uses the dry/wet/dry/wet/dry method for adding the dry and wet ingredients to the butter/sugar/egg mixture, which goes quickly and still produces a moist, tender, fine grained cake.


Next month I hope to go back to following the recipe exactly, but I have to say that this sure did make a pretty and delicious layer cake...and it was perfect for a party of 5. We ate all but two or three slices and all the plates were clean of both cake and icing when we were done...I think everyone loved this cake!


I particularly enjoyed the lemon. It's fresh flavor was a great counterpoint to the sweet blackberries in the jam and icing. Here's a slice for you.


Be sure and check out the other Cake Slice Bakers posts to see which cake they made. #atkcake


The Cake Slice Bakers are baking from a new book "The Perfect Cake" from America's Test Kitchen.

Our choices this month are...

August 2018
  1. Blueberry Boy Bait
  2. Raspberry Charlotte
  3. Blackberry-Mascarpone Lemon Cake
  4. Peanut Butter and Jam Cake.
Visit our members to see what cake choice they baked up!