Showing posts with label butter. Show all posts

Thursday, February 22, 2024

Lemon-Lime Tart for Sweetie


 Valentine's Day is always a bit of a challenge, coming as it does the day after my birthday. This year Sweetie requested a pie or tart for Valentine's Day and I had already decided to make the Queen Mother Cake for my birthday.

I bought a bag of good-sized limes, thinking that I would make a lime tart, but then we received a gift of a bag of beautiful lemons from a neighbor, so I decided to go for a lemon-lime tart for Valentine's Day.


My favorite lemon tart filling is Dorie Greenspan's, so I began with that recipe and added lime zest and juice to the lemon zest and juice, with a decoration, after the tart was finished, of strands of zest from both fruits. The tart case is fairly simple and comes out cookie-like so that the filling doesn't make it too gooey after a day. We had the last slice, shared, two days after I filled the tart shell and the base was still crisp.

As it turned out, we had the Queen Mother cake on Valentine's Day, right after Sweetie's fire board meeting. Then we had the Lemon-Lime Tart the next day and were able to share it with our daughter and her fiancé'. I was worth the wait and well worth your time to make. It would be perfect for St. Patrick's Day, which is coming up soon. It would also be delightful for Easter...or anytime, really.


The Most Extraordinary French Lemon - Lime Cream Tart 

Based on a recipe by Dorie Greenspan in Baking, From My Home To Yours

1 cup sugar
Grated zest of 2 lemons
Grated zest of 2 limes, (or 3 if smaller limes)
4 large eggs at room temperature

3/4 cup fresh lemon juice mixed with lime juice (from 3-4 large lemons or up to 6 smaller ones, plus2-4 limes)
2 sticks plus 5 tablespoons (10 1/2 ounces) unsalted butter, cut into tablespoon-sized pieces, at room temperature 
1 9-inch tart shell made with Sweet Tart Dough (recipe follows), fully baked and cooled

Have an instant-read thermometer, a strainer (if straining out the zest), and a blender (first choice) or food processor at hand.

Directions:
Bring a few inches of water to simmer in a saucepan or the bottom of a double boiler.

Put the sugar and zest in a large heatproof bowl that can be set over the pan of simmering water, or in the top pan of a double boiler. Off the heat, rub the sugar and zest together between your fingers until the sugar is moist, grainy and very aromatic. Whisk in the eggs, followed by the lemon-lime juice.

Set the bowl over the pan, or set the top into the bottom of the double boiler, and start stirring with the whisk as soon as the mixture feels tepid to the touch. Cook the lemon cream until it reaches 180 degrees F. As you whisk and you must whisk constantly to keep the eggs from scrambling, you'll see that the cream will start out light and foamy, then the bubbles will get bigger, and then as it gets closer to 180 degrees F, it will start to thicken and the whisk will leave tracks, which means that the cream is almost ready. Don't stop whisking! Continue to check the temperature. It might take a while. so be patient. Usually it's done in about 10 minutes.

As soon as the cream reaches 180 degrees F, remove from the heat and, if removing the zest, strain it into the container of the blender (or food processor); discard the zest. (If not removing the zest, just scrape the cream right into the blender or food processor). Let the cream stand, stirring occasionally, until it cools to 140 degrees F, about 10 minutes.

Turn the blender to high (or turn on the food processor) and, with the machine going, add the butter, about 5 pieces at a time. Scrape down the sided as needed as you incorporate the butter. Once all the butter is in, keep blending/processing for another 3 minutes.

Pour the cream into a container (I used a large Pyrex bowl), press a piece of plastic wrap against the surface to create an airtight seal and refrigerate at least 4 hours or overnight.

When you are ready to assemble the tart, just whisk the cream to loosen it and spoon it into the tart shell. I like to swirl the top with the back of a spoon. If desired, decorate the top with strands of lemon and lime zest for additional lemons and limes. Serve the tart, or refrigerate until needed.

Note: The filling will keep in the fridge for 4 days, or tightly sealed, in the freezer for up to 2 months. Thaw it overnight in the refrigerator and whisk before putting into the tart shell.

Sweet Tart Dough
From Dorie Greenspan

1 1/2 cups all-purpose flour
1/2 cup confectioners' sugar
1/4 teaspoon salt
1 stick plus 1 tablespoon (9 tablespoons) very cold (Frozen) unsalted butter, cut into small pieces
1 large egg yolk

Put the flour, confectioners' sugar and salt into a food processor and pulse a couple of times to combine. Scatter the pieces of butter over the dry ingredients and pulse until the butter is coarsely cut in- there will be some tiny pieces and some the size of peas.

Stir the yolk to break it up, then add it a little at a time, pulsing afer each addition. When the egg is in, process in long pulses - about 10 seconds each - until the dough forms clumps and curds. Turn the dough out onto a work surface and, knead lightly just to incorporate any dry ingredients that might have escaped mixing. In all of this, don't overwork the dough.

Butter a 9-inch tart pan with a removable bottom. Press clumps of the dough evenly over the bottom and up the sides of the pan, using all but one little piece (about a teaspoon worth), which you should save in the fridge wrapped in plastic wrap to patch any cracks after the crust is baked. Freeze the crust for at least 30 minutes, preferably longer, before baking.

Center a rack in the oven and preheat to 375 degrees F.

Butter the shiny side of a piece of aluminum foil and fit the foil, buttered side down, tightly against the crust. Put the tart pan on a baking sheet and bake the crust for 25 minutes. Carefully remove the foil. If the crust ahs puffed, press it down gently with the back of a spoon. Patch the cruse if necessary, then bake for another 8 minutes or so, until it is firm and golden brown. Keep an eye on it the last few minutes and pull it out if it gets darker than golden. Transfer the pan to a cooling rack and cool to room temperature before filling. 


Saturday, April 16, 2022

Mlyntsi (Blini) for Ukraine


The horrifying death and destruction of Ukraine by Russia continues, with high likelihood that war crimes against humanity are being committed by the Russians, including deliberate targeting of civilians.

To stand with Ukraine, if even in a very small way, the Bread Baking Babes are making Mlyntsi, Ukranian Blini, small buckwheat pancakes. A key element is melted butter on the cooked mlyntsi. This recipe is brought to you by Elizabeth of Blog from OUR Kitchen.

I used the commercial yeast recipe, mostly, although I had some nice sourdough starter on hand, so I added 1/4 cup of that for extra flavor. I adjusted the flour so that the mixture was the right thickness. Not only did these delicious morsels taste divine, but they smelled wonderful, too. The toasted buckwheat fragrance was lovely. Sweetie enjoyed his so much that he made some more after I sat down.

There is a bit of a story to go with these. Sweetie fell over and hit his head early in the morning March 30. It was unclear if he had passed out or had had a heart attack or some other medical emergency, so I called 911 and the paramedics took his vitals, found that he didn't remember falling, that he had been unconscious at least 10 minutes, but that he showed no sign of having a stroke or being in a dire situation medically when they arrived. At the hospital in the ER they did the usual labs, plus a sonogram, then admitted him and over the next few days did more lab work, more tests and finally decided that he had fainted, probably due to dehydration combined with low blood pressure from medication he no longer needed.

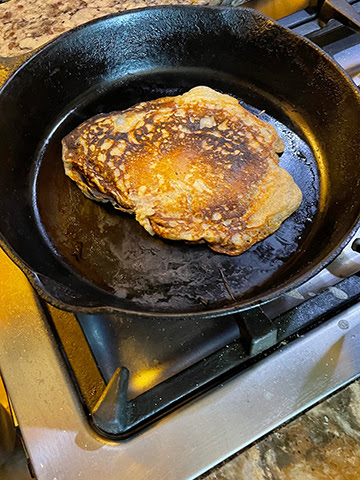
The reason that any of that goes with this recipe is that he had an appointment at 5 pm the day I made the batter, April 8th, with his GP for follow up and I forgot completely. I was ready to make these as appetizers with smoked salmon and sour cream at 5:30...but we had to leave before that and didn't get home until a bit after 6 pm. The batter was very much frothy and risen, although it sank a bit when I added the whipped egg whites. No way was this going to hold until tomorrow morning! So, I cooked some up, slathered it with melted plant-based 'butter' and served them for dinner with our cold shrimp and green salad. Totally delicious! Thank you Elizabeth for a great challenge. The next morning I added a bit of yeast, let the batter sit to revive, then made some more, which were even better. Sweetie made the final one...very big!...with the rest of the batter. Photo below.


Do consider becoming a Buddy dear reader. this is an easy recipe, no kneading required, and you'll get some really wonderful pancakes by making it. If you do, send the URL of your post, plus a photo and short description of your 'bake' to Elizabeth by April 29th for the round up and to get your Buddy Badge.


Be sure to also visit the sites of the other Bread Baking Babes to see what delights they have made. Below are both a recipe using commercial yeast and one using wild yeast (sourdough starter).


Mlyntsi (Blini)

commercial yeast | wild yeast
adapted from Darra Goldstein's recipe for Blini and Emilie Raffa's (The Clever Carrot) recipe for Fluffy Sourdough Pancakes

3 grams active dry yeast
2 Tbsp (30 grams) water at body temperature
1+1/4 cups (304 grams) milk [OR 70 grams instant milk powder + 300 grams water]
1/2 teaspoon (2 grams) sugar
6 Tbsp (23 grams) buckwheat flour
1.5 Tbsp (21 grams) butter
1 egg, separated
2 Tbsp (30 grams) plain 3% yoghurt
1/2 teaspoon (3 grams) salt
3/4 cups (94 grams) all-purpose flour
pinch baking soda

1.             In a small bowl, whisk yeast into body temperature water until it is the consistency of cream. Set aside briefly.

2.             In a medium size bowl, whisk together sugar, all but 1/4 cup of milk (or milk powder and water), buckwheat flour. Make sure the mixture is smooth; ie: no lumps. Whisk in the yeast mixture. Cover with a plate and allow to rise in a warm place for 1 hour. (In our cool kitchen, we use the oven with only the light turned on.)

3.             Melt butter and allow to cool a little before whisking it with the egg yolk and yoghurt. Stir this mixture into the buckwheat mixture, along with the remaining milk, the salt, and all-purpose flour. Again, make sure there are no lumps; you want this mixture to be smooth smooth smooth. Cover the bowl with a plate and allow to rise in a warm place for 2 hours.

4.             Whisk the egg white until stiff but not dry, then fold the fluffy egg white into the batter. Allow the batter to rest for 30 minutes more. If the batter seems thick, carefully add warm milk a very little at a time. Emilie Raffa says that "The texture should be thick, bubbly, and pourable".

5.             Heat a cast-iron pan. Run your fingers under cold water and flick the pan. If the water beads, the pan is at the right temperature. (If it lies there, the pan is too cool; if it disappears immediately in a puff of steam, the pan is too hot.)Brush the pan with butter. Use about 2 tablespoons of the batter for each blin. Darra Goldstein adds: "taking it from the top of the batter each time so that the rest doesn't fall". Swirl the pan to make a pancake that is about 5 inches in diameter.

"Cook the blin for just a few minutes, until bubbles appear on the surface, then turn and cook the other side until faintly browned. The blini are best served hot from the pan, but if they must be held, pile them in a deep dish, brushing each one with butter, and cover the top of the dish with a linen towel."
 - Darra Goldstein

...........................
When baking soda merges with the natural acids in the sourdough starter it tenderizes the texture (like buttermilk pancakes). So now you have light, fluffy and tender. 
[...] [T]he batter should be thick, bubbly and pourable. [...] You can actually "hear" it when you drag a spoon through the batter. It should drip down in slow, stretchy ribbons and not just plop into the pan.
- Emilie Raffa
.......................................

Wild Mlyntsi

[makes 10 6-inch pancakes]

ingredients based on Emilie Raffa's recipe:
LEAVENER
120 grams whole wheat flour
120 grams water
2 dessert spoons (about 30 grams) Jane Mason starter

Dough
DRY INGREDIENTS
125 grams unbleached all purpose flour
60 grams buckwheat flour
12 grams sugar
3 grams sea salt
5 grams baking soda
WET INGREDIENTS
all of the leavener from above (100% hydration and bubbly)
2 large eggs, separated
240 ml milk, plus more as needed
42 grams (3 Tbsp) melted unsalted butter, plus more to coat the skillet


1.             About 12 hours before mixing the batter, mix whole wheat flour, water, and starter from the fridge. Cover with a plate and leave at room temperature.

2.             Combine all the wet - except for the egg whites - and all the dry ingredients. Whisk well, cover with a plate and allow to rest a few moments.

3.             Beat the egg whites until stiff but not dry. Fold them gently into the batter. Cover with a plate and allow to rest for about 30 minutes before cooking the pancakes. Emilie Raffa writes, "The texture should be thick, bubbly, and pourable. Add extra milk, 1 tbsp at a time, to thin out the texture if needed. Let the batter sit for at least 5 minutes to aerate; it should be nice and bubbly before using.

4.             Heat a cast-iron pan. Run your fingers under cold water and flick the pan. If the water beads, the pan is at the right temperature. (If it lies there, the pan is too cool; if it disappears immediately in a puff of steam, the pan is too hot.)Brush the pan with butter. Use about 2 tablespoons of the batter for each blin. Darra Goldstein adds: "taking it from the top of the batter each time so that the rest doesn't fall". Swirl the pan to make a pancake that is about 5 inches in diameter.

"Cook the blin for just a few minutes, until bubbles appear on the surface, then turn and cook the other side until faintly browned. The blini are best served hot from the pan, but if they must be held, pile them in a deep dish, brushing each one with butter, and cover the top of the dish with a linen towel." 
- Darra Goldstein

Sources:
Darra Goldstein, Russian Pancakes (Blini), A Taste of Russia, p.102 https://darragoldstein.com/russian-pancakes-blini/

Emilie Raffa, The Clever Carrot, How to Make Fluffy Sourdough Pancakes https://www.theclevercarrot.com/2020/05/homemade-fluffy-sourdough-pancakes/

Some variations in blini include:
 
• Adding ingredients to the blini batter, including apple, raisins, or even grated potato. Such types of blini are more common in Eastern Europe than in Russia,
• Blini served with butter, sour cream, fruit preserve (varenie), jam, honey, or caviar,
• Blini folded or rolled into a tube, then filled with different fillings like jam, fruit, minced meat, chicken, salmon, boiled eggs, or mushrooms,
• Blini made by frying chopped vegetables and pouring the batter over them.

- Chefin Dictionary | Blini, https://chefin.com.au/dictionary/blini/


·                     Information and Tools
» Darra Goldstein: Russian Pancakes (Blini)
» The Clever Carrot: How to Make Fluffy Sourdough Pancakes
» Food to Glow: Brilliant Blinis with Sweet and Savoury Toppings
» SAVEUR: Darra Goldstein's Blini, adapted from her recipe in "Beyond the North Wind: Russia in Recipes and Lore", and made with an equal mix of buckwheat and all-purpose flours
»Tasting Table: Flour Guide - Everything you need to know about types of flour
» Gourmet Sleuth: Cooking Conversions Calculator
» Red Cross (International): Humanitarian crisis in Ukraine
» UNHCR: Ukraine Emergency


Wednesday, September 23, 2020

Garlic and Butter and Lemon and Shrimp


Shrimp Scampi is a dish I first had when I was just out of college. It used to be the kind of menu item that white tablecloth restaurants of the time almost always had on the menu. I really loved eating it but thought that it would be difficult to make well and then I moved and had little income, so shrimp, which tends to be expensive where I live, was not on my menu. Eventually I just forgot about it.

A few days ago I was in an Oliver's market in Santa Rosa. They are a local chain of markets with the best of Whole Foods but at a slightly lower price point and far less pretentious. At their meat and seafood counter I discovered that they had large shrimp that had been frozen in bags of about 1 pound. I bought one and for some reason the idea of shrimp scampi popped into my head. Still thinking that it was a difficult recipe, I looked it up on Google and found that it's actually easy. There is prep work that needs to be done before you start cooking the shrimp because it goes together very quickly (except for cooking the pasta), but the recipe itself is simple. As with any recipe that seems simple, using quality ingredients is crucial. I started with some very nice shrimp. When thawed they smelled of the sea (but not 'fishy')which is a good indicator that they were handled well before being frozen. I made sure I had good linguine, a juicy and firm lemon or two, some excellent dry white wine, good olive oil, fresh parsley and a good, firm head of garlic. The last ingredient wasn't butter, which is the best thing to use, but an excellent non-dairy butter that I usually use only as a finishing ingredient. Since this dish depends on good butter, I really needed all four tablespoons to be as close to the best butter that I could find. Having a dairy allergy is no fun sometimes.

So, timing is important for shrimp scampi. Get the water boiling for the pasta. Gather all the ingredient together and prep the shrimp (I had to peel and devein them but it was OK to leave the tail on), zest and juice the lemon, mince the garlic, mince the parsley.

First you heat up a mixture of that good butter and quality olive oil. Then you saute' the garlic in that combination of oils. Once the garlic has cooked a few minutes, you add the wine and a pinch of red pepper flakes and cook that for a few minutes, then you salt and pepper the shrimp and add them to the wine mixture, making sure they are in a single layer. After a couple of minutes, you flip them over to cook the other side. After another couple of minutes you add the lemon zest, lemon juice and parsley and stir it all together. By that time your pasta is cooked and you drain it, then add it to the shrimp mixture and toss it all with some tongs until all the pasta is coated with the butter/olive oil/garlic/ lemon/wine/parsley mixture. Quickly you put the pasta on a plate or in a shallow bowl, top with the shrimp and it's ready to serve! I think it's between 8 and 10 minutes start to finish. No wonder it used to be a popular restaurant item. Done in no time and you can charge a lot for it.

So did it live up to my memories? Yes! In fact it was better. I didn't overcook the pasta. Most restaurants in my youth did. Ditto the shrimp. I used more garlic and it was fresher. I think I should have added a touch more salt, but otherwise it was perfect and perfectly delicious. Sweetie loves shrimp and I suspect he would like me to make this every night for a week. Do try it yourself if you can get good shrimp. The recipe is a combination of about four I found online, plus the lemon zest I added on my own. Lemon zest always ups the lemon flavor, so why not?

Shrimp Scampi
Serves 2-4

1/2 lb. linguine
1 lb. large raw shrimp, rinsed, peeled and deveined (OK to leave the tail on)
4 tablespoons olive oil
4 tablespoons soft salted butter or non-dairy butter substitute
4 large cloves garlic, peeled and minced
1/4 cup dry white wine
pinch red pepper flakes
salt and pepper
juice and zest of 1 lemon
1/4 cup parsley, finely chopped

Have all the ingredient gathered and prepared. The cooking takes about 10 minutes, start to finish.

Bring a very large pot of water to a boil for the pasta. While it's coming to a boil, prepare the shrimp and the garlic, lemon and parsley. 

Once the water is boiling, add 1 teaspoon salt and the linguine and stir to separate the pasta. Leave uncovered and boil until al dente, about 8 - 10 minutes. Have a colander ready to drain the pasta.

Wait until the pasta water returns to a boil, then begin the shrimp part of the dish.

In a large skillet, melt the butter and oil together over medium-high heat. Add the garlic and saute' about 3 minutes, stirring a few times. Don't let garlic burn.

Add the white wine and the red pepper flakes. cook another two minutes, stirring often. 

Salt and pepper the shrimp to taste. Add the shrimp and make sure it is in one layer in the pan. After two minutes when the cooked side is pink insteado f gray, use tongs to turn each shrimp over. Cook on the second side for another two minutes, just until it is pink. Do not overcook the shrimp.

Add the lemon juice, lemon zest and the parsley. Stir to combine all the ingredients. Taste for salt and pepper and adjust seasonings if needed.

Drain the pasta (check first to make sure it is cooked al dente), then add it to the pan with the shrimp mixture. Use the tongs to gently turn the pasta over until all strands are coated with the garlic sauce.

Serve at once on large plates or in shallow bowls, placing the shrimp on top of the pasta. If desired, garnish with a drizzle of olive oil. Pass good bread to sop up the extra sauce.

Tuesday, May 05, 2015

Sweet Mocha Buttercream on a Fine Cake


I've been doing very little baking, well, little if you are me. It was a good idea while I was getting my digestion processes back on track. It would probably still be a good idea for my waistline, but the urge to bake is very strong now that I have a dedicated place to do it.

On Sunday I baked a half recipe of a very fine coffee flavored butter cake. I baked it in a loaf tin, which meant that for Sunday evening dessert Sweetie and I could have a slice of cake. It was moist and delicious and I think Sweetie would have loved to finish it off. I knew that I wanted to try it with Mocha Buttercream, so we restrained ourselves so that there would be cake to frost once the frosting was made. He assured me that it was better un-frosted. That might have been because I used a bit of bourbon to dissolve the espresso powder I used in the cake, plus I used strong cold coffee instead of water in the recipe, so there were some interesting flavors going on.


On Monday I made a half recipe of Mocha Buttercream, using some more espresso dissolved in bourbon, plus a nice rich cocoa powder for the chocolate part. I love this recipe, even though it is a bit more work than a butter and confectioners sugar buttercream. You start by whisking egg whites and sugar over simmering water. After 3-4 minutes the mixture has gotten white and very much like soft marshmallow cream. You transfer the mixture to a stand mixer and whisk it with the mixer until cool, about 5 minutes or so. Then you add small blobs of soft butter while the machine whisks. It takes a little while for the butter to be absorbed, but that also thickens up the mixture. Then you add the chocolate-coffee-bourbon mixture and beat it until it becomes the perfect, thick, creamy buttercream. I used an offset spatula to frost a layer in the middle of the split cake, then a layer on top. Switching to a pastry bag with star tip, I put rosettes all over the sides and as decoration on the top. It goes more quickly than you might imagine as long as you don't insist on the rosettes being perfect. Since the buttercream goes on pretty soft, I always follow up with letting the cake sit in the fridge for a while before serving.


Sweetie had to admit, the cake was even better with this decadent frosting.  He isn't usually a cake loving person, bu this one may have changed his mind.

Cake With Bourbon and Coffee Flavor 
based on a cake in The Southern Cake Book

3/4 cup unsalted butter, at room temperature
1 cup sugar
4 egg whites
1 3/4 cups cake flour
1 teaspoon baking soda
2 teaspoons baking powder
1/4 teaspoon salt
1/4 cup bourbon
1 teaspoon espresso powder
3/4 cup strong brewed coffee, at room temperature
1 teaspoon vanilla

Preheat the oven to 350 degrees F. Grease or butter a 9"x5" loaf pan. Set aside.

Beat butter and sugar at medium speed with a stand mixer, until mixture is fluffy. Gradually add egg whites, on-third at a time, beating well after each addition.

Sift together the cake flour, baking soda, baking powder and salt. In another bowl, mix together the bourbon and espresso powder, letting the espresso powder dissolve. Then add the brewed coffee and stir until thoroughly mixed.

Add the flour mixture to the butter mixture alternately with the coffee mixture, beginning and ending with the flour mixture.

Pour the batter into the prepared loaf pan, smooth the top with a spatula and rap the pan against the counter top twice, sharply, to dislodge any air bubbles.

Bake at 350 degrees F for about 30-35 minutes, turning the loaf pan half way around about half way through the baking time. A toothpick inserted into the center will come out clean when cake is done. Remove to a wire rack to cool 5 minutes, then run a knife around the pan to loosen the cake and turn the cake out, cooling cake right side up.

When completely cool, split cake in half horizontally, then fill and frost with Mocha Buttercream (recipe below). Serves 5-6.


Mocha Bourbon Buttercream

4 large egg whites
1 cup sugar
24 tablespoons (3 sticks or 1 ½ cups) unsalted butter, softened
2 tablespoons espresso powder
4 tablespoons bourbon
1 tablespoon best quality cocoa

1. Whisk the egg whites and sugar together in the bowl of an electric mixer. Set the bowl over simmering water (but don’t let the bottom of the bowl touch the water) and whisk gently until the sugar is dissolved and the egg whites are hot, about 3 minutes.

2. Attach the bowl to the mixer and whip with the whisk on medium speed until cooled, about 5 minutes. Switch to the paddles and beat in the softened butter a few small pieces at a time, and continue beating until the buttercream is smooth, about 6 – 10 minutes. While the buttercream is becoming smooth, dissolve the espresso powder in the bourbon in a small bowl, then stir in the cocoa until mixture is smooth. Once the buttercream is smooth, add the espresso-cocoa mixture, a little at a time and beat until everything is smooth again. It may take 5-10 minutes of beating.

3. Put half the buttercream in a piping bag fitted with a large star tip. Use an offset spatula to fill and frost the top of the cake, then pipe rosettes of buttercream on the sides of the cake and decorate as you like. Any leftover buttercream can be stored in the fridge for up to a week.

Monday, February 23, 2015

A Muddy Slice of Cake


This month the Cake Slice Bakers had some wonderful choices for the recipe to bake: King Cake for Mardi Gras, Mini Red Velvet cakes or a dramatic chocolate torte for Valentine's Day, or a Mississippi Mud Cake just for fun. You can see what I chose in the photo.

Because February has been waaaay too full of both fun and serious things, including a funeral which included flying to Virginia during one of the many freezes they have had this winter, a tea party, a bladder infection, a birthday bash at a great restaurant, a birthday steak cooked by Sweetie on the actual day, eye surgery, a visit by an old Peace Corps buddy of Charlie's, an Artist's night for Straight Shooter's photo show, and scholarship selection for three P.E.O. State Chapter scholarships which included flying to LA (not in that order) I am late in both making and posting my choice.

I decided to go with the fun Mississippi Mud Cake because I think it will be something that Sweetie enjoys and he has been a rock of support and love during this busy month. Because I don't have any marshmallows and I do have cream cheese, I decided to substitute a cream cheese-brown sugar-bourbon mixture for the marshmallows. It didn't brown up, but I think it goes with the Southern vibe as well as being very good with chocolate and pecans. I also used some espresso powder instead of vanilla because I like a little coffee flavor to up the chocolate flavor in baked goods.

I also made half a recipe and baked it in a square pan. The full recipe is perfect for a crowd, but that isn't going to happen. I'll give the recipe the way I made it. If you visit some of the other Cake Slice Bakers or go online to the Southern Living website you should find the full recipe.


This is one oooey, gooey chocolate marvel of a dessert. It's messy but delicious. Hard to not just go back and have a little more...then a little more. You know, that kind of deliciousness.


Mississippi Mud Cake 
from The Southern Cake Book, by Southern Living Magazine

1/2 cup butter
2 oz. semisweet chocolate (I used Scharfenberger)
1 cup sugar
2 large eggs
3/4 cup flour
1/4 cup cocoa
1/4 teaspoon espresso powder or 1/2 teaspoon vanilla
1/2 teaspoon salt
1/2 cup pecans, toasted and chopped (I used closer to a cup)
4 oz. cream cheese, softened
1/2 cup brown sugar
1 1/2 teaspoons bourbon whiskey
Warm Chocolate Frosting (recipe below)

Preheat oven to 350 degrees F. Grease a 8 x 8-inch or 9 x 9-inch baking pan. Set aside.

Microwave butter and chocolate in a large microwave safe glass bowl on HIGH for 1 minute, stirring half way through the minute. I cut the butter and chocolate into small pieces before microwaving.

Whisk the sugar into the chocolate mixture. Whisk the eggs into the chocolate mixture until well blended. In a small bowl stir together the flour, cocoa, espresso powder (if using), and salt. Stir into the chocolate mixture until well blended. Add the vanilla if using.

Pour the batter into the prepared pan.  Bake at 350 degrees F for 15 minutes.

While the batter is baking, whip the cream cheese, brown sugar and whiskey together with a stand or hand held mixer until well blended and creamy.

When the batter has baked, leave the oven on. Remove the baking pan to a heat proof work area and dollop the cream cheese mixture over the brownie in the pan. Use the back of a spatula to draw the dollops together. Layer will be bumpy with uneven amounts in the layer. Return pan to oven and bake another 10 minutes. Mixture will not brown.

While cream cheese layer is baking, make the Warm Chocolate Frosting (see below). You should just about be done making it when the cake is ready to be removed from the oven.

After 10 minutes of baking, remove pan from oven and pour Warm Chocolate Frosting over it. Spread with a small spatula if necessary. Top with the toasted pecans. Let cool at least 10 minutes for the icing to harden up a bit. Enjoy!

Warm Chocolate Frosting

Melt 1/4 cup butter in a small saucepan. Whisk in 2 tablespoons unsweetened cocoa. Whisk in 3 tablespoons milk. Bring mixture to a boil, whisking constantly. Then gradually whisk in 1 cup confectioner's sugar, whisking all the time. Mixture will thicken slightly. Use at once, as soon as the cake comes out of the oven.

Wednesday, January 28, 2015

What's An ANZAC?


If you're from New Zealand or Australia, you probably know the answer. Those two countries combined armies for a time during the First World War. The Australian and New Zealand Army Corps (ANZAC) was a First World War army corps of the Mediterranean Expeditionary Force that was formed in Egypt in 1915 and operated during the Battle of Gallipoli. They were disbanded after that battle. In Greece in 1941 during the Second World War they also fought together under that name and again in the Vietnam conflict.

They are also a delicious biscuit (cookie in America) which was sent to soldiers and also sold to raise money for the troops and later the veterans. (Recipe at the bottom.) At the website anzacday.org.au they give this info:

"During World War 1, the wives, mothers and girlfriends of the Australian soldiers were concerned for the nutritional value of the food being supplied to their men. Here was a problem. Any food they sent to the fighting men had to be carried in the ships of the Merchant Navy. Most of these were lucky to maintain a speed of ten knots (18.5 kilometers per hour). Most had no refrigerated facilities, so any food sent had to be able to remain edible after periods in excess of two months. A body of women came up with the answer - a biscuit with all the nutritional value possible. The basis was a Scottish recipe using rolled oats. These oats were used extensively in Scotland, especially for a heavy porridge that helped counteract the extremely cold climate.

The ingredients they used were: rolled oats, sugar, plain flour, coconut, butter, golden syrup or treacle, bi-carbonate of soda and boiling water. All these items did not readily spoil. At first the biscuits were called Soldiers’ Biscuits, but after the landing on Gallipoli, they were renamed ANZAC Biscuits.

A point of interest is the lack of eggs to bind the ANZAC biscuit mixture together. Because of the war, many of the poultry farmers had joined the services, thus, eggs were scarce. The binding agent for the biscuits was golden syrup or treacle. Eggs that were sent long distances were coated with a product called ke peg (like Vaseline) then packed in air tight containers filled with sand to cushion the eggs and keep out the air.

As the war drew on, many groups like the CWA (Country Women’s Association), church groups, schools and other women’s organisations devoted a great deal of time to the making of ANZAC biscuits. To ensure that the biscuits remained crisp, they were packed in used tins, such as Billy Tea tins. The tins were airtight, thus no moisture in the air was able to soak into the biscuits and make them soft. Most people would agree there is nothing worse than a soft biscuit.

During World War II, with refrigeration in so many Merchant Navy Ships, the biscuits were not made to any great extent. It was now possible to send a greater variety of food, like fruit cake.
ANZAC biscuits are still made today. They can also be purchased from supermarkets and specialty biscuit shops. Around ANZAC Day, these biscuits are also often used by veterans’ organisations to raise funds for the care and welfare of aged war veterans."

We had a visit from an Australian friend and his sister today, so I made some anzac biscuits using his wife's recipe to go with our tea. I have fond memories of watching her make them in their kitchen in Perth. This is a really easy, quick recipe as long as you have all the ingredients on hand. Your house will also smell wonderful with the butter, sugar, coconut, nuts and oats fragrances. Best of all they are irresistible. Hard to only eat one.

Anzac Cookies
makes about 2 dozen

1 stick (1/2 cup) butter, melted
2 tablespoons hot water
2 tablespoons golden syrup
3/4 cup brown sugar
1 cup rolled oats
1/2 cup flour
1/2 cup self-rising flour
1/4 teaspoon salt
1/2 teaspoon baking soda
3/4 cup dry coconut
3/4 cup walnuts, chopped
1) Preheat the oven to 350 degrees F.

2) Combine the melted butter, hot water, golden syrup and brown sugar in a mixing bowl (or the pot you melted the butter in if it large enough to hold the batter). Stir to blend well.

3) On a sheet of waxed paper combine the oats, flours, salt and soda. You could also combine them in a mixing bowl.

4) Add the nuts, coconut, dry ingredients and dried fruit to the butter mixture. Stir to blend well.

5) Pack dough into greased small tart pans or make into drop cookies on a cookie sheet. Bake in preheated oven for 15 minute until golden brown. (New note: Check cookies at 10 and 13 minutes :)

6) Cool cookies on wire rack. Store in airtight container. These cookies ship well. Enjoy!


Tuesday, September 09, 2014

Cookies From A Pot


Do you have a favorite snack for times of stress? Lots of folks turn to ice cream and that does have the advantage of being ready to eat from the carton, it come in lots of flavors, and all you need is a spoon.

I tend to go for cookies. When I knew I would be without a stove for a while I baked some blondies, and that really helped. Once they were gone I wished that I had made butterscotch cookies, so I looked here on the blog for the recipe. No way I was going to find the recipe in my recipe card file because the file had disappeared into the whirl of items that used to live in the kitchen cupboard but now were temporarily housed elsewhere for the kitchen remodel. Turns out that I never put up a post on butterscotch cookies, so I had to wait until I found the recipe box. About a week ago I spotted it on a window sill behind a curtain. Sure enough, there was the recipe I wanted, so I brought it inside and put it by the flour in the new baking center. I decided that once I was able to bake again that it would be the first thing I made.

Today was the day! The stove is working, I have sinks in working order and a dishwasher. The new drawers and shelves are starting to be put to use as I sort out my kitchen things and find new homes for them. One of the nice things about this recipe is that you can make the batter in a good sized pot. No mixer needed!

You start with a lot of butter. It gets melted in the pot, then you add a lot of brown sugar. That gets stirred together. I usually let it cool a bit and today I was blessed by a phone call from a friend so we caught up while the mixture cooled.

Once the butter/sugar mixture cools a bit, you beat in the eggs, then, all at once, add the dry ingredients, nuts, chocolate chips and vanilla. As long as your pot is big enough, all this can be done in the same pot you melted the butter in. The batter gets turned out into a greased baking pan and spread out, then it's into the preheated oven. It doesn't take long before the house smells absolutely delicious! This is a very aromatic cookie. After cooling you can cut them into bars of whatever size you like. I wish I knew where I got the recipe from, but the index card gives no clue. It is liberally stained, which shows that I've enjoyed these many times over the years.

These bars of delight ship well and keep well if you can keep them hidden. I usually freeze some so that I don't eat the whole pan in a day...I like them that well. Fortunately we are down to the punch list so my stress level should be pretty low for a while. I bet I make these again before Christmas!

In case you have been following the madness of the kitchen remodel, I'm going to include a photo and am happy to say that the last of the paint touch ups was done today. All appliances, cabinets, floor, sinks, faucets, drawer and door handles on the cabinets, hooks, garbage containers and all but one of the towel racks have been installed. Most of the shelves and drawers are lined, and some are even filled. We found a good buy on bamboo drawer dividers at Costco, so lots of items that can go in them are in drawers and in order. Now I just have to remember which drawer they went to!


I hope to post a lot more often now that I should have more cooking and baking time. I made some amazing lamb meatballs last night which I need to share with you before I forget the ingredients I threw together, plus there are a few things I've made in the last week or so that were too good not to share. Hope you have checked out some of the older posts. If you have a way to go to classic web version there is a photo of a table setting which is a link to the recipe index. The index is a little out of date, but there are some hidden treasures there if you look for them.

Chocolate-Butterscotch Bars or Squares 
Makes 40 squares - not sure how many bars

2/3 cup butter, margarine, or vegetable shortening, melted
1 1/4 cups brown sugar, packed
3 eggs
2 3/4 cups all-purpose flour
1/2 teaspoon salt
2 1/2 teaspoons baking powder
6 oz chocolate chips
1 cup chopped nuts
1 teaspoon vanilla

Mix melted butter and sugar thoroughly. Let cool a bit. Add eggs one at a time, beating well after each addition. Add sifted dry ingredients, chocolate, nuts and vanilla and mix well to combine.Spread in a greased 15" x 10" x 1" pan. Bake in moderate oven (350 degrees F) for about 25 minutes. A toothpick inserted in center of pan will come out with a few crumbs stuck to it.

Cut into 40 squares (or some bars if you prefer) while warm. Store in airtight container. Will keep a week if you don't eat them all long before that as I do.


Monday, January 13, 2014

Breakfast Buns


Bread baking has been on the back burner lately, but I noticed that some mornings I would love to have just a little something to go with the morning cup of coffee and fresh fruit. I decided to put together a breakfast bun that would work, and to put in some healthy ingredients, too. Most of all, it has to be yummy because when you can only have a small amount of bread, it should be delicious bread, right?

For starters I cooked up some oatmeal...1/2 cup rolled oats and twice that amount of water...and set it to cool. I also mixed some yeast, water, a tiny bit of sugar and some flour to make a poolish. It all sat out on the counter while I went to the gym, collecting wild yeast if I was lucky.

Later in the day I mixed the cooked oatmeal, the poolish, some milk, and egg and some more water together. In a bowl I mixed all-purpose flour, whole wheat flour, salt, a little more yeast (in case no wild yeast were around that were strong enough), and a touch of cinnamon and added those to the liquid mix to make a nice dough.

After the dough had time to rise, I turned it out onto a flour board and kneaded in dried cranberries, chopped pecans and golden raisins. Those were stretched into a large rectangle, most of the rectangle was given a light coat of butter, a sprinkle with brown sugar, and also with cinnamon. I rolled it up, jelly-roll fashion, and cut it into buns.

The buns went into a 9 x 13 pan and lightly covered. They rose over time and then were baked in a 350 degree F oven until golden brown.


So now I had a dozen breakfast buns. There is about 1/6 of the usual amount of oatmeal one might eat at breakfast, whole grain, cinnamon for antioxidant and flavor value, dried fruits and nuts, milk and egg and only about 1/3 tablespoon of butter per bun, with even less sugar. Fairly healthy as buns go and very tasty. For one of the buns I added a small amount of an icing of confectioners sugar mixed with hot water. That made it a little too sweet, so I think in the future I'll stick with the 'plain' buns. Each bun went into it's own bag, then into the freezer for future enjoyment on those days when they will be the perfect thing to go with coffee and fruit.

You might think that I would want one every day, but today I had coffee, fruit and some plain yogurt and it was just enough breakfast. Normally I'd give you the recipe, but I didn't really measure a lot of the ingredients, so I'll have to see if I can figure it out and post it later.


Friday, August 16, 2013

August BBB Delight Hints at Autumn


The days are truly getting shorter and school started in our neighborhood yesterday, so this month's Bread Baking Babes bread, Nut Roll Coffee Cake from our Kitchen of the Month Jaime of Life's a Feast, is perfect because it has the cinnamon and nuts that hint of holiday baking to come.

I only made half the recipe, baking it in a long loaf pan, but this one is so delicious that I urge you to make the full recipe, if only so that you can share it with friends. A rich, brioche-like dough is rolled around a most unusual filling. It's a nut meringue with cinnamon and the combination is amazing. Two of those lovely rolls are stacked, one on top of the other, in a tube pan, then allowed to rise a bit. After it is baked you let it cool a little bit before removing from the pan. You are supposed to let it cool completely according to the recipe, but don't. The warm, buttery, fragrant with cinnamon bread is tender and, frankly, addictive if you eat it while it retains some of the heat from the oven.

 
The remarkable thing about this bread is that it is a no-knead one. Rolling up the bread once you have spread on the meringue filling is about the hardest part of making this. If you have done anything with a jelly roll type rolling up, it will be a snap for you. The results will bring a smile to your face...and a desire for just another piece. The finished roll didn't look pretty when it came out of the pan, and it was a little hard to cut without making a mess since it had sunk a little while cooling, but it tasted so spectacular that we didn't care a bit.
 
Thanks to Jaime for picking such a perfect recipe for August. Do check out the bread baked by the other Bread Baking Babes. I'm also sending this over to Susan (Alumnae Babe) at Wild Yeast for her Yeast Spotting round up of the week.

Last, but not least, come bake with the Babes this month. Make the bread, snap a photo, send an e-mail to Jaime with a brief description of your baking experience (plus that photo) and she'll send you a Buddy Badge and include you in the round-up.

If you have kids going to school between now and the 29th, I can assure you that they will be thrilled to arrive home to the warm fragrance of cinnamon which will perfume the house when you bake this Nut Roll Coffee Cake.
 
Here is the full recipe from Jamie:
NUT ROLL COFFEE CAKE
You will need a stand mixer or beaters to whip egg whites for the meringue filling and a 10-inch (standard) tube pan.

For the dough:
2 packages (1/4 ounce/7 g each) active dry yeast
¼ cup (@ 65 ml) warm water (110°F to 115°F)
16 Tbs (225 g) unsalted butter, melted
½ cup (125 ml) warm 2% fat/lowfat milk (110°F to 115°F)
4 egg yolks
2 Tbs sugar
¾ tsp salt
 2 ½ cups (350 g*) all-purpose flour (I use French regular flour), more as needed

* when I measure flour I spoon lightly into the measuring cup and then level off so 1 cup usually weigh approximately 140 g 

For the filling:
3 egg whites
1 cup + 3 Tbs sugar, divided
2 cups ground walnuts
2 Tbs 2% fat/lowfat milk
2 tsps ground cinnamon

The day before, prepare the dough:
In a large mixing bowl, dissolve the yeast in warm water. Add the butter, milk, eggs yolks, sugar, salt and flour. Beat until smooth – the mixture will be sticky. Cover and refrigerate overnight.

The day of baking, prepare the filling:
In a small bowl, beat the egg whites on medium speed until soft peaks form. Gradually beat in 1 cup sugar, about 2 tablespoons at a time, on high speed until the sugar is incorporated and dissolved.

In a large bowl, combine the walnuts, milk, cinnamon and remaining sugar; fold in the meringue.

Prepare the Coffee Cake:
Grease a 10-inch tube pan.

Divide the dough in half. On a well-floured work surface, roll each portion into an 18 x 12 –inch (45 x 30 cm) rectangle. Spread half of the filling evenly over each rectangle within 1/2 –inch (1 cm) of the edges. Roll each up jelly-roll style, starting with the long side; pinch seam to seal.

Place one filled roll, seam side up, in the greased tube pan. Place the second roll, seam side down.
Let rise for 1 hour. Preheat the oven to 350°F (180°C).  Bake in the preheated oven for 40 – 45 minutes or until puffed and golden brown. Remove from the oven and cool for 10 minutes before removing the coffee cake from the pan to a cooling rack to cool completely. Top may crack when cooling.

Eat as is or drizzle with glaze or dust with powdered sugar.

Thursday, February 21, 2013

A Twist on Irish Soda Bread


It was rainy day before yesterday, the perfect weather for winter in Northern California. It's also good weather for baking. I have been trying to bake less because I'm reducing my caloric intake and Sweetie finds that when I bake less he weighs less, too. Tuesday all those thoughts went out the window because it was the perfect afternoon for tea and something baked. The questions was, what to bake? I have some new baking related cookbooks with recipes begging to be made...and I will. But sometimes the best thing to do is just to put a twist on an old familiar recipe. I discovered a few strips of bacon in the fridge, some pecans in the depths of the bottom shelf of the fridge and a nice jug of maple syrup from Costco that isn't getting any younger. Best of all I had a quart of buttermilk...more than enough for a nice loaf of Irish Soda Bread.

I love making Irish Soda Bread. It doesn't need any eggs, it goes together quickly, it is free form and looks very artisanal without trying, and it is delicious warm or cold. Fresh out of the oven (and cooled only slightly), it is heavenly.

So the twist this time was to make Pecan Bacon Maple Irish Soda Bread. Perhaps that makes it more Southern than Irish, but the original recipe is from my very Irish Aunt May, so I'm calling it that even with the additions.

The bacon was the star here, followed by the pecans. Who can hate bacon combined with pecans? The maple flavor was a harmonious background flavor, less assertive than I had thought it would be given that I used a full 1/2 cup! The buttermilk gave it moistness and a bit of a tang. I had to hide 3/4 of the loaf so that Sweetie wouldn't gobble it all up, it was that good! You don't need any additional butter, but it is hard to resist slathering on some. If you made up some maple butter that would be a grand addition.

The key to success with this recipe is to handle things gently, especially the dough once the liquid has been added. The mass of dough going into the oven looks like it barely holds together, but it bakes up as a nice craggy loaf with a tender interior. Too much or too firm handling will give you something more akin to a brick, so resist making a nice, neat loaf, OK?


Maple Pecan Bacon Soda Bread
Makes one large loaf

4 1/4 cups all-purpose flour
1 teaspoon baking soda
½ teaspoon baking powder
½ teaspoon salt
8 oz. (2 sticks) cold butter, in thin slices
½ cup chopped pecans
1/4 cup cooked, crumbled bacon
½ cup maple syrup
2 cups buttermilk

Sift the dry ingredients over the butter and cut in well with a fork or pastry blender. Add nuts and bacon; mix in gently but well. Add the maple syrup to the buttermilk and make a well in the dry ingredients. Pour in the buttermilk mixture, then mix just until moist - don’t over handle.

Some dry stuff is OK but the dough should be sticky.

Pat into a round on a parchment-lined cookie sheet. Cut a cross on top. Bake 45 minutes at 350 F. Cool a bit before slicing.

Good with a spread made of softened butter and maple syrup, whipped together.
 

Monday, November 26, 2012

Buttery Ravioli

I'm not a big fan of standard time, having decided years ago that daylight savings time is far better and should just be the time we use year 'round. It makes no sense to me that as the days grow shorter we switch to  standard time where an extra hour at the beginning and end of the day is in darkness or nearly so. Sweetie has been playing tennis with his friends after they finish work for most of the spring, summer and fall. Once the time was moved to standard they had to quit playing an hour earlier. If that meant that in the morning it would be light maybe I could understand but the days are so short by the time that daylight savings time ends that it is still pretty dark at 7 am, which became 6 am. Does that mean that there is more light at 8 am, which became 7 am? A little but hardly enough to warrant switching.

For me the worst part is that my photos of food suffer. I mostly use natural daylight for my shots and so that means middle of the day photos. When I'm trying to get a good photo of breakfast or dinner food I turn on all the lights I can, but everything takes on a golden tone. Sometimes that is pretty, sometimes not.

Tonight I cooked a lucious dish for dinner. It closely resembled one I had for lunch at a Santa Rosa restaurant a week before. The photo makes it look more orange than it really was, but those round butternut squash ravioli were a bit orange to begin with. You can't see it, but underneath there is a bed of fresh baby spinach. On top of that there is a warm mixture of fresh white corn, cut off the cob, mixed with diced red and yellow bell pepper and just a hint of finely chopped red onion. Next come the just cooked ravioli and a sprinkle of cubed fresh butternut squash which had been roasted until very soft and tender inside and a bit crusty on the outside. A drizzle of melted butter to which a lot of fresh, minced, sage was added and you have the dish. It was a wonder of contrasts...crisp chilled spinach, warm, soft, buttery ravioli, crunch but warm corn, zesty red bell pepper, zingy red onion, very herby sage. Sweetie loved it and ate every last bit. I served it with some sliced heirloom tomatoes and corn muffins. It was almost comfort food and seemed very much a harvest meal.Totally delicious!

The key for this dish is planning. The squash needs to be roasted first. The spinach has to be washed and dried and put in the fridge to crisp up. It doesn't take lond to cut the corn from the cob or dice the peppers or chop the onion and sage, but those are good things to do while the water comes to a boil for the ravioli. While they cook you can melt the butter and add the sage, slice and arrange and dress the tomato slices and heat the corn mixture. Just before the pasta is done is the best time to layer the spinach in the bowls. While the cooked pasta drains you can add the warm corn mixture on top of the spinach, then the pasta, the roasted squash and the butter drizzle. It's a good idea to serve it right away while the pasta is still warm and the spinach hasn't wilted from the warm elements in the dish.

Butternut Squash Ravioli with Warm Corn Salad, Spinach, Butternut Squash and Sage Butter

2 cups peeled and cubed butternut squash, seeds and stringy parts removed
1 tablespoon olive oil
salt and pepper to taste
4-5 cups fresh baby spinach
2 ears fresh corn, husks and silks removed
1/2 medium red bell pepper, seeds and ribs removed
1/4 medium yellow bell pepper, seeds and ribs removed
1 tablespoon finely chopped red onion
4 tablespoons salted butter, melted
2 teaspoons finely chopped fresh sage
1 5-oz. package fresh butternut squash and cheese ravioli, uncooked

Toss the butternut squash cubes in a plastic bag with the oil, salt and pepper. Spread on a parchment lined baking sheet and roast in a preheated 450 degree oven for 10 minutes. Stir and roast another 10 minutes. Remove from oven and keep warm.

Wash and drain and dry the baby spinach. Wrap in a tea towel and refrigerate until ready to serve.

Using a sharp knife, cut the corn from the cobs. Dice the red and yellow peppers into 1/4 inch dice. In a microwave safe bowl combine the corn kernels, all the peppers, the red onion. Set aside.

Heat 4 quarts water in a large pot over high heat until it comes to a boil. About 10 minutes before you plan to serve the dish, slide the ravioli into the water and stir. Continue to stir and/or turn the ravioli over as the pasta cooks, with the heat on medium-high, for 5-6 minutes or until pasta is tender.

While pasta cooks, mix the melted butter and fresh sage and keep warm.

Heat the corn mixture in the microwave on HALF power for 2-3 minutes, until just barely warm.

In a large bowl, like a soup bowl, layer the fresh spinach, topped by the corn mixture. Gently remove the pasta from the simmering water when it is cooked and drain in a collander. When drained, place about 5 ravioli for each serving on top of the corn mixture in the bowl. Scatter the warm squash cubes over and drizzle with the sage butter. Serve at once. Serves 2.