Showing posts with label walnuts. Show all posts

Thursday, February 08, 2024

Joy of Cooking Muffins


I've been baking from The Joy Of Cooking cookbook for longer than I can remember. This is one of those full compendium type cookbooks and it's from before there were photographs with recipes, although there are some line drawings here and there.

Another feature is that the recipes are written as directions, with the ingredients and amounts coming as part of the recitation of oven temperatures, bowls to use, pans to bake in, etc.

I prefer a recipe where the ingredients are listed first so that I can make sure at a glance that I have the stuff I need to make the item(s). Since I have a well-stocked kitchen it is very likely that I'll have the pan or pot or implement needed, but missing an ingredient is often a reason I decide to not make something.

Recently I made some healthy-ish muffins based on a recipe in the Joy of Cooking book. The recipe was for Cooked Cereal Muffins. Mine also included added nuts and seeds, plus dates.

The key thing to remember for this recipe is to cook the cereal (I used oatmeal!) far enough in advance that it can cool to room temperature. While it is cooling, the melted butter can also cool a bit. The egg and milk can use that same time to warm up a bit closer to room temperature. While those things are cooling or warming, you can chop the nuts and seed and chop the dates. After that it all goes together pretty quickly. I did use brown sugar instead of white, for flavor, and added a bit of baking soda because the muffins were baked in two batches in 8-pan tins.

This past weekend we had some major storms, including a cyclone. The winds toppled trees all over the county and beyond, which meant that many electrical wires also came down. There are still areas and thousands of customers without power today. Fortunately we were only without power for about 30 hours. We have generators which we ran for a couple hours twice a day to keep frozen stuff frozen, but not a lot more. The local internet provider also lost lines so it was even longer before that was back. Still, we were lucky that there was no damage to our property and only a few pretty small tree limbs came down.

Fortunately I had made these muffins the night before, so at least we had yummy date-walnut-oatmeal-seeds muffins to enjoy. I hope that you enjoy them, too.


Cooked Oatmeal And Seedy Muffins With Walnuts and Dates

Joy of Cooking variation

2 eggs at room temperature

½ cup rolled oats cooked in 1 cup water, then cooled to room temperature

1 cup + 2 Tablespoons milk at room temperature

4 Tablespoons/4 oz./ ½ stick butter, melted and cooled

1 ½ cups all- purpose flour

1 Tablespoon brown sugar

½ teaspoon salt

2 teaspoons double-acting baking powder

¼ teaspoon baking soda

¼ cup walnuts, chopped

¼ cup pitted and chopped dates

1/3 cup King Arthur Baking Harvest Blend mixed seeds

 Preheat oven to 400 degrees F. Grease 16 muffin cups – baking spray works well.

 
Crack the eggs into a medium bowl, then mix the eggs with a fork to break them up a bit. Add to the cooled cooked cereal gradually and use the fork to break down any lumps as you combine the eggs and cereal. Add the milk and melted butter and combine.

 
In a large bowl whisk together the flour, sugar, baking powder and baking soda and salt. Stir in the chopped walnuts, dates and the seed mixture. Pour in the liquid mixture and use the fork to stir until just combined.

 
Scoop batter into the muffin cups to about 2/3 full. If any of the cups are left unused, add a tablespoon of water to that cup instead.

 
Bake for 20-25 minutes or until muffins are golden brown and spring back when you push down gently.

 
Serve at once. Butter goes well with these muffins which are hearty and delicate at the same time.


Saturday, December 16, 2023

A Bread To Love


This is going to be my last Bread Baking Babes bread for a while, because I find that I don't make bread much anymore and Sweetie has no willpower to not eat fresh bread and is happy I'm baking less. Better for our waistlines, too. I'll still be blogging and checking on the 16th of each month to see what the others have been up to...and you should too.

The good news is that I'm Kitchen of the Month for December 2023 and I chose a wonderful bread - Fougasse. This one is often called Leaf Bread, too, because the bread is shaped like a large leaf (or Christmas tree!) and you cut the leaf veins so that this sort of flat bread looks like a leaf and tears or breaks apart for sharing very easily.

I made two versions of fougasse for this challenge. The first, which ended up being shaped similar to a Christmas Tree, was with chopped rosemary and topped with more rosemary and with sea salt. It makes your house smell delicious as it bakes and is quite tasty.

The second fougasse was shaped like a verrrry wide square-ish leaf and was flavored with both chopped walnuts and crumbles of blue cheese. That made a nice combination and went well with our bean soup. That's the photo at the top. You can see that it's an unusual shape for a leaf...and that the blue cheese melted and ran, which made it taste even better, I assure you.

The recipe given makes enough dough for 4 fougasse of about 450 grams each. Before you decide to cut the recipe in half or quarters, remember that if your fridge has room, this dough can sit in your fridge for many days, getting a better flavor each day, so you can bake the four loaves over a week or so and have lots of fresh, delicious, fragrant bread.

Fougasse is pretty flat but it should be fairly fluffy inside but it does have a lot of thin crustiness because of the cuts that create the veins. 


If you bake along with us and want to be a Buddy, be sure and email me your URL and a photo and a short description of your bake and I'll send you a Buddy badge. You have until Dec. 29th to get that to me at plachman -at-sonic-dot-net.

Be sure to check out the bakes that the other Babes have done, too. We have a very creative and supportive group and I will miss the monthly bakes and especially the bakers!

I forgot to mention that this bread makes a great gift, too...which is handy as it is gift giving season.

Let's think about baking this...You can use sourdough starter or dry yeast, you can flavor it with rosemary and sea salt...my favorite...but you could use other seasonings like oregano, basil, lemongrass...or use seeds like poppy seeds or sesame seeds to enhance the bread. Consider adding cheese, like a good strong blue cheese, and maybe some walnut pieces. Maybe you would like citrus zest added, or perhaps olives.

Let's see what you come up with. The basics of the challenge are to make a leaf shaped, slashed bread, preferably with the recipe(s) below, but you decide the shape, flavorings, and if you will use sourdough starter or not.


Fougasse with Rosemary and Sea Salt

Preferment:
1/4 teaspoon active dry yeast
2 cups lukewarm water (not hot), divided
2 cups bread flour, divided


Mix together 1/4 teaspoon active dry yeast, 1 cup lukewarm water and 1 cup bread flour in a bowl. Cover lightly and let sit for 1 hour. Add an additional 1 cup lukewarm water and add additional cup bread flour and mix until all new ingredients are incorporated. Let sit for at least an hour for flavor (or refrigerate overnight, then bring to room temperature).

Dough
all of Preferment
4 tablespoons olive oil, divided
1 cup water, divided
1/4 teaspoon active dry yeast
4 - 5.5 cups unbleached bread flour
2 teaspoons salt
2-3 tablespoons olive oil from brushing
1-2 tablespoons chopped fresh rosemary
1/2 - 1 tablespoon fresh rosemary for top of dough
1-2 tablespoons sea salt for sprinkling

In the bowl of a stand mixer place the Preferment.  Add 3 tablespoons of the olive oil and mix briefly just until the oil is mixed in.

Make sure the water for the dough is lukewarm, not hot. Take 1/4 cup of it and add the dry yeast in a small bowl. Let sit 5 minutes until foamy.

Add the rehydrated yeast, the rest of the warm water, and about half the flour (2 cups) to the mixture in the stand mixer bowl. Mix with the paddle.

Switch to the dough hook. On slow speed add the remaining flour, a half cup or so at a time, adding only a few tablespoons at a time toward the end. The dough will be soft. Add the salt and then knead with the dough hook on low to medium low speed for about 6 minutes, until the dough cleans the sides of the bowl and is smooth. If necessary, add up to an additional cup flour so that dough is soft but firm. Turn kneaded dough out on a lightly floured board or counter and knead a few turns to make sure all flour is incorporated.

Form the dough into a ball. With the remaining tablespoon olive oil, oil a large bowl and turn the dough ball in the oil to coat. Cover with oiled plastic wrap or a clean shower cap and place in a warm place and let rise until doubled in bulk. This usually takes a couple of hours but check often. Dough is ready when a finger poked into the dough leave an indent that stays.

Shaping: About an hour before baking the fougasse, punch dough down, and turn the dough out onto a lightly floured board. Knead a few times to get rid of the extra trapped gas. Divide it into four pieces weighing about the same. Take one of the pieces and knead in the chopped fresh rosemary, then press it out into a leaf shape. Use your clean hands to press it to about 10-11-inches on a side and about 1/2 - 1-inch high. Wet hands if necessary, so that dough doesn't stick. (I shaped it into a tall triangle.)

Place the shaped dough onto a piece of baking parchment which has been placed on a baking sheet. Using a bench scraper or stiff plastic scraper or something similar, cut into the dough to make leaf 'veins' - see photo at top of post. Use your fingers to gently spread out the dough to open up the cuts. Keep the leaf shape. Repeat if desired with the other pieces of dough, making four leaves, which can be flavored differently if desired, or store rest of dough, covered, in fridge, until ready to use.

Cover with lightly oiled plastic wrap, oiled side down, and let rise for about 30 minutes. Leaf will get puffy. If holes close up, gently open them again with your fingers after removing the plastic wrap.

While leaf is rising, preheat the oven to 425 degrees F. If you have a pizza stone, put it in to preheat too.

Use a pastry brush to lightly brush the surface of the leaf with olive oil, then sprinkle with some fresh rosemary and sea salt.

Bake in the preheated oven for 15-20 minutes until dark golden brown. Remove from oven, cool a bit on a wire rack after having removed it from pan and parchment. Serve while still warm, breaking off pieces of the leaf, or cutting into portions.

Don't care for rosemary and sea salt? Just replace those with your favorite enhancements.

or, for Sourdough:


Sourdough Fougasse
2 cups 100% hydration sourdough starter
4 tablespoons olive oil, divided
1 cup water, divided
1/4 teaspoon active dry yeast
4 - 5.5 cups unbleached bread flour
2 teaspoons salt
additions like cheese, nuts, herbs, citrus peels, olives, etc.

In the bowl of a stand mixer place the sourdough starter. Add 3 tablespoons of the olive oil and mix briefly with the paddle attachment just until the oil is mixed in.

Make sure the water is lukewarm. Take 1/4 cup of it and add the dry yeast. Let sit 5 minutes until foamy.

Add the yeast, the rest of the warm water, and about half the flour. Mix with the paddle.

Switch to the dough hook. On slow speed add the flour, a half cup or so at a time, adding only a few tablespoons at a time toward the end. The dough will be soft. Add the salt and then knead with the dough hook on low to medium low speed for about 6 minutes, until the dough cleans the sides of the bowl and is smooth. Turn out on a lightly floured board or counter and knead in most of the rosemary, leaving about a teaspoon for the top.

Form the dough into a ball. Oil a large bowl (not metal) and turn the dough ball in the oil to coat. Cover with plastic wrap and place in a warm place and let rise until doubled in bulk. It took mine four hours, but even my 'warm' place wasn't as warm as it should have been.

Punch dough down, turn out of the bowl onto a lightly floured surface, knead a few times to get rid of the extra trapped gas.

Use the Instructions for Shaping and Baking in the recipe above.

Elizabeth gave us the recipe to include weights. I'm a complete fool when it comes to conversions, but I think Elizabeth knows what she is doing. Thank you Elizabeth!

FOUGASSE WITH ROSEMARY AND SEA SALT
(for 4 fougasses)

PREFERMENT
1/4 teaspoon active dry yeast [0.75 grams]
2 cups lukewarm water (not hot), divided [480 grams?]
2 cups bread flour, divided [240 grams]

DOUGH
all of Preferment [720 grams?]
4 tablespoons olive oil, divided [50 grams]
1 cup water, divided [240 grams]
1/4 teaspoon active dry yeast [0.75 grams]
4 - 5.5 cups unbleached bread flour [480-660 grams]
2 teaspoons salt [12 grams]

TOPPING
2-3 tablespoons olive oil from brushing
1-2 tablespoons chopped rosemary
1-2 tablespoons sea salt for sprinkling

SOURDOUGH VERSION:
2 cups 100% hydration sourdough starter [720??? grams]
4 tablespoons olive oil, divided [50 grams]
1 cup water, divided [240 grams]
[strike]1/4 teaspoon active dry yeast[/strike]
4 - 5.5 cups unbleached bread flour [480-660 grams]
2 teaspoons salt [12 grams]
additions like cheese, nuts, herbs, citrus peels, olives, etc.
~~~~~~~~~~~~~~~~~~

If I were going to make a wild version, I think I might be a bad BBBabe and try following this previous wild yeast one I made, but leave out the poppy seeds:
https://etherwork.net/blog/wild-fougasse-with-poppy-seeds/.

Karen converted the starter, flour and salt for half the original recipe to grams. Thank you Karen!
1 cup starter = 227 to 241 grams
2 to 2 3/4 cups flour = 240 to 330 grams (I used 260 grams)
1 teaspoon table salt = 6 gram

Cathy of Bread Experience has a great post which includes instructions and photos for shaping, as well as a delicious spelt and asiago cheese version!

Monday, November 13, 2023

Tea Bread To Share...Again


My last post was for a spicy, moist, delicious gingerbread that you can bake in smaller pans, which make it easy to share. As we start gearing up for the holidays, I hope to post some more sharable baked goods so that you can choose to bake a small goodie as a gift for friends, family and neighbors instead of spending money buying them something. People truly appreciate gifts that are handmade...as long as they are also tasty.

This time the gift is for family members, but it works just as well for friends and neighbors. The batter for this yummy pumpkin chocolate chip bread was baked in four small loaf pans. Each little loaf will yield slices to go with a hot beverage like coffee, tea, or cocoa. Since the family members who will be receiving theses little pumpkin delights have a tradition of afternoon coffee with a little something sweet, I suspect the little loaves will be gone in no time!

This recipe goes together quickly. Be sure to divide the batter evenly between the pans and don't over-bake. I would suggest checking them at least 5 minutes before they are supposed to be done. Have some foil handy to cover them if the tops seem to be browning too quickly. 


Pumpkin Nut Bread…with Chocolate
Makes 1 loaf


                                                        Large Loaf

1 ½ cups all-purpose flour
½ cup whole wheat flour
½ teaspoon baking soda
2 teaspoons baking powder
1 teaspoon salt
1 teaspoon ground cinnamon
½ teaspoon ground nutmeg
¼ teaspoon ground cloves
1 cup canned solid pack pumpkin (not pumpkin pie filling)
1 cup brown sugar, packed
½ cup milk
2 eggs
1 cup chopped walnuts
1 cup semi-sweet chocolate chips

Preheat oven to 350 degrees F. Grease a 9x5x3 loaf pan or four small loaf pans. (I used a baking spray that includes flour.)

Combine dry ingredients in a large bowl (both flours, soda and powder, spices).

Put the pumpkin, brown sugar, milk and eggs in a mixing bowl and mix until well blended.

Add the dry ingredients and begin to combine. Add the nuts and chocolate chips and mix just until all are well blended.

Pour into the prepared pan and smooth the top. Bake in preheated oven 45 to 55 minutes or until toothpick inserted in center comes out clean.

If baking the four small loaf pans, divide the batter evenly between the pans and smooth the top. Bake in the preheated oven for 25-30 minutes, or until toothpick inserted in the center comes out clean.

Cool in pan(s) five minutes, then turn out of pan(s) and cool top side up on a cooling rack.


Wednesday, October 11, 2023

Using Fall Fruits and Nuts


 After our recent days of Indian Summer - three days in a row of temperatures in the mid to upper 90s!...we dropped 30 degrees day before yesterday and also had rain...and then more rain yesterday afternoon. Not a downpour, but soaking mist with short runs of medium raindrops. The good news is that it should be enough to keep autumn forest fires at bay for another week or two. The bad news is that it isn't enough to help the water table. The other good news is that it cooled things down enough for baking!

Fall fruits are some of my favorites. Pears are mellow and juicy, the fragrant quince at the foot of the driveway turn from fuzzy to golden and shiny, and the persimmons are just beginning to turn colors on their way to a deep orange. Walnuts and pecans also are harvested in the fall. This year the squirrels and crows have gotten almost all of the walnuts, but I haven't had time to shell them anyway, so that's fine. The walnuts and pecans in this recipe are from Costco. The pears are from in town, carefully ripened in a brown paper bag. I still have some of all of them, so who knows what recipes will show up her in the next little while?

The honey is a very special harvest. It came from the hives of some friends of Sweeties...he went to middle school and high school with one of the friends and they hadn't seen each other in a very long time, but we had a great lunch with them. The honey is full flavored and so delicious! I'm sure that this tart would not have been nearly as wonderful without this special honey.

I started with a recipe from almost the beginning of my blogging time, way back in February of 2007. The recipe for a Nut Mosaic Tart comes from Sunset magazine from 1983. I even got a comment at some point from someone who had lost the recipe and had been delighted to find it again.

As you know if you have been following this blog, I often take a recipe and play with it. This time I took the tart recipe and reduced the nuts but added poached and peeled Bosc pear and poached and peeled pineapple quince. I used a pre-made refrigerated pie crust in the tart pan, tucking the excess into the tart and pushing the doubled sides into the tart pan curves. Then I ran a rolling pin over the top to cut off any excess dough and neaten the top. That's all it took to have a tart shell ready to fill.

The most time-consuming part is poaching, peeling, and chilling the fruit. Be sure to pat off excess liquid with a towel or paper towel before chilling. I didn't do that with the pear and so the pear nearly fell apart plus it made the filling just a bit liquid where the pear was.


The taste of this tart is amazing! All of the elements go so well together. It is fragrant with the quince, honey and orange zest, plus the roasting nuts while baking. I does need to chill a bit before serving, but once you do you will be so glad that you made this delicious Harvest Mosaic Fruit and Nut Tart!


Harvest Mosaic Fruit and Nut Tart
Adapted from a Sunset Magazine recipe from around 1983

1  9-inch tart pan lined with pie dough

1 large Bosc pear, ripe, poached until tender, peeled, cored, tossed with lemon juice and chilled in an airtight container for at least 4 hours. 
2-3 large quince, ripe, poached until tender, peeled, cored, tossed with lemon juice and chilled in an airtight container for at least 4 hours

1 cup walnuts, chopped roughly
1/2 cup pecans, whole
3 eggs
1 cup honey
½ teaspoon grated orange peel
1 teaspoon vanilla
¼ cup butter or margarine, melted
Sweetened whipped cream (optional)


Press pie pastry evenly over the bottom and sides of an 9-inch tart pan with a removable bottom. 

Arrange slices of poached pear and quince, alternating, with small end in the middle and larger end of each slice toward the side. Set aside.

In a bowl, combine eggs, honey, orange peel, vanilla, and melted butter; beat well until blended. Stir in nuts. Pour over fruit into pastry-lined tart pan. If needed, move the nuts around with a fork to scatter them evenly around and over the fruit. 


Bake on the bottom rack of a 350 degree F oven until the top is golden brown all over, about 40 minutes.

Let cool on a wire rack. Remove pan sides. Offer wedges with whipped cream, if desired. Makes 10-12 servings.

Sunday, April 30, 2023

For All You Chocolate Lovers


It's been a while since I baked anything with chocolate...which is too bad because chocolate treats are some of the best. Sweetie likes his on the soft side, so I wandered through my cookbooks and found a recipe in Dorie Greenspan's Dorie's Cookies that sounded just right. A bar cookie, so easy to make multiple servings, all at once. The addition of walnuts adds to the joy. A little espresso brings out the chocolate richness. Extra chocolate in the form of chips or chunks (I went with the latter). Don't overbake...and that's chocolate perfection.

This cookie is a cross between a blondie (due to lots of brown sugar), a brownie (it even has the paper thin 'crust' that good brownies often have), and, according to Dorie, shortbread. I suspect I would have had to cook mine longer to get that last one, but, again, Sweetie like his cookies soft and even gooey.

They were a hit! I served them for tea one day, with lunch another, for a snack at tea time another and even put one into a lunch bag with sandwich and apple for a friend who was driving a long way home and needed lunch...and maybe dinner...from it all. You choose if you go for the really gooey inside pieces or the outside ones that have a firmer texture except for the corner toward the center on each, where they, too, are gooey (see photo below- right hand corner is toward the center, left side is outside edge). Enjoy the sweet chocolate flavor offset by the espresso powder and the chewy walnuts...and the occasional burst of chocolate chunks. Wonderful!!


Fudgy Mocha Bars

from Dorie Greenspan's Dorie's Cookies
16 squares

1 3/4 cups (238 grams) all-purpose flour
1/4 cup (21 grams) unsweetened cocoa powder
1 1/2 tablespoons ground espresso or coffee beans (or instant)
3/4 teaspoon baking powder
1/4 teaspoon baking soda
1 1/2 sticks (12 tablespoons; 6 ounces; 170 grams) unsalted butter; cut into chunks, at room temperature
1 1/4 cups (250 grams) packed light brown sugar
2/3 cup (134 grams) granulated sugar
1/2 teaspoon fine sea salt
2 large eggs, at room temperature
2 teaspoons pure vanilla extract
1 cup (6 ounces; 170 grams) chocolate pieces (finely chopped in recipe, chunks in my version) - semisweet, bittersweet or milk
1 cup (120 grams) walnuts (finely chopped in recipe, coarsely chopped in my version)

Preheat oven to 350 degrees F. - center rack in the oven. Butter or spray with baking spray a 9-inch square baking pan and line bottom with parchment paper.

Whisk the flour, cocoa, espresso, baking powder and baking soda together in a bowl. Set aside.

Working with a stand mixer fitted with the paddle attachment, or in a bowl with an electric hand mixer, beat the butter, brown and white sugars and salt together on medium speed for 2 minutes, until smooth.

Add the eggs, one at a time, beating for 1 minute after each addition. Beat in the vanilla. Use a flexible spatula to scrape down the sides and bottom of bowl and the beaters.

Add the dry ingredients all at once. On lowest speed, pulse on and off (to avoid most of the flying flour) a few times then beat on low until almost incorporated. 

Add the chocolate and nuts and mix briefly, then finish mixing in by hand with the spatula. The finished dough will be sticky and heavy. Scrape the dough into the prepared pan and use the spatula to push the dough into the corners and to even the top as best you can.

Bake for 33-36 minutes, rotating the pan after 15 minutes. When done the top will be dry and papery and a tester inserted in the center will come out clean (unless you hit a chocolate chunk like I did!). Transfer to cooling rack and let cool 30 minutes.

Gently run a table knife around the sides of the pan. Invert the cookie block onto the cooling rack, then invert again onto a cutting board. Cut into 16 squares. Let cool or eat warm. Store any leftovers at room temperature, wrapped, for up to 3 days. Tightly wrapped, they can be frozen for up to 2 months.

Thursday, December 01, 2022

Walnut Cranberry Tart for the Festive Season


Welcome December! We had lots of rain last night and this morning!! With the prolonged drought we have been in here in California, this is cause for celebration. Of course the coming holidays are also cause for joy...and lots of baking and making. Here is the first recipe I recommend to you, dear reader, for you holiday baking. It's a keeper. Do read through the full post before making it...there are tips for you.

I bought a bag of fresh cranberries sometime in early November. I do this almost every year because I know that before they get too old I'll come across a recipe or recipe idea where you need fresh cranberries...and there they will be in the bottom crisper drawer in the fridge.

That happened last week. There was no time to make the tart for Thanksgiving, but that weekend I had the time, so I made this delicious tart which combines walnuts, fresh cranberries, orange, and some brandy.

Instead of making a tart dough, I just used a refrigerated, rolled out pie dough circle. Once I fit it into my 9" tart base and pushed the dough up the sides, there was just enough to fold the rest of the dough down along the sides and push it into the sides...so I had double thick sides but a single thickness on the bottom. Of course a home made pie dough is delicious, so if you prefer to do that, the recipe is below the recipe for the tart.

Because I didn't have the size tart pan called for in the recipe (10-inch is called for but I had a 9-inch one), I knew that there would be extra filling. My solution was to let the fruit and nuts settle a bit after I mixed them into the filling, and then I poured out about a third of the filling into a spare bowl. I poured the rest into the tart shell and then topped it up with the filling in the spare bowl. It worked just fine, but I had leftover filling...without many bits of cranberry or nuts. My solution was to spray a pie dish with baking spray and then I added about a half cup of walnuts to the spare bowl and the filling still left in it. That mixture went into the prepared pie dish and it was baked at the same temperature...but for only about 15-20 minutes until the mixture was set. Sweetie had some after it cooled and he liked the mostly nuts version...without any crust!...better than the tart. I liked the tart better. I think that the cranberry added a freshness that the 'mainly nuts' filling didn't have. Still, if you would like to put in more walnuts and fewer cranberries (or none), feel free. I think you'll find that the orange-brandy-brown sugar filling works well with both.

Bakers tip: Zest the orange before you juice it.


Cranberry Walnut Tart

by Michele Anna Jordan, as published in the Nov. 23,2022 Press Democrat newspaper
Makes 6-8 servings

Pastry dough (recipe follows) (or do as I did and use ready made pie dough circles)

3 eggs
1/2 cup brown sugar, packed
1 cup agave nectar or maple syrup (I used 1/2 cup pure maple syrup and 1/2 cup dark brown Karo syrup)
1/2 cup (1 stick) butter, melted and cooled
1 teaspoon vanilla
1 tablespoon brandy
1 tablespoon fresh orange juice
2 teaspoons grated orange zest
3/4 teaspoon salt
3/4 cup fresh cranberries, minced
1 cup walnuts, toasted and coarsely chopped

First, make the pastry dough and chill it according to the instructions in the recipe.  Then, on a well-floured surface, roll out the dough into a 12-inch circle. Carefully lift the dough and put it into a 10-inch tart pan with a removable bottom, pressing it gentle at the inner edge and crimping it all around. Cover and refrigerate until ready to fill. (Alternately, use a refrigerated pre-rolled pie dough round, folding the extra dough down the inside circumference and pressing gently into the indentations to make a double sided crust. Chill as described above.) 

Preheat the oven to 350 degrees.

Put the eggs into a medium bowl and whisk until they are thick and frothy, about 3 minutes. Add the brown sugar and agave nectar or maple syrup and stir well. Add the melted butter, vanilla, brandy, orange juice, orange zest, and salt. Fold in the cranberries and walnuts, pour the mixture into the tart shell and set on a baking sheet. Set the baking sheet on the middle rack of the preheated oven and bake until the edges of the crust are golden brown and the filling is set, about 40 minutes. (Check at about 20 minutes and thereafter; if the top is getting too brown, tent loosely with foil.)

Remove from the oven and let rest at room temperature for at least 1 hour before cutting into wedges and serving.

Pastry Dough for Pies

1 cup all-purpose flour
1/2 teaspoon salt
1/2 cup unsalted butter, chilled and cut into 4 pieces , or 4 ounces of lard, chilled
3-4 tablespoons ice water

Combine the flour and salt in a medium mixing bowl. With your fingers or a pastry cutter, cut in the butter or lard until the mixture resembles coarse cornmeal; work very quickly so that the mixture doesn't get too warm.

Make a well in the center and pour in 3 tablespoons of water. Use your fingers to mix the dough together quickly; add more water if needed for the dough to come together.

Press the dough into a ball, wrap it in wax paper and refrigerate it for at least 30 minutes and as long as 2 hours.


Sunday, October 16, 2022

Babes Bake Figgy Flatbread


It's the 16th of the month...the day for the Bread Baking Babes to share what they have been up to this month.

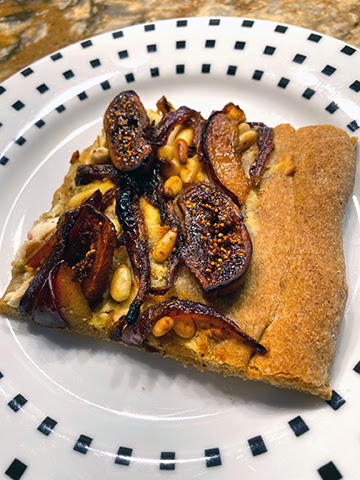
I'm Kitchen of the Month for October and I chose a lovely flatbread recipe for fall, enhanced with rosemary and figs and nuts. The recipe is from a cookbook that I found on sale at a local bookstore. The book is Joanne Weir's More Cooking in the Wine Country. The author, Joanne Weir is on a Public Televisions series 'Weir Cooking in the Wine Country II' and there are lots of delicious sounding recipes in the book. The first time I baked it I followed the recipe, but divided the dough in half and baked half with walnuts and half with pecans, plus I added some fresh figs to the dried figs. It was delicious!

For the second bake I left out the rosemary but added lemon zest along with the orange zest in the original recipe, plus I substituted pine nuts, and some whole wheat flour for part of the flour. As you can see, this is a versatile recipe. This time I had intended to weigh the ingredients, using the amounts provided by Elizabeth of Blogging from OUR Kitchen (THANK YOU Elizabeth!), but forgot to and used the cup measurements. I also used some fresh Italian prune plumbs along with the dried figs. They are in season now and added, along with the pine nuts, to the Italian feel of this flatbread. The whole wheat bread was nicely nutty but bland without the rosemary. Next time I'll stop being lazy and put in the rosemary as called for...it really does make a difference.

This is an easy dough to work with. It might seem a bit stickier than you are used to, due to the use of potato water, but use wet hands and it will be fine. If you bake this and would like to be a Bread Baking Babes Buddy, just send me an email with a brief description of your bake and a photo and the URL of your post by Oct. 29th. Email is plachman*at*sonic*dot*net. I'll send you a Buddy Badge and include you in the round-up at the end of the month. The description and photos below are from my first bake. At the bottom I have some photos from the one with pine nuts and prune plums.

Be sure to visit the rest of the Bread Baking Babes to see what marvelous flatbreads they have created.

Kelly - A Messy Kitchen - Flatbread with figs and pears

Karen - Karen's Kitchen Stories - Flatbread with figs and sherry

Cathy - Bread Experience - Sourdough flatbread with home-grown dried figs 

Judy - Judy's Gross Eats - Flatbread with apricots and almonds

Aparna - My Diverse Kitchen - Flatbread with dried figs and walnuts and onions

Elizabeth - Flatbread with dates and pine nuts and red onions

This is one of those recipes where you can do parts in advance. I made the rosemary-infused olive oil a day ahead, cooked the potatoes the evening before I made the dough, saving the potato water and re-warming it, I even soaked the figs a day early and stored them in the marsala. Even though the recipe only calls for dried figs, it's fresh fig season, so I also included sliced fresh figs and I highly recommend this change! 

The dough is slightly sticky but not a high-hydration one, just soft. Once it rose and was punched down, it was pretty easy to work with. The first piece rolled out easily but the second one needed to have relaxation time after it was flattened before it would  roll out large enough. It baked up light on the inside and crisp and lightly brown on the outside.

Because I was working with fresh figs as well as dried, I watched the flatbread carefully towards the end of baking to avoid burning the fruit...which has so much natural sugar. I had the flatbreads on pieces of parchment which made it easier to get them onto the baking stone and then out of the oven when finished, although I did use a peel, with the parchment pieces on the peel.

 I typed this up exactly as it is in the cookbook...make changes as desired, although I do encourage you to make the bread dough with the potato water and rosemary oil and chopped rosemary. If you want to use your sourdough starter, just skip the yeast/bread flour/potato water initial poolish and use 1/2 cup sourdough starter. You might need more bread flour to get the dough right, but sourdough would be great with the topping. The recipe with weights, courtesy of Elizabeth, will be at the bottom, along with the photos of the flatbread baked using those measurements.

Happy Baking!


Fig and Walnut Flatbread

from Joanne Weir's More Cooking in the Wine Country cookbook
makes 1 flatbread, serves 6

Dough
1/4 cup extra virgin olive oil
3 sprigs fresh rosemary
2 1/2 teaspoons (I package) dry yeast
1/2 cup plus 2 cups unbleached bread flour, divided
1/2 cup lukewarm potato water or plain water (110 degrees F)
1 teaspoon coarsely chopped fresh rosemary
1/2 cup potato water (additional)
1 teaspoon salt

Topping
6 to 8 dried figs, sliced
1 cup Marsala wine
3 tablespoons extra virgin olive oil
1 red onion, cut into 1/2-inch thick vertical slices
1 tablespoon sugar
1/2 teaspoon greated orange zest
salt and freshly ground black pepper
3/4 cup walnut halves

Directions
In a small saucepan, warm the olive oil and rosemary. Remove from the heat and let cool for I hour. Discard the rosemary sprigs. Set aside.

In a large bowl, mix together the yeast, 1/2 cup flour, and 1/2 cup warm potato water. Let stand 1 hour, until it bubbles up and rises. Then add the remaining 2 cups flour, the rosemary olive oil, chopped rosemary, additional potato water, and salt. Mix the dough thoroughly. Knead the dough on a floured board until it is soft but still moist, 7-8 minutes. Place the dough in an oiled bowl, turning it once to cover it with oil. Cover the bowl with plastic wrap and put it in a warm place (about 75 degrees F). Let the dough rise for 1-2 hours, until doubled in volume.

In the meantime, prepare the topping. Place the figs and Marsala in a small saucepan, and heat over medium heat until the Marsala bubbles around the edges, 1 minute. Remove from the heat and let stand for 1 hour.


Heat the 3 tablespoons olive oil in a large frying pan over medium heat. Add the onions and sugar and cook, stirring occasionally, until the onions are very soft, 15-20 minutes. Add the orange zest, season with salt and pepper, stir thoroughly, and set aside to cool.

Place a pizza stone on the bottom shelf of the oven, and preheat the oven to 500 degrees F for 30 minutes.


Form the dough into a round ball. Let it rest for 5 minutes. On a floured surface, roll the dough out to form a 9x12-inch oval, 1/2-inch thick. Place it on a well-floured pizza peel. 


Drain the figs and distribute the figs, onions, and walnuts evenly over the dough. Lightly press them into the dough. Let it rest for 10 minutes. Then transfer the flatbread to the pizza stone and bake until golden brown and crispy, 12-15 minutes. Serve immediately.


Here are the measurements by weight. Just use the instructions above to make the flatbreads.

Dough
1/4 cup extra virgin olive oil [60 ml/55 grams]

3 sprigs fresh rosemary (I skipped the rosemary in the whole wheat version)
2 1/2 teaspoons (1 package) dry yeast [7 grams]
1/2 cup plus 2 cups unbleached bread flour, divided [68 plus 274 grams] (I used all whole wheat flour)
1/2 cup lukewarm potato water or plain water (110 degrees F) [120 grams]
1 teaspoon coarsely chopped fresh rosemary [1 gram] (skipped this for whole wheat version)
1/2 cup potato water (additional) [120 grams]
1 teaspoon salt [6 grams]

Topping
6 to 8 dried figs, sliced [50 to 67 grams]
1 cup Marsala wine [240ml/240grams]
3 tablespoons extra virgin olive oil [45 ml/41 grams]
1 red onion, cut into 1/2-inch thick vertical slices
1 tablespoon sugar [12 grams]
1/2 teaspoon grated orange zest [1 gram]
1/2 teaspoon grated lemon zest [1 gram]
salt and freshly ground black pepper
3/4 cup walnut halves [75 grams] (I used untoasted pine nuts)
(I used three small prune plums, pits removed and thinly sliced...forgot to weigh them) Below is a photo of the topping. I added the drained figs and the plums once the mixture was off the heat.

Whole wheat version baked:
and served:


Tuesday, March 01, 2022

Golden Beet Salad


As we come to March we enter the time between seasons, still enjoying winter's sturdy and hearty foods while beginning to want the lighter food of spring, along with their zing. This salad fits that transition with the delicious golden beets of winter and the mixed greens and citrus dressing for the whispy part. Walnuts add crunch and remind me of fall while the orange segments lean towards spring. Most of all it's delicious!

We start by roasting the beets, then letting them cool before peeling them and cutting them into wedges. While the oven is hot, it's easy to toast the walnuts which brings out their flavor. Next comes the citrus and walnut oil dressing. Some mustard and finely chopped Italian parsley add savory elements that provide counterpoint to the sweetness of the roasted beets and the oranges. 

If you like, this salad would also be good with the addition of some salty feta cheese or some pungent blue cheese.

Once you dress the greens, I doubt that this salad would keep well, but we didn't find out...Sweetie had a second helping and finished it off!

This is my own recipe, but you can probably find similar ones on the internet. For the dressing I used Penzey's Spices dried orange and lemon peel, but it would probably be even better with fresh zest of oranges and lemons. Do use fresh lemon juice for the dressing. I have some Meyer lemons from my lemon bush and they were great, but lemons from the market work well, too. If you don't have walnut oil, a good olive oil will work well, too. Fresh orange segments instead of canned would be even better, but canned was what I had on hand and they were fine.


Golden Beet Salad with Toasted Walnuts

3-4 golden beets (1 bunch), tops removed for another use
spray olive oil
1/3 cup walnuts...pieces are OK
1 small shallot, finely minced
1/2 teaspoon each lemon and orange zest (I used equivalent dried peel)
1/2 teaspoon Dijon mustard
salt or garlic salt and pepper to taste...I used about 1/4 teaspoon pepper and 1 teaspoon garlic salt
1 tablespoon finely chopped leaves of Italian parsley; discard stems
3 tablespoons freshly squeezed lemon juice, seeds removed
1/3 cup walnut oil
1/2 cup mandarin orange segments, fresh or canned/drained
6-8 cups fresh, washed and dried, spring mix lettuce or arugula

Wash the beets to remove any soil, then cut in half (or quarters if large) and place on foil lined baking sheet that has been sprayed with olive oil. Roast in preheated 425 degree F oven for 25-45 minutes, until a skewer easily goes into center of pieces. Remove from oven and let cool. Remove skin and discard. Slice the beets into wedges. Set aside.

While the oven is still hot, toast the walnuts for 5-10 minutes, stirring every few minutes, until toasted. You will smell walnuts when toasted. Remove from oven, cool, chop roughly and set aside.

While beets are cooling, make the dressing. Combine the shallot, citrus zests, mustard, salt or garlic salt and pepper, Italian parsley, lemon juice, and walnut oil in a jar. Close lid tightly and shake until all ingredients are well blended and dressing thickens slightly. Set aside to allow flavors to meld. Right before dressing the greens, shake again and taste. Adjust by adding zest, salt, pepper and/or lemon juice as needed. It should be tangy.

When ready to serve the salad, place the spring mix in a large bowl. Add about 2/3 of the dressing; reserve any left for another salad or another use. Toss with salad fork and spoon or tongs to completely but lightly coat the leaves of the greens. If needed add more dressing, but less is best. Pile the dressed greens on a serving platter.

Add the beet wedges to the bowl that held the greens. Toss to coat with the dressing in the bowl. This is just to add a bit of shine to the beets...they don't need to be coated with dressing. Scatter the beets over the greens, then scatter over the mandarin orange segments. Top everything with the toasted chopped walnuts and serve at once.


Monday, January 10, 2022

Awesome Mushroom Tart on an Almond Freeform Crust


I love getting cookbooks for Christmas! This year I received quite a few of them, so it was challenging to pick the first recipe to make out of a new cookbook. Dorie won out...which is not surprising since her recipes are always top notch. Who is Dorie? Dorie Greenspan , one of my favorite cookbook authors, especially for baked goods. The book, received from my darling daughter and her amazing beau, is called Baking with Dorie. It has lots of sweets that I'll get to later, but the recipe that spoke to me was for a freeform tart topped with mushrooms. It's official title is Free-Style Mushroom, Herb, and Ricotta Tart. You start with a thin, crumbly crust made with almond flour and all-purpose flour, so not gluten free. This crust has lots of herbs in it. As a matter of fact, the whole tart has lots of herbs in it. The crust is topped with a ricotta-rich filling which also has herbs in it, and that is topped with cooked mushrooms...with more herbs. Then to 'gild the lily', you top the whole thing with dressed micro-greens and a drizzle of oil. I added a small amount of chopped walnuts since I used walnut oil for the drizzle and I think they added some needed crunch. Sweetie liked his tart warmed up and it really did taste better that way than at room temperature as called for in the recipe.

As with many Dorie Greenspan recipes, you can play around a bit with this recipe...use whatever herbs appeal to you or that you have on hand, mix up the mushrooms that you use, and so on. It's also a great recipe for entertaining since each of the components can be made in advance. It might seem like a long recipe, but you can make each component on a different day if you like; the spread one day, the mushroom topping another day and the crust the day you will serve it, so it's really quite manageable. You can also do it all on the same day as I did and serve it that day. 

Once it's all together I would recommend putting it on a sheet pan or cookie sheet and heating it for about 10-15 minutes at 325 degrees F. The cheese filling becomes more savory and the mushroom flavor takes over. When it's at room temperature the mushrooms are more subdued in flavor, which is a shame if you have bought the more expensive wild mushrooms.

That said, we loved, loved, loved this tart. It will go into my regular rotation and will be even better in the warmer months of the year when fresh herbs are so easy to get.


Free-Style Mushroom, Herb and Ricotta Tart
from Baking with Dorie, Sweet, Salty and Simple
Six servings

Raggedy Edged Almond-Herb Crust
1 1/2 cups (204 grams) all-purpose flour
1/2 cup (50 grams) almond flour (or an additional 1/3 cup (45 grams) all-purpose flour)
1/2 teaspoon fine sea salt
1 stick (8 tablespoons, 4 oz. 113 grams) cold unsalted butter, cut into bits (I used non-dairy margarine)
2-3 tablespoons minced fresh herbs (a mix is good - parsley, thyme, chives, dill, rosemary, scallion greens or any of them by themselves)
1 cold, large egg, lightly beaten

Put both flours and the salt in a food processor and pulse to blend. Add pieces of butter and do long pulses about 15 times until it looks like crumbs, not sand. Scrape work bowl and under blade as needed.

Drop in the herbs and pulse only to blend. Add the egg in three additions, pulsing after each addition until dough forms clumps and curds. Pinch and it should hold together. If not, add a splash of water and pulse again.

Turn the dough out and gather into a ball. Knead a few time to make dough cohesive, then gather and flatten into a disc. (I substituted the working dough with heel of your hand for the kneading and the results were good.)

Place the dough between two sheets of parchment and roll to a thickness of 1/8 inch, rolling into a rough circle of dough with ragged edges. As you roll, now and then lift of and replace the parchment...both sides in turn...to make sure to not crease dough. Remove top sheet, prick dough all over with a fork, replace parchment and slide parchment/dough/parchment sandwich onto a baking sheet. Refrigerate for at least 2 hours or freeze for at least one hour.

When ready to bake, center a rack in the oven and preheat to 400 degrees F. Peel top sheet of parchment, place it on a baking sheet, place the dough on it and cover with the other sheet of parchment, loosely, to keep tart from browning too much. Bake for 18-20 minutes, or until crust is golden around the edges. Remove the top sheet of parchment and bake for and additional 2-3 minutes to firm up the crust and give it more color. Transfer baking sheet to a cooling rack and let crust cook to room temperature. Can be made ahead but best to use within 8 hours.


The Tart

1 Raggedy Edged Almond-Herb Crust
1 recipe Ricotta Spread
1 recipe Mushroom Topping
Extra-virgin olive oil or walnut oil or toasted sesame oil
A handful of micro-greens tossed with oil, lemon juice, salt and pepper
A couple tablespoons toasted walnuts, chopped roughly


Ricotta Spread

1 cup (212 grams) ricotta
1/4 cup (60 ml) plain yogurt, preferable Greek
1/2 shallot, finely chopped, rinsed in cold water and patted dry
2 scallions, trimmed and finely sliced
1-2 tablespoons minced fresh herbs (see description in Raggedy Edged Crust above)
Fine sea salt and freshly grounds black pepper to taste

Drain the ricotta and yogurt if needed. Put into a bowl and whisk until smooth. Add the rest of the ingredients and whisk to combine. Add more salt and pepper if needed. Cover and refrigerate until ready to serve the tart. If liquid has accumulated, drain it off before using on the tart. Spread can be refrigerated up to two days.


Mushroom Topping

1 tablespoon unsalted butter (I used non-dairy margarine)
1 tablespoon olive oil
1 1/2 pounds (680 grams) mushrooms - a mix is good - ordinary ones from the market are fine, too - cleaned, trimmed and sliced
1-2 garlic cloves, minced (to taste)
3 tablespoons white wine
fine sea salt and freshly ground black pepper
3 scallions, trimmed and finely sliced (I only used one)
2 tablespoons minced fresh herbs (see description in Raggedy Edged Crust above)

Warm the butter and oil in a large skillet over medium-high heat. When the bubbles have subsided, toss in the mushrooms and garlic and cook, stirring, until the mushrooms are brown and tender and the pan is almost dry. Pour in the wine, stir and cook until it's almost evaporated. Season with salt and pepper to taste and remove the pan from the heat. Leave the topping at room temperature for up to 3 hours or pack into a covered container and refrigerate for up to 2 days; reheat in a skillet with a little water before using.


To Assemble and Serve the Tart:
Place the crust on a baking sheet and cover with the ricotta-yogurt spread.


 Stir the scallions and herbs into the mushroom topping and spoon it over the spread. 


Scatter on the walnuts and drizzle with the oil.


Reheat the tart in 325 degree F oven for 10-15 minutes, just enough to warm the tart. Remove from the oven, slide onto a cutting board or plate, and top with dressed the micro-greens. Cut the tart at the table using a pizza wheel or a long chef's knife. Serve at once while still warm.