Showing posts with label pine nuts. Show all posts

Tuesday, April 22, 2025

Pesto in a Quiche


I love making quiche for dinner and Sweetie loves eating it. The great thing about quiche is that you can put lots of different things in it and so it's a creative kind of pie.

This time I had some grilled chicken leftovers to use up, plus a few spears of fresh asparagus. I decided to do a flavor combination that has worked well for me in the past for a sandwich...chicken and pesto with roasted red pepper and Swiss cheese. I put all of those things in, plus some caramelized onion, the asparagus, and a couple large bella mushrooms, sliced. It was delicious, so I want to share with you! 

Pesto Quiche with Grilled Chicken and Roasted Red Pepper Serves 4 - 6

1 9-inch pie shell, blind baked at 425 degrees F for 10-12 minutes (use favorite pie dough recipe or pre-made)
1/3 cup caramelized yellow onion
1 cup Swiss cheese, cut into ¼ inch dice
1 cup grilled chicken thighs, cut into 1-inch cubes
4 stalks fresh asparagus, ends snapped off, spears cut into 1-inch pieces
2 large mushrooms, sliced

3 eggs (or equivalent egg substitute)
1 ½ cups evaporated milk  or light cream
1/3 cup prepared pesto
¼ teaspoon salt
dash pepper
5 or 6 strips prepared roasted red peppers
2 tablespoons pine nuts

Blind bake the pie shell in a preheated 400 degree oven, then set aside to cool.

Reduce heat setting on oven to 350 degrees F.

Caramelize the onion with a light coating of olive oil in a small crock pot or in a skillet and let cool .

Sprinkle the bottom of the pie shell with the onions and half the Swiss cheese, distributing evenly. Top with the chicken and the asparagus, then the rest of the Swiss cheese. Place mushroom slices around the outer edges of the quiche fillings. Set crust with fillings aside.

In a bowl, beat the eggs lightly with the pesto, then add the milk and beat with a fork to combine, add the salt and pepper and beat with a fork or whisk to combine.

Pour the egg/milk mixture over the ingredients in the pie shell.  There may be too much milk mixture if pie pan is shallow - don't overfill, to avoid filling running over.  Add the red pepper strips in a nice pattern on the top. Sprinkle with the pine nuts.

Put the quiche on a baking sheet. Place in the preheated oven and bake 30-45 minutes, or until set and lightly browned. (I find that setting on a parchment-lined small baking sheet is a good idea in case some of the filling spills over.) Cool for 10 minutes before cutting to serve.

Thursday, May 09, 2024

Quick Dinner


Sometimes you need or want to fix dinner quickly. I was lucky this evening to have some leftover rotisserie chicken, some ricotta tortellini, some pesto sauce, some pine nuts from the freezer, and a few veggies on hand. Put together they made a delicious meal in a very short time. Sweetie was a very happy guy and said I can make this any time.

The first thing to do is to put a big pot of water on to boil to cook the tortellini. While that's coming to a boil, toast the pine nuts in a large skillet. It only takes a minute or two. Set those aside and chop some onion - I used green onion, but yellow or white works, too. Spray the same skillet you used to cook the pine nuts with a little olive oil, then add the onions and sauté, stirring often. While those are cooking, chop some tomato...I used about a half dozen grape tomatoes. Add those to the onions, stir, and let them begin to sauté, too. Cube into bite size pieces the cooked chicken. (You could also use cooked turkey, cooked Italian sausages.) 

By now the water should be really boiling. Add some salt, if desired, and then the tortellini. Stir them every few minutes to cook the pasta part evenly, but be gentle so the fillings stays inside.

Add the cubed chicken to the onion-tomato mixture and stir to combine. Turn the heat to the lowest setting, cover and let it all heat up.

Get ready to drain the pasta when it is cooked al dente and cook about a cup of frozen peas in the microwave. Check the pasta and when it is ready, drain and put into a large bowl. Add a big scoop of pesto sauce and stir to combine with the pasta. Add the chicken-onion-tomato mixture and the pine nuts and stir gently to combine.

Serve at once with the hot peas on the side.

I know that there are no actual measurements for this recipe. If you feel you need them, make a comment asking for that and I'll try to figure out the amounts I used, O.K?

Sunday, October 16, 2022

Babes Bake Figgy Flatbread


It's the 16th of the month...the day for the Bread Baking Babes to share what they have been up to this month.

I'm Kitchen of the Month for October and I chose a lovely flatbread recipe for fall, enhanced with rosemary and figs and nuts. The recipe is from a cookbook that I found on sale at a local bookstore. The book is Joanne Weir's More Cooking in the Wine Country. The author, Joanne Weir is on a Public Televisions series 'Weir Cooking in the Wine Country II' and there are lots of delicious sounding recipes in the book. The first time I baked it I followed the recipe, but divided the dough in half and baked half with walnuts and half with pecans, plus I added some fresh figs to the dried figs. It was delicious!

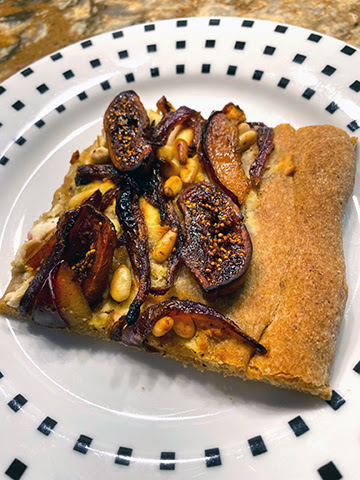
For the second bake I left out the rosemary but added lemon zest along with the orange zest in the original recipe, plus I substituted pine nuts, and some whole wheat flour for part of the flour. As you can see, this is a versatile recipe. This time I had intended to weigh the ingredients, using the amounts provided by Elizabeth of Blogging from OUR Kitchen (THANK YOU Elizabeth!), but forgot to and used the cup measurements. I also used some fresh Italian prune plumbs along with the dried figs. They are in season now and added, along with the pine nuts, to the Italian feel of this flatbread. The whole wheat bread was nicely nutty but bland without the rosemary. Next time I'll stop being lazy and put in the rosemary as called for...it really does make a difference.

This is an easy dough to work with. It might seem a bit stickier than you are used to, due to the use of potato water, but use wet hands and it will be fine. If you bake this and would like to be a Bread Baking Babes Buddy, just send me an email with a brief description of your bake and a photo and the URL of your post by Oct. 29th. Email is plachman*at*sonic*dot*net. I'll send you a Buddy Badge and include you in the round-up at the end of the month. The description and photos below are from my first bake. At the bottom I have some photos from the one with pine nuts and prune plums.

Be sure to visit the rest of the Bread Baking Babes to see what marvelous flatbreads they have created.

Kelly - A Messy Kitchen - Flatbread with figs and pears

Karen - Karen's Kitchen Stories - Flatbread with figs and sherry

Cathy - Bread Experience - Sourdough flatbread with home-grown dried figs 

Judy - Judy's Gross Eats - Flatbread with apricots and almonds

Aparna - My Diverse Kitchen - Flatbread with dried figs and walnuts and onions

Elizabeth - Flatbread with dates and pine nuts and red onions

This is one of those recipes where you can do parts in advance. I made the rosemary-infused olive oil a day ahead, cooked the potatoes the evening before I made the dough, saving the potato water and re-warming it, I even soaked the figs a day early and stored them in the marsala. Even though the recipe only calls for dried figs, it's fresh fig season, so I also included sliced fresh figs and I highly recommend this change! 

The dough is slightly sticky but not a high-hydration one, just soft. Once it rose and was punched down, it was pretty easy to work with. The first piece rolled out easily but the second one needed to have relaxation time after it was flattened before it would  roll out large enough. It baked up light on the inside and crisp and lightly brown on the outside.

Because I was working with fresh figs as well as dried, I watched the flatbread carefully towards the end of baking to avoid burning the fruit...which has so much natural sugar. I had the flatbreads on pieces of parchment which made it easier to get them onto the baking stone and then out of the oven when finished, although I did use a peel, with the parchment pieces on the peel.

 I typed this up exactly as it is in the cookbook...make changes as desired, although I do encourage you to make the bread dough with the potato water and rosemary oil and chopped rosemary. If you want to use your sourdough starter, just skip the yeast/bread flour/potato water initial poolish and use 1/2 cup sourdough starter. You might need more bread flour to get the dough right, but sourdough would be great with the topping. The recipe with weights, courtesy of Elizabeth, will be at the bottom, along with the photos of the flatbread baked using those measurements.

Happy Baking!


Fig and Walnut Flatbread

from Joanne Weir's More Cooking in the Wine Country cookbook
makes 1 flatbread, serves 6

Dough
1/4 cup extra virgin olive oil
3 sprigs fresh rosemary
2 1/2 teaspoons (I package) dry yeast
1/2 cup plus 2 cups unbleached bread flour, divided
1/2 cup lukewarm potato water or plain water (110 degrees F)
1 teaspoon coarsely chopped fresh rosemary
1/2 cup potato water (additional)
1 teaspoon salt

Topping
6 to 8 dried figs, sliced
1 cup Marsala wine
3 tablespoons extra virgin olive oil
1 red onion, cut into 1/2-inch thick vertical slices
1 tablespoon sugar
1/2 teaspoon greated orange zest
salt and freshly ground black pepper
3/4 cup walnut halves

Directions
In a small saucepan, warm the olive oil and rosemary. Remove from the heat and let cool for I hour. Discard the rosemary sprigs. Set aside.

In a large bowl, mix together the yeast, 1/2 cup flour, and 1/2 cup warm potato water. Let stand 1 hour, until it bubbles up and rises. Then add the remaining 2 cups flour, the rosemary olive oil, chopped rosemary, additional potato water, and salt. Mix the dough thoroughly. Knead the dough on a floured board until it is soft but still moist, 7-8 minutes. Place the dough in an oiled bowl, turning it once to cover it with oil. Cover the bowl with plastic wrap and put it in a warm place (about 75 degrees F). Let the dough rise for 1-2 hours, until doubled in volume.

In the meantime, prepare the topping. Place the figs and Marsala in a small saucepan, and heat over medium heat until the Marsala bubbles around the edges, 1 minute. Remove from the heat and let stand for 1 hour.


Heat the 3 tablespoons olive oil in a large frying pan over medium heat. Add the onions and sugar and cook, stirring occasionally, until the onions are very soft, 15-20 minutes. Add the orange zest, season with salt and pepper, stir thoroughly, and set aside to cool.

Place a pizza stone on the bottom shelf of the oven, and preheat the oven to 500 degrees F for 30 minutes.


Form the dough into a round ball. Let it rest for 5 minutes. On a floured surface, roll the dough out to form a 9x12-inch oval, 1/2-inch thick. Place it on a well-floured pizza peel. 


Drain the figs and distribute the figs, onions, and walnuts evenly over the dough. Lightly press them into the dough. Let it rest for 10 minutes. Then transfer the flatbread to the pizza stone and bake until golden brown and crispy, 12-15 minutes. Serve immediately.


Here are the measurements by weight. Just use the instructions above to make the flatbreads.

Dough
1/4 cup extra virgin olive oil [60 ml/55 grams]

3 sprigs fresh rosemary (I skipped the rosemary in the whole wheat version)
2 1/2 teaspoons (1 package) dry yeast [7 grams]
1/2 cup plus 2 cups unbleached bread flour, divided [68 plus 274 grams] (I used all whole wheat flour)
1/2 cup lukewarm potato water or plain water (110 degrees F) [120 grams]
1 teaspoon coarsely chopped fresh rosemary [1 gram] (skipped this for whole wheat version)
1/2 cup potato water (additional) [120 grams]
1 teaspoon salt [6 grams]

Topping
6 to 8 dried figs, sliced [50 to 67 grams]
1 cup Marsala wine [240ml/240grams]
3 tablespoons extra virgin olive oil [45 ml/41 grams]
1 red onion, cut into 1/2-inch thick vertical slices
1 tablespoon sugar [12 grams]
1/2 teaspoon grated orange zest [1 gram]
1/2 teaspoon grated lemon zest [1 gram]
salt and freshly ground black pepper
3/4 cup walnut halves [75 grams] (I used untoasted pine nuts)
(I used three small prune plums, pits removed and thinly sliced...forgot to weigh them) Below is a photo of the topping. I added the drained figs and the plums once the mixture was off the heat.

Whole wheat version baked:
and served:


Sunday, September 11, 2022

Pesto with My Garden's Basil


Pesto made with pine nuts and basil is a classic sauce for a good reason. For one thing, it smells heavenly! The bright green is enticing, too. Best of all are the robust flavors. Since I'm still not eating cheeses, I made my sauce without Parmesan cheese, but I did add nutritional yeast, plus lemon juice and zested lemon peel. Those added some complexity and the lemon added zing. 


My basil started to flower, so it was time to harvest...perhaps past time. Once rinsed, I stripped the leaves off the stem (even tiny ones) and didn't use the flowers. You need a cup, packed, so that's a lot of basil.


One of the keys to this recipe is to use a food processor and to scrape down the sides frequently so that all of the ingredients are incorporated.

This is an intensely flavored sauce, so use sparingly at first until you are familiar with the intensity.

I lightly coated cooked tortellini with this pesto and it was soooo delicious!


No Cheese Pesto


1 cup, packed, fresh basil leaves...stems discarded
2/3 cup toasted pine nuts
1teaspoon nutritional yeast
1 teaspoon lemon zest
juice from a lemon
1/3 cup olive oil, or to taste
salt and pepper to taste

In a food processor bowl fitted with the steel blade place the basil, pine nuts, nutritional yeast, lemon zest and lemon juice. Process until fairly smooth, scraping down sides as needed. With machine running, use the feed tube and add the olive oil in a thin stream until pesto is to your liking. Add salt and pepper to taste. Serve at once.

Leftover can be stored in a small glass jar. Pour a little additional olive oil gently to create a thin layer of oil on top of the pesto. This keep air out and prevents the pesto from turning brown.

Wednesday, July 29, 2020

Carrot Salad and New Blogger


First, about the new Blogger...I'm not sure that I can stand learning this new version. I had to revert to the old version to do this post since I couldn't figure out how to do a new post! It may be that when using the old version goes away in late August that new posts will go away, too. The already written posts will stay up, but who knows if I have the bandwidth to learn the new version by then. I'm currently learning the ins and outs of Zoom so that I can be a host for two of my P.E.O. scholarship groups when they need to meet. That may end up being all the learning of tech stuff that I can handle. It's been a great run on Blogger...since fall of 2006! Fourteen years is probably enough.

Still, I have until late August to learn the new version, so maybe I'll keep going...come back in late August and find out.

Today the recipe is a lovely Shredded Carrot Salad with Orange and Pine Nuts. It's from the cookbook of Michael Volpatt, co-founder of Big Bottom Market in Sonoma County. I found it one Wednesday in June in the food section of the Press Democrat. That section of the paper has improved so much during the pandemic! Not sure why, but happy that they are concentrating less on wine and more on food.

This refreshing carrot salad makes 6 servings as a side dish and is a great, fresh dish to go with barbequed foods so ubiquitous in summer. If I were to make it for the rest of the year I think I would add some spices.  It keeps for a couple of days, too, so make the full recipe and you'll have leftovers for a nice lunch salad.

I used a bunch of organic carrots from the market that came with tops. I cut off the tops and fed them to the sheep. The carrots themselves were washed and rubbed to remove dirt, and then the top part that was greenish and the tail ends were trimmed before I shredded them all in the food processor.

Before I juiced the lemon, I made zest strips from the peel and added about two teaspoons of them because zest always brightens up dishes. I really enjoyed the citrus zing of the combined juices and the crunch of the carrots and nuttiness of the pine nuts... may have used more than 1/4 cup since I love pine nuts! This salad goes with lots of other foods. Give it a try!


Shredded Carrot Salad with Orange and Pine Nuts

1 1/2 pounds of carrots, cleaned, tops removed, shredded
1/4 cup fresh orange juice
1 tablespoon fresh lemon juice
1 tablespoons olive oil
1/4 cup pine nuts
1 teaspoon salt

Prepare the carrots by cleaning, peeling if desired, removing the tops and tails and shredding. You should have about 4 cups. A food processor works well for shredding this many carrots.

Place the shredded carrots in a bowl with the orange, lemon, (lemon zest, too, if using), and salt. Allow to marinate 10-30 minutes, stirring once.

Dry toast the pine nuts in a heavy frying pan, or heat the olive oil and saute the pine nuts, stirring constantly, until golden. Just before serving, toss the nuts with the carrots.

Sunday, October 06, 2019

Roasted For Fall


Now that cooler weather has finally arrived...at least for a little while...I'm so happy to be making dishes like chili and roasted vegetables. I finally have some energy for cooking, too. Hope to be posting more in the future.

I don't often shop at Whole Foods because we have local markets that have wonderful foods that aren't so expensive, but I did shop there recently and found that they carried a tortellini pasta stuffed with almond milk ricotta by Kite Hill. I've enjoyed the Kite Hill ricotta so I had to try the tortellini. I decided to serve them with veggies that had been roasted with what I think of as 'Scarboro Fair' herbs of parsley, sage, rosemary and thyme. I topped the pasta and veggies with toasted pine nuts for a delicious vegetarian meal.

If this pasta isn't available in your area and if you can consume cheese, you can make the same sort of recipe with any cheese stuffed tortellini. The key thing here is to use a lot of water for cooking the tortellini, salt the water, and pay attention so that the pasta is just cooked al dente. Have the vegetable mixture cooked and hot and ready to eat when the pasta is done, and the pine nuts can be toasted while the pasta cooks since both only take a few minutes.

Use your favorite mixture of vegetables. Cut them so that they are all about the same size, and that should be bite sized or a bit smaller. Unfortunately I didn't measure the amounts of herbs that I used, so this is really a recipe for confident cooks who know their flavors. The same is true of the olive oil, salt, pepper, and amount of pine nuts...not measured. Sorry. So this isn't really a recipe but more a suggestion of a combination that worked and will work for you if you have some experience.

My sister suggested that this would also work with vegetables that you don't roast, for example peas and jarred roasted red peppers which you would heat up and season as desired (maybe with caramelized onions?). If I were doing those two, I'd probably make a non-dairy 'cream' sauce, toss the drained pasta in that sauce and then add the peas and peppers and onions on top then sprinkle on toasted pine nuts.

For those who are interested, our daughter is settling in nicely in her new home.


Roasted Vegetables Over Stuffed Tortellini With Pine Nuts
Serves 4

6-7 cups mixed vegetables, peeled and ends cut off as needed and cut into bite sized pieces. I used mushrooms, zucchini, yellow squash, carrots, green beans, butternut squash (seeds removed too), red onion.
1-2 tablespoons olive oil
about 2 tablespoons minced parsley
about 2 teaspoons minced fresh sage
about 1 teaspoon dried rosemary
about 1/2 teaspoon dried thyme
salt and pepper to taste
9 oz. fresh ricotta stuffed tortellini pasta
salted water
about 3-4 tablespoons pine nuts
1-2 teaspoons olive oil or butter or margarine

Preheat the oven to 580 degrees F. Prepare a shallow baking pan with a rim by lining it with heavy duty foil. Set aside.

In a large plastic bag, shake the vegetables with the oil, parsley, sage, rosemary and thyme and salt and pepper to taste (I didn't use any salt, but was generous with the pepper).

Pour the seasoned vegetable mixture into the prepared pan and roast in the preheated oven for 20 minutes. Stir the mixture, then reduce temperature to 325 degrees F. and roast for another 20 minutes.
While the vegetables are cooking at the reduced temperature, bring a large pot of water to boil, then add about 1/2 teaspoon salt. Return to the boil, then add the tortellini and simmer until the pasta is al dente.

while the pasta is cooking, dry toast the pine nuts in a non-stick skillet, stirring often, until light brown in places. Set aside.

When pasta is cooked enough, use a slotted spoon to remove the pasta from the water and place in the center of a large platter or wide, shallow serving bowl. Reserve 1/2 cup of the pasta water, then pour off the rest of the water. Return the pasta to the pot and add 1 teaspoon of the oil or butter or margarine. Add some pepper and stir over low heat. If pasta looks too dry, add some of the pasta water or additional oil. Only cook in dry pot for 1 minute, then return pasta to serving platter or bowl.

Top pasta with the roasted veggies and top those with the toasted pine nuts.

Serve at once. If desired, pass a bowl of grated Parmesan cheese on the side.

Wednesday, May 16, 2018

Red Pepper Coques and A Different Topping


There are times when I can just look at a recipe and know that the resulting food will be wonderful. This was one of those. Karen of Karen's Kitchen Stories is our Kitchen of the Month for May for the busy Bread Baking Babes. She chose Red Pepper Coques from "Bread Illustrated from America's Test Kitchen. According to the recipe, Coques are the Catalan version of the thin and crunchy tapas dish that can be found in bars in the Mediterranean region of Spain, including Barcelona."

This has been a busy month for me, starting with the final day of my visit to Denver and continuing on with massive catch-up in the garden, especially with weeding. The soil and overnight temperatures finally warmed up enough for planting, too, so there are now tomato plants, bean seedlings, cucumber seedlings, and lots of kinds of flower seedlings getting bigger. The zucchini I planted in April are getting bigger and so is the one from a neighbor...the other one was eaten by snails. I still have planting and weeding to do, but now its just a few of each.

Fitting in a bread that needs to start at least the day before it will be eaten was a bit of a challenge, but I'm glad I did. This recipe makes 4 coques, which are long ovals of flatbread, topped with a wonderful, tangy topping of roasted red pepper, caramelized onions and pine nuts (among other things). I decided that since there are only two of us enjoying these that I would make two at a time and used two different toppings on the two different bakes.

The first night I used the red pepper topping. The dough was difficult to make flat enough since it just wanted to spring back into a smaller shape. I eventually shaped the coques using gravity in a similar way to how I shape pizza dough. This left a thicker ridge around the edges, but that just helped keep the topping in the center, so no harm done. I love the topping, so do try it. The red peppers and yellow onions and pine nuts go really well together. Don't substitute on the sherry vinegar, either. It really makes the dish!

The second night I used a topping that I found in the food section of our local paper. It was meant to go on crostini, but went well on the coques, too. It is a combination of a homemade fig jam, caramelized red onions, and some soft cheese. I used Kite Hill fresh cheese mixed with a bit of soy milk in place of ricotta, but I'm sure that fresh ricotta would be lovely. I topped it with chopped walnuts since I had enjoyed the pine nuts topping the red pepper mixture the previous night. The experience was completely different, but I enjoyed this combination, too. The sweetness of the figs and onions was offset a bit by the balsamic vinegar and slight bitterness of the walnuts.

This recipe is going into the 'keep' file and will be used when I want appetizers for a party or pot luck. Except for the baking, the components can be made ahead, too, which is wonderful.

Do visit the other Bread Baking Babes sites to see their takes on this delightful bread. Bake it yourself and become a Buddy by sending Karen an email with your URL, photo and experience with making the bread. Deadline is May 29th. You'll be glad you did.


RED PEPPER COQUES
from Bread Illustrated from America's Test Kitchen

INGREDIENTS:
Dough
468 grams (16 1/2 ounces/3 cups) bread flour
2 teaspoons sugar
1/2 teaspoon instant yeast
10 2/3 ounces (1 1/3 cups) ice water
3 tablespoons extra-virgin olive oil
1 1/2 teaspoons table or fine sea salt

Red Pepper Topping
1/2 cup extra-virgin olive oil
2 large onions, peeled, halved, and thinly sliced
2 cups jarred roasted sliced red peppers
3 tablespoons sugar
3 cloves garlic, thinly sliced
1 1/2 teaspoons salt
1/2 teaspoon crushed red pepper flakes
2 bay leaves
3 tablespoons sherry vinegar
1/4 cup pine nuts
1 tablespoon minced fresh parsley


INSTRUCTIONS:
Dough
In the bowl of a food processor, pulse the flour, sugar, and yeast about 5 times. Turn the processor on, and slowly pour in the ice water and process for about 10 seconds. Let the dough rest for 10 minutes. 

Add the oil and the salt to the dough and process for 30 to 60 seconds, until the dough forms a ball. Remove the dough from the the processor, and knead by hand for a few seconds, and form it into a ball. Place it into an oiled bowl, cover, and refrigerate for at least 24 hours, and up to 3 days. 

Red Pepper Topping
Heat three tablespoons of the olive oil in a 12 inch non stick frying pan over medium heat. Add the onions, red peppers, sugar, garlic, salt, pepper flakes, and bay leaves. Cover the pan and cook for 10 minutes over medium low. 

Remove the lid and continue to cook, stirring regularly, for another 10 to 15 minutes, until the onions are golden brown. Remove the pan from the heat and discard the bay leaves. Transfer the mixture to a heatproof bowl and stir in the vinegar. Cool completely before using. You can make the mixture in advance and refrigerate overnight. 

Deflate the dough and divide it into four equal sized pieces. Shape each piece into a tight ball and place, seam side down  on your work surface, and cover with oiled plastic wrap. Let rest for an hour. 

Place oven racks in the upper and lower third positions and preheat the oven to 500 degrees F. Brush two half sheet pans with 2 tablespoons of olive oil each. 

Place one dough ball on your work surface, and roll it out to a 15 inch by 5 inch oval. Place it on the baking sheet, lengthwise. Repeat with the rest of the dough balls, two per baking sheet. If the dough springs back, let it rest for another 10 to 20 minutes, and re-roll. Dock each about 15 times with a fork. Brush each oblong piece of dough with the rest of the olive oil. 

Bake the dough for 8 minutes, switching the pans at the four minute mark. 

Remove the pans from the oven, and spread them with the red pepper and onion mixture. Sprinkle with the pine nuts. (To make the Fig and Caramelized Onion Coques, use the topping below at this point instead of the red pepper and onion mixture. Top with the walnuts instead of the pine nuts.) Place the baking sheets back into the oven, and bake for 16 minutes, switching and rotating the pans at the 8 minute mark. Continue to bake until the flatbreads are golden and crispy.

Topping
To Make the Coques:
Remove the pans from the oven and let cool on the pans for about 5 minutes. Sprinkle with the parsley, and transfer to a cutting board to slice and serve. 


Fig and Caramelized Onion Topping for Coques
adapted from Ramekins Culinary School recipe
1/4 cup dried Black Mission figs (stemmed and chopped into 1/-inch dice)- about 4 figs
1/2 cup + 2 tablespoons dry red wine
1 tablespoon granulated sugar
1 small bay leaf
pinch salt
1/2 teaspoon red wine vinegar
1 teaspoon butter or margarine
1 teaspoon olive oil
1/2 medium red onion (peeled and cut into 1/4-inch dice)
1 tablespoon red wine vinegar
1/4 teaspoon granulated sugar
1/4 teaspoon salt
1/8 teaspoon freshly ground black pepper

1/2 cup fresh ricotta cheese or Kite Hill fresh almond cheese+ 1 tablespoon soy creamer
2 tablespoons finely chopped walnuts.

Place the figs in a small saucepan. Add the red wine, sugar, bay leaf and salt. Bring to a boil, stirring to dissolve the sugar. Reduce the heat to simmer and simmer until the figs are tender and the liquid is syrupy, about 15 minutes, stirring occasionally. Add the vinegar and cook and additional minute. Removed from the heat and let cool.

Melt the butter or margarine and stir in the olive oil. Over medium-high heat sauté the onion until it is beginning to soften and brown, about 5 minutes.

Reduce the heat to low and add the vinegar and sugar. Sprinkle with salt and pepper. Stir until the vinegar has almost evaporated, about 1 minute. Remove from the heat and let cool.

If using this topping for the coques, drain the ricotta, if using, in a strainer lined with a coffee filter or cheesecloth. Transfer to a small bowl and season with salt and pepper to taste. If using the Kite Hill nut cheese, place in a small bowl and season with salt and pepper to taste.

Once the coques have baked for 8 minutes, removed from the oven, leaving the oven on, and spread the two coques with the ricotta or almond cheese mixture, dividing evenly.

Top with the onions, dividing evenly and spreading to cover each coque, then top with the figs, dividing evenly and spread to cover each cocque. Sprinkle one tablespoon finely chopped walnuts over each coque and bake an additional 10-16 minutes, or until coque is deep golden brown.

Sunday, February 02, 2014

Of Pesto and Chicken


Pesto is one of my favorite flavors. There is something wonderful about the combination of basil, pine nuts, olive oil and Parmesan cheese. It can liven up rice, pasta, a baked potato and all manner of entrees. And that basil smells fantastic, too.

It was cold and rainy today, so I stayed inside most of the day. I am so thankful that it rained...we have been having a terrible drought this winter and usually winter is when we get most of the water for the year. It also made it nice to fool around in the kitchen trying out a new recipe, with the rain pattering against the kitchen windows.

This recipe started off life as a sweet crostata with fresh grapes and golden raisins and a nut crust. The rustic look which is achieved by folding the outer couple of inches the crust over the filling is a favorite of mine, but I'd never tried it with a nut crust before. The filling is interesting, too, because it is based on whipped egg whites.

I decided that I wanted to change the recipe around to a savory crostata, filled with a pesto infused whipped egg white filling and then covered with sauteed onions, golden raisins and Parmesan coated chicken pieces. Since I was going with sunny flavors of the Med, I changed the dough to use pine nuts instead of walnuts or pecans of almonds.

The crust didn't turn out quite like I had hoped...it tended to fall apart while I was working on it...but it tasted wonderful once baked and the filling was excellent. We had a slice for dinner with some steamed mixed vegetables and Sweetie was very happy, especially since he was able to watch the Super Bowl while I played in the kitchen. We did take a nice walk with Pi during half time when there was a break in the rain, so it was a pretty nice day all around. Guess I pretty easy to please.


Nut Pastry Dough
     
1/3 cup walnuts, hazelnuts, almonds, pine nuts or pecans
1 1/2  cups all-purpose flour
1 1/2  teaspoons granulated sugar
3/4  teaspoon salt
1 1/2  tablespoons cold butter, cut into pieces
2 1/2  tablespoons walnut oil
5-6  tablespoons cold water

Preheat oven to 350 degrees F
.
Spread nuts in a pie pan and bake for 5 - 7 minutes, or until fragrant. Let cool

In a food processor, combine nuts, flour, sugar, and salt; process until nuts are finely chopped. Add butter and process until incorporated. Transfer to a large bowl.

Drizzle oil over flour mixture. Use your fingertips to rub oil into the mixture. On tablespoon at a time, add water and mix with a fork until dough is crumbly and holds together when pressed.

If making a single crust, gently form dough into a flattened disk. If making a double crust, divide dough into two pieces, 1 slightly larger than the other, and form each into a disk. (The dough will keep, tightly wrapped in plastic wrap, in the refrigerator for up to 2 days or in the freezer for up to 6 months. Return dough to room temperature before rolling.)

Chicken Pesto Crostata
1/4 cup pine nuts
1 recipe  pine nut Pastry Dough (see above)
1/2 yellow onion, peeled and thinly sliced
1 tablespoon olive oil
1 1/2 tablespoons cornstarch
2 large egg whites
1/4 teaspoon salt
2/3 cup grated Parmesan cheese, divided
1/3 cup prepared pesto
1/4 cup golden raisins
2 1/2 cups cooked chicken, cut into small bite sized pieces
pepper, to taste
1 tablespoon milk
Grated Parmesan cheese for dusting crust

Spread pine nuts in a oiled pan and bake in preheated 350 degree F. oven for about 5 minutes or until fragrant (can do this at same time nuts are being baked for pie dough if making same day). Alternatively, pine nuts can be toasted in a large cast iron skilled, shaking pan often. Let cool. Finely chop and set aside.

Raise oven temperature to 400 degrees F.

Place two overlapping sheets of plastic wrap or a wide sheet of parchment paper on a work surface. Set dough in center and cover with two more overlapping sheets of plastic wrap or another wide sheet of parchment paper. Roll dough into a 12-inch circle. Remove top sheets of plastic (or top parchment) and invert dough on to a large baking sheet with sides that has been lightly oiled or coated with nonstick spray. (I put mine on a large piece of parchment paper.) Pull off rest of plastic or the other sheet parchment. Sprinkle semolina (or cornmeal) over the crust, leaving a 1 1/2-inch border. Set aside.

In a skillet over medium-high heat, sauté the onion in the olive oil, stirring frequently, until onion is light golden brown, about 7 - 10 minutes. Remove from heat and set aside.

In a small bowl, beat egg whites and salt with an electric mixer on medium speed until soft peaks form. Gradually add 1/3 cup grated Parmesan and beat until shiny. With a rubber spatula, fold pine nut mixture and pesto into meringue until thoroughly combined.

Drop spoonfuls of meringue onto crust and gently spread over semolina. Sprinkle raisins over meringue.
Distribute caramelized onions evenly over meringue.

In a bowl, toss the chicken pieces with the remaining 1/3 cup grated Parmesan cheese and pepper, to taste. Arrange chicken over raisins, onions and meringue, distributing evenly. Fold border of crust over filling.

Brush crust with 1 tablespoon milk and dust with some grated Parmesan.


Bake for 25 - 30 minutes, or until crust is golden and grapes are puffed. With 2 large spatulas, transfer crostata to a large platter. Let cool. Serve warm or at room temperature. 

Makes 8 servings.

Sunday, July 28, 2013

Pesto to the Rescue


Everything is going so well with the entry project that I'm not really complaining, but, gee it takes a lot of time to do construction!

Yesterday we removed the old door frame, along with the expandable foam insulation, flashing above, old shims and tar paper. Sweetie did most of the heavy stuff and I scraped off old insulation and did the demo on the flashing and tar paper. Took a good chunk of the day. Thank heavens for things like pre-packaged chili seasoning and already made pesto.

 Last night we had my well-loved chili, but the night we had that awesome cheese and cherry tomato salad, we also had a super quick chicken pesto pasta dish. Could never have gotten both on the table without that Fircrest pesto. There were also the quick-fix helpers of fresh pasta from the store, frozen already-grilled chicken, and our own zucchini. Zucchini are so easy to prepare...no peeling!

So while the pasta water came to a boil, the sliced zucchini browned in a cast iron skillet. Once the zucchini came out, in went the frozen chicken strips and chunks. I let them brown, then removed them to sit with the zucchini while I browned some pine nuts. Once the pasta was done and drained, it was easy to put the hot pasta, green pesto, and a little of the pasta cooking water into a bowl and stir to coat the pasta with the pesto. A quick re-heat for a minute in the microwave made sure that the squash and chicken were hot. Into the past bowl they went, along with the pine nuts. After a quick stir to combine it all, I served it up and we enjoyed a fairly gourmet entrée that had taken only about 15 minutes to make.

It's a good recipe for hot weather, too, because you don't really heat up the kitchen much in 15 minutes. If we weren't having that salad with it I would have tossed some halved cherry tomatoes into the pasta at the end.


Pronto Pesto Chicken Pasta with Zucchini and Pine Nuts
Serves 2 - 4
1/2 cup prepared pesto (or to taste) at room temperature
1 package (8 oz.) fresh fettuccini
1-2 tablespoons olive oil
1-2 medium zucchini, ends trimmed, cut into slices
2 cups chicken strips and chunks, pre-cooked and grilled, thawed if frozen
3-4 tablespoons pine nuts
Salt and pepper to taste

Stir pesto to mix in oil. Set aside.

In a large pot bring water to a boil.

While water is coming to a boil, heat the oil in a large skillet. Brown the zucchini slices in the oil over medium-high heat, turning so that all sides brown as much as possible. Remove from skillet when brown and set aside. If pasta water is boiling, add fresh pasta and set timer for 10 minutes.

Without cleaning the skillet, add the chicken and brown it, about 5 minutes, stirring often. When browned and heated through, remove from skillet and set aside.

Without cleaning the skillet, add pine nuts to the skilled and, stirring frequently, brown them. Take care not because they can go from golden brown to burnt very quickly. Remove from skillet and set aside.

By now the pasta should be cooked. Reserve about 1/4 cup of the cooking water, then drain the pasta. Place squash and chicken on a microwave safe plate and microwave on high for 1 minutes.

Place drained pasta in a large, wide bowl. Add the pesto and a tablespoon of the cooking water. Stir. Add more water if necessary so that pesto coats the pasta. Add the heated squash and chicken and the pine nuts. Toss to combine. Serve at once.

Friday, November 23, 2012

Say Cheese

Do you like having your picture taken? I don't care one way or another but it amazes me how many people cringe when the camera is aimed their way. Often these are good looking people, too. I know that the mental picture I have of myself usually doesn't match up with what the camera sees, but I think it's fairly usual to have a different view of ourselves than others do. I'm hoping you'll tell me if that isn't true. Anyway, I hope you ignore the photo-phobes now and again because one thing I do know is that it is a great comfort to have nice photos of loved ones when they are no longer with us.  Can't guarantee you will get a smile in that photo, but you might. Sweetie dislikes having his photos taken, but recently I went though lots of old digital photos to find some choices for him to use for his Facebook page and I discovered a few that I took when he wasn't aware of it and even some where he was smiling. Now he is glad to have 'em. See.

While we are on the subject of cheese (you DO have everyone say 'cheese' when you snap their picture, right?) let me tell you about an appetizer we had yesterday for our Thanksgiving feast. It was a big hit with everyone (all 5 of us!) and was easy to do. I was inspired by a recipe in the catalog of a local company, Kozlowski Farms. They make wonderful jams, jellies, salad dressings, mustards, pies, cookies and more goodies. The recipe was for a cheese ball coated with toasted pistachios. First they layered softened, whipped cream cheese with some of their yummy fig and muscat wine preserve. Since I had neither the nuts nor the preserve I went with what I did have. I also added a tablespoon of Greek style plain yogurt so that the cheese ball would stay just a little softer, which makes it easier to serve.

I had a delicious fig and caramelized red onion confit in the 'fridge which I used in place of the Kozlowski preserves. You could also use a pepper jelly. For the nuts I used toasted pine nuts. I also used reduced fat cream cheese and you would never know the difference in this kind of recipe. It was delicious on toasted baguette slices...the crunch of the toasts was a nice contrast with the creamy cheese. I only have a photo of the cheese ball before it was served. Once we started digging in no thought was given to taking pictures.

Fig and Caramelized Red Onion Cheese Ball with Pine Nuts
Base on a recipe from Kozlowski Farms

5 oz. Fig and Caramelized Red Onion Conserve
(or use a pepper jam)
2 -8 oz. packages lower fat cream cheese, softened to room temperature
1/4 teaspoon herbs de Provence
1 tablespoon nonfat, plain Greek yogurt
3/4 cup pine nuts, toasted
1 bread baguette, sliced thin and toasted in the oven

Toast pine nuts in a pan over medium heat, stirring often, for about 2 minutes until golden. Set aside.

With a mixer, whip the cream cheese, herbs de Provence, and Greek yogurt until smooth and creamy.

Spread a length of plastic wrap at least 12 inches long over a clean counter or cutting board. Using a spatula spread on some of the cheese mixture. Using a teaspoon, spoon on some of the conserve. Repeat, with the top layer being cheese, until all the cheese mixture is used up. Some of the conserve may remain and can be used for another purpose.

Lift the edges of the plastic wrap, creating a ball of the cheese/conserve mixture. Tightly wrap the plastic wrap around the ball. Secure the plastic wrap. Place the ball in a bowl and refrigerate about 15 minutes to help the ball retain its shape.

Lay another two layer of plastic wrap on a clean counter or cutting board, with the second layer perpendicular to the first. Sprinkle the pine nuts in a circle in the middle. Take the chilled cheese ball and put it in the middle of the circle of nuts. Bring up the sides of the plastic wrap. If necessary, use your hands to help coat the sides and top with pine nuts. Wrap the cheese and nut ball in the plastic wrap and return it to the bowl. Chill until the ball is firm, about 3 - 4 hours.

Unwrap cheese/nut ball. Arrange on a platter and serve garnished with figs and slices of toasted baguette slices. Be sure to include a spreader for serving the cheese.

Tuesday, November 20, 2012

Making Progress


I used to think that I would love to have the time to just loaf around and do nothing. When you are working full time and have a couple of kids to look after, a great guy to build a life with, and the usual errands and cleaning and shopping that building a life, or just having a life, entails, it's easy to daydream about a carefree time in the future without all those time eaters.

Turns out I'd rather have projects to do and even the occasional deadline than too much time doing nothing. I like having enough things to do that I need a list to keep track of them. It usually means that I'm interacting in some way with other people (which I usually love) and that I'm making progress on something that is meaningful to me. Somewhat surprising, but not a lot. I've always enjoyed the process more than the product and you have to have things to do in order to have processes, right?

So the carpet was installed, lots of stuff found new homes and some of the old stuff returned to it's place (like this computer), although there is more to do.

The book I'm doing for my InDesign class was uploaded to the publisher today *Yay!* and will be a real book at my doorstep in early December. There is still lots more to do for the class but it feels good to have the book part of it to print.

Thanksgiving will be at our house this year so I have lists and more lists and couldn't be happier! I made the Pocketbook Rolls again, this time with my sourdough starter, so we will have puffy, slightly sour, tender rolls to go with the turkey dinner. Since I have been fairly successful with my weight loss program so far I think I'll even allow myself a good size piece of pumpkin pie!

In no time Christmas will be here, too, so there will be more fun stuff to do to get ready. That will likely mean an increase in posts as I find new recipes to try for entertaining and for gift giving. I'm stoked!

Today I have a new and simple pasta recipe that I threw together one evening. It had to be simple because my eyes were still crossed from too much time proofing the book. It starts with a bed of fresh tri-color pasta (from a package in the refrigerator section of the grocery store...any good brand will do), topped with a melange of sauted onion and garlic, wilted fresh spinach, fresh chopped tomatoes, leftover grilled chicken, and some herbs and spices. Over it all I sprinkled a generous amount of toasted pine nuts. It was wonderful! If you don't have any leftover chicken, you could substitute some rotisserie chicken, cut into bite sized pieces and dinner can be on the table before you know it!

Chicken and Spinach Pasta with Pine Nuts
my own recipe
1/2 onion, chopped
1 clove garlic, finely chopped (or more, to taste)
1 tablespoon olive or grapeseed oil
4 oz. sliced mushrooms
1/2 cup chicken broth
2 cups diced tomatoes and their juice...fresh tomatoes if possible
1 - 2 cups cooked chicken, cut into bite sized pieces
4 cups fresh baby spinach, rinsed well
2 tablespoons finely chopped flat leaf parsley
1/4 teaspoon dried thyme
salt and pepper to taste
1/3 cup pine nuts
Hot, freshly cooked, drained, fresh pasta ribbons - I used tri-color, but any fresh pasta will work

In a large saute pot, saute the onion and garlic in the grapeseed oil, stirring often, until onion is translucent, about 5 minutes. Add the mushrooms, cover the pot, and cook over low heat for 5 minutes. Uncover the pot. Add the chicken broth and deglaze the pan, stirring to release any bits stuck to the side of the pot. Add the tomatoes and cook over medium-high heat uncovered, stirring often, until sauce has thickened, about 5 minutes. Add the chicken and stir to combine. Heat 2 minutes. Add the baby spinach, stirring until it wilts. Stir in the parsley and thyme, salt and pepper.

On a dinner plate pile a serving of fresh pasta. Top with some of the sauce. Sprinkle with the pine nuts. Serve at once. Serves 4.

Saturday, September 26, 2009

Greek Omelet for Breakfast

This morning seemed like a good one to try out a recipe that I had been thinking about. I wanted to see if i could combine some Greek flavors in an omelet.

First I toasted a tablespoon of pine nuts in a small dry cast iron skillet. A few sprigs of fresh oregano from the garden were washed and minced. A couple of tablespoons of feta cheese were crumbled. About 1/4 cup of spinach was chopped, steamed and then squeezed dry in paper towels. Some of that delicious Stonyfield farms plain Oikos Greek style yogurt was ready for topping the omelet. I used three eggs worth of egg substitute, but three eggs, lightly scrambled in a bowl would work, too.

This made an absolutely delicious breakfast omelet! It was light and fluffy and full of savory goodness. the yogurt tied it all together.

This also made the perfect dish to enter into the "O Foods for Ovarian Cancer Awareness" event and contest. Since I lost a dear niece to ovarian cancer a few years ago I know how terrible this disease is. There are no obvious warning signs so it is often not diagnosed until very late. We miss J so much!

Be sure to visit Michelle at Bleeding Espresso to learn more about this event, but you can also go to the bottom of this post. Even if you are not interested in entering the event, remember that this is a silent killer. The end of the post also has the symptoms and a way to support Ovarian Cancer Research.

Greek Omelet
serves 1

1 tablespoon pine nuts
1 teaspoon butter or olive oil
3 eggs, lightly scrambled, or equivalent amount of egg substitute
1/4 cup chopped, steamed spinach, squeezed dry in a towel or paper towels
1/2 teaspoon fresh oregano, minced, or 1/8 teaspoon dried oregano
1 tablespoon feta cheese, crumbled
salt and pepper to taste
Stonyfield Farms plain Greek style Oikos yogurt

In a dry small cast iron skillet over high heat, toast the pine nuts until lightly browned in places, stirring often. Set aside.

In hot skillet, melt the butter or heat the oil. Add the eggs and let sit for a half minute, then with a fork move the cooked eggs into the center of the pan, letting the uncooked eggs flow to the outer edges. Add the spinach, oregano and feta cheese to the pan, salt and pepper to taste, then cover and cook for another 20 seconds. Uncover, use fork to fold omelet in half and slide it onto a plate. The eggs should be golden brown.

Garnish with a couple of tablespoons of the Oikos yogurt and then sprinkle with the pine nuts. Serve at once while hot.

CONTEST RULES
O Foods Contest for Ovarian Cancer Awareness Month

September is Ovarian Cancer Awareness Month, and for the second year in a row, Sara of Ms Adventures in Italy and Michelle of Bleeding Espresso are hosting the O Foods Contest to raise awareness of this important health issue.

There are TWO WAYS to take part in the O Foods Contest:

ONE: Post a recipe to your blog using a food that starts or ends with the letter O (e.g., oatmeal, orange, okra, octopus, olive, onion, potato, tomato); include this entire text box in the post; and send your post url along with a photo (100 x 100) to ofoods[at]gmail[dot]com by 11:59 pm (Italy time) on Monday, September 28, 2009.

PRIZES for recipe posts:

1st: Signed copy of Dolce Italiano: Desserts from the Babbo Kitchen by Gina DePalma, Executive Pastry Chef of Babbo Ristorante in NYC, who is currently battling ovarian cancer, inspired this event, and will be choosing her favorite recipe for this prize;
2nd: Signed copy of Molto Italiano: 327 Simple Italian Recipes to Cook at Home by Mario Batali (winner chosen by Sara);
3rd: Signed copy of Vino Italiano: The Regional Italian Wines of Italy by Joseph Bastianich (winner chosen by Michelle).

OR

TWO: If you’re not into the recipe thing, simply post this entire text box in a post on your blog to help spread the word and send your post url to ofoods[at]gmail[dot]com by 11:59 pm (Italy time) on Monday, September 28, 2009.

Awareness posts PRIZE:
One winner chosen at random will receive a Teal Toes tote bag filled with ovarian cancer awareness goodies that you can spread around amongst your friends and family.
———
From the Ovarian Cancer Research Fund:
Ovarian cancer is the leading cause of death from gynecologic cancers in the United States and is the fifth leading cause of cancer death among U.S. women; a woman’s lifetime risk of ovarian cancer is 1 in 67.

The symptoms of ovarian cancer are often vague and subtle, making it difficult to diagnose, but include bloating, pelvic and/or abdominal pain, difficulty eating or feeling full quickly; and urinary symptoms (urgency or frequency).

There is no effective screening test for ovarian cancer but there are tests which can detect ovarian cancer when patients are at high risk or have early symptoms.

In spite of this, patients are usually diagnosed in advanced stages and only 45% survive longer than five years. Only 19% of cases are caught before the cancer has spread beyond the ovary to the pelvic region.

When ovarian cancer is detected and treated early on, the five-year survival rate is greater than 92%.

And remember, you can also always donate to the Ovarian Cancer Research Fund at our page through FirstGiving!

Please help spread the word about ovarian cancer.Together we can make enough noise to kill this silent killer.

Monday, July 20, 2009

I'm As Corn-y As...

...as you can be in the summer.


Corn and summer go together like sunscreen and the beach or sunny days and baseball. Fresh corn at very reasonable prices can be had easily now at the market. I grew my own years ago when I had a big garden plot, but now it would take up too much room. I like the white kind and check on the freshness by slitting one of the kernels. If the juices spurt out then they haven't turned to starch, so the corn will generally be sweet and juicy to eat.

On rare occassions we buy too much and there is an ear of corn left over. That's happened twice in the last couple of weeks. Each time I used that single ear the next day, first in a salad and night before last in a baked side dish that I dreamed up while driving home from work. Iknew I had all the ingredients in the pantry, fridge and garden. Don't 'ya just love it when that happens?

The salad is our usual mixed greens, tomato chunks, cucumbers, sliced carrots and chunked avacodo one, but the addition of fresh corn kernels sliced from the cob completely changes the character of the salad. There is an even better sense of veggie and a summer tang and that juicy crunch of corn kernels.

Usually I use an Italian dressing or Raspberry one on green salads but for this salad I used a nice creamy Ranch dressing. It somehow plays up the farm fresh nature of corn and crispy greens. No recipe...jsut add fresh corn kernels to your favorite green salad.

The second recipe is for a cornbread based side dish. Fresh corn is folded into corn muffin batter and then the batter is partially baked in a wide, shallow baking pan. While it bakes a veggie topping and a cottage cheese based custard topping are made. Both go on top of the cornbread, the top is sprinkled with feta cheese and pine nuts and the dish is baked until golden. The mellowness of the cornbread is enlivened by the fresh corn kernels.
Summer squash (theres that zucchini again!) and spinach meld with red onion and cradeled in the custard for a savory flavor constrast to the sweet corn, then feta and pine nuts add Mediterranean flavors and additional zestiness and crunch. All in all it's a delightful side dish, although it can also be the main dish with, perhaps, a plate of sliced summer tomatoes on the side, dusted with threads of basil chiffonade.

The key to the corn and veggie bread is partially cooking the cornbread before adding the toppings. The bread gets cooked just enough this way, but the toppings also can sink into the batter just a bit and not slide off the top. The measurements are approximate. Next time I'm going to add more greens. BTW, this dish smells wonderful, even when cold. I reheated some for lunch.

As long as summer is here, we might as well enjoy it's fresh produce and these are both great ways to do that.

Elle's Zesty Veggie Cornbread Bake

½ recipe corn muffin batter (6 muffins worth) – your favorite
kernels cut from 1 ear of corn (about 1 cup)
1/3 – ½ cup chopped red onion
1 tablespoon olive oil
4 large handfuls baby spinach, chopped, about 4 cups
(you can substitute for all or part of the spinach with Swiss chard,
baby kale, baby collards or similar dark leafy greens)
1 medium zucchini squash, quartered lengthwise, then sliced – about 2 cups
½ cup cottage cheese
1/3 cup milk
2 eggs, slightly beaten
Salt & pepper to taste
1/3 cup feta cheese, crumbled
2 tablespoons pine nuts

Grease a 9 x 13 inch pan and preheat the oven to 400 degrees F.

Stir the corn kernels into the corn muffin batter, then spread batter into prepared pan.

Bake in preheated oven for 6 minutes.

While cornbread is baking, saute’ the red onions in the olive oil over medium-high heat for 2 minutes. Add the leafy greens, stir and cook another minute until wilted. Remove greens from pan, return pan to heat and add the zucchini slices. Stir and cook over high heat another 3 minutes, stirring occasionally.

While zucchini is cooking, use a blender or immersion blender to blend the cottage cheese and milk until smooth. Add the eggs and mix just until blended. Add salt and pepper to taste. (You can also add Tabasco sauce or cayenne to tasteif you like a more spicy flavored bread).

Distribute the cooked zucchini slices evenly over the partially cooked corn bread. Distribute the cooked greens mixture evenly over the zucchini and cornbread. Pour the cottage cheese mixture evenly over the veggies. Sprinkle the feta cheese evenly over the cheese mixture & sprinkle with the pine nuts.

Return the baking pan to the oven and bake another 15 minutes or until the top is lightly browned. Cool for 5 minutes, then serve in large squares.

Serves 4-6.

As you can see, the measurements are approximate so feel free to adapt this to what you have coming out of the garden.