Showing posts with label tomatoes. Show all posts

Friday, September 05, 2025

Truly Tomato Time


Every year we wait for the harvest, especially the tomato harvest. I start the seeds indoors some years. Did that this February. I was optimistic that the weather would be good, so I planted seeds for three kinds of tomatoes and three kinds of cherry tomatoes, plus three kinds of summer squash for good measure...or because I'm bonkers. This year I also grew Cucumbers, Golden Beets and two kinds of Green Beans, plus two kinds of potatoes (and I never grew potatoes before...so really bonkers!)


The zucchini were producing by June although only a few. By July we were overrun with zucchini, but the tomatoes were still green. None of the plants had been planted out until later than usual because our spring was long and chilly. Great for enjoying tulips and later iris, but the soil needs to warm up if heat loving plants like squash and tomatoes are going to do well.


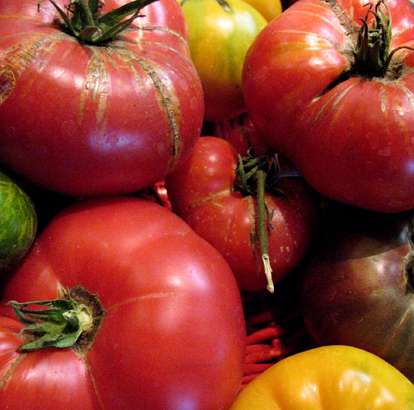
Now we have lots and lots of gorgeous heirloom tomatoes! Our favorite is the Black Krim (far left in photo above), which isn't black, but is a darker red than most tomatoes, almost a brown, and there are often bits of pink and bright yellow-green  at the stem end. The flavor is truly tomato and they are big enough to be enjoyed sliced. We often eat them sliced, with a sprinkle of garlic salt and pepper, a drizzle of olive oil and a few dashes of a good balsamic vinegar. Heaven!

Another great tomato this year is the Costeluto, a deeply lobed bright red tomato that is sort of flat-ish. It makes a great slicing tomato, too, and is also great cut into wedges in a salad.

The third one I grew this year is a yellow tomato. I forget the name, but it has a slightly elongated oval shape and a milder tomato flavor. It slices well, too, and is great in cooked dishes where it doesn't overwhelm other flavors.

The cherry tomatoes are variations of yellow/orange, red, and purple-ish sort of striped, round small tomatoes.

All of these are planted near each other, so there has been some cross-pollination. The Costeluto seems to be most susceptible to that. We've had a deeply lobed and large yellow tomato or two, some bright red but round ones and one that was sort of lobed and had the Black Krim color.

Mostly we have been eating these with very little done to them because they taste delightful as is or with just a little balsamic. I did, however, bake a tomato tart tonight that turned out very well, so I'll share the recipe in case you have lots of tomatoes yourself.


Tomato Puff Pastry Tart
Serves 6 - 8 as an appetizer

1 sheet puff pastry... I use Pepperidge Farm, thawed if frozen
2-3 large great-tasting tomatoes
1/2 cup ricotta cheese
1 small to medium egg
2 tablespoons fresh basil, finely cut or chopped
1/4 cup grated Parmesan...if possible use the real thing (but Costco has a nice container of it)
ground pepper for sprinkling
olive oil for drizzling

On a large piece of parchment that will fit in your sheet pan, roll the puff pastry to a 10 x 14 rectangle.

Turn the edges in an inch on each side, to make a rim. Press down lightly on the rim. Place in the sheet pan and chill while you make the filling.

Preheat the oven to 400 degrees F.

Thinly slice the tomatoes and place the slices on a sheet of paper towel and let drain while you work with the ricotta.

In a small bowl combine the ricotta, egg, basil and Parmesan. Stir until it is well mixed.

Remove the pastry in it's baking sheet from the fridge. Pour the filling in the middle and use a spatula to spread it until it is close to but not touching the edges of the puff pastry. Make sure it is even.

Place the tomato slices in a pattern on top of the ricotta filling.
Sprinkle lightly with ground pepper. Drizzle lightly with olive oil, being sure to drizzle over the tomato slices and the edge of the pastry.

Bake for 20 minutes, or until the pastry is browned.

Serve at once.


Thursday, May 09, 2024

Quick Dinner


Sometimes you need or want to fix dinner quickly. I was lucky this evening to have some leftover rotisserie chicken, some ricotta tortellini, some pesto sauce, some pine nuts from the freezer, and a few veggies on hand. Put together they made a delicious meal in a very short time. Sweetie was a very happy guy and said I can make this any time.

The first thing to do is to put a big pot of water on to boil to cook the tortellini. While that's coming to a boil, toast the pine nuts in a large skillet. It only takes a minute or two. Set those aside and chop some onion - I used green onion, but yellow or white works, too. Spray the same skillet you used to cook the pine nuts with a little olive oil, then add the onions and sauté, stirring often. While those are cooking, chop some tomato...I used about a half dozen grape tomatoes. Add those to the onions, stir, and let them begin to sauté, too. Cube into bite size pieces the cooked chicken. (You could also use cooked turkey, cooked Italian sausages.) 

By now the water should be really boiling. Add some salt, if desired, and then the tortellini. Stir them every few minutes to cook the pasta part evenly, but be gentle so the fillings stays inside.

Add the cubed chicken to the onion-tomato mixture and stir to combine. Turn the heat to the lowest setting, cover and let it all heat up.

Get ready to drain the pasta when it is cooked al dente and cook about a cup of frozen peas in the microwave. Check the pasta and when it is ready, drain and put into a large bowl. Add a big scoop of pesto sauce and stir to combine with the pasta. Add the chicken-onion-tomato mixture and the pine nuts and stir gently to combine.

Serve at once with the hot peas on the side.

I know that there are no actual measurements for this recipe. If you feel you need them, make a comment asking for that and I'll try to figure out the amounts I used, O.K?

Friday, November 09, 2018

Tomatoes and Smoke


No, that isn't a new recipe. The smoke part is because we are having a repeat of last year, but this time the big smoke...and fire...is in Paradise, near Chico, northeast of us quite a ways. The winds were so strong and the high was sitting in just the right place off the coast that the extreme smoke from the fire they are calling the Camp Fire in Paradise, CA blew over to us very quickly yesterday, making everything around here really smokey by 11 am. This is hard of folks who have asthma  and other respiratory ailments, but not much fun for the rest of us either. Waking up to a red sun and smokey skies was a strong reminder of the Tubbs fire of just over a year ago. Over 5,000 homes in our area were burned that day, so you can imagine the terrible memories that this smoke brings back to them. Praying for a quick resolution of the current fire for the fire victims and first responders in the Chico area, but also for the peace of mind of friends and neighbors in the greater Santa Rosa area.

Don't have a photo of the smoky situation but at 3:30 the air was dense and the sun was still red.

Tomatoes have nothing to do with wild fires, but they are the next food memory I wanted to talk about with you. My Dad grew tomatoes in the far back yard when we first moved to Northern Virginia (and probably long before that, but I was too young or merely a twinkle in his eye prior, so we'll start there). Later he grew tomatoes in the side yard near the back door. The big maple trees had gotten so tall that there was nowhere else to grow things that needed full sun all day.

I guess I inherited the need to grow vegetables from him. Even when I was living in a small apartment in Berkeley with no garden space I figured out how to grow vegetables. My first attempt pleased the neighbors and street people because I planted in the space between the street and the sidewalk. This particular patch also had a telephone pole. The tomato plant thrived and I think I may have gotten one or two ripe tomatoes, but most of them disappeared while they were still green.

The corn (three stalks) was even funnier. I did get about four ears developing, but someone picked them before the silk had even browned over. They probably found that there was a cob and some teeny tiny corn nubbins but they would have been green tasting and milky and not at all sweet at that stage.


Once we arrived in the country I was in heaven. I had a pretty large garden the first year, not realizing that the gophers were there first and would eat whatever they wanted from below ground. It was shocking at first to arrive at the garden in the morning and find that a whole plant had been sucked underground. I did manage to grow corn and one tomato plant survived. It reminded me strongly of that Berkeley experience, but this time the corn ripened and we even invited Max's kindergarten class on a field trip to pick and eat corn, visit the sheep across the fire station lot, sing harvest songs and run around a bit.

The next year I built a raised bed next to the barn with hardware cloth underneath to protect from gophers. I've also learned that the best thing to do is to plant my veggies, and even flowers and bulbs, in pots and wine half barrels. It means more work in the spring getting all that dirt refreshed and is more expensive, but the gophers only get a few things I don't really care about this way.


I found fairly quickly that our solarium is the perfect place to grow seedlings. Every February or March I begin with seeds and end up, by planting time, with sturdy seedlings. My favorites are tomatoes and zucchini, but I also do cucumbers. The beans and peas do best being planted directly in the soil, but sometimes I do the cucumbers that way, too.


One year I grew a dozen different kinds of heirloom tomatoes. Each of three seed packs had four kinds in it. Fortunately, almost all of the seeds germinated, so I had plenty of seedlings to give away to friends. Those were the best tomatoes! So much flavor and so many pretty colors. They were a joy to grow and to eat. There were green zebra tomatoes, black krim, costelluto, a yellow one that I forget the name of, brandywine, and more.

Last year I did something similar, but planted more seeds of fewer varieties and gave the seedlings away to the local Grange for their spring fundraiser. It is a bit of a process going from seed to cell pack to larger seedling pot, keeping them watered, hardening them off before planting and then keeping them healthy until their roots get well worked into the soil and they begin to really grow.


Then it's mostly a matter of even watering (done with a drip system for the last 10 years or so), fertilizer once or twice during the season, tying them up if they are escaping their tomato cage, and usually pretending to be a bee once at the beginning of the time when they set fruit. We used to have enough real bees, but they are not as plentiful, so a camel hair brush helps transfer pollen from male to female flowers. Once the first few tomato fruit are set, the plant seems to get the idea and I don't usually have to help again.

Send me an email if you would like information on to how to start your own seeds the way that I do it. It starts with damp paper towels and small plastic bags, like sandwich bags and, of course, seeds. Be sure to leave the little plastic bags with their roll of paper towels studded with seeds open to let in fresh air, but keep them on their sides to store as much moisture as possible. Once you check them and see that there are roots and the first leaves, get them into the ground or into cell packs (I do the latter) to keep growing. To harden off, take the seedlings outside during the day for a few hours, then take them inside again in the late afternoon, and do that for four days running. After that you remove the lower leaves, plant them with some of the stem (where those lower leaves were) under the soil because roots form there for stronger plants, add water and tomato cages and watch them grow! It's important that the soil warms up before you plant the seedling out. Otherwise they will just sit there, keeping the same size, until the soil warms. That can be frustrating!


So what is the best recipe I can think of for using the ripe tomatoes once they are firm but juicy and fully colored and come off the stem easily? To really enjoy the flavor of the tomatoes, best is just sliced with maybe some salt and pepper. Next would be to drizzle slices with good balsamic vinegar and peppery virgin olive oil, plus a scattering of finely sliced fresh basil. The taste of summer...our here, the taste of early fall.

Saturday, April 07, 2018

Spanish Style Chicken and Rice


This was one of my favorite meals when I was growing up. This is another braised dish, this time with chicken, onions and garlic, tomatoes, peppers, rice, sherry, saffron, cloves and peas. It is very aromatic and quite delicious. The rice soaks up the flavors of the veggies, sherry, saffron and cloves and the topping of hot peas and some pimento or roasted red peppers is colorful and finishes off this one pot meal. It's perfect for a chilly spring evening. It didn't take long to clean the plate.


My mother used to make this with a whole chicken, usually at least 2 and a half pounds of chicken. Since Sweetie and I are not a large family with eight children, I cut the recipe in half. I also used boneless, skinless chicken thighs, which worked well. The thighs take well to braising and by being boned and skinless, the flavors penetrated the chicken really well. They may cook a little faster, too.


Arroz con Pollo (Spanish Chicken and Rice)

1 frying chicken (about 2½ lbs. ) cut up
3 tablespoons olive oil
1 large onion, chopped
1 clove garlic, minced
1 medium green pepper, chopped (I used yellow bell pepper)
1 can peeled tomatoes (19 oz.)
¼ teaspoon black pepper
½ teaspoon paprika
1 cup water
1-2 bay leaves
1/3 cup dry sherry
1 pinch Spanish saffron
2 whole cloves
1 cup long grain white rice, uncooked
1 cup peas, cooked and hot
1 pimento, cut up

Dry chicken pieces. If desired, season chicken with salt. Brown in hot oil. Add onion, garlic, and green pepper; brown 5 minutes longer. Add remaining ingredients, except for rice, peas, and pimento.

Cover and simmer 15 minutes. 

Add rice. Bring to a boil, stir; cover and simmer for 30 minutes. Garnish with peas and pimento. 

Serves 6 - 8.

Monday, June 26, 2017

Spanish Chicken and Rice for Dinner


Want an easy casserole of chicken, rice, tomatoes, onions and garlic, herbs and spices and a little marsala wine? Check out this one that was a family favorite for many, many years. I made it tonight but had to change a few things. It was supposed to be sherry instead of marsala, and the dish should have saffron, but those were both missing. It still tasted wonderful! The good news was that it went together so quickly. We've spent quite a bit of time today on our next project and suddenly it was almost dinner time. From start to finish was less than an hour. Don't leave out the whole cloves...it is an essential flavor in this dish.

Sweetie and I are in the planning stages for replacing the tub in Grandma's farmhouse with a nice alcove shower with glass doors. We still haven't decided on the size but have narrowed it down to a 5 foot one that is basically the same size as a tub in length, or a 4 foot one that will allow us to move the vanity over to the same wall...a blessing in a bathroom as narrow as this one. I'm going with white shower, vanity and toilet, brushed nickel fixtures and door frame, and cream colored walls with bright white trim. The floor is currently cork colored but it will need replacing, so we may go with something darker for contrast with all that white. It should be fresh feeling once we are done. We are hiring a plumber to do all the plumbing and the electrical that's in there should be OK, so it's really mostly constructing some walls to attach the shower walls to, some tile or sheetrock, and paint. Probably doing demo will be the most complicated because it involves, among other things,  moving a very heavy cast iron clawfoot tub out and across to the outbuilding where it will live until we find a place for it or sell it.

I'll try to remember to post photos of the before and after once the project is finished. The one at the top is courtesy of WayFair. Probably not the vanity we will use, but I like the sleek look.

Speaking of photos, I completely forgot to take any of this delicious dish. Think browned chicken pieces peeking out of a sea of tomato-studded rice with a nice sprinkle of peas on top. Colorful and savory. Don't take my word for it...try it yourself.

Arroz con Pollo (Spanish Chicken and Rice)
From Family Food by Patricia Lachman
Serves 6-8

2 1/2 lbs. chicken...I used boneless, skinless chicken thighs, but a cut up frying chicken is traditional
salt (optional)
3 tablespoons olive oil
1 large onion, chopped
1 clove garlic, minced
1 medium pepper, chopped (traditionally green, but I used red)
1 can peeled, chopped tomatoes in their own juice
1/4 teaspoon pepper
1/2 teaspoon paprika
1 bay leaf
a pinch saffron
2 whole cloves
1 cup water
1/3 cup sherry (or marsala)
1 cup long grain uncooked rice
1 cup cooked green peas
1 pimento, cut up (optional)

Use a large skillet or Dutch oven with a tight-fitting lid. Season chicken with salt, if desired (I always skip the salt...it's not needed). Brown the chicken in 2 tablespoons of the olive oil. Remove the chicken and cover with foil. Add remaining olive oil, heat, then add the onion, garlic and pepper. Brown 5 minutes. Add remaining ingredients, except for rice, peas and pimento. Return the chicken to the pot. Cover and simmer 15 minutes. Add the rice. Bring to a boil, stir, being sure that the rice is submerged in the liquid in the pot, cover and simmer for 30 minutes.
Garnish with the hot peas and with the pimento, if using.

This dish makes great leftovers since the rice tastes even better the next day.

Friday, April 07, 2017

Spanish Chicken With Memories


One of my favorite casserole dishes from when I was growing up is Arroz con Pollo, or Spanish Chicken with Rice. It includes things my mom didn't use very often together, like saffron and sherry. This is a mellow dish with browned chicken (I used boneless, skinless thighs even though the original recipe calls for whole cut up chicken, with bones and skin), garlic and onion, peppers, tomatoes and rice, bay leaf and cloves and paprika, and the saffron and sherry, too. The finished dish is garnished with green peas, so it is a whole meal in one dish and once the chicken is browned, the rest goes pretty quickly. I made mine a day early so that the flavors would mingle. Because I was unexpectedly out of yellow onions, I used a red onion...worked beautifully. I was also out of sherry and used Port instead. That seemed to be emblematic of this cooking spree.

So if you need a blast from the past, or just a delicious, filling, fairly healthy but still slightly exotic flavorings, give this a try. The leftover are even better than the fresh dish, too, so be sure to make the whole recipe. I left off the pimento because I forgot to buy some, but if you have it, it adds greatly to the dish, both in flavor and color. Since I used red bell pepper instead of green bell pepper, that brought a bit of the flavor and color to mine, but not as much as the pimento. Give this one a try. It is well worth your time. We had the leftovers tonight and they were so good that I neglected to take a nice photo. What you have above is what was on the plate when I remembered. *Grin*

Arroz con Pollo (Spanish Chicken and Rice)

1 frying chicken (about 2½ lbs. ) cut up
3 tablespoons olive oil
1 large onion, chopped
1 clove garlic, minced
1 medium green pepper, chopped
1 can peeled tomatoes (19 oz.)
¼ teaspoon black pepper
½ teaspoon paprika
1 cup water
1-2 bay leaves
1/3 cup dry sherry (I used dry Port...out of sherry)
1 pinch Spanish saffron
2 whole cloves
1 cup long grain white rice, uncooked
1 cup peas, cooked and hot
1 pimento, cut up

Dry chicken pieces. If desired, season chicken with salt. Brown in hot oil. Add onion, garlic, and green pepper; brown 5 minutes longer. Add remaining ingredients, except for rice, peas, and pimento. Cover and simmer 15 minutes. Add rice. Bring to a boil, stir; cover and
simmer for 30 minutes. Garnish with peas and pimento. Serves 6 - 8.

Wednesday, January 11, 2017

What Smells SO Good?


That's what Sweetie asked after he came in from cutting up the Christmas tree to put it into the green recycle bin. We finally took down the tree today and put all the decorations and ornaments and lights up in the attic until next year. Usually I would have done it on January 7th (the day after Epiphany), but we have been having terrible wind and rain since the weekend and it was nice having the lights and soft glow of the round ornaments during the rain. Of course we also had some blackouts with no power - 3 hours and then about 6 hours, plus a few brief ones, (less than a minute), so no comfort from the tree lights then. Still, we are on high ground, so no flooding here. We didn't lose too many tree limbs, although our old apple tree did fall over, which is very sad.

Our friend and neighbor Phil also asked, "What smells so good?" when he came by this afternoon to borrow a few gallon jugs of well water. Our neighbors are on a different power line and had been out of power for about 14 hours by then and needed a little extra. Fortunately, I usually fill up about a dozen during December for times like these. We have our well water treated with a salt, so for tea and coffee I use bottled spring water because it has more acid than the treated water, so it's better tasting, for tea especially. I just fill those as they empty and label them with the date and "Well".

So what did smell so good? The Country Bean, Ham and Cabbage Soup that took most of the day to make. This is one of those recipes that are good to do when you're going to be hanging out at home much of the day. We did get a walk in with Pi between storms,


and saw how flooded the Laguna de Santa Rosa was on High School Rd. in Sebastopol. Many roads in the Santa Rosa area have flooded and there have been mudslides and evacuations from low lying areas. We have had over 11 inches of rain since Sunday. A good time for soup since there is more rain today and will be a little more tomorrow. Taking care of the Christmas tree was also a 'between the storms' thing since we finally had a day where there was a break between storms.

You actually start this soup recipe the night before. You rinse dry white beans and put them to soak with water covering them. (Actually put at least an inch of water over them. They soak it all up during the night). The next day there are draining, rinsing and simmering sessions. The longest is for an hour and a half. Most of the rest are for 15 minutes or a half hour. It does take a little time to chop the veggies and to make the herb bouquet. Towards the end of the process you have to take a few minutes to fish out the herb bouquet to discard and to cut the ham into bite sized chunks, as well as to slice up the cabbage. The recipe calls for a roux of cooked flour and butter to thicken the soup, but mine simmered so long that it didn't need any thickening.

Give this a try. The recipe is from my Mom, but I don't know where she got it from...I just make it and enjoy it. It is hearty, tasty, stick-to-your-ribs good, and pretty healthy, too. It makes lots, so there are leftovers which are even more delicious than the original meal. Just be prepared for that question: What Smells SO Good?

Country Bean Ham and Cabbage Soup

2 1/3 cup dry pea beans (Great Northern, white beans)
1 3-lb cooked picnic ham, bone in
1 celery stalk, sliced
2 carrots, quartered and sliced
5 sprigs parsley + 2 bay leaves tied together
2 medium onion, sliced, plus 1 onion stuck with
3 whole cloves
4 garlic cloves, mashed
½ teaspoon EACH dried thyme & ground pepper
1 teaspoon salt
1 can tomatoes
1 small head green cabbage, sliced in 1/4” slices


Cover beans with cold water by at least an inch and let stand overnight. 

Drain, rinse, return to pot and cover with fresh water and bring to a boil. Turn off heat and soak for 1 hour. 

Drain & rinse & return beans to the pot. Add ham. Add enough water to cover the beans. Bring to a low simmer and simmer 15 minutes. 

Add the vegetables, herbs, onions and seasonings to pot. Cover and simmer 1 ½  hours. 

Add the tomatoes and simmer ½  hour. If tomatoes stay whole, chop them up with a spoon. 

Remove herb bouquet and whole onion. 


Add the cabbage, stir, and simmer ½ hour. 


Remove any ham bones and discard. Cut up any ham chunks into bite sized pieces and return to the pot.

Make a roux of 2 tablespoons butter and 2 tablespoons flour, cooked in a small pan until light brown. Add it to soup. Simmer 15 minutes. 

Taste and season with more salt and/or pepper as needed. Serve hot.

Tuesday, November 18, 2014

Pasta Sauce With Italian Sausage and Mushrooms


With chilly weather finally here, the time has come for slow cooked dishes and stir fry dishes and casseroles. We still have meals from the grill, but not as often.

One of my favorite pasta sauces is based on zucchini squash blended with tomatoes or tomato sauce, then mixed with cooked onions, herbs, garlic and maybe a dash of wine or some mushrooms. It really doesn't need meat, but now and then I'll add browned ground turkey or, as I did this week, browned bulk Italian sausage.

On the the great things about this sauce is that the squash soaks up the flavorings and so even after a short time on the stove it tastes like Mama had it on the stove simmering all day. Give it a try when you are in a hurry to get dinner on the table.

Squash Based Pasta Sauce with Mushrooms

1/2 lb ground meat (beef or turkey or Italian sausage - I used Italian sausage this time)
1-2 tablespoons olive oil
1/2 medium onion, chopped
2 cloves garlic, minced
4 oz. fresh mushrooms, sliced or chopped
2 medium squash, cut into chunks (any summer squash, but zucchini works best)
1 15 oz. can tomato sauce
1 15 oz can diced tomatoes in juice
2 teaspoons oregano
1 teaspoon dry basil
1/4 teaspoon dry rosemary
note - fresh oregano, basil and rosemary can be used - use twice as much, or more, to taste
1 teaspoon salt
1/4 teaspoon pepper

In large skillet heat oil over medium high heat. Brown ground meat. Set aside.

Using same pan, cook onion and garlic until translucent and barely brown, about 5 minutes, stirring now and then. Add the mushrooms, stir, cover pan and cook another 3 minutes, stirring once half way through.

While meat and then onions/garlic cook, put half of squash in a blender. Add 1/2 of the can of tomato sauce and 1 tablespoon of water. Pulse blender, removing top and stirring every couple of pulses, until mixture is broken down but still chunky. Once onion mixture has finished, pour this squash mixture into the pan. Lower heat to simmer and deglaze the pan with the tomato mixture, scraping up the browned bits.

Return browned meat to the pan and stir. Put the rest of the squash into the blender, add rest of tomato sauce, pulse the same way the first batch was done. Add this batch to the pan of meat mixture and stir.

Add diced tomatoes, herbs, salt and pepper to pan, stir.

Return to boil, cover, turn down heat and simmer at least 2 minutes, stirring about every 10 minutes to avoid scorching. (The longer the sauce simmers, the better it will taste.)

While sauce is simmering, bring large pot of water to a boil. Add pasta and cook according to directions on package, until al dente. Drain pasta well.

Put generous serving of pasta on plate. Top with pasta sauce and garnish with fresh basil and/or good Parmesan cheese shards.

note - this sauce tastes even better if allowed to cool and left in the refrigerator overnight to blend the flavors. Reheat over low heat until simmering.

Saturday, August 04, 2012

What to Do with the Rest of the Beans

Only one cup of cooked cranberry beans were left after making the awesome Cranberry Bean Salad. I cleaned out the fridge today and there they were...poor, unloved beans. I also found that the crisper had ample amounts of fresh spinach, half a yellow onion, some red bell pepper that needed using up, lots of celery and some carrots that were starting to dry out. There was no doubt in my mind that the answer was...SOUP. With the fog scheduled to roll in by dinnertime I knew it would be cool enough to enjoy some soup. The fridge clean out also inspired me to make some salmon egg rolls, but that's for another post.


I often don't post soups that I make because it seems so simple to me to make soup. This time it turned out so well that I want the recipe just as I made it for future reference. It is still pretty simple, but these days I forget what I had for dinner last night, so it is likely I won't remember the exact proportions and that might just be the secret for why this soup was so savory and delicious.

I started, as I usually do, with chopped onion, sauteed in a little olive oil. Garlic goes in after the onion has had some time to soften. Chopped celery and red pepper went in next, followed closely by chopped carrot. That all cooked for about 3 minutes before I added some yellow zucchini, covered the pot, turned the heat way down, and sweated the mixture for a while...about 10 minutes.

Then I gave it a good stir and turned the heat up to high...that allowed the excess liquid to steam off and also some of the veggies had some nice browned spots on them. Before brown could turn to black I added chopped tomato including juice. That deglazed the pan nicely! Fresh spinach was stirred in until it wilted. The beans were added, along with thyme, sage, dried orange peel, paprika, and pepper. Again the the pot was covered and the heat turned low. Another 10 minutes allowed all those wonderful flavors to combine. After uncovering again I added some broth and gave it all a stir. Covered again the mixture simmered another 20 minutes.

The soup smelled sooo good and tasted even better. Often I try a new recipe and make notes right away on what to do differently next time. This time I wouldn't change a thing. Quite unusual, but now you know why I want to save this recipe...and why I want to share it with you.


Cranberry Bean and Veggie Soup
serves 2-4

2 tablespoons olive oil
1/2 yellow onion, chopped
2 cloves garlic, chopped fine
1-2 stalks celery, chopped
1/2 red bell pepper, seeded and chopped
1/2 cup chopped carrot
1/2 medium zucchini (any color) sliced lengthwise in quarters and then sliced in 1/4 inch slices
1-2 medium tomatoes, cored and chopped...keep the juice for the pot
3-4 cups fresh spinach, rinsed
1 cup cooked cranberry beans (see THIS recipe for cooking the beans)
1/4 teaspoon dried thyme
1/8 teaspoon dried orange peel
1/4 teaspoon paprika
1/2 teaspoon dried sage
pepper to taste
1 can (1 3/4 cups) vegetable or chicken broth

In a soup pot heat the olive oil over medium-high heat. Add the onions, stir and cook, stirring often, for 2 minutes. Add the garlic, stir and cook another minute. Add the celery, bell pepper, and carrot and stir. Cook for 3 minutes. Stir in the zucchini and stir. Cover and cook over low heat for 10 minutes. Uncover and turn heat to high. Cook another 3 minutes, stirring about every 30 seconds. Vegetables will brown a little bit.

Add the chopped tomatoes to the pot and stir. Lower the heat to medium. Use a wooden or nylon spoon to scrap any dark brown or black bits from the bottom and sides of the pan. Add the fresh spinach and stir. Let cook another minute to wilt the spinach. Add the cooked beans, dried thyme, dried orange peel, paprika, sage and pepper to taste. Cover and cook 10 minutes over low heat.

Uncover, add the broth, recover the pot and simmer for 20 minutes. Serve. If desired, sprinkle a little grated Parmesan cheese over the soup in the bowl before serving.

Friday, January 13, 2012

Beef Salad to Mashed Potatoes


It's amazing how much I take for granted, like being able to chew my food with enjoyment. A few days ago I had a wonderful salad for lunch which included lots of field greens, cucumbers, tomatoes, carrots, and slices of some left over grilled beef...I think it was boneless short ribs but Sweetie cooked them before I saw the packaging. I used a tablespoon of blue cheese dressing to dress the leaves and veggies, then topped the dressed plated salad with the beef slices. Very tasty indeed.

But what does that have to do with mashed potatoes you may ask? Well, the salad was chewy and, because I can always find something else to do than go to the dentist, some bits of the greens seem to hide out at the back of my jaw, but the truth is that I did the right thing and had a procedure at the dentist yesterday that will help solve that little problem and keep me healthy yadayadayada. Bottom line? today for breakfast I had mashed potatoes with a little sharp cheese melted in because all that being healthy also led to a sore set of gums and sore jaw...and no interest in chewing anything. Tea and coffee and water seem fine, but no orange juice...too acid according to the dentist... and I just decided that today I'll keep my choices to soft ones. It was packaged mashed potatoes, too, because they are truly soft...no lumps. I had them on hand for adding to bread doughs. Lunch will be soup and dinner might just be custard. Good nutrition can start tomorrow.

Hope your days are pain free and include lots of enjoyable chewing.

Beef Salad
Per person:

2 cups field greens
1 small or 1/2 of large tomato
1 small or 1/2 of large cucumber
1 small or 1/2 of large carrot
prepared blue cheese dressing to taste
slices of grilled beef that has been seasoned with salt and pepper - to taste

Wash and dry the field greens, wrap in a towel and chill to crisp.

While greens are crisping, cut the tomato into wedges, cut the cucumber into dice after removing the seeds. I used Persian cucumber, so left the peel on. If you are using cucumbers with waxed or tough peel, then peel it before dicing. Also cut the carrot into coins or 1/2 coins.

Remove the crisp greens from the 'fridge and place into a large plastic bag. (I save the bags I bring produce home from the stores in.) Add the dressing and close the bag. Toss the greens until the leaves are coated, then pour from the bag onto your plate. Add the tomato, cucumber and carrot. Arrange slices of the beef over all and serve. This salad goes well with chilled mandarin oranges on the side.

Tuesday, August 24, 2010

Summers Jewels

Although some of the plants in the garden this year are from starts I bought at the nursery, most of them are either volunteers from last year or ones that I grew from seeds. It's a long haul from February or March when the seeds go into the little soil blocks and get to be cozy in the sunspace while they germinate and send up shoots and leaves, growing nice roots below soil, to late August when we are finally, finally getting ripe tomatoes. You would think that the cute brownish cherry tomatoes would ripen far earlier than the hefty Black Krim beefsteak type, but it seems they whispered at night and decided to keep me in suspense by ripening all together.

The very first was the Costuluto, ribbed like a pumpkin, bright fire engine red in color and with a true strong tomato taste. It went right into a salad. The next bunch were more Costuluto, a couple of Black Krims, a Brandywine and a handful of those cute cherry tomatoes. They were eaten by themselves, with just a touch of olive oil, a splash of balsamic vinegar and some salt and pepper to highlight their natural fresh-from-the-garden flavors.

Now we have gotten enough that I was able to make a veggie casserole the other night. Layers of zucchini, tomato, fresh corn (from the market),

mushrooms, onions, thyme and lite Swiss cheese in a small dice filled a casserole. On top I put some more Swiss cheese, some Parmesan and chopped Italian parsley.

Baked together they created a fabulous dish full of the flavors and colors of summer garden jewels. This is a delicious combination and looked far better 'in person' because I forgot to take a photo once it was on the plate until Sweetie had almost finished his second helping...the last of the yummy veggie layers.


Although I do love to blog about bread and baked goodies, I'm really happy that this post, the 500th (hard to imagine that many!) is about my garden, since it is one of my enduring enthusiasms and always gives back more than I put into it, like the true friend that it is. Hope that you have a garden or will plant one soon. If you have one, hope that it is a happy garden, full of beauty and hope.

Summer in Layers
3 small yellow summer squash or zucchini ( or mixed) sliced
4 tomatoes, sliced, then cut into wedges
1 ear corn, fresh, yellow or white
1 tablespoon olive oil
1 yellow or white onion, peeled and chopped
1 cup sliced mushrooms
1 small bell pepper, removed from core and diced
¼ teaspoon dry thyme
salt and pepper
1 cup finely diced or shredded Swiss, Emthaler or Jarlsberg cheese
½ cup shredded Parmesan cheese
1 tablespoon chopped Italian parsley

Butter a deep 2 quart casserole. Make a layer using half the zucchini or yellow squash, half the tomato wedges. Use a sharp knife to cut the kernels from the cob of corn. Sprinkle the zucchini and tomatoes in the casserole with half the corn. Set aside

In a medium skillet, sauté the chopped onions, sliced mushrooms and chopped bell pepper until soft, about 5 minutes, stirring often to keep from sticking or over-browning. Sprinkle with the dried thyme and stir to combine. Spoon half of this mixture over the vegetables in the casserole and distribute evenly. Season with salt and pepper. Sprinkle half the Swiss, Emanthaler or Jarlsberg cheese over.

Repeat layering process in the casserole, using the remaining squash, tomato, corn and onion mixture. Season with salt and pepper (I had additional squash slices, so I put on another layer and seasoned it.)Sprinkle on the remaining cheese. Sprinkle with all the Parmesan cheese and then the chopped parsley.

Bake uncovered in a preheated 350 degree oven for 45 minutes or until cheese melts and/or browns lightly. Serve hot. Serves 2-4 unless you dislike veggies...then maybe 6.

Thursday, February 04, 2010

More Black Beans

So you get a phone call from a friend who is looking for a dish for a luncheon and it has to be something that a non-cook can make. It would be nice if it is also vegan and not too expensive. Even better would be something that doesn’t need to be re-heated or even refrigerated. Oh, yes, can it also be delicious?

If you get that kind of phone call I have just the thing for you. We served it to our scholarship group yesterday and it was a hit! We had a four person committee and three of them were non-cooks, but they did a great job with this salad. Parkay made a great chairwoman! We served it on lettuce leaves accompanied by a gorgeous big strawberry that had been fanned out, plus fresh blueberries and some bakery rolls. Delish!

Black beans and corn work together here to make a complete protein, plus they taste great together and look colorful, too. Add tomatoes, red pepper and Italian parsley (the flat leaf kind), plus some red onion and you have a very jazzy looking salad. A red wine and olive oil based dressing ties it all together and a hint of cayenne makes it sing. Since it uses frozen corn and canned beans and tomatoes, the only cooking is some chopping of peppers, onions and parsley.

Even if you are a proficient cook, this is a great meal to have in your repertoire, especially if you keep some of the ingredients on hand. You can pull it together at a moment’s notice when you have unexpected guests or are just too tired to do ‘real’ cooking. Just remember, the best reason to make this salad is that it tastes great!

Black Bean, Corn and Tomato Salad

1 (16 oz.) bag frozen corn, thawed
½ - 1 cup fresh tomatoes, diced, plus any juices that collect (you can remove the skin and seeds or not, as you prefer) OR 1 (14 to 15 oz ) can diced tomatoes and their juice
½ cup red pepper, cored and diced
½ medium red onion, diced
½ cup fresh parsley, finely minced – flat leaf gives a stronger flavor than curly leaf
1 14 to 15 oz ) can black beans, rinsed and drained
Dressing
¼ cup red wine vinegar
¼ cup balsamic vinegar
(OR ½ cup red wine vinegar and NO balsamic vinegar)
½ cup olive oil
½ teaspoon salt
¼ teaspoon freshly ground pepper
½ teaspoon Dijon mustard
¼ teaspoon ground cayenne pepper (or more to taste)

Place thawed corn, tomatoes, diced pepper, red onion, parsley and beans into a bowl.

Shake the dressing ingredients together in a small jar with tightly fitting lid. Pour dressing over salad and stir to mix ingredients thoroughly.

Cover salad and chill for at least an hour and up to 12 hours until thoroughly chilled.

Serves 6-8.

Note: Sometimes you can find frozen corn that has red pepper bits already in it. If you do, you can skip dicing the fresh red pepper…just use the frozen corn with red peppers.

Monday, November 02, 2009

Catching Up -Caprese on a Skewer

I remember, not that long ago, when my kids would return to school after having the summer off. It was always fun to see the other parents and do some catching up. Since we live in a rural area our kids often didn't see their school mates all summer either. That is so different from my experience growing up in a suburb. We saw our neighborhood friends all year round.

We moved to our farm when my daughter was in 5th grade. It didn't take long for me to become involved in the school activities. One of the ideas that I came up with was to have the school's Parents' Club (our version of PTA) host a back to school bar-b-q on the first Saturday after school started. The Parents' Club provided free hot dogs and sold water and sodas. Everyone who came brought side dishes to share. As the afternoon light lowered, long tables from the cafeteria became loaded down with pasta salads, green salads, rice salads, baked beans, deviled eggs, platters of watermelon slices and lots of cookies and brownies and other delights. Parents brought lawn chairs to sit in or blankets to spread on the school lawn for sprawling on as we ate. The leadership students supervised the creation by the little kids of giant bubbles using flat trays and big bubble wands. It was a great way to spend time catching up.

Recently Sweetie has been getting e-mails and phone calls from guys he knew in grade school and high school. Not sure how it all got started, but guys he has stayed in touch with heard from others and his contact information was passed along. It has been bitter sweet because some friends have lost spouses or are ill themselves and one guy called to let everyone know that another friend had just died. There was a lot of good news and fond memories, too, so he was glad to do some catching up, all without Facebook.

Our daughter has been hearing from old friends and former schoolmates, too, but hers has been mainly through Facebook and MySpace. There was a young woman who used to babysit for Max who contacted her, too. We had been wondering how she was so it was nice to see, via our daughter, that J has grown into a beautiful woman and has her own little one to care for and a happy marriage, too.

How do you catch up with old friends?

Now for a catching up recipe. I made this dish a while ago but it got lost in the end of summer shuffle. Now that the clocks have been moved back to "regular" time I guess I better get this posted before it is completely out of season. I made it again today so I could do photos to replace the ones I scrambled on the digital film by answering the questions 'do you want to reformat?" wrong. Not sure what I was thinking...another brain fart I guess...but there went a bunch of photos. Nice thing about an old brain is that I had also forgotten what most of the photos were images of, so I don't really miss them.

This is a total steal of a recipe from the lovely Giz and Psychgrad at Equal Opportunity Kitchen blog. I think they used it for the wedding reception. We just had our for lunch, but it was equally delicious.

Elle's Note: You can use pre-marinated mozzarella balls or cubes of fresh mozzarella, of you can marinate your own as I did by letting them marinate in a mixture of olive oil, dried oregano and basil, garlic, salt and pepper...amounts to your own taste. You could make it with plain cheese if you are in a hurry, but the added marinade flavors take this to another level.


Caprese Salad on a Skewer
adapted from a recipe at Equal Opportunity Kitchen

1 fresh mozzarella, cut in cubes or 8 or more oz of fresh mozzarella balls, marinated (see note above)
1 pint basket small yellow pear tomatoes
4-5 medium red tomatoes, cored and cut into bite sized pieces
fresh basil leaves

On wooden skewers alternate each of the ingredients, starting with a red tomato piece, skin side to the bottom of the skewer. Eat.

How's that for a simple recipe?

Thursday, August 13, 2009

Heirloom Lemon Cucumbers


Until I bought the seed packets a few years ago I had no idea that lemon cucumbers were considered heirloom veggies.

When we first move to the farm a neighbor brought over some that she had grown and they seemed very strange to me...about the size of a baseball but shaped and colored a bit like a lemon. They have a very refreshing cucumber flavor, a nice crisp crunch and are really easy to grow from seed. They are also pretty, adding a sunny punch to whatever dish they are added to. You don't even need to remove the skin, so that gives extra health benefits. She said her family had been growing them for years but nothing about the heirloom bit.

All of a sudden I seem to be finding ripe lemon cucumbers in the garden. I planted quite a few plants since the seeds all seemed to sprout and produce fine looking seedlings. The mini heat wave we are having has brought on all kinds of ripening...even the tomatoes are starting to show some color.

Prep is really easy. I washed them off, cut the stem end off, just a little bit, and then cut them into wedges, and halved the wedges. I cut a really large locally grown (although not in my garden)beefsteak tomato into pieces about the same size. The addition of a scallion added bite and the dressing had both balsamic and apple cider vinegar to play off of the olive oil. You could used finely chopped red onion instead of the scallion and add some fresh basil if you have it handy. Summer in a bowl with sweet and savory, soft and crunchy all together.

This salad benefits from some time chilling to let the flavors meld. I like it icy cold, but you could also take it to a picnic because it is OK at room temperature, too.

Anh of a Food Lover's Journey is hosting Herb Blogging Weekend this time. This is my entry and I took the liberty of copying the information so that you can join in the fun if you want to:

Weekend herb blogging this week (10 Aug – 16 Aug): This event was originally created by Kalyn and it is now in the care of Haalo.

Rules of WHB can be read here.

Please send your entry to Anh by:3pm Sunday - Utah Time10pm Sunday - London Time11pm Sunday - Rome Time7am Monday - Melbourne (Aus) Time (times have been adjusted for changes in daylight saving)

Send your post to anhnguyen118[at]gmail[dot]com with the following details:

• Your Name

• Your Blog Name/URL

• Your Post URL

• Your Location

• Attach a photo: 300pix wide

Heirloom Lemon Cucumber Salad with Tomatoes
Serves 2-4

2 – 4 lemon cucumbers
1 – 2 large tomatoes (heirlooms if you have them)
1 scallion (green onion), chopped, including the green parts
2 tablespoons balsamic vinegar
1 tablespoon apple cider vinegar
¼ cup olive oil
salt and pepper to taste
Optional but good – chopped fresh basil

Cut the lemon cucumbers into bite sized pieces. Cut the tomatoes in bite sized pieces.

In a salad bowl, combine the lemon cucumbers, tomatoes, and scallions. Set aside.

In a small mixing bowl, whisk together the two vinegars, then whisk the olive oil into the vinegar mixture in a thin stream. Season to taste with salt and pepper.

Pour the dressing over the vegetables and stir to mix well. Cover and chill at least 30 minutes or up to 24 hours to let the flavors combine.

Serve chilled.

Friday, June 19, 2009

Summer Salad Time


After a nice cool spring, we felt some heat today, so for dinner I decided to make a nice cool salad. There is nothing amazing about this salad...you have probably made one like it yourself on occasion, but i think it's a fine idea to write out the recipe so I have it the next time I want a good, easy, quick but delicious dinner salad. We had it with some fresh, juicy Silver Queen corn on the cob.

I'm not too crazy about summer hot weather, but I love the clean fresh flavors of summer foods! I used a combination of field greens salad mix and baby spinach for the greens. The warm chicken contrasts nicely with the chill, crips greens


Summer Supper Salad
serves 2

Big bowl of mixed salad greens - enough for two people
1/2 large yellow pepper, thinly sliced
1 tomato, cut in half, each half cut in wedges, then the wedges halved
2 boneless skinless chicken breasts
garlic salt
balsamic pesto dressing (recipe below)


Toss the greens pepper slices and tomato wedges gently to mix. Set aside in fridge to stay cool.

In a large cast iron or non-stick skillet, heat 1 tablespoon canola or olive oil.

If the chicken breasts are too thick to cook evenly, butterfly them to even out the thickness. Sprinkle lightly with garlic salt.

Saute' the chicken breasts in the hot oil until lightly browned on one side, about 2-3 minutes, then turn the breasts and cover the pan. Lower the heat and cook for another 3 minutes. Check center to see if they are cooked. Cook another minute uncovered if necessary to fully cook. Slice the cooked chicken in bite sized pieced.

Toss the salad greens with the dressing. Arrange a large serving on each plate and top with the warm chicken, dividing the chicken evenly between the two plates. Serve at once.


Balsamic Pesto Dressing

2 tablespoons olive oil
1 tablespoon water
1 tablespoon balsamic vinegar
1/4 teaspoon freshly ground pepper
1 clove garlic, crushed
1 tablespoon prepared pesto

Place all ingredients in a jar and top with a tightly sealing lid (I use a pint canning jar and lid). Shake well to mix the ingredients. Let sit at least five minutes for flavors to meld. Shake vigorously right before pouring on salad. Can be made ahead. Will keep in refrigerator at least a week.


Tuesday, May 12, 2009

Signs of Late Spring

One of the signs of spring would be Mothers Day gifts. My lovely and talented daughter is quite creative with pottery painting. I enjoy the tea set she painted for me for Mothers Day last year so much! She has a way with color and pattern.

This year she surprised me with two delightful plates one yellow with purple polka dots and one purple with yellow polka dots! They will be a great way to display some of my Daring Baker and Daring Cook creations and other delights. Sometimes it's difficult for talented people to realize that one of the best gifts they can give is something they made themselves. I know that I will treasure these plates for a long time.


Another sign of late spring is a roomful of seedlings ready to plant. Our sunspace, part of the passive solar design of our home, is a great place to grow seedlings. Year before last I grew six kinds of heirloom tomatoes. This year I stuck to three heirloom varieties, but I'm also growing three kinds of summer squash, eggplant, cucumber, chard, and green beans.


Spring is when a young at heart man's fancy turns to poetry. An unexpected gift was the following poem, dedicated to the lovely tomato. Since Poss was the recipient of some of those sunspace grown tomato seedlings, it should be fun to match up the poem with the fruits of his labors later in the season.


To May 'Toes

A gift that grows
in leafy bower,
With daily hose,
Voila! A tower.

Steadfast weeding
of the plot,
Constant heeding
Yields a lot.

Spaded soil,
A sunny sky.
Upwards toil
'Til late July.


Then gently pick,
rinse, cut, chill.
Serve up quick
Dash'd with dill

Dress up spicey,
Vinegars, oregano.
Sweet orbs slicey,
BLT, extra mayo!

Of perfect veggies
Most wishful
Home-grown 'Maters
are most blissful!

Poss Pragoff, May 09


Happy late spring to you! Hope you are finding your own signs of the season!!

Monday, September 29, 2008

Give me an 'O'

It's almost October, but that's not what the 'O' is for this post. Instead, it's for 'Onions', one of those versatile foods that it would be hard to live without. It's also for Ovarian Cancer Awareness Month (see end of post), an important kind of awareness for sure.

Onions go into a lot of my favorite foods, but there is one recipe that is so simple that it would be lost without the onion. It has a limited number of ingredients, so be sure to use a good firm onion with flavor. I usually use a yellow onion.

This is also a great dish to make ahead, chill, then reheat because it tastes even better that way. The chilling also allows you to remove any fat that rises to the top of the sauce before you reheat it...good if you care about that sort of thing.

Last, but not least, it's easy-peasy to make. I've been making this for so long that if there ever was a recipe I have no idea of the details. Go on, give it a try. Then go to the end of the post and participate in raising awareness for Ovarian Cancer and maybe help raise a bit of funds, too.

Simply Delish Chicken, Onions and Tomatoes

2 tablespoons olive oil (or less if using a non-stick skillet)
6 - 8 chicken thighs...you can use boneless and skinless if you like
1 large onion, cut in half, then thinly sliced
1 cup fresh chard or kale, washed and chopped (optional)
1 can diced tomatoes in juice or the equivalent of fresh diced, peeled, seeded tomatoes
1 can chicken broth or the equivalent of home made chicken broth
1/4 cup freshly chopped parsley
1/4 teaspoon mixed Italian seasonings
salt and pepper to taste

Preheat the oven to 350 degrees F.

In a large ovenproof skillet, saute' the chicken thighs, 4 minutes on a side, until browned and partially cooked through. Set aside. If necessary add more oil to the pan.

Add the onions and stir as you saute' for 2 minutes, until crispy-tender. If using the chard or kale, add to the pan and continue cooking another minute.

Spread out the vegetables, then place the chicken around the pan, spacing equally.

On top of the chicken, add the tomatoes, broth, parsley, Italian seasonings, salt and pepper to the pan.

Cover the pan tightly, then put into the oven and bake at least 45 minutes or up to an hour. Can sit in a turned off oven for another hour; after that either serve or refrigerate.

Serve hot over rice, noodles, polenta, or potatoes. Great with a crisp mixed greens salad.

Serves 4 - 6


O Foods for Ovarian Cancer Awareness Month Contest

I was saddened to learn that Gina De Palma, author of the splendid cookbook, Dolce Italiano: Desserts from the Babbo Kitchen and executive pastry chef of Babbo Ristorante in NYC,has been diagnosed with ovarian cancer.

September is Ovarian Cancer Awareness Month, and in honor of Gina, Sara of Ms Adventures in Italy, Jenn of The Leftover Queen, and Michelle of Bleeding Espresso are asking you to donate to the Ovarian Cancer Research Fund (via FirstGiving.org and to partake in their O Foods for Ovarian Cancer Awareness Month Contest. Interested? Here's what you need to do (this is from Sara's blog):

1. Post a recipe to your blog using a food that starts or ends with the letter O (e.g., oatmeal, orange, okra, octopus, olive, onion, potato, tomato) and include this entire text box in the post;
OR

2. If you’re not into the recipe thing, simply post this entire text box in a post on your blog to help spread the word about the event and Ovarian Cancer Awareness Month.
AND

3. Then send your post url [along with a photo (100 x 100) if you've made a recipe] to ofoods[at]gmail[dot]com by 11:59 pm (Italy time) on September 30, 2008.
We will post a roundup and announce prize winners on October 3.
1 Recipe Prize for best “O food” concoction: $50 gift certificate to Amazon;
1 Awareness Prize for only publicizing event: Copy of Dolce Italiano cookbook.

———
From the Ovarian Cancer Research Fund:

Ovarian cancer is the leading cause of death from gynecologic cancers in the United States and is the fifth leading cause of cancer death among U.S. women; a woman’s lifetime risk of ovarian cancer is 1 in 67.

The American Cancer Society estimates that 21,650 women will be diagnosed with ovarian cancer in the U.S. in 2008 and about 15,520 women will die from the disease.

The symptoms of ovarian cancer are often vague and subtle, making it difficult to diagnose. There is no effective screening test for ovarian cancer but there are tests which can detect ovarian cancer when patients are at high risk or have early symptoms.

In spite of this patients are usually diagnosed in advanced stages and only 45% survive longer than five years. Only 19% of cases are caught before the cancer has spread beyond the ovary to the pelvic region.

When ovarian cancer is detected and treated early on, the five-year survival rate is greater than 92%.

Please donate to the Ovarian Cancer Research Fundand help spread the word!
This post is in memory of Janna Barto, a victim of Ovarian Cancer and a fantastic woman.

Monday, August 25, 2008

Juicy

August might be a hot month in this area, but it is also the month when the harvest really starts to come in...corn, tomatoes, summer squash, pears, late blackberries, early apples, peppers, late strawberries and more. So many possible things to create with in the kitchen! Along with grilled zucchini, steamed corn on the cob, fruit salads, roasted peppers with onions and mushrooms (a great condiment with grilled sausages) and strawberries with yogurt and honey,

we have been having all manner of salads, but two stand out in recent days. Both are juicy!


The first is a fine plate of ripe, juicy, local tomatoes, lightly dressed with balsamic vinegar and olive oil and sprinkled with shreds of fresh basil. For those not allergic, it is the essence of summer.


The second was perfect for a warm summer evening. It's also great when you are busy (as I have been) because you put it together and marinate everything but the lettuce for a couple of days. What you get is a big bowl of cool shrimp, mixed with tangy red onions, juicy oranges, all of it flavored robustly with a zesty marinade that includes lemon, red wine vinegar, mustard seed, celery seed and the kick of some dried red pepper flakes. After I drained off the marinade, this wonderful mixture went into a bowl which I'd lined with the better part of a head of butter lettuce. This one should be served with plenty of napkins...messy but the best shrimp you'll ever taste. My thanks goes to my friend Pam, an excellent cook, who gave me the recipe.
Shrimp, Onion and Orange Salad can even go to a picnic if you make sure to keep the shrimp mixture good and cold.


Hands Down Best Shrimp Onion & Orange Salad
Based on a recipe from the New York Times Heritage Cookbook

1 large sweet red onion, halved, sliced thinly, and separated into half rings
1 ½ pounds shrimp – cooked, shelled and deveined (with tails left on)
4 oranges, peeled and sliced into wedges
1 ½ cup oil
2/3 cup lemon juice
1 cup wine vinegar
1/3 cup catsup
2 tablespoons sugar
1 teaspoon celery seeds
1 teaspoon mustard seeds
½ teaspoon crushed red pepper
2 cloves garlic, finely chopped
2 tablespoons chopped fresh parsley
Bed of lettuce leaves (optional)

Combine onion rings, shrimp and orange wedges in a large glass or ceramic bowl (or large resealable bag).

Mix together oil, lemon juice, vinegar, catsup, sugar, celery seeds, mustard seeds, red pepper flakes, garlic and parsley. Pour over shrimp mixture and marinate 24-48 hours (48 hours is better!) in the refrigerator.

At serving time, drain off the marinade and serve the shrimp, onions and orange wedges. Looks nice served on a bed of lettuce, but for close friends just pile on a platter. (Include a small dish to hold the discarded tails.) Provide plenty of napkins. Serves 4 - 6