Showing posts with label honey. Show all posts

Wednesday, October 11, 2023

Using Fall Fruits and Nuts


 After our recent days of Indian Summer - three days in a row of temperatures in the mid to upper 90s!...we dropped 30 degrees day before yesterday and also had rain...and then more rain yesterday afternoon. Not a downpour, but soaking mist with short runs of medium raindrops. The good news is that it should be enough to keep autumn forest fires at bay for another week or two. The bad news is that it isn't enough to help the water table. The other good news is that it cooled things down enough for baking!

Fall fruits are some of my favorites. Pears are mellow and juicy, the fragrant quince at the foot of the driveway turn from fuzzy to golden and shiny, and the persimmons are just beginning to turn colors on their way to a deep orange. Walnuts and pecans also are harvested in the fall. This year the squirrels and crows have gotten almost all of the walnuts, but I haven't had time to shell them anyway, so that's fine. The walnuts and pecans in this recipe are from Costco. The pears are from in town, carefully ripened in a brown paper bag. I still have some of all of them, so who knows what recipes will show up her in the next little while?

The honey is a very special harvest. It came from the hives of some friends of Sweeties...he went to middle school and high school with one of the friends and they hadn't seen each other in a very long time, but we had a great lunch with them. The honey is full flavored and so delicious! I'm sure that this tart would not have been nearly as wonderful without this special honey.

I started with a recipe from almost the beginning of my blogging time, way back in February of 2007. The recipe for a Nut Mosaic Tart comes from Sunset magazine from 1983. I even got a comment at some point from someone who had lost the recipe and had been delighted to find it again.

As you know if you have been following this blog, I often take a recipe and play with it. This time I took the tart recipe and reduced the nuts but added poached and peeled Bosc pear and poached and peeled pineapple quince. I used a pre-made refrigerated pie crust in the tart pan, tucking the excess into the tart and pushing the doubled sides into the tart pan curves. Then I ran a rolling pin over the top to cut off any excess dough and neaten the top. That's all it took to have a tart shell ready to fill.

The most time-consuming part is poaching, peeling, and chilling the fruit. Be sure to pat off excess liquid with a towel or paper towel before chilling. I didn't do that with the pear and so the pear nearly fell apart plus it made the filling just a bit liquid where the pear was.


The taste of this tart is amazing! All of the elements go so well together. It is fragrant with the quince, honey and orange zest, plus the roasting nuts while baking. I does need to chill a bit before serving, but once you do you will be so glad that you made this delicious Harvest Mosaic Fruit and Nut Tart!


Harvest Mosaic Fruit and Nut Tart
Adapted from a Sunset Magazine recipe from around 1983

1  9-inch tart pan lined with pie dough

1 large Bosc pear, ripe, poached until tender, peeled, cored, tossed with lemon juice and chilled in an airtight container for at least 4 hours. 
2-3 large quince, ripe, poached until tender, peeled, cored, tossed with lemon juice and chilled in an airtight container for at least 4 hours

1 cup walnuts, chopped roughly
1/2 cup pecans, whole
3 eggs
1 cup honey
½ teaspoon grated orange peel
1 teaspoon vanilla
¼ cup butter or margarine, melted
Sweetened whipped cream (optional)


Press pie pastry evenly over the bottom and sides of an 9-inch tart pan with a removable bottom. 

Arrange slices of poached pear and quince, alternating, with small end in the middle and larger end of each slice toward the side. Set aside.

In a bowl, combine eggs, honey, orange peel, vanilla, and melted butter; beat well until blended. Stir in nuts. Pour over fruit into pastry-lined tart pan. If needed, move the nuts around with a fork to scatter them evenly around and over the fruit. 


Bake on the bottom rack of a 350 degree F oven until the top is golden brown all over, about 40 minutes.

Let cool on a wire rack. Remove pan sides. Offer wedges with whipped cream, if desired. Makes 10-12 servings.

Tuesday, June 16, 2020

Babes Bake Bee Keeper Loaf


In the middle of the week for each of the last three or four weeks we've had a heat wave. Even the days that are not super hot aren't really what we expect them to be like, here in the North Bay. Most summers we have a lot of fog and the chill that fog brings and a few hours of sun in the middle of the day and not much rain...often no rain after April. This year we've had some rain each month, thunderstorms (which used to be rare), and this warm to hot weather. At least there isn't much of the mugginess that I disliked as a child, growing up in Northern Virginia. Still, I would be happy with the usual fog.

Heat waves don't inspire me to bake, so little of that has been going on. I did bake some brownies from a mix on Friday but I added small chunks of bittersweet chocolate to make them more interesting. They were a tea treat from a good friend who loves chocolate. She and I sat far enough apart to qualify as social distancing and we consumed a lot of tea and a few of those brownies.

On Sunday it was cool enough to bake but I was tired from painting the floor in the farm house office, so all I did was start the biga for the Bread Baking Babes amazing June bread, brought to us by Tanna of My Kitchen In Half Cups. It's called Bee Keeper's Pain de Mie and it uses a good amount of honey! If you are adventurous you can also steep lavender, camomile or both in the warm milk that you mix the honey into. I had some really, really nice raw blackberry honey, so I skipped the herbs so that I could taste the honey.

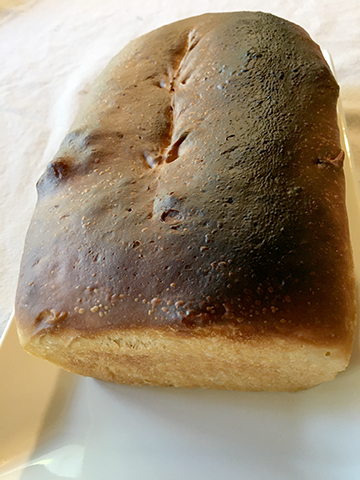
This is one of those recipes that requires you to think and act ahead. You start both the biga and the milk mixture 12 to 18 hours before mixing the full dough. It's also fun because you use a pullman loaf pan (or you engineer something that works like a pullman pan...using bricks!) Of course that would be if you were baking in a regular size oven that allows space for both the loaf pan and bricks. Unfortunately, with the heat, I baked the loaf in my toaster oven so I didn't try for a pullman style, just a regular loaf. I also found that it was very slow to rise. That meant in my case that by bedtime it still hadn't risen enough, so I put the pan and dough into the fridge overnight, then let it sit at room temperature in the morning to finish rising. I only made one loaf since it's just the two of us. Sweetie really liked this bread, especially the buttery quality of it.

This dough browns easily. I actually burned part of the top crust on my loaf by not watching it as it baked. Perhaps baking in the toaster oven didn't allow sufficient space between the top of the loaf and the top of the oven. In the end, I turned the oven down to 325 degrees F for the last 5 minutes.


This is a lovely bread, soft and moist and very buttery. It is only slightly sweet and you taste a hint of sweetness, not the honey itself. I used a fairly strongly flavored blackberry honey, so it's interesting that not much honey flavor remains.

I think this will make wonderful French toast, regular toast, grilled sandwiches, etc. It's just as it it or with a bit of butter spread on it. The crumb is delightful. The crust is pretty thin, but that's OK. Do try this one yourself...just remember to start it the day before you want to bake it.

If you' like to be a Buddy, bake the bread, send an email to Tanna with a photo and a short note about your baking experience with this bread. She'll send you a Buddy badge. Do this by June 29th! Please use BBB Buddy w Bee Keeper’s Pain De Mis as the subject line.

Do visit other Bread Baking Babes sites to see how they baked the bee keeper's bread.


Bee Keeper's Pain de Mie
Martin Philip's book Breaking Bread: A Baker's Journey Home in 75 Recipes
Breaking Bread - 
two 9X5 pullman pans

******** TOTAL AMOUNTS USED IN BIGA + FINAL DOUGH

410 grams durum flour

410 grams AP flour

352 grams water
172 grams wildflower tea (lavender) 
17 grams salt, fine
16 grams yeast
123 grams butter


START HERE

******** BIGA******** 

410 grams AP flour  (205 grams for 1 loaf)

246 grams water (123 grams for 1 loaf)

pinch yeast

******** WILDFLOWER LAVENDER TEA********

170 grams milk (85 grams soy creamer for 1 loaf)
35 grams honey (subtracted 57 grams sugar, increased honey) (18 grams honey)
4 grams lavender  (omit)
2 grams chamomile flowers (omit)

******** FINAL DOUGH FORMULA********
172  grams wildflower tea (86 grams for 1 loaf)
656  grams Biga (all above) (328 grams Biga for 1 loaf)
106 grams water  (53 grams water for 1 loaf)
410 grams Durum flour or Bread flour   (205 grams bread flour for 1 loaf)
123  grams butter   (62 grams non-dairy butter for 1 loaf)
17 grams salt, fine  (9 grams salt, fine, for 1 loaf)
16 grams yeast   (8 grams yeast for 1 loaf)

Directions:

DAY ONE - BIGA 

Combine the flour and yeast in a large mixing bowl. 
Add tepid water (75-80°).  Mix briefly, then knead until a smooth dough forms.
Cover and set at room temperature for 12 to 16 hours.


WILDFLOWER LAVENDER TEA ~ I have not used the chamomile and lavender. I wanted to try it with just the honey the first time.

Combine milk, honey in a small pot.
Over low heat, warm the mixture so the honey mixes into the milk.
When there are small bubbles around the edges add the chamomile and lavender if using.
Turn off the heat.
Cover and allow to set at room temperature 12 to 16 hours.
Strain before using.
Warm the tea to 80° when ready to use.

DAY TWO FINAL DOUGH ~ I used a stiff spatula to break up the biga, then my hands, and did all the rest of the mixing with my hands. 
Ending desired dough temperature: 80°.
Combine strained Tea, all the BIGA and the water.
Mix until the biga is broken up.
Add very soft butter, flour, salt and yeast.
Stir until the dough forms a shaggy mass.
Resist the urge to add more flour.

BULK FERMENTATION 
Cover and allow to rise for about 90 minutes.

FOLD
Fold after 30 and 60 minutes; then leave untouched until divide.


DIVIDE AND PRE-SHAPE
Divide the dough into 2 pieces which will weight approximately 750 grams each. (Piece for 1 loaf will be about 750 grams.)
Pre-shape as tubes. Cover and rest 15 minutes.

SHAPE
Butter or spray two (one) loaf pans or two 9x5 inch pullman pans.
Shape as pan loaves.
With the long side facing you, fold the bottom third of the dough up to the center and the top third over (like a business letter). Fold the dough in half lengthwise, and seal the edges with the heel of your hand.
Place in pans seam side down. Press dough into pans to evenly fill to all corners.

PROOF
For loaf pans: Cover and proof until dough is about 1 to 1.5 inches above top of pan: about 60 - 90 minutes. (Mine took so long that I ended up putting the pan with dough into the fridge overnight and baking it in the morning.

For pullman pans: Place the dough seam-down into the pan, and press it evenly into the corners. Put the lid on the pan and close all but an inch or so in order to monitor the loaf as it rises.
Allow the dough to rise until it's just below the lip of the pan, 60 to 90 minutes.

Towards the end of the rising time, preheat the oven to 425°F.

BAKE
If using a loaf pan, score the loaf in the middle. Put in the oven.


Close the lid of the pan completely, and put the pan in the oven.

Bake the bread for 20 then remove the lid and bake for an additional 5-10 minutes. The loaf should be a deep golden brown on all sides.


Remove the loaf from the oven and, after 5 minutes, turn it out onto a rack to cool completely. Do not allow to cool in the pan as that will result in a soggy crust.

Wednesday, May 10, 2017

Onion Tart With Something Extra


Inspiration comes from different places, and when it comes to cooking and baking that can include meals eaten at other's homes or in restaurants, cookbooks, magazines, the internet...lots on the internet...and even books.

When I knew that we were going to be visiting with sisters and their families this weekend, I offered to make some bread, but heard the answer too late to do so. Falling back on something that I knew was a hit and which I could make fairly quickly, I decided to go with an onion tart made with frozen puff pastry (which I usually have in the freezer), but I wanted to change it just a bit. My inspiration for the changes was a pizza that Sweetie had earlier in the week when we had lunch with friends. The pizza had fig jam and prosciutto which seemed like a great combo. It seemed likely that that combo would complement the herbed sour cream and sweet-tart honey-wine roasted onions that are the tart's filling in the original recipe. After all, the original had bacon and prosciutto is like bacon.

The challenge was mostly how to assemble the tart...onions on the sour cream base, then jam and prosciutto or jam and prosciutto topped with onions or some other arrangement? I eventually decided to cook the ultra thin slices of prosciutto so that they were a bit crisped, then put them and the jam over the herbed sour cream mixture, topping it all with the roasted onions.

Even though the onions became a bit charred from overcooking, the tart was delicious and everyone seemed to enjoy it a lot. If you cook the onions ahead of time and put them in the freezer, you could have the tart, or a variation of it, in pretty short order since the tart only takes 20-25 minutes to cook. I only took one photo, mostly because I was feeling happy after drinking a mint julep and so forgot I needed more photos of the tart served...and then it was eaten pretty fast, too.


Fig, Prosciutto Honey-Roasted Onion TartInspired partly by February 2011 Bon Appetit magazine


1 sheet frozen puff pastry (half of 17.3-oz. package), thawed

6 paper thin slices prosciutto

1/4 cup honey
1/4 cup dry white wine
1 tablespoon olive oil
2-3 large sweet yellow onions (about 1 1/2 pounds), cut into 1/4 inch thick rounds
Nonstick vegetable oil spray
3/4 cup sour cream (I used non-dairy soy sour cream)
1/2 teaspoon fine sea salt
1/8 teaspoon freshly grated nutmeg
1/4 teaspoon dried thyme
2-3 tablespoons fig jam
Few sprigs fresh thyme leaves


Using lightly floured rolling pin, roll out puff pastry on lightly floured surface to 14 x 10-inch rectangle. Fold 1/2 inch of pastry edges in toward center on all sides, forming 13 x 9-inch rectangle. Transfer pastry to large rimmed baking sheet. Press firmly on pastry edges with fork to form rim. Chill crust.

Cook prosciutto in medium skillet over medium heat, one slice at a time, until shriveled and slightly crisp. Position rack in top third of oven and preheat to 375 degrees F while prosciutto is cooking. Transfer cooked prosciutto to paper towels to drain. .

Whisk honey, wine and olive oil in large bowl. Add onions; toss to coat. Coat another large rimmed baking sheet with nonstick spray. Spread onion mixture in even layer on sheet. Roast 30 minutes. Turn onions over, allowing rings to separate. Roast until onions are caramelized, turning often for even browning, 30 to 40 minutes. Watch carefully towards the end because honey burns easily. (I cooked them until the least colored ones were pale gold, which meant that some edges were charred, but mostly the mass of onions was medium gold, not darker because they will still be browning while tart cooks later.) Cool onions slightly. 

Increase oven temperature to 400 degrees F. Mix sour cream, sea salt,nutmeg and dried thyme in small bowl. Using offset spatula, spread sour cream mixture over crust almost to the folded edge. Dollop fig jam in 'little finger nail' sized blobs evenly over sour cream. Break cooked prosciutto into pieces and arrange all over the sour cream and jam. Arrange slightly cooled onions atop jam and prosciutto. Bake tart until crust is light golden brown and topping is bubbling, 20 to 25 minutes. Sprinkle with fresh thyme and serve.

Makes about 6 appetizer servings.

Saturday, April 16, 2016

So Not Cinnamon Rolls


The Bread Baking Babes were given an unusual challenge for April by Baking Soda (Karen) of our Kitchen of the Month, Bake My Day. We were to make rolls that look like cinnamon rolls, but have no cinnamon. The dough is also unusual because it contains yeast like many cinnamon rolls, but also has both baking powder and baking soda, ingredients usually used to help the dough rise when no yeast is used. I was intrigued to see how this would work out.

These are light rolls but have a texture closer to coffee cake than to rolls with only yeast. They are soft and the dough seemed easy to work with, probably because there was a fair amount of oil. I added some freshly grated nutmeg to the dough (not cinnamon!) and then decided to use a flavored honey as the filling. The honey flavors are lemon and lavender but I decided that since the honey was so sweet that it needed the additional tang of freshly grated lemon zest, so I sprinkled the zest of one Meyer lemon over the honey that was spread over the rolled out dough. The filling was still pretty sweet but the zest cut it to an enjoyable amount.

This was a tasty combination, if a bit sticky one. The rolls didn't want to unstick from the bottom of the baking pan, so I ended up scooping them out with a spatula, which damaged the middle one a bit. Still, Sweetie and I enjoyed them and found willing friends and family to help eat the rest.

I don't think I'll make this dough again since I prefer the texture of yeasted sweet rolls with no additional baking powder or baking soda, but I might use the honey and zest again, perhaps with some toasted pecans or almonds.


It was fun to make these rolls with no cinnamon and, really, there are lots of other fillings that are delicious. Check out my fellow Bread Baking Babes to see what they have filled theirs with.

You can also be a Buddy by baking your own Not Cinnamon Rolls, taking a photo or two and sending an e-mail to Baking Soda with a brief description of your rolls and include the photo for the round up. She will send you a Buddy Badge for your blog and include you in the round up. Just get it to her by April 28th.


Not Cinnamon Rolls
The ingredients:
480 ml  [2 cups] milk (I used soy milk)
120 ml [1/2 cup] vegetable oil 
95 gr [1/2 cup] sugar 
2 to 2.1/2 tsp yeast
520 gr [4 cups] all-purpose flour
65 gr [1 1/2 cup] 
all-purpose flour (extra, reserve to add later)
1/2 tsp heaping baking powder
1/2 tsp scant baking soda
1/2 tablespoon [9 gr] salt
1/4 cup honeyzest of one lemon

Oven: 375F / 190 C

Basically this recipe follows the rules for making rolls, as in: make the dough, bulk rise. Roll out in a rectangle, add filling of your choice, roll up from the long side and cut into slices. Proof and bake in a moderate oven.

Now the difference lies in the leavening combo and that comes to show in the rising method.
So:
Room temperature milk, vegetable oil, sugar and yeast in a bowl.
Add 4 cups of all-purpose flour. Stir until combined, cover and let rise for 1 hour. 

Next, remove the cover and add baking powder, baking soda, salt and the remaining 1 1/2 cups of flour. Stir thoroughly to combine. Plan to leave it in for 1 hour or so.

You may now proceed to roll out the dough in a rectangle or refrigerate for at least an hour or up to 3 days. (Probably need to keep an eye out for overflowing dough, so punch down if it rises to the top). Relatively slack dough so it probably is easier to work with when chilled!

Proceed as you will with any other rolls you make; roll dough into a large rectangle on a floured surface. Original states to roll thin, I rolled my usual thickness. Use whatever you feel comfortable with. 

To make the filling, use your imagination... go sweet, go savoury, go wacky. Make it yours and make it good! I used the honey drizzled over the rectangle, then sprinkled on the lemon zest.

Now you are probably ready to start rolling, I always start with the long side closest to me and roll away from my body. You could do it the other way round, I am easy like that! Just keep a tight roll.

Once you have your roll, pinch the seam and roll it once over so the seam is on the bottom. Slice into 1.1/2 inch thick slices, or use a piece of dental floss, crossed, to cut the rolls. Place in greased baking pans (I used 9" round ones). You could also line the bottom of the pan with parchment and grease the parchment. It would make it easier to get the rolls out of the pan once baked. Cover and set aside to rise for at least 20-45 minutes before baking.

Bake for 15-18 minutes in a preheated oven (375F/190C)until tops are golden brown. Turn out of the baking pan quickly because the honey will thicken and it will be hard to remove the rolls. Place right size up on a serving plate. Serve warm if at all possible.


Monday, November 02, 2015

Fall Walnut Honey Cake


We are finally getting some autumn rain, which is a true blessing considering that we have been short on rain for at least four years now. I love autumn and the cooler weather it brings. It has been late coming this year, with lots of days in the mid-80s recently.

While the sun was still shining a week or so ago I gathered walnuts on our back deck. Although I do want the limb of the walnut tree that hangs over the deck to be pruned back, it really is handy that so many walnuts collect on the deck and get properly dried out by the sun, then are easy to collect. After gathering the nuts I just sweep the leaves and husks and broken shells (from the ones that our silly dog cracks with his teeth and somehow gets the nutmeats from) off the deck, ready for the next batch of nuts to drop.

Yesterday I watched some back episodes of Fixer Upper (HGTV) while shelling the nuts. I ended up with about three cups of fresh walnuts!


Since I also had a nice bottle of honey, I decided to make a honey walnut cake and serve it with apple slices that had been cooked in a little more honey. I'm glad that the apples released some juice as they simmered because then I had a little honey-apple juice mixture to drizzle over the top of each serving. The cake is delicious, with just a hint of orange, but it is dry. I just made up a honey syrup with a little orange liqueur in and brushed it on the cake to add some moisture. Will try it this evening and see if it improves the cake.

This is an easy cake to make if you have a food processor. The nuts get toasted, then rubbed in a clean towel to loosen some of the skin. I didn't find that much skin was loosened, so may skip the rubbing part next time, but the toasting add a depth of flavor, so don't skip that part.

I used non-dairy butter instead of the real thing and added a bit of the flour mixture (yes, gluten free flour) to the creaming butter, sugar, and honey so that it would whip better. I also put a tablespoon of the granulated sugar into the food processor, with the rest going into the butter mixture. That extra grit with the nuts helps in getting the nuts to be finely ground but not walnut butter.

This makes a single layer but you could probably double the recipe to make a stunning layer cake, maybe frosted with some maple or caramel frosting. You could also make the syrup (I think it would still be a good idea to brush some on, even for a layer cake) honey-orange and then use an orange buttercream. If you stick with one layer like I did, a side of cooked fruit is nice, but so is a dollop of whipped cream or scoop of ice cream. The recipe called for honey coated walnuts to decorate the top, but I skipped that. It would be a nice garnish if you like.


Honey Walnut Cake
from The Vineyard Kitchen by Maria Helm Sinskey
Serves 8-10

1 1/2 cups walnut pieces
1 cup all-purpose flour (I used King Arthur Flour's gluten-free mixture)
1 1/2 teaspoons baking powder
1/4 teaspoon salt
12 tablespoons (1 1/2 sticks) unsalted butter, at room temperature
1/2 cup honey
1/4 cup sugar
3 large eggs
1 teaspoon freshly grated orange zest
1/2 teaspoon pure vanilla extract
Optional: 10 nice walnut halves and 2 tablespoons honey for garnish

Preheat the oven to 350 degrees F.

Butter and flour a 9-inch cake pan.

Spread the walnuts on a sheet pan and toast in the preheated oven for 6 minutes. Cool and rub the nuts in a towel to remove the loose skins.

Grind the nuts in a food process with 1/2 cup of the flour (and 1 tablespoon of the sugar if doing it my way) until very fine. In a medium bowl, combine the ground nuts, remaining flour, baking powder, and salt. Reserve.

In a standing mixer bowl, with a paddle attachment (or with an electric hand mixer) beat the room temperature butter with the honey and the sugar (remaining sugar if doing it my way) until light and fluffy, about 3 minutes. Scrape down the sides of the bowl.

In a small bowl, beat the eggs lightly with the orange zest and vanilla. Add it in thirds to the butter mixture, beating well to incorporate egg mixture after each addition. Scrape down the sides of the bowl. Add the dry ingredients and mix until fully incorporated.

Spread the batter evenly in the prepared cake pan. Bake in the preheated oven for 35 - 40 minutes, until a toothpick inserted into the center comes out clean.

For the optional walnut topping: while the cake is baking, toast ten walnut halves on a sheet pan for 8 minutes . While they are still warm, rub the nuts in a towel to remove the excess skin and place them in a small bowl. Add the 2 tablespoons of honey and stir until the walnuts are coated. Reserve the walnut halves at room temperature to garnish the cake when it is finished.

Cool the cake in the pan for 5 minutes, and then run a knife around the edges and turn the cake out on to a cooling rack, then carefully turn over so that the top side is up. Cool completely. Garnish the edges of the cake with the walnut halves. This cake is nice served with a dollop of whipped cream.

Honey Orange Syrup: If desired, place 1/4 cup sugar and 1/4 cup water in a small saucepan. Heat over medium-high heat until mixture boils and sugar dissolves completely. Add 1/4 cup honey. Heat another 2 minutes, stirring often. Remove from heat and add 2 tablespoons orange liqueur (I used Cointreau) and stir to combine. Pour slowly over the cake or brush on with a pastry brush until all the syrup is absorbed. Cover with plastic wrap and let sit at least an hour to allow syrup to moisten the cake.

Saturday, January 24, 2015

The Comfort of Buttermilk Biscuits


It's true that I get revved up thinking about making new recipes, especially the ones that the Bread Baking Babes and Cake Slice Bakers make each month. New ideas and techniques really get my creative juices flowing and it's fun to discover foods that can become favorites.

Sometimes, though, it's so nice to make a recipe that I've made over and over again. The process is usually faster and calmer and somehow comforting. I've made these biscuits since I was a young girl. My Dad loved his biscuits for breakfast and he loved them with stew. He loved them with ham and they make a great topping for chicken pot pie. Best of all they are great with some butter and honey, just out of the oven, with nothing but a cup of coffee. Well, I like them that way.


I haven't made biscuits for a long time, but this morning I was in the mood and I had all the ingredients ready to go. It's a short list, just self-rising flour, shortening and buttermilk. I keep my Crisco in the back of the fridge because I use it so rarely that it goes rancid in my cupboard between uses. That also makes it nice and cold for cutting into the biscuit flour. The essential thing with these biscuits is to avoid over handling the dough. You don't want a lot of gluten for these, just tender flakiness. I only knead the dough a few times; just enough to make sure the ingredients are evenly distributed. I do roll out the dough to about half the thickness I plan on having, then fold half of it over the other half. This makes it easy to split the biscuits when baked. Pushing straight down on the biscuit cutter is another tip. These really are easy as child's play, so try them soon. I bet you'll enjoy them as much as my Dad did. Don't forget the honey. I'm thankful to my newest neighbors who gave us a jar of local honey with comb in it for Christmas. They made these biscuits just perfect!


Classic Self-Rising Flour Buttermilk Biscuits

3 cups sifted self-rising flour
 ½ cup shortening
1 cup buttermilk ( you can also use plain milk)

Cut shortening into the flour until consistency of coarse meal. Add enough milk to make a soft dough (may be slightly more or less than one cup).

Turn dough out onto a lightly floured surface; knead gently about ten strokes. Roll 1/4 the thickness desired for finished biscuit height. Fold half of the rolled out dough over the other half. Cut with a floured biscuit cutter (or drinking glass rim) pushing straight down. Don’t twist the cutter.

Place biscuits on a baking sheet. Bake in a preheated 4000 F oven for 12-15 minutes. Makes about 14 two-inch biscuits.

Thursday, October 16, 2014

Bread Baking Babes Get Stuffed for October


It's the 16th again...time for the Bread Baking Babes to reveal the October bread. This month we were treated by Katie of Thyme for Cooking, our Kitchen of the Month, to a savory stuffed bread.This was a sticky dough at first, but fine by the time I was rolling it out.Of course that may have been because I stored it overnight after the dough had it's first rise. I let it come to room temperature and rise a little more, then turned it out on a floured board and shaped it. It smells heavenly with the herbs, but the herbs were barely tasted in the final bread. 

I admit that part of the situation may be because I used a different onion filling. Thinly sliced onions are mixed with honey, white wine, and bacon drippings, then caramelized. When you make the bread, you put ricotta cheese in the center third, then the onions, then crumbled bacon. It is a wonderful filling, but it may have overpowered the other flavors in the bread. I still want to thank Katie for choosing this savory stuffed bread. It sure did get eaten fast and it made a very pretty braid. It was also filling, so cut small pieces. The original recipe can be found on Katie's site. The filling recipe I used is here.


If you'd like to bake this bread and be a Buddy, bake it by the 29th and let Katie know by e-mail about your experience with this bread and be sure to send a photo for the roundup. Further instructions should be on her blog.


Be sure to visit the other Babes because you can be sure that many of them will make a wonderful savory braid and there may be a few surprises along the way.

Bake My Day - Karen, Blog From OUR Kitchen - Elizabeth, Bread Experience - Cathy, Girlichef - Heather, Life's a Feast - Jaime, Living in the Kitchen with Puppies - Natashya, Lucullian Delights - Ilva, My Diverse Kitchen - Aparna, My Kitchen in Half Cups - Tanna, Notitie van Lien - Lien

Monday, August 18, 2014

Honey From the Hive


Last spring we pulled into the driveway and stopped for the mail from the box by the road. An intense humming sound drew my attention toward the olive tree downhill and I was happy to see that there was a bee swarm. Why would that make me happy? Well, I knew that our near neighbors, just across the road, were hoping to start a bee hive in their garden and here was a local swarm, ready to find a new home.


Later that day, dressed in a bee costume and armed with clippers and a cardboard box, AM, G and Sweetie captured the swarm from the olive tree where they were unsuccessfully trying to create a home. They took to their new home in the hive quite well, although initially they started a comb in a part of the box not meant for a comb. Soon they were buzzing about the local area, pollinating the fruit trees and berry shrubs, the veggies and the flowers in the cultivated gardens, gathering pollen and making honey. With the current problems with bee hive disease and die off, every healthy hive is a welcome addition.

Yesterday we were in San Francisco celebrating the birthday of one of our favorite people. The traffic home was slower than usual, so we were very happy to get home. We were even happier when we rolled up the hill and met AM, who had just dropped off something for us.

There, by the door, was a package wrapped in lined paper with "taste me" written on it. Given that AM makes amazingly delicious cheese, soup, bread, and other goodies there was no telling what delights were in store for us.


We removed the paper and found a golden, almost glowing, piece of honey comb, full of fragrant honey!
All thoughts of dinner fled as I quickly made tea and toast.


The toast was the perfect vehicle for that honey.See the little chunks of honey comb? We could almost taste the flowers. A delight indeed. Thank you AM and your bees!

Tuesday, May 27, 2014

Ooodles of Asian Noodles and More


When warm weather hits like it has this weekend, it's nice to be able to turn to a fairly quick and easy and filling pasta salad to sit on the plate with chicken fresh off the grill. Sweetie brushed on some teriyaki sauce while he grilled them, so that had  a nice dark color and Asian flavor. I contributed a dish I'd seen on the Food Network a week or so ago.


It's called Sesame Peanut Noodles, and it has two kinds of peanuts - peanut butter and chopped peanuts, plus cilantro, lime, fresh ginger, rice vinegar and soy sauce which combine together to make a great sauce, along with a little honey and some toasted sesame oil. The recipe called for toasted sesame seeds, too, but I'm supposed to take it easy on sesame seeds, so I skipped that part. The pasta is whole wheat linguine and the salad part includes sliced cabbage, green onion, red pepper (and some broccoli slaw because I had some and wanted to add it). Sweetie and Straight Shooter both loved it and even though it makes a big bowl, we somehow managed to polish off every strand and chunk.

The most time consuming part of this was measuring out the ingredients for the sauce, grating the fresh ginger and lime zest, and juicing the lime. The pasta cooks while you make the sauce and chop up the veggies and then you just toss the drained pasta with the veggies and sauce and sprinkle chopped peanuts on top. Yum!


Sesame Peanut Noodles
from the Food Network


Ingredients
12 oz. linguine
Peanut Dressing:
1/4 cup creamy peanut butter
3 tablespoons soy sauce
2 tablespoons rice vinegar
1 tablespoon grated fresh ginger
1 tablespoon water
1 tablespoon honey
1 tablespoon Sriracha (I used some cayenne pepper instead)
1 teaspoon sesame oil
Zest and juice of 1/2 lime
Salad:
1/2 cup loosely-packed chopped fresh cilantro
2 green onions, sliced
1/2 head green cabbage, thinly sliced (I used some broccoli slaw mix, too)
1/3 red bell pepper, in thin strips
1/4 cup roughly chopped skinless roasted peanuts, for garnish

Directions
Put a large pot of water on to boil. When water is boiling, add the pasta. Cook the pasta until al dente. Do not overcook. Drain, reserving some of the starchy pasta water, rinse and set aside.

For the peanut dressing: Place the peanut butter in a large measuring cup and microwave to soften, 15 seconds. Whisk in with the soy sauce, vinegar, canola oil, ginger, honey, Sriracha, sesame oil and lime zest and juice in a small bowl. Thin with the starchy pasta water if needed, 1 tablespoon at a time. (Dressing should be thick, but pourable.)

For the salad: Place the pasta in a large mixing bowl and add the cilantro and vegetables and toss with the dressing. Top with the chopped peanuts  and serve.

Sunday, March 10, 2013

Roasted Sesame Green Beans - More March Green


I've never been a big fan of fresh green beans, unless they are super slim and small. I think that the larger, older beans must develop some taste that the young ones don't have. Even blanching the bigger ones doesn't seem to stop them from tasting really, really beany. It might have been the reason why fresh green beans were always cooked almost to a mush when I was growing up, plus that pot of what my sisters and brothers and I called 'dead beans' usually had a liberal amount of bacon grease added. Almost anything with bacon flavor is easier to work up an appetite for than something without when it comes to vegetables.

As an adult I have tried different things with fresh beans since I actually like my beans to be green and have some body when I eat them. A few days ago a free copy of Cooks Illustrated magazine appeared in my mailbox. If you are not familiar with it, it is a most unusual magazine. There are no ads, many black and white photos, and the recipes have been tested and fiddled with until they are just what the author wants. There are guides for buying ingredients, step-by-step illustrations for technique, tips, buying information and more. The write-up of the recipes often explain in detail why they found that a certain ingredient needed to be added to or subtracted from the recipe, what was the result of baking something a one temperature instead of another and similar finding that can help create the perfect finished product.

On page 20 there is an article about roasting fresh green beans. There is a basic recipe and then variations. One of the variations really appealed to me; roasted sesame green beans. The basic beans are roasted for 10 minutes, then the pan is removed from the oven, a mixture of fresh garlic, ginger, some honey, toasted sesame oil and some hot pepper flakes is added and the beans are tossed with tongs and then roasted another 10 minutes, then sprinkled with toasted sesame seeds.

These are great beans! I did have to sub cayenne pepper for the pepper flakes since my spice rack seemed to be free of pepper flakes, but otherwise I followed the recipe...until the end. I forgot to toss the beans in the sesame seeds, so I sprinkled them on top of the plated beans. Worked just fine! The beans were still green, softer than I like but still toothsome, and the topping and sesame seeds added just the right flavor and crunch. I'm going to make these again soon. I love the way the beans caramelized and the flavor that was added by that and by the garlic and ginger. Now even supermarket green beans are delicious.

Roasted Sesame Green Beans
Serves 4

1 lb fresh green beans, stem ends snapped off
1 tablespoon olive oil
salt and pepper to taste
1 tablespoon minced garlic (about 3 cloves)
1 teaspoon minced fresh ginger
2 teaspoons honey
1/2 teaspoon hot red pepper flakes
4 teaspoons sesame seeds, lightly toasted

Adjust oven rack to middle position; heat oven to 450 degrees F. Line rimmed baking sheet with aluminum foil. Put beans into a produce bag or other food safe plastic bag. Drizzle with the oil. Close bag and shake. Add salt and pepper. Shake again. Spread oiled and seasoned beans on baking sheet in an even layer. Roast 10 minutes.

While beans are roasting, combine garlic, ginger, honey, toasted sesame seed oil and pepper flakes in a small bowl. When beans have finished their 10 minutes of roasting, remove pan from oven. Using tongs, coate beans evenly with the garlic/ginger mixture; redistribute on pan in an even layer. Return to oven and continure roasting until dark golden brown in spots and starting to shrivel, 9 - 12 minutes longer. Transfer to serving dish, sprinkle with the toasted sesame seeds and additional salt/pepper if needed. Serve at once.

Wednesday, June 13, 2012

Forbidden

There is a sense of mystery about something forbidden...and a challenge, too. I felt that way upon discovering black forbidden rice, a gorgeous black rice with a nutty flavor similar to wild rice. The mystery is how to use this lovely grain to best advantage...and that was the challenge, too.

A salad or room temperature dish seemed like a good idea so I trolled the Internet and found something close to what I wanted with a Black Forbidden Rice with Sugar Snap Peas and Nectarine dish by Giada De Laurentiis. It can be served warm or at room temperature, it has a slightly Asian feeling with fresh ginger and soy sauce and the combination of fruits and vegetables is interesting, too. As usual I had some ideas on how to change the recipe to make it my own.

My version keeps the ginger and the soy sauce, but I add a strong orange note with both orange zest and juice in the dressing. I find that citrus adds a sparkle to both rice and bean dishes. I was out of nectarines, but had just purchased fresh red cherries so I used them.
Cherries and oranges are also a great combination. For a bit of crunch I added celery and some green onions for their fresh green taste.

I had thought that such a good dose of fresh ginger would leave a strong ginger taste in the rice but during the cooking process the ginger is muted and the flavor of the rice shines with just a hint of ginger in the background. I didn't use any hot sauce or other additional heat but after tasting this rice dish I think that you could add a little fresh minced ginger to the dressing or a dash of cayenne if you like your food a bit spicier than I do and it would be a great addition.

By the time I served this dish, the rice was lukewarm. The warm cherry mixture was perfect with the slightly cooler rice and the dressing added just the right mixture of salty and sweet. Sweetie took two helping, so I suspect that this will be a hit with your family, too. If you wish to dress this beautiful rice dish up, you could sprinkle some toasted sliced almonds over it when you are ready to serve it.
Black Forbidden Rice with Cherries

based on a recipe of Giada De Laurentiis'

Serves 4-6

Rice:
3 1/2 cups water
2 cups black forbidden rice
1 (1 1/2-inch) piece fresh ginger, peeled and finely chopped
2 teaspoons kosher salt
1 tablespoon olive or grapeseed oil
2 stalks celery, sliced
1 green onion, sliced, white part only
6 oz fresh cherries, pitted and halved

Dressing:
1/4 cup unseasoned rice vinegar
1/4 cup grapeseed oil
3 tablespoons honey
2 tablespoons fresh orange juice
1 tablespoon soy sauce
1 teaspoon grated orange zest

Directions:
For the rice: In a medium saucepan, bring the water, rice, ginger, and salt to a boil over medium heat. Reduce the heat to a simmer, cover the pan, and cook until the rice is tender, about 30 minutes. Remove the pan from the heat and set aside for 5 minutes. Fluff with a fork and place in a large serving bowl.

Heat the oil in a large skillet. Add the celery and green onion and sauté for 3-5 minutes, or until onion is translucent. Add the cherry halves and sauté for 2 minutes. Transfer the mixture to the serving bowl with the cooked rice.

For the dressing: In a medium bowl, whisk together the rice vinegar, oil, honey, orange juice, soy sauce and orange zest until smooth.

Pour the dressing over the rice and cherry mixture and toss gently to combine. Serve warm or at room temperature.

Friday, April 22, 2011

First Garlic Now Onions


It must be strong flavors month. The phenomenal garlic bread that the Bread Baking Babes baked this month was such a treat that when I saw this Onion Tart with Honey in an issue of Bon Appetit it was a irresistible draw. Who can resist warm, flaky puff pastry, tangy creme fraiche, a bit of nutmeg and thyme, crumbled bacon and ooodles of caramelized onions soaked in honey and wine? Not me.


Since Sweetie and I don't usually indulge in this sort of thing as a twosome, it was provident that we were invited to a birthday party and asked to bring the appetizer. Our hostess even warmed it slightly just before serving. It was a huge hit. In record time every morsel was eaten and we all wanted more. Next time I'm making two batches. The tart almost outshone the delicious marinated grilled lamb and fresh corn salad that were the highlights of dinner, but not quite, at least for me because I just love lamb!


One of the appeals of this tart is the way the sweetness of the onions and honey plays off the saltiness of the bacon. Another is the nice mix of textures with the delicate but crisp puff pastry and the gooey chewiness of the onions. If you use ready made puff pastry and pre-cook the onion mixture as I did, the whole thing comes together fairly quickly. Next time I plan on using the food processor to slice the onions and to make at least two recipes' worth so that I can make two tarts or so that I can freeze the onion mixture to make a tart at another time. Wouldn't that be a nice thing to have in the freezer so that you could create a party worthy appetizer in record time? Totally yum!


Honey-Roasted Onion Tart
February 2011 Bon Appetit magazine


1 sheet frozen puff pastry (half of 17.3-oz. package), thawed

3 slices bacon, cut crosswise into 1/2-inch pieces

1/4 cup honey
1/4 cup dry white wine
2-3 large sweet yellow onions (about 1 1/2 pounds), cut into 1/4 inch thick rounds
Nonstick vegetable oil spray
3/4 cup creme fraiche
1/2 teaspoon fine sea salt
1/8 teaspoon freshly grated nutmeg
1/4 teaspoon dried thyme
Few sprigs fresh thyme leaves


Using lightly floured rolling pin, roll out puff pastry on lightly flour surface to 14 x 10-inch rectangle. Fold 1/2 inch of pastry edges in toward center on all sides, forming 13 x 9-inch rectangle. Transfer pastry to large rimmed baking sheet. Press firmly on pastry edges with fork to form rim. Chill crust.

Cook bacon in small skillet over medium heat until brown and crisp. Position rack in top third of oven and preheat to 375 degrees F while bacon is cooking. Transfer crisp bacon to paper towels to drain. Reserve 1 tablespoon bacon drippings from skillet.

Whisk honey, wine and reserved 1 tablespoon bacon drippings in large bowl. Add onions; toss to coat. Coat another large rimmed baking sheet with nonstick spray. Spread onion mixture in even layer on sheet. Roast 30 minutes. Turn onions over, allowing rings to separate. Roast until onions are caramelized, turning often for even browning, 30 to 45 minutes. (I cooked them until the least colored ones were pale gold, which meant that some edges were charred, but mostly the mass of onions was medium gold, not darker because they will still be browning while tart cooks later.) cool onions slightly. (At this point, and without leaving the oven on, I refrigerated the onion mixture, then brought it back to room temperature the next day for the baking part.)


Increase oven temperature to 400 degrees F. Mix creme fraiche, sea salt,nutmeg and dried thyme in small bowl. Using offset spatula, spread creme fraiche mixture over crust almost to the folded edge. Arrange onions atop creme fraiche. Sprinkle with bacon. Bake tart until crust is light golden brown and topping is bubbling, 20 to 25 minutes. Sprinkle with fresh thyme and serve.


Makes about 6 appetizer servings.

Sunday, December 19, 2010

Christmas Strong Bread

Most of my adult life I've been an explorer of sorts, almost always ready to try something new, to learn a new skill, read a new book, look at something in a new way. Success has not always followed, but I learn from my mistakes, too, so they are valuable in their own way.

For the last half year or so the impetus to try new things has hibernated while I worked on getting a handle on what I really want...probably easy for some people but lately a struggle for me. Not too surprisingly to those who know us, top of the list of what I really want is to be with Sweetie. Since I turned into a bit of a shrew during the bathroom project it's good to know that he still feels the same way and he is happy that I've returned to being the loving and mostly reasonable woman who was hard to find during the summer and fall. The optimistic office worker has also resurfaced perhaps because there are new tasks to master and a change of venue coming up.

So 'what does all this have to do with food blogging?' you ask...it means I'm back to looking for the enjoyment of challenges in the kitchen...and my first High Five entry in quite a while. As you may or may not remember, Lynn, known in the blogosphere as Cookie Baker Lynn, challenged us last winter to stretch ourselves in the kitchen, blog about it and then let her know our High Five accomplishment. The idea was to do one a month. Hahahahahaha. Great idea, but hasn't happened.


My High Five this time is for baking Pan Forte di Siena, a sort of Tuscan fruitcake with a honey base. I've seen it at the specialty stores for an absurd amount of money for a small wedge and was sure that I could make it myself. Still, there is an awful lot of costly ingredients in this 'strong bread' so I was a little nervous about making it...it IS very different from anything I've made before.


For starters I scoured the Internet for recipes, looked at suggested techniques and proportions, then put together my own recipe with what I like and had on hand. The basic unit of measurement for my version is 3/4 cup. The toasted nuts add up to a double of 3/4 cup. The dried fruit is the same. The dry ingredients combined equals 3/4 cup and you use 3/4 cup each of sugar and honey for the syrup that binds it all together.

This cake/bread uses no oil other than to butter the pan and parchment and it has no eggs either. The syrup is boiled to a soft ball stage in all the recipes I looked at and almost all baked it in a low oven for about 30 minutes. There is far more fruit and nuts than 'cake' in pan forte (and it has no resemblance to Aunt Hattie's fruitcake brick).


This pan forte is a thin cake filled with fruit, nuts and spices with a lovely honey-citrus note. A little goes a long way, so you can see why this was historically considered the Crusaders Power Bar. There are versions with figs and walnuts, too. If you have made candied orange peel you will probably want to increase the amount of orange peel and decrease the citron. Dates would work in this, too, and pine nuts would be great for some of the nuts. Just keep the 3/4 cup and 1 1/2 cup proportions.

Pan Forte is available year round now but used to be one of the treats of the Yuletide in Italy, especially in Sienna. This is not a difficult recipe, although prepping the dried fruit and roasting the nuts takes some time. Sweetie and Straight Shooter assure me that it was well worth the time. Try it yourself and you, too, can have a High Five from Lynn!


Pan Forte di Siena

1 ½ cups toasted nut…mix of whole almonds and slivered almonds and chopped hazelnuts
½ cup diced citron
½ cup diced apricots & ½ cup diced dried cherries
2 tablespoons diced candied orange peel
zest of 1 lemon and zest of 1 orange
1 teaspoon cinnamon
¼ teaspoon each: cloves, nutmeg, cardamom
pinch of pepper
½ cup flour
¼ cup unsweetened cocoa
¾ cup granulated sugar
¾ cup honey
2-3 tablespoons almond meal or ground almonds
parchment paper

Preheat oven to 300 degrees F. Butter a 9” springform pan, line bottom with parchment paper, butter that, sprinkle on the almond meal or ground almonds evenly & set pan aside.

In a bowl mix together the nuts, citron, apricots, candied peel, citrus zest, spices, flour and cocoa.

In a heavy pot stir together the sugar and honey. Over low heat, stirring constantly, melt the honey and sugar together. Increase heat to medium high. Stop stirring and let cook until mixture reaches 245 degrees F (soft ball stage), using a wet pastry brush to wash down the sides of the pot to keep crystals from forming. When soft ball stage is reached remove pan from heat and pour mixture into dry ingredients, stir it all together quickly to combine all ingredients. Pour mixture into the prepared pan and using slightly wet hands smooth the top. Work quickly as mixture hardens fast.

Bake in preheated oven for ½ hour - 35 minutes with pan set on rimmed cookie sheet.

Set on a rack to cool. When cool remove from pan, invert and remove the parchment paper. Invert again and sift liberally with confectioners’ sugar. Serve in small slices. To store wrap twice in plastic wrap and then in foil and store at room temperature.