Showing posts with label cherries. Show all posts

Wednesday, June 16, 2021

Babes Bake Hungarian


The Bread Baking Babes group has been baking for so many years now that it is something of a challenge just to find breads we haven't baked yet. This month I'm Kitchen of the Month for the Babes, but I've had the recipe ready for months. It's similar to last month's challenge, Povitica, in that it requires a thin, rich dough. It also has a filling using nuts, but this filling is very different. The shaping method is also different, so I do hope that if you like to bake bread that you'll try this one. I'm sorry that this wasn't posted this morning, but we were having work done on the house and my computer was covered with dust cloths until just a little while ago.

I found the recipe for this month's bread during the pandemic, when I was throwing out old magazines. It's from Sunset Magazine from 2001. I used to have a subscription but it's been a while since I had a subscription to any magazine. When I first came to California from the east coast, Sunset was a great resource for living the west coast lifestyle. This recipe isn't Californian, or even west coast, because it's a recipe for a nut roll from Hungary. 


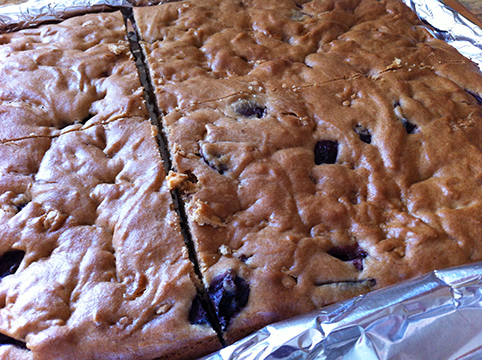
One of the reasons I chose it is because, once baked, it keeps for a week, meaning there is a treat waiting at tea time for that long without heating up the oven again, especially since it is a 2-pound loaf. Another reason is that I was fascinated by the idea of a filling made with cooked milk and almonds. 

The dough is basically a brioche dough, so don't expect a big rise out of it. It is rich tasting and goes really well with the almond and dried fruit filling. I used dried cherries which I soaked for an hour in Kirsch. I'm not sure that you can tell that they were soaked in a liqueur, but they are nice and soft.

I did have some trouble with rolling the dough using a cloth. I used a linen couche and thought that I had it well floured, but it stuck quite a bit as I rolled it. Still, once baked you couldn't really tell. Will probably try this again with an actual tablecloth.

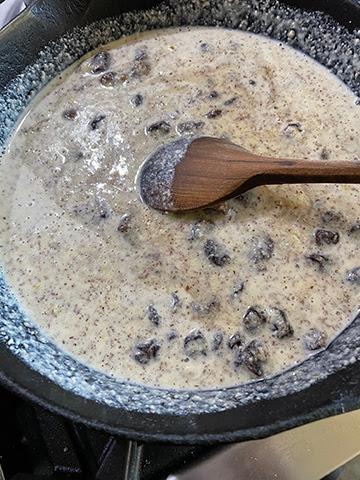
The filling is really fun. You start with a slurry of milk, almonds and dried fruit but with enough heat, it turns into an almost creamy filling with great flavor and fragrance. I did add a few drops of almond extract along with the vanilla because almond flavor really goes well with cherries.

Do try this yourself. If you'd like to be a Buddy, bake it and then email me by June 29th to be included in the round-up. I'd love a photo and a short description of your experience with this bake. Plachman -at-sonic-dot-net.

Also, be sure to visit the other Babes blogs to see what they have done with this tea time treat!


Gigi's Hungarian Almond Roll

 Makes one 2-pound loaf

From Sunset Magazine, Dec 2001

1 package active dry yeast
6 tablespoons warm water
1/4 cup sugar
2 large egg yolks (divided)
About 6 tablespoons butter or margarine, cut into small pieces
About 1 1/2 cups all-purpose flour
Almond Filling (recipe follows)

1 tablespoon milk or water

 Have all ingredients at room temperature except warm water, which should be about 108-110 degrees F.

 In a bowl, sprinkle yeast over the 6 tablespoons warm (about 110 degrees F) water; let stand until soft, about 5 minutes. Add sugar, 1 egg yolk, 6 tablespoons butter pieces, and 1 1/2 cups flour; stir until evenly moistened.

 To knead with a dough hook, beat at medium speed until dough pulls cleanly from bowl, about 5 minutes. To knead by hand, scrape dough onto a lightly floured board and knead until smooth, about 10 minutes, adding flour (as little as possible) if necessary to prevent sticking; return to bowl.

 Cover dough with plastic wrap and let rise in a warm place until it's puffy enough to hold an impression when pressed with a finger (dough won't double in volume), about 1 hour.

 With dough hook or your hands, punch air out of dough; lift dough from bowl and shape into a smooth ball. Set on the center of a floured pastry cloth or clean, smooth-textured dish towel. Pat dough flat; with a rolling pin, roll into a 14-inch to 15-inch square.


Spread or evenly dot Almond Filling over dough to within 1-inch of edges. Lift cloth from one side to roll dough into a compact loaf. Gently lift loaf and lay, seam side down, on a buttered 12-inch x 17-inch baking sheet. Pinch ends to seal, then fold under.


Cover loaf loosely with plastic wrap and let stand in a warm place until dough is slightly puffy, about 45 minutes.


In a small bowl, mix remaining egg yolk with milk. Brush loaf with yolk mixture; discard any remaining.


Bake loaf on the center rack in a 325 degree F regular or convection oven until rich golden brown, about 45 minutes. Transfer to a rack and let cool at least 1 hour. Serve at room temperature. Cut cross-wise into 1/4-inch thick slices.


Almond Filling: In a food processor, whirl 1 cup un-blanched almonds to fine meal. Ina a 10-12-inch nonstick frying pan, combine almonds, 3/4 cup raisins, 3/4 cup sugar, 3/4 cup milk, and 1 teaspoon grated lemon zest. Stir over high heat until mixture is thick enough to hold a clean trail for a few seconds when you draw a spoon across pan bottom. Remove from heat and stir in 1/2 teaspoon vanilla. Let cool at least 30 minutes.


Tuesday, June 30, 2020

Fruit Basket Coffee Cake


Summer certainly brings lots of kinds of fruit. Right now we have ripe peaches, luscious dark cherries, olallieberries right off the vine, and raspberries, plus green grapes and some plums that are almost ripe which are turning a lovely shade of red-gold on the tree down the hill. The plums and olallieberries are the only local fruit, but the cherries, peaches and raspberries are certainly seasonal.

Yesterday I made a lovely coffee cake to showcase the peaches, cherries, olallieberries and raspberries. It's a variation of the Nectarine Cake in Lauren Chattman's Cake Keeper Cakes book, one of the great cookbooks we baked from during my time with the Cake Slice Bakers.

I made one and a half times the cake batter because the original recipe only makes a thin layer of cake and I wanted one thick enough to absorb all the fruit juices. I also added some almond extract, while keeping the vanilla extract. For the topping I used brown sugar, pecans and ground nutmeg instead of white sugar and cinnamon...they recipe gave two choices for nuts and pecans were one of them.

I baked it in a nine-inch springform pan instead of a ten-inch one. Because I had such a wonderful choice of fruits, I used cherry halves around the outer edge, then peach slices, then olallieberries and raspberries in the middle.

Do watch this cake because the nuts might get too brown...just tent with foil if that happens. Because  the batter is deeper than the original, it took a while to bake, but came out moist with a nice crumb and browned crust. We actually enjoyed this cake for dinner dessert, so I served it with soy vanilla ice cream and that was a great choice. Sweetie added some whipped cream to his, and you can always add extra prepared fresh fruit.


I've never been a big fan of summer, but sitting outside for dinner because it's still warm by 7 o'clock makes summer a bit easier to take. All of the beautiful flowers that are blooming in the garden also are a benefit of summer. Too bad it gets so hot!

Do try this cake, especially if you have some ripe fruit on hand. You can use all one kind of fruit or two kinds, or three if four is too much. With most kinds of fruit, push them down into the batter a bit to allow the juices to soak into the cake. Enjoy!


Fruit Basket Cake with Nutmeg Nut Topping
based on Nectarine Cake in Lauren Chattman's Cake Keep Cakes
serves 8-10

For the Topping:
2 tablespoons brown sugar, packed
1/4 teaspoon ground nutmeg
1/2 cup pecans, finely chopped

For the Cake:
1 1/2 cups all-purpose flour
1 1/2 teaspoons baking powder
1/2 teaspoon salt
1 1/4 cup sugar
3/4 cup (1 1/2 sticks, 6 oz.), unsalted butter or non-dairy margarine, softened
3 large eggs
1 teaspoon pure vanilla extract
1/2 teaspoon almond extract
2 cups assorted stone fruit and/or berries or one kind or fruit, ripe - peel plums or peaches and pit them, pit cherries, pit nectarines or apricots, wash and dry berries

Preheat the oven to 375 degrees F. Grease the insides of a springform pan, 9-inch or 10-inch preferred.

Combine the brown sugar, nutmeg and chopped nuts in a small bowl. Set aside.

Combine the flour, baking powder and salt in a medium bowl or on a sheet of waxed paper.

In the bowl of a stand mixer, beat the sugar and butter together on medium-high speed until fluffy, about 3 minutes. Scrape bowl and beaters as needed.

With the mixer on low, add the eggs, one at a time, beating to combine the eggs with the butter mixture after each addition. Scrape bowl and beaters as needed.

Beat in the vanilla and almond extracts. With mixer on low, gradually add the flour mixture, a 1/2 cup at a time. Scrape bowl and beaters as needed and at the end. Use scraper to give batter a final stir to make sure all is combined.

Scrape batter into the prepared pan and smooth the top of the batter. Carefully place the prepared fruit, pushing down a bit into the batter. If using more than one kind of fruit, you can create a pattern.

Sprinkle with the topping. Bake until golden and a toothpick inserted in the center comes out clean, about 45-55 minutes. Cool cake in pan for 5 minutes, then run a knife around the sides, unhinge the springform and cool cake on wire rack until tepid. Remove from the springform bottom and place on a serving plate.

Serve with more fruit, ice cream, whip cream or just as is.

Store uneaten cake, if any, in a cake keeper or wrap in plastic and store at room temperature for up to 2 days.

Monday, February 05, 2018

Queen Mum Revisited


I've baked Maida Heatter's version of the Queen Mother Cake a number of times and it is always a hit.

 After hearing a request for a chocolate cake, covered in chocolate...well, anything covered in chocolate actually, I had some fun paging through cookbooks and visiting online sources, too.


In the end the Queen Mother Cake sounded like the perfect thing to make, but with a slight variation. I decided to make it birthday worthy by including some sour cherries that had been bathed in cognac for awhile. It made for a surprise here and there in the cake rather than a dominant theme.

Of course the star of the dessert was the moist, dense but tender cake and that awesome ganache covering it. This is a flourless chocolate cake made with ground almonds instead of the flour. Spend plenty of time creaming the butter and the sugar and adding the eggs because that, plus the whipped egg whites, are what keeps the cake from being flat and too dense to enjoy. The finished cake was fragrant with chocolate and so rich that you only needed a small slice. To gild the lily (and provide a nice contrast to the intensity of the chocolate), those who enjoy dairy had a dollop of softly whipped cream with their slice. Decadent, and delicious. Happy Birthday G!


Queen Mother's Cherry Chocolate Cake with Ganache On Top
12 portions
A variation of Queen Mother Cake in Maida Heatter's Book of Great Chocolate Desserts


6 oz. almond flour (I used King Arthur Flour's)
6 oz. semisweet chocolate, cut into small pieces (I used Scharffen Berger's)
3/4 cup granulated sugar, divided
6 oz. (1 1/2 sticks) non-dairy margarine or butter, at room temperature
6 eggs, separated
1/8 teaspoon salt
1 teaspoon lemon juice
1 cup pitted sour cherries, drained if needed
Enough cognac to cover the cherries, about 3/4 cup

Adjust a rack one-third up in the oven. Preheat the oven to 375 degrees F.

Grease the bottom and sides of a 9 x 3-inch springform pan and line the bottom with a round of baking-pan liner (parchment works well) cut to fit. Grease the paper. Dust the pan all over the inside with fine, dry bread crumbs. Invert the pan over paper, and tap lightly to shake out excess crumbs. Set the prepared pan aside.

In a small bowl marinate the cherries for at least an hour, pouring the cognac over the cherries. When ready to make the cake, drain the cherries thoroughly. The liquid can be used in cocktails or discarded.

Sift the almond flour into a small bowl and stir in 1/4 cup granulated sugar. Set aside

Place the chocolate in the top of a small double boiler over warm water on moderate heat. Cover until partially melted, then uncover and stir until just melted and smooth. Remove top pan from double boiler and set it aside until tepid or room temperature.

In a stand mixer bowl put the butter. Beat the butter until soft. Add the remaining 1/4 cup granulated sugar and beat to mix. Add the egg yolks one at a time, beating and scraping the sides of the bowl as necessary until smooth. On low speed add the chocolate and beat until mixed. Then add the almond flour/sugar mixture and beat, scraping the bowl, until incorporated. If you have only one stand mixer bowl, transfer batter to another large bowl. If you have two, leave batter in stand mixer bowl and set aside while you prepare the egg whites.

Wash and rinse out and dry the stand mixer bowl if there is batter clinging to the sides. In that large bowl of a stand mixer, with clean beaters (I used the whisk attachment) beat the whites with the salt and lemon juice, starting on low speed and increasing it gradually. When the whites barely hold a soft shape, reduce the speed a bit and gradually add 1/4 cup granulated sugar. On high speed continue to beat until the whites hold a straight point when the beaters are slowly raised. Do not overbeat. Whites should not be stiff or dry.

Stir a large spoonful of the beaten whites into the chocolate mixture to soften it a bit. Then, in three additions, fold in the remaining whites. Do not fold thoroughly until the last addition and do not handle any more than necessary.

Turn 1/2 the batter into the prepared pan and spread to sides. Scatter the marinated cherries over the batter evenly. Cover with the remaining batter. Rotate the pan a bit briskly from left to right in order to level the batter.

Bake for 20 minutes at 375 degrees F. and then reduce the temperature to 350 degrees F. and continue to bake for an additional 50 minutes (total baking time is 1 hour and 10 minutes). Do not over bake; the cake should remain soft and moist in the center. (The top might crack a bit, but that is OK.) NOTE: I found that I needed to check the cake after about 30 minutes and that it was done, so check early and often.

Let cake stand on cooling rack until tepid, 50 - 60 minutes.

Release and remove the sides of the pan. Do not cut around the sides with a knife - it will make the rim of the cake messy. Let the cake stand until it is completely cool, or longer if you wish.

The cake will sink a little in the middle as it cools. Use a long, thin, sharp knife and cut the top level, removing the higher sides. Brush away loose crumbs. (I skipped this part, iced the cake right side up, and was very happy with the results. When the icing goes on its a little thicker in the center, which we found to be fine.)

Place a rack or a small board over the cake and carefully invert. Remove the bottom of the pan and the paper lining. The cake is now upside down; that is the way it will be iced (unless you do as I did and ice the top). Place four strips of baking-pan liner paper (each about 3 x 12 inches) around the edges of a cake plate (although I forgot to do this and the drips were enchanting). With a large, wide spatula, carefully  transfer the cake to the plate; check to be sure that the cake is touching the papers all around. The paper help to keep the icing off the plate when you ice the cake. (I chilled the cake, still on the springform pan bottom, overnight, then turned it out onto my hand, finger spread, removed the pan bottom & the paper and set the cake on a cake plate. Because it was cold it wasn't difficult to work with.)

Icing
1/2 cup soy creamer (or whipping cream)
6 oz. semisweet chocolate, cut into small pieces (I used Scharffen Berger semisweet for both cake and icing)
Scald the soy creamer  or whipping cream in a 5-6 cup saucepan over moderate heat until it begins to form small bubbles around the edges.  Add the chocolate and stir occasionally over heat for 1 minutes. Then remove the pan from the heat and whisk or stir until the chocolate is all melted and the mixture is smooth.

Let the icing stand at room temperature, stirring occasionally, for about 15 minutes or until the icing barely begins to thicken.

Stir to  mix the icing and pour it slowly over the top of the cake, pouring onto the middle. Use a long, narrow metal spatula to smooth the top and spread the icing until a little runs down the sides, then use a small, narrow metal spatula to smooth that icing over the sides. The icing on the sides should be thinner than that on the top.

Remove the strips of paper by pulling each on out toward a narrow end.

If desired, sprinkle decorations on top while icing is still wet.


Tuesday, August 29, 2017

Hot Day Sorting


Don't like hot days, but nearing September we often get a heat spell like the one we are experiencing now. Don't like sorting things, either, but nearing September I know that I should get my files in order for the meetings that start up in mid-September. Seemed like a great idea to combine a hot day with the paperwork, so have been sorting, filing, shredding and all that sort of good organizing. Bleech.

Will treat myself with some soy ice cream after dinner...with dark Bing cherries on top!

Now if only I could find my three hold punch gadget...

Couldn't resist showing some more garden photos. Prettier than the sorting stuff for sure.


Saturday, August 01, 2015

The Puzzle Continues


The last six or seven months have been some of the worst of my life as far as health goes. UTIs, the flu, surgery on my eyes, amoebic dysentery have all played their part. Yesterday I had a colonoscopy as a method to help discern more pieces of the puzzle of my GI troubles. No results yet but I suspect that there will be changes coming up, some of them dietary. Might mean going gluten free. Might mean giving up nuts and seeds or dairy or maybe just fatty foods. Still thinking about it, but I might continue to bake with gluten and just not eat it myself...more for Sweetie, friends, firefighters, etc.


Earlier in the week I baked one of my favorite cookies, butterscotch bar cookies. No puzzle this time. I love the butterscotch flavor, the cake type crumb and the addition of chocolate and fruit. It makes a big pan of cookies, with plenty to share. This time  I substituted white chocolate chips for the chocolate chips and put in fresh pitted, chopped dark sweet cherries instead of the nuts. These cookies were yummy, but next time (if there is one) I think I would reduce the brown sugar to 3/4 cup and use white sugar for the additional sugar needed so there would be a bit less of the butterscotch flavor. Still, a delicious cookie and made in one pot, so hardly any washing up, especially if you line the cookie sheet with heavy aluminum foil like I did! Do be sure to check often at the end of baking. I left mine in the oven a tad too long and they do get dry.


Chocolate-Butterscotch Bars or Squares
Makes 40 squares - not sure how many bars

2/3 cup butter, margarine, or vegetable shortening, melted
1 1/4 cups brown sugar, packed
3 eggs
2 3/4 cups all-purpose flour
1/2 teaspoon salt
2 1/2 teaspoons baking powder
6 oz chocolate chips (I used white chocolate chips)
1 cup chopped, pitted fresh cherries 
1 teaspoon vanilla

Melt butter in a large pot. Add the sugar. Mix melted butter and sugar thoroughly. Let cool a bit. Add eggs one at a time, beating well after each addition. Add sifted dry ingredients, white chocolate, cherries and vanilla and mix well to combine. Spread in a greased 15" x 10" x 1" pan. Bake in moderate oven (350 degrees F) for about 25 minutes. A toothpick inserted in center of pan will come out with a few crumbs stuck to it.


Cut into 40 squares (or some bars if you prefer) while warm. Store in airtight container. Will keep a week if you don't eat them all long before that as I do.

Saturday, June 06, 2015

Black Rice Salad With Cherries And Snow Peas


At first there is something a bit forbidding about a bowl of black rice salad. It is so dark and mysterious looking and if you are not familiar with black rice it doesn't even look that tasty. Add to that the legend that it used to be forbidden rice...available in China only to the elite. It's a wonder anyone eats it.

If you do, you will know that this is a first rate dish. The rice is nutty tasting and it goes so well with the bright citrus notes of the lime and orange, with the sweet cherries, the delicate snow peas and the crunch of sliced almonds. It's an unusual combination, but delicious.  I added grilled chicken, cut into bite sized pieces, to the salad to make it even more of a main dish. Sweetie at two portions and not just to get more chicken.


Surprise your family with this dish or take it to a pot luck or picnic. If you leave out the chicken it can sit at room temperature for quite a while. Black rice can be found at Costco according to a friend, or I/m pretty sure you can buy it at Trader Joe's. I've had my bag of rice a few years and I got it there, so it's likely they still have it. You can absolutely buy it on Amazon. This recipe makes enough for a crowd, but it keeps well, too, so it can make a couple of meals if your numbers are smaller.

So whats with the photo at the top? Well, I forgot to take any photos of the rice dish, so you get to see my photo from last week's trip to the redwoods. The photo below is from my 2012 post of a similar rice dish. Pretend that you see cucumber moons, snow peas and sliced almonds instead of celery, OK?


Black Forbidden Rice with Cherries
based on a recipe of Giada De Laurentiis'

Serves 6 - 8

Rice:
3 1/2 cups water
2 cups black forbidden rice 
1/4 teaspoon ground ginger
1/8 teaspoon dried orange zest or fresh orange zest
a few drops orange oil (skip if you use fresh orange zest)
2 teaspoons kosher salt
1 tablespoon olive oil
2 tablespoons finely chopped Italian parsley
1 green onion, sliced, white part only
1 small cucumber, peeled if peel is tough, cut into thin half moons
6 oz fresh cherries, pitted and halved
2-3 oz. fresh snow peas, ends trimmed and cut into 1-inch pieces
2 chicken breasts, grilled and cut into bite sized pieces (optional)
1/3 cup sliced almonds

Dressing:
1/4 cup Champagne vinegar 
1/4 cup olive oil 
3 tablespoons honey
2 tablespoons fresh lime juice
1 tablespoon soy sauce 
1 teaspoon grated lime zest
Directions
For the rice: In a medium saucepan, bring the water, rice, ground ginger, orange zest (and orange oil if using) and salt to a boil over medium heat. Reduce the heat to a simmer , cover the pan, and cook until the rice is tender, about 30 minutes. Remove the pan from the heat and set aside for 5 minutes. Fluff with a fork and place in a large serving bowl. Let cool to barely warm.
Add Italian parsley, green onion, cucumber, cherries, snow peas and chicken breast pieces (if using)  to the serving bowl with the cooked rice. Stir to combine.

For the dressing : In a medium bowl, whisk together the champagne vinegar, oil, honey, lime juice, soy sauce and lime zest until smooth.

Pour the dressing over the rice and cherry mixture and toss gently to combine.  When ready to serve, stir in the sliced almonds. Serve warm or at room temperature. 

Sunday, February 08, 2015

Cherries


Every year at Christmas time one of the gifts we look forward to are the cherries from Michigan. One of my sisters lives near Traverse City, Michigan, which is cherry country with a capital C. She often sends us dried cherries and they usually are eaten before the tree gets taken down. Last year I hid some for baking because they are excellent in baked goods. Yesterday I had to use some from the store since the Michigan cherries are all gone, but I was thinking of her as I baked this slab pie and wishing she was here to have a slice. I also wished I had Michigan cherries, but had to settle for Montmorency cherries canned in a jar (from Wisconsin I think).


This pie is a variation of one I found in XX. The original recipe was for apple pie, but Sweetie isn't a huge fan of apples, plus I had a yen for cherries. This would make an excellent Valentine's Day dessert. It looks like it feeds a crowd, but is really about six slices long. I'm pretty sure that you could cut it into 4 huge slices if you needed to. We shared it with our dinner partners last night and it served the four of us with medium slices, plus a couple left over for their breakfast. We were treated to an excellent Middle Eastern feast by the KitchenThink kitchen designer whom we love, so it was great that she loved this slab cherry pie, too.


The challenge for me with this recipe was to make a filling to replace the apple filling. I used another recipe in the book, for regular cherry pie, but added extra thickener and used fewer cherries. Because I was using canned cherries, I also included some dried tart cherries which I marinated in Amaretto liquor since almonds and cherries are a great combo. I also added about a teaspoon grated Meyer lemon zest to the Meyer lemon juice for some zing since canned cherries can be a bit bland. It all worked out well. The filling was thick enough for a slab pie, it was flavorful and had just a bit of tang. I know I'll make it again soon.


The crust was the one called for in the book, a all-butter pie crust that you can make in the food processor. It is very similar to the Martha Stewart one, but was even better and very flaky. I did increase the ice water to 1/4 cup. The mixture still looked like crumbs at that point, but it did hold together when squeezed. When I wrapped it up in plastic, I kneaded it together just a bit, then shaped it into a rectangle. Not sure if it is important, but I chilled the flour in the freezer and put the small cubes of butter there, too. The water was very cold. I think that having such cold ingredients and not overworking the dough helped with making it flaky.

Another change was that I painted the edges that became sealed together with the egg wash before folding the dough over. The recipe called for water, but I had the egg wash ready to go, so I used it. The filling that came out did so from a vet not the edges, so it worked to keep those edges really sealed. I also left the salt out of the egg wash. There was so much sparkling sugar on top that it really wasn't missed.


Cherry Slab Pie
a variation of Apple Slab Pie in The Culinary Institute of America's Pies and Tarts book

Makes on 5 x 15 inch slab pie
(about 6 servings)

One All-Butter Pie Dough (recipe below) formed into in rectangular disc
3-4 cups canned or frozen tart cherries, drained...reserve 1/4 cup juice
1/2 cup dried tart cherries in a small bowl with enough Amaretto to cover tehm
1/3 cup cornstarch (I used 1/2 cup tapioca starch, which worked well)
2 teaspoons fresh lemon juice (I used Meyer lemons)
1 teaspoon fresh lemon zest, grated fine
1 1/4 cup granulated sugar
1/4 teaspoon salt
Egg Wash of 1 egg whisked with 1 teaspoon water
Sanding sugar (or granulated sugar) for the top of the pie

Preheat the oven to 375 degrees F. Make sure the pie dough is chilling in the fridge. Line a baking sheet with parchment paper. Set aside.

In a small bowl, combine the reserved 1/4 cup cherry juice, the cornstarch or tapioca starch and whisk together with a small whisk or a fork. Set aside.

Drain the dried cherries. The liquid can be used for other purposes (like sipping)

In a medium saucepan, combine the drained cherries, lemon juice and zest, sugar, salt and drained dried cherries. Bring to a gentle simmer over medium heat, and simmer, stirring, for 10 minutes to reduce some of the liquid. Remove the pan from the heat and stir in the cornstarch mixture. Return the pan to the stove top and bring to a simmer over medium heat. Stirring constantly, cook for 3-5 minutes, until clear and thickened. Mixture will thicken more as it cools. That is fine. Remove the pan from the heat and allow to cool for 30 - 45 minutes, or until cooled to room temperature.

Dust a 13" x 18" sheet of parchment paper lightly with flour. On it roll out the chilled dough to 1/8 inch thick. Using a pastry wheel, trim the dough to 10 inches by 15 inches. If dough is at all soft refrigerate by placing the parchment on a baking sheet and putting the whole thing in the fridge.
On chilled rectangle of dough, spread the cherry filling on one half, along the long side, leaving a 1/2 inch border on three sides. If needed, press gently on filling with a spatula to eliminate any air gaps.

Use the egg wash and a pastry brush to brush the wash on all edges of the pastry, about 1/2 inch in. Using the parchment paper to help, fold half the dough over the other half. Press down on the edges to seal and further seal and crimp by pressing down with the tines of a fork.

Carefully turn the pie over onto the parchment lined baking sheet. Brush the top with egg wash. Sprinkle liberally with sanding sugar or granulated sugar. Use a paring knife to cut 6 or 7 vents in the top at 2 - 3 inch intervals.

Bake in the preheated oven until the filling is bubbly and top is golden, about 45 - 50 minutes. Remove the baking sheet from the oven and place it on a cooling rack. Let cool for 2 - 3 hours. The filling will continue to thicken and set as the pie cools.

To serve, cut wedges down the pie, with the point of the wedge facing in one direction for one slice and in the opposite direction for the next slice.

Refrigerate any leftovers.

All-Butter Pie Dough
from same book as above

1 1/2 cups all-purpose flour, put into the freezer for 1 hour
1/2 teaspoon salt
1/2 teaspoon sugar
4 oz - 1 stick, unsalted butter, cut into 1/2-inch cubes and frozen
1/4 cup ice cold water, more if needed

In the bowl of a food processor fitted with steel blade, combine the cold flour, salt and sugar. Process for a few seconds to combine.

With the processor off, add half the frozen butter. Pulse for 3 - 5 seconds, or until the butter looks like small peas. With the processor off, add the remaining butter and pulse for 4 - 5 seconds, or until the mixture is well mixed and butter pieces are various sizes from small to pea sized or larger.

With the processor off, sprinkle half of the ice-cold water over the mixture. Pulse for 3 - 5 seconds, or until just combined. With processor off, add half of the remaining water. Again pulse for 3-5 seconds. Check the dough by pressing it to the side of the work bowl. If it does not hold together, add the rest of the water and pulse for 3 - 5 seconds, and check again. The dough should just hold together when pressed to the side of the bowl. It will be very dry looking and should not form a ball or mass of dough in the bowl.

Turn the dough out onto a lightly floured work surface. Shape the dough into a disc, kneading gently just a bit if needed to make the dough cohesive. Shape disc into a rectangle and wrap tightly in plastic wrap. Chill in the refrigerator for at least 1 hour or, preferably, overnight.

Use straight from the fridge to roll out.

Thursday, May 29, 2014

Lots of Fruit


What would you make if you had some really nice fresh apricots, ripe and fragrant and about the size of a tennis ball? How about ripe, sweet and juicy strawberries? Firm, dusky blueberries? Fat sweet dark red cherries? I have some of all of those from a local farm stand in my kitchen right now and the first of the ollaliberries are going to be ripe within the week. I don't use a lot of jam or jelly except for making cookies at Christmas, so it has to be something else. We do eat lots of fruit fresh and with no preparation other than a quick wash and removal of stems or stem end leaves or inedible peels in the case of mangoes.

If you have a recipe to go with your suggestion, that would be excellent! Don't want the fruits of spring and early summer to come and go without some fun cooking and baking!

Wednesday, January 22, 2014

Buttermilk and Cherries


We are in that season where much of the fruit available in the markets are imported, except for apples and pears. Pears are often not ripe and I made apple crisp last time this friend was over for dinner, so yesterday I decided to make a dessert with things on hand. I had some buttermilk, eggs, and butter in the fridge and a jar of pitted sweet dark cherries in the pantry.

 A short amount of time on the internet led me to a lovely recipe for a moist, fluffy, tender single layer cake with cherries. Well, the recipe actually used raspberries, but I knew cherries would work well with the cake. I also used almond extract instead of vanilla because almond flavor brings out the cherry flavor so well and these were not fresh fruit, so could use that bit of help. Otherwise I mostly followed the recipe and we enjoyed the cake after dinner. It was not too much, and not too little...just right.


Cherry Buttermilk Cake
based on Raspberry Buttermilk Cake in
Gourmet, June 2009, by Melissa Roberts

Simple, tender buttermilk cake topped with a nice, sugary crunch and enriched with cherries

Ingredients
1 cup all-purpose flour
1/2 teaspoon baking powder
1/2 teaspoon baking soda
1/4 teaspoon salt
1/4 teaspoon ground cardamom
1/2 stick unsalted butter, room temperature
2/3 cup sugar
1/2 teaspoon almond extract
1 large egg, room temperature
1/2 cup well-shaken buttermilk, room temperature
1 cup pitted cherries (I used some that had been canned in a jar and drained off the juice used to pack them, but fresh cherries would be even better), drained
1 tablespoon soft butter and 3 tablespoons sugar for the pan
1 1/2 tablespoons sugar, preferably sanding sugar, for the topping

Preheat oven to 400 degrees F, with rack in the middle. Butter the bottom and sides of a 9-inch cake pan, then coat with the sugar, shaking out any excess into the sink. Set aside.

Whisk together the flour, baking powder, baking soda, salt and cardamom.
Beat butter and sugar together with an electric mixer until pale and fluffy, about 2 minutes, then beat in the almond extract. Add egg and beat well.

At low speed, beat in 1/2 of the flour mixture, the buttermilk, then the rest of the flour mixture, beating only until combined each time.

Spoon batter into prepared pan, smoothing top. Scatter the drained cherries evenly over the top. Sprinkle top with the sanding sugar. Bake in preheated oven for 25 - 30 minutes, or until cake is golden and a wooden pick inserted in the center comes out clean.

Cool in the pan 10 minutes, then run a knife blade around the sides of the pan to loosen the cake and turn it out onto a rack. Invert onto a serving plate and let cool 10 - 15 minutes more. Cherries will have sunk to the bottom of the cake, and the top will be crunchy with sugar.


Serves 8

Friday, December 28, 2012

Yuletide Treat

When my Mom was a child the family would gather at one of the aunt's homes and the dessert highlight at Christmas was plum pudding with hard sauce. When I was little we always had lots of cookies, but the highlight of Christmas dinner was the Lane Cake. Lane Cake is a layer cake with a plain white cake for the layers and a rich, fruity, bourbon-laced filling and frosting between the layers and on the top and sides.

We used to start making the Lane Cake the day after Thanksgiving to give the concoction time for the bourbon to mellow and mingle with all those dried and candied fruits. Coconut was fresh and grated by hand. The raisins were put through the meat grinder and came out in long black snakes. The candied cherries were bright red and green and had to be cut up by hand...a sticky business. Pecans were chopped, too. It was a good thing that we had lots of willing hands to help out with all the prep. Mom baked the cake layers and I think Dad assigned us the different prep tasks. The most difficult part was getting the filling just right. Cook it for too short a time and it would slide down the sides and cook it for too long and it turned grainy. You served it in thin slices since it was so rich.

When I had children of my own I made Lane Cake once to carry on the tradition, but found that I was the only one who enjoyed it, so it really wasn't worth all the work. I found that gingerbread, both as cookies and as houses, was what my family wanted for Christmas...and cookies, too.

Last spring when I was working on the Classic Comfort Foods Cookbook I found out that my niece Mandy had become the family Lane Cake maker and that she had changed the recipe a bit, especially by using dried natural cherries instead of the candied ones. The family had also discovered that the cake was fine if you only made it a week ahead of Christmas and also that you could just put the filling between the layers and on the top (but not the sides) which made the consistency of the filling less of an issue.

This year we were thrilled to have Mandy's sister T with us for Christmas. I was thrilled that she made and brought a Lane Cake. I even had the pleasure of being consulted by phone on baking tips the day she made it. It was perfect...moist and flavorful and just a bit boozy. Gorgeous to look at, too, like T herself. We took our portion home and had it with some hot cocoa. It brought back sweet childhood memories for me. Thank you T!  Maybe next year we can bake the cake together?

XO Elle


Lane Cake
from Classic Comfort Foods


Prepare 4 cake pans by greasing them and lining them with waxed paper. Preheat oven to 375 degrees F.

Ingredients
1 cup butter at room temperature
2 cups sugar
1 teaspoon vanilla
3¼ cups flour, sifted
3½ teaspoons baking powder
¾ teaspoon salt
1 cup milk
8 egg whites

Cream butter; add sugar and vanilla. Sift together dry ingredients. Alternately add dry ingredients and milk to butter mixture. In separate bowl, beat egg whites to soft, glossy points, but not dry. Fold egg whites into batter until incorporated. Divide into the 4 prepared pans. Bake 2 pans to each rack, for 15-20 minutes in preheated oven. Cool 3-5 minutes, loosen edges, and turn out to cool. Remove waxed paper and turn right side up carefully. Set aside while preparing the filling/frosting.

Filling/Frosting
1½ cups seedless raisins
12 egg yolks
1¾ cups sugar
½ teaspoon salt
¾ cup butter
½ cup bourbon whisky
½ cup pecans, coarsely chopped
½ cup red and green candied cherries, quartered - or try modern version (Mandy’s) below
1½ cups coconut, shredded (fresh or frozen)

Cover raisins with hot water, let stand to plump. Drain and dry. Chop or grind (Note: Dad used to grind the raisins in a meat grinder, but they can be chopped with a knife, too.) Put egg yolks in top of double boiler; beat slightly. Add sugar, salt and butter. Put over simmering water. Cook, stirring constantly, until sugar is dissolved, butter melts, and mixture thickens. Do not overcook. Mixture should be almost translucent and should mound when small amount is dropped on waxed paper. Remove from heat; add bourbon. Beat 1 minute with a beater. At this point, mixture can be transferred to a bowl. Fold in nuts, cherries, coconut and raisins. Cool. Spread between layers and on top of cake. (Sides optional) Wrap cake in plastic wrap and mellow one month (or less, about one week, for less stale cake). Serve in thin slices. Serves 20-24.

Niece Mandy’s Modern Lane Cake: “I made the cake the same as the recipe directs; I just did the cakes in 2 batches of 2 pans. 8” this year and 9” last year.

For the filling/frosting, I did a few things differently:

Rather than using 1½ cups raisins and ½ cup candied cherries, I did about 1 ¼ cups dried Traverse City cherries (I’m biased) and ¾ cup other dried fruits (this year was just raisins, but last year I also used currents). I also soak all of these in a combination of freshly-boiled water and a few splashes of bourbon. Just enough liquid to cover the fruit. I then ground about half the fruit and very coarsely chopped the rest, leaving a few whole.

When at the step of combining the eggs, sugar, salt, and butter on top of the double boiler (or bowl over boiling water, like what I used), note that it will take about 30-45 minutes to thicken.”

Saturday, December 04, 2010

Merry Cherry Bread

I found a wonderful bread book, The Festive Bread Book by Kathy Cutler, in a secnodhand book shop and immediately fell in love. There are so many seasonal festive breads in this book and some nice photos to inspire you.

The section for the Christmas season is, naturally, the largest. Today I took one of the recipes and changed it a bit, eliminating some of the spices, adding almond extract, and using cherry jam and cherries as a filling. One of the biggest chaanges was coiling the ropes of filled dough instead of braiding them. With the rainy weather we have been having, the snails are out in force in the garden, so this bread shape was an easy one to think of. Since the bread rises in the center higher thanat the sides, it also looks a bit like a bee hive.

This would makde a great bread for Christmastime eating...or the rest of the year when you want a sweet bread that isn't too sweet and has the added benefit of nice sweet-sour cherries.


I'm going to send this over to Susas at Wild Yeast for her Yeastspotting event...this week devoted to Holiday breads. Do visit her site to see fabulous breads!

Sourdough Cherry Almond Coil

¾ cup warm water (not over 110 degrees F)
½ cup sourdough starter
4 – 4 ½ cups flour (I used bread flour)
1 stick butter at room temperature
½ cup sugar
2 egg yolks
1 teaspoon salt
¼ teaspoon ground nutmeg
¼ teaspoon almond extract
½ teaspoon lemon peel
2/3 cup sliced almonds
about ½ cup cherry preserves
about ¼ cup prepared sour cherries, drained
1 tablespoon milk
2 cups confectioners’ sugar or to taste

Combine warm water, sourdough starter, and 2 cups flour in a large bowl. Cover and leave on counter overnight at room temperature.

The next day, in the bowl of a stand mixer, cream butter, sugar and egg yolks together. Add 1 cup flour, salt, nutmeg, almond extract and lemon peel. Mix to combine. Add the sourdough mixture and mix thoroughly to combine. Add enough remaining flour to make a soft dough. Knead in mixer or on a lightly flour surface until smooth – about 10 minutes.

Divide dough into thirds. Roll each, one at a time, into a 14 – 16 inch rope. Use your fingers to flatten the rope about 4 inches wide. Down the center of the long oval spoon a thin line of preserves and then place the cherries down the line. Using fingers moistened with water, moisten along one long side of the oval. Pick up the opposite long side, a little at a time and fold toward the center, overlapping the filling, then, using the other hand, pull the moistened long side over that, pinching to seal. Continue down the long sides of the oval. Pinch the ends to seal. When all three ropes have been filled and sealed, beginning in the middle of a silicon mat or parchment lined large baking sheet, coil the ropes like a snail shell or coil or rope, pinching the ends together as you go and tucking the last end under the loaf.

Place a piece of parchment over the loaf, then a damp tea towel. Let rise in a warm place until doubled in size, about 1 hour. Toward the end of the hour preheat the oven to 350 degrees F.
Remove tea towel and parchment. Bake in preheated oven for about an hour, or until golden brown, turning the baking sheet around about half way through the hour of baking time.

Remove from oven and let cool on a rack. When cool, mix together the milk and confectioners’ sugar to make a glaze or drizzle and use to glaze or decorate the loaf. Let the glaze or drizzle dry and the loaf cool completely before serving. (If you like you can decorate the glaze or drizzle with more sliced almonds.)

Makes 1 large loaf. (You could also shape the three filled ropes into a braid and continue the rest as written.)

Happy Holidays! XO Elle

Monday, August 23, 2010

Racing Cherries - a Guest Blog Event

Doesn't that sound special...a Guest Blog Event? NoHandle, who has blogged here before in a wonderful way is pretty special to me and he has sent on a post that will intrigue you. Seeing as I live in wine country this one will be easy for me to replicate. I might have to use blackberries...we finally got some heat today...high 90s...so ripe blackberries will surely follow.

Give this one a try, especially if you can gather a group of friends to try it with.

Thanks NoHandle! Keep 'em coming. XO Elle


Racing Cherries

This blog has a lot of baking, so by way of contrast I wanted to contribute a brief blog entry about food, but one that is fun, and does not require actual cooking, although there is a small bit of preparation. This was something my friend Runt and I discovered together one summer evening, and we found it so much fun (particularly after a few glasses) that we pass it on to other fun loving foodies. Most recently we shared, and experimented, with a couple of friends, and in the process went on to expand to other fruit, which we found to display different behaviors. All were eager to repeat the experiments. I’m saving a description of the behaviors for the end of the article. Don’t peek!

We tried several different sparkling wines (which I will call champagne as a generic), including Barefoot Bubbly Brut, and Cristalino Brut Cava, Codorníu Brut Cava, possibly a Bonny Doon sparkling, and a Prosecco whose name is now lost. An Asti might provide slightly different results, as might sweeter wines. By the way, these are all inexpensive sparkling wines that are good enough to enjoy drinking, even without the silliness. We are not wine snobs. Don’t get the wrong impression from the number of bottles, these “experiments” were conducted over several evenings, and no one had to drive home.


Hardware:
Champagne flutes (one per diner; Crate and Barrel has nice but cheap 9 oz. ones, for about $4)

Software:
1 pound of cherries (any variety)
Smaller quantities of blackberries or red raspberries
Champagne (one or more bottles; 4 or 5 servings per bottle) Well, sparkling wine really, but as I said earlier, I’m going to use that as a generic term throughout this blog.

Directions:
Open the Champagne (Use care so as not to injure anyone with a flying cork.)
Place one cherry (or other fruit) in each flute
Partially fill the flute with Champagne

Now just sit back and enjoy the activities, noting which cherry moves faster (this is the racing from the title). Share with all your friends.

Optional variations:
Discover which other fruit has the physical properties to mimic this behavior. Hint: dried cherries even work, but I don’t think grapes did. You may need to empty and re-fill the flutes to keep the action brisk, and add to the enjoyment.

What you should see:
What you will observe is the cherry first sinking to the bottom of the flute, then gathering bubbles and floating to the top. If it is not overly ripe, the cherry will sink after a few minutes, only to rise again. It will cycle five or six times if you have enough patience, or are not too thirsty. The berries tend to float, but will flip over every so often. Feel free to experiment with other fruit (Hint: don’t bother with star fruit) and beverages; beer might work; try lagers and ales to see.

Scientifically, it’s all about physics; specific gravity and carbonation. But after several evenings of experimentation, none of the “scientists” involved had a coherent theory as to why any of this worked. Science is about predictability, and we were able to successfully predict most of the behavior, and that we would have fun verifying those predictions.

Play, but play responsibly,

NoHandle.

Sunday, July 19, 2009

Ongoing Quest to Use Up Zucchini - with Chocolate

We are still looking for interesting ways to eat our veggies...and use up some of the ubiquitous veggie of summer...zucchini!

As I mentioned yesterday, bloggers are so positive and generous...I did say generous, too, didn't I...and today I have a true example. Tanita Davis is an author extraordinaire of two books (with another being written), both dealing with charming and determined young women, one a cook who wants her own cooking show and the other a World War II WAC who gets sent to the European theatre to get the mail going to the troops. You can read about them at her blog Tanita S. Davis. Better yet, go order them on Amazon or at your local bookstore.

Tanita left a comment with a link to a yummy chocolate zucchini bread. The link was to a blog, Jama Rattigan's Alphabet Soup (where you should check out her enormous zucchinis), and Jama linked to another blog where the recipe was posted by a friend, Robin, of the blog Robin Brande. She told of the woman, Elizabeth, who made some of the bread and gave it to Robin. Got that? I think Elizabeth has a blog, too, but I couldn't find the link to it.

So now, due to the generosity of each of these women, I have a recipe for Elizabeth's Phenomenal Chocolate Zucchini bread, which does indeed use up another two cups of shredded zucchini. Woot!

Looking the recipe over I see that it, too, contains a whole cup of oil. It also has a lot of sugar, and cinnamon. I like sweet, but the chocolate has some in it, so I'm losing 1/2 cup of the sugar. I like cinnamon, but not with chocolate, so I'm losing the cinnamon. A half cup of yogurt will replace 1/2 cup of the oil. Best of all, I'm adding 1/2 cup of chopped dark, sweet cherries because chocolate and cherries is a flavor combo that makes me happy.


I also reduced the nuts to 1/2 cup.

This is a great bread to give as a gift, especially if you make smaller loaves (just bake them a shorter time), or you can freeze some for that far off time when garden fresh zucchini and sweet, dark cherries are just fond memories.


Bread Baking Day is an ongoing event and this month, for BBD #22, Stefanie of Hefe und mehr asked us to make sweet breads. It doesn't get much sweeter than chocolate and cherries, so I'm sending this over to her. With all the changes it probably should be called Elle's Phenomenal Chocolate Zucchini Bread, but I'm calling it Chocolate Zucchini Bread with Cherries...simple and true. It is probably a lighter textured bread than the original recipe, but still has a nice chocolate kick, especially when eaten warm.

Speaking of generosity, next time a neighbor wants to gift you with some zucchini (unless you have your own plants overtaking your garden), say 'thank you!' and make this bread. You'll be glad that Tanita, Jama, Robin and Elizabeth were all so generous, too.


Chocolate Zucchini Bread with Cherries
based on:

ELIZABETH'S PHENOMENAL CHOCOLATE ZUCCHINI BREAD
brought to you via Robin Brande & Jama Rattigan & Tanita Davis

3 cups flour
1/4 cup unsweetened cocoa powder
1 tsp baking soda
1/2 tsp baking powder
1 tsp salt
1 ½ cups sugar
3 eggs or equivalent egg substitute
½ cup vegetable oil
½ cup plain yogurt
1 tsp vanilla
2 cups shredded zucchini (about 2-3 medium zucchini)(measured after being squeezed dry)


½ cup chopped nuts ( I used walnuts)
1 pkg (12-oz) chocolate chips
½ cup sweet dark fresh cherries, pitted and chopped into about ¼ inch dice

Preheat oven to 350 degrees. Lightly grease two 9x5" loaf pans with canola spray.

In a large bowl, combine flour, cocoa, soda, baking powder, and salt. Mix well. In a separate bowl, beat eggs (or egg substitute and water) with the sugar until well combined. Add oil, yogurt and vanilla. Beat to combine, then stir in zucchini. Add wet bowl to dry bowl and stir until just moistened. Stir in nuts and chocolate chips and cherries.

Spoon evenly into pans. Bake 55-60 minutes or until toothpick comes out clean. Cool 10 minutes in pans, then turn onto racks. This bread is yummy when eaten still warm...the chips are melty and the fragrance is full chocolate!


This bread got Sweeties's seal of approval...he had some more for breakfast, and is asking for another piece tonight for dessert.