Showing posts with label Maida Heatter's Cakes. Show all posts
Wednesday, July 04, 2018
Blueberry Muffins - #TheCakeSliceBakers extra
Since the late fall The Cake Slice Bakers have been baking from The Perfect Cake and posting on or after the 20th of the month. Often we have also had another cake cookbook to choose a recipe from with the rule being that it has to be posted by the 19th of the month. Something has always gotten in the way of my baking that extra recipe, but this month, July, I did! Happy 4th of July!
I love to bake with seasonal fruits. July is the season for blueberries and our market had them on sale, too. Lovely, purple-blue fat juicy blueberries seemed perfect for blueberry muffins. Our 'extra' cookbook, Maida Heatter's Cakes has a great recipe for blueberry muffins. Muffins are, essentially, small cakes. I made that even more apparent by baking them in giant muffin tins. The muffins came out of the pan looking like little cakes bursting with cooked blueberries and their juices, with a nice browned top and tender interior.
As I often do, I made a few changes. Besides the size of the pans, I also substituted 1/2 cup almond flour (finely ground blanched almonds) for the same amount of flour. Instead of adding the lemon zest with the wet ingredients, I rubbed the zest into the sugar before adding the sugar/zest to the dry ingredients. Since dairy is a no-no for me, I used soy milk instead of regular milk and non-dairy margarine, melted, instead of the melted butter. Finally, I sprinkled some sanding sugar over the tops of the unbaked muffins right before they went into the oven.
When I was younger and could burn off the calories more quickly, I would have blueberry muffins quite a few times in the summer when they are in season. Now I'll probably only have them this one time... a much appreciated seasonal treat. We'll still enjoy them with our morning yogurt or cereal of course and in a fruit mixture with other delicious summer fruits. But blueberry muffins this good should be baked often, so, dear reader, it's up to you. They do freeze well after all. Just remember, when mixing the wet into the dry ingredients, mix as little as possible and gently for the most tender, delicious blueberry muffins!
Blueberry Muffins
Makes 12 regular or about 5 super sized
1 cup plus 2 tablespoons all-purpose flour
1/2 cup almond flour (finely ground blanched almonds)
1 teaspoon baking powder
1/2 teaspoon salt
1/2 cup granulated sugar
finely grated rind of 1/2 lemon
1 cup fresh blueberries, rinsed and dried
1 egg, lightly beaten
4 tablespoons (half stick, 1/4 cup) butter or margarine, melted and cooled a bit
1/2 cup milk or soy milk or almond milk
about 1 tablespoon sanding sugar (optional)
Preheat oven to 400 degrees F. Oven rack should be in center of oven. Use paper liners if you desire, or butter the muffins cups, even if pans are nonstick.
In a very large mixing bowl, combine the flour, almond flour, baking powder and salt. Pour the granulated sugar in a mound over this combination and add the grated lemon zest on top of the sugar. Using clean fingers, rub the zest into the sugar. You will smell the lemon oils being released into the sugar and will see the sugar become moist. Once zest is rubbed in, whisk all the dry ingredients together until fully combined. Add the dry blueberries and use your finger to lightly mix them with the dry ingredients. Set aside.
In a small bowl place the lightly beaten egg. Add the butter and milk and use a fork to combine thoroughly. Gently make a well in the dry ingredients center and pour in the wet ingredient combination. Using the fork, gently and quickly combine the wet and dry using as few strokes as possible until just mixed.
Use a small measuring cup or disher to fill prepared muffin cups 2/3 full with the batter. If desired, lightly sprinkle the tops with sanding sugar.
Bake in the preheated oven for 20 minutes. Test for doneness. Pressing lightly on the tops in the center will cause them to spring back after pressing when done. If needed bake another 2-5 minutes.
Place baked muffins, in tin(s), on a cooling rack for ten minutes. Use a table knife or small offset spatula to carefully remove the muffins from the tin and set them right side up. Muffins in paper cups will be easy to remove, but you may need to use the knife if they have stuck to the tin.
Serve warm or cooled. Usually no additional butter is necessary.
Monday, February 05, 2018
Queen Mum Revisited
I've baked Maida Heatter's version of the Queen Mother Cake a number of times and it is always a hit.
After hearing a request for a chocolate cake, covered in chocolate...well, anything covered in chocolate actually, I had some fun paging through cookbooks and visiting online sources, too.
In the end the Queen Mother Cake sounded like the perfect thing to make, but with a slight variation. I decided to make it birthday worthy by including some sour cherries that had been bathed in cognac for awhile. It made for a surprise here and there in the cake rather than a dominant theme.
Of course the star of the dessert was the moist, dense but tender cake and that awesome ganache covering it. This is a flourless chocolate cake made with ground almonds instead of the flour. Spend plenty of time creaming the butter and the sugar and adding the eggs because that, plus the whipped egg whites, are what keeps the cake from being flat and too dense to enjoy. The finished cake was fragrant with chocolate and so rich that you only needed a small slice. To gild the lily (and provide a nice contrast to the intensity of the chocolate), those who enjoy dairy had a dollop of softly whipped cream with their slice. Decadent, and delicious. Happy Birthday G!
Queen Mother's Cherry Chocolate Cake with Ganache On Top
12 portions
A variation of Queen Mother Cake in Maida Heatter's Book of Great Chocolate Desserts
6 oz. almond flour (I used King Arthur Flour's)
6 oz. semisweet chocolate, cut into small pieces (I used Scharffen Berger's)
3/4 cup granulated sugar, divided
6 oz. (1 1/2 sticks) non-dairy margarine or butter, at room temperature
6 eggs, separated
1/8 teaspoon salt
1 teaspoon lemon juice
1/8 teaspoon salt
1 teaspoon lemon juice
1 cup pitted sour cherries, drained if needed
Enough cognac to cover the cherries, about 3/4 cup
Adjust a rack one-third up in the oven. Preheat the oven to 375 degrees F.
Grease the bottom and sides of a 9 x 3-inch springform pan and line the bottom with a round of baking-pan liner (parchment works well) cut to fit. Grease the paper. Dust the pan all over the inside with fine, dry bread crumbs. Invert the pan over paper, and tap lightly to shake out excess crumbs. Set the prepared pan aside.
In a small bowl marinate the cherries for at least an hour, pouring the cognac over the cherries. When ready to make the cake, drain the cherries thoroughly. The liquid can be used in cocktails or discarded.
Sift the almond flour into a small bowl and stir in 1/4 cup granulated sugar. Set aside
Place the chocolate in the top of a small double boiler over warm water on moderate heat. Cover until partially melted, then uncover and stir until just melted and smooth. Remove top pan from double boiler and set it aside until tepid or room temperature.
In a stand mixer bowl put the butter. Beat the butter until soft. Add the remaining 1/4 cup granulated sugar and beat to mix. Add the egg yolks one at a time, beating and scraping the sides of the bowl as necessary until smooth. On low speed add the chocolate and beat until mixed. Then add the almond flour/sugar mixture and beat, scraping the bowl, until incorporated. If you have only one stand mixer bowl, transfer batter to another large bowl. If you have two, leave batter in stand mixer bowl and set aside while you prepare the egg whites.
Wash and rinse out and dry the stand mixer bowl if there is batter clinging to the sides. In that large bowl of a stand mixer, with clean beaters (I used the whisk attachment) beat the whites with the salt and lemon juice, starting on low speed and increasing it gradually. When the whites barely hold a soft shape, reduce the speed a bit and gradually add 1/4 cup granulated sugar. On high speed continue to beat until the whites hold a straight point when the beaters are slowly raised. Do not overbeat. Whites should not be stiff or dry.
Stir a large spoonful of the beaten whites into the chocolate mixture to soften it a bit. Then, in three additions, fold in the remaining whites. Do not fold thoroughly until the last addition and do not handle any more than necessary.
Turn 1/2 the batter into the prepared pan and spread to sides. Scatter the marinated cherries over the batter evenly. Cover with the remaining batter. Rotate the pan a bit briskly from left to right in order to level the batter.
Bake for 20 minutes at 375 degrees F. and then reduce the temperature to 350 degrees F. and continue to bake for an additional 50 minutes (total baking time is 1 hour and 10 minutes). Do not over bake; the cake should remain soft and moist in the center. (The top might crack a bit, but that is OK.) NOTE: I found that I needed to check the cake after about 30 minutes and that it was done, so check early and often.
Let cake stand on cooling rack until tepid, 50 - 60 minutes.
Release and remove the sides of the pan. Do not cut around the sides with a knife - it will make the rim of the cake messy. Let the cake stand until it is completely cool, or longer if you wish.
The cake will sink a little in the middle as it cools. Use a long, thin, sharp knife and cut the top level, removing the higher sides. Brush away loose crumbs. (I skipped this part, iced the cake right side up, and was very happy with the results. When the icing goes on its a little thicker in the center, which we found to be fine.)
Place a rack or a small board over the cake and carefully invert. Remove the bottom of the pan and the paper lining. The cake is now upside down; that is the way it will be iced (unless you do as I did and ice the top). Place four strips of baking-pan liner paper (each about 3 x 12 inches) around the edges of a cake plate (although I forgot to do this and the drips were enchanting). With a large, wide spatula, carefully transfer the cake to the plate; check to be sure that the cake is touching the papers all around. The paper help to keep the icing off the plate when you ice the cake. (I chilled the cake, still on the springform pan bottom, overnight, then turned it out onto my hand, finger spread, removed the pan bottom & the paper and set the cake on a cake plate. Because it was cold it wasn't difficult to work with.)
Icing
1/2 cup soy creamer (or whipping cream)
6 oz. semisweet chocolate, cut into small pieces (I used Scharffen Berger semisweet for both cake and icing)
Scald the soy creamer or whipping cream in a 5-6 cup saucepan over moderate heat until it begins to form small bubbles around the edges. Add the chocolate and stir occasionally over heat for 1 minutes. Then remove the pan from the heat and whisk or stir until the chocolate is all melted and the mixture is smooth.
Let the icing stand at room temperature, stirring occasionally, for about 15 minutes or until the icing barely begins to thicken.
Stir to mix the icing and pour it slowly over the top of the cake, pouring onto the middle. Use a long, narrow metal spatula to smooth the top and spread the icing until a little runs down the sides, then use a small, narrow metal spatula to smooth that icing over the sides. The icing on the sides should be thinner than that on the top.
Remove the strips of paper by pulling each on out toward a narrow end.
If desired, sprinkle decorations on top while icing is still wet.
Labels:
birthday cake
,
cherries
,
chocolate
,
Maida Heatter's Cakes
,
Queen Mother Cake
Thursday, October 20, 2016
Sugar And Swirls of Spice for the Cake Slice Bakers
It's often sad to finish up with a cookbook, but each October the Cake Slice Bakers do just that. We have been baking since last November from Maida Heatter's Cake book and I've enjoyed all of the cakes I chose to make during that time. This month we get to choose our own recipe. With it finally feeling like Fall, I decided to go with a cake that has a spicy component and a vanilla/almond component. This marble cake is delicious, the crumb is moist and light and tight and it looks pretty, too.
If you make this cake be prepared to use a lot of bowls. You make the spice batter and, unless you have multiple stand mixer bowls, you scrape it out into another bowl, clean up the mixer bowl and use it to make the vanilla/almond batter. For that batter you need to whip egg whites...so another bowl. A three bowl cake, but it is well worth it (but just wanted you to know).
In the past I've made marble cakes where you put in the batter in sections and then swirled the two batters together with a knife. The recipe didn't indicate that we should do that, but I wish I had. This way the batters are more like ribbons than marbling. Still yummy, but next time I'd do a swirl or two. I also changed the directions a bit because, unless you have many stand mixer bowls, it is easier to beat the egg whites first and then mix up the light batter so that the whites are ready to fold in as soon as the white batter is mixed. You might even want to beat the whites before you do the dark batter...
Do try this one if you want a pretty, spicy, wonderful tube or Bundt cake. You'll be glad you did.
Marbelized Spice Cake
adapted from Maida Heatter's Cakes
12-16 portions
Note: This is a three bowl recipe - 1 bowl for the dark batter, 1 for the light batter, and 1 to whip the egg whites in. If you have three stand mixer bowls, great. If not, be prepared to transfer batters and wash and dry bowls as you go along. You'll need to wash and dry the beaters either way.
Dark Batter
2 cups cake flour
1 teaspoon EACH: baking soda and cinnamon
1/2 teaspoon EACH: nutmeg and ginger
1/4 teaspoon salt
1 tablespoon unsweetened cocoa powder (preferably Dutch-process)
1 teaspoon espresso powder
4 oz. (1 stick) margarine, at room temperature
1 cup packed dark brown sugar
4 egg yolks
1/2 cup dark molasses
1 cup unflavored plain yogurt
Adjust a rack one-third up from the bottom of the oven and,
once you have everything ready to go, preheat the oven to 350 degrees F. Butter
a large tube pan with a 14 cup capacity, then dust it all over with fine, dry
bread crumbs to coat. Use your fingers to sprinkle crumbs on the inner tube.
Invert the pan over paper and tap to shake out excess. Set the pan aside. (I
used two small decorative Bundt pans and a 6 cup capacity standard Bundt pan
and there was just a little too much batter. Allow some room for the cake(s) to
rise.)
Sift the cake flour, then sift it again with the baking
soda, cinnamon, nutmeg, ginger, salt, cocoa powder and espresso powder; set
aside.
In the large bowl of a stand mixer, beat the margarine until soft, add the sugar, and beat to mix; then add the yolks all at once along with the molasses. Beat until smooth and slightly lighter in color; a couple of minutes.
On low speed add the sifted dry ingredients in three
additions alternating dry ingredients with the yogurt in two additions. Beat batter
as you go. Scrape the bowl and beaters as you go to keep everything
incorporated well.
Set aside or transfer batter to another bowl if you only
have one bowl as I do. In that case, clean and dry the bowl and beaters.
Light Batter
4 egg whites at room temperature
1/4 cup sugar
1/4 cup sugar
In the clean, dry bowl, with clean beaters, preferably the
whisk beaters, beat the egg whites until they hold a soft shape. Reduce the
speed to moderate and gradually add the sugar. Increase the speed again and
beat briefly only until the whites hold a definite shape. Transfer beaten
whites to a clean bowl, then re-clean the stand mixer bowl and beaters and dry
them.
2 1/2 cups cake flour
2 teaspoons baking powder
1/4 teaspoon salt
4 oz. (1 stick) margarine at room temperature
1 teaspoon vanilla extract
1/4 teaspoon almond extract
3/4 cup granulated sugar
3/4 cup soy milk
2 teaspoons baking powder
1/4 teaspoon salt
4 oz. (1 stick) margarine at room temperature
1 teaspoon vanilla extract
1/4 teaspoon almond extract
3/4 cup granulated sugar
3/4 cup soy milk
Sift the flour, then sift it again with the baking powder
and salt. Set aside.
In the clean stand mixer bowl, beat the margarine until soft.
Add both extracts and the 3/4 cup sugar and beat until thoroughly mixed. On low
speed add the dry ingredients in three additional alternately with the soy milk
in two additions. Beat, scraping the bowl and beaters as necessary, until the
ingredients are smooth.
With a flexible rubber or silicon spatula, fold in the
beaten egg whites, a third at a time...don't fold thoroughly until the last
addition.
Take the prepared pan and two large serving spoons. Scoop
dark batter into the prepared pan(s), leaving space between the scoops. Fill
the space, using the other spoon, with light batter. Scoop dark batter on top
of the light batter and, using the light batter spoons, scoop light batter on
top of the first layer's dark batter. Keep going, alternating dark and light,
until pan is almost full, but leave room at the top for the cake to rise.
Rotate the pan briskly and tap it on the counter to release
air bubbles and even the top.
Bake in the preheated oven for about 1 hour. When don a cake
tester inserted gently to the bottom will come out clean.
Cool cake in the pan for 10 minutes. Then cover with a rack,
turn the pan and the rack over, remove the pan and let your gorgeous cake cool
on the rack.
Sunday, December 20, 2015
Cinnamon Bun Transformation
For the December Cake Slice Bakers, we had the choice of Walnut Raisin Rum Cake which looked wonderful but sounded too much like what I baked last month, Ginger Ginger Cake which was too much like the Gingerbread Cake I had recently made, and Zugar Kirchtorte, a cake I would have loved to make when I was still enjoying butter, but, sadly, butter is no longer my friend.
The fourth choice is the one I chose, Cinnamon Buns, a fine yeast recipe made with fresh mashed potatoes and potato water. I suppose it can be considered, if you stretch the term a bit, as a cake, but I think of it as a sweet bread. I had to make this one as a tip of the hat to my friend Tanna of My Kitchen In Half Cups. She had me make my first potato bread ever, back when we were both Daring Bakers, and I have loved potato breads ever since. Yeast seems to just love potatoes and the dough, once you get past the initial stickiness (which has been known to cause me to swear), potato dough is supple and feels wonderful to work with. It takes a few more minutes to make these with freshly cooked and mashed potatoes, but it is worth the trouble because the yeast bread is superior to that make with reconstituted mashed potatoes. Just be sure to let the water and potatoes cool enough so that your yeast are happy and not cooked.
Because it's the holiday season I decided to transform the standard pan of buns into a wreath shape. I made two of them and gave one as a gift to a friend. Sweetie and some neighbors enjoyed the other. To make this bread properly, you do need to use milk and butter. It's also a good idea to use fresh cinnamon since that is a key ingredient. I used Penzy's Vietnamese Cinnamon. It is full flavored and so fragrant that it was perfect for this bread. I also decided to add some chopped walnuts, which I sprinkled on top of the butter and cinnamon before I rolled up the dough.
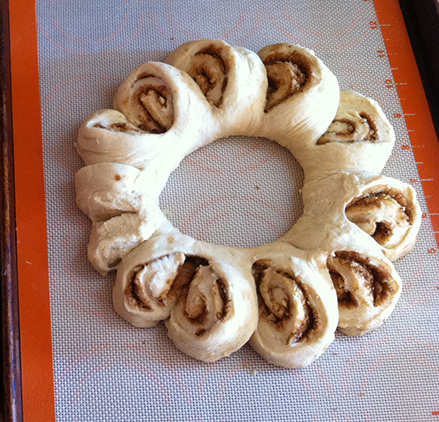
Once the dough is rolled up, which you do for both the buns and the wreath, to make the wreath, form the dough log into a circle and connect the ends together by pinching them. You then take a pair of clean kitchen scissors/shears and cut almost all the way through about every two inches around the circle. You leave the dough connected (uncut) at the inner side of the circle. Once that is done, you turn each of those pieces a bit so that you can see the spiral of bread dough and spice/sugar
.
After that you let the dough rise again and bake it at the same temperature as the buns. I like a bit of decoration, so I mixed together some hot milk and confectioners sugar and drizzled it over the wreath in a decorative pattern. Pretty as a picture and a nice gift, too.
These buns (for those pieces you turned on the wreath become buns when the wreath is cut) are soft and tender with a wonderful taste of cinnamon and sugar. It smells like the best kitchen in the world while they are baking!
Cinnamon Bun Wreaths
and adaption of a recipe from Maida Heatter's Cakes
Dough:
1 cup mashed potatoes (see Notes)
1 cup milk
1/2 cup plus 1 tablespoon granulated sugar, divided
1/2 teaspoon salt
2 oz. (1/2 stick) unsalted butter, cut up
1/4 cup warm water (105-110 degrees F)
1 envelope active dry yeast
1 egg at room temperature
1 teaspoon vanilla extract
About 4 1/4 cups unsifted all-purpose flour or bread flour,
plus additional flour, mostly for kneading
(bread flour is excellent in bread where there is a lot of butter and sugar)
Notes: The mashed potatoes can be made with instant dry mashed potatoes or fresh potatoes.
It takes about 3/4 pound fresh potatoes to make 1 cup mashed. Peel, cut into chunks, place in a small saucepan with water, boil, partially covered, until tender, drain, and then mash the potatoes. Be sure to save the water the potatoes were boiled in and use some of it for dissolving the yeast. Since yeast loves potatoes so much, this will make it extra happy.
Filling:
2 tablespoons granulated sugar (I used brown sugar)
1 1/2 teaspoons cinnamon
1/4 teaspoon nutmeg
1 oz (1/4 stick) unsalted butter, melted
1/2 cup finely chopped walnuts
Instructions:
Generously butter a 4-6 quart bowl or other container for the dough to rise in. Set it aside.
Place the mashed potatoes (which may be warm or cool, as long as below 111 degrees F) in a saucepan and, stirring constantly, add the milk very gradually. Stir in 1/2 cup of the sugar and the salt and butter. Place over low heat and stir occasionally until the mixture is warm (105-110 degrees F).It is not necessary for the butter to have melted completely, but OK if it does.
Meanwhile, in a 1-cup glass measuring cup, stir the warm water (can be potato water) with the remaining 1 tablespoon sugar, sprinkle on the yeast, stir briefly with a knife, and set aside for about 10 minutes until the mixture rises to about the 3/4 cup line.
In a small bowl, beat the egg to mix and add the vanilla.
When the potato-and-milk mixture is warm enough, transfer it to the large bowl of an electric mixer. Beat in the yeast mixture and the egg. On low speed, gradually add about 3 cups of the flour. Beat on low speed for a minute or two. Remove the bowl from the mixer. The dough will be wet and sticky now. With a heavy wooden spoon, gradually stir in the remaining 1 1/4 cups of flour. Dough will still be sticky.
Flour a large work surface. Turn the dough out onto the floured surface. The dough will still be too sticky to knead. Add a bit of additional flour and, with a dough scraper or a wide metal spatula, turn the dough over and over with the additional flour - adding still a bit ore if necessary - until you can handle the dough. (a glass of wine to the side and/or some swearing help when getting through this part - Elle's notes.) You might have to add 1/2 to 3/4 cup additional flour. Remember, though, that potato based dough has a tendency to remain a bit sticky even when enough flour has been added, so do not use more than you must...err on the side of sticky dough.
After about five minutes active kneading, the dough should be smooth and feel alive. If you can be really careful to not add too much flour, you can also do the kneading with your stand mixer.
Place the dough in the buttered bowl, turn it around in the bowl to butter all sides, cover the bowl with plastic wrap (or a clean shower cap) and place it in a clean, draft-free spot to rise for 1 to 1 1/2 hours, until the dough is at least double in volume.
Once dough had doubled in volume, make a fist and punch it down in the middle, then fold in and press down the sides of the dough to deflate all of it. Turn the dough out onto a lightly floured surface and use a knife or bench scraper to divide the dough in half. Return half the dough to the rising bowl and re-cover.
Take the half dough still on the lightly floured surface and roll it out in a rectangle about 16-18 inches by 10 inches.
The dough may fight you...if so, let it sit for a few minutes while you make the filling components, then return to it and continue shaping.
For the filling, in a small bowl, mix the sugar with the cinnamon and nutmeg. Make sure the walnuts are finely chopped. Brush half the melted butter over the rolled out dough, leaving about 1/2-inch clear around all edges. Sprinkle on half the cinnamon sugar mixture evenly over the butter, then sprinkle half the walnuts over that evenly. Roll up on the long side like a jelly-roll, pinching the edges together once it is all rolled.
Carefully lift the rolled dough onto a parchment lined baking sheet (or use a silicon mat lined baking sheet) and form into a wreath shape. Pinch the ends together. Use a pair of clean scissors or kitchen shears to cut the dough about every two inches, leaving the dough attached at the inner edge of the roll. Carefully take each cut section and turn it so that you can see the filling. Do that with each cut section around the wreath. See the photo above in the beginning of the post to see how it looks at the end, before rising.
Repeat the rolling, filling, rolling up, cutting and turning with the other half of the dough and filling. I used two baking sheets so that they wouldn't stick together.
Set the wreaths in a warm, draft free place and let rise until puffy, about 1 hour. Towards the end of that time, preheat the oven to 375 degrees F. Before preheating, adjust the rack one-third up from the bottom of the oven.
Bake the risen wreaths for about 10 minutes, then reverse the pan from front to back and continue to bake until the wreaths are light golden brown. I baked one pan at a time, but you could probably bake both pans at once if you switched them around half way through baking. Ovens vary, but it will probably take about 25-30 minutes total. Once baked, remove from the oven and let cool on a rack five minutes while you prepare the icing.
Optional Icing
In a small bowl mix together 1 tablespoon warm milk and enough confectioners sugar (about 3/4 cup) to make an icing that is the thickness you like. Drizzle the icing over the cooled wreaths.
A cooled, iced wreath makes a nice gift and is also a lovely addition to your holiday table, especially at breakfast or brunch!
Check out the other Cake Slice Baker creations too.
Subscribe to:
Posts
(
Atom
)