Showing posts with label NoHandle. Show all posts

Tuesday, December 27, 2016

Comfort Food Like It's The 1960s


We are coming to the end of 2016 and I am delighted that NoHandle has given us the gift of another guest post:

My eclectic reading led me to a discussion of the national cuisine of Great Britain not being Fish and Chips, but rather Curry. This brought back some memories of a dish that didn’t make it into Elle’s cookbook, but was served at home at least a few times. Internet searching suggests it was somewhat commonplace into the 1960s. It was called 9-Boy Curry, where the 9 might be any number between 5 and 12, and signified the number of servants (boys) that would have been needed, in England’s far-Eastern empire, to serve the condiments that enlivened the dish, and that topped the curry after it was served. A quick survey of the Internet yielded the basic recipe, a chicken curry, and that it was traditionally served over white rice (at least in the U. S. of the period), plus an extensive list of condiments, with which you can go wild. They are listed at the end of the recipe and narrative given here.

That curry is archetypically British was already known to me. There is no curry native to Indian cuisine as such, and in fact the composition of this melange of spices, apart from the “5 Cs” and turmeric, is highly variable. The closest Indian mixture is probably Garam Marsala. Curry was composed for the British occupiers, and exported home when they left. In my brief visit to London a few years ago, I didn’t notice any particularly large number of curry shops, but I wasn’t looking for them either. My friend Butterfly spent several months in London, and assures me the British eat a LOT of curry.

With that preamble, here is a quick trip through preparing this exotic comfort food. Like curry powder, this recipe is a blend of several sources. It’s all good. The list is long, but preparation is quite simple:

Ingredients:
2 three-lb. roasting chickens or 8 chicken breast halves
            (It has been noted that this is also a great way to consume turkey leftovers.)
1 yellow onion, quartered
4 whole cloves
1 carrot
2 celery stalks
2 Tablespoons of parsley
1 bay leaf
1 teaspoon salt
_____________________________________________________
½ Cup butter
2 cloves garlic, minced
2 Tablespoons curry powder (or to taste)
½ teaspoon ground ginger (fresh ginger is even nicer, about 1 Tablespoon shredded should work)
1 teaspoon dry mustard
¼ teaspoon smoked paprika
½ teaspoon ground pepper
dash of cayenne pepper (optional)
2 green apples (Granny Smith will do) peeled and sliced
2 onions, chopped
1 14-oz. can of tomatoes with green chillies, drained
3 Tablespoons flour
½ teaspoon salt
4 Cups (reserved) chicken stock
1 lemon’s juice
½ Cup dry white wine
½ Cup half and half
Cooked rice (basmati is nice for this)

Directions:


We are starting with a chicken stock, so in a deep stock pot, place whole chickens (or breasts) with the next eight ingredients (above the line above). Add enough water to cover the chickens plus a couple of inches. If you are using chicken breasts, layer the seasonings with the chicken. Cover and simmer until just tender, but not falling apart. For me, at altitude (Denver, U.S.A. area), this was about two hours from a standing start. The only attention was to turn down the heat once it boiled (about 30 minutes). Chickens cook quickly, but stock pots vary wildly. Skim the stock if foam collects. 


When done, remove the chicken to cool; skin, bone, and cut into bite-sized pieces. A pair of tongs was my most useful tool. Strain and reserve the stock. You will have lots more than you need.


Next prepare the sauce; this part takes about 45 minutes. Sauté garlic in the butter, then the flour and seasonings. This blooms the spices before the other ingredients dilute the effect. Add the onions, apples, tomatoes, and cover. Cook for 10 minutes, then add stock (4 cups), lemon juice, and wine.


Cook an additional 15 minutes until smooth and fairly thick. Divide this sauce into two batches and blend. 


Add enough cream to reach the desired consistency (fairly thick; you know, covers the back of a spoon). Restore the chicken pieces to the sauce and heat gently for 10 minutes. You could put this in a warmer on the table so people can serve themselves small portions as they mix and match the condiments. 

Serve with a side steamer of rice, and of course your selection of condiments. Pass them around, family style, or place in the center for easy access. You won’t want to try everything together, but you might choose a few, server yourself a little more and try a different selection, repeating until you have found your favorites. Some combinations will be surprisingly good; who knew that this paired so well with that? It’s an adventure!


At about the same time as you start the sauce, you will want to start the rice (unless your using MinuteRice, which I do occasionally). Here I used James Beard’s technique for “steamed” rice, done in a skillet. Cover the rice (1 cup here, but probably 2 cups or more with a full recipe) with about an inch of water, and heat to boiling. Then reduce to a simmer. Takes about 20 minutes. It came out slightly gummy.

Condiments (choose a dozen or less from this list):
Crumbled bacon
toasted coconut
grated egg yolks
grated egg whites
chopped toasted peanuts (boiled peanuts toast really well)
sunflower seeds
chopped crystalized ginger (or sweetened dried ginger slices, chopped; check Costco)
sultanas (golden raisins)
raisins
chopped celery
diced carrots
chopped onion (red or yellow)
diced pickled onions
strips of citrus zest (both lemon and lime; experiment with grapefruit)
chopped scallions
chopped toasted (or smoked) almonds
chutney (lots of choices here)
dried (or fresh) pineapple shreds
avocado pieces
chopped olives
orange marmalade

This is a great family or friends experience, seeing how your flavor palates compare, and trying new flavors from a land that is not traditionally known for rich spices. By the way, this is not bland, but neither is it as spicy as most dishes at an Indian restaurant. My wife (sorry girls ;-) is not a fan of strong spices, and she liked this a lot. Experiment with the amounts of spices too. Enjoy! ~NoHandle


Tuesday, September 22, 2015

Not By Bread Alone


Tomorrow is the natal day of NoHandle, my dear brother who sometimes, including today, is a guest blogger here. Happy Birthday a day early NoHandle. He and I were close as children (except for when he was taking delight in teasing me) and I was always interested in and a bit in awe of his passion for electronics, such as ham radio. I still remember that when he went away to college that I offered to be the one to help clean his room because I was willing to take each dustpan of stuff swept from the floor and extract the transistors, radio tubes and bits of coated wire and save them for him for his return. Now we live too far away from each other to visit very often, but through the ease of the Internet, another magical (to me) electronic device, we can share our passion for cooking. He is an excellent cook and this time has given us another imaginative use of the seasonal favorite, zucchini, this time giving that excellent if prolific vegetable a chance to play at being another vegetable. Read on!

Not by Bread Alone

My last post talked about Zucchini bread as a vehicle to deal with the bounty of the fruit that seem to engulf us every year. The season is declining, but I wanted to talk about another aspect of this abundance, overly large fruit, and how to deal with that.

A number of years ago my uncle Ray (I usually call him my obscure relative, because he is my mom's half-sister's husband. But practically speaking, he's my uncle.) brought me a zucchini from his garden that must have eluded his attention for quite a while. If you garden, you've had that happen too. It was so big that its seeds were well established, the squash bigger than my forearm. I hadn't cooked zucchini before, at least one that large, and I was somewhat at a loss as to how to proceed. My inspiration was eggplant, for which the Italians (he's one) have a politically incorrect nickname, and he explained that too. What I did was substitute zucchini for the eggplant in Eggplant Parmesan. First I extracted the seeds, then sliced the rest long-ways, and layered the strips with spaghetti sauce, topped with cheese, both mozzarella and Parmesan, and baked.

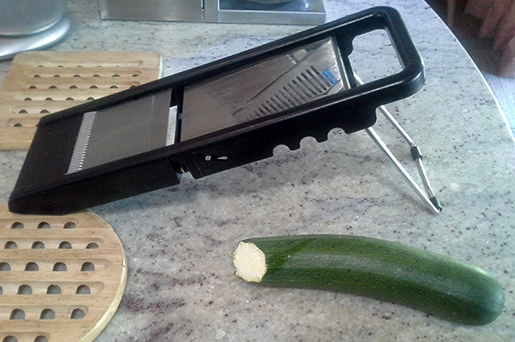
When another similar but somewhat smaller renegade appeared in my garden recently, I decided to replicate that earlier recipe. BTW, the one in the picture is smaller yet; you can use them too, it just may take more than one. 


The best recipe I found online (thanks Kraft) also included sliced mushrooms, and that sounded good to me, so I used that to re-inspire my efforts. In this case, the seeds weren't a problem so I simply sliced the zucchini using a mandolin, set to about a 1/4 inch thickness, not even peeling, and stacked them up to assemble the dish. 


I put a layer of them down in a 9 inch by 13 inch glass baking dish, covering the bottom, and topped them with sliced mushrooms, and sprinkled them lightly with jarred spaghetti sauce, pizza sauce works too, and is about the right amount; almost any sort will do.


 A word about mushrooms though. I chose the largest whole white mushrooms I could find and sliced them about as thick as the zucchini, but by hand. I could have used pre-sliced mushrooms, but they are smaller, thicker, and wouldn't cover as well. You could slice Portobellos too, they are nice, and are what you see in the photos here.


Continue alternately stacking zucchini strips, sliced mushrooms and sauce until you run out of zucchini (about three layers). Go gently with the sauce, it doesn't take as much as you might think. Bake until the veggies are tender. 


Finally, sprinkle liberally with  mozzarella, and top that with the Parmesan. I used more than the recipe called for because that is the signature of the dish, after all. Then back to the oven to melt and brown the topping. You can also just put the cheese on before baking, and get a nice browning.
 

Serving is a matter of cutting across the vegetable strips and moving carefully to a plate. You can serve four to six people with a single zucchini, depending on how much they like their veggies. If there aren't that many of you, the leftovers are great too.

Ingredients:
1 lb. large, (or if larger, seeded) zucchini, up to 1.5 lb., sliced about 1/4 inch thick
½ lb. large mushrooms sliced
1 cup of your favorite spaghetti or pizza sauce
1 cup of low-moisture, part skim mozzarella cheese, shredded (10-12 ounces)
½ cup Parmesan cheese, shredded (not the ground stuff) better quality helps; I used a Reggiano.

Directions:

Heat oven to 400 degrees F. Coat 13 x 9-inch baking dish with cooking spray. Layer the vegetables and sauce in the dish. Bake for 25 minutes. Top with the cheeses. Return to the oven and bake an additional 5 minutes or so, until the cheese melts and starts to brown. Cut into portions and serve immediately.

Saturday, March 15, 2014

An Irish/British Dessert You May Not Know


Please welcome NoHandle again, with a wonderful, seasonal guest post:

About 25 years ago, in March, I had occasion to travel to Britain and Norway, and back to Britain before heading home. It was not a holiday, but the launch of my company's new computer product, and the Norwegians were one of our "beta" customers. I was taken care of in Britain by a local employee of the company Stuart P. (and a long overdue Thank-You to Stuart and family) and in the first few hours I learned that there were things in Britain that were unknown in the U.S. Among these were "work to rule" which delayed my departure from the airport by a few hours, halogen stovetops, Comic Relief red noses on cars, which was in only it's second year, the driver's seat being on the other side of the car, and a desert called Banofee Pie. The name is a portmanteau of Banana and Toffee. Now this is not the crunchy candy you may know as Almond Toffee, but something closer to soft caramel. While I did not sample this desert at the time, I was introduced to it by Stuart's charming son and daughter, who were quite enthusiastic about it. I reciprocated by describing Pecan Pie, which you can find in the cookbook Elle, the keeper of this blog, has published. (It's still in print.) The desert has been wildly popular in both Britain and Ireland since its creation in about 1970. Being close to St. Patrick's Day lets me talk about it as an Irish dessert. As I said it is wildly popular there too.

There is an element of danger in preparing this desert. Most recipes call for boiling a sealed can of condensed (not evaporated) milk for a few hours.

If you don't keep it completely covered in water it may redecorate your kitchen! What can be more fun than the chance, even a slight chance, of things exploding? There is also the danger that you will find it as popular as the English and Irish do, which could become a danger to your waistline. Aside from this element, the recipe is simple and quick. One of the online sources suggests boiling in the evening and letting it cool overnight. The milk can be prepared months in advance with no ill effect. If you are lazy, and your supply chain supports it, you can get pre-boiled caramelized condensed milk directly from Carnation under a couple of different names; Dulce de Leche is one. Another uniquely British ingredient is Digestive Biscuits, but you can substitute Graham Crackers with no harm to the taste. Over there biscuit can mean either cracker or cookie. There are one or two recipes that use chocolate biscuits (but not chocolate coated biscuits), but that seems to me to be gilding the lily.

The night (or several nights) before let one or more 14 oz. cans of condensed milk boil for three hours or so, and allow it to cool overnight. Removing the label first is a good idea.


In the morning, pulverize the biscuits or Graham crackers, melt butter, and combine to create the crust mixture. I used a rolling pin to get it started, and finished in the blender. Cover the bottom and sides (about 2 inches up the sides) of a Springform pan, or similar, to form the crust. As you may be able to tell from the pictures, I used an ordinary pie pan, which results in having more ingredient than place to put them. Refrigerate for a couple of hours. While the crust is cooling, open one can of the cooled caramelized condensed milk


and warm it some, cut the bananas into thin slices enough to build a dense layer in the pan, and whip the cream. An egg slicer makes a great banana slicer.

You may want to combine instant coffee crystals into the cream, or you may not. Other options are shaved chocolate or candied pecans as toppings. There seems to be no agreement on which is more authentic, but most do not talk about the nuts.

When the crust is ready, fill the bottom with the toffee (caramelized milk), smooth out the layer, add a layer of sliced bananas


 (actually about three layers), and then top with a layer of whipped cream. Add any garnish that suits your fancy (I shaved dark chocolate with a microplane, and garnished with a few stray banana slices), release from the pan, slice and serve. The pie can be kept in the refrigerator for several hours before serving, and any leftovers for a couple of days after. It may not last that long, as it is said to make a great guilty late-night snack.

Banofee Pie
Serves 8, generously

INGREDIENTS
FOR THE PIE CRUST:
1 stick unsalted butter, melted
1 10-oz. package of digestive biscuits, such as McVities brand [or a similar quantity (two of the three internal packages) of Graham crackers, any brand]

FOR THE FILLING:
1 stick of unsalted butter (optional; I don't think you would notice if it were salted)
½ cup (4 oz) packed dark brown sugar (optional)
1 14-oz. can condensed milk, such as Carnation brand, boiled
4 bananas, sliced into discs 


1 pint heavy whipping cream (double cream in the UK) [three quarters of a pint was enough]
1 tsp. instant coffee crystals (optional)
Grated chocolate, any style

If you include butter and brown sugar, melt the butter, add the sugar, then add the milk, and heat before pouring into the crust, then refrigerate to cool before adding the other layers. I didn't use sugar or butter, and find that the dessert is plenty sweet, and with all the other milk and butter fat present, don't miss the milk or butter either.


Enjoy, NoHandle.

Monday, June 10, 2013

NoHandle's Two Cookies

Cookies A or Cookies B? And what is the difference between the two kinds of cookies? Read on as Guest Blogger NoHandle explains all.

Myth Busting in the Kitchen
With this blog posting, you will be getting two recipes for the price of one (They pay?). Several years ago I encountered a myth (in an email) that told of a woman who liked the cookies at a Nieman Marcus coffee shop in Dallas so much that she wanted the recipe. They put the charge on her bill, “two fifty”, which turned about to be $250, rather than the $2.50 she expected. As the story was told, she decided to publish the recipe over the then-new Internet as revenge for the charge. Tom, a friend of mine from Dallas assured me that the Nieman Marcus store there had no such coffee shop, so it must be a hoax, and so it was. The recipe however looked like a good one, and I decided to try it out one day. Well, the day is upon us.

There is another little wrinkle; Neiman Marcus decided this was a marketing opportunity, and published their own, somewhat different recipe on the Internet, which they give away for free, as they do all of their recipes. I thought, “Why not try that one too, and see which was better.” So, it's a contest. By the way, the details of this urban myth can be found on snopes.com and several other sites. The old recipe came from my archives, but you can find that online too.

From a baking perspective, there is nothing special about either recipe. You cream the butter, combine the dry ingredients and add the chocolate. They are then drop cookies, although one recipe flattens them (and I consider this optional). Some of the ingredients are the main differentiator.

The $250 Cookie
The original (urban myth, 1980s) recipe is notable for the variety of its chocolate, and perhaps the processing of the oatmeal. Apart from that and the story, it is fairly ordinary.


Processing the oatmeal is simple, just drop it into the blender and turn it on to about medium speed. Let it run for a few minutes, until the consistency is like a very coarse wheat flour.


Grating chocolate, on the other hand, can be a bit challenging, but keeping it chilled in warm weather helps. Wrap the doubled bar in a paper towel, and grate with a box grater. Warmer chocolate will yield long strings; colder chocolate produces small chunks and powder. The latter mixes better in this dough. I also used an extra ounce of chips, since I had them from the later recipe. I'm glad I did.

Here is the grated chocolate, ready for the recipe

I strongly recommend a stand mixer for both the creaming and combining the final dough. I was (barely) able to mix everything together with a strong hand mixer, but I would have used a stand mixer if I had one. I just don't do enough of this kind of cooking to justify one. The other, and cheaper, accessory I would recommend is a scoop for portioning the dough for the individual cookies. I haven't found one I like yet. The next recipe calls for one.

Going back to the mixing, with all the dry ingredients and the relatively small amount of moisture, this is a very stiff dough, even though it spreads in the oven.


Even with a stand mixer you will need to scrape the sides of the bowl a time or two.

Cookie A
(This is the halved recipe; which was plenty for me. The larger size may have been intended to make it appear as a recipe for a larger operation): 


1 cup butter (two sticks), softened

1 cup granulated sugar 

1 cup brown sugar 

2 eggs 

1 tsp. vanilla
1 cup flour (I favor unbleached)

2½ cups oatmeal, blended 
(see below)
½ tsp. salt 

1 tsp. baking powder 

1 tsp. baking soda 

2 oz. chocolate chips 
(left over from the recipe below)
½ of an 8 oz. Hershey bar (grated) 
(The Extra Large Hershey Milk Chocolate bar is now 4.4 oz.; I used that)
1½ cups chopped nuts (your choice; I used pecans)

Put oatmeal in blender and blend to a fine powder, the consistency of [very] coarse flour.

Pre-heat oven to 375 F. Cream the butter and both sugars.

Add eggs and vanilla; mix together with flour, oatmeal, salt, baking powder, and soda. These should be sifted or mixed together in advance.

Add chocolate chips, Hershey bar shreds and nuts. Roll into sub-golfball sized balls and place two inches apart on a cookie sheet.

Bake for 10 minutes, until browned at the edges. Place on cooling rack.

Makes 56 cookies.

With all that butter, you would think that you wouldn't need to grease the cookie sheet, but we would be wrong. A spritz of cooking spray for each batch helps. At this temperature the sugar sticks to the pan. The cookie coming out of the oven has flattened itself, and is not very cohesive. Wait for a few minutes before removing them from the sheet onto the cooling rack.


Neiman Marcus Strikes Back

The later (Neiman Marcus, 1995) version is even more conventional, and a bit smaller size (I didn't need halve this one). It has fewer, and lighter, ingredients, lacking the oatmeal and with only half the butter and eggs, and a lot less sugar, but adds a bit of instant coffee powder for flavor, and bakes longer in a cooler oven. Espresso coffee powder is less common these days, but is available in your average grocery.

This too is a straightforward recipe to follow. Cream the butter and sugars as usual, if goes very quickly if the butter is soft enough, and a bit slower if it is still somewhat chilled. Then add such wet ingredients as there are, an egg and vanilla extract. Follow with the flour with the baking powder and soda mixed in. You can use a hand mixer for this much with no problems. This mixture is not as stiff as the above recipe. The expresso powder happens to be the contents of one serving, at least for the powder I used. Depending on your taste, you may want to dial this back to one teaspoon of the powder. I found the full amount a bit over the top. At this point, I added a cup of coarsely ground pecans (not in the recipe), to match the earlier recipe, and because I just like the flavor. The mixture is stiff now, but not as bad as above. Finally add the chocolate chips and stir, either with the hand mixer on low, or with a wooden spoon. That's it.

I spritzed the cookie sheet before the first batch, but didn't need subsequent greasing. Now use the cookie scoop, heavily loaded to portion out the cookies. I broke down and bought one at Crate and Barrel, and I was glad I did. It was much easier and faster than using spoons to do this. I did not smash them down, and I am happy with that decision as well. The result is a much prettier cookie than the earlier recipe. They look like chocolate chip cookies are supposed to look. The texture is nice too, with a nice crispy bottom and chewy interior.


Cookie B
½ cup (1 stick) butter, softened
1 cup light brown sugar
3 tablespoons granulated sugar
1 large egg
2 tsp. Vanilla extract
1¾ cups all-purpose flour (again, I favor unbleached)
½ tsp. baking powder
½ tsp. baking soda
½ tsp. salt
1½ tsp. Instant espresso coffee powder (I used Folgers Fresh Breaks Black Silk)
1½ cups semi-sweet chocolate chips (9.4 oz.)

Preheat oven to 300 F. Cream the butter with the sugars until fluffy using an electric mixer on medium speed (approximately 30 seconds).

Beat in the egg and vanilla extract for another 30 seconds.

In a mixing bowl, sift together the flour, baking powder and baking soda and beat into the butter mixture at low speed for about 15 seconds. Stir in the espresso coffee powder and the chocolate chips.

Using a 1-ounce scoop or 2-tablespoon measure, drop cookies onto a greased cookie sheet about 3 inches apart. Gently press down on the dough with the back of a spoon to spread out into a 2-inch circle.

Bake for about 23 minutes, or until nicely browned around the edges. Bake a little longer for a crispy cookie.

Makes 2 dozen cookies.

And the Winner Is!
This is a tough decision. There are a number of dimensions to the question of which is the better cookie; appearance, texture, mouth feel, and of course taste. Lets call the $250 recipe cookie A, and the Nieman Marcus recipe cookie B.

Cookie B wins on appearance, yielding a fairly fat cookie with a nice distribution of chips visible. Cookie A is thin and almost lace-like, with thin or empty areas among the cookie lumps.

I like the texture of Cookie A a bit better. I think it's the oatmeal. The same goes for the mouth feel.

The taste is harder still. I liked the strong chocolate flavor of Cookie B, but it is almost too strong. Cookie A is more balanced, and brings out the pecan flavors better. The butter flavor is nicer too.

So for me Cookie A is the best, but don't take my word for it, try them both yourself and leave your comments with your choice.

Sunday, May 19, 2013

Timeless Goodness


One of the nice things about going back East to visit at my Mom's is that I often get to talk cooking with family members who are equally passionate about food. In some cases I'm pretty sure they are more passionate than I am.

One of these is NoHandle and he offered to do another of his wonderful guest posts. Read on and find out what he has put together because I think you will find this the perfect thing to bring on picnics, as we did.

NoHandle writes:
It all started as I was reading “The Minstrel Boy” a sequel to “Blue Bells of Scotland” by Laura Vosika. The tale is about medieval Scotland, at least in part, and they talked about a portable meal called a Bridie, which seemed to be the Scottish version of the Pastie, but without potatoes or other root vegetables. The author of Peter Pan, J. M. Barrie, hails from the place in Scotland where these are famous. One suggestion for the origin of the name is that these were popular finger food at wedding celebrations.

I was casting about for something to blog about, and I had an up-coming pot-luck party to provision, so this looked like a great opportunity. I also had some leftover puff pastry sheets, called for in one of the recipes, so using them was another plus. If you are unfamiliar with Bridies or Pasties (I was) I will tell you that it is a light dough surrounding a seasoned ground meat center. It takes a bit over an hour to prepare, with most of the time devoted to baking the finished product. I should also warn you that sampling the meat before adding it to the pastry can be addictive. It is an experience much like tasting raw cookie dough, if you swing that way, but meat-based and cooked. You have been warned.

I have blended this recipe (“Forfar Bridies”) from two sources, both claiming a measure of authenticity. The differences are minor, and reader comments were incorporated too.


The first thing you should do is defrost the pastry sheets. This is said to take about 40 minutes, but may be 10 minutes less. Once that is started, I saute the onions in a cast iron skillet, although the original recipes called for cooking the meat first. I also chose ground beef for the first try, mostly because I'm the only one in the household who likes lamb. I'm going to try a blend next time, with other consumers. Once the onions are soft, add the ground meat and seasonings. When the meat is browned, drain most of the fats and juices (it's mostly fat) and add the flour, stirring it around to form a roue. Then add the beef stock and simmer for 20 minutes. Check the taste, adding salt and pepper if needed (I go light on the salt and heavier on the pepper, but that's just me). This would be a good time to pre-heat the oven to 375. Remove the skillet from the heat and let the meat mixture cool while you prepare the pastry sheet(s).


The recipe calls for ½ cup of the meat mixture for each Bridie, and thinks you can get six from a frozen pastry sheet. I couldn't; I may have used a few more ounces of beef, but the pastry was a problem. I was able to build four full size Bridies and one demi-Bridie from the scraps. This is where indulging in tasting may pay off, you don't need as much filling. On my second attempt, I managed five full-sized ones.


The other issue is fitting ½ cup of filling in a six-inch round of pastry dough. I had to stretch the dough some to even partially seal the product, and even then it was, shall we say, rustic. This is not a bad thing, as the filling must be vented anyway and this just adds to the venting opportunities to the two or so holes where you pierce the dough. If Peter Pan walked up to a passel of Bridies, he would recognize the ones with two vents as containing onions, and those with a single vent as being “plain”.


You can be creative here so people can distinguish different fillings, if you choose to make more than one kind, like one vent for beef and two for lamb. If you want to make the entire thing from scratch (of course you do), a flaky pie crust is said to work well, and will provide plenty of pastry. Another option is to make more smaller ones; I suspect that three-inch circles would take a tablespoon or so of filling, perhaps two. This size would be better as cocktail snacks as a full Bridie would be enough for a lunch for many. Let me know if you find a size and proportion that works better for you.


Once the pastries are sealed (using the usual water method) apply an egg white wash, and bake for about 35 minutes. Remove when “golden brown and delicious.” Serve as quickly as you can, especially at altitude. They are best piping hot. If there are leftovers, you can freeze them in individual plastic bags and reheat in the microwave. About two minutes should do it. Leave them right-side up when reheating or the pastry will get flattened and a bit soggy; they will still taste great.


The Bridie was the Hot Pocket® of it's day, and can be eaten that way today. Enjoy!


The Bridie
makes about 5-6 lunch sized Bridies

Ingredients:
• 1 tablespoon of butter
• 1 medium onion, chopped
• 12 ounces ground lamb (or beef, or a combination)
• 1½ tablespoons all-purpose flour
• 
2 tablespoons beef broth
• 2 teaspoons Worcestershire sauce
• ½ tablespoon dry mustard
• 1/4 teaspoon salt, or to taste
• 1/4 teaspoon ground black pepper, or to taste
• 1 package or frozen puff pastry or 1 recipe flaky pastry for double-crust pie
• 1 egg white, lightly beaten

Directions:
In a large heavy skillet (I prefer cast iron) over medium heat, saute the onion. Add and cook lamb (or beef) until evenly brown; drain excess fat. Add the flour and stir for a minute or two. Remove from heat, and stir in beef broth, mustard, and Worcestershire sauce. Season with salt and pepper to taste.

Preheat oven to 375 degrees F (190 degrees C). Allow the meat mixture to cool for about 20 minutes.

On a lightly floured surface, roll pastry out to 1/8 inch thickness (or unfold thawed puff pastry sheet). Cut into 6 inch rounds. Place approximately 1/2 cup filling on each. Stretch and fold the pastry over the filling, and crimp edges to seal. Brush lightly with beaten egg white, and cut two or three slits in the top to allow steam to escape. Place on a lightly-greased (baking spray will do) baking sheet.

Bake in preheated oven for 35 to 40 minutes, or until golden brown.

To take on a picnic, bring in an insulated bag, or put into a casserole, wrap that in newspapers and put into a cardboard box lined with crumpled newspaper, or into a cooler and fill in with crumpled newspaper.

Saturday, September 25, 2010

Late Birthday Good Wishes and a Baby

NoHandle, my favorite Guest Blogger recently had a birthday...which I somehow missed remembering...so Happy Birthday NoHandle!

In honor of his big day, we are again turning the blog over to him for a Guest Post. GO NoHandle!

Browning Up Baby
By NoHandle

A few years ago, Natasha sent me a recipe for something called "German Baby". It looked interesting, and I tried it. I wasn't sure how it was supposed to come out, and I wasn't too impressed with the results; it didn’t rise very much, yielding an unappealing texture.

Later, when I was poking around the Internet, looking for some recipe to devour, I found references to Dutch Baby, some of them with apples. Some had pictures, and better descriptions of the finished product. I had misplaced the original recipe, but this seemed similar. It was time for a second try.

The recipe I decided to take on was one found on cooks.com. No pictures, but it just seemed right. And it was simple too. They use Dutch here like you would say Pennsylvania Dutch, meaning German. I don’t know where the Baby part comes from. Perhaps it a corruption of another German word.

So, I pulled out my shiny new mandolin (the slicing kind) that daughter-in-law Jennifer had given me for Christmas (at my prompting; I must have been thinking ahead to just this application) and sliced up a couple of apples. The recipe allows that a cast-iron skillet is OK; I would say preferred. Into my skillet went the sinful amount of butter, then sugar and cinnamon, followed with the sliced apples. I cooked the apples in two batches for better carmelization. Fairly quickly the whole mass was browned nicely, and keeping warm in the pan.

While it was cooking, I put together the batter, using a hand mixer rather than the blender the recipe calls for. It worked as well as the blender would have, although I did beat it at high speed for extra time to whip in a bit of air, which probably helps the batter to rise better. I wouldn’t recommend the stick blender approach unless you have a fairly powerful one. Then it's into the frying pan with the batter, pouring it on top of the cooked apples, and into the oven with the skillet. I think that part of getting this to rise properly is to keep the pan warm. I live at altitude and it took fully 20 minutes to brown the baby. I didn’t feel the need to make any adjustments to the recipe because of altitude though.

After resting a couple of minutes (that seems to be immediately enough), and topping with powdered sugar, the dish is ready to serve. It makes enough for four delicate, or two hungry, people. We were somewhere in the middle; there will be a wedge or two to cheer up lunch. I made this as a breakfast treat, but I think Natasha and Walt cook it up for afternoon tea.

I recently received another copy of Natasha's recipe, and it was nearly identical to the one from cooks.com. Here is the Natasha's recipe (with minor editorial changes, and unconventional decimal measures because the fractions don’t always display correctly):

German Baby

3 Tablespoons butter
2 apples (Braeburns or McIntosh)
3 Tablespoons confectioners’ sugar (plus more for topping)
.125 teaspoon cinnamon (1/8 teaspoon)
1 Tablespoon lemon juice (ReaLemon is OK for this)
3 eggs, at room temperature
.25 teaspoon salt (1/4 teaspoon)
.5 Cup milk (1/2 cup)
.5 Cup flour (1/2 cup)

Preheat oven to 425 degrees F.

Melt butter in (oven-proof; I prefer cast iron) skillet and take off heat. Remove 2 T and set aside in tall bowl (suitable for stick blender) or blender.

Peel, core and slice apples. Put slices in large bowl; add confectioners sugar, cinnamon and lemon juice; toss to mix.

Return skillet to burner and heat to medium. Add apples and cook, stirring often about 3-4 minutes until tender, but still hold shape.

Add eggs, salt and milk to butter in bowl/blender and blend together. (If blender, add flour too.) Blend in flour until smooth.

Spread apples evenly on bottom of skillet and pour batter on top. Bake in the PREHEATED oven for about 20 minutes, until golden, but not brown in the middle, and puffy around the edges. Turn over onto platter. (You can just server from the skillet if you want.)

Dust with confectioners’ sugar (optional) and serve immediately. Serves 2-3. To satisfy a 3rd person, add an additional apple. To serve 4-5, use 4-5 apples, double other ingredients, and use a 12 inch pan.

Sunday, September 12, 2010

Th Lazy Baker Makes Pizza

I am a baker, and occasionally lazy but not today. There are times when being in the kitchen for hours, lovingly stirring a pot of pasta sauce or chili, making cookies, baking bread and other such tasks is pure comfort and joy. Other times life gets hectic and all you want to do is get something good on the table at dinnertime without a lot of fuss.

It has been the former kind of weekend here at the ranch with lots of time to make fresh tomato sauce and stir polenta and concoct salad with lots of local veggies in them. Almost everything I made has already been posted before now, so even though pleasant hours were spent in the kitchen, there is little to post about.

Luckily for me NoHandle has sent me another guest post. Along with fond memories of pizza made by his Dad, he also passes on a quick pizza that he made for his sons when they were growing up. This pizza takes about an hour and a half total time to make, although most of that time is taken up with waiting for the dough to rise.

For you pleasure we have The Lazy Baker Makes Pizza, guest blogged by NoHandle:

The Lazy Baker Makes Pizza
By NoHandle

When my kids were younger (3 boys) they always liked pizza, as did my wife and I. Like my dad before me, I decided I could do a presentable job for a lot less money than the carry-out stores (Yeah, not just lazy, cheap too). Actually, when my dad made pizza there were no carry-out pizza stores; pizza was only available in Italian restaurants. Saturday night became pizza night at our house, and even with the extra time, it always seemed to be a rush job. Teen-age boys are always hungry. I don’t know where the recipe came from, but it has served me well over the years.

When I say lazy, I mean that this recipe doesn’t take a lot of time or effort, and uses some prepared ingredients. If you want to cook up your own sauce, go for it! The dough is a yeast dough, as you will see, but with rapid-rise yeast, and only one rise (and one kneading) it is both quick and easy. You can use whatever toppings you choose, but as Wallace Simpson once said, “You can never be too rich, too thin, or have too many mushrooms on your pizza.” Well, she said most of that, anyway. So mine was usually topped with as many mushrooms as would fit. Since this makes two pies, the other was often topped with pepperoni.

I will describe briefly the dough making process, and leave the recipe to speak to the rest. Add 1.25 Cups of warmed water (I microwave it) to the salt and yeast in the bottom of a medium-large bowl. Add in the flour. (It usually takes an extra .5 Cup or so to get the right consistency; it is sticky, but you can lift the dough without it dripping through your fingers. This is not critical, you will end up kneading in more after it rises.) I have always set the bowl in a shallow bowl of warm water, cover it with a towel, and let it rise until doubled in volume. This typically takes a bit less than an hour.

I then turn it out on a floured plastic sheet (from Tupperware, long, long ago) “pastry cloth” and knead in extra flour until it is no longer even a little sticky. I then divide into two even balls and roll it out each of them on the same sheet. You could toss it, but like the title says, I’m lazy. Also, I suspect the dough would not stretch well with so little time spent in its preparation. I usually made one round (12 inch) and one rectangular (9x13 or so) pie, because those were the pans we had. These are fairly thick crusts, but that’s the way I like my pizza, and it’s less work rolling them out.

After that, it goes very quickly, so you should preheat the oven when you start kneading the dough. I use a Pampered Chef pizza stone which slows the preheating considerably. I usually grease the pans lightly with cooking spray, but it doesn’t usually stick if I don’t.

So with that out of the way, here is the recipe:

Crust:
1 package rapid rise yeast
1.25 Cups warm water
.5 teaspoon salt
2 Cups unbleached all purpose flour

Toppings:
2 teaspoons crushed Oregano (dry)
1 small jar of thick spaghetti sauce (Ragu or one of the others)
12-16 ounces of shredded part-skim Mozzarella cheese (Dad used sliced fresh, and you can too if that is your preference, but his came out more like what you get with carry-out.)
8 ounces sliced mushrooms (I slice them about .125 inches thick)
Other toppings to taste

Add the oregano to the sauce, stir and let stand. Prepare the dough as described above. Preheat the oven to 400 degrees. Spread the sauce over the prepared dough, sprinkle on the cheese, and add your toppings. Bake until the cheese (and the crust) starts to brown at the edges (about 25 minutes where I live, perhaps a bit less at sea level). Remove from the oven, slice and serve. If you ended up with extra dough, coat it with butter, cinnamon and sugar, and bake on the rack below the pizza on a cookie sheet. I usually bake each one separately, but with a large oven you can probably bake both together with no issues.

Pizza is a clean canvas. You can top it with lots of different things. Tomato sauce is sort of traditional, but you can leave that off and top with wild mushrooms, sliced onions and cheese (again mozzarella is more traditional, but not mandatory). We had that combination recently at a local new pizza restaurant, and it was yummy.

See that was pretty quick and easy. The total time is about 90 minutes, with only a few minutes of that (maybe 10) actually doing any work. Shiraz pairs nicely with this if you are out of Chianti.

Monday, August 23, 2010

Racing Cherries - a Guest Blog Event

Doesn't that sound special...a Guest Blog Event? NoHandle, who has blogged here before in a wonderful way is pretty special to me and he has sent on a post that will intrigue you. Seeing as I live in wine country this one will be easy for me to replicate. I might have to use blackberries...we finally got some heat today...high 90s...so ripe blackberries will surely follow.

Give this one a try, especially if you can gather a group of friends to try it with.

Thanks NoHandle! Keep 'em coming. XO Elle


Racing Cherries

This blog has a lot of baking, so by way of contrast I wanted to contribute a brief blog entry about food, but one that is fun, and does not require actual cooking, although there is a small bit of preparation. This was something my friend Runt and I discovered together one summer evening, and we found it so much fun (particularly after a few glasses) that we pass it on to other fun loving foodies. Most recently we shared, and experimented, with a couple of friends, and in the process went on to expand to other fruit, which we found to display different behaviors. All were eager to repeat the experiments. I’m saving a description of the behaviors for the end of the article. Don’t peek!

We tried several different sparkling wines (which I will call champagne as a generic), including Barefoot Bubbly Brut, and Cristalino Brut Cava, Codorníu Brut Cava, possibly a Bonny Doon sparkling, and a Prosecco whose name is now lost. An Asti might provide slightly different results, as might sweeter wines. By the way, these are all inexpensive sparkling wines that are good enough to enjoy drinking, even without the silliness. We are not wine snobs. Don’t get the wrong impression from the number of bottles, these “experiments” were conducted over several evenings, and no one had to drive home.


Hardware:
Champagne flutes (one per diner; Crate and Barrel has nice but cheap 9 oz. ones, for about $4)

Software:
1 pound of cherries (any variety)
Smaller quantities of blackberries or red raspberries
Champagne (one or more bottles; 4 or 5 servings per bottle) Well, sparkling wine really, but as I said earlier, I’m going to use that as a generic term throughout this blog.

Directions:
Open the Champagne (Use care so as not to injure anyone with a flying cork.)
Place one cherry (or other fruit) in each flute
Partially fill the flute with Champagne

Now just sit back and enjoy the activities, noting which cherry moves faster (this is the racing from the title). Share with all your friends.

Optional variations:
Discover which other fruit has the physical properties to mimic this behavior. Hint: dried cherries even work, but I don’t think grapes did. You may need to empty and re-fill the flutes to keep the action brisk, and add to the enjoyment.

What you should see:
What you will observe is the cherry first sinking to the bottom of the flute, then gathering bubbles and floating to the top. If it is not overly ripe, the cherry will sink after a few minutes, only to rise again. It will cycle five or six times if you have enough patience, or are not too thirsty. The berries tend to float, but will flip over every so often. Feel free to experiment with other fruit (Hint: don’t bother with star fruit) and beverages; beer might work; try lagers and ales to see.

Scientifically, it’s all about physics; specific gravity and carbonation. But after several evenings of experimentation, none of the “scientists” involved had a coherent theory as to why any of this worked. Science is about predictability, and we were able to successfully predict most of the behavior, and that we would have fun verifying those predictions.

Play, but play responsibly,

NoHandle.